
![]()
Consuming ASP.NET Web API
One of the greatest benefits of ASP.NET Web API is its reachability. A broad range of clients in disparate platforms can consume your web API, leveraging the support HTTP enjoys across platforms and devices. In this chapter, I cover the topic of client applications consuming your web API. I’ve limited the coverage to .NET clients—a console application, a Windows Presentation Foundation (WPF) application, and a JavaScript client running in the context of a browser.
11.1 Calling a Web API from a Console Application
In this exercise, you will call your web API from a C# console application. To call the web API, you can use System.Net.WebClient, or even WebRequest and WebResponse classes, or for that matter any other library you are familiar with. You just need HTTP capabilities to call a web API. However, this example will use HttpClient, the modern HTTP client that is available from the .NET framework version 4.5 (ported to .NET 4.0 as well). You can issue more than one request through a single HttpClient instance, and you get the async features of .NET 4.5 by default, helping you manage and coordinate multiple requests.
- You will use the solution from Chapter 10 for this exercise. For this reason, a prerequisite to start working on this chapter is that you complete all the exercises in Chapter 10.
- If you prefer, you can make a copy of the entire folder containing both the solutions (Robusta.TalentManager and Robusta.Broker) and other files from Chapter 10 and start making changes for this chapter.
- Open the Robusta.TalentManager solution in Visual Studio 2012.
- In the Robusta.TalentManager.WebApi.Core project, open EmployeesController and comment out the AuthorizeByTimeSlot attribute on the Get(int) action method.
- In the Solution Explorer, right-click Solution ‘Robusta.TalentManager’ and choose Add ➤ New Project. Under Visual C# templates, select Windows and choose Console Application. Give it a name of Robusta.TalentManager.WebApi.Client.ConsoleApp. Right-click this project in the Solution Explorer and select Set As Startup Project.
- Right-click References under the Robusta.TalentManager.WebApi.Client.ConsoleApp project and select Manage NuGet Packages. Search for the package Microsoft.AspNet.WebApi.Client, select the package in the search results, and click Install.
- Add the following project reference to Robusta.TalentManager.WebApi.Client.ConsoleApp:
- a. Robusta.TalentManager.WebApi.Dto
- Add the code in Listing 11-1 to the Main method in the Program class of the Robusta.TalentManager.WebApi.Client.ConsoleApp project. Add a breakpoint in the closing brace of the Main method.
Listing 11-1. The Console Application Main Method
using System;
using System.Net.Http;
using System.Net.Http.Headers;
using Robusta.TalentManager.WebApi.Dto;

class Program
{
    static void Main(string[] args)
    {
        HttpClient client = new HttpClient();
        client.BaseAddress = new Uri(" http://localhost/TalentManager/api/ ");

        HttpResponseMessage response = client.GetAsync("employees/1").Result;

        Console.WriteLine("{0} - {1}", (int)response.StatusCode, response.ReasonPhrase);

        if (response.IsSuccessStatusCode)
        {
            var employee = response.Content.ReadAsAsync<EmployeeDto>().Result;
            Console.WriteLine("{0}	{1}	{2}",
                                employee.Id,
                                    employee.FirstName,
                                        employee.LastName,
                                            employee.DepartmentId);

        }
    } // Add a breakpoint on this line
} - Rebuild the solution and press F5.
- It works and returns a 200 - OK and the employee data.
- We read the response as response.Content.ReadAsAsync<EmployeeDto>().Result;. Since the web API returns EmployeeDto and this class is part of a separate assembly, Robusta.TalentManager.WebApi.Dto, we are able to just reference the assembly and use the same type in both the server and the client side.
- Also, by getting the Result property of the Task object, we block the Main method. The main thread waits for the response to come back and resumes processing.
- Add the code from Listing 11-2 to the end of the existing Main method.
Listing 11-2. POSTing an Employee
EmployeeDto newEmployee = new EmployeeDto()
{
    FirstName = "Julian",
    LastName = "Heineken",
    DepartmentId = 2
};

response = client.PostAsJsonAsync<EmployeeDto>
                                (" http://localhost/TalentManager/api/employees ", newEmployee)
                                       .Result;

if (response.IsSuccessStatusCode)
{
    Console.WriteLine(response.Content.ReadAsStringAsync().Result);

    if (response.Headers != null)
        Console.WriteLine(response.Headers.Location);
}

Console.WriteLine("{0} - {1}", (int)response.StatusCode, response.ReasonPhrase); - Rebuild the solution and press F5. The code we just added makes a POST and adds a new employee resource.
HttpClient makes it easy to add the request headers using strongly typed APIs instead of having to work with strings all the time.
- Add the code from Listing 11-3 to the end of the Main method. It requests an XML representation of the employee resource and writes the XML to the console.
Listing 11-3. Adding Accept Headers
client.DefaultRequestHeaders.Accept.Add(
                             new MediaTypeWithQualityHeaderValue("application/json", 0.8));

client.DefaultRequestHeaders.Accept.Add(
                               new MediaTypeWithQualityHeaderValue("application/xml", 0.9));

response = client.GetAsync("employees/1").Result;

Console.WriteLine("{0} - {1}", (int)response.StatusCode, response.ReasonPhrase);

if (response.IsSuccessStatusCode)
{
    Console.WriteLine(response.Content.ReadAsStringAsync().Result);
} - In the Robusta.TalentManager.WebApi.Core project, open EmployeesController and apply the Authorize attribute on the Get and Post action methods, like so:
[Authorize]
public HttpResponseMessage Get(int id) { ... }

[Authorize]
public HttpResponseMessage Post(EmployeeDto employeeDto) { ... } - Rebuild the solution and press F5 to run the console client application. You get 401 - Unauthorized for all three calls from the Main method.
The Authorize attribute expects authenticated identity, and we are not passing any credentials for the message handlers to establish identity. To send the credentials, we could add the code directly in the Main method. Instead, let us use a client-side message handler. Just as on the server side, you can have message handlers on the client side as well.
- Add a class named CredentialsHandler to the Robusta.TalentManager.WebApi.Client.ConsoleApp project, as shown in Listing 11-4.
Listing 11-4. The Client Message Handler
using System;
using System.Net.Http;
using System.Net.Http.Headers;
using System.Text;
using System.Threading;
using System.Threading.Tasks;

public class CredentialsHandler : DelegatingHandler
{
    protected override async Task<HttpResponseMessage> SendAsync(
                                    HttpRequestMessage request,
                                        CancellationToken cancellationToken)
    {
        var headers = request.Headers;
        if (headers.Authorization == null)
        {
            string creds = String.Format("{0}:{1}", "jqhuman", "p@ssw0rd!");
            byte[] bytes = Encoding.Default.GetBytes(creds);

            var header = new AuthenticationHeaderValue("Basic", Convert.ToBase64String(bytes));
            headers.Authorization = header;
        }

        return await base.SendAsync(request, cancellationToken);
    }
} - Comment out the line HttpClient client = new HttpClient(); in the Main method of the Program class in the Robusta.TalentManager.WebApi.Client.ConsoleApp project and add the following line:
HttpClient client = HttpClientFactory.Create(new CredentialsHandler());
We use HttpClientFactory to create the client instance in order to specify the handler to be run in the client pipeline.
- Rebuild the solution and press F5 to run the console client application. All three web API calls work now.
![]() Note Because we set the header from the message handler, the header is set for every request, with the handler being called every time we make a web API call. If you set the header using the DefaultRequestHeaders property of HttpClient, setting it once is enough.
Note Because we set the header from the message handler, the header is set for every request, with the handler being called every time we make a web API call. If you set the header using the DefaultRequestHeaders property of HttpClient, setting it once is enough.
11.2 Calling a Web API from a WPF Application
In this exercise, you will call your web API from a WPF application using HttpClient. The code you will write for calling the web API will be very similar to Exercise 11.1. However, you will see how to write non-blocking code to take advantage of the async features of .NET 4.5.
If you are not familiar with the Model-View-View-Model (MVVM) pattern typically followed with WPF applications, the code in this exercise might appear different from what you are used to, but the idea is to separate the concerns and make the view models completely unit-testable. So you will not find any code in the view (the code-behind file of the XAML) except the call to the InitializeComponent method. We use MVVM mainly to keep the code clean, and the MVVM pattern is not mandatory for consuming ASP.NET Web API from your WPF application.
- We will continue to use the solution from the previous exercise. Run Visual Studio as administrator and open the Robusta.TalentManager solution from Exercise 11.1.
- In the Solution Explorer, right-click Solution ‘Robusta.TalentManager’ and choose Add ➤ New Project. Under Visual C# templates, select Windows and choose WPF Application. Give it a name of Robusta.TalentManager.WebApi.Client.WinApp. Right-click this project in the Solution Explorer and select Set As Startup Project.
- Right-click References under the Robusta.TalentManager.WebApi.Client.WinApp project. Select Manage NuGet Packages. Search for the package Microsoft.AspNet.WebApi.Client, select the package in the search results, and click Install.
- Add the following project reference to Robusta.TalentManager.WebApi.Client.WinApp:
- a. Robusta.TalentManager.WebApi.Dto
- Create a folder named ViewModels in the Robusta.TalentManager.WebApi.Client.WinApp project.
- Within this folder, create an abstract ViewModelBase class, as shown in Listing 11-5.
Listing 11-5. The ViewModelBase Class
using System;
using System.ComponentModel;
using System.Linq.Expressions;

public abstract class ViewModelBase : INotifyPropertyChanged
{
    public event PropertyChangedEventHandler PropertyChanged;

    protected void RaisePropertyChanged<T>(Expression<Func<T>> propertyExpresssion)
    {
        string propertyName = GetPropertyName(propertyExpresssion);

        if (this.PropertyChanged != null)
            this.PropertyChanged(this, new PropertyChangedEventArgs(propertyName));
    }

    private string GetPropertyName<T>(Expression<Func<T>> propertyExpresssion)
    {
        string propertyName = String.Empty;

        MemberExpression expression = propertyExpresssion.Body as MemberExpression;
        if (expression != null)
        {
            propertyName = expression.Member.Name;
        }

        return propertyName;
    }
} - Create a folder named Commands in the Robusta.TalentManager.WebApi.Client.WinApp project.
- In this folder, create a new class named RelayCommand
, as shown in Listing 11-6.
Listing 11-6. The RelayCommand Class
using System;
using System.Windows.Input;

public class RelayCommand : ICommand
{
    private readonly Action<object> action;
    private readonly Predicate<object> canExecute;

    public RelayCommand(Action<object> execute) : this(execute, null) { }

    public RelayCommand(Action<object> execute, Predicate<object> canExecute)
    {
        action = execute;
        this.canExecute = canExecute;
    }

    public bool CanExecute(object parameter)
    {
        return canExecute == null ? true : canExecute(parameter);
    }

    public event EventHandler CanExecuteChanged
    {
        add { CommandManager.RequerySuggested += value; }
        remove { CommandManager.RequerySuggested -= value; }
    }

    public void Execute(object parameter)
    {
        action(parameter);
    }
} - Delete MainWindow.xaml.
- Create a folder named Views in the Robusta.TalentManager.WebApi.Client.WinApp project.
- In this folder, create a new Window (WPF) with a name of EmployeeFind. Figure 11-1 shows the window as it appears in the designer.

Figure 11-1. The EmployeeFind window
- The XAML for this window is shown in Listing 11-7.
Listing 11-7. The EmployeeFind XAML
<Window x:Class="Robusta.TalentManager.WebApi.Client.WinApp.Views.EmployeeFind"
        xmlns=" http://schemas.microsoft.com/winfx/2006/xaml/presentation "
        xmlns:x=" http://schemas.microsoft.com/winfx/2006/xaml "
        Title="Find Employee" Height="300" Width="300">
    <Grid>
        <StackPanel>
            <WrapPanel>
                <TextBlock Text="ID:" Width="50"/>
                <TextBox Text="{Binding EmployeeId}" Width="100"/>
                <Button Content="Find" HorizontalAlignment="Left"
                            Command="{Binding FindCommand}" Name="btnFind"
                            VerticalAlignment="Top" Width="100" FontWeight="Normal"/>
            </WrapPanel>
            <TextBlock Name="txbResult">
                <Run Text="Employee ID: "/>
                <Run Text="{Binding EmployeeFound.Id}" />
                <LineBreak/>
                <Run Text="Employee Name: "/>
                <Run Text="{Binding EmployeeFound.FirstName}" />
                <Run Text="{Binding EmployeeFound.LastName}" />
            </TextBlock>
        </StackPanel>
    </Grid>
</Window> - In the ViewModels folder, create a new class named EmployeeFindViewModel, deriving from ViewModelBase, as shown in Listing 11-8. The Find button is bound to the FindCommand property of the view model, which just relays to the method FindEmployee, which implements the logic to call the web API. Pay attention to the Result property used, which blocks the thread.
Listing 11-8. The EmployeeFindViewModel Class
using System;
using System.Net.Http;
using System.Net.Http.Headers;
using System.Text;
using System.Windows.Input;
using Robusta.TalentManager.WebApi.Client.WinApp.Commands;
using Robusta.TalentManager.WebApi.Dto;

public class EmployeeFindViewModel : ViewModelBase
{
    private int employeeId;
    private EmployeeDto employeeFound;

    public EmployeeFindViewModel()
    {
        this.FindCommand = new RelayCommand(p => FindEmployee());
    }

    public ICommand FindCommand { get; private set; }

    public int EmployeeId
    {
        get
        {
            return employeeId;
        }
        set
        {
            employeeId = value;
            RaisePropertyChanged(() => this.EmployeeId);
        }
    }

    public EmployeeDto EmployeeFound
    {
        get
        {
            return employeeFound;
        }
        set
        {
            employeeFound = value;
            RaisePropertyChanged(() => this.EmployeeFound);
        }
    }

    private void FindEmployee()
    {
        HttpClient client = new HttpClient();
        string creds = String.Format("{0}:{1}", "jqhuman", "p@ssw0rd!");
        byte[] bytes = Encoding.Default.GetBytes(creds);

        var header = new AuthenticationHeaderValue("Basic", Convert.ToBase64String(bytes));
        client.DefaultRequestHeaders.Authorization = header;

        // GET
        HttpResponseMessage response = client
                    .GetAsync(" http://localhost/TalentManager/api/employees/ " + this.EmployeeId)
                        . Result;

        if (response.IsSuccessStatusCode)
        {
            this.EmployeeFound = response.Content.ReadAsAsync<EmployeeDto>().Result;
        }
    }
} - Open App.xaml and remove the attribute StartupUri="MainWindow.xaml" from the Application element.
- Right-click App.xaml in Solution Explorer and select View Code. Override the OnStartup method in App.xaml.cs, as shown in Listing 11-9.
Listing 11-9. The Startup Method
using System.Windows;
using Robusta.TalentManager.WebApi.Client.WinApp.ViewModels;
using Robusta.TalentManager.WebApi.Client.WinApp.Views;

public partial class App : Application
{
    protected override void OnStartup(StartupEventArgs e)
    {
        base.OnStartup(e);

        EmployeeFindViewModel viewModel = new EmployeeFindViewModel();

        EmployeeFind view = new EmployeeFind();
        view.DataContext = viewModel;
        view.Show();
    }
} - Open EmployeesContoller in the Robusta.TalentManager.WebApi.Core project and add a delay in the Get method, as shown in Listing 11-10.
Listing 11-10. Adding Delay in the Get Method of EmployeesController
[Authorize]
public HttpResponseMessage Get(int id)
{
    var employee = repository.Find(id);
    if (employee == null)
    {
        var response = Request.CreateResponse(HttpStatusCode.NotFound, "Employee not found");

        throw new HttpResponseException(response);
    }

    System.Threading.Thread.Sleep(5000);

    return Request.CreateResponse<EmployeeDto>(
                        HttpStatusCode.OK,
                              mapper.Map<Employee, EmployeeDto>(employee));
} - Rebuild the solution and press F5 to run the WPF application.
- Type an employee ID, say 2, in the text box and click Find.
- Click the title bar of the window and try to move it. You will not be able to move, as the window will be frozen and not responding to your input.
- After a few seconds, when the response is returned by the web API, the window starts responding to your input, and you can now move the window by dragging its title bar. This behavior occurs because of our call to the Result property on the Task object returned by the GetAsync method, which blocks the UI thread.
- Solving this problem is very easy with ASP.NET Web API, especially in .NET 4.5. Modify the FindEmployee method in the EmployeeFindViewModel class in the Robusta.TalentManager.WebApi.Client.WinApp project, as shown in Listing 11-11. The changes are shown in bold type.
Listing 11-11. Asynchronous FindEmployee
private async TaskFindEmployee()
{
    HttpClient client = new HttpClient();
    string creds = String.Format("{0}:{1}", "jqhuman", "p@ssw0rd!");
    byte[] bytes = Encoding.Default.GetBytes(creds);

    var header = new AuthenticationHeaderValue("Basic", Convert.ToBase64String(bytes));
    client.DefaultRequestHeaders.Authorization = header;

    // GET
//HttpResponseMessage response = client
//            .GetAsync(" http://localhost/TalentManager/api/employees/ " + this.EmployeeId)
//                .Result;

    HttpResponseMessage response = await client
                .GetAsync(
                          " http://localhost/TalentManager/api/employees/ "
                                  + this.EmployeeId); // Not calling .Result now

    if (response.IsSuccessStatusCode)
    {
        this.EmployeeFound = response.Content.ReadAsAsync<EmployeeDto>().Result;
    }
} - Rebuild the solution and press F5 to run the WPF application. Type an employee ID, say 2, in the text box and click Find. Click the title bar of the window and try to move it. Now, you will be able to move the window freely, and it will continue to respond to your mouse input, as you move your mouse over the controls, drag the title bar, or even minimize the window and restore it. Eventually, when the result comes back, the employee name and the ID are displayed.
- When you are done, remove the delay we introduced in the Get action method of EmployeesController in the Robusta.TalentManager.WebApi.Core project by deleting this line:
System.Threading.Thread.Sleep(5000);
11.3 Calling a Web API from JavaScript
In this exercise, you will call your web API from JavaScript. ASP.NET Web API is a great technology choice to produce the JSON for your JavaScript application needs. Consuming a web API from JavaScript is a different process than in the preceding exercises, where you consumed the web API from .NET clients. Of course, you will use a JavaScript library such as jQuery (which we use in this exercise), but JavaScript runs under the context of a browser and there are limitations associated with this scenario.
In Chapter 3, we looked at the same-origin policy, which allows JavaScript running on a web page originating from a site (defined by a combination of scheme, hostname, and port number) to access the methods and properties of another page originating from the same site but prevents access to pages originating from different sites. For example, the URI for an employee resource that we have been using all along in this chapter is http://localhost/TalentManager/api/employees/12345. If you try to access this URI from the JavaScript running in a page from another ASP.NET MVC application, say http://localhost:14126/Home/Index, the browser will not allow the call. In Chapter 3, we worked around this problem by using JSONP, which is nothing more than a hack. JSONP will not work with HTTP methods other than GET, such as POST or PUT. A better alternative is Cross-Origin Resource Sharing (CORS), which I’ll describe in this exercise.
The Web Applications Working Group within the W3C has proposed the Cross-Origin Resource Sharing (CORS) recommendation, which provides a way for the browser and the server to work together to determine whether to allow the cross-origin request through the use of HTTP headers. There are two types of cross-site requests :
- Simple requests: GET or POST requests are simple requests. For POST requests, the Content-Type request header must be one of the following values: application/x-www-form-urlencoded, multipart/form-data, or text/plain. There must not be any custom headers in the request. In the case of simple requests, the Origin request header is sent to the server, which responds with the Access-Control-Allow-Origin header in the response, indicating that cross-site access is acceptable. A value of * means the resource can be accessed by any domain in a cross-site manner. If the access must be restricted to a specific domain, that domain can be sent in this header.
- Pre-flighted requests: Any request that does not qualify to be a simple request is a pre-flighted request . Pre-flighted requests first send an HTTP OPTIONS request to the resource on the other domain, in order to determine whether the actual request is safe to send. An OPTIONS request has two request headers: Access-Control-Request-Method and Origin. The Access-Control-Request-Method header contains the HTTP method of the actual cross-site request. The server responds with Access-Control-Allow-Methods, Access-Control-Allow-Origin, and Access-Control-Allow-Headers (this is not an exhaustive list; check http://www.w3.org/TR/cors/). The first header contains the list of HTTP methods that are allowed. The second header denotes the allowed origin, and the third header contains the list of allowed headers (the header names) for the cross-site request.
Another aspect worthy of careful consideration is the security aspect of authentication, specifically how to present the credentials to the web API from JavaScript. The following are the possible scenarios .
- JavaScript gets the credentials from the user and presents them as-is to the web API. This is the simplest scenario of all. There are two sub-scenarios possible here: (1) the user enters the credentials in a window popped up by the browser and (2) the user enters the credentials in an HTML form, from which JavaScript picks up the credentials and uses them for subsequent requests. The former case is susceptible to attacks like cross-site request forgery (CSRF). The downside with the latter case is that the credentials are cached by JavaScript, and any security flaw with the client application can expose the web API credentials.
- JavaScript gets the credentials from the user and presents them to a broker, which validates and returns another credential such as a token, which has a finite lifetime. JavaScript presents the token as a credential to the web API. The token is cached by JavaScript but if it is compromised, the window of opportunity to exploit will be limited by the token expiry.
- JavaScript does not get the credential at all. It redirects the user to a page that is part of a broker or some entity that the user trusts. Here in this page, the user enters the credentials and is authenticated, and the broker page sends back a token to the JavaScript. This is similar to the previous scenario, except that the JavaScript running in the client application does not get access to the user credential at all. OAuth 2.0 implicit grant is a great candidate for this case. You can find more information about OAuth 2.0 in my other book, Pro ASP.NET Web API Security: Securing ASP.NET Web API (Apress, 2013; see http://www.apress.com/microsoft/asp-net/9781430257820).
In this exercise, you will implement a solution along the lines of the second scenario. You will use the broker that we created in Chapter 10 to obtain the token. JavaScript will POST the credentials to the broker and get back a JWT that it sends to the web API as credential. From the CORS perspective, the call to the broker will be a simple cross-site request, and the call to web API will be a pre-flighted request. For the simple request, we send the Access-Control-Allow-Origin header by manually adding it to the response. For the pre-flighted request, we use the library Thinktecture.IdentityModel.
![]() Note Thinktecture.IdentityModel supports a rich configuration API to control the cross-site access. The CORS implementation of Thinktecture.IdentityModel will be part of the System.Web.Cors namespace in ASP.NET Web API VNext. At the time of writing, this is available only in the nightly builds and hence we use Thinktecture.IdentityModel. By the time you read this chapter, if the System.Web.Cors namespace is available in the stable release, you should make use of it.
Note Thinktecture.IdentityModel supports a rich configuration API to control the cross-site access. The CORS implementation of Thinktecture.IdentityModel will be part of the System.Web.Cors namespace in ASP.NET Web API VNext. At the time of writing, this is available only in the nightly builds and hence we use Thinktecture.IdentityModel. By the time you read this chapter, if the System.Web.Cors namespace is available in the stable release, you should make use of it.
- We will continue to use the same solution—the solution we used in Exercise 11.2 for this exercise. Run Visual Studio as administrator. Open the Robusta.TalentManager solution from Exercise 11.2.
- In the Solution Explorer, right-click Solution ‘Robusta.TalentManager’ and choose Add ➤ New Project. Under Visual C# templates, select Web and choose ASP.NET MVC 4 Web Application. Give it a name of Robusta.TalentManager.WebApi.Client.Web. Choose the Basic application template. Right-click this project in the Solution Explorer and select Set As Startup Project.
- Run the Internet Information Services (IIS) Manager application. The path to this application in Windows 7 is %windir%system32inetsrvInetMgr.exe. In Windows 7, you can type inetmgr in the Run box and click OK to launch IIS Manager. In Windows 8, type inetmgr in the Search box and press Enter.
- In IIS Manager, go to Your Server ➤ Sites ➤ Default Web Site ➤ TalentManager. This is the web site of the project Robusta.TalentManager.WebApi.WebHost in IIS. Double-click Handler Mappings in the IIS section. Remove OPTIONSVerbHandler by right-clicking the handler and selecting Remove from the pop-up. Restart IIS. The reason for the removal is that we need to send precise response headers for OPTIONS requests as part of CORS. The out-of-box OPTIONS handler is not suitable for our needs.
- In the Robusta.TalentManager.WebApi.Client.Web project, right-click the Controllers folder and select Add ➤ Controller. Select Empty MVC Controller from the Template dropdown in the Add Controller dialog and create a new MVC controller with a name of HomeController.
- Visual Studio creates a default action method:
public ActionResult Index() { return View(); } - Right-click the Index action method code generated by Visual Studio in HomeController and select Add View.
- Accept the default name of Index and the view engine of Razor (CSHTML). If the Create A Strongly-Typed View checkbox is checked, uncheck it and click Add.
- Copy and paste the code from Listing 11-12 into the /Home/Index view created in the previous step. Change the port placeholder <brokerport> in the following listing to the port on which the Robusta.Broker application runs on your machine. To determine the port, open the Robusta.Broker solution in Visual Studio and press F5. Internet Explorer opens the home page. Ignore the 403 – Forbidden status code and just note down the port displayed by IE in the URL bar. The code does the following:
- a. Using jQuery UI, we pop up a dialog based on the content of the DIV tag (id="login-dialog").
- b. When the user clicks OK, we make a POST to the broker to get the JWT, passing in the credentials entered by the user.
- c. When the call to the broker successfully returns, we clear out the username and password from DOM.
- d. Then, we make a call to the web API, sending the JWT in the bearer scheme. Of course, we do not cache the token, either; but in a real application, you will need to store the token to use in the subsequent web API calls.
Listing 11-12. The /Home/Index View
@section scripts{
    <script type="text/javascript">
        $(function () {
            $("#login-dialog").dialog({
                modal: true,
                buttons: {
                    Ok: function () {
                        $(this).dialog("close");

                        $.post(" http://localhost: <brokerport>/handler/jwt ",
                            {
                                username: $('#username').val(),
                                password: $('#password').val()
                            })
                            .done(function (token) {
                                $('#username').val(null);
                                $('#password').val(null);

                                $.ajax({
                                    type: 'GET',
                                    url: ' http://localhost/talentmanager/api/employees/1 ',
                                    headers: { 'Authorization': 'Bearer ' + token },
                                    success: function (employee) {
                                        var content = employee.Id + ' ' + employee.FirstName;
                                        content = content + ' ' + employee.LastName;
                                        $('#employee').append($('<li/>', { text: content }));
                                    }
                                });
                            });
                    }
                }
            });
        });

    </script>
}
<div>
    <div>
        <ul id="employee" />
    </div>
</div>

<div id="login-dialog" title="Please Login">
    <table>
        <tr>
            <td>User ID:</td>
            <td>@Html.TextBox("username")</td>
        </tr>
        <tr>
            <td>Password:</td>
            <td>@Html.Password("password")</td>
        </tr>
    </table>
</div> - Since we use the jQuery UI for the pop-up, we need the script library to be sent back. By default, BundleConfig.cs, in the App_Start folder in the Robusta.TalentManager.WebApi.Client.Web project, has jQuery UI script and style bundles created. We just need to reference the bundles. Change _Layout.cshtml under Views ➤ Shared, as shown in Listing 11-13. The lines shown in bold type are the new lines added.
Listing 11-13. The Master Layout
<!DOCTYPE html>
<html>
<head>
    <meta charset="utf-8" />
    <meta name="viewport" content="width=device-width" />
    <title>@ViewBag.Title</title>

    @Styles.Render("∼/Content/css")
    @Styles.Render("∼/Content/themes/base/css")
    @Scripts.Render("∼/bundles/modernizr")
</head>
<body>
    @RenderBody()

    @Scripts.Render("∼/bundles/jquery")
    @Scripts.Render("∼/bundles/jqueryui")

    @RenderSection("scripts", required: false)
</body>
</html> - Right-click References under the Robusta.TalentManager.WebApi.Core project and select Manage NuGet Packages. Search for the package Thinktecture.IdentityModel, select the package in the search results, and click Install.
- In the Robusta.TalentManager.WebApi.Core project, in the Configuration folder, create a class named CorsConfig, as shown in Listing 11-14. Change port 14126 to the port used by the Robusta.TalentManager.WebApi.Client.Web project in your machine.
Listing 11-14. The CorsConfig Class
using System.Web.Http;
using Thinktecture.IdentityModel.Http.Cors.WebApi;

public static class CorsConfig
{
    public static void RegisterCors(HttpConfiguration httpConfig)
    {
        WebApiCorsConfiguration corsConfig = new WebApiCorsConfiguration();

        corsConfig.RegisterGlobal(httpConfig);

        corsConfig
            .ForResources("Employees")
                .ForOrigins(" http://localhost: 14126")
                    .AllowRequestHeaders("Authorization")
                        .AllowMethods("GET");
    }
} - In the Robusta.TalentManager.WebApi.WebHost project, add the following line to the Application_Start method in Global.asax, as shown in Listing 11-15.
Listing 11-15. Registering CORS Configuration
public class Global : System.Web.HttpApplication
{
    protected void Application_Start(object sender, EventArgs e)
    {
        IocConfig.RegisterDependencyResolver(GlobalConfiguration.Configuration);
        WebApiConfig.Register(GlobalConfiguration.Configuration);
        DtoMapperConfig.CreateMaps();

        CorsConfig.RegisterCors(GlobalConfiguration.Configuration);
    }
} - Finally, we need one change to be done in the broker. Open the Robusta.Broker solution that copied over from the previous exercise into the folder you are working on.
- Change the BrokerHandler class
as shown in Listing 11-16. Lines shown in bold type are the additions. The changes are done to handle the simple CORS. That is, we send the Access-Control-Allow-Origin header in the response to ensure that the AJAX call to get the JWT succeeds. Change port 14126 to the port used by the Robusta.TalentManager.WebApi.Client.Web project in your machine.
Listing 11-16. BrokerHandler Supporting CORS
using System;
using System.Collections.Generic;
using System.IdentityModel.Protocols.WSTrust;
using System.IdentityModel.Tokens;
using System.Security.Claims;
using System.Web;

public class BrokerHandler : IHttpHandler
{
    private const string ISSUER = "Robusta.Broker";
    private const string AUDIENCE = " http://localhost/talentmanager/api ";

    private ISet<string> allowedOrigins = new HashSet<string>()
                                                        { " http://localhost:14126 " };

    public bool IsReusable
    {
        get { return true; }
    }

    public void ProcessRequest(HttpContext context)
    {
        HttpRequest request = context.Request;

        string userName = request["username"];
        string password = request["password"];

        bool isAuthentic = !String.IsNullOrEmpty(userName) &&
                                                              userName.Equals(password);

        if (isAuthentic)
        {
            // I use a hard-coded key
            byte[] key = Convert.FromBase64String(
                                                 "qqO5yXcbijtAdYmS2Otyzeze2XQedqy+Tp37wQ3sgTQ=");

            var signingCredentials = new SigningCredentials(
                                        new InMemorySymmetricSecurityKey(key),
                                            SecurityAlgorithms.HmacSha256Signature,
                                                SecurityAlgorithms.Sha256Digest);

            var descriptor = new SecurityTokenDescriptor()
            {
                TokenIssuerName = ISSUER,
                AppliesToAddress = AUDIENCE,
                Lifetime = new Lifetime(DateTime.UtcNow, DateTime.UtcNow.AddMinutes(5)),
                SigningCredentials = signingCredentials,
                Subject = new ClaimsIdentity(new Claim[]
                {
                    new Claim(ClaimTypes.Name, userName),
                    new Claim(ClaimTypes.Role, "HRManager")
                })
            };

            var tokenHandler = new JwtSecurityTokenHandler();

            var token = tokenHandler.CreateToken(descriptor);

            var origin = context.Request.Headers["Origin"];

            if(origin != null&& allowedOrigins.Contains(origin))
                context.Response.Headers.Add("Access-Control-Allow-Origin", origin);

            context.Response.Write(tokenHandler.WriteToken(token));
        }
        else
            context.Response.StatusCode = 401;
    }
} - Rebuild both solutions and run the Robusta.TalentManager.WebApi.Client.Web project using Google Chrome. To do that, click the down arrow next to Internet Explorer and select Google Chrome, as shown in Figure 11-2. We use Google Chrome
because CORS is not supported in Internet Explorer version 9 and below. CORS is supported in IE 10
1
, however.
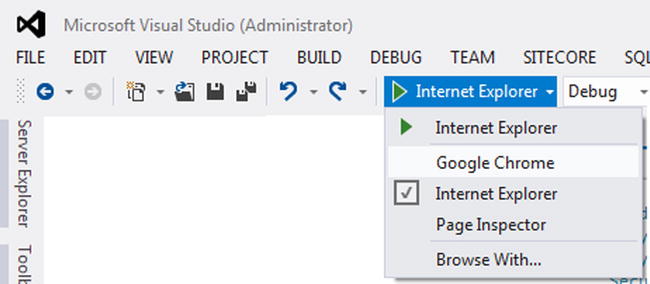
Figure 11-2. Running with Google Chrome
- You will get a popup, as shown in Figure 11-3. Enter jqhuman for both user ID and password. The results of the web API call will be displayed in the browser window.
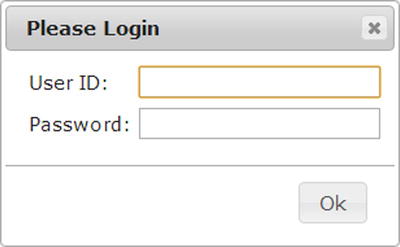
Figure 11-3. The jQuery UI popup
- Here is the sequence of events as the user enters the user ID and password and clicks OK.
- We make an AJAX call to the broker http://localhost:<brokerport>/handler/jwt, sending the request message with the body of username=jqhuman&password=jqhuman and Content-Type: application/x-www-form-urlencoded. This is a simple cross-site request, and Google Chrome lets it go through since we send the Access-Control-Allow-Origin response header. The response message body contains JWT.
- Using that, we make the web API call, which is another AJAX call to http://localhost/talentmanager/api/employees/1. We send the Authorization request header, passing in the JWT in bearer scheme. Chrome sends an OPTIONS request to check if the cross-site request is acceptable with the web API. We have configured Thinktecture.IdentityModel to handle this request. Thinktecture.IdentityModel sends the required response headers (Access-Control-Allow-Methods, Access-Control-Allow-Origin, and Access-Control-Allow-Headers) to make Chrome happy. Chrome allows the GET with Authorize request header containing the JWT obtained from the broker, and jQuery pulls down the JSON response and renders the employee data.
Summary
A broad range of clients in disparate platforms—any software program or hardware device capable of making HTTP calls—can consume HTTP services built using ASP.NET Web API. Consuming your HTTP services from a .NET client is easier with HttpClient, the modern HTTP client that is available from the .NET framework version 4.5 (ported to .NET 4.0 as well). With HttpClient, you get the async benefit of .NET 4.5 by default, and it is quite easy to write non-blocking, responsive applications.
When it comes to JavaScript clients, you need to consider the unique aspects related to the client application running in the context of a browser. There could be restrictions related to the same-origin policy imposed by browsers. CORS is one way to overcome this limitation. The security requirements are also unique with JavaScript applications.