
![]()
HTML Primer
We are going to spend a lot of time in this book working on HTML documents. In this chapter, I set out the information you’ll need to understand what we are doing later in the book. This isn’t an HTML tutorial but rather a summary of the key characteristics of HTML that I rely on in later chapters.
The latest version of HTML, which is known as HTML5, is a topic in its own right. HTML5 has more than 100 elements, and each of them has its own purpose and functionality. That said, you need only a basic knowledge of HTML to understand how jQuery works, but if you want to learn about the details of HTML, then I suggest another of my books: The Definitive Guide to HTML5, also published by Apress.
Introducing a Basic HTML Document
The best place to start is to look at an HTML document. From such a document, you can see the basic structure and hierarchy that all HTML documents follow. Listing 2-1 shows a simple HTML document. I use this document throughout this chapter to introduce the core concepts of HTML.
Listing 2-1. A Simple HTML Document
<!DOCTYPE html>
<html>
<head>
    <title>Example</title>
    <script src="jquery-2.0.2.js" type="text/javascript"></script>
    <style>
        h1 {
            width: 700px; border: thick double black; margin-left: auto;
            margin-right: auto; text-align: center; font-size: x-large; padding: .5em;
            color: darkgreen; background-image: url("border.png");
            background-size: contain; margin-top: 0;
        }
        .dtable {display: table;}
        .drow {display: table-row;}
        .dcell {display: table-cell; padding: 10px;}
        .dcell > * {vertical-align: middle}
        input {width: 2em; text-align: right; border: thin solid black; padding: 2px;}
        label {width: 5em;  padding-left: .5em;display: inline-block;}
        #buttonDiv {text-align: center;}
        #oblock {display: block; margin-left: auto; margin-right: auto; width: 700px;}
    </style>
</head>
<body>
    <h1>Jacqui's Flower Shop</h1>
    <form method="post">
        <div id="oblock">
            <div class="dtable">
                <div class="drow">
                    <div class="dcell">
                        <img src="aster.png"/><label for="aster">Aster:</label>
                        <input name="aster" value="0" required>
                    </div>
                    <div class="dcell">
                        <img src="daffodil.png"/><label for="daffodil">Daffodil:</label>
                        <input name="daffodil" value="0" required >
                    </div>
                    <div class="dcell">
                        <img src="rose.png"/><label for="rose">Rose:</label>
                        <input name="rose" value="0" required>
                    </div>
                </div>
                <div class="drow">
                    <div class="dcell">
                        <img src="peony.png"/><label for="peony">Peony:</label>
                        <input name="peony" value="0" required>
                    </div>
                    <div class="dcell">
                        <img src="primula.png"/><label for="primula">Primula:</label>
                        <input name="primula" value="0" required>
                    </div>
                    <div class="dcell">
                        <img src="snowdrop.png"/><label for="snowdrop">Snowdrop:</label>
                        <input name="snowdrop" value="0" required>
                    </div>
                </div>
            </div>
        </div>
        <div id="buttonDiv"><button type="submit">Place Order</button></div>
    </form>
</body>
</html>
This is a short and basic HTML document, but it contains some of the most important characteristics associated with HTML. You can see how this document appears in a browser in Figure 2-1.
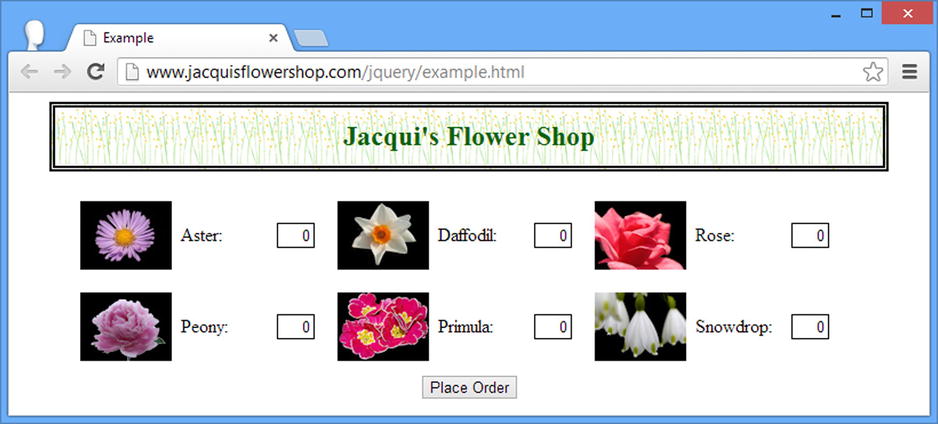
Figure 2-1. Displaying the example HTML document in the browser
Understanding the Anatomy of an HTML Element
At the heart of HTML is the element, which tells the browser what kind of content each part of an HTML document represents. Following is an element from the example:
...
<h1>Jacqui's Flower Shop</h1>
...
This element has three parts: the start tag, the end tag, and the content, as illustrated by Figure 2-2.
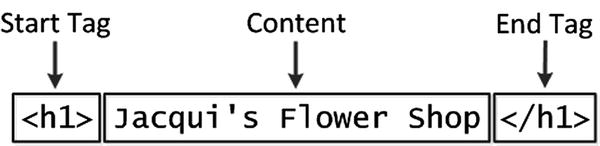
Figure 2-2. The anatomy of a simple HTML element
The name of this element (also referred to as the tag name or just the tag) is h1, and it tells the browser that the content between the tags should be treated as a top-level header. You create the start tag by placing the tag name in angle brackets, the < and > characters. You create the end tag in a similar way, except that you also add a / character after the left-angle bracket (<).
Understanding Attributes
You can provide additional information to the browser by adding attributes to your elements. Listing 2-2 shows an element with an attribute from the example document.
Listing 2-2. Defining an Attribute
...
<label for="aster">Aster:</label>
...
This is a label element, and it defines an attribute called for. I have emphasized the attribute to make it easier to see. Attributes are always defined as part of the start tag. This attribute has a name and a value. The name is for, and the value is aster. Not all attributes require a value; just defining them sends a signal to the browser that you want a certain kind of behavior associated with the element. Listing 2-3 shows an example of an element with such an attribute.
Listing 2-3. Defining an Attribute That Requires No Value
...
<input name="snowdrop" value="0" required>
...
This element has three attributes. The first two, name and value, are assigned a value. (This can get a little confusing. The names of these attributes are name and value. The value of the name attribute is snowdrop, and the value of the value attribute is 0.) The third attribute is just the word required. This is an example of an attribute that doesn’t need a value, although you can define one by setting the attribute value to its name (required="required") or by using the empty string (required="").
The id and class Attributes
Two attributes are particularly important in this book: the id and class attributes. One of the most common tasks you need to perform with jQuery is to locate one or more elements in the document so that you can perform some kind of operation on them. The id and class attributes are useful for locating one or more elements in the HTML document.
You use the id attribute to define a unique identifier for an element in a document. No two elements are allowed to have the same value for the id attribute. Listing 2-4 shows a simple HTML document that uses the id attribute.
Listing 2-4. Using the id Attribute
<!DOCTYPE html>
<html>
<head>
    <title>Example</title>
</head>
<body>
    <h1 id="mainheader">Welcome to Jacqui's Flower Shop</h1>
    <h2 id="openinghours">We are open 10am-6pm, 7 days a week</h2>
    <h3 id="holidays">(closed on national holidays)</h3>
</body>
</html>
I have defined the id attribute on three of the elements in the document. The h1 element has an id value of mainheader, the h2 element has an id value of openinghours, and the h3 element has an id value of holidays. Using the id value lets you find a specific element in the document.
The class attribute arbitrarily associates elements together. Many elements can be assigned to the same class, and elements can belong to more than one class, as shown in Listing 2-5.
Listing 2-5. Using the class Attribute
<!DOCTYPE html>
<html>
<head>
    <title>Example</title>
</head>
<body>
    <h1 id="mainheader" class="header">Welcome to Jacqui's Flower Shop</h1>
    <h2 class="header info">We are open 10am-6pm, 7 days a week</h2>
    <h3 class="info">(closed on national holidays)</h3>
</body>
</html>
In Listing 2-5, the h1 element belongs to the header class, the h2 element belongs to the header and info classes, and the h3 element belongs just to the info class. As you can see, you can add an element to multiple classes just by separating the class names with spaces.
Understanding Element Content
Elements can contain text, but they can also contain other elements. Following is an example of an element that contains other elements:
...
<div class="dcell">
    <img src="rose.png"/>
    <label for="rose">Rose:</label>
    <input name="rose" value="0" required>
</div>
...
The div element contains three others: an img, a label, and an input element. You can define multiple levels of nested elements, not just the one level shown here. Nesting elements like this is a key concept in HTML because it imparts the significance of the outer element to those contained within (this is a theme I return to later). You can mix text content and other elements, as follows:
...
<div class="dcell">
    Here is some text content
    <img src="rose.png"/>
    Here is some more text!
    <input name="rose" value="0" required>
</div>
...
The HTML specification includes elements that may not contain content. These are called void or self-closing elements and they are written without a separate end tag. Following is an example of a void element:
...
<img src="rose.png"/>
...
A void element is defined in a single tag, and you add a / character before the last angle bracket (the > character). Strictly speaking, there should be a space between the last character of the last attribute and the / character, as follows:
...
<img src="rose.png" />
...
However, browsers are tolerant when interpreting HTML and you can omit the space character. Void elements are often used when the element refers to an external resource. In this case, the img element is used to link to an external image file called rose.png.
Understanding the Document Structure
There are some key elements that define the basic structure of any HTML document: the DOCTYPE, html, head, and body elements. Listing 2-6 shows the relationship between these elements with the rest of the content removed.
Listing 2-6. The Basic Structure of an HTML Document
<!DOCTYPE html>
<html>
<head>
    ...head content...
</head>
<body>
    ...body content...
</body>
</html>
Each of these elements has a specific role to play in an HTML document. The DOCTYPE element tells the browser that this is an HTML document and, more specifically, that this is an HTML5 document. Earlier versions of HTML required additional information. For example, following is the DOCTYPE element for an HTML4 document:
...
<!DOCTYPE HTML PUBLIC "-//W3C//DTD HTML 4.01//EN"
    "http://www.w3.org/TR/html4/strict.dtd">
...
The html element denotes the region of the document that contains the HTML content. This element always contains the other two key structural elements: head and body. As I said at the start of this chapter, I am not going to cover the individual HTML elements. There are too many of them, and describing HTML5 completely took me more than 1,000 pages in my HTML5 book. That said, I will provide brief descriptions of the elements I use so that you have a good idea of what a document does. Table 2-1 summarizes the elements used in the example document from Listing 2-1, some of which I describe in a little more detail later in this chapter.
Table 2-1. HTML Elements Used in the Example Document
| Element | Description |
|---|---|
| DOCTYPE | Indicates the type of content in the document |
| body | Denotes the region of the document that contains content elements (described in the section “Understanding the Content Elements”) |
| button | Denotes a button; often used to submit a form to the server |
| div | A generic element; often used to add structure to a document for presentation purposes |
| form | Denotes an HTML form, which allows you to gather data from the user and send them to a server for processing |
| h1 | Denotes a header |
| head | Denotes the region of the document that contains metadata (described in the section “Understanding the Metadata Elements”) |
| html | Denotes the region of the document that contains HTML (which is usually the entire document) |
| img | Denotes an image |
| input | Denotes an input field used to gather a single data item from the user, usually as part of an HTML form |
| script | Denotes a script, typically JavaScript, that will be executed as part of the document |
| style | Denotes a region of CSS settings; see Chapter 3 |
| title | Denotes the title of the document; used by the browser to set the title of the window or tab used to display the document’s content |
Understanding the Metadata Elements
The head element contains the metadata for the document—in other words, one or more elements that describe or operate on the content of the document but that are not directly displayed by the browser. The example document contains three metadata elements in the head section: title, script, and style. The title element is the most basic and the contents of this element are used by browser to set the title of the window or tab, and all HTML documents are required to have a title element. The other two elements are more important for this book, as I explain in the sections that follow.
Understanding the script Element
The script element lets you include JavaScript in your code. This is an element that you will see often once I start covering jQuery in depth. The example document contains one script element, which is shown in Listing 2-7.
Listing 2-7. The script Element from the Example Document
...
<script src="jquery-2.0.2.js" type="text/javascript"></script>
...
When you define the src attribute for the script element, you are telling the browser that you want to load the JavaScript contained in another file. In this case, this is the main jQuery library, which the browser will find in the file jquery-2.0.2.js. A single HTML document can contain more than one script element, and you can include the JavaScript code between the start and end tags if you prefer, as shown in Listing 2-8.
Listing 2-8. Using the script Element to Define Inline JavaScript Code
<!DOCTYPE html>
<html>
<head>
    <title>Example</title>
    <script src="jquery-2.0.2.js" type="text/javascript"></script>
    <script type="text/javascript">
        $(document).ready(function() {
           $('#mainheader').css("color", "red");
        });
    </script>
</head>
<body>
    <h1 id="mainheader" class="header">Welcome to Jacqui's Flower Shop</h1>
    <h2 class="header info">We are open 10am-6pm, 7 days a week</h2>
    <h3 class="info">(closed on national holidays)</h3>
</body>
</html>
This example has two script elements. The first imports the jQuery library to the document, and the second is a simple script that uses some basic jQuery functionality. Don’t worry about what the second script does for the moment. I’ll get into jQuery properly starting in Chapter 5. The script element can appear in the head or body element in an HTML document. In this book, I tend to put scripts only in the head element, but this is just a matter of personal preference.
![]() Tip The order of script elements is important. You have to import the jQuery library before you can make use of its features.
Tip The order of script elements is important. You have to import the jQuery library before you can make use of its features.
Understanding the style Element
The style element is one of the ways you can introduce Cascading Style Sheets (CSS) properties into your documents. In short, you can use CSS to manage the way your document is presented when displayed to the user in the browser. Listing 2-9 shows the style element and its contents from the example document.
Listing 2-9. Using the style Element
...
<style>
    h1 {
        width: 700px; border: thick double black; margin-left: auto;
        margin-right: auto; text-align: center; font-size: x-large; padding: .5em;
        color: darkgreen; background-image: url("border.png");
        background-size: contain; margin-top: 0;
    }
    .dtable {display: table;}
    .drow {display: table-row;}
    .dcell {display: table-cell; padding: 10px;}
    .dcell > * {vertical-align: middle}
    input {width: 2em; text-align: right; border: thin solid black; padding: 2px;}
    label {width: 5em;  padding-left: .5em;display: inline-block;}
    #buttonDiv {text-align: center;}
    #oblock {display: block; margin-left: auto; margin-right: auto; width: 700px;}
</style>
...
The browser maintains a set of properties, the values of which are used to control the appearance of each element. The style element allows you to select elements and change the value of one or more of those properties. I get into this in more detail in Chapter 3.
The style element, like the script element, can appear in the head and body elements, but in this book you will find that I place them only in the head section, as in the example document. This is another matter of personal preference; I like to separate my styles from my content.
Understanding the Content Elements
The body element contains the content in an HTML document. These are the elements that the browser will display to the user and that the metadata elements, such as script and style, operate on.
Understanding the Semantic/Presentation Divide
One of the major changes in HTML5 is a philosophical one: the separation between the semantic significance of an element and the effect an element has on the presentation of content. This is a sensible idea. You use HTML elements to give structure and meaning to your content and then control the presentation of that content by applying CSS styles to the elements. Not every consumer of HTML documents needs to display them (because some consumers of HTML are automated programs rather than browsers, for example), and keeping the presentation separate makes HTML easier to process and draw meaning from automatically.
This concept is at the heart of HTML. You apply elements to denote what kind of content you are dealing with. People are good at inferring significance by context. For example, you immediately understood that the header for this section on the page is subordinate to the previous header because it is printed in a smaller typeface (and because this is a pattern that you have seen in most nonfiction books you have read).
Computers can’t infer context anywhere near as well and for this reason, each HTML element has a specific meaning. For example, the article element denotes a self-contained piece of content that is suitable for syndication and the h1 element denotes a heading for a content section. Listing 2-10 shows an example document that uses elements to confer structure and significance.
Listing 2-10. Using HTML Elements to Add Structure and Meaning to Content
<!DOCTYPE html>
<html>
<head>
    <title>Example</title>
</head>
<body>
    <article>
        <header>
            <hgroup>
                <h1>New Delivery Service</h1>
                <h2>Color and Beauty to Your Door</h2>
            </hgroup>
        </header>
        <section>
            We are pleased to announce that we are starting a home delivery service for
            your flower needs. We will deliver within a 20 mile radius of the store
            for free and $1/mile thereafter. All flowers are satisfaction-guaranteed and
            we offer free phone-based consultation.
        </section>
        <section>
            Our new service starts on <b>Wednesday</b> and there is a $10 discount
            for the first 50 customers.
        </section>
        <footer>
            <nav>
                More Information:
                <a href="http://jacquisflowershop.com">Learn More About Fruit</a>
            </nav>
        </footer>
    </article>
</body>
</html>
There are no hard-and-fast rules about when to apply a section or article element, but I recommend you apply them consistently in your content. Elements like section and article don’t provide any information to the browser about how the content they contain should be displayed. This is the heart of the semantic/presentation divide. The browser has a style convention for most HTML elements that determines how they will be displayed if the presentation is not changed using CSS, but the idea is that you will make liberal use of CSS to create the presentation you require for your document. This is something you can do with the style element and that jQuery makes easy to do in a script element.
Some of the elements that existed in HTML4 were created when there was no notion of separating presentation from meaning, and that puts us in an odd situation. An example of this oddity is the b element. Until HTML5, the b element instructed the browser to show the content contained by the start and end tags as bold text. In HTML5, elements are not intended to be solely presentational and so the definition for the b element was revised, as follows:
The b element represents a span of text offset from its surrounding content without conveying any extra emphasis or importance, and for which the conventional typographic presentation is bold text; for example, keywords in a document abstract, or product names in a review.
—HTML: The Markup Language, w3c.org
This is a long-winded way of way of saying that the b element tells the browser to make text bold. There is no semantic significance to the b element; it is all about presentation. And this weasel-worded definition tells us something important about HTML5: we are in a period of transition. We would like there to be a complete separation between elements and their presentation, but the reality is that we also want to maintain compatibility with the countless documents that have been written using earlier versions of HTML, and so we have to compromise.
Understanding Forms and Inputs
One of the most interesting elements in the body of the example document is the form element. This is a mechanism you can use to gather data from the user so that you can send it to the server. As you’ll see in Part 3, jQuery has some excellent support for working with forms, both directly in the core library and in some commonly used plug-ins. Listing 2-11 shows the body element from the example document and its contents, which includes the form element.
Listing 2-11. The Content Elements of the Example Document
...
<body>
    <h1>Jacqui's Flower Shop</h1>
    <form method="post">
        <div id="oblock">
            <div class="dtable">
                <div class="drow">
                    <div class="dcell">
                        <img src="aster.png"/><label for="aster">Aster:</label>
                        <input name="aster" value="0" required>
                    </div>
                    <div class="dcell">
                        <img src="daffodil.png"/><label for="daffodil">Daffodil:</label>
                        <input name="daffodil" value="0" required >
                    </div>
                    <div class="dcell">
                        <img src="rose.png"/><label for="rose">Rose:</label>
                        <input name="rose" value="0" required>
                    </div>
                </div>
                <div class="drow">
                    <div class="dcell">
                        <img src="peony.png"/><label for="peony">Peony:</label>
                        <input name="peony" value="0" required>
                    </div>
                    <div class="dcell">
                        <img src="primula.png"/><label for="primula">Primula:</label>
                        <input name="primula" value="0" required>
                    </div>
                    <div class="dcell">
                        <img src="snowdrop.png"/><label for="snowdrop">Snowdrop:</label>
                        <input name="snowdrop" value="0" required>
                    </div>
                </div>
            </div>
        </div>
        <div id="buttonDiv"><button type="submit">Place Order</button></div>
    </form>
</body>
...
When there is a form element, the input element can usually be found nearby. This is the element you use to get a particular piece of information from the user. Listing 2-12 shows an example input element from the document.
Listing 2-12. Using the input Element
...
<input name="snowdrop" value="0" required>
...
This input element gathers a value from the user for a data item called snowdrop , which has an initial value of zero. The required attribute tells the browser that the user should not be able to send the form to the server unless he has supplied a value for this data item. This is a new feature in HTML5 called form validation , but frankly you can achieve much better validation using jQuery, as I demonstrate in Part 3.
Closely related to forms is the button element, which is often used to submit the form to the server (and can also be used to reset the form to its initial state). Listing 2-13 shows the button element I defined in the example document.
Listing 2-13. Using the button Element
...
<button type="submit">Place Order</button>
...
Setting the type attribute to submit tells the browser I want the form submitted when the button is pressed. The contents of the button element are displayed within the button control in the browser, as you can see in Figure 2-3.
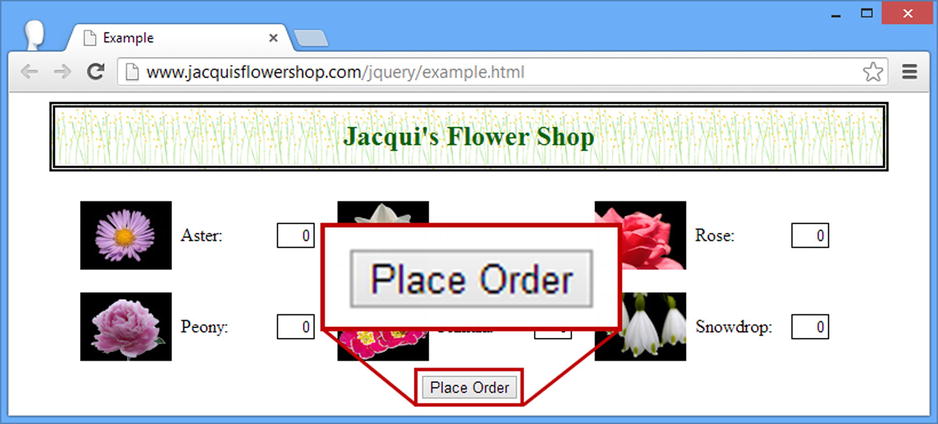
Figure 2-3. Using the content of the button element
Understanding Structural Elements
You will notice that there are a lot of div elements in the body of the example document. This is an element that has no specific semantic significance and is often used just to control the layout of content. In the case of the example document, I use the div element to create a table layout, such that the elements that the div elements contain are presented to the user in a grid. The layout is applied to the div elements by some of CSS contained in the style element. I’ll be using CSS throughout this book and I give a quick primer in Chapter 3.
Understanding Elements with External Resources
Some elements allow you to bring external resources into your document. A great example of this is the img element, which you can use to add images to documents. In the example document in Listing 2-1, I used the img element to display pictures of the different flowers on sale, as shown in Listing 2-14.
Listing 2-14. Using the img Element to Refer to an External Image
...
<img src="snowdrop.png"/>
...
The src attribute is used to specify the image. I have used the image snowdrop.png. This is an example of a relative URL (uniform resource locator), which means the browser will use the URL of the document that contains the element to work out the URL of the image I want.
The alternative to a relative URL is an absolute URL (also known as a fully qualified URL). This is a URL that has all of the basic components defined, as shown in Figure 2-4. (I have included the port in Figure 2-4, but if this is omitted, then the browser will use the default port associated with the scheme. For the http scheme, this is port 80.)

Figure 2-4. The basic structure of a URL
It can be tiresome to have to type out fully qualified URLs for every resource you want, which is why relative URLs are so useful. When I specified a value of snowdrop.png for the src attribute of the img element, I was telling the browser that it could find the image at the same location that it obtained the document that contains the img element. Table 2-2 shows the different kinds of relative URL you can use and the absolute URLs that are created from them. These all assume that the document has been loaded from http://www.jacquisflowershop.com/jquery/example.html.
Table 2-2. Relative URL Formats
| Relative URL | Equivalent To |
|---|---|
| snowdrop.png | http://www.jacquisflowershop.com/jquery/snowdrop.png |
| /snowdrop.png | http://www.jacquisflowershop.com/snowdrop.png |
| / | http://www.jacquisflowershop.com/jquery/ |
| //www.mydomain.com/index.html | http://www.mydomain.com/index.html |
The last example in the table is rarely used because it doesn’t save much typing, but it can be useful to ensure that resources are requested using the same scheme as was used to retrieve the HTML document. This avoids a problem where some content is requested over an encrypted connection (using the https scheme) and other content is requested over an unencrypted connection (using the http scheme). Some browsers, especially Internet Explorer and Google Chrome, don’t like mixing secure and insecure content and will warn the user when it occurs.
![]() Caution You can use the two periods (..) to navigate relative to the directory on the web server that contains the main HTML document. I recommend avoiding this technique, not least because many web servers will reject requests that contain these characters as a security precaution.
Caution You can use the two periods (..) to navigate relative to the directory on the web server that contains the main HTML document. I recommend avoiding this technique, not least because many web servers will reject requests that contain these characters as a security precaution.
Understanding the Element Hierarchy
The elements in an HTML document form a natural hierarchy. The html element contains the body element, which contains content elements, each of which can contain other elements, ad infinitum.
Understanding this hierarchy is important when you want to navigate the document, either to apply styles using CSS (which I describe in Chapter 3) or to use jQuery to find elements in the document (which I explain in Part 2).
The most important part of the hierarchy is the relationships that exist between elements. To help me describe these relationships, I have represented the hierarchy for some of the elements from the flower shop example document in Figure 2-5.
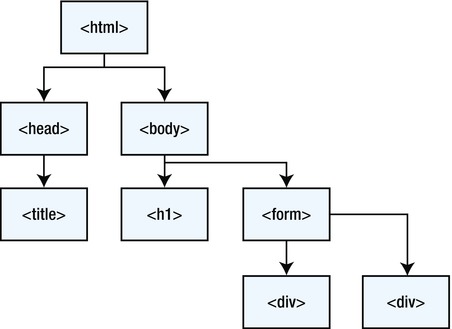
Figure 2-5. Part of the document hierarchy
Figure 2-5 shows just part of the hierarchy of elements from the document so you can see that the relationships correspond directly to the way that one element can contain another. There are various kinds of relationships, as described in the following sections.
Understanding Parent-Child Relationships
A parent-child relationship exists when one element contains another, for example. The form element is a child of the body element in the figure. Conversely, the body element is the parent of the form element. An element can have more than one child but only one parent. In Figure 2-5, the body element has two children (the form and h1 elements) and is the parent to both of them.
The parent-child relationship exists only between an element and elements that are directly contained within it. So, for example, the div elements are children of the form element, but they are not children of the body element.
There are some variations on the child relationship. The first child is the child element that is defined first in the document. For example, the h1 element is the first child of the body element. The last child is the last child element defined in the document. The form element is the last child of the body element. You can also refer to the nth-child, where you start with the first child element and start counting children until you get to n (you start counting at 1).
Understanding Ancestor-Descendant Relationships
An element’s descendants are its children, its children’s children, and so on. In fact, any element contained directly or indirectly is a descendant. For example, the descendants of the body element are the h1, form, and both div elements, and all of the elements shown in Figure 2-5 are descendants of the html element.
The opposite relationship is ancestors, which are an element’s parent, the parent’s parent, and so on. For the form element, for example, the descendants are the body and html elements. Both div elements have the same set of ancestors: the form, body, and html elements.
Understanding Sibling Relationships
Siblings are elements that share a common parent. In Figure 2-5, the h1 and form elements are siblings because they share the body element as their parent. When working with siblings, we tend to refer to the next siblings and the previous siblings. These are the siblings defined before and after the current element. Not all elements have both previous and next siblings; the first and last child elements will have only one or the other.
Understanding the Document Object Model
When the browser loads and processes an HTML document, it creates the Document Object Model (DOM). The DOM is a model where JavaScript objects are used to represent each element in the document, and the DOM is the mechanism by which you can programmatically engage with the content of an HTML document.
![]() Note In principle, the DOM can be used with any programming language that the browser cares to implement. In practice, JavaScript dominates the mainstream browsers, so I am not going to differentiate between the DOM as an abstract idea and the DOM as a collection of related JavaScript objects.
Note In principle, the DOM can be used with any programming language that the browser cares to implement. In practice, JavaScript dominates the mainstream browsers, so I am not going to differentiate between the DOM as an abstract idea and the DOM as a collection of related JavaScript objects.
One of the reasons you should care about the relationship between elements that I described in the previous section is that they are preserved in the DOM. As a consequence, you can use JavaScript to traverse the network of objects to learn about the nature and structure of the document that has been represented.
![]() Tip Using the DOM means using JavaScript. If you require a refresher in the basics of the JavaScript language, then see Chapter 4.
Tip Using the DOM means using JavaScript. If you require a refresher in the basics of the JavaScript language, then see Chapter 4.
In this part of the chapter, I demonstrate some of the basic features of the DOM. For the rest of the book, I focus on using jQuery to access the DOM, but in this section I show you some of the built-in support, in part, to emphasize how much more elegant the jQuery approach can be.
Using the DOM
The JavaScript object that defines the basic functionality that is available in the DOM for all types of elements is called HTMLElement. The HTMLElement object defines properties and methods that are common to all HTML element types, including the properties shown in Table 2-3.
Table 2-3. Basic HTMLElement Properties
| Property | Description | Returns |
|---|---|---|
| className | Gets or sets the list of classes that the element belongs to | string |
| id | Gets or sets the value of the id attribute | string |
| lang | Gets or sets the value of the lang attribute | string |
| tagName | Returns the tag name (indicating the element type) | string |
Many more properties are available. The exact set depends on the version of HTML you are working with. But these four are sufficient for me to demonstrate the basic workings of the DOM.
The DOM uses objects that are derived from HTMLElement to represent the unique characteristics of each element type. For example, the HTMLImageElement object is used to represent img elements in the DOM, and this object defines the src property, which corresponds to the src attribute of the img element. I am not going to go into any detail about the element-specific objects, but as a rule, you can rely on properties being available that correspond to an element’s attributes.
You access the DOM through the global document variable, which returns a Document object. The Document object represents the HTML document that is being displayed by the browser and defines some methods that allow you to locate objects in the DOM, as described by Table 2-4.
Table 2-4. Document Methods to Find Elements
| Property | Description | Returns |
|---|---|---|
| getElementById(<id>) | Returns the element with the specified id value | HTMLElement |
| getElementsByClassName(<class>) | Returns the elements with the specified class value | HTMLElement[] |
| getElementsByTagName(<tag>) | Returns the elements of the specified type | HTMLElement[] |
| querySelector(<selector>) | Returns the first element that matches the specified CSS selector | HTMLElement |
| querySelectorAll(<selector>) | Returns all of the elements that match the specified CSS selector | HTMLElement[] |
Once again, I am just picking the methods that are useful for this book. The last two methods described in the table use CSS selectors, which I describe in Chapter 3. Listing 2-15 shows how you can use the Document object to search for elements of a specific type in the document.
Listing 2-15. Searching for Elements in the DOM
<!DOCTYPE html>
<html>
<head>
    <title>Example</title>
    <script src="jquery-2.0.2.js" type="text/javascript"></script>
    <style>
        h1 {
            width: 700px; border: thick double black; margin-left: auto;
            margin-right: auto; text-align: center; font-size: x-large; padding: .5em;
            color: darkgreen; background-image: url("border.png");
            background-size: contain; margin-top: 0;
        }
        .dtable {display: table;}
        .drow {display: table-row;}
        .dcell {display: table-cell; padding: 10px;}
        .dcell > * {vertical-align: middle}
        input {width: 2em; text-align: right; border: thin solid black; padding: 2px;}
        label {width: 5em;  padding-left: .5em;display: inline-block;}
        #buttonDiv {text-align: center;}
        #oblock {display: block; margin-left: auto; margin-right: auto; width: 700px;}
    </style>
</head>
<body>
    <h1>Jacqui's Flower Shop</h1>
    <form method="post">
        <div id="oblock">
            <div class="dtable">
                <div class="drow">
                    <div class="dcell">
                        <img src="aster.png"/><label for="aster">Aster:</label>
                        <input name="aster" value="0" required>
                    </div>
                    <div class="dcell">
                        <img src="daffodil.png"/><label for="daffodil">Daffodil:</label>
                        <input name="daffodil" value="0" required >
                    </div>
                    <div class="dcell">
                        <img src="rose.png"/><label for="rose">Rose:</label>
                        <input name="rose" value="0" required>
                    </div>
                </div>
                <div class="drow">
                    <div class="dcell">
                        <img src="peony.png"/><label for="peony">Peony:</label>
                        <input name="peony" value="0" required>
                    </div>
                    <div class="dcell">
                        <img src="primula.png"/><label for="primula">Primula:</label>
                        <input name="primula" value="0" required>
                    </div>
                    <div class="dcell">
                        <img src="snowdrop.png"/><label for="snowdrop">Snowdrop:</label>
                        <input name="snowdrop" value="0" required>
                    </div>
                </div>
            </div>
        </div>
        <div id="buttonDiv"><button type="submit">Place Order</button></div>
    </form>
    <script>
        var elements = document.getElementsByTagName("img");
        for (var i = 0; i < elements.length; i++) {
            console.log("Element: " + elements[i].tagName + " " + elements[i].src);
        }
    </script>
</body>
</html>
In Listing 2-15, I have added a script element at the end of the body element. When browsers find a script element in a document, they execute the JavaScript statements right away, before the rest of the document has been loaded and processed. This presents a problem when you are working with the DOM because it means your searches for elements via the Document object are performed before the objects you are interested in have been created in the model. To avoid this, I have placed the script element at the end of the document. jQuery provides a nice way of dealing with this issue, as I explain in Part 2.
In the script, I use the getElementsByTagName method to find all of the img elements in the document. This method returns an array of objects that I enumerate to print out the value of the tagName and src properties for each object to the console. The output written to the console is as follows:
Element: IMG http://www.jacquisflowershop.com/jquery/aster.png
Element: IMG http://www.jacquisflowershop.com/jquery/daffodil.png
Element: IMG http://www.jacquisflowershop.com/jquery/rose.png
Element: IMG http://www.jacquisflowershop.com/jquery/peony.png
Element: IMG http://www.jacquisflowershop.com/jquery/primula.png
Element: IMG http://www.jacquisflowershop.com/jquery/snowdrop.png
The objects in the DOM are live, meaning that changing the value of a DOM object property affects the document that the browser is displaying. Listing 2-16 shows a script that has this effect. (I am just showing the script element here to reduce duplication. The rest of the document is the same as for Listing 2-15.)
Listing 2-16. Modifying a DOM Object Property
...
<script>
    var elements = document.getElementsByTagName("img");
    for (var i = 0; i < elements.length; i++) {
        elements[i].src = "snowdrop.png";
    }
</script>
...
In this script, I set the value of the src attribute to be snowdrop.png for all of the img elements. You can see the effect in Figure 2-6.
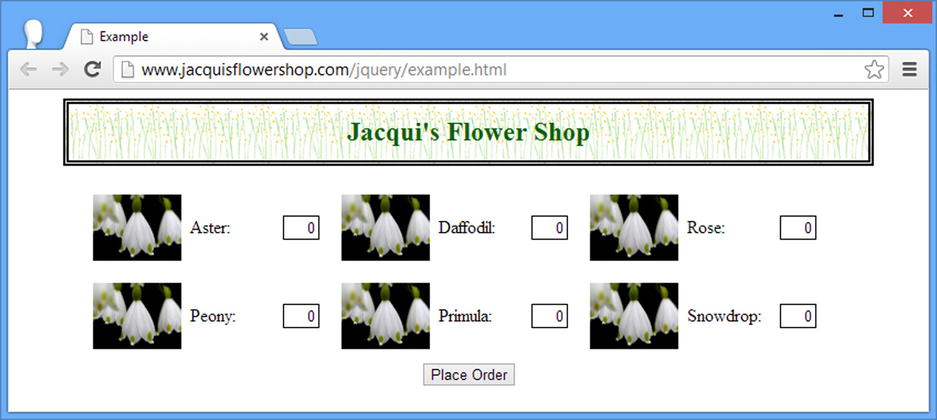
Figure 2-6. Using the DOM to modify the HTML document
You can use the DOM to change the values for CSS properties. (Chapter 3 provides a primer in CSS if you need it.) The DOM API support for CSS is comprehensive, but the simplest technique is to use the style property that is defined by the HTMLElement object. The object returned by the style property defines properties that correspond to CSS properties (I realize that there are a lot of properties in this sentence, for which I apologize).
The naming scheme of properties as defined by CSS and by the object that style returns is slightly different. For example, the background-color CSS property becomes the style.backgroundColor object property. Listing 2-17 demonstrates the use of the DOM to manage styles.
Listing 2-17. Using the DOM to Modify Element Styles
...
<script>
    var elements = document.getElementsByTagName("img");
    for (var i = 0; i < elements.length; i++) {
        if (i > 0) {
            elements[i].style.opacity = 0.5;
        }
    }
</script>
...
In this script, I change the value of the opacity property for all but the first of the img elements in the document. I left one element unaltered so you can see the difference in Figure 2-7.
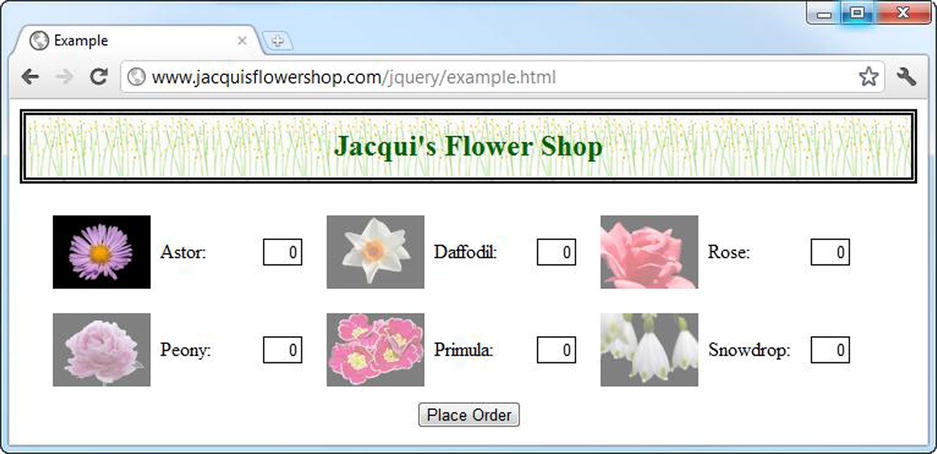
Figure 2-7. Using JavaScript to change CSS property values
Events are signals sent by the browser to indicate a change in status of one or more elements in the DOM. There is a range of events to represent different kinds of state change. For example, the click event is triggered when the user clicks an element in the document and the submit element is triggered when the user submits a form. Many events are related. For example, the mouseover event is triggered when the user moves the mouse over an element, and the mouseout event is triggered when the user moves the mouse out again. You can respond to an event by associating a JavaScript handler function with an event for a DOM element. The statements in the handler function will be executed each time the event is triggered. Listing 2-18 gives an example.
Listing 2-18. Handling an Event
...
<script>
    var elements = document.getElementsByTagName("img");
    for (var i = 0; i < elements.length; i++) {
        elements[i].onmouseover = handleMouseOver;
        elements[i].onmouseout = handleMouseOut;
    }

    function handleMouseOver(e) {
        e.target.style.opacity = 0.5;
    }

    function handleMouseOut(e) {
        e.target.style.opacity = 1;
    }
</script>
...
This script defines two handler functions, which I assign as the values for the onmouseover and onmouseout properties on the img DOM objects. The effect of this script is that the images become partially transparent when the mouse is over them and return to normal when the mouse exits. I don’t intend to get too deeply into the DOM API event handling mechanism, because the jQuery support for events is the topic of Part 2. I do, however, want to look at the object that is passed to the event handler functions: the Event object. Table 2-5 shows the most important members of the Event object.
Table 2-5. Functions and Properties of the Event Object
| Name | Description | Returns |
|---|---|---|
| type | The name of the event (i.e., mouseover) | string |
| target | The element at which the event is targeted | HTMLElement |
| currentTarget | The element whose event listeners are currently being invoked | HTMLElement |
| eventPhase | The phase in the event life cycle | number |
| bubbles | Returns true if the event will bubble through the document; returns false otherwise | boolean |
| cancelable | Returns true if the event has a default action that can be canceled; returns false otherwise | boolean |
| stopPropagation() | Halts the flow of the event through the element tree after the event listeners for the current element have been triggered | void |
| stopImmediatePropagation() | Immediately halts the flow of the event through the element tree; untriggered event listeners for the current element will be ignored | void |
| preventDefault() | Prevents the browser from performing the default action associated with the event | void |
| defaultPrevented | Returns true if preventDefault() has been called | boolean |
In the previous example, I used the target property to get hold of the element for which the event was triggered. Some of the other members relate to event flow and to default actions, which I briefly explain in the next section. I am just laying the groundwork in this chapter.
An event has three phases to its life cycle: capture, target, and bubbling. When an event is triggered, the browser identifies the element that the event relates to, which is referred to as the target for the event. The browser identifies all of the elements between the body element and the target and checks each of them to see whether they have any event handlers that have asked to be notified of events of their descendants. The browser triggers any such handler before triggering the handlers on the target itself. (I’ll show you how to ask for notification of descendant events in Part 2.)
Once the capture phase is complete, you move to the target phase, which is the simplest of the three. When the capture phase has finished, the browser triggers any listeners for the event type that have been added to the target element.
Once the target phase has been completed, the browser starts working its way up the chain of ancestor elements back toward the body element. At each element, the browser checks to see whether there are listeners for the event type that are not capture-enabled (which I’ll explain how to do in Part 2). Not all events support bubbling. You can check to see whether an event will bubble using the bubbles property. A value of true indicates that the event will bubble, and false means that it won’t.
Some events define a default action that will be performed when an event is triggered. As an example, the default action for the click event on the a element is that the browser will load the content at the URL specified in the href attribute. When an event has a default action, the value of its cancelable property will be true. You can stop the default action from being performed by calling the preventDefault method. Note that calling the preventDefault function doesn’t stop the event flowing through the capture, target, and bubble phases. These phases will still be performed, but the browser won’t perform the default action at the end of the bubble phase. You can test to see whether the preventDefault function has been called on an event by an earlier event handler by reading the defaultPrevented property. If it returns true, then the preventDefault function has been called.
Summary
In this chapter, I took you on a tour of HTML, albeit without describing any of the 100+ elements in detail. I showed you how to create and structure a basic HTML document, how elements can contain a mix of text content and other elements, and how this leads to a hierarchy of elements with specific types of relationship. I also showed you basic use of the DOM API and how it handles element selection and events—as you’ll see throughout this book, one of the main reasons to use jQuery is because it hides away the details of the DOM API and makes working with HTML elements and the JavaScript objects that represent them simple and easy. In Chapter 3, I provide a quick primer to Cascading Style Sheets, which are used to control the presentation of HTML elements.