
Chapter 1. Game Center
Game Center is the Apple technology that allows game developers to integrate leaderboards, achievements, and multiplayer support, among other things, into their iOS apps. Why is it so important? Simply because Apple takes care of the server infrastructure of Game Center for you! Apple also provides iOS developers with a framework, called GameKit, to make Game Center integration into iOS Apps really easy.
Introducing GCD and Block Objects
Problem
You want to learn how to use block objects and Grand Central Dispatch so that you can write Game Center apps in iOS.
Solution
Learn the basics of block objects and Grand Central Dispatch here.
Discussion
All of us, at some point, have used threads. We use threads to separate the paths of execution in our code and to give priority to certain paths of execution over others. A classic example of this is the main UI thread in every iOS application. All iOS developers are encouraged to avoid keeping the UI thread busy for work that is non-UI-related, in order to sustain a responsive user interface. Therefore, all work that is not UI-related can, and indeed should, be executed in separate threads.
With the introduction of multicore mobile devices such as the iPad 2, threads and their management have become more complicated than ever before. Not only should developers know what path of execution is running at any instance, they should also know which core of the processor that path is running on in order to utilize the power of the multicore processor. To simplify matters, Apple made available, to iOS and OS X developers, an excellent set of APIs wrapped in a library named Grand Central Dispatch (GCD). GCD allows developers to simply focus on the code that has to be executed and forget about the dirty work that needs to be carried out in order to balance the work among multiple threads on a device that can have multiple cores.
GCD works with block objects. Block objects are first-class
functions, which means, among many other traits, that they can be passed
to other methods as parameters and can be returned from methods as
return values. Block objects have a syntax that differs from a simple C
function or procedure. For instance, a C function that takes two
int parameters (call them value1 and value2), adds them up, and returns the sum as
an int can be implemented in this
way:
int sum (int value1, int value2){
  return value1 + value2;
}
The equivalent of this code written using a block object would be:
int (^sum)(int, int) = ^(int value1, int value2){
  return value1 + value2;
};
Or, for instance, if we were to implement a procedure in C that
simply prints out a string to the console, we would write it like this,
using the printf procedure:
void printSomestring(void){
  printf("Some string goes here...");
}
The same code can be written using block objects as demonstrated here:
void (^printSomeString)(void) = ^(void){
  printf("Some string goes here...");
};
As mentioned earlier, block objects are first-class functions, and
can therefore be passed to
methods, procedures, and functions as parameters. For example, the
sortUsingComparator: method of
instances of NSMutableArray, as we
will soon see, accepts block
objects that return a value of type NSComparisonResult and take in two parameters
each of type id. Here is how you
would call that method to sort your array:
NSMutableArray *array = [[NSMutableArray alloc] initWithObjects:
                         @"Item 1",
                         @"Item 2",
                         @"Item 3",
                         nil];

[array sortUsingComparator:^NSComparisonResult(id obj1, id obj2) {
  /* Sort the array here and return an appropriate value */
  return NSOrderedSame;
}];

[array release];
In addition to passing inline block objects to other methods, it
is important that you also learn how to write methods that accept and
work with inline block objects passed as parameters. Let’s say we have
an Objective-C method, sumOf:plus:,
which will take in two parameters of type NSInteger, calculate the sum, and return a
64-bit value of type long long. This
Objective-C method itself will then call a block object that will
calculate the sum and return the result. Here is how we can implement
this:
long long (^sum)(NSInteger, NSInteger) =
^(NSInteger value1, NSInteger value2){

  return (long long)(value1 + value2);

};

- (long long) sumOf:(NSInteger)paramValue1
              plust:(NSInteger)paramValue2{

  return sum(paramValue1, paramValue2);

}
Block objects are executed just like C procedures and functions.
In the case of the sum block object
that we had before, we can execute it easily as shown here, inside an
Objective-C method:
int (^sum)(int, int) = ^(int value1, int value2){
  return value1 + value2;
};

- (int) calculateSumOfTwoNumbersUsingBlockObjects:(int)number1
                                     secondNumber:(int)number2{
  return sum(number1, number2);
}
The calculateSumOfTwoNumbersUsingBlockObjects:secondNumber:
Objective-C method calls the sum
block object and passes the return value of the block object to the
calling code. Are you starting to see how simple block objects are? I
suggest that you start writing a few block objects in your Xcode
projects to just get used to the syntax. I am quite aware that the
syntax of a block object is not exactly desirable as far as Objective-C developers are concerned, but
once you learn the power that block objects have to offer, you will most
likely forget this difficulty in constructing them and instead focus on
the advantages.
One of the most important advantages to block objects is that they
can be used inline and, as a result, passed to other methods as
parameters. For example, if we want to sort an instance of NSMutableArray in an ascending fashion, we
could use the sortUsingComparator: method of
the NSMutableArray class as shown
here. This method accepts a block object with two parameters and returns
a value of type NSComparisonResult.
Because sortUsingComparator: accepts a block object as
a parameter, we can use it for any kind of data and adjust the sorting
method as appropriate.
NSMutableArray *array = [[NSMutableArray alloc] initWithObjects:
                         [NSNumber numberWithInteger:10],
                         [NSNumber numberWithInteger:1],
                         [NSNumber numberWithInteger:20],
                         [NSNumber numberWithInteger:15],
                         nil];

/* Start an ascending sort on the array */
[array sortUsingComparator:^NSComparisonResult(id obj1, id obj2) {

  /* By default, let's assume the values are the same */
  NSComparisonResult result = NSOrderedSame;

  /* Get the two values as numbers */
  NSNumber *firstNumber = (NSNumber *)obj1;
  NSNumber *secondNumber = (NSNumber *)obj2;

  /* If the second number is bigger than the first, we are on
   an ascending trend */
  if ([secondNumber integerValue] > [firstNumber integerValue]){
    result = NSOrderedAscending;
  }
  /* Otherwise, if the second number is smaller than the first number,
   we are on a descending trend */
  else if ([firstNumber integerValue] > [secondNumber integerValue]){
    result = NSOrderedDescending;
  }

  return result;

}];

NSLog(@"%@", array);

[array release];
The output printed by the NSLog
procedure in this example code is:
(
 1,
 10,
 15,
 20
)
Although there’s an even simpler way to sort an array, this
example demonstrates the use of block objects and how other classes such
as NSMutableArray allow you to pass
block objects as parameters to different methods inside that class. The
example goes one step further in using block objects as first-class
functions that can be used as parameters to other methods.
With GCD, Apple decided block objects were the perfect match for what they wanted to achieve: simplicity in developing multithreaded applications on single or multicore devices. Think of GCD as a controller object. A controller of what, you might ask? A controller of a big pool of threads placed in dispatch queues. Dispatch queues are simply a queue of tasks submitted by the system or by the developer. The tasks will get executed in the threads, as managed by GCD. So when we talk about dispatch queues, just think of a queue of tasks.
At the heart of GCD are some global concurrent queues, which can
be accessed using the dispatch_get_global_queue function like
so:
dispatch_queue_t dispatchQueue =
  dispatch_get_global_queue(DISPATCH_QUEUE_PRIORITY_LOW, 0);
The first parameter to the method is the priority of the dispatch queue. The second parameter to the method is reserved and currently should always be set to 0. The higher the priority of the queue, the faster the tasks inside it get executed (ideally). For the first parameter, you can pass any of the following values:
DISPATCH_QUEUE_PRIORITY_HIGHTasks inside this queue will get executed with the highest priority.
DISPATCH_QUEUE_PRIORITY_DEFAULTTasks in this queue get executed after the high priority tasks and before the tasks with low priority.
DISPATCH_QUEUE_PRIORITY_LOWTasks inserted in a queue with low priority will get executed with a priority lower than the high and medium priority tasks.
DISPATCH_QUEUE_PRIORITY_BACKGROUNDTasks inside this queue will be scheduled at the lowest priority available to the system.
In addition to the global concurrent queues, you can also use the main queue. Each application has at most one main queue. The difference between the main queue and the global concurrent queues is that the main queue always executes your code on the main thread, whereas the global concurrent queues will execute your code, depending on a decision made by the system, on various other threads created and managed by GCD.
In order to retrieve your application’s main queue, you must use
the dispatch_get_main_queue function like
so:
dispatch_queue_t mainQueue = dispatch_get_main_queue();
/* Dispatch tasks to the queue */
We now know how to get the handle to global concurrent queues and
the main queue. The big question is: how do we execute a piece of code
on these queues? The answer is simple: use one of the dispatch_ procedures. Here are a few flavors
for you:
dispatch_syncSubmits a block object to a given dispatch queue for synchronous execution.
dispatch_asyncSubmits a block object to a given dispatch queue for asynchronous execution.
dispatch_onceSubmits a block object to a given dispatch queue for execution, only once during the lifetime of an application. Calling the same method and passing the same block object to any dispatch queue will return immediately without re-executing the block object.
Note
Block objects submitted to any of the aforementioned dispatch methods must return void and have no parameters.
Fair enough! Let’s give it a go. I want to have three loops, each
printing the number sequence 1 to 10, and I want to have all of them run
at the same time, asynchronously. When we talk about asynchronous
execution of block objects, we know we should be using the dispatch_async procedure:
/* Define our block object */
void (^countFrom1To10)(void) = ^{

  NSUInteger counter = 0;
  for (counter = 1;
       counter <= 10;
       counter++){
    NSLog(@"Thread = %@. Counter = %lu",
          [NSThread currentThread],
          (unsigned long)counter);
  }

};
The second and final piece of the puzzle is the decision as to which dispatch queue we want our code to be executed on. For this example, we can execute the code on either the main queue (run on the main thread) or better yet, on any one of the global concurrent queues. So let’s go ahead and use a global concurrent queue:
/* Calling this method will execute the block object
 three times */
- (void) countFrom1To10ThreeTimes{

  /* Get the handle to a global concurrent queue */
  dispatch_queue_t concurrentQueue =
  dispatch_get_global_queue(DISPATCH_QUEUE_PRIORITY_DEFAULT, 0);

  /* Now run the block object three times */
  dispatch_async(concurrentQueue, countFrom1To10);
  dispatch_async(concurrentQueue, countFrom1To10);
  dispatch_async(concurrentQueue, countFrom1To10);

}
If you invoke the countFrom1To10ThreeTimes method in your
application, the results printed in the console might be similar to
these:
...
Thread = <NSThread: 0x94312b0>{name = (null), num = 3}. Counter = 7
Thread = <NSThread: 0x9432160>{name = (null), num = 5}. Counter = 6
Thread = <NSThread: 0x9431d70>{name = (null), num = 4}. Counter = 7
Thread = <NSThread: 0x94312b0>{name = (null), num = 3}. Counter = 8
Thread = <NSThread: 0x9432160>{name = (null), num = 5}. Counter = 7
Thread = <NSThread: 0x94312b0>{name = (null), num = 3}. Counter = 9
Thread = <NSThread: 0x9431d70>{name = (null), num = 4}. Counter = 8
Thread = <NSThread: 0x9432160>{name = (null), num = 5}. Counter = 8
Thread = <NSThread: 0x94312b0>{name = (null), num = 3}. Counter = 10
Thread = <NSThread: 0x9431d70>{name = (null), num = 4}. Counter = 9
Thread = <NSThread: 0x9432160>{name = (null), num = 5}. Counter = 9
Thread = <NSThread: 0x9431d70>{name = (null), num = 4}. Counter = 10
Thread = <NSThread: 0x9432160>{name = (null), num = 5}. Counter = 10
Note
The thread number for the main thread is 1; hence, looking at
the thread numbers printed in this example, it can be concluded that
none of the block objects were executed on the main thread. That’s our
proof that the global concurrent queue really did execute our block
objects on threads other than the main thread. And we can conclude
that the dispatch_async procedure also did
its job right by executing our block objects’ code
asynchronously.
Now let’s take a look at another example. Suppose we want to
asynchronously download the contents of three URLs
and mark the end of all the downloads by displaying an alert to our
users on the user interface. The choice here between the main queue and
one of the global concurrent queues is rather simple. Since the contents
of the URLs could be very large, it is best not to keep the main thread
busy downloading them. In other words, we should avoid using the main
queue. Also, we want to download the URLs one by one. Put simply, we
want to wait for the first URL to be downloaded before moving to the
second one, and so on. We have the luxury of synchronous URL requests
because we know that we are going to execute our block object on a
global concurrent queue, which will not block the main thread. To
achieve this, we shall use the dispatch_sync procedure, which will block a
given queue before moving to the next block of code.
Let’s break this down into two pieces of code. One piece is the
block object, which will be able to download any URL that we pass to it
and return YES if the download
succeeds or NO if it fails:
BOOL (^downloadURL)(NSURL *) = ^(NSURL *paramURL){

  NSURLRequest *request = [NSURLRequest requestWithURL:paramURL];
  NSData *data = [NSURLConnection sendSynchronousRequest:request
                                       returningResponse:nil
                                                   error:nil];

  if ([data length] > 0){
    NSLog(@"Successfully downloaded %lu bytes of data",
          (unsigned long)[data length]);
    return YES;
  } else {
    NSLog(@"Failed to download the data.");
    return NO;
  }

};
Now what? We have the block that can download URLs for us synchronously. Now let’s get the handle to a global concurrent queue and execute this block synchronously on it. After we are done, we want to display a message to the user on the user interface. To do anything UI-related, we have to execute our blocks on the main queue, which executes its tasks on the main thread as shown here:
- (void) downloadThreeURLsAndDisplayAlert{

  __block BOOL wasSuccessful = YES;

  dispatch_queue_t concurrentQueue =
  dispatch_get_global_queue(DISPATCH_QUEUE_PRIORITY_DEFAULT, 0);

  dispatch_sync(concurrentQueue, ^(void){
    NSLog(@"Downloading iOS 4 Cookbook's main page data...");
    wasSuccessful &= downloadURL([NSURL URLWithString:
                                  @"http://www.ios4cookbook.com"]);
  });

  dispatch_sync(concurrentQueue, ^(void){
    NSLog(@"Downloading a blog's main page data...");
    wasSuccessful &= downloadURL([NSURL URLWithString:
                                  @"http://vandadnp.wordpress.com"]);
  });

  dispatch_sync(concurrentQueue, ^(void){
    NSLog(@"Downloading O'Reilly's main page data...");
    wasSuccessful &= downloadURL([NSURL URLWithString:
                                  @"http://www.oreilly.com"]);
  });

  /* Make sure the UI-related code is executed in the
   main queue */
  dispatch_queue_t mainQueue = dispatch_get_main_queue();

  dispatch_async(mainQueue, ^(void) {
    if (wasSuccessful == YES){
      NSLog(@"Successfully downloaded all URLs.");
      /* Display an alert here */
    } else {
      NSLog(@"At least one URL failed to download.");
      /* Display an alert here too */
    }
  });

}
Note
The __block directive makes a
variable accessible to a block with write access. If you remove the
__block directive in this example
code and attempt to assign a value to the wasSuccessful variable, the compiler will
throw errors. By default, a block object has read access to all
variables in its lexical scope,
but not write access.
If you have an Internet connection, running this code will give you results similar to those shown here:
Downloading iOS 4 Cookbook's main page data...
Successfully downloaded 518 bytes of data
Downloading a blog's main page data...
Successfully downloaded 74849 bytes of data
Downloading O'Reilly's main page data...
Successfully downloaded 80530 bytes of data
Successfully downloaded all URLs.
If you do not have an Internet connection, you will receive results similar to these:
Downloading iOS 4 Cookbook's main page data...
Failed to download the data.
Downloading a blog's main page data...
Failed to download the data.
Downloading O'Reilly's main page data...
Failed to download the data.
At least one URL failed to download.
The dispatch_sync procedure
executes our block object on a global concurrent queue, meaning that the
block object will get executed on a thread other than the main thread.
At the same time, because of the nature of dispatch_sync procedure, the executing code
will block the concurrent queue until it has finished. Then the second
synchronous dispatch happens, and so on, until we get to where we want
to display a message to the user. In this case, we execute our block
object on the main queue, because all UI-related code (to display
something, hide something, add a view to a window, etc.) needs to be
executed on the main thread.
Before we can move to subjects related to Game Center, we should
also take a look at the dispatch_once
procedure discussed earlier. This procedure will execute a block object
on a given dispatch queue once and only once during the lifetime of the
application. There are a few things that you have to bear in mind when
working with the dispatch_once
procedure:
This procedure is blocking. In other words, it is synchronous and will block the dispatch queue on which it runs until its code is fully executed.
Unlike
dispatch_syncanddispatch_async, this procedure does not take a dispatch queue as its parameter. By default, it will execute its task on the current dispatch queue.
Note
Call the dispatch_get_current_queue function to get
the current dispatch
queue.
The first parameter to this procedure is the pointer to a value of type
dispatch_once_t. This is how this procedure keeps track of which blocks to execute and which blocks not to execute. For instance, if you call this procedure with two different pointers for this parameter but pass the exact same block object, the block object will get executed twice because the first pointer passed each time points to different blocks of memory. If you pass the same pointer for this parameter and the same block object twice, the block object will get executed only once.The second parameter to this method is the block object that has to be executed. This block object has to return
voidand take no parameters.
Let’s take a look at an example. Let’s say I have a block object that counts from 0 to 5 and I just want it to be executed once, on a global concurrent queue to avoid blocking the main thread, during the lifetime of my application. This is how I should implement my code:
void (^countFrom1To5)(void) = ^(void){
  NSUInteger counter = 0;
  for (counter = 1;
       counter <= 5;
       counter++){
    NSLog(@"Thread = %@, Counter = %lu",
          [NSThread currentThread],
          (unsigned long)counter);
  }
};

- (void) countFrom1To5OnlyOnce{

  dispatch_queue_t globalQueue =
  dispatch_get_global_queue(DISPATCH_QUEUE_PRIORITY_DEFAULT, 0);

  static dispatch_once_t onceToken;

  dispatch_async(globalQueue, ^(void) {
    dispatch_once(&onceToken, countFrom1To5);
    dispatch_once(&onceToken, countFrom1To5);
  });

}
If I call the countFrom1To5OnlyOnce method and run my
program, I will get results similar to those shown here:
Thread = <NSThread: 0x5f07f10>{name = (null), num = 3}, Counter = 1
Thread = <NSThread: 0x5f07f10>{name = (null), num = 3}, Counter = 2
Thread = <NSThread: 0x5f07f10>{name = (null), num = 3}, Counter = 3
Thread = <NSThread: 0x5f07f10>{name = (null), num = 3}, Counter = 4
Thread = <NSThread: 0x5f07f10>{name = (null), num = 3}, Counter = 5
What if I pass a different token to the dispatch_once procedure in the countFrom1To5OnlyOnce method?
Thread = <NSThread: 0x6a117f0>{name = (null), num = 3}, Counter = 1
Thread = <NSThread: 0x6a117f0>{name = (null), num = 3}, Counter = 2
Thread = <NSThread: 0x6a117f0>{name = (null), num = 3}, Counter = 3
Thread = <NSThread: 0x6a117f0>{name = (null), num = 3}, Counter = 4
Thread = <NSThread: 0x6a117f0>{name = (null), num = 3}, Counter = 5
The code in this example was executed twice. Not what we wanted.
So make sure that, for whatever block of code that has to be executed
once, you pass the same pointer to the first parameter of the dispatch_once procedure.
You should now have a good understanding of block objects and GCD, so we can dive right into more interesting subjects concerning Game Center. Here are a few links if you require further information about block objects and GCD:
Creating Game Center Accounts
Problem
You know you need to set something up before being able to use Game Center but you are not quite sure what you need to do.
Solution
Use the iOS Simulator’s built-in Game Center app to set up your Game Center accounts as demonstrated here.
Discussion
Each player is identified by an account on Game Center. Each account is linked to an email address. Game Center accounts run on either the production server or the sandbox server. The production server is the server that hosts Game Center apps when they go live on the App Store. The sandbox server is the server that hosts Game Center apps before they go to production, such as apps that are run on the iOS Simulator so that developers can test whether the app is working fine before they submit it to the App Store. All code that you write for your Game Center apps will work on the production server if they work fine on the sandbox server.
To test your Game Center apps, you must create Game Center accounts. Each account is associated with just one of the two servers just discussed. Since we want to test our apps before submitting them to the store, we must create a few Game Center sandbox players. Please take the following steps to create Game Center sandbox players:
Navigate to Gmail and create a few email addresses. I created three email addresses so that I could have three players on sandbox Game Center servers. I recommend giving them similar names because managing and remembering them can be a hard task otherwise. For instance, here are three suggestions: mysandboxgamecenteruser1, mysandboxgamecenteruser2, and mysandboxgamecenteruser3. The first person reading this book will likely create these, so think of something else to use.
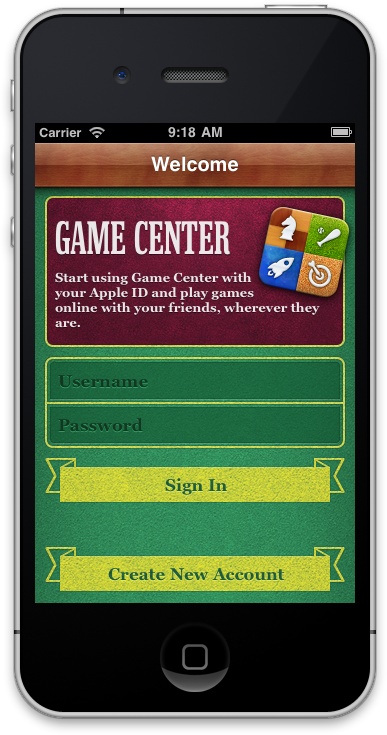
Open iOS Simulator and open the Game Center app. If a player is logged into Game Center on the iOS Simulator, simply sign out as that player. Now you will end up with the main screen of the Game Center on the Simulator (Figure 1-1).
Tap on the Create New Account button.
The New Account screen will get displayed, asking for your country. Select your country and press the Next button on the navigation bar.
A screen will appear asking for your birthdate. Using this date, Game Center will determine whether you are underage. More about this later. Once you are done entering the date, press the Next button.
You will now be presented with the Terms & Conditions. Read them and press the Agree button if you want to be allowed to use the server. You will be presented with a message asking you whether you really agree with the Terms & Conditions or not. Press the Agree button if you do agree and proceed to the next screen.
Here you will be asked to enter your full name (first name and last name), your email address, a password that will be used to log into Game Center, and a secret question and answer that can be used if you forget your password in the future. There is also a switch that asks you whether or not you want to subscribe to news about Game Center and related products. This switch is by default off. The email address that you enter must be valid. Use one of the email addresses that you created (described in step 1). Once you are done entering your details, press the Next button on the navigation bar.
In the next screen, you will be asked to enter your nickname. Each Game Center player has a nickname that other players will be able to see. Go wild and enter anything you like that you believe represents you well. (However, these names are unique in the Game Center, so you must find a name no one has chosen yet. I know the procedure is not ideal, but if you enter something and Game Center nags that it has already been taken, you will need to select a different nickname). Make sure the Allow Game Invites switch is on (more about this later). Also, if you would like other players to find you on Game Center using your email address, switch on Find Me By Email. You can also add other email addresses to the list that your account is associated with so players can find your Game Center account using any of these addresses. Once you are finished, press the Done button on the navigation bar.
The Game Center app on the iOS Simulator will now log you into Game Center and display the main Game Center interface, as shown in Figure 1-2.
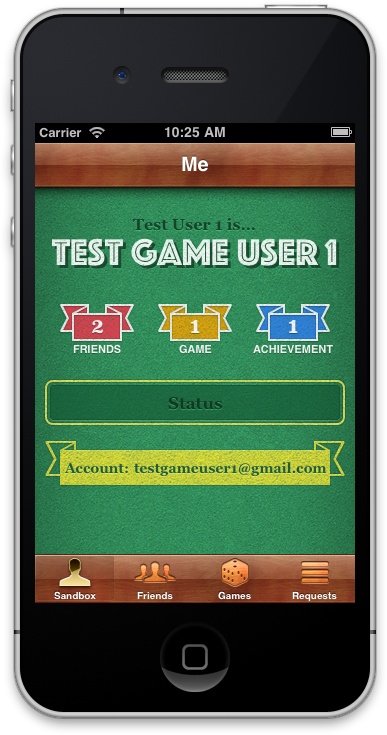
Note
The leftmost tab in the Game Center app (once you have logged in) says “Sandbox,” denoting that you are indeed using the sandbox environment.
Now go ahead and create at least one more Game Center player on the sandbox environment. To test the example code in this book, you will ideally need three sandbox players. If you are reluctant to spend time registering three players, you must at least create two. Otherwise, you will not be able to test about 90 percent of the example code.
Setting Up Game Center for an iOS App
Problem
You want to be able to connect to the Game Center servers in your iOS apps.
Solution
You need to create your app in iTunes Connect and also set your
app’s bundle identifier both in iTunes Connect and your app’s
info.plist file as demonstrated in the
Discussion section.
Discussion
In Creating Game Center Accounts, we created sandbox Game Center accounts using the Game Center iOS App, which is installed on all instances of iOS Simulator. That was the first piece of the puzzle. The next is setting up our iOS App with Game Center using iTunes Connect. This might confuse you a bit at first. The linchpin is to create an app in Xcode and give it a bundle identifier. For instance, here is the bundle identifier that I am using:
com.pixolity.testgame
Setting the identifier in your app bundle won’t do the trick by itself. You have to set up your application on iTunes Connect. Set the app’s bundle identifier on iTunes Connect to the same identifier you set in your application bundle in Xcode.
We’ll handle these tasks in this section, but we will not upload the app to iTunes Connect. By following the procedure in this section, you’ll set up your app on iTunes in the state of Prepare for Upload. You will be able to access Game Center for the app. But because it is not actually uploaded to iTunes Connect, your Game Center connections will run on the sandbox environment. The same code will run on the production server in a later stage, after your app has been uploaded to iTunes Connect.
Follow these steps to set up an iOS app with Game Center on iTunes Connect:
Sign in to Apple Developer Portal using your developer credentials.
Once you are logged in, select iOS Provision Portal from the righthand side.
In the portal, select App IDs from the lefthand side menu.
Press the New App ID button.
In the New App ID screen, give your new App ID a description. This can be anything you want that describes your application.
In the Bundle Seed ID (App ID Prefix) section, select the Generate New item. This will generate a new bundle seed ID for your application. The application bundle (which we talked about earlier) appended to this seed ID will form a unique name that identifies your application. For instance, if you leave this option up to Generate New, the generated seed ID might be something similar to
KQTHO099023. If you set your bundle identifier in Xcode tocom.mycompany.mygame, then the unique identifier of your application will beKQTHO099023.com.mycompany.mygame.In the Bundle Identifier (App ID Suffix) box, put the identifier that will uniquely identify your application with Apple. The norm for this field is
com.mycompany.myapplication, wheremycompanyis the name of the company through which you set up your developer account with Apple andmyapplicationis the name of your application.Once you are done setting the values in the New App ID screen, press the Submit button. Your new application ID is now created.
You are done in the iOS Provision Portal. Head back to the Apple Developer Portal and select iTunes Connect from the righthand side of the screen.
In iTunes Connect, select Manage Your Applications.
In Manage Your Applications, select the Add New App button in the top lefthand corner.
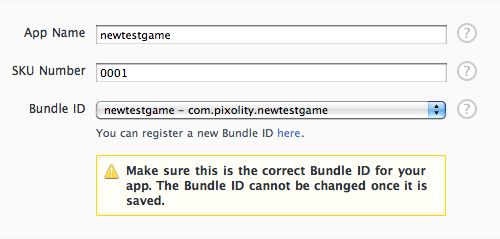
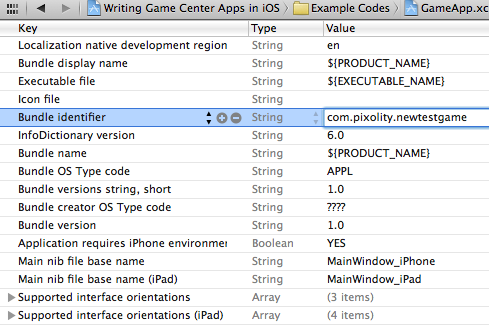
Give your application a name, a unique number, and the bundle ID you set earlier. For instance, I created a bundle ID of
com.pixolity.newtestgame, so for the App Name field, I enterednewtestgame. For the SKU Number, I chose to enter0001, and for the Bundle ID, I chose, from the picker,newtestgame - com.pixolity.newtestgame, which is the combination of the description and the bundle identifier I set in step 5. These values that I entered are displayed in Figure 1-3. Once you set your values, press the Continue button at the bottom of the page.In the pricing screen, simply select the Price Tier that you want and leave everything else untouched. Press the Continue button. These values can be changed later when you want to submit your app to the App Store.
The next screen is where you put the details of your application. Enter the values that make sense to you. You will be able to change these later, so just try to enter as little as possible so you can proceed to the next step. You must also set the large image and upload screenshots for your application. Don’t worry, simply upload any image (as long as the sizes adhere to Apple’s guidelines) for now. You’ll be able to change them to their final production images later, before uploading your binary for review. Once you are done entering all the values and uploading the screenshots, press the Save button at the bottom righthand side of the page.
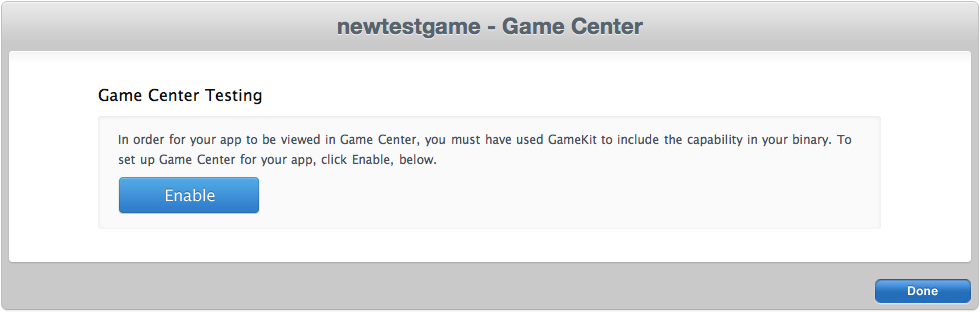
After saving your application’s information, your app is set up on iTunes Connect, but no binary has been submitted yet. This is the exact state in which you have to keep the app in order to test Game Center. To enable Game Center for your app now, in the same page, select the Manage Game Center button on the righthand corner. If you have landed on any other page, go to iTunes Connect and select the application that you just set up from the list of your applications.
Once you land in the Manage Game Center page, press the Enable button to enable Game Center for your application, as shown in Figure 1-4.
Press Done at the bottom of the page.
Open your Xcode project. In the Info.plist file, set the bundle identifier to that which you set in step 5, as shown in Figure 1-5.
Now you’re done. Go ahead and import the Game Kit framework into your project, as described in Adding the Game Kit Framework.
See Also
Adding the Game Kit Framework
Problem
You have set up your project and want to start incorporating Game Center APIs into your app.
Solution
Add the Game Kit framework to your app as demonstrated in the Discussion section.
Discussion
To use Game Center’s capabilities, you must link your application against the Game Kit framework. Assuming you have created an Xcode project already for this app, import this framework into your Xcode project as follows:
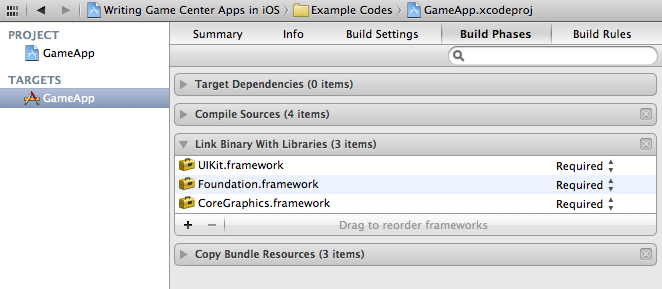
Click on your project (which should have a blueish icon) in Xcode. Once you see your project’s settings, click on the target that has to be linked against the Game Kit framework.
On the top of the screen, select Build Phases and then expand the Link Binary With Libraries box, as shown in Figure 1-6.
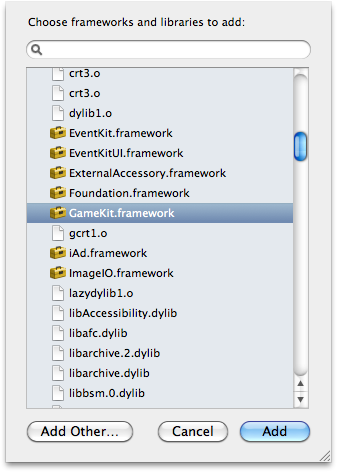
Click on the + button, select GameKit.framework from the list, and press the Add button, as depicted in Figure 1-7.
Game Kit is now added to your project. Now you have to decide whether or not using Game Kit is a requirement in your application. iOS versions older than 4.1 do not support Game Center (although iOS 4.0 demoed Game Center), so you must decide whether or not your application really requires Game Center to function or whether Game Center is an optional functionality that you are offering with your game.
If your application cannot function without Game Center, you must follow these steps to make it clear in your application’s Info.plist file:
Find your Info.plist file and right click on it.
From the menu that pops up after you right click, select Open As→Source Code.
Add a key named
UIRequiredDeviceCapabilitiesto the list with an array that contains the string value ofgamekit, as shown here:
<key>UIRequiredDeviceCapabilities</key>
<array>
  <string>gamekit</string>
</array>
If your app makes use of Game Center but Game Center isn’t the main part of the app, you can optionally load Game Center. To do so, follow these steps:
Retrieve the current iOS version. If the version is higher than 4.1, you can be 50 percent sure that Game Center is available for your application.
Determine whether one of the classes (such as
GKLocalPlayer) in the Game Kit framework is available in the host device. This covers the other 50 percent of cases: a positive result suggests that Game Center is supported on the host device.
Combine these two methods and you can be 100 percent sure whether or not Game Center is available on the given device. Here is sample code that lets you detect the availability of Game Center in your application:
- (BOOL) gameCenterSupported{

  NSUInteger availabilityPercentage = 0;

  if (NSStringFromClass([GKLocalPlayer class]) != nil){
    availabilityPercentage += 50;
  }

  NSString *systemVersionAsString =
  [[UIDevice currentDevice] systemVersion];

  NSNumber *systemVersion = [NSNumber numberWithDouble:
                             [systemVersionAsString doubleValue]];

  NSNumber *minimumSystemVersion = [NSNumber numberWithDouble:4.1];

  if ([minimumSystemVersion compare:systemVersion] != NSOrderedDescending){
    availabilityPercentage += 50;
  }

  if ((NSUInteger)availabilityPercentage == 100){
    NSLog(@"Game Center is supported.");
    return YES;
  } else {
    NSLog(@"Game Center is not supported");
    return NO;
  }

}
Note
Make sure you have imported Game Kit’s main header file as shown here:
#import <GameKit/GameKit.h>
The code compares the current system version to the minimum required system version and makes sure the current version is higher or the same (ascending order). For instance, 4.1 (minimum required) followed by 4.2 (current version) is an ascending order, hence we can conclude that Game Center is supported. Compare that to 4.1 (minimum required) followed by 4.0 (current version) which is a descending order, indicating a lack of support for Game Center on the current machine.
Now that you have determined whether Game Center is present on the host device, we can move on to the next step.
Authenticating the Local Player in Game Center
Problem
You know that the first step to using Game Center functionalities is to authenticate the local player, but you have no idea how you should do that.
Solution
Use the authenticateWithCompletionHandler: instance
method of the GKLocalPlayer class, as
shown in the Discussion section.
Discussion
In Game Center, everything depends on the simple ability to access the local player. The local player is the player that is authenticated into Game Center either through the Game Center app on an iOS device or through an iOS app that utilizes Game Center. If the player has not authenticated herself yet, attempting to retrieve the local player will prompt the player to authenticate first. If the player cancels, we will get an error back in our code. If the player has already authenticated, she won’t be prompted to log into Game Center again. So long as she is authenticated, we will be able to retrieve her player object.
Every player in Game Center is represented with an object of
GKPlayer. The local player is also a
player, but is represented with an object of type GKLocalPlayer, a subclass of the GKPlayer class. In order to retrieve a
reference to the local player object, you can use the localPlayer class method of the GKLocalPlayer class like so:
GKLocalPlayer *localPlayer = [GKLocalPlayer localPlayer];
After you have the local player’s object, you must, as soon as you
have the ability to do so (right after your application loads),
authenticate the player using the authenticateWithCompletionHandler: instance
method of the GKLocalPlayer class.
This method accepts a block object
that should have no return value and should accept a single parameter of type NSError that will store any error that occurs
during the authentication process:
- (void) authenticateLocalPlayer{
GKLocalPlayer *localPlayer = [GKLocalPlayer localPlayer];
[localPlayer authenticateWithCompletionHandler:^(NSError *error) {
if (error == nil){
NSLog(@"Successfully authenticated the local player.");
} else {
NSLog(@"Failed to authenticate the player with error = %@", error);
}
}];
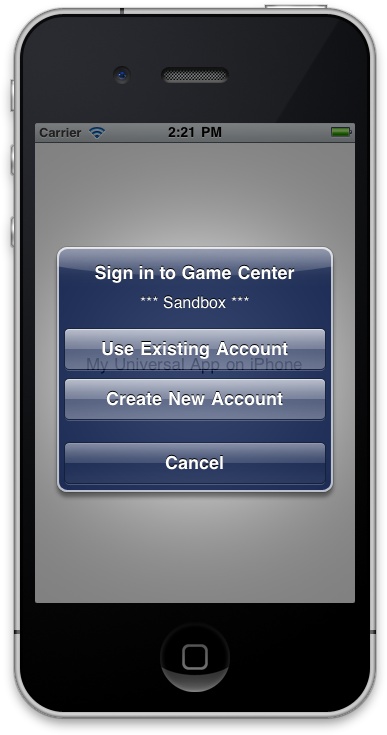
}If the player has not logged into Game Center, after the execution of this code, she will be prompted with a dialog asking her to do so. This is depicted in Figure 1-8.
The isAuthenticated instance
method of the GKLocalPlayer class
returns YES if the local player has already authenticated and NO if she
has not. So, in order to improve our authentication method, we can add
this factor in:
- (void) authenticateLocalPlayer{

  GKLocalPlayer *localPlayer = [GKLocalPlayer localPlayer];

  if ([localPlayer isAuthenticated] == YES){
    NSLog(@"The local player has already authenticated.");
    return;
  }

  [localPlayer authenticateWithCompletionHandler:^(NSError *error) {

    if (error == nil){
      NSLog(@"Successfully authenticated the local player.");
    } else {
      NSLog(@"Failed to authenticate the player with error = %@", error);
    }

  }];

}
Note
We are calling the isAuthenticated instance method of the
GKLocalPlayer class to avoid
attempting to authenticate the player over and over again. Leaving out this check will
not bother the player because,
if she has already logged into Game Center, the dialog displayed in
Figure 1-8 will not
get displayed again. But doing the check saves us a wasted call to
Game Center.
Now that you know how to authenticate the local player, it is time to move to more sophisticated subjects in Game Center, such as Retrieving the Local Player’s Information.
Retrieving the Local Player’s Information
Problem
You have authenticated the local player, but you need to get her alias and other information.
Solution
Use different properties available to the GKLocalPlayer class, such as the alias property, as demonstrated in the
Discussion section.
Discussion
The GKPlayer object represents
a player in Game Center. Each player possesses a few very important
properties:
playerIDEach player in Game Center has an identifier. This identifier should not be displayed to the player. Instead, the player alias is what the player is interested in seeing in leaderboards, etc. In many Game Center methods, we will first be able to retrieve players’ IDs and use them to load other information for the player, such as her scores in a specific leaderboard. In other words, player IDs are important only when working with Game Center APIs.
aliasThe alias that the player sets for herself during the registration process in Game Center. You can display this alias to the player if you wish.
isFriendThis property returns a value of type BOOL, allowing you to determine whether the player is the friend of the currently authenticated local player.
This is a property of the
GKPlayerclass only. Although theGKLocalPlayerclass subclassesGKPlayer, theisFriendproperty cannot be accessed in theGKLocalPlayerclass.
Now let’s go ahead and demonstrate this with example code. In this code, what I want to demonstrate can be separated into two pieces of code expressed in block objects. One block object simply attempts to print out the local player’s alias and player ID:
void (^printLocalPlayerInfo)(void) = ^{

  GKLocalPlayer *localPlayer = [GKLocalPlayer localPlayer];
  if ([localPlayer isAuthenticated] == YES){

    NSLog(@"Player ID = %@", [localPlayer playerID]);
    NSLog(@"Player Alias = %@", [localPlayer alias]);

  }

};
The second block object does the authentication and passes the control to the first block object after the authentication is done:
- (void) authenticateLocalPlayerAndGetHerInfo{

  dispatch_queue_t concurrentQueue =
    dispatch_get_global_queue(DISPATCH_QUEUE_PRIORITY_DEFAULT, 0);

  dispatch_async(concurrentQueue, ^(void) {
    GKLocalPlayer *localPlayer = [GKLocalPlayer localPlayer];
    if ([localPlayer isAuthenticated] == NO){
      [localPlayer authenticateWithCompletionHandler:^(NSError *error) {
        if (error == nil){
          NSLog(@"Successfully authenticated.");
          dispatch_async(concurrentQueue, printLocalPlayerInfo);
        } else {
          NSLog(@"Failed to authenticate. Error = %@", error);
        }
      }];
    } else {
      dispatch_async(concurrentQueue, printLocalPlayerInfo);
    }
  });

}
Plain and simple! If I invoke the authenticateLocalPlayerAndGetHerInfo method in
my application, the following information is printed to the
console:
Successfully authenticated.
Player ID = G:1428628142
Player Alias = Test Game User 1
Note
This output gets printed to the console only if the local player has authenticated in Game Center. The code will attempt to authenticate the player, which means that if the player has not already logged in, she will be asked to log in. If the player deliberately decides not to authenticate and can’t successfully authenticate, then the code will print out the error that it receives from Game Center as a result of the user’s actions.
The local player (GKLocalPlayer), unlike any other player
(GKPlayer), has a property named
friends that defines which players
have been associated as friends with the local player. To read more
about this, please refer to Retrieving the Local Player’s Friends Information.
Adding Friends in Game Center
Problem
You have learned to authenticate the local player, but to test Game Center APIs on other players, you want to add some friends to the local player’s account.
Solution
Use the iOS Simulator built-in Game Center app to add friends to the local player, as demonstrated in the Discussion section.
Discussion
To add a friend in Game Center on the sandbox server, follow these steps:
Open the iOS Simulator if it’s not already open.
Open the Game Center app in the Simulator.
Log in, if you are not logged in already.
Once logged in, from the bottom of the screen, select the Friends tab.
Press + on the navigation bar.
In the Friend Request screen, type the nickname or the email address of the friends you want to add to your list.
Once done, press Send on the navigation bar in the top righthand corner.
Game Center will then let you know whether it could send the invites or not.
It just couldn’t be simpler than this!
Retrieving the Local Player’s Friends Information
Problem
You’ve added friends to the local player’s Game Center account, but now you want to enumerate them and retrieve their information, such as their alias.
Solution
Use the friends property of the
local player’s object, an instance of GKLocalPlayer.
Discussion
The GKLocalPlayer class has a
property called friends of type
NSArray. This property will contain
the players that the local player is friends with. The array represents
the players using their player IDs (explained in Retrieving the Local Player’s Information).
I said will in the previous paragraph
because, after authentication of the local player, this array is empty
(nil). You need to call the loadFriendsWithCompletionHandler: instance method of the GKLocalPlayer class to load the player ID for
each of the local player’s friends. After retrieving the IDs, call
another method to retrieve other information for each friend based on his
or her player ID.
The loadFriendsWithCompletionHandler: instance
method of the GKLocalPlayer class
accepts one parameter, which should be a block that returns void (or in other words, doesn’t return
anything). This block object will have two parameters. The first is of
type NSArray and will, upon return,
contain the friend IDs of the local player. The second is of type
NSError and will indicate whether an
error occurred during the process.
Note
To avoid repeating code over and over, I assume that you have already authenticated the local player using the material taught in Authenticating the Local Player in Game Center.
Let’s take a look at an example where we just load the local player’s friends’ IDs:
void (^getLocalPlayerFriends)(void) = ^{

  GKLocalPlayer *localPlayer = [GKLocalPlayer localPlayer];

  if ([localPlayer isAuthenticated] == NO){
    NSLog(@"The local player is not authenticated.");
    return;
  }

  NSLog(@"Loading local player's friend IDs...");
  [localPlayer loadFriendsWithCompletionHandler:
   ^(NSArray *friends, NSError *error) {

     if (friends != nil){
       NSLog(@"Successfully retrieved friends of the local player.");
       NSUInteger counter = 1;
       for (NSString *friendID in friends){
         NSLog(@"Friend %lu = %@", (unsigned long)counter, friendID);
         counter++;
       }
     }

     if (error != nil){
       NSLog(@"Error occurred. Error = %@", error);
     }

  }];

};
Note
As I mentioned in step 1, I created three Game Center players just so I can demonstrate Game Center’s functionalities to you. If you have created only one player, you will not be able to do things such as adding friends to your list, unless you know other players on the sandbox whom you might want to add. However, I strongly suggest again that you create at least two players to test the example codes in this book.
Running this code in the iOS Simulator, I get the following results:
Loading local player's friend IDs...
Successfully retrieved friends of the local player.
Friend 1 = G:1428629254
Friend 1 = G:1428629742
As you can see, I’ve added two friends to the local player’s list
(Adding Friends in Game Center). If you look at the code
once again, you’ll notice that I am checking whether the friends array
is nil and then
checking whether an error occurred during the loading process. The
reason behind this is quite simple: Game Center attempts to load the
local player’s friends. If an error occurs, some of the information
might have been loaded nonetheless. Therefore, you might get an array
that contains the partial list of the local player’s friends. If you do
get this, you might decide to go ahead with the partial array. But if
you want to be sure that no error occurs, I suggest that you check the
error parameter first and then print out the contents of the friends array.
To detect if Game Center could successfully load the list of
friends, we should make sure that the error parameter is
nil, and to detect if the list of friends was
partially retrieved, we should check if the array of friends and the
error parameter are both not nil. This means that
although we did get some of our friends enumerated in the array, there
was also an error retrieving the rest of them.
All is good. I have the identifiers of the local player’s friends.
How can I get instances of the GKPlayer class using the player identifiers?
For that you will have to use the loadPlayersForIdentifiers:withCompletionHandler:
class method of the GKPlayer class.
The complete sequence of tasks is:
Authenticate the local player.
Retrieve the IDs of the local player (Discussion).
Retrieve instances of
GKPlayerbased on the player IDs:
void (^getLocalPlayerFriendsDetails)(void) = ^{

  GKLocalPlayer *localPlayer = [GKLocalPlayer localPlayer];

  if ([localPlayer isAuthenticated] == NO){
    NSLog(@"The local player is not authenticated.");
    return;
  }

  if ([[localPlayer friends] count] == 0){
    NSLog(@"The local player has no friends. How sad!");
    return;
  }

  NSLog(@"Loading players...");
  [GKPlayer
   loadPlayersForIdentifiers:[localPlayer friends]
   withCompletionHandler:^(NSArray *players, NSError *error) {

     if (players != nil){
       NSLog(@"Successfully loaded the players.");
       for (GKPlayer *player in players){
         NSLog(@"%@", player);
       }
     }

     if (error != nil){
       NSLog(@"Error happened. Error = %@", error);
     }

   }];

};

void (^getLocalPlayerFriends)(void) = ^{

  GKLocalPlayer *localPlayer = [GKLocalPlayer localPlayer];

  if ([localPlayer isAuthenticated] == NO){
    NSLog(@"The local player is not authenticated.");
    return;
  }

  NSLog(@"Loading local player's friend IDs...");
  [localPlayer loadFriendsWithCompletionHandler:
   ^(NSArray *friends, NSError *error) {

     if (friends != nil){
       NSLog(@"Successfully retrieved friends of the local player.");

       dispatch_queue_t concurrentQueue =
        dispatch_get_global_queue(DISPATCH_QUEUE_PRIORITY_DEFAULT, 0);
       dispatch_async(concurrentQueue, getLocalPlayerFriendsDetails);

     }

     if (error != nil){
       NSLog(@"Error occurred. Error = %@", error);
     }

  }];

};

- (void) authenticateLocalPlayerAndGetHerInfo{

  dispatch_queue_t concurrentQueue =
    dispatch_get_global_queue(DISPATCH_QUEUE_PRIORITY_DEFAULT, 0);

  dispatch_async(concurrentQueue, ^(void) {
    GKLocalPlayer *localPlayer = [GKLocalPlayer localPlayer];
    if ([localPlayer isAuthenticated] == NO){
      [localPlayer authenticateWithCompletionHandler:^(NSError *error) {
        if (error == nil){
          NSLog(@"Successfully authenticated.");
          dispatch_async(concurrentQueue, getLocalPlayerFriends);
        } else {
          NSLog(@"Failed to authenticate. Error = %@", error);
        }
      }];
    } else {
      dispatch_async(concurrentQueue, getLocalPlayerFriends);
    }
  });

}
After calling the authenticateLocalPlayerAndGetHerInfo method in
this example code, I get the following results (because I authenticate
the local player, who has two friends in her list):
Successfully authenticated.
Loading local player's friend IDs...
Successfully retrieved friends of the local player.
Loading players...
Successfully loaded the players.
<GKPlayer 0x5f32d90>(playerID: G:1428629254, alias: Test Game User 2,
      status: (null), rid:(null))
<GKPlayer 0x5f32cf0>(playerID: G:1428629742, alias: Test Game User 3,
      status: (null), rid:(null))
Once you have this information, you can either display it to the player or keep it for future reference. With regard to player IDs, please do not store these in your game. Whenever the player runs your app, you must attempt to retrieve the fresh list of friends instead of assuming the friends that your app retrieved a few days ago are still the local player’s friends. Also, the format of the player ID might change, as Apple has mentioned in its documentation:
Do not make assumptions about the contents of the player identifier string. Its format and length are subject to change.
—Game Center Documentation
Creating Leaderboards in iTunes Connect
Problem
You don’t know how to start incorporating leaderboards into your iOS games.
Solution
Set up leaderboards in iTunes Connect.
Discussion
One of the functionalities in Game Center is the ability to manage leaderboards in your iOS apps. For instance, you can write a racing game for iOS and have players compete to achieve the best score. You can then report these scores to a leaderboard and allow the players to see the leaderboard. This gives your players a reason to come back to your app (in order to compete with their friends).
To use leaderboards in your app, you must first create them for your app in iTunes Connect. Here is how you can do that:
Go to the Apple Developer Portal and select iTunes Connect from the righthand side of the screen.
In iTunes Connect, select Manage Your Applications.
In Manage Your Applications, select the app you want to add a leaderboard to. To add a leaderboard to an app, you must have already enabled Game Center for it (Figure 1-4).
Once in the app in iTunes Connect, select the Manage Game Center button on the righthand side of the screen.
Under Leaderboard box, select the Set Up button.
Select the Add Leaderboard button on the top lefthand corner.
There are two types of leaderboards in Game Center:
- Single Leaderboard
A leaderboad that you report scores to and retrieve scores from. This can be, for instance, a leaderboard for one of the levels in your game. Level 1 of your game can have one leaderboard, Level 2 can have another, and so on.
- Combined Leaderboard
This is a leaderboard that merges data from two or more leaderboards. For instance, if you have ten levels in your game and one leaderboard per level (that is, ten leaderboards in total) and you want to find the player with the highest score in total from all ten leaderboards, combined leaderboards are the way to go (more on this later).
Follow these steps to create a single leaderboard that can contain scores from 1 to 1,000, with 1,000 being the highest score:
Select the Choose button in the Single Leaderboard category.
In the Leaderboard Reference Name box, enter a name that you would like to use to refer to this leaderboard. This will not be the name you will be using to refer to this leaderboard in your code. This is simply a name which you choose and can see later in iTunes Connect. Pick a descriptive name such as “My Game’s Level 1 Leaderboard.”
In the Leaderboard ID box, enter the ID that you will use later in your code to refer to this leaderboard. For instance, I could pick MGL1LB (referring to “My Game’s Level 1 Leaderboard,” which I picked as the reference name). You don’t have to do as I did; simply pick a reference ID, but remember that this will be the ID of this leaderboard you use in your app.
In the Score Format Type dropdown, pick Integer, since we want just to report scores ranging from 1 to 1,000.
For Sort Order, pick Descending because we want the highest score (1,000) to be displayed on top and score 1 to be at the bottom. If you want the lowest score (1) to be displayed on top of the leaderboard, pick Ascending for this option.
In the Score Range box, set the left box’s value to 1 and the right box’s value to 1,000. That will define the score range that your application will report to this specific leaderboard. Any other score which is not in this range will automatically get deleted by Game Center.
Note
Each leaderboard in Game Center has its own localization, managed by iTunes Connect. For instance, if your app supports English and Italian localizations, you will want your leaderboard data to be presented to the players in each one of these countries in their own language. For instance, displaying “120 points” to an Italian player is not very nice. The “points” part is English and should not be displayed to Italian players. iTunes Connect allows you to specify these suffixes and prefixes for your scores depending on what localization the player has enabled on his device. The good thing is that once you enter these values in iTunes Connect, Game Center APIs on the device will automatically fetch the correctly localized values from Game Center servers, depending on the localization of the current device. You won’t have to detect the localization at run time.
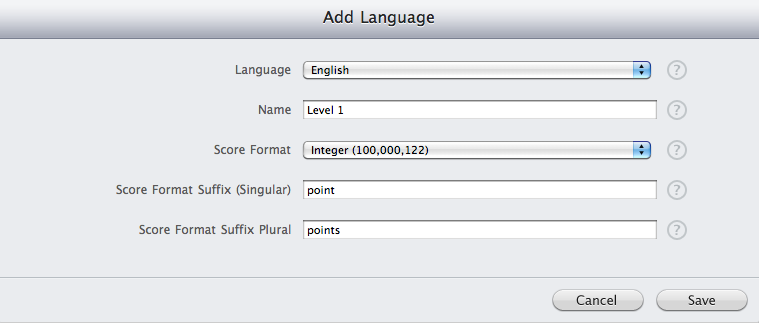
Select the Add Language button (Figure 1-9).
Pick English from the Language box.
In the Name box, pick a name (that gets displayed to the player) for this leaderboard. For instance, I picked Level 1.
In the Score Format, pick 100,000,122.
In the Score Format Suffix (Singular), write “point” without the quotation marks. This gets attached to the end of scores that are 1. For instance, if the player scores 1 in Level 1 of your game, you want to display “1 point” in the leaderboard, whereas for a player who has scored 1,000 points, you want to display “1,000 points“.
In the Score Format Suffix Plural box, enter “points” without the quotation marks.
Press the Save button.
After adding the localizations, press the Save button at the bottom righthand side of the Add Leaderboard screen in iTunes Connect.
Once you have created a leaderboard for your app, you will be able to access it in your app using Game Kit. This is explained in Reporting Scores to Leaderboards.
Reporting Scores to Leaderboards
Problem
You have created at least one leaderboard in iTunes Connect and now you want to store players’ scores to that leaderboard.
Solution
Use the reportScoreWithCompletionHandler: instance
method of the GKScore class as
demonstrated in the Discussion section.
Discussion
Assuming that you have already created a leaderboard (see Creating Leaderboards in iTunes Connect), you must follow these steps to report scores to it:
Authenticate the local player (see Authenticating the Local Player in Game Center).
Create an instance of the
GKScoreclass and set the category of that score to the Leaderboard ID that you chose when you were creating this leaderboard.Set the
valueproperty of the score object.Use the
reportScoreWithCompletionHandler:instance method of theGKScoreclass to report the error. This method accepts one parameter, which must be a block that returnsvoidand accepts a parameter of typeNSError. You can use this error to determine whether an error occurred during the process of reporting the score:
- (BOOL) reportScore:(NSUInteger)paramScore
       toLeaderboard:(NSString *)paramLeaderboard{

  __block BOOL result = NO;

  GKLocalPlayer *localPlayer = [GKLocalPlayer localPlayer];

  if ([localPlayer isAuthenticated] == NO){
    NSLog(@"You must authenticate the local player first.");
    return NO;
  }

  if ([paramLeaderboard length] == 0){
    NSLog(@"Leaderboard identifier is empty.");
    return NO;
  }

  GKScore *score = [[[GKScore alloc]
                     initWithCategory:paramLeaderboard] autorelease];

  score.value = (int64_t)paramScore;

  NSLog(@"Attempting to report the score...");

  [score reportScoreWithCompletionHandler:^(NSError *error) {
    if (error == nil){
      NSLog(@"Succeeded in reporting the error.");
      result = YES;
    } else {
      NSLog(@"Failed to report the error. Error = %@", error);
    }
  }];

  return result;

}

- (void) authenticateLocalPlayerAndReportScore{

  GKLocalPlayer *localPlayer = [GKLocalPlayer localPlayer];

  if ([localPlayer isAuthenticated] == YES){
    NSLog(@"The local player has already authenticated.");
    return;
  }

  [localPlayer authenticateWithCompletionHandler:^(NSError *error) {

    if (error == nil){
      NSLog(@"Successfully authenticated the local player.");

      [self reportScore:10
          toLeaderboard:@"MGL1LB"];

    } else {
      NSLog(@"Failed to authenticate the player with error = %@", error);
    }

  }];

}
Calling the authenticateLocalPlayerAndReportScore method
will attempt to authenticate the local player and then report the score of 10 to
a leaderboard with Reference ID of
MGL1LB (see Creating Leaderboards in iTunes Connect). Here are the results
that I see printed to my console window:
Successfully authenticated the local player.
Attempting to report the score...
Succeeded in reporting the error.
If you try reporting a score to a nonexistent leaderboard, the
error that you will receive from the reportScoreWithCompletionHandler: method will
be similar to this:
Error Domain=GKErrorDomain Code=17 "The requested operations could
not be completed because one or more parameters are invalid."
UserInfo=0x5f43a90 {NSUnderlyingError=0x5f09390 "The operation
couldn’t be completed. status = 5053", NSLocalizedDescription=The
requested operations could not be completed because
one or more parameters are invalid.}
There are three ways you can see the scores that you have reported to Game Center (sandbox server):
Using the Game Center app on iOS Simulator.
Retrieving the scores programmatically (see Retrieving Leaderboards Information Programmatically ).
Displaying leaderboards in your app’s user interface (see Displaying Leaderboards to Players).
The latter two methods of displaying leaderboard scores to the player are explained in their own sections. Here I’ll just explain how to display scores using the iOS Simulator. Follow these steps to see the local player’s leaderboards using the Simulator:
Open the Game Center app on the Simulator.
If you haven’t already logged in as the local player, do so now.
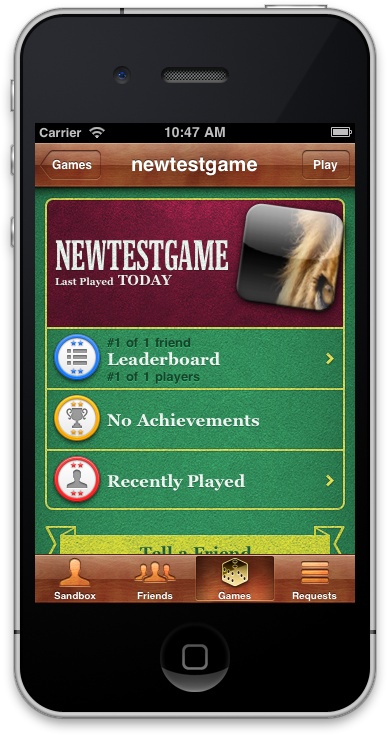
Navigate to the Games tab at the bottom of the screen.
Select the game for which you reported a score. You will now see the game menu for the game that you just selected (see Figure 1-10).
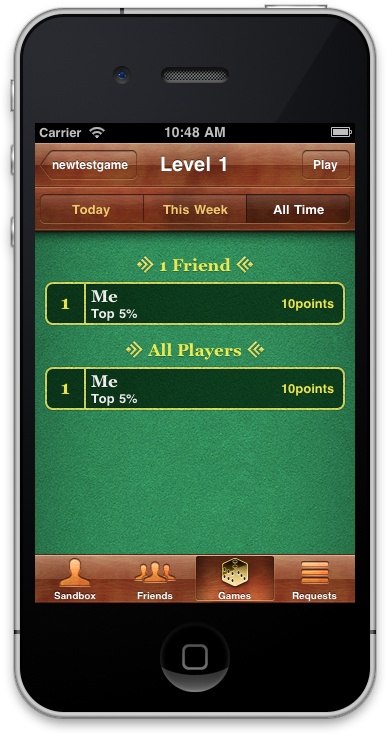
Select Leaderboard. You can now see where you are in the leaderboard (see Figure 1-11).
Note
The score in Figure 1-11 is 10 because we reported this score earlier in this recipe.
Read on to the next two sections to learn the other ways to display scores.
Retrieving Leaderboards Information Programmatically
Problem
After reporting scores to a leaderboard, you are curious as to how you can retrieve this information from the leaderboard programmatically.
Solution
Use the loadScoresWithCompletionHandler: instance
method of the GKLeaderBoard class, as
shown in the Discussion section.
Discussion
To retrieve a leaderboard’s scores in your app, follow these steps:
Authenticate the local player (see Authenticating the Local Player in Game Center).
Instantiate an object of type
GKLeaderBoard.Set the category of this object to the Reference ID of the leaderboard whose data you want to read (see Creating Leaderboards in iTunes Connect).
Call the
loadScoresWithCompletionHandler:instance method ofGKLeaderBoardclass and pass a block that returnsvoidand accepts two parameters. The first parameter to this block is an instance ofNSArray, which will contain the scores that were loaded from the given leaderboard. The second parameter is of typeNSError, which will contain an error (if any).Note
Game Center might, under certain circumstances, return a valid array of scores to you and, at the same time, an error. This means that, although some of the scores were retrieved successfully, an error occurred while the scores were being fetched from Game Center. In this case, Game Center stops as soon as it receives the error and you will get some of the scores, not all of them.
Each leaderboard score in Game Center is encapsulated into an
instance of GKScore, as we saw in
Reporting Scores to Leaderboards. Let’s take a look at
example code retrieving scores from a leaderboard with Reference ID (category)
of MGL1LB:
GKLocalPlayer *localPlayer = [GKLocalPlayer localPlayer];

  NSLog(@"Authenticating the local player...");
  [localPlayer authenticateWithCompletionHandler:^(NSError *error) {

    if (error == nil){

      NSLog(@"Successfully authenticated the local player.");
      GKLeaderboard *leaderboard =
        [[[GKLeaderboard alloc] init] autorelease];

      [leaderboard setCategory:@"MGL1LB"];
      NSLog(@"Loading the scores in leaderboard...");
      [leaderboard loadScoresWithCompletionHandler:
       ^(NSArray *scores, NSError *error) {

         if (scores != nil){
           for (GKScore *score in scores){
             NSLog(@"%@", score);
           }
         }

         if (error != nil){
           NSLog(@"Error occurred = %@", error);
         }

      }];

    } else {
      NSLog(@"Failed to authenticate with error = %@", error);
    }

  }];
After reporting the score 10, 20, and 35 for three Game Center players (who are all friends of each other) in Reporting Scores to Leaderboards and executing this code, the console window will print following similar to this:
Authenticating the local player...
Successfully authenticated the local player.
Loading the scores in leaderboard...
GKScore player=G:1428629742 rank=1 date=2011-03-27
      10:39:58 +0000 value=35 formattedValue=35points
GKScore player=G:1428629254 rank=2 date=2011-03-27
      10:39:24 +0000 value=20 formattedValue=20points
GKScore player=G:1428628142 rank=3 date=2011-03-27
09:21:19 +0000 value=10 formattedValue=10pointsDisplaying Leaderboards to Players
Problem
You want to display leaderboards to your app users using a graphical user interface.
Solution
Use the GKLeaderboardViewController class as shown in
the Discussion section.
Discussion
Game Center can construct built-in leaderboard screens for your games. Doing this is a piece of cake for Game Center. All you have to do is build an iOS application that makes use of view controllers. This is outside the scope of this book, but is thoroughly explained in iOS 4 Programming Cookbook. For the remainder of this section, I assume you have created an application with one view controller inside a navigation controller.
To have Game Center construct a leaderboard screen for your iOS app, follow these steps:
Make sure that you have a view controller in your application (see iOS 4 Programming Cookbook). Also make sure that your view controller conforms to the
GKLeaderboardViewControllerDelegateprotocol.Authenticate the local player (see Authenticating the Local Player in Game Center).
Allocate and instantiate an object of type
GKLeaderboardViewControllerand present it to the player using thepresentModalViewController:animated:instance method of your view controller.Implement the
leaderboardViewControllerDidFinish:delegate method of theGKLeaderboardViewControllerDelegateprotocol in your view controller.In the implementation of the
leaderboardViewControllerDidFinish:delegate method, dismiss your leaderboard view controller using the view controller’sdismissModalViewControllerAnimated:instance method.
Instances of the GKLeaderboardViewController class have three
important properties:
leaderboardDelegateThe object that will receive delegate messages from the leaderboard view controller. You use these delegate methods to dismiss the leaderboard view controller, among other things.
timeScopeIf you want to narrow down the scores reported and shown by the leaderboard view controller, you can set this property to any of these values:
GKLeaderboardTimeScopeTodayNarrows down the scores to those reported today.
GKLeaderboardTimeScopeWeekNarrows down the scores to those reported this week. This is the default value.
GKLeaderboardTimeScopeAllTimeShows all scores irrespective of when they were reported.
categoryThe leaderboard category that has to be displayed. Setting the value of this property is optional. If not set, Game Center will retrieve the default leaderboard (you can set the default leaderboard in iTunes Connect) for the current app.
Let’s take a look at an example where I want to display scores
submitted to a leaderboard with Reference ID of MGL1LB (see Creating Leaderboards in iTunes Connect) during this
week:
- (void)leaderboardViewControllerDidFinish:
  (GKLeaderboardViewController *)viewController{

  /* We are finished here */
  [self dismissModalViewControllerAnimated:YES];

}

- (void) viewDidLoad{

  [super viewDidLoad];

  GKLocalPlayer *localPlayer = [GKLocalPlayer localPlayer];

  [localPlayer authenticateWithCompletionHandler:^(NSError *error) {

    if (error == nil){

      GKLeaderboardViewController *controller =
        [[GKLeaderboardViewController alloc] init];

      /* The category for our leaderboard. We created this before */
      [controller setCategory:@"MGL1LB"];
      /* Only show the scores that were submitted this week */
      [controller setTimeScope:GKLeaderboardTimeScopeWeek];
      [controller setLeaderboardDelegate:self];
      [self presentModalViewController:controller
                              animated:YES];
      [controller release];

    } else {
      NSLog(@"Could not authenticate the local player. Error = %@", error);
    }

  }];

}
Once you run the app and it loads the view controller that contains this code, you will see results similar to that shown in Figure 1-12.
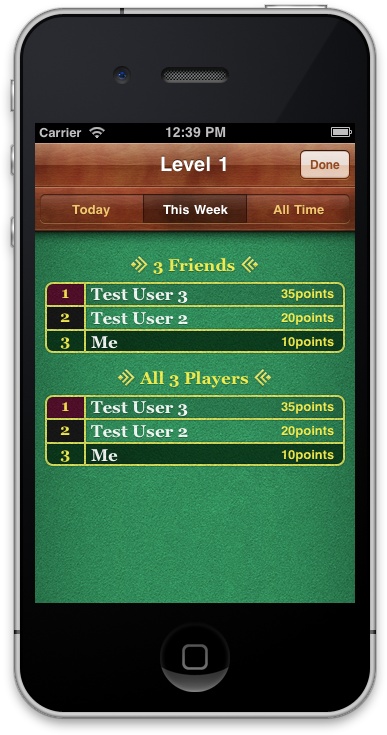
Note
You can see scores for three players in the leaderboard because I have reported scores for all three players using the same method that we learned about in Reporting Scores to Leaderboards.
Creating Achievements in iTunes Connect
Problem
You want your game’s users to keep coming back to your app by allowing them to unlock achievements inside your game.
Solution
Use iTunes Connect to create achievements for your game, as demonstrated in the Discussion section.
Discussion
Game Center allows iOS developers to include achievements in their apps and record the player’s progress toward completing an achievement. For instance, you might be writing a first person shooter game. In your game, you have a normal map that the player can walk through and engage in battles with the opponent. You might have decided to include some hidden paths in your game that not everybody can find. Only those who have been playing the game long enough know about these hidden paths. When a player finds a hidden path for the first time, you can report an achievement to the Game Center and give the player some reward in order to keep her interested in the game. The player can then work toward completing that achievement, as each achievement can have a completion percentage.
Let’s consider a simple scenario. Let’s say I find the hidden path in the game. Suppose the game requires me not only to find the path, but also to go to the end of the path for the achievement to be unlocked. When the player finds the path, you can report 0 percent for that achievement. Once the player is halfway through the path, you can report 50 percent for that achievement, and once she goes through the road and comes out of the other side, you can mark that achievement 100 percent completed.
You can have two different types of achievements:
- Normal
These will appear in the player’s list of achievements as soon as a progress has been reported by your app to the Game Center, even if it is 0 percent.
- Hidden
These cannot be seen by the player unless the progress reported to Game Center by your app is 100 percent.
To add achievements to your app, you must first create them for your app in iTunes Connect. Here is how you can do that:
Go to the Apple Developer Portal and select iTunes Connect from the righthand side of the screen.
In iTunes Connect, select Manage Your Applications.
In Manage Your Applications, select the app you want to add an achievement to. To add an achievement to an app, you must have already enabled Game Center for it (Figure 1-4).
Once in the app in iTunes Connect, select the Manage Game Center button on the righthand side of the screen.
In the Achievements box, select the Set Up button.
Select the Add New Achievement button on the top lefthand corner.
In the Achievement Reference Name box, enter a name that you would like to use to refer to this achievement. This will not be the name you will be using to refer to this achievement in your code. This is simply a name you can see later in iTunes Connect. Pick a descriptive name such as “My Game’s Level 1 Hidden Path 1 Completed.”
In the Achievement ID box, enter the ID that you will use later in your code to refer to this achievement. For instance, I could pick
MGL1HP1C(referring to “My Game’s Level 1 Hidden Path 1 Completed,” which I picked as the reference name). Pick any reference ID you want, and use it later in your app to refer to this achievement.If you want this achievement to be a hidden achievement, select Yes; otherwise, select No. For this example, please select No.
In the Point Value box, select 100.
Note
All achievements for an app combined together can have a maximum number of 1,000 points. Each achievement by itself can have a maximum of 100 points.
The Game Center app displays achievements (with at least one progress reported) to the player. A player will be able to see a normal achievement in her list even before completing it. Let’s say you are working on a racing game with AI-controlled cars, and one of the achievements goes to players who can win against them 10 times in a row. As soon as the player wins against the computer once, you can report a completion progress of 10 percent (one-tenth of the final achievement). At this point, the player can log into the Game Center app and see this achievement in his list. Game Center will not say that this achievement has been completed, because the completion progress is not 100 percent. What it will say, however, is how the player can work to complete this achievement, a description you should provide. Once the player wins against the AI-driven car 10 times in a row, Game Center will show that he has received this achievement successfully. Because you should provide descriptions of the achievement when the first progress is displayed and after the player completes the achievement, you need to use the localization feature in iTunes Connect as follows:
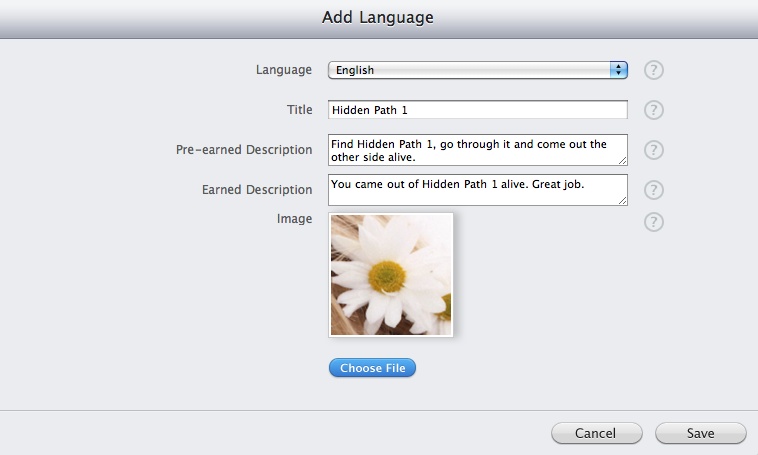
Select the Add Language button.
Pick English in the Language box (Figure 1-13).
In the Title box, pick a title (that gets displayed to the player) for this achievement. For instance, I entered “Hidden Path 1.”
In the Pre-earned Description box, describe exactly how the player should complete this achievement in the language that you selected (in this case, English).
In the Earned Description box, write something that the player will see after they have completed that achievement.
For the Image section, upload a 512 × 512 minimum 72-DPI image, which can be in any of the following formats:
png
jpeg
jpg
tif
tiff
Press the Save button.
After adding your localizations, press the Save button at the bottom righthand side of the Add Achievement screen in iTunes Connect.
Once you have created an achievement for your app, you will be able to access it in your app using Game Kit. This is explained in Reporting Achievements to Game Center.
Reporting Achievements to Game Center
Problem
You created achievements for your game in iTunes Connect and you are ready to use them in your game.
Solution
Use the GKAchievement class in
your iOS app.
Discussion
Reporting achievement progress to Game Center is similar to reporting scores to leaderboards in Game Center (see Reporting Scores to Leaderboards). Follow these steps to report an achievement to Game Center:
Authenticate the local player (see Authenticating the Local Player in Game Center).
Allocate and initialize an object of type
GKAchievement. Allocate the object using theinitWithIdentifier:initialization method or simply use theinitmethod but later use thesetIdentifier:instance method of the achievement to set its identifier. The identifier of an achievement is the Achievement ID that we selected when creating the achievement (see Creating Achievements in iTunes Connect).Use the
setPercentComplete:instance method of the achievement object to set the completion value of the achievement (a value between 0 to 100 percent).Call the
reportAchievementWithCompletionHandler:instance method of the achievement object and pass a block object that returnsvoidand accepts a parameter of typeNSError.
The following sample code reports 50 percent completion on an
achievement with ID of MGL1HP1C (see
Creating Achievements in iTunes Connect):
- (BOOL) reportAchievementWithID:(NSString *)paramAchievementID
             percentageCompleted:(double)paramPercentageCompleted{

  BOOL result = NO;

  if ([paramAchievementID length] == 0){
    NSLog(@"Achievement ID cannot be empty.");
    return NO;
  }

  GKAchievement *achievement =
    [[[GKAchievement alloc] initWithIdentifier:paramAchievementID]
     autorelease];

  NSLog(@"Setting percentage to %.02f", paramPercentageCompleted);
  [achievement setPercentComplete:paramPercentageCompleted];

  NSLog(@"Reporting the achievement...");
  [achievement reportAchievementWithCompletionHandler:^(NSError *error) {

    if (error == nil){
      NSLog(@"Successfully reported the achievement.");
    } else {
      NSLog(@"Failed to report the achievement. %@", error);
    }

  }];

  return result;

}

- (void) authenticateLocalPlayerAndReportAchievement{

  GKLocalPlayer *localPlayer = [GKLocalPlayer localPlayer];

  NSLog(@"Authenticating the local player...");
  [localPlayer authenticateWithCompletionHandler:^(NSError *error) {

    if (error == nil){
      NSLog(@"Successfully authenticated the local player.");
      NSLog(@"Reporting achievement...");
      [self reportAchievementWithID:@"MGL1HP1C"
                percentageCompleted:50.0f];
    } else {
      NSLog(@"Failed to authenticate the local player. %@", error);
    }

  }];

}
After calling the authenticateLocalPlayerAndReportAchievement
method, you will get results printed to the console window similar to
these shown here (unless there is an error, in which case the errors
will get printed to the console window):
Authenticating the local player...
Successfully authenticated the local player.
Reporting achievement...
Setting percentage to 50.00
Reporting the achievement...
Successfully reported the achievement.
After an achievement is reported to Game Center, if the achievement wasn’t set up as a hidden achievement, the local player can open the Game Center app and take a look at it, along with all the achievements she has collected while using your app, as shown in Figure 1-14.
Once the player selects the Achievements option, she will see all the achievements that an app has reported to Game Center and the progress along each achievement, as shown in Figure 1-15.
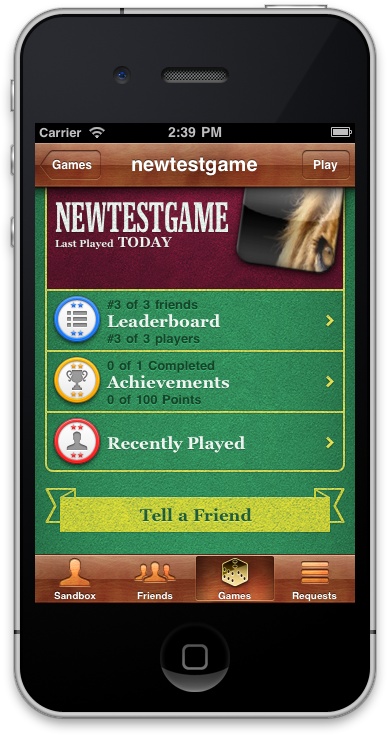
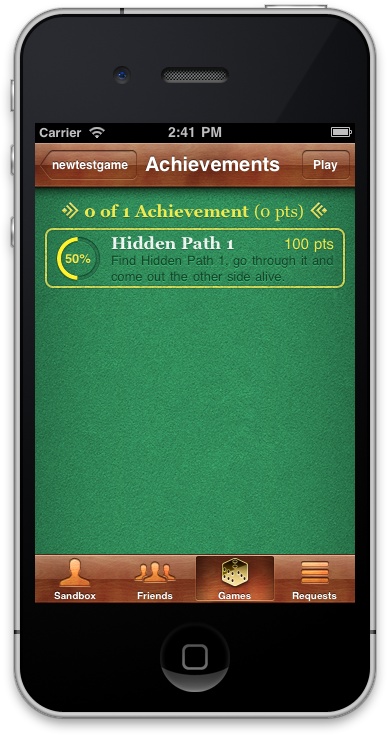
Note
After you create an achievement in iTunes Connect, there might be a slight delay between its creation and when you can report progress for that achievement using Game Center APIs. If you are getting errors saying that your achievement does not exist, but you are sure that it does, please wait 5-10 minutes and try again.
Retrieving Achievements Information Programmatically
Problem
You want to retrieve the progress of achievements that have been reported to Game Center for the local authenticated player.
Solution
You need to invoke the loadAchievementsWithCompletionHandler: class
method of the GKAchievement class.
Discussion
Just as we can retrieve leaderboard information programmatically (see Retrieving Leaderboards Information Programmatically), we can ask Game Center to provide us with the latest information about the progress the authenticated local player has made on each one of the achievements that we have enabled on our app. To do this, simply follow these steps:
Authenticate the local player (see Authenticating the Local Player in Game Center).
Next, invoke the
loadAchievementsWithCompletionHandler:class method of theGKAchievementclass. This method accepts one parameter, which must be a block object that returnsvoidand accepts two parameters. The first parameter is an array of typeNSArray, which will contain the achievements retrieved from Game Center. The second parameter is an error of typeNSError, which will contain any error that might happen during this process.You can then enumerate the objects in the array of achievements retrieved from the aforementioned method. Each achievement object will be of type
GKAchievement.
Here is an example of how we can retrieve achievements programmatically:
- (void) authenticateAndGetAchievements{

  GKLocalPlayer *localPlayer = [GKLocalPlayer localPlayer];

  NSLog(@"Authenticating the local player...");
  [localPlayer authenticateWithCompletionHandler:^(NSError *error) {

    if (error == nil){
      NSLog(@"Successfully authenticated the local player.");

      [GKAchievement loadAchievementsWithCompletionHandler:
       ^(NSArray *achievements, NSError *error) {

         NSUInteger counter = 1;
         for (GKAchievement *achievement in achievements){
           NSLog(@"Achievement %lu = %@",
                 (unsigned long)achievement,
                 achievement);
           counter++;
         }

      }];

    } else {
      NSLog(@"Failed to authenticate the local player. %@", error);
    }

  }];

}
Before invoking the authenticateAndGetAchievements method, I added
another achievement in iTunes
Connect (see Creating Achievements in iTunes Connect) for
my app and then went ahead and reported a progress of 10 percent for
that achievement. Here are the results that I got from invoking this
method:
Authenticating the local player...
Successfully authenticated the local player.
Achievement 111340288 = id: MGL1HP1C	50.000000
Achievement 111379664 = id: MGL1HP2C	10.000000
Note
Obviously, you might not receive the exact same results as I did, depending on how you have reported progress for your game’s achievements.
As you saw in Creating Achievements in iTunes Connect, each achievement was
configured with two descriptions: one that gets displayed to the player
before she has completed the achievement and the
other that gets displayed after she earns that
achievement. The GKAchievement class
can’t retrieve these descriptions. You must use the GKAchievementDescription class for that
instead. The loadAchievementDescriptionsWithCompletionHandler:
class method of the GKAchievementDescription class allows you to
retrieve descriptions for all achievements available to the local
player, each encapsulated into an object of type GKAchievementDescription. The
loadAchievementDescriptionsWithCompletionHandler:
method accepts a block object that returns void as a parameter. This block object should
have, as parameters, an instance of NSArray that will contain the achievements and
an instance of NSError that will
contain any errors that occur. Here is example code:
- (void) authenticateAndGetAchievementsInfo{

  GKLocalPlayer *localPlayer = [GKLocalPlayer localPlayer];

  NSLog(@"Authenticating the local player...");
  [localPlayer authenticateWithCompletionHandler:^(NSError *error) {

    if (error == nil){
      NSLog(@"Successfully authenticated the local player.");

      [GKAchievementDescription
       loadAchievementDescriptionsWithCompletionHandler:
       ^(NSArray *descriptions, NSError *error) {

         NSUInteger counter = 1;
         for (GKAchievementDescription *description in descriptions){
           NSLog(@"Achievement %lu. Description = %@",
                 (unsigned long)counter,
                 descriptions);
           counter++;
         }

       }];

    } else {
      NSLog(@"Failed to authenticate the local player. %@", error);
    }

  }];

}
Here is an example of what the authenticateAndGetAchievementsInfo method
could print out to the console window:
Authenticating the local player...
Successfully authenticated the local player.
Achievement 1. Description = (
    "id: MGL1HP1C	visible	You came out of
      Hidden Path 1 alive. Great job.",

    "id: MGL1HP2C	visible	You found Hidden
      Path 2. Congratulations."
)
Achievement 2. Description = (
    "id: MGL1HP1C	visible	You came out of
      Hidden Path 1 alive. Great job.",

    "id: MGL1HP2C	visible	You found Hidden
      Path 2. Congratulations."
)
Note
The achievement description objects contain an ID which you can match against the achievement objects we retrieved earlier. Here is how you can retrieve achievements and match them against their descriptions:
Retrieve the list of achievements in objects of type
GKAchievement, as we saw earlier.Use the
loadAchievementDescriptionsWithCompletionHandler:class method of theGKAchievementDescriptionclass to retrieve the description of all achievements.Finally, match the descriptions with the achievement objects that you retrieved earlier.
Displaying Achievements to Players
Problem
You need to display the achievements that the local player has received or is in the progress of receiving, using a graphical user interface.
Solution
Use the GKAchievementViewController class.
Discussion
Game Center can construct built-in achievements screens for your games. All you have to do is to build an iOS application that makes use of view controllers, covered in iOS 4 Programming Cookbook. For the remainder of this section, I assume you have created an application with one view controller inside a navigation controller.
In order to have Game Center construct an achievement screen for your iOS app, follow these steps:
Make sure that you have a view controller in your application (see iOS 4 Programming Cookbook). Also make sure your view controller conforms to the
GKAchievementViewControllerDelegateprotocol.Authenticate the local player (see Authenticating the Local Player in Game Center).
Allocate and instantiate an object of type
GKAchievementViewControllerand present it to the player using thepresentModalViewController:animated:instance method of your view controller.Implement the
achievementViewControllerDidFinish:delegate method of theGKAchievementViewControllerDelegateprotocol in your view controller.In the implementation of the
achievementViewControllerDidFinish:delegate method, dismiss your achievement view controller using the view controller’sdismissModalViewControllerAnimated:instance method.
Instances of the GKAchievementViewController class have an
important property named achievementDelegate, which is the object that
will receive delegate messages from the achievement view controller. You
use these delegate methods to dismiss the achievement
view controller, among other things.
Let’s take a look at an example where I want to display all achievements for the currently authenticated local player:
- (void)achievementViewControllerDidFinish:
  (GKAchievementViewController *)viewController{

  /* We are finished here */
  [self dismissModalViewControllerAnimated:YES];

}

- (void) viewDidLoad{

  [super viewDidLoad];

  GKLocalPlayer *localPlayer = [GKLocalPlayer localPlayer];

  [localPlayer authenticateWithCompletionHandler:^(NSError *error) {

    if (error == nil){

      GKAchievementViewController *controller =
        [[GKAchievementViewController alloc] init];

      [controller setAchievementDelegate:self];
      [self presentModalViewController:controller
                              animated:YES];
      [controller release];

    } else {
      NSLog(@"Could not authenticate the local player. %@", error);
    }

  }];

}
Once you run the app and it loads the view controller that contains this code, you will see results similar to that shown in Figure 1-16.
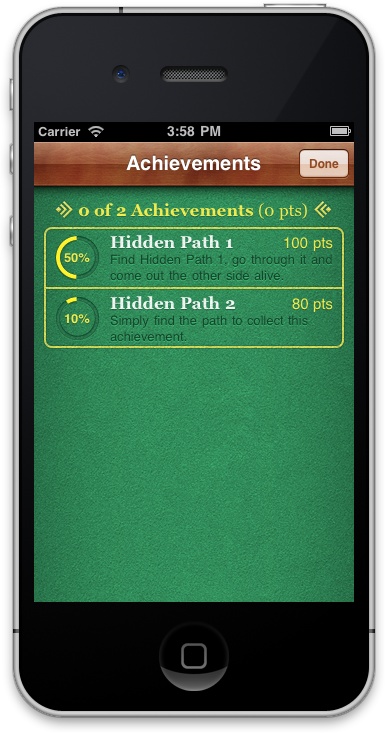
Note
In Figure 1-16, you can see two achievements for the local player, because I personally reported progress for two achievements for my app. You can learn how to create achievements in iTunes Connect by reading Creating Achievements in iTunes Connect. Reporting progress to achievements is explained in Reporting Achievements to Game Center.
Supporting Multiplayer Games and Matchmaking
Problem
You want to allow multiple players to join the same game and play your game together.
Solution
Incorporate matchmaking in your app, as explained in the Discussion section.
Discussion
One of the most important functionalities provided to iOS developers in Game Center is matchmaking. Matchmaking allows two or more players to play the same game in multiplayer mode at the same time. You can either use Apple’s servers for multiplayer games or host your own server. In this book, we will only cover matchmaking using Apple’s server, for the sake of simplicity.
Note
Sending matchmaking invites is not possible from the iOS Simulator. Since matchmaking is between two or more players, you need at least two real iOS devices to test it, even on Sandbox servers. For the examples in this section, I am testing the code on an iPhone 4 and an iPad 2.
There are two essential programming activities in a multiplayer game using Game Center:
Creating, waiting for, and accepting new match requests.
Transmitting game data during play.
The first part is perhaps the more difficult one to understand. To make it easier for you, let me paint a rather general picture of how things work in multiplayer mode in Game Center. When your app runs on an iOS device, it must:
Authenticate the local player (see Authenticating the Local Player in Game Center).
Tell Game Center which block of code has to be executed, if an invitation is received from Game Center. This block of code (a block object) will be stored in Game Center locally on the device. When your application is not even running and a new invitation comes to the local player, Game Center will start your app and execute the given block of code that you have provided. Learn this and you’ve learned 50 percent of all there is to know about matchmaking in Game Center.
Handle delegate messages for each match: messages such as state changes for players playing the game. For instance, if you are in the middle of a match and a player gets disconnected, you will receive a specific match delegate.
Once the match has started, you will be able to use the match object to send data to other players, or to all of them at the same time. The match delegate methods will get called on other players’ devices when new data comes through. The app can then read that data (encapsulated in an instance of
NSData) and act upon it.
Before we jump into coding, please make sure the following conditions have been met:
Have at least two iOS devices ready for development.
Assign a bundle ID to your application, as described in Setting Up Game Center for an iOS App.
You must have created a provision profile for your application. Follow these steps to do so:
Go to the Apple Developer Portal and in the righthand side of the screen, select iOS Provision Portal.
Select Provisioning from the lefthand side.
In the Development tab, select the New Profile button on the righthand side to land in the Create iOS Development Provisioning Profile screen (Figure 1-17).
In the Profile Name, choose a name for your profile. This name will be visible in Xcode so you know which profile you are choosing.
For Certificates, select your developer certificate. Usually you will see only one item here, so check that item.
In the App ID dropdown, select the App ID that you created for your app in Setting Up Game Center for an iOS App.
In the Devices section, select at least the two devices that you want to run the app on. If you don’t see any devices in the list, you must first select Devices from the lefthand side menu, add the two devices that you are intending to run the app on, and then come back to these steps.
Once you are done, select the Submit button from the bottom left side.
Download the provision profile that you just created.
Drag and drop the provision profile that you downloaded into iTunes.
Connect the devices on which you want your app to run to your computer and sync them with iTunes, at which point iTunes will install the provision profile that you created on the devices.
In Xcode, select your project file (with a blueish icon), and from the list on the lefthand side, select your target.
Once the target is selected, select the Build Settings tab from the top and then navigate to the Code Signing section. Make sure the Debug/Release code signing identities are set to the provision profile that you just created in the iOS Provision Portal.
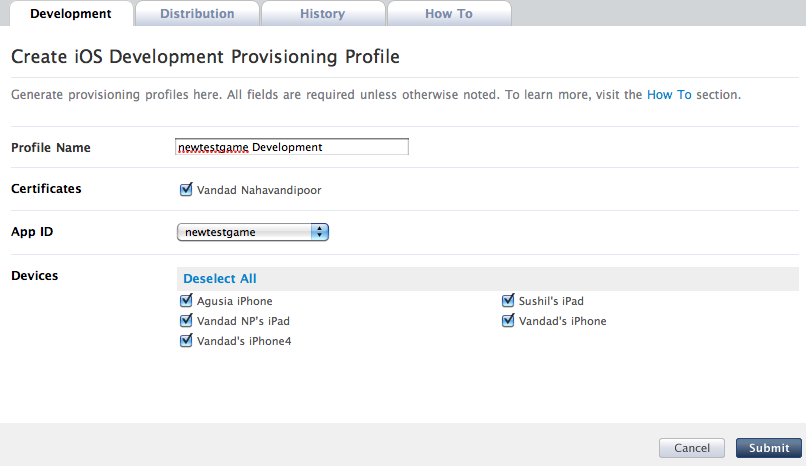
Note
If you are experiencing difficulties with iOS Provision Portal, please refer to the iOS Provision Portal User Guide.
Let’s get to the most important parts now. Our devices are set up and the provision profiles are set. Now it’s time to develop the core matchmaking and multiplayer functionality into our app. Follow these steps thoroughly and don’t cut corners:
Note
I’ll assume you want to run this app on two iPhone devices. If you intend to run the app on an iPad and an iPhone, you must do extra work to write a universal app, though your code base for Game Center will be the same. It’s just your UI code that will need to be written for both devices. Also make sure that you have a view controller in your app (one root view controller is sufficient).
Import Game Kit header files in your view controller’s .h file:
#import <GameKit/GameKit.h>
Make sure your view controller conforms to the
GKMatchmakerViewControllerDelegateandGKMatchDelegateprotocols:
#import <UIKit/UIKit.h>
#import <GameKit/GameKit.h>

@interface RootViewController_iPhone : UIViewController
  <GKMatchmakerViewControllerDelegate, GKMatchDelegate> {

}
Declare three
protectedproperties namedacceptedMatch(of typeGKMatch),buttonSendData(of typeUIButton), andtextViewIncomingData(of typeUITextView). TheacceptedMatchvariable will hold the match object as soon as it has been initiated by Game Center. ThebuttonSendDatavariable will be an outlet in Interface Builder where you should have a Send Data button. Pressing this button will attempt to send a string value to all players for the match (more on this later). Last but not least, thetextViewIncomingDatavariable will be another outlet in Interface Builder where you should have a text view whose text will get set to incoming data.Declare the button and the text view as outlets and simply retain the match object. Also declare an action method called
buttonSendDataTapped:, and in Interface Builder have abuttonSendDatabutton to fire this action method whenever the player taps on that button:
#import <UIKit/UIKit.h>
#import <GameKit/GameKit.h>

@interface RootViewController_iPhone : UIViewController
  <GKMatchmakerViewControllerDelegate, GKMatchDelegate> {
@protected
  GKMatch *acceptedMatch;

  UIButton *buttonSendData;
  UITextView *textViewIncomingData;
}

@property (nonatomic, retain)
  IBOutlet UIButton *buttonSendData;

@property (nonatomic, retain)
  IBOutlet UITextView *textViewIncomingData;

@property (nonatomic, retain)
  GKMatch *acceptedMatch;

- (IBAction)buttonSendDataTapped:(id)sender;

@end
In the .m file of your view controller, make sure that you synthesize the properties that you declared in the .h file and remember to release them when the view controller gets deallocated:
#import "RootViewController_iPhone.h"

@implementation RootViewController_iPhone
@synthesize buttonSendData;
@synthesize textViewIncomingData;
@synthesize acceptedMatch;

- (void)dealloc{
  [acceptedMatch release];
  [buttonSendData release];
  [textViewIncomingData release];
  [textViewIncomingData release];
  [super dealloc];
}
In the
viewDidLoadinstance method of your view controller, authenticate the local player (see Authenticating the Local Player in Game Center):
- (void) viewDidLoad{
  [super viewDidLoad];

  GKLocalPlayer *localPlayer = [GKLocalPlayer localPlayer];

  [localPlayer authenticateWithCompletionHandler:^(NSError *error) {

    if (error == nil){

      /* We will write the rest of this code soon */

    } else {
      NSLog(@"Failed to authenticate the player. Error = %@", error);
    }

  }];

}
As soon as the player is successfully authenticated, you should, as was mentioned earlier, tell Game Center how you want to respond to incoming matchmaking requests. Declare an instance method called
setInviteHandlerand in it, set theinviteHandlerof the shared matchmaker object, as shown here:
- (void) setInviteHandler{

  [GKMatchmaker sharedMatchmaker].inviteHandler =
  ^(GKInvite *acceptedInvite, NSArray *playersToInvite) {


  };

}
The
acceptedInviteparameter passed to this block object will get set if an invitation has been sent by another player playing the same game to start a multiplayer match. In this case, you have to present the matchmaking view controller, as we shall soon see. TheplayersToInviteparameter will get set to an array of players that have requested matchmaking on your application through the Game Center app, in which case the Game Center app will wake your application up and ask it to handle the request. When this happens, you should also present the matchmaking view controller, but we will initialize the view controller differently:
- (void) setInviteHandler{

  [GKMatchmaker sharedMatchmaker].inviteHandler =
  ^(GKInvite *acceptedInvite, NSArray *playersToInvite) {

    if (acceptedInvite != nil){

      NSLog(@"An invite came through. process it...");

      GKMatchmakerViewController *controller =
        [[[GKMatchmakerViewController alloc]
          initWithInvite:acceptedInvite] autorelease];

      [controller setMatchmakerDelegate:self];
      [self presentModalViewController:controller
                              animated:YES];

    }

    else if (playersToInvite != nil){

      NSLog(@"Game Center invoked our game. process the match...");

      GKMatchRequest *matchRequest =
        [[[GKMatchRequest alloc] init] autorelease];

      [matchRequest setPlayersToInvite:playersToInvite];
      [matchRequest setMinPlayers:2];
      [matchRequest setMaxPlayers:2];


      GKMatchmakerViewController *controller =
        [[[GKMatchmakerViewController alloc]
          initWithMatchRequest:matchRequest] autorelease];

      [controller setMatchmakerDelegate:self];
      [self presentModalViewController:controller
                              animated:YES];
    }
  };

}
Every time our view controller’s view is loaded, we decide to authenticate the local player. In addition to that, after the local player’s authentication, we have to now set the invitation handler for new Game Center invites by calling the
setInviteHandlerinstance method. In addition to that, we want to display a matchmaking view controller to the player as soon as she opens the app. So imagine two players opening the app at the same time. The first thing they will see is the matchmaking view controller asking them to start a match with another person:
- (void) viewDidLoad{
  [super viewDidLoad];

  GKLocalPlayer *localPlayer = [GKLocalPlayer localPlayer];

  [localPlayer authenticateWithCompletionHandler:^(NSError *error) {

    if (error == nil){

      [self setInviteHandler];

      GKMatchRequest *matchRequest = [[GKMatchRequest alloc] init];
      [matchRequest setMinPlayers:2];
      [matchRequest setMaxPlayers:2];

      GKMatchmakerViewController *controller =
        [[GKMatchmakerViewController alloc]
         initWithMatchRequest:matchRequest];

      [controller setMatchmakerDelegate:self];

      [matchRequest release];

      [self presentModalViewController:controller
                              animated:YES];
      [controller release];

    } else {
      NSLog(@"Failed to authenticate the local player %@", error);
    }

  }];

}
Since you called the
setMatchmakerDelegate:instance method of your matchmaking view controller, you should implement the delegate methods in theGKMatchmakerViewControllerDelegateprotocol:
- (void)matchmakerViewControllerWasCancelled:
  (GKMatchmakerViewController *)viewController{

  [self dismissModalViewControllerAnimated:YES];

}

/* Matchmaking has failed with an error */
- (void)matchmakerViewController:
  (GKMatchmakerViewController *)viewController
                didFailWithError:(NSError *)error{

  [self dismissModalViewControllerAnimated:YES];

}

/* A peer-to-peer match has been found, the
 game should start */
- (void)matchmakerViewController:
  (GKMatchmakerViewController *)viewController
                    didFindMatch:(GKMatch *)paramMatch{

  [self dismissModalViewControllerAnimated:YES];

  self.acceptedMatch = paramMatch;
  [self.acceptedMatch setDelegate:self];

}

/* Players have been found for a server-hosted game,
 the game should start */
- (void)matchmakerViewController:
  (GKMatchmakerViewController *)viewController
                  didFindPlayers:(NSArray *)playerIDs{

  [self dismissModalViewControllerAnimated:YES];

}
In the
matchmakerViewController:didFindMatch:delegate method of your matchmaking view controller, you are retaining the match object. Here is where you know our match has started. The match object’s delegate gets set toself, so you need to implement the delegate objects in theGKMatchDelegateprotocol:
/* The match received data sent from the player. */
- (void)  match:(GKMatch *)match
 didReceiveData:(NSData *)data
     fromPlayer:(NSString *)playerID{

}


/* The player state changed
 (eg. connected or disconnected) */
- (void)  match:(GKMatch *)match
         player:(NSString *)playerID
 didChangeState:(GKPlayerConnectionState)state{

}

/* The match was unable to connect with the
 player due to an error. */
- (void)              match:(GKMatch *)match
 connectionWithPlayerFailed:(NSString *)playerID
                  withError:(NSError *)error{

}

/* The match was unable to be established
 with any players due to an error. */
- (void)    match:(GKMatch *)match
 didFailWithError:(NSError *)error{

}
Note
For more information about players’ states during a multiplayer match, please refer to Handling Players’ State Changes in Multiplayer Games.
The
match:didReceiveData:fromPlayer:delegate method of the match object gets called whenever the local player receives incoming data from a player in the current match. In this method, we want to receive the incoming data, turn it into a string, and append it to the end of the text we are currently displaying on our text view. For instance, if a player sends the data “I am Ready to Start Level 1” the first time and then “I Finished Level 1” the next time, we will display “I am Ready to Start Level 1” as the first line and “I Finished Level 1” as the second line inside our text view:
/* The match received data sent from the player. */
- (void)  match:(GKMatch *)match
 didReceiveData:(NSData *)data
     fromPlayer:(NSString *)playerID{

  NSLog(@"Incoming data from player ID = %@", playerID);

  NSString *incomingDataAsString =
    [[NSString alloc] initWithData:data
                          encoding:NSUTF8StringEncoding];

  NSString *existingText = self.textViewIncomingData.text;

  NSString *finalText =
    [existingText stringByAppendingFormat:@"
%@",
     incomingDataAsString];

  [self.textViewIncomingData setText:finalText];

  [incomingDataAsString release];

}
In the
buttonSendDataTapped:action method, which gets called when the Send Data button is pressed, send some data (asNSData) to all players in the game (in this case, aside from the local player, only one other player) using thesendDataToAllPlayers:withDataMode:error:instance method of your match object, theacceptedMatchproperty of your root view controller:
- (IBAction)buttonSendDataTapped:(id)sender {

  NSString *dataToSend =
    [NSString stringWithFormat:@"Date = %@",
     [NSDate date]];

  NSData *data =
    [dataToSend dataUsingEncoding:NSUTF8StringEncoding];

  [self.acceptedMatch
   sendDataToAllPlayers:data
   withDataMode:GKMatchSendDataReliable
   error:nil];

}
Last but not least, in the
viewDidUnloadmethod of your view controller, make sure to set your outlet properties to nil in order to make sure the view’s lifetime is properly handled in case of memory warnings getting sent by the iOS:
- (void)viewDidUnload{
  self.buttonSendData = nil;
  self.textViewIncomingData = nil;
  [super viewDidUnload];
}
We are all done. Let’s run the app on two iOS devices and see what happens. What I’m going to demonstrate here is running the app on an iPad 2 and an iPhone 4. The iPad 2 version of the app will send an invite to the local player on the iPhone 4 while the app is not even open on the iPhone. Figure 1-18 shows what the iPhone player will see on her device.
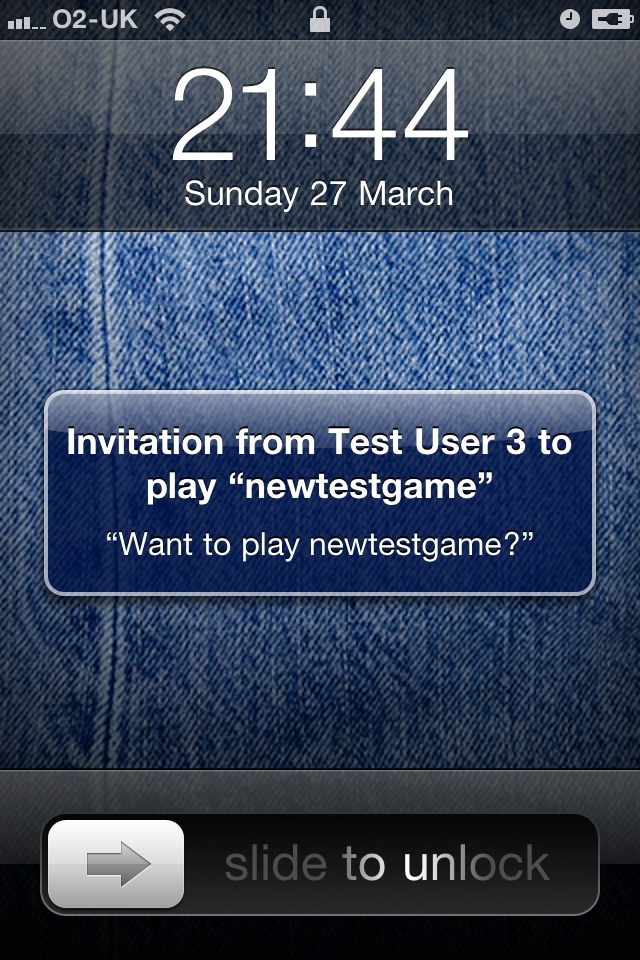
Note
To get the invitation, the recipient must have opened your app
at least once, for it is the viewDidLoad instance method of your root
view controller that sets the
block object that must get invoked when a new game invite gets sent.
If the player has just installed your app on her device but has not
opened it, invites from other players will not be handled.
Once the player unlocks her device by sliding the switch to the right, she will see an alert view on her home screen containing the invitation message the iPad player sent when inviting the iPhone player to play the game, as shown in Figure 1-19.
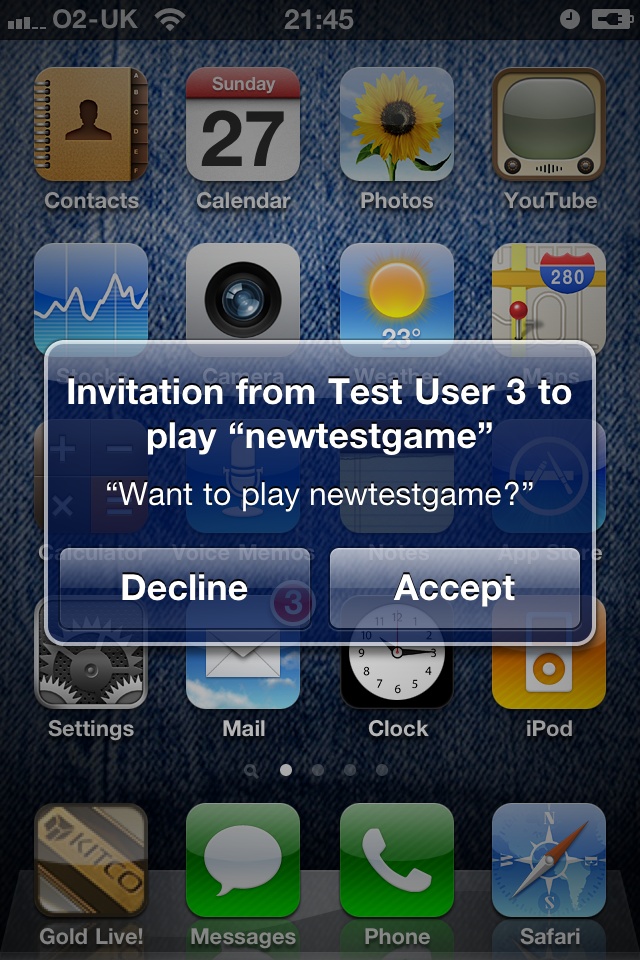
Once the match is initialized, both players can press the Send
Data button we implemented in our user interface in order to send some
data to the player. The data that we are sending at the moment is a
string representation of the current date and time for the sake of
simplicity, but you can send anything as long as you can get an NSData out of it.
Handling Players’ State Changes in Multiplayer Games
Problem
You want to detect when players in multiplayer mode get disconnected while playing the game.
Solution
Implement and handle the match:player:didChangeState: delegate message
of the GKMatchDelegate class.
Discussion
In a multiplayer game, it is important for each player to know the state of the other players in the game. The state in this case could be either connected or disconnected. Let’s take a look at an example.
Suppose you’ve written a racing game and you’ve incorporated matchmaking (see Supporting Multiplayer Games and Matchmaking). Two players connect to each other and start playing the first lap in a tournament. The game is going well until player #2 gets disconnected. At this point, player #1 must be notified by the game that player #2 has been disconnected. The game could then end the match for player #1 and start listening for other invites.
In order to get notified of changes in state of players in a
match, implement and handle the match:player:didChangeState: delegate message
of the GKMatchDelegate class. The
player parameter will contain the
player ID whose state has changed, while the didChangeState parameter, which is of type
GKPlayerConnectionState, will contain
one of the following values:
GKPlayerStateUnknownThe player’s state is unknown at the moment. In a racing game for instance, you might want to temporarily hold this player’s car position motionless on the map while the player is in an unknown state.
GKPlayerStateConnectedThe player’s state changes to this whenever she connects to the match. You might want to display a message to the local player here. For instance, you could say “Player 2 is connected, let’s roll!”
GKPlayerStateDisconnectedThis state is sent for a player when she gets disconnected from the match. Use this state to make a decision whether you want your game to stop and go back to its main menu waiting for another match, pause the game temporarily, etc.
You can use the expectedPlayerCount instance method of your
match object of type GKMatch to find
out how many other players your match object requires before it can get
started. For instance, if we start a match that needs a minimum and
maximum number of two players and then one of the players gets
disconnected, the expectedPlayerCount
method will return the value of 1, telling us that the match object
expects one more player before it can start again. In the following
code, assuming we are in a two-player match during which one player gets
disconnected, we will stop the match all together:
/* The player state changed
 (eg. connected or disconnected) */
- (void)  match:(GKMatch *)match
         player:(NSString *)playerID
 didChangeState:(GKPlayerConnectionState)state{

  switch (state){

    case GKPlayerStateDisconnected:{

      if ([match expectedPlayerCount] > 0){
        [match disconnect];
      }
      break;

    }
  }

}