
Chapter 10. Listing, Iterating, and Administrating
For quite a while now, you’ve been focusing on some pretty basic details: a user, his information, and as an extension of that information, his profile picture. It’s been good. You’ve gotten pretty intimate with PHP and MySQL, figured out not just one but two ways to deal with one of the most common PHP issues: image loading—and you’ve managed to keep things looking good throughout. These aren’t small accomplishments; they’re very much big ones.
But it’s still been a pretty focused view. Right now, as a user, you can get set up and specify some basic information. But what if you’re not a user; what if you’re you? If you want to see how many users are in your system; if you want to delete a malicious user; if you want to update a picture because it’s not quite socially palatable; you have to do all that through your MySQL command line. That’s okay, and you’re certainly capable, but you probably already realize that in the big bad world of web applications, most administrators aren’t keeping a MySQL terminal running in the corner of their screen.
Instead, they have administrative interfaces. With these interfaces, they can list all the users in a system. They can check some boxes here and there and mass delete users. They can see any user they want. And it’s all through a nice clean web interface. You can give your web application the same nice features.
Granted, a web application where users supply their basic social profile isn’t going to take down Facebook or Twitter or Google+ anytime soon. But whenever you start thinking about an administrative interface, you run into all sorts of interesting problems. You’ve got to use different types of SQL queries. You’ve got to mix together a lot more PHP and MySQL with your HTML, because you’ll have to list every user from the database, one at a time. You’ll have to deal with DELETE statements, and a lot more WHERE statements.
In other words, you’ll take everything you know, and push further. There are not a lot of radically new techniques you need, but there are lots of important variations on what you already do know. So why wait any longer, or settle for MySQL as your admin interface? Time to get after a better, more visual way to keep up with your users.
Note
And if you’re just salivating for something completely new and different, work through this chapter in anticipation of the next. There, you’ll secure all these nice administrative pages, and then you’ll need—and learn—a whole new bag of tricks.
Some Things Never Change
Where to begin? The same place you’ve begun in almost every other task: figuring out what you need, and roughing out the broad strokes of how things look and interact. You can start with a few bullet points, figure out the screens you’re going to need, and throw together some mock-ups, either in HTML or even a tool like Photoshop.
Because your app is pretty straightforward, you don’t need much right now:
A form that lists all the users in the system
A link to each user’s profile page
The ability to delete a user
The ability to update or change a user’s information
A means of giving other users administrative privileges
That last one is going to take quite a bit of work, and create some unique headaches that you’ll have to deal with, so save it for a bit later. (Later as in, the next chapter.) But the rest are very doable.
(User Interface) Brevity is Still the Soul of Wit
Now, you could build up a complex system of pages that let you manage all these interactions. show_user.php could figure out if you’re an admin and selectively show a Delete button; you could build up a whole administrative menu, in fact. Then again, sometimes the simple things are the best things. On top of that, as a general rule, the Web rewards fewer clicks. If you can provide a single page that allows for the major required functionality, then you probably should keep things to just a single page.
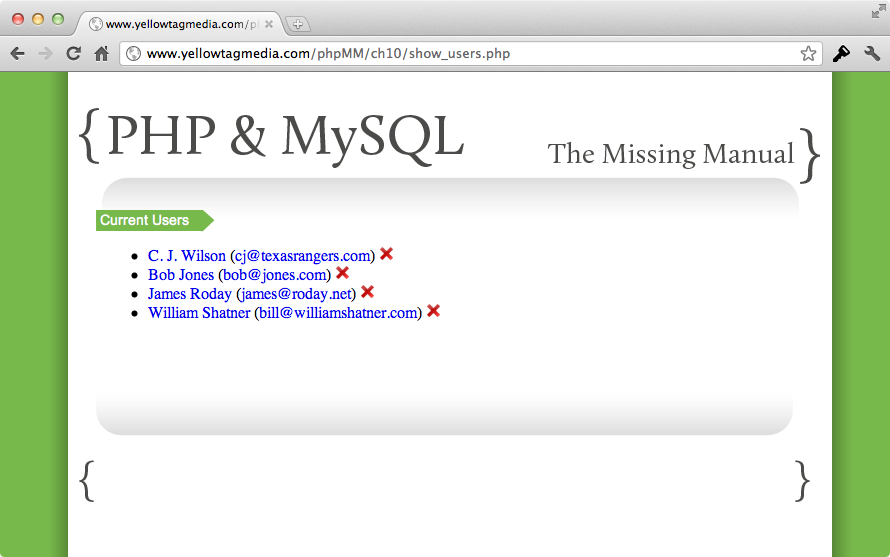
In this case, you can do just that. You can list users in a simple sequence, turn the name of each user into a link to her profile page, and even add a delete button after each user. You’ll have to deal with changing a user’s information, but still, three items on one form is a good start.
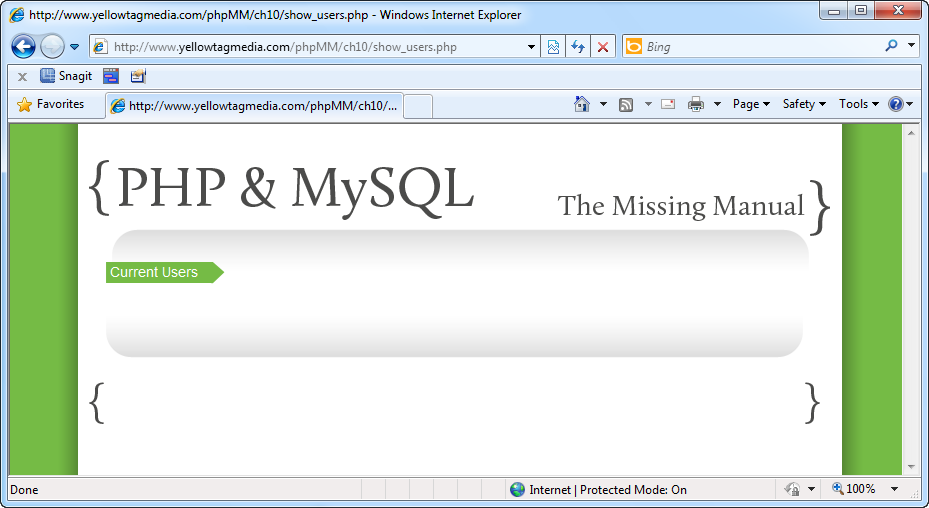
So what should this look like? Figure 10-1 is a good place to begin.

The HTML for this page is helpful. It’s immediately apparent that there’s a lot of duplication, and PHP is good at reducing duplication:
<html>
 <head>
  <link href="../css/phpMM.css" rel="stylesheet" type="text/css" />
 </head>

 <body>
  <div id="header"><h1>PHP & MySQL: The Missing Manual</h1></div>
  <div id="example">Current Users</div>

  <div id="content">
   <ul>
    <li>
     <a href="show_user.php?user_id=30">William Shatner</a>
     (<a href="mailto:[email protected]">[email protected]</a>)
     <a href="delete_user.php?user_id=30">
       <img class="delete_user" src="../images/delete.png" width="15" />
     </a>
    </li>
    <li>
     <a href="show_user.php?user_id=22">James Roday</a>
     (<a href="mailto:[email protected]">[email protected]</a>)
     <a href="delete_user.php?user_id=22">
       <img class="delete_user" src="../images/delete.png" width="15" />
     </a>
    </li>
    <li>
     <a href="show_user.php?user_id=1">C. J. Wilson</a>
     (<a href="mailto:[email protected]">[email protected]</a>)
     <a href="delete_user.php?user_id=1">
       <img class="delete_user" src="../images/delete.png" width="15" />
     </a>
    </li>
   </ul>
  </div>
  <div id="footer"></div>
 </body>
</html>
Wish Lists are Good, Too
So far, you’ve gone directly from a mock-up to code. That’s not altogether bad, but it does mean that when you get your mock-up created in code, anything you want to add is a bit of a mystery. Will it work well with the way you’ve built your pages and scripts? Or will you have to do some redesign to get your new ideas into your existing framework?
Obviously, you could spend some serious time with your mock-ups. You could get those little red Xs just right, and you could nail down spacing, and basically spend significant time in Photoshop. Of course, nothing in HTML and CSS ever looks just like a Photoshop mock-up, but still, you could get things pretty close.
The problem, though, is twofold. First, you’re spending a lot of time on the front-end before you’ve done any code. Second, you’re not even thinking about how decisions made as you implement your existing code might affect future decisions and functionality. So you are implementing code without any real foresight.
The answer? Just have a short list of future functionality you hope to implement. This doesn’t need to be anything fancy; a text document or stickies (for the Agile development crowd) or even something on your iPad or iPhone sitting next to your workstation are all fine. Then, add or update that list as you go and features and functionality change. Hopefully, just having these “next version” features handy will help you think clearly about how decisions you make today might help you—or hurt you—when you get around to writing more code tomorrow, or next week, or next month.
So for now, here are just a few things that might be nice to add once the basic functionality is in place:
Design a better user interface. So line up the different “columns” of data in a more intuitive fashion, as well as getting those delete “X” buttons to line up.
Add in user profile pictures so you can get a little better graphical view of each user in the admin interface.
Allow multiple users to be selected and deleted on one screen.
Add a confirmation dialog box or pop-up when a user is selected for deletion to avoid accidental deletions.
You should add your own ideas to this list, but this is certainly a good starting point. Maybe you’ll code these up, and maybe you won’t, but now at least you can make decisions that will help these features, rather than hurt them.
Listing All Your Users
First things first: before you can add delete buttons and profile pictures and worry about alignment, you need a list of all your users. This isn’t too hard, in terms of the SQL query you want to write. You could do something like this:
SELECT *
  FROM users;
But this is a bit of a brute force approach. There’s some refinement you can make to improve performance, make your code clearer, and generally be a good PHP and MySQL citizen. So first things first: you should get that query into shape.
SELECTing What You Need (Now)
The thing about SELECT * is that it gets everything in a table. Even worse, if you’re joining tables, it gets everything in all the tables that are joined. Now, in the case of users, that’s not awful. Here are all the columns you’re going to grab with a SELECT *.
mysql> describe users;
+----------------+--------------+------+-----+---------+----------------+
| Field          | Type         | Null | Key | Default | Extra          |
+----------------+--------------+------+-----+---------+----------------+
| user_id        | int(11)      |      | PRI | NULL    | auto_increment |
| first_name     | varchar(20)  |      |     |         |                |
| last_name      | varchar(30)  |      |     |         |                |
| email          | varchar(50)  |      |     |         |                |
| facebook_url   | varchar(100) | YES  |     | NULL    |                |
| twitter_handle | varchar(20)  | YES  |     | NULL    |                |
| bio            | text         | YES  |     | NULL    |                |
| user_pic_path  | varchar(200) | YES  |     | NULL    |                |
| profile_pic_id | int(11)      | YES  |     | NULL    |                |
+----------------+--------------+------+-----+---------+----------------+
9 rows in set (0.10 sec)
Note
Depending on how closely you’ve been following along, you may have the user_pic_path column, but not the profile_pic_id. In fact, that’s probably where you want your database to be, so you don’t have to worry about a foreign key with an images table that you’re no longer using.
You can get rid of that column with this:
ALTER TABLE users
       DROP COLUMN profile_pic_id;
But look back again at Figure 10-1. You don’t need all this information. Instead, you need first_name, last_name, the user_id for a hyperlink to show_user.php, and the user’s email. So that SELECT * is grabbing several unnecessary columns: facebook_url, twitter_handle, bio, and user_pic_path.
Why is this a big deal? First, there’s the principle of the thing: you should get the information you need, because…well…that’s the information you need. Don’t order everything on the menu when all you want is a hamburger. You’ll end up carrying around way too much, and your arms will get tired.
Every time you select all the entries from the users table, you’re getting one more row. And every column in that rows is space, bandwidth on your network, and resources. Suppose you have 100 users, or 1,000 users, or 10,000 users, and suppose they’ve all written 20-paragraph bios. Just by not selecting * (and thereby not selecting bio) from users, you’re saving a lot of traffic and resource consumption. No, it won’t change the nation’s credit rating, but it will make a difference, especially over the life of your application.
So what do you need now? Just a few columns:
SELECT user_id, first_name, last_name, email
  FROM users;
That’s all you need, so that’s all you should SELECT.
Building a Simple Admin Page
So now you’ve got a good SELECT statement. It’s time to create another script. But before you do that, there’s another important decision to make: what will you call this script? admin.php might seem like a pretty good idea, but is that really thinking through the implications of that sort of choice?
Look back at the other script names you’ve used:
create_user.php creates a new user
show_user.php shows a user for a given user ID
app_config.php configures your application
database_connection.php connects to your database
Each of these names describes what the script does. That’s very helpful, as it’s clear immediately how to use these scripts, and even how they might interact. For example, create_user.php creates a user, and then should probably hand over control to show_user.php.
But what does admin.php do? What if you eventually need to add a form and script to let an admin change a user’s password? That’s administration, but doesn’t belong on admin.php. The same is true for adding a user to a group, or updating the fields on a form. Those are all “admin-ing”, but none of them involve this script.
In essence, this script lists all the users. To use the same naming scheme as other scripts, show_users.php is a better, more descriptive name.
So open up a new file, call it show_users.php, and begin by selecting all the users, with just the information you need:
<?php

require_once '../scripts/app_config.php';
require_once '../scripts/database_connection.php';

// Build the SELECT statement
$select_users =
  "SELECT user_id, first_name, last_name, email " .
  "  FROM users";

// Run the query
$result = mysql_query($select_users);
?>
Note
Since you’re not inserting anything into the SELECT query, there’s no reason to use sprintf. You can just create the query directly with a string.
You should also go ahead and set up the “shell” of the HTML page: the parts that you know won’t be generated by your script:
<?php
// Get all the users
?>

<html>
 <head>
  <link href="../css/phpMM.css" rel="stylesheet" type="text/css" />
 </head>

 <body>
  <div id="header"><h1>PHP & MySQL: The Missing Manual</h1></div>
  <div id="example">Current Users</div>

  <div id="content">
   <ul>
     <!-- All the users will go here, in <li> tags. -->
   </ul>
  </div>
  <div id="footer"></div>
 </body>
</html>
There’s not much to see yet, but you can still test and make sure you don’t have any errors in your PHP or HTML. Figure 10-2 shows the empty—but errorless—show_users.php in action.
Iterating Over Your Array
Now you need to fill in an <li> for every user. You can build up the entire HTML string you need using sprintf again:
$user_row = sprintf(
  "<li><a href='show_user.php?user_id=%d'>%s %s</a> " .
  "(<a href='mailto:%s'>%s</a>) " .
  "<a href='delete_user.php?user_id=%d'><img " .
     "class='delete_user' src='../images/delete.png' " .
     "width='15' /></a></li>",
  // information to fill in the values);
Note
There’s not a significant advantage here to using sprintf over a string via quotation marks and curly braces with variables inside of them. Still, once you start using sprintf, you’ll often find you use it almost everywhere you need to insert variables inside of strings. It becomes a default tool, and it’s quite a handy tool at that.
That’s a pretty big string, but ultimately, it should result in something like this:
<li><a href='show_user.php?user_id=1'>C. J. Wilson</a>
  (<a href='mailto:[email protected]'>[email protected]</a>)
   <a href='delete_user.php?user_id=1'><img class='delete_user'
      src='../images/delete.png' width='15' /></a></li>
So now all you need is to loop over each result from your query. But that’s easy, you’ve done that before with code like this:
while ($row = mysql_fetch_row($result)) {
  echo "<li>{$row[0]}</li>";
}
And then of course you can get each piece of data in the returned query with this:
while ($row = mysql_fetch_row($result)) {
  echo "<li>{$row['col_name']}</li>";
}
This gets a specific value—whatever is associated with col_name—from $row.
So if you make that specific to your users table and the columns you know are being returned, and then insert that into your HTML, you end up with this:
<?php // Get all the users ?> <html> <head> <link href="../css/phpMM.css" rel="stylesheet" type="text/css" /> </head> <body> <div id="header"><h1>PHP & MySQL: The Missing Manual</h1></div> <div id="example">Current Users</div> <div id="content"> <ul><?phpwhile ($user = mysql_fetch_array($result)) {$user_row = sprintf("<li><a href='show_user.php?user_id=%d'>%s %s</a> " ."(<a href='mailto:%s'>%s</a>) " ."<a href='delete_user.php?user_id=%d'><img " ."class='delete_user' src='../images/delete.png' " ."width='15' /></a></li>",$user['user_id'], $user['first_name'], $user['last_name'],$user['email'], $user['email'], $user['user_id']);echo $user_row;}?></ul> </div> <div id="footer"></div> </body> </html>
Note
This HTML refers to a script that’s not yet been written: delete_user.php. That’s okay…it’s coming up soon. So you’re coding here in anticipation of what other work you know you’ve got to complete.
At first glance, this may seem a bit like a jump. That’s a long sprintf, but take a second look. This is just putting a lot of things together, and it happens that this particular line of HTML is pretty long. Once you get past that, there’s nothing here particularly tricky or difficult.
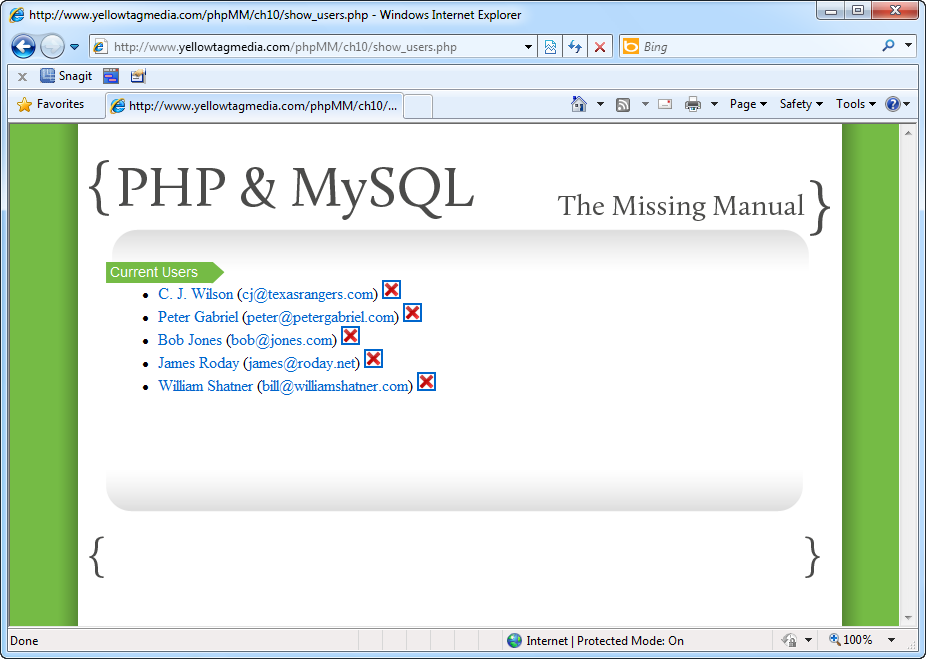
Things are humming along, and you’re ready to see how things look. Pull up show_users.php and make sure everything is where it belongs. Figure 10-3 shows you what you’re going for.
This is still not a work of art, but it’s a pretty significant step forward. Click on any of the users, and make sure you’re taken to the correct show_user.php for that user, as shown in Figure 10-4.
Deleting a User
There are lots of times in programming where a new problem presents new challenges; new techniques that must be grasped; new language features that have to be absorbed. Those are fun times, but they can also be frustrating. Your pace slows to a crawl, and it’s often at least a few hours—and sometimes a few days—before it seems like you make real progress. (This is also probably how and why programmers develop a stubbornness that drives those who spend much time with them absolutely nuts.)
Then there are times when you have tricks, knowledge, and experience to complete a new task. This is one of those simple cases: deleting a user.
Surveying the Individual Components
What’s the query to delete a user? You already know:
DELETE FROM users;
Add to this query a WHERE clause to zero in on a particular user:
DELETE FROM users
      WHERE user_id = [some_user_id];
Nothing new here at all. To get that user_id, you can get it from whatever script calls your script. And that’s what you’ve already got in place in show_users.php:
<?php
  while ($user = mysql_fetch_array($result)) {
    $user_row = sprintf(
      "<li><a href='show_user.php?user_id=%d'>%s %s</a> " .
      "(<a href='mailto:%s'>%s</a>) " .
      "<a href='delete_user.php?user_id=%d'><img " .
         "class='delete_user' src='../images/delete.png' " .
         "width='15' /></a></li>",
      $user['user_id'], $user['first_name'], $user['last_name'],
      $user['email'], $user['email'], $user['user_id']);
    echo $user_row;
  }
?>
Once this code gets turned into HTML, you’ll get this:
<a href='delete_user.php?user_id=22'>...</a> This code should look quite similar to something you've done before, when you sent auser_idto theshow_user.phpscript: // Redirect the user to the page that displays user information header("Location: show_user.php?user_id=" . mysql_insert_id());
Note
This code was in create_user.php (Updating Your User Creation Script). The user got redirected after her information was stored in the database.
And once you’ve gotten a user_id and deleted the user, you can just redirect back to your show_users.php script, which will re-SELECT from users, and the deleted user will simply be gone. Perfect!
Putting It All Together
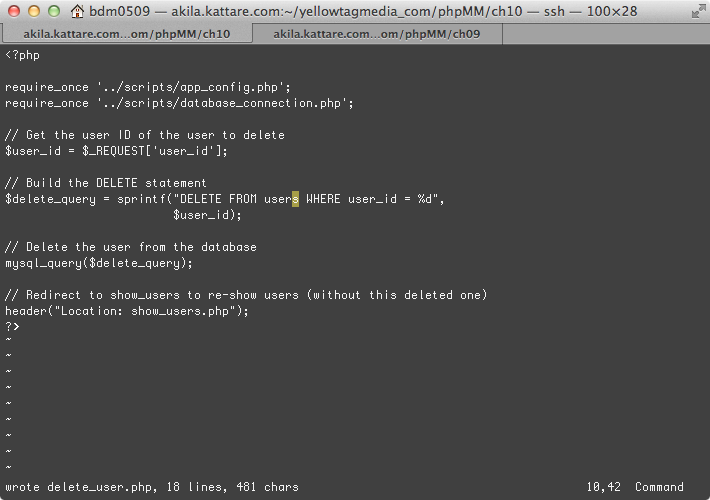
Now it’s just a matter of retyping various bits from your other scripts, and changing a few things here and there. The result? delete_user.php, shown here:
<?php

require_once '../scripts/app_config.php';
require_once '../scripts/database_connection.php';

// Get the user ID of the user to delete
$user_id = $_REQUEST['user_id'];

// Build the DELETE statement
$delete_query = sprintf("DELETE FROM users WHERE user_id = %d",
                        $user_id);


// Delete the user from the database
mysql_query($delete_query);

// Redirect to show_users to re-show users (without this deleted one)
header("Location: show_users.php");
exit();
?>
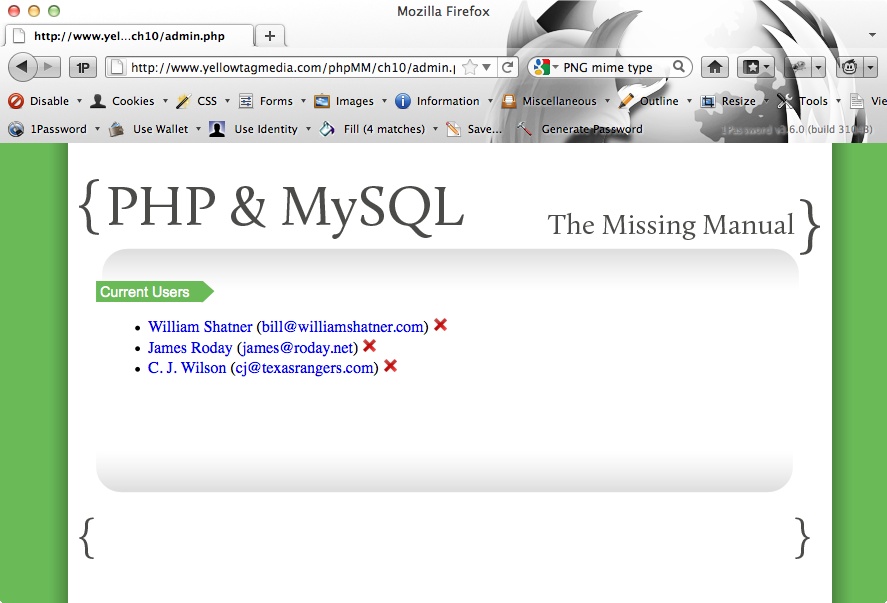
So try this thing out. You’ve already got show_users.php with the right links, so open it up, and pick an unlucky user to delete. Click the “X” icon, and you should get back something like Figure 10-7—which looks just like Figure 10-4, minus poor Peter Gabriel.
Deleting Users Shouldn’t Be Magical
The functionality you’ve got in place for deleting users is perfect. There are no hitches, no pauses, nothing but a quick request to delete_user.php, a deletion in your database, and a return to show_users.php.
And that perfection—that minimal pause and nothing else—is exactly why you’re not done with deleting users.
Deletion is a big deal. You’re trashing information, never to be heard from again. And you’re doing it based on one click of the mouse, with no further warning or second thought. That’s a problem.
In fact, think about your own web usage. Have you ever managed to delete anything with one click? For most of you, you’re probably so inundated with “Are you sure?” and “You’ll never get to use this file again” and even “Be careful! Your information will be gone forever!” that you may be a bit down on warnings. But they’re an essential part of the process of deletion.
So you need to add a little more to the deletion process. What you’re doing now is just pre-deletion. You’ve got to give the user a chance to rethink their decision before you pass things on to delete_user.php. So it’s back to show_users.php.
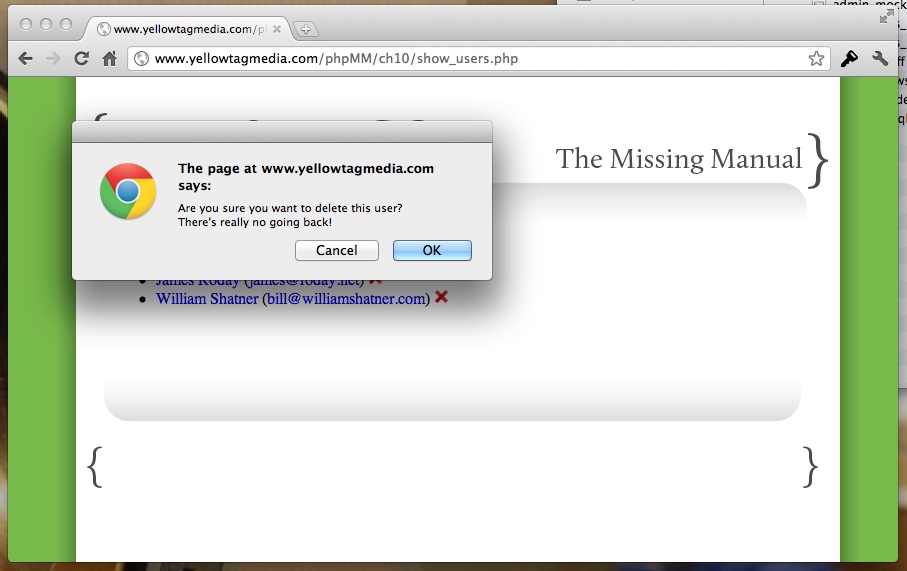
Start with a Little Javascript
When it comes to things like confirmation boxes, you’re firmly in the world of browsers and clients. Although you could build some sort of PHP confirmation, it wouldn’t be pretty. You’d essentially need to send a request to the server for deletion, the server would run a PHP script that creates a new HTML form and asks for confirmation, the browser would return that to the user, and the user would click “OK.” Then another request would go to the browser, and you’d finally get to perform deletion.
Even if you use Ajax to avoid lots of page refreshing, you still have way too much server interaction for a simple confirmation. That’s especially true because JavaScript offers you a built-in, all-client means of doing the same thing with confirm.
So open back up show_users.php, and add some JavaScript:
<?php // SELECT all users ?> <html> <head> <link href="../css/phpMM.css" rel="stylesheet" type="text/css" /><script type="text/javascript">function delete_user(user_id) {if (confirm("Are you sure you want to delete this user?" +" There's really no going back!")) {window.location = "delete_user.php?user_id=" + user_id;}}</script></head> <body> <!-- HTML body --> </body> </html>
This script is pretty straightforward. You’re just creating a function that asks for user confirmation before passing control over to delete_user.php. And there’s a little extra work, as the user_id has to be passed to this function, which then shuffles it along to delete_user.php by using the JavaScript version of a redirect: window.location.
Note
If this code freaks you out a bit, or if you’re rusty on your JavaScript, check out JavaScript: The Missing Manual by David Sawyer McFarland. It’s a solid JavaScript book that will break this and a lot more JavaScript down. In fact, it might be the perfect complement to a PHP book: it covers on the client side what you need for your server-side scripts to run smoothly and without error.
And while you’re being freaked out, if you really feel unsettled by the use of JavaScript in this page—rather than it being referenced through an external JavaScript file—be sure to check out the box below.
Finish with a Change in Linking
You’ve got your JavaScript in place, and now it’s time for the big finish: just change the link that previously went directly to delete_user.php in your page to call your new JavaScript function:
<?php
  while ($user = mysql_fetch_array($result)) {
    $user_row = sprintf(
      "<li><a href='show_user.php?user_id=%d'>%s %s</a> " .
      "(<a href='mailto:%s'>%s</a>) " .
      "<a href='javascript:delete_user(%d);'><img " .
         "class='delete_user' src='../images/delete.png' " .
         "width='15' /></a></li>",
      $user['user_id'], $user['first_name'], $user['last_name'],
      $user['email'], $user['email'], $user['user_id']);
    echo $user_row;
  }
?>
Beautiful! Try it out, and you’ll finally get a handy warning before you flush William Shatner down the deletion black hole, as shown in Figure 10-8.
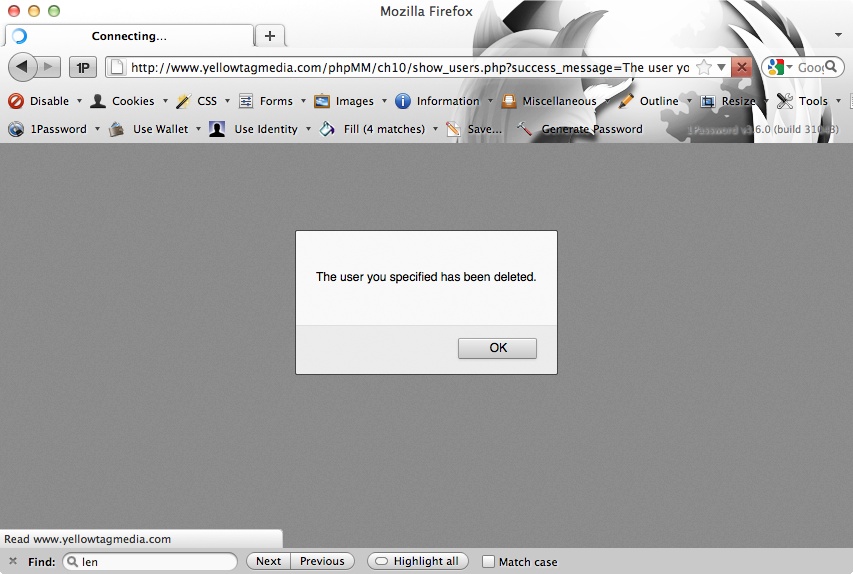
Talking Back To Your Users
The addition of an alert confirmation box goes a long way on the front end of deletion. It gives users a chance to think twice about deleting a user, and to cancel the operation if they’re dissatisfied or concerned. But that’s only half of the equation; not only do you need to make sure deletion is the intent, but then you need to make sure that deletion was accomplished.
Obviously, for you the programmer, you’ve written code, you’ve run the code, you may have even gone back to the database and done your own manual SELECT to ensure that results were deleted in delete_user.php. And, of course, the user is gone in show_users.php. But that’s from a programmer’s point of view.
For a user, that’s not enough. Just as she’ll often want to confirm a deletion before the deletion goes through, she usually wants to know—beyond any shadow of doubt—that the deletion has gone through. So that means at the end of the process, she gets some sort of message that confirms what’s just gone on. So your flow should look something like this:
A user selects another user to delete by clicking the red “X” in show_users.php next to that user.
The user confirms that deletion is intended.
delete_user.php handles the actual deletion of the selected user.
A message is supplied to the user saying something like, “Yup, they’re gone, gone, gone.”
show_users.php re-shows the users, minus the deletion.
So it’s Step 4 here that’s new, and requires a little thought and work.
redirect Has Some Limitations
Just looking at this flow, it seems like the natural place to handle confirmation is within delete_user.php. That’s the script that handles deletion, and it’s also before show_users.php re-shows all the users the post-deletion confirmation message applies.
So you might, for example, throw up a status message or pop up an alert box once deletion’s complete. But take a look at the last line from delete_user.php:
header("Location: show_users.php");Redirection in PHP is done using HTTP headers. So this line sends the browser a raw Location header. The browser gets the header, and moves the actual HTTP response to the URL specified. No big deal, and it works great.
But—and this is an important but—header can only be called before any output is sent from PHP. You can’t use echo or HTML or blank lines in a file, or anything else. The browser can only get the headers, and then it shifts the request. So in reality, you can’t send anything before calling header, and once you’ve called header, you’re not supposed to send anything after. Of course, bugs are made when things that shouldn’t happen do happen, and that’s why every call to a Location header is followed by that little exit() statement to make sure nothing else tries to execute.
In other words, a script like delete_user.php can do work on the database and other PHP objects, but it can’t do any output. It just deletes a user, and then redirects output to a view script, like show_users.php. So you’ve got to figure out a way to interact with show_users.php, and let that script handle letting the user know that a deletion’s gone down.
So delete_user.php needs to provide a message—since it knows that deletion has occurred—but it’s got to let something else handle the actual display. You can add a message to your redirect. Connect this new message to a new request parameter, success_message:
// Redirect to show_users to re-show users (without this deleted one)$msg = "The user you specified has been deleted.";header("Location: show_users.php?success_message={$msg}");
Tip
If you’re already thinking that it might be nice to have an error_message, too, then you’re very much on the right track.
Now, even before you go back to working on your view code in show_users.php, you can test this out. Visit show_users.php, delete a user, and then look closely at the browser bar when you’re taken back to show_users.php. You should see the success_message request parameter with the value set to your message, as shown in Figure 10-9.

JavaScript alert Redux
So now you’re back to show_users.php, and you’ve got an incoming message.
Note
Actually, you potentially have an incoming message. When show_users.php is called normally, it does not have a message. It’s only when it’s redirected to after deletion (or some similar operation) that it has information coming via request parameters.
What needs to happen when that message is received? Probably the easiest option is to go back to JavaScript, and use an alert dialog box. This is the equivalent of the confirmation dialog box you used before deletion, so it’s certainly a nice symmetry.
An All-Javascript Approach
One approach would be to write a JavaScript function that you can add to show_users.php. JavaScript doesn’t directly support reading request parameters, so you’d have to do a little parsing to get at them. You’d need something that uses regular expressions to pick apart the window.location.href property, which is the URL the browser has:
function get_request_param_value(param_name) {
  param_name = param_name.replace(/[[]/,"\[").replace(/[]]/,"\]");
  var regexS = "[\?&]" + param_name + "=([^&#]*)";
  var regex = new RegExp(regexS);
  var results = regex.exec(unescape(window.location.href));
  if (results == null)
    return "";
  else
    return results[1];
}
Warning
You don’t need to make much sense of this code. Heck, if this code made perfect sense to you, maybe you should be writing the chapters on JavaScript and regular expressions!
Now, all that said, if you wanted to take a few minutes to work through this code, line by line, you’d probably step up your JavaScript game significantly. It also demonstrates once again that while regular expressions might look pretty weird at first, they are an essential part of your programming toolkit. And just think: every bit of what you learned about regular expressions in this PHP book translates over to JavaScript.
You could then call this function like this to get at the success_message parameter (probably in another JavaScript function):
msg = get_request_param_value("success_message");
if (msg.length > 0) {
  // let the user know
}
So then—after uncrossing your eyes from all the forward and backslashes in get_request_param_value—you could issue an alert:
msg = get_request_param_value("success_message")
if (msg.length > 0) {
  alert(msg);
}
There’s certainly nothing wrong with this approach. It works fine, and you’ll get something like the message shown in Figure 10-10 if you add this code in to the head section between script tags in show_users.php.
Before you start wondering how to piece all this together, though, there might just be a better way.
Your PHP Controls Your Output
The all-JavaScript approach above makes a subtle but important assumption: that the page—the HTML, CSS, and JavaScript delivered to the user via his browser—has to make all the decisions about what to do, show, and how to act. So there’s JavaScript that must figure out if the success_message parameter was passed along, JavaScript to parse the request URL and find the value of that parameter, and JavaScript that conditionally displays an alert.
But here’s the thing: show_users.php isn’t limited in the same way that the page that it outputs is. Just because the HTML and JavaScript that is ultimately output is unaware of whether or not there’s a request parameter doesn’t mean that your script that generates that output is unaware. In fact, it’s trivial to get a request parameter in show_users.php; you’ve done it tons of times:
$msg = $_REQUEST['success_message'];
Now, in one line, you’ve eliminated all this JavaScript:
function get_request_param_value(param_name) {
  param_name = param_name.replace(/[[]/,"\[").replace(/[]]/,"\]");
  var regexS = "[\?&]" + param_name + "=([^&#]*)";
  var regex = new RegExp(regexS);
  var results = regex.exec(unescape(window.location.href));
  if (results == null)
    return "";
  else
    return results[1];
}
That’s a win by any measure of accounting.
Note
To be a little more balanced, it’s probably not a bad idea to add a function like get_request_param_value to your basic JavaScript utilities, and have it around for situations where you don’t have PHP generating your output.
But here’s the big thing to sink your teeth into here: you’re in control of what goes to the client. Your script can make decisions about what to output.
So in your PHP, you can do something like this:
// See if there's a message to display
if (isset($_REQUEST['success_message'])) {
  $msg = $_REQUEST['success_message'];
}
That’s on the server. You haven’t done any output yet. If you do have a message to show—and only if you have a message to show—you can simply add a few lines of JavaScript into your HTML output:
  <script type="text/javascript">
    function delete_user(user_id) {
      if (confirm("Are you sure you want to delete this user?" +
                  "
There's really no going back!")) {
        window.location = "delete_user.php?user_id=" + user_id;
      }    }

<?php if (isset($msg)) { ?>
    window.onload = function() {
      alert("<?php echo $msg ?>");
    }
<?php } ?>
  </script>
So put it all together, and here’s the new-and-improved show_users.php:
<?php

require_once '../scripts/app_config.php';
require_once '../scripts/database_connection.php';

// Build the SELECT statement
$select_users =
  "SELECT user_id, first_name, last_name, email " .
  "  FROM users";

// Run the query
$result = mysql_query($select_users);

// See if there's a message to display
if (isset($_REQUEST['success_message'])) {
  $msg = $_REQUEST['success_message'];
}
?>

<html>
 <head>
  <link href="../css/phpMM.css" rel="stylesheet" type="text/css" />
  <script type="text/javascript">
    function delete_user(user_id) {
      if (confirm("Are you sure you want to delete this user?" +
                  "
There's really no going back!")) {
        window.location = "delete_user.php?user_id=" + user_id;
      }
    }

<?php if (isset($msg)) { ?>
    window.onload = function() {
      alert("<?php echo $msg ?>");
    }
<?php } ?>
  </script>
 </head>

 <body>
  <div id="header"><h1>PHP & MySQL: The Missing Manual</h1></div>
  <div id="example">Current Users</div>
  <div id="content">
   <ul>
     <?php
       while ($user = mysql_fetch_array($result)) {
         $user_row = sprintf(
           "<li><a href='show_user.php?user_id=%d'>%s %s</a> " .
           "(<a href='mailto:%s'>%s</a>) " .
           "<a href='javascript:delete_user(%d);'><img " .
              "class='delete_user' src='../images/delete.png' " .
              "width='15' /></a></li>",
           $user['user_id'], $user['first_name'], $user['last_name'],
           $user['email'], $user['email'], $user['user_id']);
         echo $user_row;
       }
     ?>
   </ul>
  </div>
  <div id="footer"></div>
 </body>
</html>
Note
At this point, it’s quite possible it’s getting hard to keep up with all the changes to show_user.php and show_users.php, as well as app_config.php. If you find yourself getting some weird errors or unusual results, you may want to hop online to the Missing CD page (page xvii) and download the latest chapter’s examples. That will get you a clean, current set of files that are up-to-date, and you can focus on new changes, rather than old debugging.
What you’ve done here is a really big deal when it comes to PHP programming. Instead of relying on your output to make complicated decisions, you’re making most of the decisions in your PHP, and then tailoring your output as a result. So one script—depending on the decisions it makes—might push out two, three, four, even more variations of the same output.
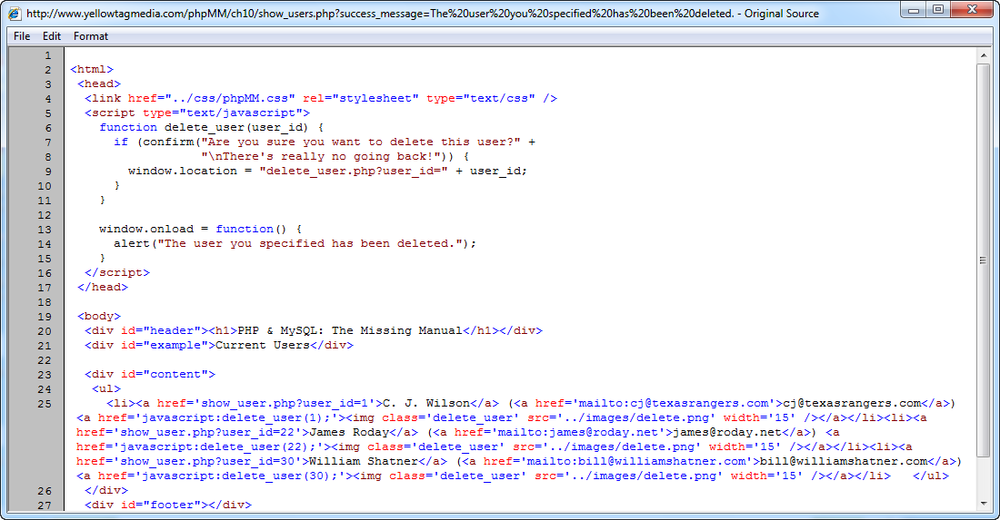
First, take this thing for a test drive. If you’ve still got a browser up with a URL like yellowtagmedia.com/phpMM/ch10/show_users.php?success_message=The%20user%20you%20specified%20has%20been%20deleted, then just reload that page to get the new changes to show_users.php. You should see a nice pop-up with the message passed through the URL, as in Figure 10-11.
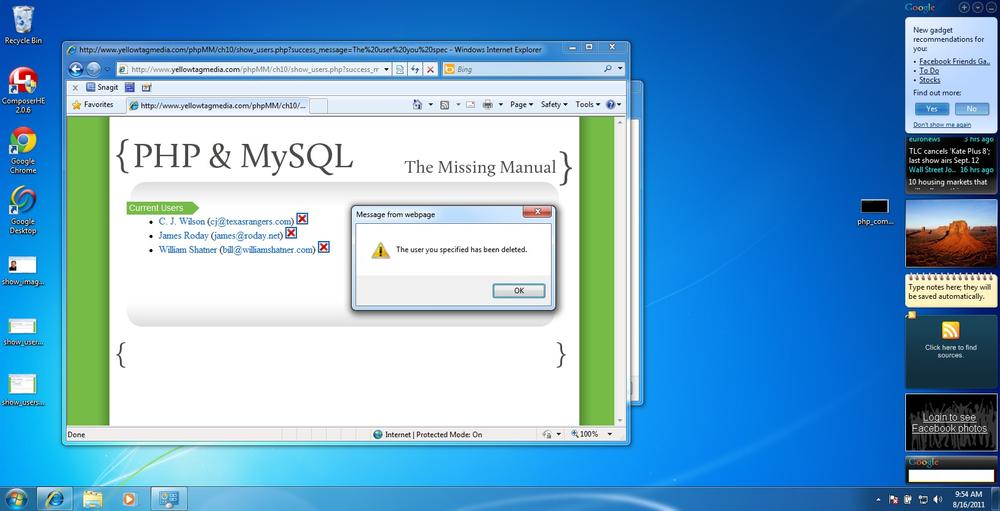
Go ahead and view the source on this page to see what’s so cool. Figure 10-12 shows that there’s a “hard-coded” alert for the message passed along. Change the message in the request URL, and you’ll see the HTML change to match.
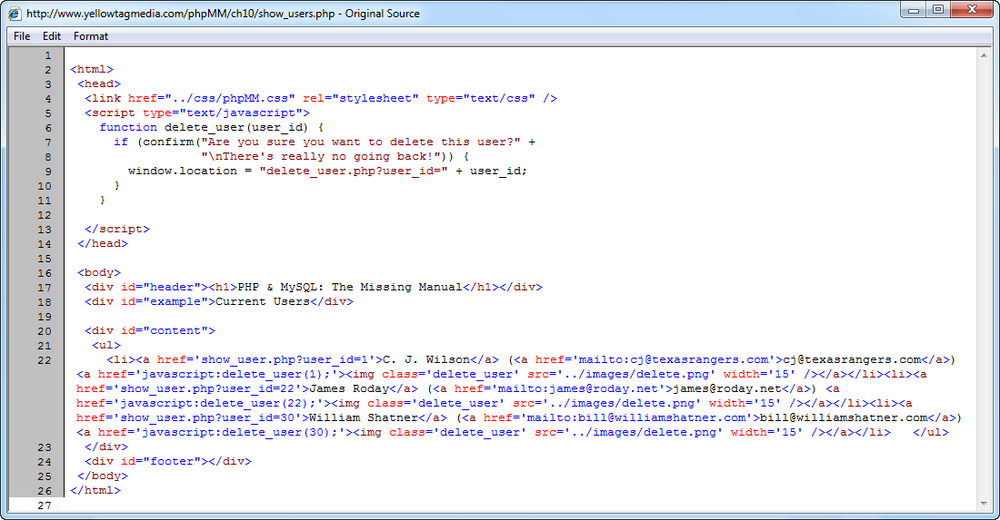
Now delete all the request parameters from show_users.php in your URL bar, and hit the page again. The alert box should go away and so should the JavaScript in the HTML page that show_users.php generates. Figure 10-13 is the source from this page: the window.onload function has vanished.
alert Is Interruptive
You’ve got a pretty nice book-end of notifications now. A confirmation box gets a user’s OK before deleting a user, and another alert lets them know once that deletion’s done. So, from a functional point of view, you’re ready to move on.
But now is one of those moments where you have to move a bit beyond web programming and start thinking about web designing…or better, web usability. Usability is just a high-dollar way of saying “What’s the user experience like?”
Note
You’ll also often hear terms like UX (for user experience) and UI (user interface) in this discussion. To some degree, these terms aren’t that different, although a UX designer might get ruffled if you confused him with a UI designer. Still, the basic goal is the same: create a natural, compelling online experience for a user. That experience includes not just functionality, but aesthetics, accessibility, and overall “feel” of a website or web application.
In terms of deleting a user, things are pretty solid. Although you might use something like jQuery to present a better looking dialog box, it makes perfect sense to interrupt the user to make sure they really want to delete a user. In effect, you’re requiring a double-action: click once to select delete, and click once more to ensure that’s the intention.
Note
If you’d like a nicer jQuery-style dialog and confirmation box—and it’s highly recommended that you do—check out jQuery UI and their dialog boxes at www.jqueryui.com/demos/dialog. In particular, look at the option for a Modal confirmation. It’ll take you 10 minutes to download and install jQuery UI and another 5 to move from your confirm call to a call to the jQuery confirmation dialog.
But what about after deletion? Yes, you need to let the user know that deletion has occurred. But do you need to effectively shut them down until they click “OK”? Ideally, you’d let them know about deletion, but do it a little less interruptive.
And that’s a general principle for web usability/design/whatever-you-want-to-call-it: if you’re going to make the user take their hands off the keyboard and click a button, make sure it’s worth it. In this case, there’s a risk you’re being annoying. “Why do I have to click again? I just clicked twice to delete the user in the first place!”
Standardizing on Messaging
There’s another issue that you may have already considered: is a success message the only type of message you may need to display? What if you have an error that doesn’t rise to needing handle_error? What if you need a status message, perhaps something like “Please log in before attempting to delete a user.”
Note
Logging in before deleting a user? Hmmm…that does sound like a good idea. That just might be perfect topic for a Chapter 11, don’t you think? Something to look forward to.
These are all similar cases: you want to tell the user something, but you don’t want to interrupt their flow. You want to add content to the page, but JavaScript’s alert and confirm aren’t really the best choices.
And as an additional consideration, this would ideally be something that could be made generic. You don’t want every script to have to output 5 or 10 lines of code. It would be nice to have your output do something like this:
<body>
  <?php display_messages($_REQUEST); ?>

  <!-- All the rest of the HTML output you want -->
</body>
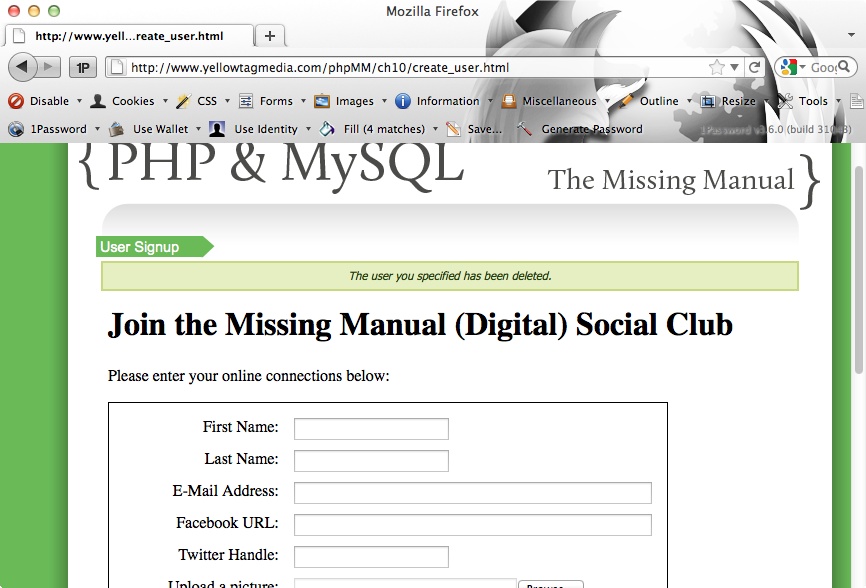
Then, this function would just “take care of things,” whatever that ends up meaning. So for a success message, you might get a banner-type of message across the top of a page, as shown in Figure 10-14.
The HTML for success messages is pretty simple:
<div id="messages">
  <div class="success">
    <p>The user you specified has been deleted.</p>
  </div>
</div>
Errors could be shown in similar fashion, as in Figure 10-15.
Note
You may have noticed that these rough mockups are done with create_user.html. That was simply the closest piece of HTML when it came to trying out a look for these messages. It’s not relevant what page you use for testing these things out. Remember, the goal is to have every page automatically display, or not display, messages sent to it.
Here’s the HTML for the error. It’s identical to the success message with a different class on the inner div:
<div id="messages">
  <div class="error">
    <p>Your username and password were invalid.</p>
  </div>
</div>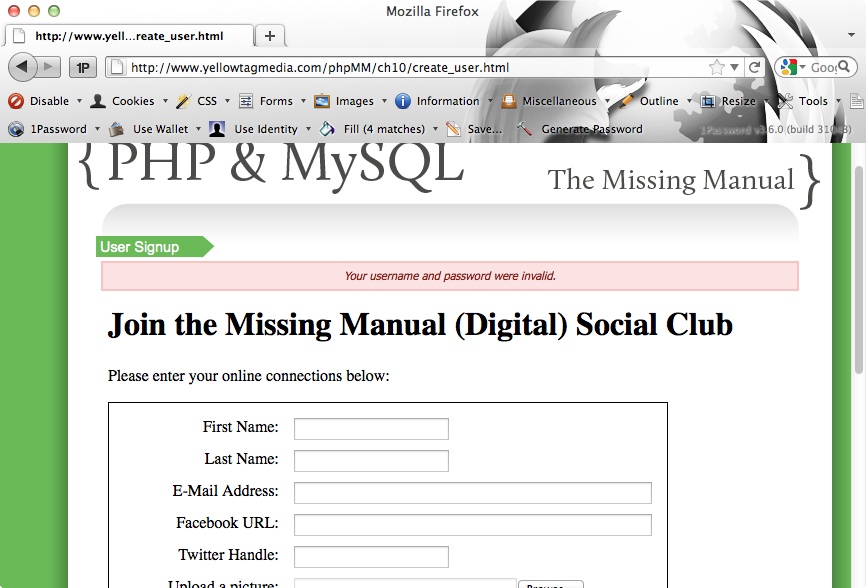
Building a New Utility Function for Display
So once again, it’s back to thinking generic. Rather than worrying about the specific success message passed into show_users.php by delete_user.php, what’s the more general form of a success message?
It’s something like this:
<div id="messages">
  <div class="success">
    <p>$msg</p>
  </div>
</div>
That’s not real PHP, of course; you’d really want to do this:
<div id="messages">
  <div class="success">
    <p><?php echo $msg; ?></p>
  </div>
</div>
But that’s not hard at all. You just need a new function that takes in the message:
function display_success_message($msg) {
  echo "<div id='messages'>
";
  echo " <div class='success'>
";
  echo "  <p>{$msg}</p>
";
  echo " </div>
";
  echo "</div>

";
}
So this function works well. But what about error messages? You could use something similar:
function display_error_message($msg) {echo "<div id='messages'> ";echo " <div class=error> ";echo " <p>{$msg}</p> "; echo " </div> "; echo "</div> "; }
But look closely: both of these are outputting the “messages” div. That’s no good. You really need something that can handle both error types. Then that sort of “parent” function can pass the individual messages to smaller functions, each of which handles success and errors:
function display_messages($success_msg, $error_msg) {
  echo "<div id='messages'>
";
  display_success_message($success_msg);
  display_error_message($error_msg);
  echo "</div>

";
}

function display_success_message($msg) {
  echo " <div class='success'>
";
  echo "  <p>{$msg}</p>
";
  echo " </div>
";
}

function display_error_message($msg) {
  echo " <div class='error'>
";
  echo "  <p>{$msg}</p>
";
  echo " </div>
";
}
That looks better. Well, kinda… does anything bother you here? Does it seem like you might be seeing double?
Duplicate Code is a Problem Waiting to Happen
The problem here is a bit subtle, which is why it can be so nasty. Look how close these two functions are to each other:
function display_success_message($msg) {
  echo " <div class='success'>
";
  echo "  <p>{$msg}</p>
";
  echo " </div>
";
}

function display_error_message($msg) {
  echo " <div class='error'>
";
  echo "  <p>{$msg}</p>
";
  echo " </div>
";
}
That’s a lot of code that’s identical… all for just one change, the class of the div in each. And any time you see code that’s this similar, be thinking “Uh oh. That’s fragile code.” So you really want to avoid this sort of thing.
Since there’s so much repeated code, you can consolidate these functions:
function display_message($msg, $msg_type) {
  echo " <div class='{#msg_type}'>
";
  echo "  <p>{$msg}</p>
";
  echo " </div>
";
}
This code is much better. It’s clear, it’s succinct, and, as explained in the box below, very DRY. In fact, take things even further and define the allowed message types as constants:
define("SUCCESS_MESSAGE", "success");
define("ERROR_MESSAGE", "error");


function display_messages($success_msg, $error_msg) {
  echo "<div id='messages'>
";
  display_message($success_msg, SUCCESS_MESSAGE);
  display_message($error_msg, ERROR_MESSAGE);
  echo "</div>

";
}


function display_message($msg, $msg_type) {
  echo " <div class='{#msg_type}'>
";
  echo "  <p>{$msg}</p>
";
  echo " </div>
";
}Beautiful! Now you don’t have to remember the message type for an error was “ERROR” or “error” or “errors” or something else altogether. The constant handles that mapping for you.
So you can start to put this all together. Create a new script, and call it view.php. Then drop in all this code, along with a require_once for the obligatory app_config.php:
<?php

require_once 'app_config.php';

define("SUCCESS_MESSAGE", "success");
define("ERROR_MESSAGE", "error");

function display_messages($success_msg, $error_msg) {
  echo "<div id='messages'>
";
  display_message($success_msg, SUCCESS_MESSAGE);
  display_message($error_msg, ERROR_MESSAGE);
  echo "</div>

";
}

function display_message($msg, $msg_type) {
  echo " <div class='{$msg_type}'>
";
  echo "  <p>{$msg}</p>
";
  echo " </div>
";
}

?>View and Display Code Belongs Together
You’ve now got another script: view.php. This script belongs in your main scripts/ directory, alongside app_config.php and database_connection.php. It also furthers you creating not only utility code, but nicely organized code. So while you could put display_messages and display_message in app_config.php, that’s not good organization.
Taking time now to build out groups of functions in scripts that are nicely named is well worth that time. When you’re writing a script like show_users.php that handles display, you immediately know you can include view.php and get helpful functions. On the other hand, in a script like delete_user.php that doesn’t do any display, you can skip view.php. It’s that simple.
Integrating Utilities, Views, and Messages
You’re finally ready to put all this together. Revisit show_users.php, and the less refined messaging that started this entire journey that led to view.php:
<head>
  <link href="../css/phpMM.css" rel="stylesheet" type="text/css" />
  <script type="text/javascript">
    function delete_user(user_id) {
      if (confirm("Are you sure you want to delete this user?" +
                  "
There's really no going back!")) {
        window.location = "delete_user.php?user_id=" + user_id;
      }
    }


<?php if (isset($msg)) { ?>
    window.onload = function() {
      alert("<?php echo $msg ?>");
    }
<?php } ?>
  </script>
 </head>
Calling Repeated Code from a View Script
This code is no longer needed. So you can remove it, and then you should also add in the require_once for your new view-related function script:
<?php

require_once '../scripts/app_config.php';
require_once '../scripts/database_connection.php';
require_once '../scripts/view.php';

// and so on...

?>
Warning
It’s nearly impossible to show deleted code in a book. “Look, there’s some deleted code. What? You can’t see it? That’s because it’s deleted!”
But be sure you do delete the PHP code interjected into the head section of the HTML output by show_users.php that pops up an alert message.
Now, you can add a call to your display_messages function in your HTML:
<body>
  <div id="header"><h1>PHP & MySQL: The Missing Manual</h1></div>
  <div id="example">Current Users</div>
  <?php display_messages($msg); ?>
Now, there’s a bit of a problem here: display_messages takes two parameters: a success message and an error message. So there needs to be some means of passing in an empty message, and then display_messages needs to handle an empty message on the receiving end.
However the issue with errors is resolved, this should become a standard part of all your view HTML. Anytime you’re displaying HTML, you want to allow messages to be handled. And where does that leave you?
You’re back to repeat code! Every single view-related script has started out with the same basic HTML… although occasionally you’ve needed to insert some JavaScript, as in show_users.php:
<html> <head> <link href="../css/phpMM.css" rel="stylesheet" type="text/css" /><script type="text/javascript">function delete_user(user_id) {if (confirm("Are you sure you want to delete this user?" +" There's really no going back!")) {window.location = "delete_user.php?user_id=" + user_id;}}</script></head>
And then you’ve got your body tag, the same header—more repeated code—and then a page title. And now, you’ve got messages to display. Here’s another chance to take code that you’ve been typing into your scripts, over and over, and pull that repeated code out and drop it into yet more utility functions. view.php is about to get a lot bigger, and a lot more useful.
Flexible Functions are Better Functions
So there’s now a bit of a list of interrelated things you have to deal with, most of which involves updates to view.php:
display_messages should handle empty or nonexistent messages for the success and the error message. If either message isn’t set, the div related to that message shouldn’t be output.
You need a new function—call it display_header—that handles outputting the head section of each page’s HTML. This function should take in JavaScript that can be added into the document’s head, but should also handle the case where there’s no extra JavaScript needed.
You need another new function—call this one display_title—that prints out the page title, the page’s subtitle, which is passed in by each script, and any message, which also should be passed in by the calling script.
None of these functions are particularly difficult, so time to get back to work.
Use Default Argument Values in Display_Messages
Returning to view.php, display_messages needs to be able to accept a non-value for a message. In PHP, this is handled by the special keyword NULL, which simply means “non-value.”
Note
You’ll see NULL in almost every language, although usually with slight variations. In Ruby, it’s nil. In Java, it’s null. PHP has NULL, as does C++. They always means the same thing, though: the absence of value.
Now, because NULL is a non-value, you can’t compare it to a value. So this code doesn’t make sense in PHP:
if ($value == NULL) // do something
What you need to use is another PHP helper, is_null. You pass a value to is_null, and PHP let’s you know what you’ve got.
You can now update display_messages. If a message passed in is NULL, then there’s no need to call the individual display_message for that type of message:
function display_messages($success_msg, $error_msg) {
  echo "<div id='messages'>
";
  if (!is_null($success_msg)) {
    display_message($success_msg, SUCCESS_MESSAGE);
  }
  if (!is_null($error_msg)) {
    display_message($error_msg, ERROR_MESSAGE);
  }
  echo "</div>

";
}
This script is almost perfect. There’s just one thing missing: what if a script—like show_users.php—doesn’t have a value to pass in for $error_msg? Or for $success_msg? In these cases, you want display_messages to have a default value. That’s just a value to assign by default if nothing else is passed in.
You can assign a function’s arguments default values like this:
function do_something(this_value = "default value") {
  // do something with this_value
}
So for display_messages, the default values should be NULL, or no value:
function display_messages($success_msg = NULL, $error_msg = NULL) {
  echo "<div id='messages'>
";
  if (!is_null($success_msg)) {
    display_message($success_msg, SUCCESS_MESSAGE);
  }
  if (!is_null($error_msg)) {
    display_message($error_msg, ERROR_MESSAGE);
  }
  echo "</div>

";
}
Now display_messages is finally ready for primetime and for usage by the other functions you need to add to view.php.
Outputting a Standard Header with Heredoc
What’s next? You need to deal with the standard HTML output for a page in your app. This is basically the opening html, the title, the head, and any page-specific JavaScript that needs to be added. But with view.php in place, your knowledge of functions, default arguments, and everything else you’ve already done, this should be a piece of cake.
You can create a new function, and since it’s possible that some scripts need to pass in JavaScript to add to the head section, but others may not, using a default value for a function argument is the way to go again:
function display_head($page_title = "", $embedded_javascript = NULL) {This code sets a default value for the $page_title, too. That’s not completely necessary, but again, it’s a bit of extra protection. Now if someone calling this function forgets to send in the title, the HTML output can be constructed regardless.
The body of this function is just some echo work and a conditional for the potential JavaScript:
function display_head($page_title = "", $embedded_javascript = NULL) {
  echo "<html>";
  echo " <head>";
  echo "  <title>{$page_title}</title>";
  echo '  <link href="../css/phpMM.css" rel="stylesheet" type="text/css" />';
  if (!is_null($embedded_javascript)) {
    echo "<script type='text/javascript'>" .
         $embedded_javascript .
         "</script>";
  }
  echo " </head>";
}
Notice that the link line uses single quotes around the HTML so that double-quotes can be used for the href, rel, and type attributes. Unfortunately, you’re going to have to either use multiple quote styles like this, or escape a lot of your quotes with ” and ’. Neither solution is particularly pretty, so pick your own poison.
Of course, programmers aren’t used to limitations like this, and you should immediately be thinking, “Wait a second. I’m a programmer. Why am I stuck with two bad solutions?” And truth be told, you’re really not. What you need is a way to deal with multi-line strings, and PHP doesn’t disappoint. In fact, multi-line strings are such a common issue in PHP that there are a couple of ways to deal with this issue.
The most common is to use something called heredoc. heredoc gives you a way to mark the beginning of a piece of text, and the end of a piece of text. Then, everything between that beginning and end is treated as text—without you needing to surround things in quotation marks.
You start a piece of heredoc with three less-than signs, and then a sequence that you’ll use to mark the end of the string:
$some_text = <<<EOD
So here, you’re saying, “I’m starting some text. And the text will end when you run across EOD.”
Note
You can use any ending sequence you want. The most typical choices are EOD and EOT, though, so it’s best to stick with these unless you have a good reason for going with a different sequence.
Now you can put as much text as you want in. You can use multiple lines, single quotes, double quotes, and even the {$var_name} syntax. It’s all fair game:
<html>
 <head>
  <title>{$page_title}</title>
   <link href="../css/phpMM.css" rel="stylesheet" type="text/css" />
 </head>
And finally, end the text with your end sequence:
EOD;
So all together, you get this:
$some_text = <<<EOD
<html>
 <head>
  <title>{$page_title}</title>
   <link href="../css/phpMM.css" rel="stylesheet" type="text/css" />
 </head>
EOD;
Warning
You can’t indent the ending sequence. It has to be the first thing on a line, all by itself, with no spacing before it.
Just as dangerous is having whitespace after the ending sequence. There’s no way to illustrate that, but even a single space after the closing semicolon will do you in.
The best way to recognize these things is to watch out for the dreaded “unexpected T_SL” error. That’s usually PHP’s ultra-cryptic way of letting you know that you’ve got whitespace where it doesn’t belong: either before or after the ending sequence, in most cases.
Put all this together, and you can clean up the look of display_head quite a bit:
function display_head($page_title = "", $embedded_javascript = NULL) {
  echo <<<EOD
<html>
 <head>
  <title>{$page_title}</title>
  <link href="../css/phpMM.css" rel="stylesheet" type="text/css" />
EOD;
  if (!is_null($embedded_javascript)) {
    echo "<script type='text/javascript'>" .
         $embedded_javascript .
         "</script>";
  }
  echo " </head>";
}
You probably noticed that in this version of display_head, there was no need to assign the string created using heredoc to a variable. You can directly output the multi-line string, and save a step. The result is a hodgepodge of echo, heredoc, conditional logic, and potentially some JavaScript. But, it’s getting increasingly easy to read, and that’s a good thing.
Updating Your Script(S) to Use Display_Head
Things are coming together. Now you can head back to show_users.php (and show_user.php if you like) and remove lots of HTML. Replace the HTML for the head of your document with a call to display_head. While you’re at it, you may want to use a little more heredoc in the process, particularly in show_users.php, which sends some JavaScript to be embedded:
<?php // code to get all the user data ?><?php$delete_user_script = <<<EODfunction delete_user(user_id) {if (confirm("Are you sure you want to delete this user? " +"There's really no going back!")) {window.location = "delete_user.php?user_id=" + user_id;}}EOD;display_head("Current Users", $delete_user_script);?><!-- Remaining HTML markup --> </html>
Note
You could just as easily keep all the PHP that gets the users in the same <?php/?> block as the code that calls display_head. That’s up to you. Some programmers like to keep the data gathering and the actual view display separate, and some prefer to avoid duplicating <?php. The choice is yours.
This uses heredoc so that creating a string of JavaScript to pass to display_head doesn’t involve lots of escaping single or double quotes. In fact, you’ll find that heredoc is almost as handy to have around as sprintf, and you’ll use both liberally for outputting HTML or other long stretches of text.
There’s still the issue of displaying messages, but before you get to that, try out your changes to show_users.php. You should see something like Figure 10-16.

Standardize and Consolidate Messaging in the View
All that’s left is messaging. You have a display_messages function, but it’s not integrated into the HTML that’s typically around those messages. Just as display_head output HTML with some potential embedded JavaScript, the first part of your page should output some standard HTML, the page title (again), and potentially success and error messages. So the final output should look a bit like this:
<html>
 <head>
  <title>Current Users</title>
  <link href="../css/phpMM.css" rel="stylesheet" type="text/css" />
  <script type='text/javascript'>function delete_user(user_id) {
  if (confirm("Are you sure you want to delete this user? " +
              "There's really no going back!")) {
    window.location = "delete_user.php?user_id=" + user_id;
  }
}</script>
</head>
 <body>
  <div id="header"><h1>PHP & MySQL: The Missing Manual</h1></div>
  <div id="example">Current Users</div>
  <div id='messages'>
 <div class='success'>
  <p>The user you specified has been deleted.</p>
 </div>
</div>


  <div id="content">
    <!-- HTML content -->
  </div>
 </body>
</html>
This is a piece of cake now. Go ahead and create display_title in view.php:
function display_title($title, $success_msg = NULL, $error_msg = NULL) {
echo <<<EOD
 <body>
  <div id="header"><h1>PHP & MySQL: The Missing Manual</h1></div>
  <div id="example">$title</div>
EOD;
  display_messages($success_msg, $error_msg); ?>
}
How easy is that? You’d call this like so, say in show_users.php:
display_title("Current Users", $msg);But you already know how messages come across: through request parameters, accessible via $_REQUEST. So why worry about whether they’re set in your view or not? Just pass them in—even if the values are NULL—to display_title:
display_title("Current Users",
              $_REQUEST['success_message'], $_REQUEST['error_message']);
Note
You can also remove the code in show_users.php that gets the success_message request parameter from $_REQUEST explicitly, as that’s now handled by this new call to display_title.
Things are looking pretty good. display_head and display_title are both great, and you’ve already got calls to display_head in place.
But before you go adding in a call to display_title in all your scripts, take a moment to think about what you’ve done.
Build a Function to Call Two Functions
Now, remember, the idea here was to create another function—display_title—to handle outputting the starting portion of every HTML page’s body. But now that you have that function, there are a few things to think about:
The HTML from display_title will always directly follow the HTML output from display_head.
The title used in display_head should typically match the title used in display_title.
So if this HTML always follows the HTML from display_head, and the title in both is the same, why is this two calls? In your scripts, you’d always have something like this:
<?php // Code like crazy ?><?php display_head($title, $javascript); ?><?php display_title($title,$_REQUEST['success_message'], $_REQUEST['error_message']);?><!-- More HTML --> </html>
But is this necessary? Why do you need two calls here? Wouldn’t this be cleaner?
<?php // Code like crazy ?><?php page_start($title, $javascript,$_REQUEST['success_message'], $_REQUEST['error_message']) ?><!-- More HTML --> </html>
Not only is this a simpler call, but now you don’t need to pass in $title twice. It goes in a single time and gets applied across all the opening HTML.
Now you don’t need to start messing around with display_title, display_head, or display_messages. Instead, just build a function for your script to call that handles all the smaller functions:
function page_start($title, $javascript = NULL,
                    $success_message = NULL, $error_message = NULL) {

  display_head($title, $javascript);
  display_title($title, $success_message, $error_message);
}Perfect! Now one call from a view script takes care of all of this.
Just Pass that Information Along
What’s left? Removing calls to display_head; avoiding another call to display_title; and finally, one call to rule them all.
Note
Yes, that was Lord of the Rings humor. But 350 pages into programming PHP, you deserve a nerdy joke.
In fact, take a look at the new, improved show_users.php. This script is shorter, and a lot clearer. Even with the bit of indentation clutter that heredoc introduces, this is a pretty sleek script:
<?php

require_once '../scripts/app_config.php';
require_once '../scripts/database_connection.php';
require_once '../scripts/view.php';

// Build the SELECT statement
$select_users =
  "SELECT user_id, first_name, last_name, email " .
  "  FROM users";

// Run the query
$result = mysql_query($select_users);

// Display the view to users
  $delete_user_script = <<<EOD
function delete_user(user_id) {
  if (confirm("Are you sure you want to delete this user? " +
              "There's really no going back!")) {
    window.location = "delete_user.php?user_id=" + user_id;
  }
}
EOD;
  page_start("Current Users", $delete_user_script,
             $_REQUEST['success_message'], $_REQUEST['error_message']);
?>
  <div id="content">
   <ul>
     <?php
       while ($user = mysql_fetch_array($result)) {
         $user_row = sprintf(
           "<li><a href='show_user.php?user_id=%d'>%s %s</a> " .
           "(<a href='mailto:%s'>%s</a>) " .
           "<a href='javascript:delete_user(%d);'><img " .
              "class='delete_user' src='../images/delete.png' " .
              "width='15' /></a></li>",
           $user['user_id'], $user['first_name'], $user['last_name'],
           $user['email'], $user['email'], $user['user_id']);
         echo $user_row;
       }
     ?>
   </ul>
  </div>
  <div id="footer"></div>
 </body>
</html>
At this point, take it out for a spin. Make sure error messages work. Make sure success messages work. Change your other scripts to also use page_start. Heck, add more functions to view.php. Maybe you want a page_end that outputs the closing div, the footer, and some contact text. You could add a sidebar function.
The thing is, with this modular approach, you can do anything you want…except for controlling just who gets to delete users. That’s a problem for the next chapter.