
pgAdmin (a.k.a. pgAdmin III or pgAdmin3) is the current rendition of the most commonly used graphical administration tool for PostgreSQL. Though it has its shortcomings, we are always encouraged by not only how quickly bugs are fixed, but also how quickly new features are added. Since it’s accepted as the official graphical administration tool for PostgreSQL, and packaged with many binary distributions of PostgreSQL, pgAdmin has the responsibility to always be kept in sync with the latest PostgreSQL releases. Should a new release of PostgreSQL induct new features, you can count on the latest pgAdmin to let you manage it. If you’re new to PostgreSQL, you should definitely start with pgAdmin before exploring other tools that could cost money. We should also mention that as of yet, we have not encountered a tool that’s absolutely superior to pgAdmin.
Get pgAdmin at http://www.pgadmin.org. While on the site, you may opt to peruse one of the guides that’ll introduce pgAdmin, but the tool is well-organized and, for the most part, guides itself quite well. For the adventurous, you can always try beta and alpha releases of pgAdmin. Your help in testing would be greatly appreciated by the community.
To whet your appetite, here’s a list of goodies found in pgAdmin that are our favorites. There are many more you can find listed on pgAdmin Features:
Graphical
EXPLAINplan for your queries. This most awesome feature offers a pictorial insight into what the query planner is thinking. Gone are the days of trying to wade through the verbosity of text-based planner outputs.SQL pane. pgAdmin ultimately interacts with PostgreSQL via SQL; it’s not shy about letting you see the generated SQL. When you use the graphical interface to make changes to your database, the underlying SQL to perform the tasks automatically displays in the SQL pane. For SQL novices, studying the generated SQL is a great learning opportunity. For pros, taking advantage of the generated SQL is a great time-saver.
Direct editing of configuration files such as postgresql.conf and pg_hba.conf. You no longer need to dig around for the files and use another editor.
Data export. pgAdmin can easily export query results as CSV or other delimited format. It can even export as HTML, providing you with a turn-key reporting engine, albeit a bit crude.
Backup and restore wizard. Can’t remember the myriad of commands and switches to perform a backup or restore using pg_restore and pg_dump? pgAdmin has a nice interface that’ll let you selectively back up and restore databases, schemas, single tables, and globals, and the message tab shows you the command line pg_dump or pg_restore it used to do it.
Grant Wizard. This time-saver will allow you to change permissions on many database objects in one fell swoop.
pgScript engine. This is a quick and dirty way to run scripts that don’t have to complete as a transaction. With this you can run loops and so forth that commit on each SQL update, unlike stored functions that require all steps completed before the work is committed. Unfortunately, you can not use it outside of pgAdmin GUI.
Plugin architecture. Newly developed add-ons are quickly accessible with a single mouse-click. You can even install your own. We have a description of this feature in Change in pgAdmin Plugins and PostGIS.
pgAgent plugin. We’ll be devoting an entire section to this cross-platform job scheduling agent which is similar in flavor to SQL Server’s job scheduler (SQLAgent). pgAdmin provides a cool interface to it.
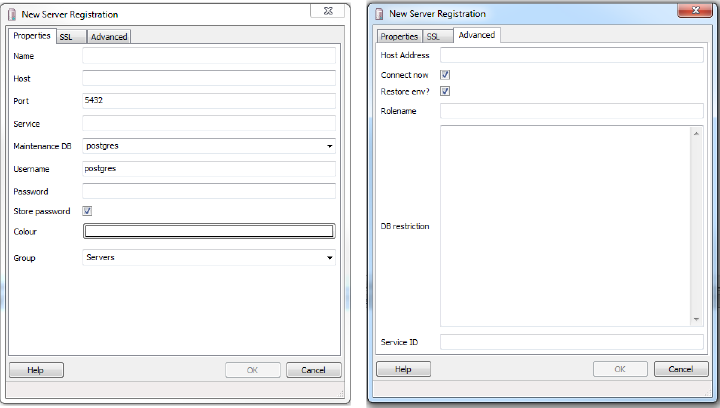
Connecting to a PostgreSQL server with pgAdmin is fairly self-explanatory. The General and Advanced tabs are shown in Figure 4-1.
pgAdmin’s tree layout is intuitive to follow but does start off showing you every esoteric object found in the database. You can pare down the display tree by going into the Options tab and unchecking objects that you would rather not have to stare at every time you use pgAdmin.
To simplify the tree sections, go to Tools→Options→Browser, you will see a screen as shown in Figure 4-2.

If you check the Show System Objects in the treeview check box, you’ll see the guts of PostgreSQL consisting of internal functions, system tables, hidden columns in each table, and so forth. You will also see the metadata stored in the information_schema catalog and the pg_catalog PostgreSQL system catalog. information_schema is an ANSI-SQL standard catalog found in other databases such as MySQL and SQL Server. You may recognize some of the tables and columns from working with other databases and its superb for getting standard metadata in a cross database compatible way.
Warning
pgAdmin does not always keep the tree in sync, with current state of the database. For example, if one person alters a table, the tree for a second person will not automatically refresh. There is a setting in recent versions that forces an automatic refresh if you check it, but may slow things down a bit.
pgAdmin is chock full of goodies. We won’t have the space to bring them all to light so we’ll just highlight the features that we use on a regular basis.
Although pgAdmin is a great
tool, there are cases where psql does a better job. One of those cases
is executing large SQL files such as those output by pg_dump and other dump tools. To do this,
you’ll want to use psql covered in Chapter 3. pgAdmin has a feature that makes
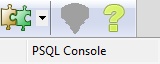
jumping to psql easy and painless. If you click on the
plugin menu item as shown in Figure 4-3 and then psql, this will open a
psql session connected to the database you are currently connected to in
pgAdmin. You can use the
cd and i psql commands to cd and run a psql
script file.
Since this feature relies on a database connection, you’ll see it disabled until you’re connected to a database.
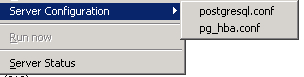
To edit configuration files directly from pgAdmin, you need to have the admin pack extension installed on your server. If you installed PostgreSQL using one of the one-click installers, you should see the menu enabled as shown in Figure 4-4.
If the menu is greyed out and you are connected to a PostgreSQL
server, then you don’t have the admin pack installed on that server or
are not logged in as a superuser. To install the admin pack on a 9.0 or
lower server, connect to the database named postgres as a superuser and
run the file sharecontribadminpack.sql. For PostgreSQL
9.1 or above, connect to the database named postgres and run the SQL statement
CREATE EXTENSION adminpack;, or use the graphical interface
for installing extensions as shown in Figure 4-5. Disconnect from the server
and reconnect, and you should see the menu enabled.

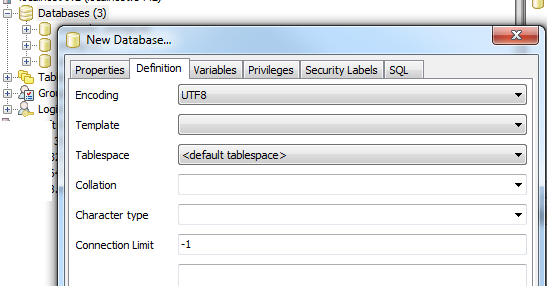
Creating a database in pgAdmin is simple. Just right-click on the database section of the tree and choose New Database as shown in Figure 4-6. The definition tab provides a drop down to use a specific template database, similar to what we did in Creating and Using a Template Database.
You’d follow the same steps to create roles, schemas, and other objects. Each will have its own relevant set of tabs for you to specify additional attributes.
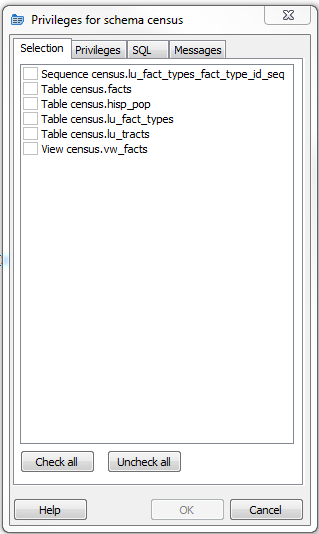
For setting permissions on existing objects, nothing beats the
pgAdmin Grant Wizard, which you
can access from the Tools→Grant Wizard menu of pgAdmin. As with many other features, this
option is greyed out unless you are connected to a database. It’s also
sensitive to the location in the tree you are on. For example, to set
permissions in objects located in the census schema, we select the
census and then choose the Grant Wizard. The grant wizard screen is
shown in Figure 4-7. You can then
selectively check all or some of the objects and switch to the
Privileges tab to define the roles and permissions
you want to grant.
More often than setting permissions on existing objects, you may
want to set default privileges for new objects in a schema or
database. To do, so right-click the schema or database, select
Properties, and then go to the Default
Privileges tab and set permissions for the desired object
types as shown in Figure 4-8.
The default privileges feature is only available if you are running
PostgreSQL 9.0 or above.
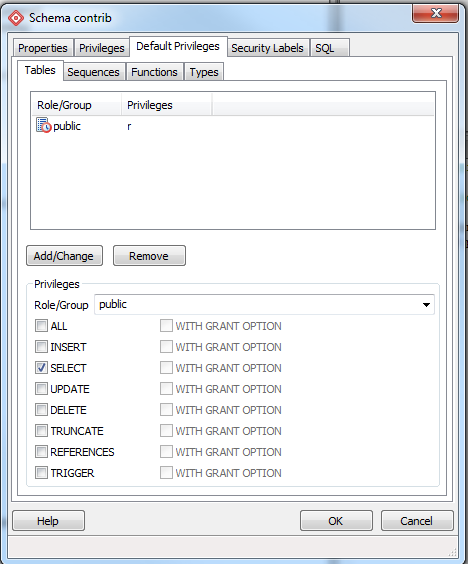
When setting permissions for schema, make sure to also set the USAGE permission on the schema to the groups you will be giving access.
Most of the backup and restore features of pg_dump and pg_restore are accessible from pgAdmin. In this section, we’ll repeat some of the examples we covered in Backup and Restore, but using pgAdmin’s graphical interface instead of the command line. The backup and restore in pgAdmin are just GUIs to the underlying pg_dump and pg_restore utilities. If you have several versions of PostgreSQL or pgAdmin installed on your computer, it’s a good idea to make sure that the pgAdmin version is using utilities versions that you expect. Check what the bin setting in pgAdmin is pointing to in order to ensure it’s the latest available, as shown in Figure 4-9.

Warning
If your server is remote or your databases are huge, we recommend using the command-line tools for backup and restore instead of pgAdmin to avoid adding another layer of complexity in what could already be a pretty lengthy process. Also keep in mind that if you do a compressed/tar/directory backup with a newer version of pg_dump, then you also need to use the same or higher version of pg_restore because a newer pg_dump compressed or tar backup can not be restored with an older pg_restore.
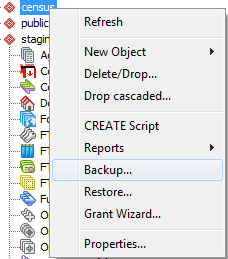
In Example 2-8, we
demonstrated how to back up a database. To repeat the same steps using
the pgAdmin interface, we would
right click on the database we want to backup and choose
custom for format as shown in Figure 4-10.

pgAdmin provides a graphical interface to pg_dumpall for backing up system objects, which does much the same as what we covered in Systemwide Backup Using pg_dumpall. To use, first connect to the server you want to backup from the Server tree and then from the top menu, choose Tools → Backup Globals.
Unfortunately, pgAdmin doesn’t give you any options of what to backup as you get by using the command line interface, and instead will backup all table spaces and roles. If you want to backup the whole server, doing a pg_dumpall, then use the Tools → Backup Server option.
pgAdmin provides a
graphical interface to pg_dump
that we covered in Selective Backup Using pg_dump for doing selective
backup of objects. To back up selective objects right-mouse click on
the object you want to back up and select Backup .... You
can back up a whole database, schema, table, or anything else.
If all you wanted to back up was that one object, you can forgo the other tabs and just do as we did in Figure 4-10. However, you can selectively pick or uncheck some more items by clicking on the objects tab as shown in Figure 4-12.
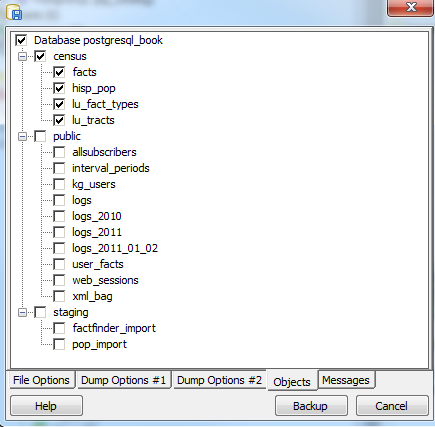
Note
pgAdmin behind the scenes just runs pg_dump to perform the backup. If ever you want to know the actual commands it’s doing for later scripting, just look at the Messages tab of the backup screen after you click the Backup button, and you’ll see the exact call with arguments to pg_dump.
pgScript is a built-in scripting tool in pgAdmin. It’s most useful for being able to run repetitive SQL tasks. Unlike PostgreSQL stored functions, pgScript commits data right away which makes it particularly handy for memory-hungry processes that you don’t need completed as a single transaction. You can see an example of where we use it for batch geocoding here at http://www.postgresonline.com/journal/archives/181-pgAdmin-pgScript.html.
The underlying language is lazily typed and supports loops, data
generators, macro replacement, basic print statements and record
variables. The general syntax is similar to that of Transact SQL—the
stored procedure language of Microsoft SQL Server. You launch pgScript by opening up a query
![]() window, typing in some pgScript specific syntax,
and then click on the
window, typing in some pgScript specific syntax,
and then click on the ![]() icon to execute it. We’ll show you some
examples.
icon to execute it. We’ll show you some
examples.
Example 4-1 demonstrates how to
use pgScript record variables and
loops to build a cross tab table using the
lu_fact_types table we create in Example 6-7. It creates an empty
table called census.hisp_pop with numeric columns of
hispanic_or_latino, white_alone,
black_or_african_american_alone, and so on.
Example 4-1. Create table using record variables in pgScript
DECLARE @I, @labels, @tdef;
SET @I = 0;
labels becomes a record variable
SET @labels = SELECT
quote_ident(replace(replace(lower(COALESCE(fact_subcats[4], fact_subcats[3])), ' ', '_'),':','')) As col_name,
fact_type_id
FROM census.lu_fact_types
WHERE category = 'Population' AND fact_subcats[3] ILIKE 'Hispanic or Latino%'
ORDER BY short_name;
SET @tdef = 'census.hisp_pop(tract_id varchar(11) PRIMARY KEY ';

Loop thru records using LINES function
WHILE @I < LINES(@labels)
BEGIN
SET @tdef = @tdef + ', ' + @labels[@I][0] + ' numeric(12,3) ';
SET @I = @I + 1;
END
SET @tdef = @tdef + ')';
print out table def
PRINT @tdef;
create the table
CREATE TABLE @tdef;
Although pgScript does not support the EXECUTE
command like PL/pgSQL for running dynamically generated SQL, we
demonstrated in Example 4-1 that it’s
still possible to do so by using macro replacement in pgScript. Example 4-2 pushes the envelope a bit
further by populating the census.hisp_pop table we just
created.
Example 4-2. Dynamic Population with pgScript
DECLARE @I, @labels, @tload, @tcols, @fact_types;
SET @I = 0;
SET @labels = SELECT
quote_ident(replace(
replace(
lower(
COALESCE(fact_subcats[4], fact_subcats[3])), ' ', '_'),':'
,'')) As col_name, fact_type_id
FROM census.lu_fact_types
WHERE category = 'Population' AND fact_subcats[3] ILIKE 'Hispanic or Latino%'
ORDER BY short_name;
SET @tload = 'tract_id';
SET @tcols = 'tract_id';
SET @fact_types = '-1';
WHILE @I < LINES(@labels)
BEGIN
SET @tcols = @tcols + ', ' + @labels[@I][0] ;
SET @tload = @tload + ', MAX(CASE WHEN fact_type_id = ' + CAST(@labels[@I][1] AS STRING) + ' THEN val ELSE NULL END)' ;
SET @fact_types = @fact_types + ', ' + CAST(@labels[@I][1] As STRING);
SET @I = @I + 1;
END
INSERT INTO census.hisp_pop(@tcols)
SELECT @tload
FROM census.facts
WHERE fact_type_id IN(@fact_types) AND yr=2010
GROUP BY tract_id;
The lesson to take away from Example 4-2 is that as long as the beginning of your statement starts with SQL, you can dynamically inject SQL fragments into it anywhere.
One of the great gems in pgAdmin is its informative, at-a-glance
graphical explain of the query plan. You can access the graphical explain
plan by opening up an SQL query window, write some query and then clicking
on the ![]() icon.
icon.
If we run the query:
SELECT left(tract_id, 5) As county_code, SUM(hispanic_or_latino) As tot
 , SUM(white_alone) As tot_white
 , SUM(COALESCE(hispanic_or_latino,0) - COALESCE(white_alone,0)) AS non_white
FROM census.hisp_pop
GROUP BY county_code
ORDER BY county_code;
We will get a graphical explain as shown in Figure 4-13. The best tip we can give for reading the graphical explain plan is to follow the fatter arrows. The fatter the arrow, the more time consuming a step.

Graphical explain will be disabled if Query→Explain→Buffers
is enabled. So make sure to uncheck buffers before trying a graphical
explain. In addition to the graphical explain, the Data
Outputcode> tab will show the textual explain plan which for
this example looks like:
GroupAggregate  (cost=111.29..151.93 rows=1478 width=20)
  Output: ("left"((tract_id)::text, 5)), sum(hispanic_or_latino), sum(white_alone), ...
  ->  Sort  (cost=111.29..114.98 rows=1478 width=20)
	Output: tract_id, hispanic_or_latino, white_alone, ("left"((tract_id)::text, 5))
	Sort Key: ("left"((tract_id)::text, 5))
	->  Seq Scan on census.hisp_pop  (cost=0.00..33.48 rows=1478 width=20)
Output: tract_id, hispanic_or_latino, white_alone, "left"((tract_id)::text, 5)pgAgent is a handy utility for scheduling jobs. Since pgAgent can execute batch scripts in the OS, we use it for much more than scheduling PostgreSQL jobs. In fact, we don’t recall the last time where we even touched crontab or the Windows task scheduler. pgAgent goes further, you can actually schedule jobs on any other server regardless of operating system. All you have to do is install the pgAgent service, PostgreSQL server itself is not required but the client connection libraries are. Since pgAgent is built atop of PostgreSQL, we are blessed with the added advantage of having access to all the tables controlling the agent. If we ever need to replicate a complicated job multiple times, we can just go into the database tables directly and insert records instead of using the interface to set up each new job. We’ll get you started with pgAgent in this section, but please visit Setting up pgAgent and Doing Scheduled Backups to see more working examples and details of how to set it up.
You can download pgAgent from pgAgent Download. The packaged SQL install script will create a new schema named pgAgent in the postgres database and add a new section to your pgAgmin.
Should you wish pgAgent to run batch jobs on additional servers, follow the same steps, except for the install of the pgagent SQL script. Pay particular attention to the permission settings of the pgAgent service. Make sure each agent has adequate permissions to execute the batch jobs that you will be scheduling.
Warning
Batch jobs often fail in pgAgent though they may run fine from the command line. This is often due to permission issues. pgAgent always runs under the context of the account the pgAgent service is running under. If this account doesn’t have sufficient permissions or the necessary network path mappings, then it will fail.
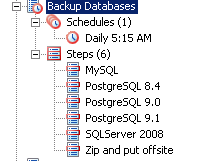
Each scheduled job has two parts: the execution steps and the schedule to run. When you create a new job, you need to specify one or more steps. For each step, you can enter SQL to run, point to a shell script on the OS, or even cut and paste in a full shell script as we commonly do. The syntax for the SQL will not vary across OS and the PostgreSQL server it runs on is controlled by the Connection Type property of the step. The syntax for batch jobs should be specific to the OS running it. For example, if your pgAgent job agent is running on Windows, your batch jobs should have valid DOS commands. If you are on Linux, your batch jobs should have valid sh or bash commands. Steps run in alphabetical order and you can decide what kind of actions you wish to take upon success or failure of each individual step. You also have the option of disabling steps that should remain dormant but you don’t want to delete because you may reactivate them later. Once you have the steps ready, go ahead and set up a schedule to run them. You can get fairly detailed with the scheduling screen. You can even set up multiple schedules.
By default, all job agents on other machines will execute all the
jobs. If you want to only have the job run on one specific machine,
you’ll need to fill in the host agent field when
creating the job. Agents running on other servers will skip the job if
it doesn’t match their host name.
Note
pgAgent really consists of two parts: the data defining the jobs and storing the job logging, which resides in pgAgent schema, usually in postgres database; the job agents query the jobs for the next job to run and then insert relevant logging information in the database. Generally, both the PostgreSQL Server holding the data and the job agent executing the jobs reside on the same server, but in practice they are not required to. Additionally, you can have one PostgreSQL server servicing many job agents residing on different servers.
A fully formed job is shown in Figure 4-15.
To get a glimpse inside the tables controlling all of your agents and jobs, connect to the postgres database and execute the query in Example 4-3:
Example 4-3. Description of pgAgent tables
SELECT c.relname As table_name, d.description
FROM pg_class As c
 INNER JOIN pg_namespace n ON n.oid = c.relnamespace
 INNER JOIN pg_description As d ON d.objoid = c.oid AND d.objsubid = 0
WHERE n.nspname = 'pgagent'
ORDER BY c.relname;
table_name     |       description
---------------+-------------------------
pga_job        | Job main entry
pga_jobagent   | Active job agents
pga_jobclass   | Job classification
pga_joblog     | Job run logs.
pga_jobstep    | Job step to be executed
pga_jobsteplog | Job step run logs.
pga_schedule   | Job schedule exceptions
As you can see, with your finely-honed SQL skills you can easily replicate jobs, delete jobs, edit jobs directly by messing with pgAgent packaged tables. Just be careful!
Although pgAdmin provides an intuitive interface to pgAgent scheduling and logging, you may find the need to run your own reports against the system tables. This is especially true if you have many jobs or you just want to do stats on your results. We’ll demonstrate the one query we use often.
Example 4-4. List log step results from today
SELECT j.jobname, s.jstname, l.jslstart,l.jslduration, l.jsloutput
FROM pgagent.pga_jobsteplog As l
 INNER JOIN pgagent.pga_jobstep As s ON s.jstid = l.jsljstid
 INNER JOIN pgagent.pga_job As j ON j.jobid = s.jstjobid
WHERE jslstart > CURRENT_DATE
ORDER BY j.jobname, s.jstname, l.jslstart DESC;
We find it very useful for monitoring batch jobs because sometimes these show as having succeeded when they actually failed. pgAgent really can’t discern success or failure of a shell script on several operating systems. The jsloutput field provides the shell output, which usually details about what went wrong.