
Chapter 9. Development Process and Workflow
At the beginning of the book, we introduced Leiningen with lein-cljsbuild as an easy way to get started with ClojureScript. However, it is far from being the only way to work with ClojureScript.
This chapter will give a brief overview of some alternative means of installing ClojureScript (including the cutting-edge development branch), as well as instructions on how to use the more low-level tools included with ClojureScript to compile manually or script your own personal workflow. It will also include some pointers to more advanced features of Leiningen that you may find useful for particular tasks.
Most importantly, perhaps, it also includes a discussion of the ClojureScript browser REPL, which you can use for interactive coding in a live browser environment.
Installing ClojureScript
Leiningen works by referencing the ClojureScript JAR file directly from a public Maven repository (via a local cache on your computer, of course). The Maven release, however, does not include some of the command-line tools and tests included in the source release.
In addition, the source release includes cutting-edge features from the master Git branch, whereas the Maven repository will only contain the latest milestone releases. For most production or educational work, the milestone releases are desirable, but bug fixes are often available much sooner on the master branch. If you’re developing a ClojureScript library or tools for working with ClojureScript, you should consider testing your code on the master branch frequently for advance warning of any incompatibilities, so you can have them sorted out before the next milestone release.
There are two ways of obtaining the ClojureScript source code: checking out directly from Git, and downloading a zip or tar archive from GitHub.
Checking Out from Source Control
Start up a command line, and navigate to the directory where you would like to install ClojureScript. Then, just execute the following Git command to clone the repository:
git clone https://github.com/clojure/clojurescript.git
By default, Git will check out the most recent code from the
master branch into a directory called clojurescript. If you
want to run the bleeding-edge development version of ClojureScript,
nothing else is required. However, you might wish to use a tagged
milestone release, for greater reliability. (Although broken code is
rarely checked in to master, it can happen on occasion).
To see a list of available tags, just use the git tag
command. At the time of this writing, the most recent tag is
r1450. To check out the tagged code, run a Git
checkout on the tag. For example:
git checkout r1450
Your “clojurescript” directory will now contain the r1450 version of ClojureScript.
Downloading a Compressed Archive
GitHub provides the capability to download the repository as a zip
or tar file, which does not require you to install the git
program itself. The easiest place to do this is from the GitHub
tags view, located here. This
page lists all the tagged versions of ClojureScript; each is a hyperlink
to a zip file. Hovering over the link will also reveal a link to a tar
archive. Click the most recent tag to download that version. If you wish
to download the latest master branch, visit this
page and click “download as zip” or “download as tar.gz”.
Extracting the downloaded file will create a directory that contains the entire ClojureScript repository, which is everything you need to get started using ClojureScript. You may wish to rename the directory to something simpler (such as “clojurescript”), instead of the default name, which includes the full repository name and commit hash ID.
Whether you installed via Git or archive, you should have ended up
with a directory somewhere on your system containing the ClojureScript
distribution. A common practice is to set up a
CLOJURESCRIPT_HOME environment variable pointing to this
directory, for convenience. The installation directory will be referred
to as CLOJURESCRIPT_HOME throughout the rest of this
chapter.
Installing Dependencies
Before you can use ClojureScript, you will need to download and install ClojureScript’s dependencies.
For Unix-based systems (including OS X), ClojureScript provides a
script that makes the process easy. Just navigate to the
CLOJURESCRIPT_HOME directory you just set up, and run the
bootstrap script:
./script/bootstrap
This will automatically download and install everything else ClojureScript needs to run.
Unfortunately there is no automatic bootstrap script for Windows users. Instead, you must install ClojureScript’s dependencies yourself.[4]
These instructions may change over time as features are added to ClojureScript, so rather than committing them to print, you should look them up on the Windows installation wiki page on the ClojureScript GitHub site.
The Built-In Tools
Command-Line Compilation
ClojureScript includes a command-line tool for compiling
*.cljs files to *.js files:
the cljsc or cljsc.bat script (depending on
platform) located in ClOJURESCRIPT_HOME/bin. It is a common
practice to add CLOJURESCRIPT_HOME/bin to your system’s
executable PATH, so you can easily run cljsc
from anywhere.
The command takes two arguments. The first is the path of either a
single *.cljs file or a directory containing
*.cljs files (in which case they will all be
compiled together). The second argument is a string representation of
the ClojureScript compiler options map, and should be enclosed in single
quotes. Invoking cljsc looks something like this:
cljsc my/src/dir '{:optimizations :advanced, :output-to "out.js"}'Note that you’ll definitely want to specify an
:output-to key in the compiler options; if you don’t, the
entire compiled output will be dumped to standard out, which in most
cases is not what you want (although it can be useful, on occasion, as
part of a longer scripted compilation chain).
Clojure REPL
If you just want to get started with a Clojure REPL, but with all
the ClojureScript classes loaded on the classpath and ready to go, you
can use the script/repl (or script/repl.bat
for Windows) script in CLOJURESCRIPT_HOME. Launching it
will start a basic Clojure REPL, but with everything you need to use
ClojureScript already loaded into the classpath.
ClojureScript REPL
If all you want to do is run ClojureScript itself in a headless
(nonbrowser) REPL, the fastest way to get started is to run the
script/repljs script (script/repljs.bat for
Windows), which launches straight into a ClojureScript REPL running in
the headless Rhino JavaScript interpreter. You won’t have access to any
browser-specific features, but will be able to experiment freely with
the language itself, as well as its standard libraries.
The Browser REPL
One of the main benefits of using a language from the Lisp family is
the dynamic, highly interactive development workflow. However, since
ClojureScript does not natively support the eval function, it
requires the support of a Clojure runtime running the ClojureScript
compiler to compile forms for execution in a REPL.
For local REPLs (such as the Rhino REPL), this is easy: the REPL just runs in the same JVM/Clojure process as the ClojureScript compiler and hands off forms for compilation. To achieve the same effect in the browser, however, requires that there be some sort of communication channel between the browser’s JavaScript runtime environment, and the ClojureScript compiler running in a JVM.
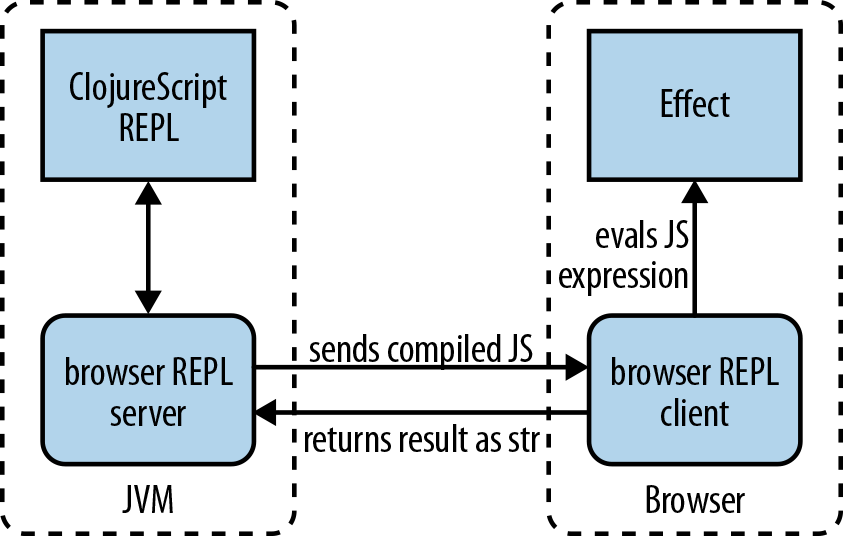
Therefore, there are two parts to the ClojureScript browser REPL (often abbreviated bREPL), which operate in a client/server configuration. The bREPL server runs in the same JVM process as the ClojureScript compiler and exposes a REPL for developer interaction. The bREPL client runs in ClojureScript in the browser itself, and maintains a long-poll connection to the server so it can receive push messages (Figure 9-1).
Whenever you type a form in the bREPL, the server feeds it to the
ClojureScript compiler and pushes the emitted JavaScript code to the
client. There, it is evaluated in the browser’s JavaScript context, where
it may cause side effects that will be visible in the browser window. The
return value of the expression is stringified (using the ClojureScript
pr-str function) and sent back to the
bREPL, where it is printed out as the expression’s return value.
Setting Up the Browser REPL
Needless to say, this does require a bit of configuration—not only is it necessary to start the bREPL server, but you must also initiate the bREPL on the client side to establish the client/server connection.
Unfortunately, there is also one more requirement to use the
browser REPL. Due to the restrictions browsers enforce to prevent
cross-site scripting attacks, and the fact that the bREPL runs on
localhost, the client page must also
run on localhost. This means that, unlike the examples
presented earlier in this book, you can’t just create a static HTML page
referencing your ClojureScript code and load it from a
file: URL. Instead, you must serve the client page from an
actual HTTP server running on localhost.
The most straightforward way to do this is to set up your
Leiningen project to include a Ring application running on an embedded
Jetty web server, and use Compojure to configure it to serve HTML files
from the resources/public directory. Ring is a low-level
HTTP web application library with wide adoption in the Clojure
community. It is used as the foundation for most Clojure web
applications. You can learn about it on its GitHub page. Compojure is a popular
web routing library for Ring that makes it easy to configure web routes.
Its page is here.
Although any technique for serving resources from a
localhost address will work, we will use Ring and Compojure
since they are relatively easy to set up, and are by far the most
popular ways to set up a Clojure web app.
Once you’re set up to serve resources, all you need to do is start the Ring server at the beginning of your development session, and you can serve up the HTML files as you work on them just as you did when referencing the files statically.
Serving your HTML via Ring and Compojure
Modify your Leiningen project (or create a new one) so the
project.clj includes Compojure and the Ring-Jetty adapter
as dependencies. It should look something like the following:
(defproject brepl-hello "0.1.0-SNAPSHOT"
 :plugins [[lein-cljsbuild "0.2.7"]]
 :dependencies [[org.clojure/clojure "1.4.0"]
                [org.clojure/clojurescript "0.0-1450"]
                [compojure "1.1.0"]
                [ring/ring-jetty-adapter "1.1.1"]]
 :source-paths ["src/clj"]
 :cljsbuild {
   :builds [{
       :source-path "src/cljs"
       :compiler {
         :output-to "resources/public/brepl-hello.js"
         :optimizations :whitespace
         :pretty-print true}}]})
Then, at a Clojure REPL, you can start a Ring server configured
to serve resources from the resources/public directory on
port 3000:
(use 'ring.adapter.jetty)
(use 'compojure.route)
(run-jetty (resources "/") {:port 3000 :join? false})
You can verify that the server is working by placing a file (for
example, test.html) in resources/public,
then hitting http://localhost:3000/test.html in your
browser. You should see the contents of test.html served
correctly.
If you don’t want to start a Clojure REPL every time you start a
server, you can use the lein-ring Leiningen
plug-in, which allows you to add a server configuration directly to
your project.clj, and start it by running lein ring
server on the command line. See the
lein-ring GitHub page
for configuration instructions.
Starting the bREPL server
Next, you must start the server component of the bREPL. This can be done from within a Clojure REPL (which you should already have open, after starting the Ring server). lein-cljsbuild also provides some convenience functions for starting a browser REPL server, which are covered later in Additional lein-cljsbuild Features.
From the Clojure REPL, run the following forms to start the browser REPL:
(require 'cljs.repl)
(require 'cljs.repl.browser)
(cljs.repl/repl (cljs.repl.browser/repl-env))
This will drop you into a ClojureScript REPL. Note that if you try to evaluate a form at this point, rather than returning a response, the REPL will simply hang. This is because we haven’t yet configured the client side of the bREPL, which is required to actually evaluate the compiled JavaScript.
By default, the bREPL server runs on port 9000. If for some
reason you need to run it on a different port, you can specify a
:port key and value when creating a bREPL environment
with the repl-env function:
(cljs.repl/repl (cljs.repl.browser/repl-env :port 8888))
Configuring the bREPL client
To connect to the bREPL server from within a browser, you must
invoke the clojure.browser.repl/connect ClojureScript
function in your client-side code. Typically, the easiest way to do
this is to add an invocation to it as a top-level form in a
ClojureScript namespace.
You can add it to an existing namespace, or create a new one as shown:
(ns brepl-hello
  (:require [clojure.browser.repl :as repl]))

(repl/connect "http://localhost:9000/repl")
If you changed the port on which you’re running the bREPL
server, you’ll need to reflect that change in the URL passed to the
connect function.
At the command line, compile the file with lein cljsbuild
once. If your project.clj is configured like the
example given above, this will emit a
resources/public/brepl-hello.js file. Include it on an
HTML page:
<!DOCTYPE html>
<html>
<head><title>ClojureScript bREPL Hello World</title></head>
<body>
    <script type="text/javascript" src="brepl-hello.js"></script>
</body>
</html>
If your Ring server and bREPL server are running, you can visit
localhost:3000/brepl-hello.html in your browser, and upon
loading, the bREPL client will establish a connection to the bREPL
server and you can start evaluating forms. If you had already entered
a form prior to starting the bREPL client, the REPL should have come
“unstuck” as soon as you started the client and an execution
environment became available.
To see an example of a live update to the HTML page, enter the following form at the browser REPL:
ClojureScript:cljs.user> (js/alert "Hello from bREPL!")
You should see a JavaScript alert box pop up from the web page. Congratulations! You now have a live REPL running against a real web page.
If you like, you can start your browser’s debugging console and watch the bREPL send messages back and forth via AJAX requests as you type forms at the REPL.
Additional lein-cljsbuild Features
lein-cljsbuild provides several features beyond the basic functionality we have covered so far.
Launching a Browser REPL
As you may have noticed while working through the browser REPL section above, starting up a Clojure REPL just to start a bREPL server can be annoying, and tedious if you have to do it often.
To alleviate this problem, lein-cljsbuild
includes the repl-listen task, which will start a bREPL
server and drop you into a ClojureScript REPL in a single step. Run it
using this command:
lein trampoline cljsbuild repl-listen
(Recall that the trampoline task is necessary for
Leiningen to receive interactive input.)
This command will start the bREPL server and a ClojureScript REPL
in your current console. Note that you will still need to configure the
bREPL client side as discussed above—the REPL started with
repl-listen will not be functional until you’ve loaded a
browser page with the client side code to establish the client-server
connection.
Custom bREPL Launch Commands
lein-cljsbuild also offers a
repl-launch command which, in addition to starting the
bREPL server, also launches a browser for the bREPL client.
repl-launch does essentially the same thing as
repl-listen, but also executes shell commands defined in
the :repl-launch-commands key in the
:cljsbuild configuration of project.clj. By
specifying a vector representing a shell command that launches a
browser, you can launch both the bREPL client and server with the same
command. For example:
(defproject my-project "1.0.0-SNAPSHOT"
   ;; other leiningen configuration items
   :cljsbuild {
     ;; other configuration items & build configurations
     :repl-launch-commands {"firefox" ["firefox" "page.html"]}})
If you have the “firefox” binary on your system’s PATH, you can
run lein trampoline cljsbuild repl-launch firefox. The
final parameter, firefox, will be looked up in the
:repl-launch-commands map, and the associated command
(firefox page.html) will be executed, launching Firefox and
opening the specified page.
Of course, you are still responsible for ensuring that the page
you specified (in this case, page.html) calls the
clojure.browser.repl/connect function to launch the client
side of the bREPL.
Hooking Into Default Leiningen Tasks
Normally, ClojureScript-specific build actions are triggered using
the lein cljsbuild command, which pertains exclusively to
ClojureScript code. However, for some projects, it’s desirable to set up
Leiningen to build everything at once.
To do this, it is necessary to add hooks to
Leiningen’s default tasks so that when you run lein
compile, lein clean, or lein jar, the
appropriate lein-cljsbuild plug-in task is also
executed. lein-cljsbuild already includes these
hooks; all you have to do is add them to the :hooks
configuration key at the root of your project.clj:
(defproject my-project "1.0.0-SNAPSHOT"
   ;; ...
   :hooks [leiningen.cljsbuild])
Once you’ve added this line, invoking lein compile
will kick off a ClojureScript compilation (the same as lein
cljsbuild once). lein clean will also run lein
cljsbuild clean, and lein jar will add ClojureScript
source to the JAR if it’s configured for that cljs build (see Including ClojureScript in JAR Files).
Testing ClojureScript Code
There are a variety of ways to test ClojureScript code.
lein-cljsbuild does not attempt to dictate a
particular testing methodology or tools, but instead provides a generic
hook for executing tests. By specifying a map of test configurations in
a :test-commands key in the :cljsbuild
configuration map, you can set up lein-cljsbuild to
invoke any command-line sequence after compilation by invoking
lein cljsbuild test.
For example, if you have ClojureScript tests that compile to a
file called resources/test/test.js, you might wish to run
the script in a headless browser such as PhantomJS. At the command line, you
would run them by executing phantomjs
resources/test/test.js. To set up the same script to run within
Leiningen, do something like this:
(defproject my-project "1.0.0-SNAPSHOT"
   ;; other leiningen configuration items
   :cljsbuild {
     ;; other configuration items & build configurations
     :test-commands {"unit" ["phantomjs" "resources/test/test.js"]}})
This will create a test configuration (named “unit”), so that when
you run lein cljsbuild test it will first compile the
ClojureScript, then execute the phantomjs
resources/test/test.js shell command in a single step. Because
the test command is just a system shell invocation, you can replace it
with any command you like, making it flexible enough to use any testing
runtime or framework you might choose. The downside is, of course, that
you’ll have to set up the test execution code yourself. But as long as
you can run the tests from the command line, you can add them to the
Leiningen test cycle using this technique.
The :test-commands configuration also supports
capturing the stdout and stderr output streams
from commands that it runs. To do this, add :stdout or
:stderr key/value pairs after the command sequence:
(defproject my-project "1.0.0-SNAPSHOT"
   ;; ... other leiningen configuration items ...
   :cljsbuild {
     ;; ... other configuration items & build configurations ...
     :test-commands {"unit" ["phantomjs" "test.js" :stdout "test.out.txt"
                                                   :stderr "test.err.txt"]}})
With this configuration, output from the phantomjs
process will be redirected to the test.out.txt and
test.out.err files.
Note that you can also capture the output of
:repl-launch-commands in the same way.
Including ClojureScript in JAR Files
If you’re creating a ClojureScript library that you’d like to be available for other projects, it’s a good idea to bundle it as a JAR file so that your clients can just add the JAR to their ClojureScript compiler classpath and start referencing your namespaces in their ClojureScript code.
By default, however, Leiningen does not include *.cljs files when creating a JAR file. To tell it to do so, you must first enable the lein-cljsbuild Leiningen hooks as described above.
Then, you must add the :jar true key to the
ClojureScript build configurations you want included in the JAR file.
When added, your project.clj looks something like
this:
(defproject my-project "1.0.0-SNAPSHOT"
   ;; ... other leiningen configuration items ...
   :hooks [leiningen.cljsbuild]
   :cljsbuild {
     ;; ... other cljsbuild configuration items ...
     :builds [{:source-path "src/cljs"
               ;; ... other build options ...
               :jar true}]})
Once you’ve added these configuration items, you can build a JAR
like you normally would in Leiningen, with lein jar. The
emitted JAR file will contain all the *.cljs files
specified in the build configuration, making them available on the
classpath for any program that includes the JAR.
Compiling the Same Code as Clojure and ClojureScript
If you have code that is both valid Clojure and ClojureScript, lein-cljsbuild supports cross-compiling the code using its crossovers feature. Obviously, such code must consist only of the subset of Clojure that is also valid ClojureScript, and vice versa. It must not use any of the interop forms from either language, nor can it rely on any platform-specific features.
To use crossovers, specify a :crossovers key in the
:cljsbuild configuration map. The value should be a vector
of Clojure namespaces, which will then also be compiled as
ClojureScript.
So, for example, if you have a namespace called
myapp.shared that you want to be available as both Clojure
and ClojureScript code, your project.clj might look
something like this:
(defproject myapp "1.0.0-SNAPSHOT"
   ;; ... other leiningen configuration items ...
   :cljsbuild {
     ;; ... other cljsbuild configuration items & builds ...
     :crossovers [myapp.shared]})
Under the hood, lein-cljsbuild implements
this feature by literally copying the *.clj files
containing the specified namespaces, giving them a
*.cljs extension, and placing them in a interim
directory, which is added to the ClojureScript source path. By default,
it is .crossover-cljs. If you wish to use a
different directory for this purpose, you may do so by specifying the
desired path as the value of a :crossover-path key in the
:cljsbuild configuration map. If you set
:crossover-jar to true, the copied crossover
*.cljs files will also be added when building JAR
files (if lein-cljsbuild is configured to do so, as
described in the previous section).
There is one additional caveat when using crossovers: code that contains macros. Because ClojureScript macros are actually written in Clojure, it isn’t possible to simply copy Clojure files that contain macros to ClojureScript, and thus they won’t work as crossover code as outlined above. lein-cljsbuild does provide some (arcane) tools for resolving this situation. Refer to lein-cljsbuild’s documentation on the feature here.
[4] At the time of this writing, the command-line ClojureScript tools have not been tested on the Cygwin Unix environment for Windows. We recommend either running a Linux virtual machine or following the Windows installation instructions.