
![]()
Installation and Security Framework and EM12c Release 4
Now that you understand the Enterprise Manager architecture, you may want to understand more-advanced installation methods for the Oracle Management Service (OMS) host or for a remote installation. You’ll also want to be up to date on the latest verbs that come into play with 12.1.0.4, also known as EM12c Release 4, which is all covered in this chapter.
EM CLI and WebLogic Installation
Enterprise Manager runs as a domain on a WebLogic server (WLS). The cloud life-cycle solution couldn’t exist without the middle-tier architecture provided by WebLogic. WLS handles the business logic along with communicating with web services and other remote processing to ensure front-end transactions are completed from beginning to end.
There was a time when the OMS required a separate installation of the WLS. Although it’s currently an automated step in the installation of EM12c, comprehending how to perform this manually is valuable to the administrator, especially going forward when administering and managing the environment.
The WebLogic server must be made available to and synchronized with the Enterprise Manager Command-Line Interface (EM CLI) in order to offer the latest plug-ins, management packs, and full access to the Enterprise Manager Cloud environment.
Requirements
In order to understand the requirements before the EM CLI installation on your OMS proceeds, ensure that the WebLogic Domain Provisioning Profile is created in such a way that the software library has the Middleware Home that belongs to the domain archived and stored as part of the WebLogic domain.
Creating the WebLogic Domain Provisioning Profile
There are three components that make up the provisioning profile:
- a middleware home
- the binaries used by the WebLogic server components
- the domain configuration for the provisioning profile
If you simply have an administrator or super administrator log in to the EM12c environment, it will not be sufficient to complete the WLS domain provisioning profile. To complete this task, you must have the following:
- Host credentials for the WLS and any other host involved in the provisioning setup. These credentials were required during the initial OEM installation.
- All targets must have Java Required Files (JRF) enabled, which is discovered and monitored by Enterprise ManagerEnsure.
Log in to the Enterprise Manager Cloud Console as a super user and click on Enterprise, Provisioning and Patching, and then Software Library, as shown in Figure 2-1.

Figure 2-1. Accessing the software library within the EM12c console
Once you enter the software library, you will need to create a folder in which to store the profile (Figure 2-2).

Figure 2-2. Creating a new folder within the software library for provisioning, patching, or installations
The Software Library already has a pre-determined set of sub-directories available. For our example, we will create a new directory named Profile_Home, give a defined description, and save it to a newly defined Networks sub-directory (Figure 2-3).

Figure 2-3. Creation and details for the Profile_Home folder to be used for the WebLogic EM CLI installation
Once satisfied with the entries, click OK. You will be shown that the directory was created successfully as well as the location of the new sub-directory off the software library directory tree (Figure 2-4).

Figure 2-4. Confirmation of successful folder creation in the software library within the Networks directory
You will be returned to the software library main menu. Once more, click Actions, Create Entity, and then Component (Figure 2-5).
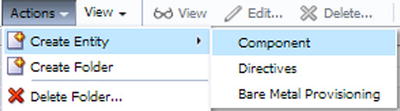
Figure 2-5. The Actions menu, displaying expanded options to access the component-creation action in the software library
The component wizard will take you through the steps to create the actual profile. A dropdown menu will show on the screen; choose the final option, WebLogic Domain Provisioning Profile (Figure 2-6).

Figure 2-6. Creating an entity for a WebLogic Domain Provisioning Profile within the EM12c console
Once the profile subtype has been chosen, click on the Continue button.
![]() Note Don’t be concerned if it takes a bit of time before the next step in the process returns to the screen. There is a delay at the Continue step.
Note Don’t be concerned if it takes a bit of time before the next step in the process returns to the screen. There is a delay at the Continue step.
Once the wizard arrives at the details page for the component, enter in the following (Figure 2-7):
- Name
- Description
- Other attributes (these settings can also be set on the home page for your WebLogic server)

Figure 2-7. Filling out description and values for a new WebLogic Domain Provisioning Profile
Don’t add any file attachments or any other information, but simply click Next. You will then be asked about selecting a WebLogic service. Before choosing one, ensure that the box is checked for “Include the binaries for the Middleware Home in the profile to be created.” This is essential for the profile to be created correctly.
Click on the magnifying glass next to “No WebLogic Domain Selected.” A pop-up will show available WebLogic domains (Figure 2-8).

Figure 2-8. Selecting a target to add to the WebLogic domain in the EM12c console
You can simplify the search, but most environments have only a few WebLogic servers. Choose the one that you wish to use from the list and click Select.
The Configure page will require you to review the data you’ve chosen so far (Figure 2-9). Correctly set a working directory that exists and has at least 200 MB of free space for work files. If you set the working directory incorrectly or if there is not enough space, the job will fail, which will leave profile components to be cleaned up and recreated from the beginning of this step. This also is in no way your final storage location for your profile, and all working files will be cleaned up after processing.

Figure 2-9. Configuring the provisioning profile for the WebLogic domain to be used with the software library setup
Ensure the credentials are set properly, creating new ones if necessary, but hopefully by this time you will have created preferred credentials, as is best practice.
Once you have verified that the information on the Configure page of the wizard is correct, click Next.
If you are satisfied with the information on the Review page (no upload of any files is required, so don’t be alarmed when it shows that there aren’t any files at this time in the bottom section), click Save and Upload.
A job will now be submitted for the task, and you will receive confirmation (Figure 2-10).
![]()
Figure 2-10. Confirmation of job submittal for the WebLogic Domain Provisioning Profile creation
As the job is managed by the Enterprise Manager Job Service, you can now click on Enterprise, Jobs, and Job Activity to monitor the job like any other job submitted through this feature (Figure 2-11).

Figure 2-11. Monitoring the provisioning profile job within the Job Activity view in the EM12c console
You may need to refresh the console view as the job is running and then again after the job has completed. You may need to change the Activity view status to All or Successful in order to view the completed job. The job takes a significant amount of time, but you can see the job directory on the server within the working directory in which you choose to place the working files (for this example, I chose to create a temp folder in /u01/home/oracle/, as shown in Figure 2-12).
![]()
Figure 2-12. Viewing the job status from the command line via the working files that were created as part of the job
Once the job has completed you can verify that it has done so successfully in one of three ways:
- Check the Job Activity Details to ensure all steps were completed successfully.
- Click on Enterprise, Patching and Provisioning, then on Middleware and check that the profile you just created is listed.
- Click on Enterprise, Patching and Provisioning, then on Software Library. If you expand the Networks folder into its sub-directories, you will be able to see each of the three components that made up the profile, and they all should show a successful status.
Filtering Out Fusion Middleware
With the provisioning profile out of the way, you can now reduce the number of procedures in your onscreen list by filtering out Fusion Middleware. This is done by creating a new properties file template for a Fusion Middleware Provisioning Procedure (FMWPROV) procedure by the corresponding Global Universal Identifier (GUID). The FMWPROV procedure is submitted to completion using the updated properties file.
To capture the GUID for the deployment procedure, the emcli command is as follows:
> emcli get_procedures | grep FMWPROV
Your result will be the following:
<proc_guid>, <procedure_type>, <display_name>, <version>, <parent_name>
Output appears like:
> emcli get_procedures | grep FMWPROV
F5143FC2A0D94E37E043BB76F00ADE34 FMW Provisioning FMWPROV_DP Provision Middleware 5.0 ORACLE
Using the GUID above, prepare the properties file template:
> emcli describe_procedure_input -procedure=F5143FC2A0D94E37E043BB76F00ADE34 >FMVtmp.properties
> A properties file with the name FMVtmp.properties is created
Once the file is created, open the file with vi and update it with those properties required to complete the necessary data for the FMV provisioning (seen in red in Figure 2-13; will need to be updated with the values for your environment):

Figure 2-13. Example of filled-out properties file to be used in fulfilling request for procedure calls with EM CLI
Save the updated template file and submit the procedure to complete the provisioning:
> emcli submit_procedure -input_file=data:FMVtmp.properties -procedure= F5143FC2A0D94E37E043BB76F00ADE34
One of the biggest strengths of provisioning is scalability. EM12c offers the opportunity to increase the cluster’s capacity with additional server instances. The option to scale a managed server up and out—using EM CLI commands along with the SCALEUP procedure and the instance GUID—is required in order to create the input properties file for the procedure. Once the properties file is updated, the SCALEUP procedure can be submitted:
> emcli get_procedures | grep SCALEUP
B95E01B1F145B5EEE050634DC8854DC, FMW Provisioning, SCALEUP DP, Scale up/Scale out Middleware, 2.0, ORACLE
Once this information is returned, you can use the GUID information to create the properties file. This process must be submitted at least once for the target GUID to create the properties file or an error will occur:
> emcli get_instance_data –instance= B95E01B1F145B5EEE050634DC8854DC > instancetmp.properties
A properties file with the name instancetmp.properties is created.
Open the properties file in an editor and enter the updated information, then save. Once updates are completed, you must submit the procedure:
> emcli submit_procedure –input_file: instancetmp.properties –procedure=B95E01B1F145B5EEE050634DC8854DC
This will complete the process of submitting the procedure to scale up a middleware deployment.
Jython
Python has been around for quite a while and will continue to grow in popularity as a relatively easy and robust development language. But what is “Jython”?
Jython, by the simplest definition, is the Java implementation of the Python language. Like Python, the syntax is simple to learn, self-formatted, and does not require compilation (like Perl) before the code can be used.
Beginning with EM12c Release 3, the EM CLI includes an embedded Jython interpreter. The function calls, also known as verbs, are executed with their corresponding key-value pairs or parameters presented as verb arguments. The purpose and use of verbs is explained later in this book.
If utilizing interactive mode, the interpreter opens a shell where simpler commands are issued, rather than shell-scripting mode where the interpreter accepts a scripted list of commands to process as a program, or rather than when simply exercising EM CLI at the command prompt. The advantage, of course, is that end-users can apply the power of EM CLI without being concerned about syntax and key-value pairs.
You can connect to any target in the Enterprise Manager environment via stateless communication and a security layer in the OMS so as to utilize Jython with EM CLI. There is a simple and generic list function within the Enterprise Manager resources, as well as an ability to run user-defined SQL queries to access published repository views.
To execute a script written in Jython, the command can be as simple as executing it from the command line interactively, much as you would a SQL script:
> emcli @test_python_scrpt.py
To run in interactive mode, you would need to start the EM CLI program:
> emcli <enter>
emcli>
The Jython-based scripting environment allows interactive processing and a simple scripting mode with a standardized format using JSON. JSON stands for Java Script Object Notation. JSON format is also fairly simple. It requires only the representative data for collections of names and value pairs. These pairs are then housed within arrays, maps, or lists to ensure manageability.
Similar to XML, JSON corresponds to how both developers and environment systems read data, but it doesn’t have the metadata overhead that is required for XML, referred to as elements and attribute names.
Supported Java Versions
EM CLI requires proper Java version support, which is also a requirement for advanced scripting with Jython, so knowledge of Java versions is important. The copy of EM CLI installed on your OMS during standard product installation relies on the JAVA_HOME already in place for OEM.
EM CLI on other locations (such as your desktop) must have the JAVA_HOME set, and it requires Java version 1.6.0.43 or greater.
If using Jython, Java must be installed and set before installing the EM CLI advanced kit (emcliadvancedkit.jar). Windows 8 and 8.1 will experience errors unless Java version 1.7.0.17 is present. Compatibility matrices are available at My Oracle Support.
![]() Tip Windows servers will often recommend uninstalling older versions of Java once new ones are in place. To avoid registry issues, ensure that:
Tip Windows servers will often recommend uninstalling older versions of Java once new ones are in place. To avoid registry issues, ensure that:
- no other ORACLE_HOME is utilizing the Java version in its path, and
- the older version of Java is uninstalled before installing the newer version to prevent any impact to the new installation.
Path and Environment Variables
To execute EM CLI verbs, no matter if they are Python or otherwise, you will need a connection to the OMS. This will require environment variables to be set (also known as client properties) as part of the EM CLI scripting environment. You can inspect all possible client properties by utilizing the help option in the EM CLI:
> emcli>help('client_properties')
        EMCLI_OMS_URL
        EMCLI_USERNAME
        EMCLI_AUTOLOGIN
        EMCLI_TRUSTALL
        EMCLI_VERBJAR_DIR
        EMCLI_CERT_LOC
        EMCLI_LOG_LOC
        EMCLI_LOG_LEVEL
        EMCLI_OUTPUT_TYPE(status())
Client or Remote Target Installation
There are various reasons for installing the EM CLI on a remote target. You must decide if there is a significant need to do so or if a task that needs to be run from the remote target can be accomplished with an emctl command instead.
Here are two reasons for not installing the EM CLI on a remote target or client:
- Security: The EM CLI will be configured to access the OMS, and the security risk of doing so should be justified. Any person using the EM CLI on the remote target or client will still be required to log in as they would from the OMS installation of the EM CLI, but this does pose an added security risk versus a solely OMS-installed configuration.
- Efficiency: Enterprise Manager Control (EMCTL) command can accomplish several of the same tasks as EM CLI at the command line, such as issuing a remote blackout of a target and so forth. In those cases, there is no need to go through a full remote installation and configuration of EM CLI. EMCTL uses the existing EM agent to perform those tasks, using its standard connections without the need for additional passwords or authentication tokens.
Now we will review the steps to follow when you have a justified reason to proceed with a remote target or client installation of the EM CLI. Desktop installation of the EM CLI client is also accomplished with this procedure.
Downloading and deploying the EM CLI client to remote hosts requires only a few steps. The actual EM CLI installation was completed automatically on the OMS host, so only remote client installations are required to be done manually. There are two kits that come as part of the EM CLI client—the EM CLI standard kit and the EM CLI scripting kit. If you wish to use the scripting method outside of the OMS host, then both kits are required for the remote installation. The scripting kit includes the Jython interpreter, so a secondary interpreter is not required for Jython scripting.
This section will focus solely on the standard kit, while the next section will enhance the installation technique by focusing on the advanced (both standard and scripting) kit.
Before installing, you must meet the following requirements on any client or remote target:
- EM12c Cloud Control Framework
- Java Version 1.6x or higher
- Operating System Linux, Sun, HPUX, AIX, or Windows.
Once these requirements have been met, you must download the kit(s) from one of two places. The first it through the EM12c console by clicking on Setup, Command Line Interface, then choosing “Download the EM CLI Standard Kit to your Workstation.” Choose a location to which to save the download.
You can also download it from the OMS Host using the URL link:
https://<OMS_HOST>:<port>/em/<swlib_directory>/emcli/kit/emclikit.jar
Once you have completed the download of the emclikit.jar file, copy it via SCP/FTP or other transport utility to the remote server.
Upon completing the transfer of the .jar file, as with any kit installation, ensure your JAVA_HOME is set. Depending on your operating system, this may require one of the following:
Unix:
> setenv JAVA_HOME /usr/local/packages/j2sdk
> setenv PATH $JAVA_HOME/bin:$PATH
> echo $JAVA_HOME
> echo $PATH
Linux:
> export JAVA_HOME /usr/bin/jdk6/jre
> export PATH $JAVA_HOME/bin:$PATH
> echo $JAVA_HOME $PATH
Windows:
> set JAVA_HOME D:progra~1javajre
> echo %JAVA_HOME%
![]() Note The path will be set in the server’s environment variable.
Note The path will be set in the server’s environment variable.
Then check the Java path as follows:
Unix/Linux:
> which java
Windows:
C:users: where java
Once the JAVA_HOME is verified, the EM CLI standard kit can be quickly installed by executing the following command, replacing the emcli_install_dir with the associated directory in which you wish to install the EM CLI:
> $JAVA_HOME/bin/java -jar emclikit.jar -install_dir=<em_cli_home_dir>
For Windows, the process is adjusted to take changes for environment variables into consideration:
%JAVA_HOME%injava -jar emclikit.jar -install_dir=<em_cli_home_dir>
Once complete, the following message will be returned:
The EM CLI client is installed in <emcli_client_install_dir>
This will verify that the installation is complete. You will need to review the logs and ensure that there were no errors in the installation; also check that all functionality is enabled. If you use Single Sign-on (SSO) or other advanced security, ensure that there are steps taken to include synchronization with the EM CLI.
EM CLI Advanced Kit
As with the standard kit, the EM CLI advanced kit can be downloaded from the EM12c console. Once logged in to the Enterprise Environment, click on Setup, then on Command Line Interface (Figure 2-14).

Figure 2-14. Accessing the EM CLI from the Enterprise Manager console
Once you’ve entered the EM CLI installation wizard, you will see the choices shown in Figure 2-15.
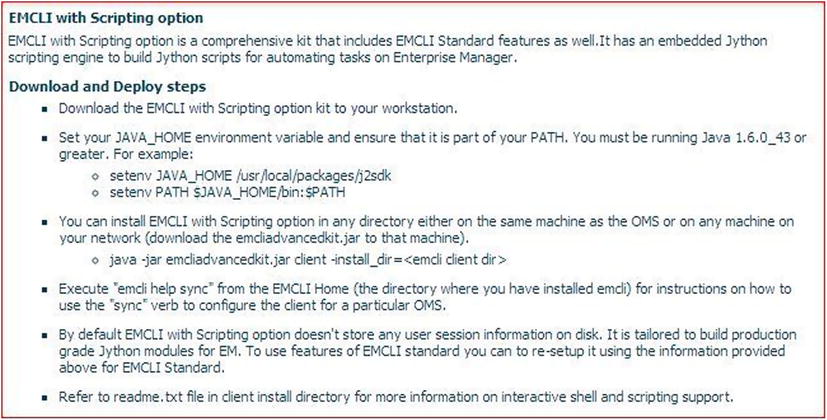
Figure 2-15. Installation requirements for the EM CLI installation from the Enterprise Manager console
The instructions on the right-hand side of the page give clear and defined steps on how to download the kit and which pre-requisites are required to complete the installation successfully.
EMCLI Installation via the OMS
The last option for installation is performed through the OMS. You will initially download the EM CLI kit to the remote host or your workstation. Note that the download link is the first bulleted option in the display page, “Download the EM CLI with scripting options to your workstation.”
Click on this link to start the download process. As this is a Java file, you may receive the following or similar warning (Figure 2-16):

Figure 2-16. Warning when downloading the .jar file required for a workstation download of the EM CLI installation
You can also download the file directly via this URL:
http://<EM_HOST>:<port>/em/<public_sw_lib>/emcli/kit/emcliadvancedkit.jar
Once this is complete, ensure you’ve copied the file to the new host via SCP/FTP or another file transfer utility. If the advanced kit is to be used on the local OMS host, then proceed with the installation step.
Ensure that you’ve set your JAVA_HOME properly and that it’s part of your environment path, which we covered in the standard kit installation steps.
![]() Note If this is for a Windows host installation, set the JAVA_HOME in the environment variables and not at the session level. Oracle installs invariably call secondary sessions that may not carry over the session-level variables, which can cause a failure in those secondary processes.
Note If this is for a Windows host installation, set the JAVA_HOME in the environment variables and not at the session level. Oracle installs invariably call secondary sessions that may not carry over the session-level variables, which can cause a failure in those secondary processes.
Execute the installation step with the following command, replacing emcli_install_dir with the directory associated with the installation path:
> java –jar emcliadvancedkit.jar client –install_dir=<emcli_install_dir>
As before, the following message will return upon successful installation:
The EM CLI client is installed in <emcli_install_dir>
Post-Installation
Once the installation is complete for any kit, on host or remote host, synchronization with the OMS should be performed.
You first need to configure the EM CLI client or remote host information with the existing OMS before synchronizing with it.
Change over to the EM CLI home directory and set up a local user with local configuration information. You can easily collect information on the setup verb by typing in the following command:
> emcli help setup
Setting up a local user requires the following command syntax:
Standard Kit:
> emcli setup –url=http://<local_host_name>:<port>/em –username=em_user
Advanced (Scripting) Kit
> emcli setup –url=http://<local_host_name>:<port>/em –username=em_user -trustall
> emcli login –username=sysman
Once set up, you need to synchronize it with the OMS:
> emcli help sync
Patching and Upgrades
Although patching and upgrades may not first appear to be part of installation, they are a very important aspect of it. Considering that we stress the importance of applying any and all bundle patches upon installation, the inclusion of checking for these during the installation process should relay how important this step is in the installation of any OEM environment.
Patching with the EM CLI Clients
Patching can be performed by utilizing deployment procedures from the command-line interface as completely as it can be performed via the Enterprise Manager console. Patching is performed in conjunction with a properties file, which includes the inputs to ease commands and offers the information the EM CLI requires to complete the patching process. It’s important to remember that EM CLI is not an agent like the regular EM agent on each host; it is a utility that installs as client software.
To create a properties file from scratch, you need to know how and when to create one, using one of the following steps:
- from a template from an existing procedure
- using a properties file in its current state, created via the console
- re-using a saved properties file from a previous execution
Creating a Properties File from a Template
Using an existing procedure GUID, a template can be built with just a few commands and values inserted for the new procedure that you want to execute.
Then perform the execution of the EM CLI command to pull info about the procedure templates available. For our example below, we are going to pull patching template examples:
./emcli get_procedures -type=PatchOracleSoftware
CF9D698E8D3843B9E043200B14ACB8B3, PatchOracleSoftware, CLONE_PATCH_SIDB, Clone and Patch Oracle
Database, 12.2, ORACLE
CF9D698E8D4743B9E043200B14ACB8B3, PatchOracleSoftware, PATCH_ALL_NODES_CLUSTER_ASM, Patch Oracle
Cluster ASM - All Nodes, 12.2, ORACLE
The first information returned is the procedure GUID that we require to then create our properties file from which to work:
./emcli describe_procedure_input -procedure=CF9D698E8D3843B9E043200B14ACB8B3
> Patch_template.properties
Verifying parameters ...
And your template file is now created:
-rw-r--r-- 1 oracle dba 65950 Jan 27 19:12 Patch_template.properties
Patching Remote Client Installations
If you have EM CLI clients deployed to target servers, it is simple to track them by registering them with the OMS as part of the EM CLI setup. Tracking information is retained in the OMS on all EM CLI client installation binaries that require patching. It will also identify EM CLI installations that need to be updated with new passwords or synced with new verbs from the OMS repository. Client software installations are not targets in OEM, so they are not tracked or monitored by the EM agents.
EM Security Framework
Security is always on the top of anyone’s mind given the power behind the EM CLI. The command line has access to the entire monitored environment, so it’s no surprise that this topic is included here.
As is standard with any Oracle security practice, hardening of servers—removing services and access to direct OS-level files that are part of Oracle—is recommended as part of a security exercise.
Basic security design requires that we look from all monitored targets up through the Enterprise Manager components, but there are white papers to address concerns outside of the EM CLI; we will focus on the command line and Enterprise Manager in this section.
Security in the EM CLI
The security architecture for the EM CLI is built around the architecture in the Enterprise Manager 12c environment and is often the first point of security concerns, as we’ve discussed above. The single point of access to the Enterprise Manager via the EM CLI is the second concern. The credentials to the remote targets that you will be interacting with via the EM CLI are the third level of access and are of even more concern, as these targets most likely include the production targets of your database environment.
Secure Mode for EM CLI Setup
Looking at the second level of security, we will discuss what secure mode means in the EM CLI. Secure mode EM CLI, which is the installation mode by default, does not store any Enterprise Manager or SSO passwords on local disk or in logs and files.
By default, the EM CLI login automatically times out after reaching a set point for inactivity, and the user must log in again before attempting to issue any other commands via the EM CLI.
If you wish to set up the EM CLI installation to log in automatically upon re-issue of a verb and demand an explicit logout of the EM CLI, execute the following command:
> emcli setup –noautologin
HTTPS Trusted Certificate
Setting up HTTPS trusted certificates first requires a quick check to verify it hasn’t already been done. This can be achieved with an EM CLI status after the following sync, as shown in Figure 2-17:
> emcli status

Figure 2-17. Issuing the status call from the EM CLI to view information about the Enterprise Manager Command-Line Interface and https status
Check the EM URL value to see if a secure HTTPS URL is already being used for the connection. If not, this can be configured with an EM CLI verb call:
> emcli setup –url="http[s]://host:port/em" –username="<username>” [-trustall] [-novalidate]
You will be asked to provide the SYSMAN password to complete this security-level configuration change to the EM console. Enter the password and press Return to complete the setup. Running the emcli status verb call will show the updated value for the EMURL, or one can use the emcli setup call to view it (Figure 2-18).

Figure 2-18. Issuing the setup command to verify a secure https connection for the EM URL used by the EM CLI and Enterprise Manager console
Verbs of Great Value in Release 4
As with each of the EM12c releases, there have been great enhancements and the introduction of new verbs to be used with the EM CLI. Release 4 (12.1.0.4) was no different, and there were updated patches to complete the release, as dependencies for the verbs from other product lines were released as well.
Gold Agent Update Verbs
The “gold agent” verbs were one of those verb groups that were released in a patch versus being part of the initial Release 4. They were listed with the initial EM CLI release documentation and help file, but were not actually available until the patch. See here:
- get_agent_update_status: Shows all agent update results using a gold image
- get_not_updatable_agents: Shows agents that can’t be updated as part of a gold image
- get_updatable_agents: Shows updatable agents for a given gold agent image name or part of a gold image series
BI Publisher Reports Verbs
Release 4 included BI Publisher as part of the installation. The compact install, which is now only approximately 300 MB in size, required only a few EM CLI commands to grant access and features to an Enterprise Manager user:
- grant_bipublisher_roles: Grants access to the BI Publisher catalog and features
- revoke_bipublisher_roles: Revokes access to the BI Publisher catalog and features
Cloud Service Verbs
Cloud offerings improved significantly with Release 4, and the ability to manage cloud requests, users, and service-instance data from the command line was essential to simplifying task management for cloud services:
- cancel_cloud_service_requests: Cancel the cloud requests. Either user or names option should be provided
- delete_cloud_service_instances: Deletes the cloud service instances based on the specified filter
- delete_cloud_user_objects: Deletes cloud user objects, including cloud service instances and requests
- get_cloud_service_instances: Retrieves the list of cloud service instances. All instances will be printed if no option is specified.
- get_cloud_service_requests: Retrieves the list of cloud requests. All requests will be printed if no filter is applied.
- get_cloud_user_objects: Retrieves the list of cloud user objects, including cloud service instances and requests. All objects will be printed if user option is not used.
Miscellaneous Verbs
There were significant changes to blackouts in Release 4, one of which was to allow for retroactive blackouts within the console, as well as within the command line:
- create_rbk: Creates retroactive blackout on given targets and updates their availability. The retroactive blackout feature needs to be enabled from the UI for using this emcli command.
- Orphan targets have been an issue for a while. Having the new compliance-enhancement verb addresses this problem:
- fix_compliance_state: Fix compliance state by removing references in deleted targets.
- The following verb is to support the complex composite targets in WebLogic environments. Having a specific verb designed to modify these targets is essential:
- modify_monitoring_agent: This verb can be used to change the agents that are configured to monitor targets in a WebLogic domain.
Fusion Middleware Provisioning Verbs
Fusion Middleware has a number of verb additions and enhancements to help manage WebLogic features and build out more options from the command line:
- create_fmw_domain_profile: Creates a Fusion Middleware Provisioning Profile from a WebLogic domain
- create_fmw_home_profile: Creates a Fusion Middleware Provisioning Profile from an Oracle home
- create_inst_media_profile: Creates a Fusion Middleware Provisioning Profile from installation media
Job Verbs
There were a number of enhancements to the EM Job Service. These enhancements enable us to export and import jobs from one EM12c Release 2 OMS to a same version or higher environment. For better job management options, Oracle has also added more-advanced job control from the EM CLI with Release 4:
- export_jobs: Exports all matching job definitions in EM, including corrective actions. System jobs and nested jobs are excluded.
- import_jobs: Imports all job definitions in to EM, including corrective actions from zip files. Library jobs are created. EM CLI logged-in user is set as the library job owner.
- job_input_file: Specifies some or all properties for the job verb in a property file. Properties set on the command line override values set in the file.
- resume_job: Resumes a job or a set of jobs matching the filter criteria.
- suspend_job: Suspends a job or a set of jobs matching the filter criteria.
- create_assoc: Creates target association instances
- delete_assoc: Deletes target association instances
- list_allowed_pairs: Lists allowed association types for the specified source and destination target types
- list_assoc: Lists associations between the specified source and destination targets
- manage_agent_partnership: Overrides Enterprise Manager’s default behavior of automatically assigning partner agents to other agents. A partner agent is an agent that, in addition to its other functions, is assigned to another agent as its “partner” in order to remotely monitor the availability of that agent and its host. This verb is not meant to be commonly used. It is provided to support special circumstances where an administrator might want to explicitly assign agent partnerships or exclude agents from being partners, or exclude agents from being remotely monitored by other agents.
Summary
For most readers, verb procedural calls have been the largest consumer of EM CLI work. Being familiar with the significant verb changes in 12.1.0.4 is crucial, but for the remainder of the book, we are going to build out your knowledge with the goal of scripting within the Enterprise Manager Command-Line Interface.