
![]()
Boot
When the power is first applied to the Raspberry Pi, or it has been reset (for more information, see the “Reset” section in Chapter 3 of Raspberry Pi Hardware Reference [Apress, 2014]), a boot sequence is initiated. As you will see in this chapter, it is the GPU that actually brings up the ARM CPU.
The way that the Raspberry Pi is designed, it must be booted from firmware found on the SD card. It cannot boot from any other source. RISC code for the GPU is provided by the Raspberry Pi Foundation in the file bootcode.bin.
After the second-stage boot loader has been executed, it is possible that other operating systems or ARM boot loaders such as U-Boot can be initiated.
Generally speaking, Linux under the ARM architecture needs a small amount of assistance to get started. The following are some of the minimal things that the boot loader needs to do:25
- Initialize and configure memory (with MMU, cache, and DMA disabled)
- Load the kernel image into memory
- Optionally, load an initial RAM disk image
- Initialize and provide boot parameters to the loaded kernel (ATAG list)
- Obtain/determine the Linux machine type (MACH_TYPE)
- Execute the kernel image with the correct starting register values (r1 = machine number, r2 points to the ATAG list)
- Additionally, the boot loader is expected to perform some initialization of a serial and/or video console.
In the Raspberry Pi, this boot-loading assistance comes from the embedded GPU in the SoC. The GPU supports a small RISC core that is able to run from initial code found in its ROM. From this small amount of code, the GPU is able to initialize itself and the SD card hardware. From the media on the SD card, it is able to bootstrap itself the rest of the way. For this reason, the Raspberry Pi must always bootstrap from an SD card.
Boot Sequence
This section looks at the startup sequence in greater detail. The participating hardware components, the files and data elements are considered. The boot procedure consists of the following sequence of events:
- At power-up (or reset), the ARM CPU is offline.23
- A small RISC core in the GPU begins to execute SoC ROM code (first-stage boot loader).
- The GPU initializes the SD card hardware.
- The GPU looks at the first FAT32 partition in the SD media. (There remains some question about specific limitations as Broadcom has documented this—for example, can it boot from a first FAT16 partition?)
- The second-stage boot-loader firmware named bootcode.bin is loaded into the GPU.
- The GPU control passes to the loaded bootcode.bin firmware (SDRAM is initially disabled).
- The file start.elf is loaded by the GPU into RAM from the SD card.
- An additional file, fixup.dat, is used to configure the SDRAM partition between GPU and ARM CPU.
- The file config.txt is examined for configuration parameters that need to be processed.
- Information found in cmdline.txt is presumably also passed to start.elf.
- The GPU allows the ARM CPU to execute the program start.elf.
- The module start.elf runs on the ARM CPU, with information about the kernel to be loaded.
- The kernel is loaded, and execution control passes to it.
Boot Files
The FAT32 partition containing the boot files is normally mounted as /boot, after Raspbian Linux has come up. Table 2-1 lists the files that apply to the boot process. The text files can be edited to affect new configurations. The binary files can also be replaced by new revisions of the same.
Table 2-1. /boot Files
|
File Name |
Purpose |
Format |
|---|---|---|
|
bootcode.bin |
Second-stage boot loader |
Binary |
|
fixup.dat |
Configure split of GPU/CPU SDRAM |
Binary |
|
config.txt |
Configuration parameters |
Text |
|
cmdline.txt |
Command-line parameters for kernel |
Text |
|
start.elf |
ARM CPU code to be launched |
Binary |
|
kernel.img |
Kernel to be loaded |
Binary |
|
Name can be overridden with kernel= parameter in config.txt |
The config.txt file permits you to configure many aspects of the boot process. Some options affect physical devices, and others affect the kernel being loaded.
The composite video output from the Raspberry Pi is primarily configured by three basic parameters:
- sdtv_mode
- sdtv_aspect
- sdtv_disable_colourburst
Standard Definition Video
The parameter sdtv_mode determines the video mode (TV standard) of the composite video output jack.
|
sdtv_mode |
Description |
|---|---|
|
0 |
Normal NTSC (default) |
|
1 |
Japanese NTSC (no pedestal) |
|
2 |
Normal PAL |
|
3 |
Brazilian PAL 525/60 |
Composite Aspect Ratio
The sdtv_aspect parameter configures the composite video aspect ratio.
|
sdtv_aspect |
Description |
|---|---|
|
1 |
4:3 (default) |
|
2 |
14:9 |
|
3 |
16:9 |
By default, color burst is enabled. This permits the generation of color out of the composite video jack. Setting the video for monochrome may be desirable for a sharper display.
|
sdtv_disable_colourburst |
Description |
|---|---|
|
0 |
Color burst enabled (default) |
|
1 |
Color burst disabled (monochrome) |
This section covers config.txt settings that affect HDMI operation.
The hdmi_safe parameter enables support of automatic HDMI configuration for optimal compatibility.
|
hdmi_safe |
Description |
|---|---|
|
0 |
Disabled (default) |
|
1 |
Enabled |
When hdmi_safe=1 (enabled), the following settings are implied:
- hdmi_force_hotplug=1
- config_hdmi_boost=4
- hdmi_group=1
- hdmi_mode=1
- disable_overscan=0
This configuration setting allows you to force a hot-plug signal for the HDMI display, whether the display is connected or not. The NOOBS distribution enables this setting by default.
|
hdmi_force_hotplug |
Description |
|---|---|
|
0 |
Disabled (non-NOOBS default) |
|
1 |
Use HDMI mode even when no HDMI monitor is detected (NOOBS default) |
HDMI Ignore Hot-Plug
Enabling the hdmi_ignore_hotplug setting causes it to appear to the system that no HDMI display is attached, even if there is. This can help force composite video output, while the HDMI display is plugged in.
|
hdmi_ignore_hotplug |
Description |
|---|---|
|
0 |
Disabled (default) |
|
1 |
Use composite video even if an HDMI display is detected |
This mode allows you to choose between DVI (no sound) and HDMI mode (with sound, when supported).
|
hdmi_drive |
Description |
|---|---|
|
1 |
Normal DVI mode (no sound) |
|
2 |
Normal HDMI mode (sound will be sent if supported and enabled) |
Enabling this option causes the EDID information from the display to be ignored. Normally, this information is helpful and is used.
|
hdmi_ignore_edid |
Description |
|---|---|
|
Unspecified |
Read EDID information |
|
0xa5000080 |
Ignore EDID information |
HDMI EDID File
When hdmi_edid_file is enabled, the EDID information is taken from the file named edid.txt. Otherwise, it is taken from the display, when available.
|
hdmi_edid_file |
Description |
|---|---|
|
0 |
Read EDID data from device (default) |
|
1 |
Read EDID data from edid.txt file |
Enabling this option forces the support of all audio formats even if the display does not support them. This permits pass-through of DTS/AC3 when reported as unsupported.
|
hdmi_force_edid_audio |
Description |
|---|---|
|
0 |
Use EDID-provided values (default) |
|
1 |
Pretend all audio formats are supported |
Avoid fuzzy matching of modes described in the EDID.
|
avoid_edid_fuzzy_match |
Description |
|---|---|
|
0 |
Use fuzzy matching (default) |
|
1 |
Avoid fuzzy matching |
HDMI Group
The hdmi_group option defines the HDMI type.
|
hdmi_group |
Description |
|---|---|
|
0 |
Use the preferred group reported by the EDID (default) |
|
1 |
CEA |
|
2 |
DMT |
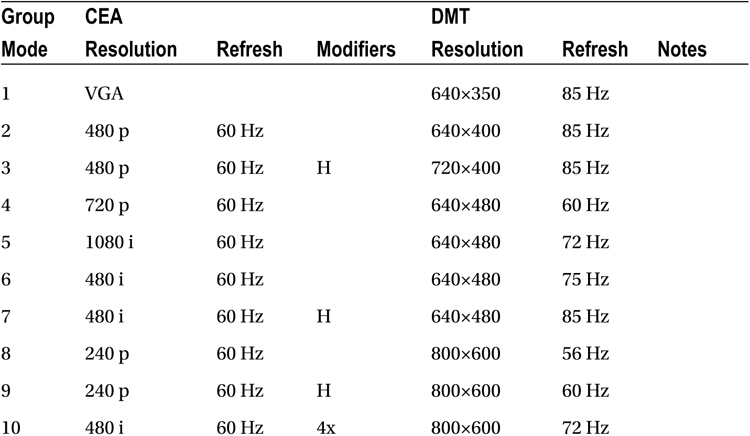
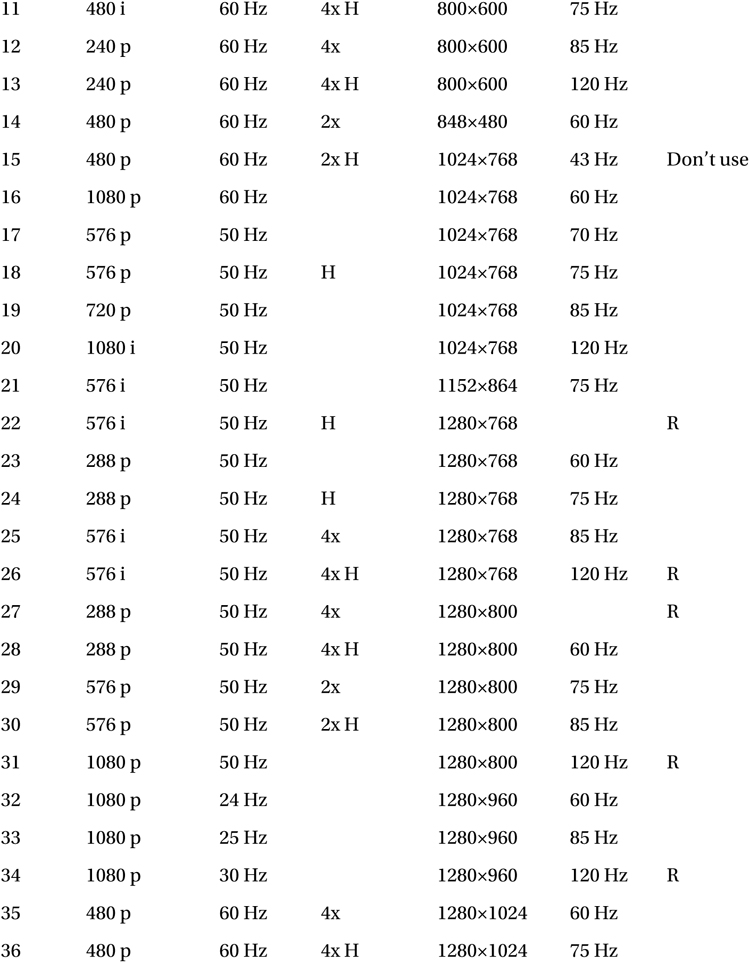
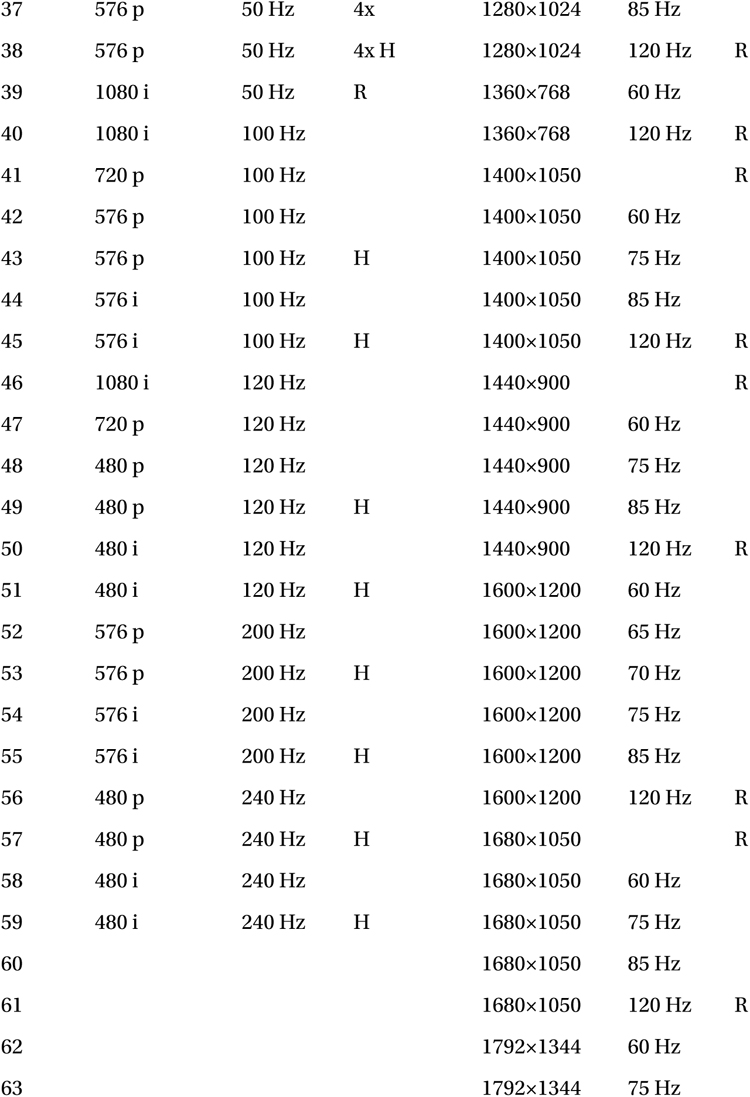
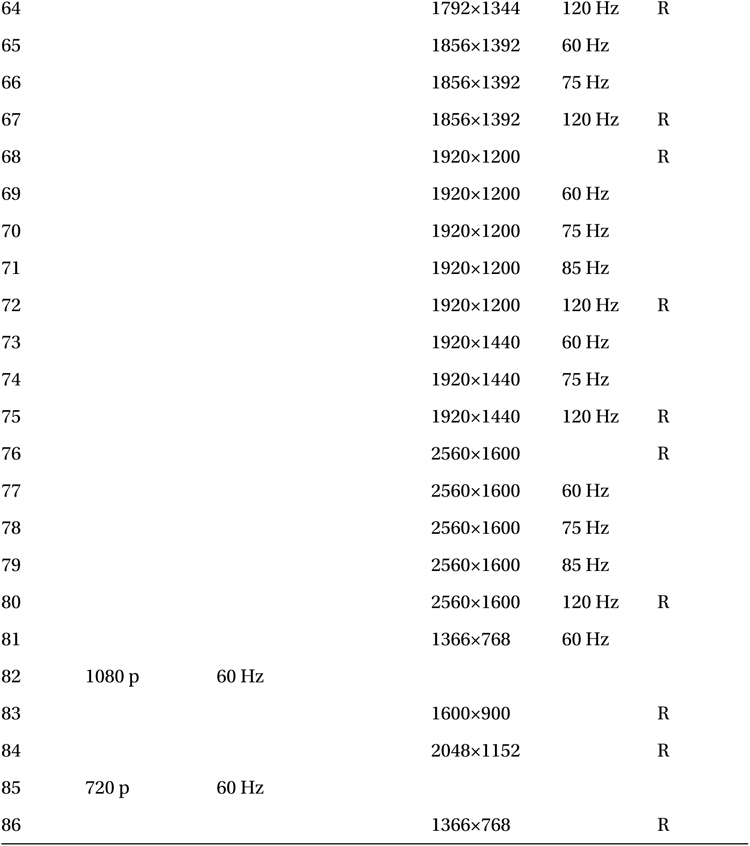
This option defines the screen resolution to use in CEA or DMT format (see the parameter hdmi_group in the preceding subsection “HDMI Group”). In Table 2-2, the modifiers shown have the following meanings:
- H means 16:9 variant of a normally 4:3 mode.
- 2x means pixel doubled (higher clock rate).
- 4x means pixel quadrupled (higher clock rate).
- R means reduced blanking (fewer bytes are used for blanking within the data stream, resulting in lower clock rates).
Table 2-2. HDMI Mode Settings
HDMI Boost
The config_hdmi_boost parameter allows you to tweak the HDMI signal strength.
|
config_hdmi_boost |
Description |
|---|---|
|
0 |
Non-NOOBS default |
|
1 | |
|
2 | |
|
3 | |
|
4 |
Use if you have interference issues (NOOBS default setting) |
|
5 | |
|
6 | |
|
7 |
Maximum strength |
HDMI Ignore CEC Init
When this option is enabled, the CEC initialization is not sent to the device. This avoids bringing the TV out of standby and channel switch when rebooting.
|
hdmi_ignore_cec_init |
Description |
|---|---|
|
0 |
Normal (default) |
|
1 |
Don’t send initial active source message |
HDMI Ignore CEC
When this option is enabled, the assumption made is that CEC is not supported at all by the HDMI device, even if the device does have support. As a result, no CEC functions will be supported.
|
hdmi_ignore_cec |
Description |
|---|---|
|
0 |
Normal (default) |
|
1 |
Disable CEC support |
A few options control the overscan support of the composite video output. When overscan is enabled, a certain number of pixels are skipped at the sides of the screen as configured.
Disable Overscan
The disable_overscan option can disable the overscan feature. It is enabled by default:
|
disable_overscan |
Description |
|---|---|
|
0 |
Overscan enabled (default) |
|
1 |
Overscan disabled |
Overscan Left, Right, Top, and Bottom
These parameters control the number of pixels to skip at the left, right, top, and bottom of the screen.
|
Parameter |
Pixels to Skip |
|---|---|
|
overscan_left=0 |
At left |
|
overscan_right=0 |
At right |
|
overscan_top=0 |
At top |
|
overscan_bottom=0 |
At bottom |
Frame Buffer Settings
The Linux frame buffer support is configured by a few configuration options described in this section.
Frame Buffer Width
The default is to define the width of the frame buffer as the display’s width minus the overscan pixels.
|
framebuffer_width |
Description |
|---|---|
|
default |
Display width overscan |
|
framebuffer_width=n |
Set width to n pixels |
Frame Buffer Height
The default is to define the height of the frame buffer as the display’s height minus the overscan pixels.
|
framebuffer_height |
Description |
|---|---|
|
default |
Display height overscan |
|
framebuffer_height=n |
Set height to n pixels |
Frame Buffer Depth
This parameter defines the number of bits per pixel.
|
framebuffer_depth |
Description |
|---|---|
|
8 |
Valid, but default RGB palette makes an unreadable screen |
|
16 |
Default |
|
24 |
Looks better but has corruption issues as of 6/15/2012 |
|
32 |
No corruption, but requires framebuffer_ignore_alpha=1, and shows wrong colors as of 6/15/2012 |
Frame Buffer Ignore Alpha
The alpha channel can be disabled with this option. As of this writing, this option must be used when using a frame buffer depth of 32 bits.
|
framebuffer_ignore_alpha |
Description |
|---|---|
|
0 |
Alpha channel enabled (default) |
|
1 |
Alpha channel disabled |
General Video Options
The display can be flipped or rotated in different ways, according to the display_rotate option. You should be able to do both a flip and a rotate by adding the flip values to the rotate value.
![]() Note I was unable to get the flip options to work on Linux Raspberry Pi 3.2.27+ #250. It is possible that a newer version of the boot-loader bootcode.bin may be needed. But as of 2014, this remains an issue.
Note I was unable to get the flip options to work on Linux Raspberry Pi 3.2.27+ #250. It is possible that a newer version of the boot-loader bootcode.bin may be needed. But as of 2014, this remains an issue.
The 90º and 270º rotations require additional memory on the GPU, so these options won’t work with a 16 MB GPU split.
|
display_rotate |
Description |
|---|---|
|
0 |
0º (default) |
|
1 |
90º |
|
2 |
180º |
|
3 |
270º |
|
0x1000 |
Horizontal flip |
|
0x2000 |
Vertical flip |
While the flip options are documented, I was unable to get them to work. The rotations, however, were confirmed as working.
The following options permit you to configure the purchased license key codes for the codecs they affect.
|
Option |
Notes |
|---|---|
|
decode_MPG2=0x12345678 |
License key for hardware MPEG-2 decoding |
|
decode_WVC1=0x12345678 |
License key for hardware VC-1 decoding |
The following test option enables image/sound tests during boot. This is intended for manufacturer testing.
|
test_mode |
Description |
|---|---|
|
0 |
Disable test mode (default) |
|
1 |
Enable test mode |
Memory
This section summarizes configuration settings pertaining to memory.
Disable GPU L2 Cache
The disable_l2cache option allows the ARM CPU access to the GPU L2 cache to be disabled. This needs the corresponding L2 disabled in the kernel.
|
disable_l2cache |
Description |
|---|---|
|
0 |
Enable GPU L2 cache access (default) |
|
1 |
Disable GPU L2 cache access |
GPU Memory (All)
The gpu_mem option allows configuration of the GPU memory for all Raspberry Pi board revisions (unless gpu_mem_256 or gpu_mem_512 is supplied).
|
gpu_mem |
Description |
|---|---|
|
gpu_mem=64 |
Default is 64 MB |
|
gpu_mem=128 |
128 MB |
GPU Memory (256)
The gpu_mem_256 option allows configuration of the GPU memory for the 256 MB Raspberry Pi boards. When specified, it overrides the gpu_mem option setting.
|
gpu_mem_256 |
Description |
|---|---|
|
unspecified |
Defined by gpu_mem option |
|
gpu_mem_256=128 |
128 MB (example) |
GPU Memory (512)
The gpu_mem_512 option configures the GPU memory allocated for the 512 MB Raspberry Pi boards. When specified, it overrides the gpu_mem option setting.
|
gpu_mem_512 |
Description |
|---|---|
|
unspecified |
Defined by gpu_mem option |
|
gpu_mem_512=128 |
128 MB (example) |
Boot Options
Several options in this section affect the boot process. Many options pertain to the kernel being started, while others affect file systems and devices.
Disable Command-Line Tags
The disable_commandline_tags option permits the user to prevent start.elf from filling in ATAGS memory before launching the kernel. This prevents the cmdline.txt file from being supplied to the kernel at boot time.
|
disable_commandline_tags |
Description |
|---|---|
|
0 |
Enable ATAGS (default) |
|
1 |
Disable command line in ATAGS |
Command Line
The cmdline option allows you to configure the kernel command-line parameters within the config.txt file, instead of the cmdline.txt file.
|
cmdline |
Description |
|---|---|
|
unspecified |
Command line is taken from cmdline.txt |
|
cmdline=“command” |
Command line is taken from parameter |
Kernel
By default, start.elf loads the kernel from the file named kernel.img. Specifying the kernel parameter allows the user to change the file’s name.
|
kernel |
Description |
|---|---|
|
unspecified |
kernel=“kernel.img” (default) |
|
kernel=“plan9.img” |
kernel=“plan9.img” |
Kernel Address
This parameter determines the memory address where the kernel image is loaded into.
|
kernel_address |
Description |
|---|---|
|
0x00000000 |
Default |
RAM File System File
The ramfsfile parameter names the file for the RAM FS file, to be used with the kernel.
|
ramfsfile |
Description |
|---|---|
|
unspecified |
No RAM FS file used |
|
ramfsfile=“ramfs.file” |
File ramfs.file is used |
RAM File System Address
The ramfsaddr parameter specifies where the RAM file system image is to be loaded into memory.
|
ramfsaddr |
Description |
|---|---|
|
0x00000000 |
Default address |
This option is a convenience option, which combines the options ramfsfile and ramfsaddr.

Device Tree Address
The device_tree_address option defines where the device tree address is loaded.
|
device_tree_address |
Description |
|---|---|
|
0x00000000 |
Default |
Init UART Baud
The init_uart_baud option allows the user to reconfigure the serial console to use a baud rate that is different from the default.
|
init_uart_baud |
Description |
|---|---|
|
115200 |
Default baud rate |
Init UART Clock
The init_uart_clock parameter permits the user to reconfigure the UART to use a different clock rate.
|
init_uart_clock |
Description |
|---|---|
|
3000000 |
Default |
Init EMMC Clock
The init_emmc_clock parameter allows the user to tweak the EMMC clock, which can improve the SD card performance.
|
init_emmc_clock |
Description |
|---|---|
|
100000000 |
Default |
Boot Delay
The boot_delay and boot_delay_ms options allow the user to reconfigure the delay used by start.elf prior to loading the kernel. The actual delay time used is computed from the following:
![]()
where
- D is the computed delay in milliseconds.
- b is the boot_delay value.
- m is the boot_delay_ms value.
|
boot_delay (b) |
Description |
|---|---|
|
1 |
Default |
The boot_delay_ms augments the boot_delay parameter.
|
boot_delay_ms (m) |
Description |
|---|---|
|
0 |
Default |
Avoid Safe Mode
A jumper or switch can be placed between pins P1-05 (GPIO 1) and P1-06 (ground) to cause start.elf to initiate a safe mode boot. If GPIO 1 is being used for some other I/O function, the safe mode check should be disabled.
|
avoid_safe_mode |
Description |
|---|---|
|
0 |
Default (check P1-05 for safe mode) |
|
1 |
Disable safe mode check |
According to the Raspberry Pi Configuration Settings file, Revision 14 (http://elinux.org/RPi_config.txt) the ARM CPU, SDRAM, and GPU have their own clock signals (from a PLL). The GPU core, H.264, V3D, and ISP all share the same clock.
The following commands can be used to check your CPU, once you have a command-line prompt. The /proc/cpuinfo pseudo file will give you a BogoMIPS figure:
$ cat /proc/cpuinfo
Processor        : ARMv6−compatible processor rev 7 (v6l)
BogoMIPS         : 697.95
Features         : swp half thumb fastmult vfp edsp java tls
CPU implementer  : 0x41
CPU architecture : 7
CPU variant      : 0x0
CPU part         : 0xb76
CPU revision     : 7
Hardware         : BCM2708
Revision         : 000f
Serial           : 00000000 f52b69e9
$
The vcgencmd can be used to read the ARM CPU clock frequency:
$ vcgencmd measure_clock arm
frequency (45)=700074000
$
To configure for overclocking, you start with the phase-locked loop (PLL). The PLL frequency is computed as follows:

where
- p is the computed PLL frequency.
- c is the core frequency.
From this, the GPU frequency multiple m is computed from a trial GPU frequency t as follows:

The value m is then rounded to the nearest even integer value, and the final GPU frequency g is computed as follows:

If we take an example where the core frequency c is 500 MHz, then p is determined as follows:

Further, if we are targeting a GPU frequency of 300 MHz, we compute m:

The value m is rounded to the nearest even integer:
![]()
The final GPU frequency becomes
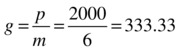
The example GPU clock is 333.33 MHz.
Table 2-3 lists the standard clock profiles, as provided by the Raspberry Pi Foundation. Additionally, it is stated that if the SoC reaches temp_limit, the overclock settings will be disabled. The value of temp_limit is configurable.
Table 2-3. Standard Clock Profiles
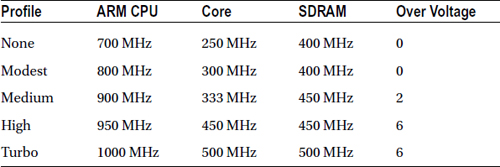
At one time, overclocking could void your warranty. Also note that Internet forum users have reported SD card corruption when trying out overclocked configurations (though several improvements to SD card handling have been made). Be sure to back up your SD card.
The following combination of parameters may set a permanent bit in your SoC chip and void your warranty. While the Raspberry Pi announcement (www.raspberrypi.org/introducing-turbo-mode-up-to-50-more-performance-for-free/) speaks of overclocking without voiding the warranty, it is subject to some conditions like using the cpufreq driver. The following conditions may put your warranty in jeopardy:
- ver_voltage > 0, and at least one of the following:
- force_turbo = 1
- current_limit_override = 0x5A000020
- temp_limit > 85
The documentation indicates that force_turbo has no effect if other overclocking options are in effect.
By default, force_turbo is disabled. When disabled, it disables some other configuration options such as h264_freq. However, enabling force_turbo also enables h264_freq, v3d_freq, and isp_freq.
|
force_turbo |
Description |
|---|---|
|
0 (default) |
Enables dynamic clocks and voltage for the ARM core, GPU core, and SDRAM. In this mode, settings for h264_freq, v3d_freq, and isp_freq are ignored. |
|
1 |
Disables dynamic clocks and voltage for the ARM core, GPU core, and SDRAM. Configuration option values h264_freq, v3d_freq, and isp_freq apply when specified. |
The initial_turbo option is described in config.txt as “enables turbo mode from boot for the given value in seconds (up to 60).” This is somewhat confusing.
What is meant is that turbo mode will be enabled after a delay of a configured number of seconds after boot. By default, if turbo mode is enabled, it is enabled immediately (after examining config.txt).
The initial_turbo option allows the boot process to proceed at normal clock rates until the process has progressed to a certain point. Some people on Internet forums that experience SD card corruption from overclocking will suggest the initial_turbo option as a solution.
|
initial_turbo |
Description |
|---|---|
|
0 |
No timed turbo mode (default) |
|
60 |
Maximum number of seconds after boot before enabling turbo mode |
The temp_limit configuration option allows the user to override the default safety limit. Increasing this value beyond 85ºC voids your warranty.
When the SoC temperature exceeds temp_limit, the clocks and voltages are set to default values for safer operation.
|
temp_limit |
Description |
|---|---|
|
85 |
Temperature limit in Celsius (default) |
|
> 85 |
Voids your warranty |
The parameter arm_freq sets the clock frequency of the ARM CPU in MHz. This option applies in non-turbo and turbo modes.
|
arm_freq |
Description |
|---|---|
|
700 |
Default ARM CPU frequency, in MHz |
|
> 700 |
May void warranty—check related conditions |
Minimum ARM CPU Frequency
This option can be used when using dynamic clocking of the ARM CPU. This sets the lowest clock speed for the ARM.
|
arm_freq_min |
Description |
|---|---|
|
700 |
Default ARM CPU frequency in MHz |
|
> 700 |
May void warranty—check related conditions |
The gpu_freq option determines the following other values:
|
Parameter |
MHz |
|---|---|
|
core_freq |
Core frequency |
|
h264_freq |
H.264 frequency |
|
isp_freq |
Image sensor pipeline frequency |
|
v3d_freq |
3D video block frequency |
The gpu_freq parameter has the following default value:
|
gpu_freq |
Description |
|---|---|
|
250 |
Default GPU frequency (MHz) |
The core_freq option allows the user to configure the GPU processor core clock. This parameter also affects the ARM performance, since it drives the L2 cache.
|
core_freq |
Description |
|---|---|
|
250 |
Default in MHz |
Minimum Core Frequency
When dynamic clocking is used, this sets the minimum GPU processor core clock rate. See also the core_freq option. Like the core_freq option, this parameter affects the ARM performance, since it drives the L2 cache.
|
core_freq_min |
Description |
|---|---|
|
250 |
Default in MHz |
This parameter configures the frequency of the video block hardware. This parameter applies when force_turbo mode is enabled.
|
h264_freq |
Description |
|---|---|
|
250 |
Default in MHz |
This parameter configures the image sensor pipeline clock rate and applies when force_turbo mode is enabled.
|
isp_freq |
Description |
|---|---|
|
250 |
Default in MHz |
The v3d_freq configures the 3D block frequency in MHz. This parameter applies when force_turbo mode is enabled.
|
v3d_freq |
Description |
|---|---|
|
250 |
Default in MHz |
The sdram_freq parameter allows the user to configure frequency of the SDRAM.
|
sdram_freq |
Description |
|---|---|
|
400 |
Default in MHz |
Minimum SDRAM Frequency
When dynamic clocks are used, the sdram_freq_min allows the user to configure a minimum clock rate in MHz.
|
sdram_freq_min |
Description |
|---|---|
|
400 |
Default in MHz |
The avoid_pwm_pll configuration parameter allows the user to unlink the core_freq from the rest of the GPU. A Pi configuration note states, “analog audio should still work, but from a fractional divider, so lower quality.”
|
avoid_pwm_pll |
Description |
|---|---|
|
0 |
Linked core_freq (default) |
|
1 |
Unlinked core_freq |
Voltage Settings
The configuration parameters in this subsection configure voltages for various parts of the Raspberry Pi.
Current Limit Override
When supplied, the switched-mode power supply current limit protection is disabled. This can be helpful with overclocking if you are encountering reboot failures.
|
current_limit_override |
Description |
|---|---|
|
Unspecified |
Default (limit in effect) |
|
0x5A000020 |
Disables SMPS current limit protection |
Over Voltage
The ARM CPU and GPU core voltage can be adjusted through the over_voltage option. Use the values shown in Table 2-4.
Table 2-4. Voltage Parameter Values
|
Parameter |
Voltage |
Notes |
|---|---|---|
|
-16 |
0.8 V | |
|
-15 |
0.825 V | |
|
-14 |
0.85 V | |
|
-13 |
0.875 V | |
|
-12 |
0.9 V | |
|
-11 |
0.925 V | |
|
-10 |
0.95 V | |
|
-9 |
0.975 V | |
|
-8 |
1.0 V | |
|
-7 |
1.025 V | |
|
-6 |
1.05 V | |
|
-5 |
1.075 V | |
|
-4 |
1.1 V | |
|
-3 |
1.125 V | |
|
-2 |
1.15 V | |
|
-1 |
1.175 V | |
|
0 |
1.2 V |
Default |
|
1 |
1.225 V | |
|
2 |
1.25 V | |
|
3 |
1.275 V | |
|
4 |
1.3 V | |
|
5 |
1.325 V | |
|
6 |
1.35 V | |
|
7 |
1.375 V |
Requires force_turbo=1 |
|
8 |
1.4 V |
Requires force_turbo=1 |
The over_voltage_min option can be used when dynamic clocking is employed, to prevent the voltage dropping below a specified minimum. Use the values from Table 2-4.
The over_voltage_sdram configuration option is a convenient way to set three options at once:
- over_voltage_sdram_c: SDRAM controller voltage
- over_voltage_sdram_i: SDRAM I/O voltage adjust
- over_voltage_sdram_p: SDRAM physical voltage adjust
Raspberry Pi documentation says the over_voltage_sdram option “sets over_ voltage_sdram_c, over_voltage_sdram_i, over_voltage_sdram_p together.” Use the values shown in Table 2-4.
Use the over_voltage_sdram_c option to set the voltage for the SDRAM controller. Use the values shown in Table 2-4. See also the over_voltage_sdram option.
Use the over_voltage_sdram_i option to set the voltage for the SDRAM I/O subsystem. Use the values shown in Table 2-4. See also the over_voltage_sdram option.
The over_voltage_sdram_p option adjusts the “physical voltage” for the SDRAM subsystem. Use the values shown in Table 2-4. See also the over_voltage_sdram option.
The cmdline.txt file is used to supply command-line arguments to the kernel. The Raspbian values supplied in the standard image are broken into multiple lines here for easier reading (note that the NOOBS distribution may show a different device for the root file system):
$ cat /boot/cmdline.txt
dwc_otg.lpm_enable=0
 console=ttyAMA0,115200
 kgdboc=ttyAMA0,115200
 console=tty1
 root=/dev/mmcblk0p2
 rootfstype=ext4
 elevator=deadline
 rootwait
$
This file is provided as a convenience, since the parameters can be configured in the config.txt file, using the cmdline="text" option. When the config.txt option is provided, it supersedes the cmdline.txt file.
Once the Raspbian Linux kernel comes up, you can review the command-line options used as follows (edited for readability):
$ cat /proc/cmdline
 dma.dmachans=0x7f35
 bcm2708_fb.fbwidth=656
 bcm2708_fb.fbheight=416
 bcm2708.boardrev=0xf
 bcm2708.serial=0xf52b69e9
 smsc95xx.macaddr=B8:27:EB:2B:69:E9
 sdhci−bcm2708.emmc_clock_freq=100000000
 vc_mem.mem_base=0x1c000000
 vc_mem. mem_size=0x20000000
 dwc_otg.lpm_enable=0
 console=ttyAMA0,115200
 kgdboc=ttyAMA0,115200
 console=tty1
 root=/dev/mmcblk0p2
 rootfstype=ext4
 elevator=deadline
 rootwait
$
Additional options can be seen prepended to what was provided in the cmdline.txt file. Options of the format name.option=values are specific to kernel-loadable modules. For example, the parameter bcm2708_fb.fbwidth=656 pertains to the module bcm2708_fb.
There are too many Linux kernel parameters to describe here (entire books have been written on this topic), but some of the most commonly used ones are covered in the following subsections.
The Linux console parameter specifies to Linux what device to use for a console. For the Raspberry Pi, this is normally specified as follows:
console=ttyAMA0,115200
This references the serial device that is made available after boot-up as /dev/ttyAMA0. The parameter following the device name is the baud rate (115200).
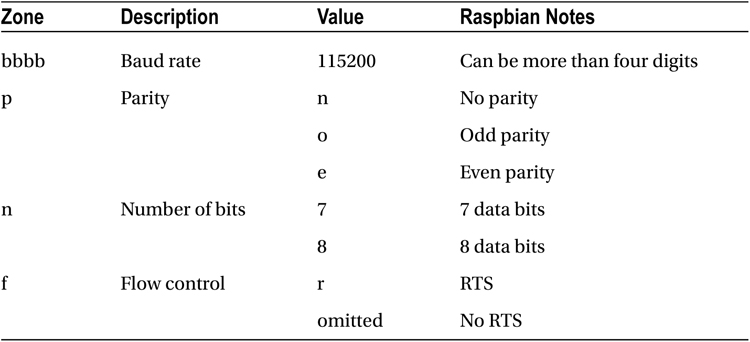
The general form of the serial console option is as follows:
console=ttyDevice,bbbbpnf
The second parameter is the options field:
Linux supports a virtual console, which is also configurable from the console= parameter. Raspbian Linux specifies the following:
console=tty1
This device is available from /dev/tty1, after the kernel boots up. The tty parameters used for this virtual console can be listed (edited here for readability):
$ sudo −i
# stty −a </dev/tty1
speed 38400 baud ; rows 26; columns 82; line = 0;
intr = ^C; quit = ^; erase = ^?; kill = ^U;
eof = ^D; eol = <undef>; eol2 = <undef>; swtch = <undef>;
start = ^Q; stop = ^S ; susp = ^Z; rprnt = ^R; werase = ^W;
lnext = ^V; flush = ^O; min = 1; time = 0;
−parenb −parodd cs8 hupcl −cstopb cread −clocal −crtscts
−ignbrk brkint −ignpar −parmrk −inpck −istrip −inlcr
−igncr icrnl ixon −ixoff −iuclc −ixany imaxbel iutf8
opost −o lcuc −ocrnl onlcr −onocr −onlret −ofill −ofdel
nl0 cr0 tab0 bs0 vt0 ff0
isig icanon iexten echo echoe echok −echonl −noflsh
−xcase −tostop −echoprt −echoctl echoke
#
kgdboc=
The kgdboc parameter was named after the idea “kgdb over console.” This allows you to use a serial console as your primary console as well as use it for kernel debugging. The primary console, however, need not be a serial console for kgdboc to be used.27
The Raspbian image supplies this:
kgdboc=ttyAMA0,115200
This allows kernel debugging to proceed through serial device /dev/ttyAMA0, which is the only serial device supported on the Raspberry Pi.
root=
The Linux kernel needs to know what device holds the root file system. The standard Raspbian image supplies the following:
root=/dev/mmcblk0p2
This points the kernel to the SD card (mmcblk0), partition 2 (non-NOOBS distribution). See also the rootfstype parameter.
The general form of the root= parameter supports three forms:
- root=MMmm: Boot from major device MM, minor mm (hexadecimal).
- root=/dev/nfs: Boot a NFS disk specified by nfsroot (see also nfs-root= and ip=).
- root=/dev/name: Boot from a device named /dev/name.
rootfstype=
In addition to specifying the device holding the root file system, the Linux kernel sometimes needs to know the file system type. This is configured through the rootfstype parameter. The standard Raspbian image supplies the following:
rootfstype=ext4
This example indicates that the root file system is the ext4 type.
The Linux kernel can examine the device given in the root parameter to determine the file system type. But there are scenarios where the kernel cannot resolve the type or gets confused. Otherwise, you may want to force a certain file system type. Another situation is when MTD is used for the root file system. For example, when using JFFS2, it must specified.
This option selects the I/O scheduler scheme to be used within the kernel. The standard Raspbian image specifies the following:
elevator=deadline
To find out the I/O scheduler option being used and the other available choices (in your kernel), we can consult the /sys pseudo file system:
$ cat /sys/block/mmcblk0/queue/scheduler
noop [deadline] cfq
$
The name mmcblk0 is the name of the device that your root file system is on. The output shows in square brackets that the deadline I/O scheduler is being used. The other choices are noop and cfq. These I/O schedulers are as follows:
|
Name |
Description |
Notes |
|---|---|---|
|
noop |
No special ordering of requests | |
|
cfq |
Completely fair scheduler |
Older |
|
deadline |
Cyclic scheduler, but requests have deadlines |
Newest |
The deadline I/O scheduler is the newest implementation, designed for greater efficiency and fairness. The deadline scheduler uses a cyclic elevator, except that it additionally logs a deadline for the request. A cyclic elevator is one where the requests are ordered according to sector numbers and head movement (forward and backward). The deadline scheduler will use the cyclic elevator behavior, but if it looks like the request is about to expire, it is given immediate priority.
rootwait=
This option is used when the device used for the root file system is a device that is started asynchronously with other kernel boot functions. This is usually needed for USB and MMC devices, which may take extra time to initialize. The rootwait option forces the kernel to wait until the root device becomes ready.
Given that the root file system is on the SD card (a MMC device), the Raspbian image uses the following:
rootwait
nfsroot=
The nfsroot option permits you to define a kernel that boots from an NFS mount (assuming that NFS support is compiled into the kernel). The square brackets show placement of optional values:
nfsroot=[server−ip:]root−dir[,nfs−options]
|
Field |
Description |
|---|---|
|
server-ip |
NFS server IP number (default uses ip=) |
|
root-dir |
Root dir on NFS server. If there is a %s present, the IP address will be inserted there. |
|
nfs-options |
NFS options like ro, separated by commas |
When unspecified, the default of /tftpboot/client_ip_address will be used. This requires that root=/dev/nfs be specified and optionally ip= may be added.
To test whether you have NFS support in your kernel, you can query the /proc file system when the system has booted:
$ cat /proc/filesystems
nodev   sysfs
nodev   rootfs
nodev   bdev
nodev   proc
nodev   cgroup
nodev   tmpfs
nodev   devtmpfs
nodev   debugfs
nodev   sockfs
nodev   pipefs
nodev   anon_inodefs
nodev   rpc_pipefs
nodev   configfs
nodev   devpts
        ext3
        ext2
        ext4
nodev   ramfs
        vfat
        msdos
nodev   nfs
nodev   nfs4
nodev   autofs
nodev   mqueue
From this example, we see that both the older NFS (nfs) and the newer NFS4 file systems are supported.
ip=
This option permits the user to configure the IP address of a network device, or to specify how the IP number is assigned. See also the root= and nfsroot= options.
ip=client−ip:server−ip:gw−ip:netmask:hostname:device:autoconf
Table 2-5 describes the fields within this option. The autoconf value can appear by itself, without the intervening colons if required. When ip=off or ip=none is given, no autoconfiguration takes place. The autoconfiguration protocols are listed in Table 2-6.
Table 2-5. ip= Kernel Parameter
|
Field |
Description |
Default |
|---|---|---|
|
ip-client |
IP address of the client |
Autoconfigured |
|
ip-server |
IP address of NFS server, required only for NFS root |
Autoconfigured |
|
gw-ip |
IP address of server if on a separate subnet |
Autoconfigured |
|
netmask |
Netmask for local IP address |
Autoconfigured |
|
hostname |
Hostname to provide to DHCP |
Client IP address |
|
device |
Name of interface to use |
When more than one is available, autoconf |
|
autoconf |
Autoconfiguration method |
Any |
Table 2-6. Autoconfiguration Protocols
|
Protocol |
Description |
|---|---|
|
off or none |
Don’t autoconfigure |
|
on or any |
Use any protocol available (default) |
|
dhcp |
Use DHCP |
|
bootp |
Use BOOTP |
|
rarp |
Use RARP |
|
both |
Use BOOTP or RARP but not DHCP |
Emergency Kernel
In the event that your Raspberry Pi does not boot up properly, an emergency kernel is provided in /boot as file kernel_emergency.img. This kernel includes a BusyBox root file system to provide recovery tools. Through use of e2fsck, you’ll be able to repair your normal Linux root file system. If necessary, you’ll be able to mount that file system and make changes with the BusyBox tools.
To activate the emergency kernel, mount your SD card in a Linux, Mac, or Windows computer. Your computer should see the FAT32 partition, allowing you to rename files and edit configurations. Rename your current kernel.img to something like kernel.bak (you likely want to restore this kernel image later). Then rename kernel_emergency.img as kernel.img.
If you have used special configuration options in config.txt and cmdline.txt, you should copy these to config.bak and cmdline.bak, respectively. Then remove any special options that might have caused trouble (especially overclocking options). Alternatively, you can restore original copies of these two files, as provided by the standard Raspbian image download.
![]() Note Your FAT32 partition (/boot) probably has about 40 MB of free disk space (for a standard Raspbian disk image). Renaming large files, rather than copying them, saves disk space. Consequently, renaming kernel images is preferred over copying. Small files like config.txt or cmdline.txt can be copied as required.
Note Your FAT32 partition (/boot) probably has about 40 MB of free disk space (for a standard Raspbian disk image). Renaming large files, rather than copying them, saves disk space. Consequently, renaming kernel images is preferred over copying. Small files like config.txt or cmdline.txt can be copied as required.
The entire procedure is summarized here:
- Rename kernel.img to kernel.bak (retain the normal kernel).
- Rename kernel_emergency.img to kernel.img.
- Copy config.txt to config.bak.
- Copy cmdline.txt to cmdline.bak.
- Edit or restore config.txt and cmdline.txt to original or safe configurations.
Step 5 requires your own judgment. If you have customized hardware, there may be some nonstandard configuration settings that you need to keep (see the previous “Avoid Safe Mode” section). The idea is to simply give your emergency kernel as much chance for success as possible. Disabling all overclocking options is also recommended.
![]() Caution After changes, make sure you properly unmount the SD card media (Linux/Mac) or “safely remove USB device” in Windows. Pulling the SD card out before all of the disk data has been written will corrupt your FAT32 partition, adding to your troubles. This may even cause loss of files.
Caution After changes, make sure you properly unmount the SD card media (Linux/Mac) or “safely remove USB device” in Windows. Pulling the SD card out before all of the disk data has been written will corrupt your FAT32 partition, adding to your troubles. This may even cause loss of files.
With the kernel exchanged and the configuration restored to safe options, it should now be possible to boot the emergency kernel. Log in and rescue.
To restore your system back to its normal state, you’ll need to follow these steps:
- Rename kernel.img to kernel_emergency.img (for future rescues).
- Rename kernel.bak to kernel.img (reinstate your normal kernel).
- Restore/alter your config.txt configuration, if necessary.
- Restore/alter your cmdline.txt configuration, if necessary.
At this point, you can reboot with your original kernel and configuration.