
![]()
Setting Up Maven
Maven installation is an easy and straightforward process. This chapter will explain how to install and set up Maven using the Windows 7 operating system. You can follow the same procedure with other operating systems.
![]() Note Maven is a Java-based application and requires the Java Development Kit (JDK) to function properly. Maven version 3.2 requires JDK 1.6 or above and versions 3.0/3.1 can be run using JDK 1.5 or above. Before proceeding with Maven installation, make sure that you have Java installed. If not, install the JDK (not just Java Runtime Environment [JRE]) from http://www.oracle.com/technetwork/java/javase/downloads/index.html. In this book, we will be using JDK 1.7.
Note Maven is a Java-based application and requires the Java Development Kit (JDK) to function properly. Maven version 3.2 requires JDK 1.6 or above and versions 3.0/3.1 can be run using JDK 1.5 or above. Before proceeding with Maven installation, make sure that you have Java installed. If not, install the JDK (not just Java Runtime Environment [JRE]) from http://www.oracle.com/technetwork/java/javase/downloads/index.html. In this book, we will be using JDK 1.7.
You will begin the installation process by downloading the latest version of Maven from the Apache Maven web site (http://maven.apache.org/download.html). At the time of this writing, the latest version is 3.2.3. Download the Maven 3.2.3 binary .zip file as shown in Figure 2-1.

Figure 2-1. Maven download page
Once the download is complete, unzip the distribution to a local directory on your computer. It will create a folder named apache-maven-3.2.3-bin. This book assumes that you have placed the contents of apache-maven-3.2.3-bin folder under c: oolsmaven directory, as shown in Figure 2-2.
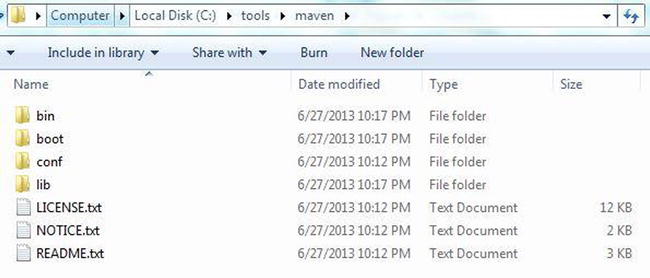
Figure 2-2. Maven install location
The next step in the installation process is to add the M2_HOME environment variable pointing to the Maven installation directory, in our case c: oolsmaven. Launch the Start menu, and right-click the Computer option. Next select System Properties followed by the Advanced system settings. This will launch the window shown in Figure 2-3.
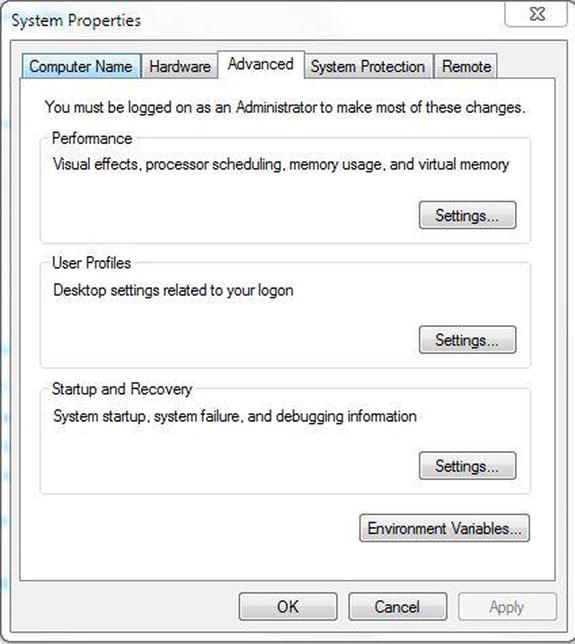
Figure 2-3. System Properties window
Click the Environment Variables button, and then click New under System variables. Enter the values shown in Figure 2-4 and click OK.
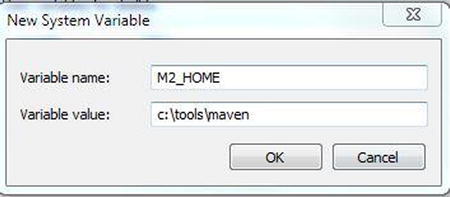
Figure 2-4. Maven Home system variable
The final step in the process is to modify the Path Environment variable so that you can run Maven commands from the command line. Select the Path variable and click Edit. Add %M2_HOME%/bin at the beginning of the path value, as shown in Figure 2-5. Click OK. This completes the Maven installation. If you have any open command-line windows, close them and reopen a new command-line window. When environment variables are added or modified, new values are not propagated to open command-line windows automatically.

Figure 2-5. Adding Maven Home to the path variable
MAVEN_OPTS ENVIRONMENT VARIABLE
When using Maven, especially in a complex project, chances are that you will run into OutOfMemory errors. This may happen, for example, when you are running a large number of JUnit tests or when you are generating a large number of reports. To address this error, increase the heap size of the Java virtual machine (JVM) used by Maven. This is done globally by creating a new environment variable called MAVEN_OPTS. To begin, we recommend using the value -Xmx512m.
Testing Installation
Now that Maven is installed, it’s time to test and verify the installation. Open a Command Prompt and run the following command:
mvn –v
This command should output information similar to the following:
C:WindowsSystem32>mvn -v
Apache Maven 3.2.3 (33f8c3e1027c3ddde99d3cdebad2656a31e8fdf4; 2014-08-11T14:58:10-06:00)
Maven home: c:	oolsmaven
Java version: 1.7.0_25, vendor: Oracle Corporation
Java home: C:Javajdk1.7.0_25jre
Default locale: en_US, platform encoding: Cp1252
OS name: "windows 7", version: "6.1", arch: "x86", family: "windows"
The –v command-line option tells the path where Maven is installed and what Java version it is using. You would also get the same results by running the expanded command mvn --version.
Getting Help
You can get a list of Maven’s command-line options by using the –h or --help options. Running the command below will produce output similar to that shown in Figure 2-6.
mvn -h
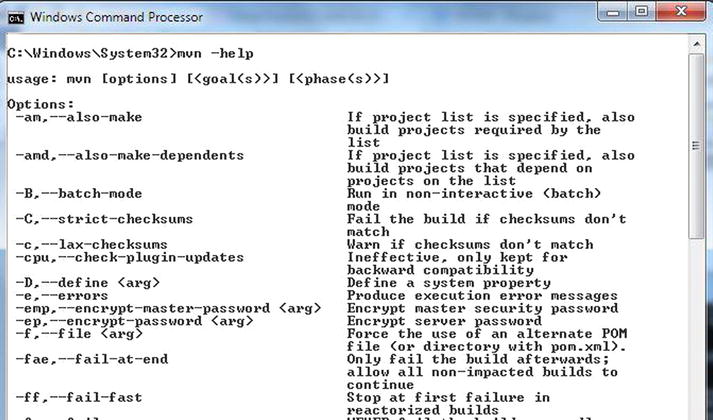
Figure 2-6. Results of running Maven Help command
Additional Settings
The installation steps we have provided so far are enough to get you started with Maven. However, for most enterprise uses, you need to provide additional configuration information. This user-specific configuration is provided in a settings.xml file located in the c:Users<<user_name>>.m2 folder.
![]() Note The .m2 folder is important to Maven’s smooth operation. Among many things, this folder houses a settings.xml file and a repository folder. The repository folder contains plug-in JAR files and metadata that Maven requires. It also contains the project-dependent JAR files that Maven downloaded from the Internet. We will take a closer look at this folder in Chapter 3.
Note The .m2 folder is important to Maven’s smooth operation. Among many things, this folder houses a settings.xml file and a repository folder. The repository folder contains plug-in JAR files and metadata that Maven requires. It also contains the project-dependent JAR files that Maven downloaded from the Internet. We will take a closer look at this folder in Chapter 3.
By default, the .m2 folder is located in your home directory. In Windows, this directory is usually c:Users<<your_user_name>>. Maven automatically creates the .m2 folder. If you don’t see this folder on your computer, however, go ahead and create one.
Out of the box, the .m2 folder does not contain a settings.xml file. In the .m2 folder on your local computer, create a settings.xml file and copy the contents of the skeleton settings.xml file as shown in Listing 2-1. We will cover some of these elements in the coming chapters. A brief description of the elements is provided in Table 2-1.
Listing 2-1. Skeleton Settings.xml Contents
<settings xmlns="http://maven.apache.org/SETTINGS/1.0.0"
      xmlns:xsi="http://www.w3.org/2001/XMLSchema-instance"
      xsi:schemaLocation="http://maven.apache.org/SETTINGS/1.0.0
                          http://maven.apache.org/xsd/settings-1.0.0.xsd">
      <localRepository/>
      <interactiveMode/>
      <usePluginRegistry/>
      <offline/>
      <pluginGroups/>
      <servers/>
      <mirrors/>
      <proxies/>
      <profiles/>
      <activeProfiles/>
</settings>
Table 2-1. Details of the settings.xml Elements
|
Element Name |
Description |
|---|---|
|
localRepository |
Maven stores copies of plug-ins and dependencies locally in the c:Users<<your_user_name>>.m2 epository folder. This element can be used to change the path of the local repository. For example, <localRepository>c:mavenrepo</localRepository> will change the repository location to the mavenrepo folder. |
|
interactiveMode |
As the name suggests, when this value is set to true, the default value, Maven interacts with the user for input. |
|
offline |
When set to true, this configuration instructs Maven to operate in an offline mode. The default is false. |
|
servers |
Maven can interact with a variety of servers, such as Apache Subversion (SVN) servers, build servers, and remote repository servers. This element allows you to specify security credentials, such as the username and password, which you need to connect to those servers. |
|
mirrors |
As the name suggests, mirrors allow you to specify alternate locations for your repositories. |
|
proxies |
proxies contains the HTTP proxy information needed to connect to the Internet. |
|
profiles |
profiles allow you to group certain configuration elements, such as repositories and pluginRepositories. |
|
activeProfile |
The activeProfile allows you to specify a default profile to be active for Maven to use. |
As we will discuss in detail in Chapter 3, Maven requires an Internet connection to download plug-ins and dependencies. Some companies employ HTTP proxies to restrict access to the Internet. In those scenarios, running Maven will result in Unable to download artifact errors. To address this, edit the settings.xml file and add the proxy information specific to your company. A sample configuration is shown in Listing 2-2.
Listing 2-2. Settings.xml with Proxy content
<settings xmlns="http://maven.apache.org/SETTINGS/1.0.0"
  xmlns:xsi="http://www.w3.org/2001/XMLSchema-instance"
  xsi:schemaLocation="http://maven.apache.org/SETTINGS/1.0.0
                      http://maven.apache.org/xsd/settings-1.0.0.xsd">
  <proxies>
    <proxy>
      <id>companyProxy</id>
      <active>true</active>
      <protocol>http</protocol>
      <host>proxy.company.com</host>
      <port>8080</port>
      <username>proxyusername</username>
      <password>proxypassword</password>
      <nonProxyHosts />
    </proxy>
  </proxies>
 </settings>
IDE Support
Throughout this book, we will be using the command line to create and build sample applications. If you are interested in using an IDE, the good news is that all modern IDEs come with full Maven integration without needing any further configuration.
Summary
This chapter walked you through the setup of Maven on your local computer. You learned that Maven downloads the plug-ins and artifacts needed for its operation. These artifacts are stored in the .m2 epository folder. The .m2 folder also contains the settings.xml file, which can be used to configure Maven’s behavior.
In the next chapter, we will take a deeper look at Maven’s dependency management.