
![]()
Documentation and Reporting
Documentation and reporting are key aspects of any project. This is especially true for enterprise and open source projects, where many people collaborate to build the project. This chapter looks at some of Maven’s tools and plug-ins, which make publishing and maintenance of online documentation a breeze.
This chapter will once again be working with the gswm Java project you built in earlier chapters. The gswm project is also available in the C:apressgswm-bookchapter7 folder.
As discussed in Chapter 5, Maven provides the site life cycle that can be used to generate a project’s documentation. Let’s run the following command from the gswm directory:
mvn site
The site life cycle uses Maven’s site plug-in to generate the site for a single project. Once this command completes, a site folder gets created under the project’s target. Figure 7-1 shows the contents of the site folder.
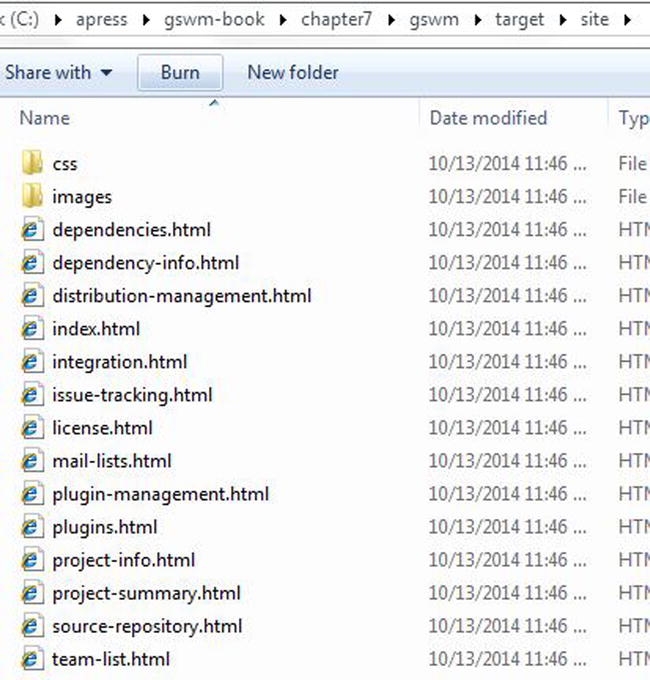
Figure 7-1. Generated site folder
Open the index.html file to browse the generated site. You will notice that Maven used the information provided in the pom.xml file to generate most of the documentation. It also automatically applied the default skin and generated the corresponding images and CSS files. Figure 7-2 shows the generated index.html file.
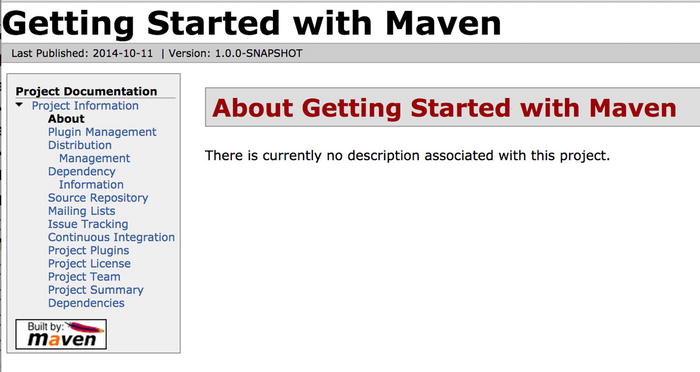
Figure 7-2. Generated index page
The Project Dependencies page provides valuable information regarding the project’s direct and transitive dependencies. It also provides the licensing information associated with those dependencies, as shown in Figure 7-3.
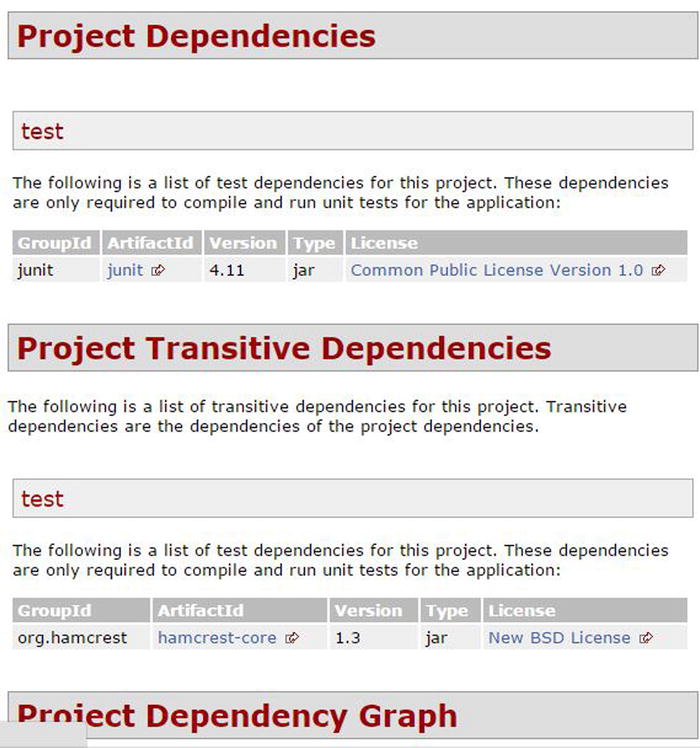
Figure 7-3. Project dependencies page
As you browse the generated site, you will notice that pages such as About, Mailing Lists, and Project License are missing information. Let’s modify the pom.xml file and add the missing information, as provided in Listing 7-1.
Listing 7-1. The pom.xml File with Project Information
<project xmlns="http://maven.apache.org/POM/4.0.0" xmlns:xsi="http://www.w3.org/2001/XMLSchema-instance"
  xsi:schemaLocation="http://maven.apache.org/POM/4.0.0 http://maven.apache.org/xsd/maven-4.0.0.xsd">
  <modelVersion>4.0.0</modelVersion>

  <groupId>com.apress.gswmbook</groupId>
  <artifactId>gswm</artifactId>
  <version>1.0.0-SNAPSHOT</version>
  <packaging>jar</packaging>

  <name>Getting Started with Maven</name>
  <url>http://apress.com</url>

  <description>
    This project acts as a starter project for the Introducing Maven book (http://www.apress.com/9781484208427) published by Apress.
  </description>

  <mailingLists>
    <mailingList>
      <name>GSWM Developer List</name>
      <subscribe>[email protected]</subscribe>
      <unsubscribe>[email protected]</unsubscribe>
      <post>[email protected]</post>
    </mailingList>
  </mailingLists>

  <licenses>
    <license>
      <name>Apache License, Version 2.0</name>
      <url>http://www.apache.org/licenses/LICENSE-2.0.txt</url>
    </license>
  </licenses>

  <!--- Developer, Dependency and Build information removed for brevity--->

</project>
Looking at the code for the pom.xml file in Listing 7-1, it is obvious that the description element is used to provide the project description. The mailingList element holds the mailing list information, and the license element includes the project’s license. Let’s regenerate the site by running the following command:
mvn clean site
Launch the index.html file under the newly generated targetsite folder. Figure 7-4A and Figure 7-4B shows the new About and Project License pages, respectively. Notice that Maven uses the URL declared in the license element to download the license text and include it in the generated web site.
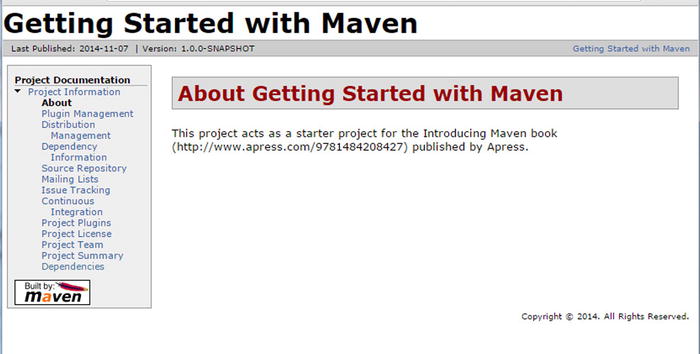
Figure 7-4A. Generated About page
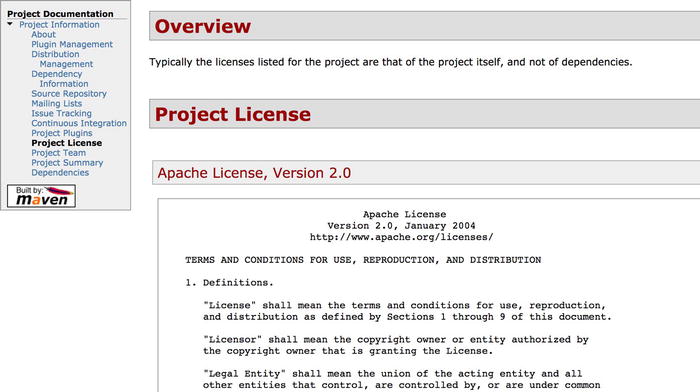
Figure 7-4B. Generated Project License page
Advanced Site Configuration
In the preceding section, project information was specified in the pom.xml file for Maven to use during site generation. For medium to complex projects, this approach would result in bloated and hard-to-maintain pom.xml files. Also, enterprises typically prefer to use their branding and logos in the generated site rather than the default Maven skin. To address these concerns, Maven allows you to specify content and configuration for site generation under the aptly named src/site folder. Figure 7-5 shows the directory structure for a simple site folder.
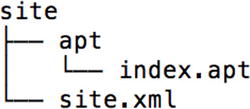
Figure 7-5. Site folder directory structure
The site.xml file, also known as the site descriptor, is used to customize the generated site. We will look at this element in just a second.
The apt folder contains site content written in Almost Plain Text (APT) format. The APT format allows documentation to be created in a syntax that resembles plain text. More information about the APT format can be found on the Maven web site (http://maven.apache.org/doxia/references/apt-format.html). In addition to APT, Maven supports other formats, such as FML, Xdoc, and Markdown.
Maven provides several archetypes that allow you to generate site structure automatically. Because you will be updating the existing gswm project, you will use the create goal instead of generate, as shown in the following code. Run the command in the C:apressgswm-bookchapter7gswm folder:
mvn archetype:create -DarchetypeArtifactId=maven-archetype-site-simple
Upon successful completion, you will see the site folder created under gswmsrc with the site.xml and apt folders. Let’s start by adding the project description to index.apt. Replace the contents of the index.apt file with the code from Listing 7-2.
Listing 7-2. The index.apt File Contents
-----
 Getting Started with Maven Starter
 -----
 Apress
 -----
 10-10-2014
 -----
This project acts as a starter project for the Introducing Maven book published by Apress. For more information check out the Apress Site https://www.apress.com.
Running mvn clean site results in a new About page, as shown in Figure 7-6.
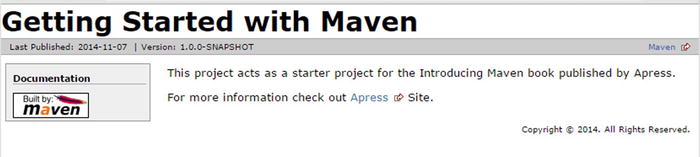
Figure 7-6. About page with new content
Notice that the left navigation pane for the page has completely disappeared. This is because Maven constructs this navigation using the site.xml file, and this site.xml file currently lacks navigation information.
Before we look at the information in the site.xml file, let’s add an image that will serve as the site logo. Static assets, such as images and HTML files, are placed in the site/resources folder. When Maven builds the site, it copies the assets in the resources folder to the root of the generated site. Copy the company logo company.png from the C:apressgswm-bookchapter7 folder and place it in the gswm/src/site/resources/images folder.
Now you are ready to modify the site.xml file so that the logo and navigation show up. Replace the site.xml file with the contents of Listing 7-3. Notice that the src element for the logo includes the relative path images/company.png. The menu element is used to create different navigation links to be displayed on the site.
Listing 7-3. The site.xml File Contents
<?xml version="1.0" encoding="ISO-8859-1"?>

<project xmlns="http://maven.apache.org/DECORATION/1.6.0" xmlns:xsi="http://www.w3.org/2001/XMLSchema-instance"
  xsi:schemaLocation="http://maven.apache.org/DECORATION/1.6.0 http://maven.apache.org/xsd/decoration-1.6.0.xsd"
  name="Getting Started With Maven" >

        <bannerLeft>
        <name>Apress</name>
        <src>images/company.png</src>
        <href>http://apress.com</href>
    </bannerLeft>
        <body>
            <links>
              <item name="Maven" href="http://maven.apache.org/"/>
            </links>
            <menu name="Project Information">
            <item name="Introduction" href="index.html"/>
            <item name="Plugin Management" href="plugin-management.html"/>
            <item name="Dependency Information" href="dependency-info.html"/>
            <item name="Source Repository" href="source-repository.html"/>
            <item name="Mailing Lists" href="mail-lists.html"/>
            <item name="Issue Tracking" href="issue-tracking.html"/>
            <item name="Continuous Integration" href="integration.html"/>
            <item name="Project Plugins" href="plugins.html"/>
            <item name="Project License" href="license.html"/>
            <item name="Project Team" href="team-list.html"/>
            <item name="Project Summary" href="project-summary.html"/>
            <item name="Dependencies" href="dependencies.html"/>
        </menu>
        <menu name="Reports">
        </menu>
        </body>
</project>
Running mvn clean site generates the site with the new logo and navigation, as shown in Figure 7-7.
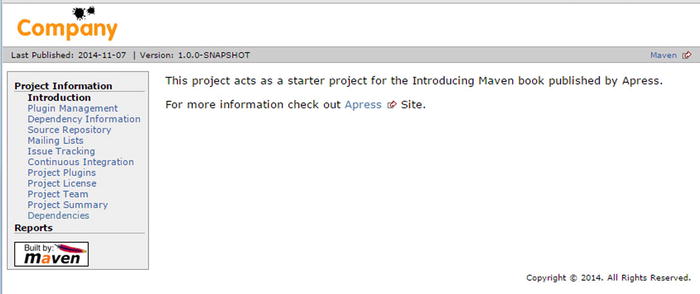
Figure 7-7. About page with the new logo
Javadoc is the de facto standard for documenting Java code. It helps developers understand what a class or a method does. Javadoc also highlights deprecated classes, methods, or fields.
Maven provides a Javadoc plug-in, which uses the Javadoc tool for generating Javadocs. Integrating the Javadoc plug-in simply involves declaring it in the reporting element of pom.xml file, as shown in Listing 7-4. Plug-ins declared in the pom reporting element are executed during site generation.
Listing 7-4. The pom.xml Snippet with Javadoc Plug-in
<project>
        <!—Content removed for brevity-->
 <reporting>
    <plugins>
      <plugin>
        <groupId>org.apache.maven.plugins</groupId>
        <artifactId>maven-javadoc-plugin</artifactId>
        <version>2.10.1</version>
      </plugin>
    </plugins>
  </reporting>
</project>
Now that you have the Javadoc plug-in configured, let’s run mvn clean site to generate the Javadoc. After the command successfully runs, you will notice the apidocs folder created under gswm /target/site. Double-click the index.html file under apidocs, and you will be able to browse the Javadoc. Figure 7-8 shows the Javadoc generated for the gswm project.
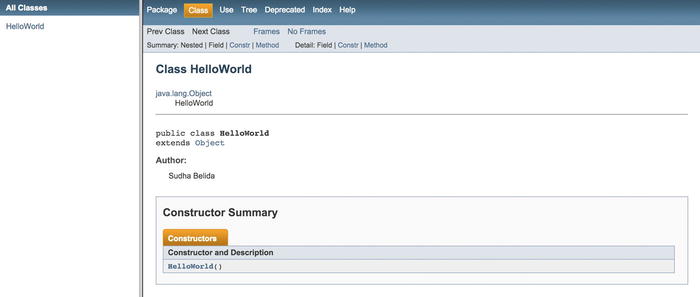
Figure 7-8. Generated Javadoc page
Test-driven development has become the norm in enterprises today. Unit tests provide immediate feedback to developers and allow them to build quality code. Considering how important tests are, Maven executes all of the tests for each build. Any test failures result in a failed build.
Maven offers the Surefire plug-in that provides a uniform interface for running tests created by frameworks such as JUnit or TestNG. It also generates execution results in various formats such as XML and HTML. These published results enable developers to find and fix broken tests quickly.
The Surefire plug-in is configured in the same way as the Javadoc plug-in in the reporting section of the pom file. Listing 7-5 shows the Surefire plug-in configuration.
Listing 7-5. The pom.xml Snippet with Surefire Plug-in
<project>
        <!—Content removed for brevity-->
  <reporting>
    <plugins>
      <plugin>
        <groupId>org.apache.maven.plugins</groupId>
        <artifactId>maven-surefire-report-plugin</artifactId>
        <version>2.17</version>
      </plugin>
    </plugins>
  </reporting>
</project>
Now that Surefire is configured, let’s generate a Maven site by running mvn clean site command. Upon successful execution of the command, you will see a Surefire Reports folder generated under gswm arget. It contains the test execution results in XML and TXT formats. The same information will be available in HTML format in the surefire-report.html file under site folder. Figure 7-9 shows Surefire Report for the gswm project.
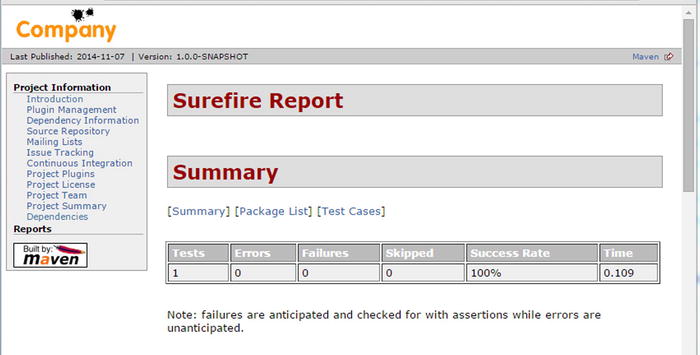
Figure 7-9. Generated Surefire Report
Generating Code Coverage Reports
Code coverage is a measurement of how much source code is being exercised by automated tests. Essentially, it provides an indication of the quality of your tests. Emma and Cobertura are two popular open source code coverage tools for Java.
In this section, you will use Cobertura for measuring this project’s code coverage. Configuring Cobertura is similar to other plug-ins, as shown in Listing 7-6.
Listing 7-6. The pom.xml Snippet with the Cobertura Plug-in
<project>
        <!—Content removed for brevity-->
  <reporting>
    <plugins>
      <plugin>
        <groupId>org.codehaus.mojo</groupId>
        <artifactId>cobertura-maven-plugin</artifactId>
        <version>2.6</version>
      </plugin>
   </plugins>
  </reporting>
</project>
Now that the plug-in is configured, let’s generate the site using the mvn clean site command. Upon successful completion of the command, Cobertura will create a cobertura folder under gswm argetsite. Launch the report by double-clicking the index.html file. The report should be similar to the one shown in Figure 7-10.

Figure 7-10. Generated Cobertura report
Generating the FindBugs Report
FindBugs is a tool for detecting defects in Java code. It uses static analysis to detect bug patterns, such as infinite recursive loops and null pointer dereferences. Listing 7-7 shows the FindBugs configuration.
Listing 7-7. The pom.xml Snippet with FindBugs Plug-in
<project>
        <!—Content removed for brevity-->
  <reporting>
    <plugins>
      <plugin>
        <groupId>org.codehaus.mojo</groupId>
        <artifactId>findbugs-maven-plugin</artifactId>
        <version>3.0.0</version>
      </plugin>
   </plugins>
 </reporting>
</project>
Once the Maven site gets generated, open the findbugs.html file under C:apressgswm-bookchapter7gswm argetsite to launch the FindBugs report. It should be similar to the one shown in Figure 7-11.
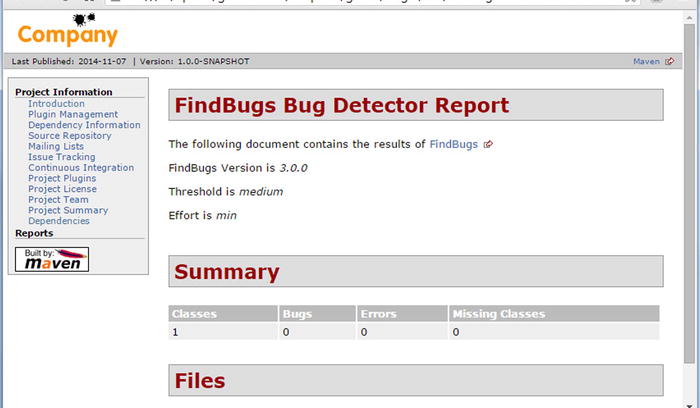
Figure 7-11. Generated FindBugs Bug Detector Report
Summary
The documentation and reporting capabilities provided by Maven play an important role in creating maintainable quality software. This chapter explained the basics of using the site life cycle and the configuration needed to produce documentation. You also looked at generating Javadocs, test coverage, and FindBugs reports.
In the next chapter, we will explain how to integrate Maven with Nexus and SVN. You will also learn about Maven’s release process.