![]()
Extending Your Network with Azure
Introducing Azure Virtual Networks
Virtual networks (VNets, in Azure), maintain the same characteristics as physical networks. The processes of physical networks enable data from one computer to be transported over Transmission Control Protocol, Internet Protocol (TCP/IP) to another computer. The information, or data, is transformed so that TCP/IP packets can transport it efficiently; it is sent to another computer through hardware network interface cards (NICs) via physical network switches. To send the data to and from other buildings and other datacenters, network engineers use hardware devices referred to as gateways. Additionally, in datacenters today, the hardware provides network architects with the ability to virtualize physical networks or subnetworks (subnets) into a virtual network subnet called a virtual LAN (VLAN). How would your budget be improved if Azure VNets reduced the need for a considerable amount of physical networking equipment?
This chapter provides you with a deep understanding of Microsoft Azure virtual networking components. You gain the insight needed for the planning considerations that let you use Azure Networks successfully. Finally, you walk through the steps required to build several VNet configurations used in Azure and study use cases for each option. One major arrangement provides steps for extending your current on-premises network infrastructure into Azure—what the industry refers to as a hybrid network.
An Azure VNet provides network engineers with the components to create virtual private networks (VPNs) that connect to your on-premises physical networks. VPNs allow computers to communicate using TCP/IP and reduce the need for physical networking hardware. This lowers the financial burden for items such as routers, switches, and gateway devices, not to mention the cost of maintaining and updating network hardware. The hardware components are virtualized to support Azure Cloud Services, and VNets are what you enable and configure through the Azure Portal or through PowerShell.
Remember that Azure is built on a modified version of the Microsoft virtualization platform, Hyper-V. The Microsoft hypervisor provides the virtualization of server hardware, including network adapters (NICs) and Hyper-V enabled virtual network switches. In your on-premises datacenter, physical network hardware is mixed with virtualized network hardware. In Microsoft Azure, only virtualized networking components are needed. You can use Hyper-V virtual network cards, virtual network switches, and gateways. In some of the Azure documentation, you may see the description “network overlay.” This is because Hyper-V supports on-premises datacenter requirements to mix physical network hardware components with virtualized network components, or the entire network can be virtualized as in Azure. To support your understanding of Azure VNets, see Figure 8-1.
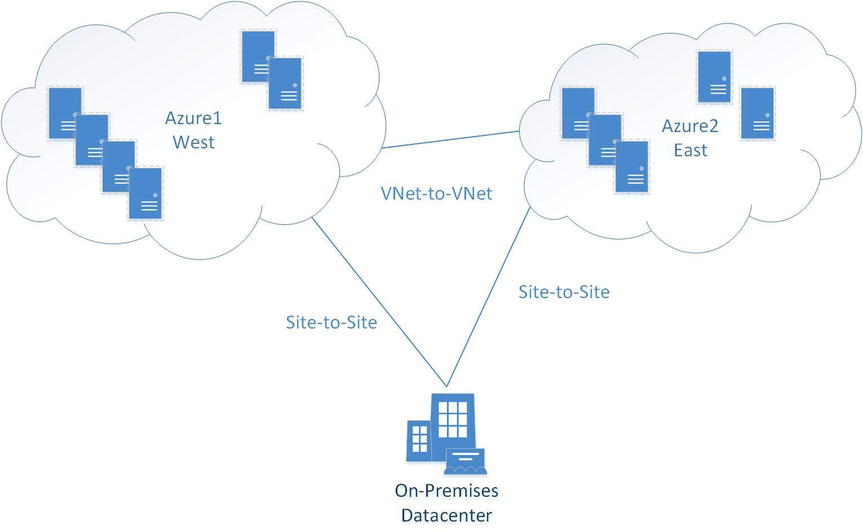
Figure 8-1. Azure VNet and cloud services
Areas of network condensation essential for successful network architecting are very similar to traditional hardware networking requirements, including the following:
- IP subnets
- IP addresses
- DNS name resolution
- Protocols
IP networks are normally divided into subnetworks (subnets), which are smaller divisions of the overall IP network or local area network (LAN). In Azure, there is currently no limit on the number of subnets in the VNet address space, and there should not be any overlap between subnets.
Important considerations when planning subnets include the following:
- For each IP subnet in Azure, the first and last IP addresses are reserved when you create a new subnet (public or private). These two addresses equal all 0s (zeros) for the network address and all 1s (ones) for the broadcast address.
- IP addresses can be public or private, following the Request for Comments (RFC) standards.
IP addresses used in Azure follow the specifications in Classless Inter-Domain Routing (CIDR, pronounced “cider”), which is a method of allocating IP addresses and routing IP packets. The Internet Engineering Task Force (IETF) introduced CIDR in 1993 as an IP version 4 (IPv4) standard. Planning for the use of IP address subnets using CIDR notation is another network architecture consideration when designing your Azure network.
CIDR notation consists of an IP address and a routing-prefix size expressed in decimal notation. The smallest subnet supported in Azure using CIDR notation is /29, and the largest subnet is /8. Here are some examples of CIDR notation:
- 192.168.1.0 / 29 (6 addresses, 8 subnets, range 192.168.1.0–192.168.1.7)
- 192.168.1.0 /24 (254 addresses, 256 subnets, range 192.168.1.0–192.168.1.255)
- 10.0.0.0 / 22 (1,022 addresses, 1,024 subnets, range 10.0.0.0–10.0.3.255)
- 10.10.0.0 /16 (65,534 addresses, 65,536 subnets, range 10.10.0.0–10.10.255.255)
- 98.245.0.0 /8 (16,777,214 addresses, 16,777,216 subnets, range 98.0.0.0–98.255.255.255)
The IP address is unique to a single device (server NIC, switch interface, or gateway). Azure VNets support public IP addresses and private (non-Internet-routable) IP address ranges, defined in RFC 1918, in the use of subnet address ranges (see Figure 8-2). The use of public IP addresses is a relatively new feature to provide broader options for your Azure services; it closes the gap between traditional network hardware and Azure VNet capabilities.
Figure 8-2. Azure VNet and subnets
Public IP address ranges and private IP address ranges are added to Azure the same way: by editing network configurations using the netcfg command with the appropriate switches, or by editing in the Azure Portal. You can enter the public or private IP address ranges when the subnets are created or edit them later.
Other IP address considerations include the IP addresses assigned to virtual machines (VMs) or the cloud service. IP address are divided into the following three categories:
- DIP internal IP address from a DHCP pool of IP addresses
- VIP virtual IP, which is assigned to the cloud service where the VM resides and not assigned to the VM directly
- PIP instance-level public IP, which can be assigned directly to the VM but not to the cloud service
Public IP addresses and internal IP addresses are assigned when the service is created. The internal IP address DIP is a DHCP address assigned to the VM. The DIP is not designed for public-facing connectivity, and it is assigned to the VM based on the IP subnet from the Azure VNet that is created. If no VNet was created, then the VM is assigned a random IP address (from DHCP) until the VM is stopped and deallocated. The IP address that is assigned in this case is not part of your VNet, and therefore the VM to which this address was assigned cannot connect with your on-premises network.
DNS Name Resolution
Domain name system (DNS) is a naming system for computers and services used on the Internet or in an on-premises datacenter. It translates easily memorized names to TCIP addresses. The first Azure virtual server to boot in a subnet acquires the x.x.x.4 IP address. This server could be a stand-alone server, a stand-alone DNS server for your Azure VMs to use, or a DNS server that replicates DNS zones with your on-premises DNS server. The DNS is an essential component for effective functioning of most Azure services, on-premises datacenters, and Internet services around the world.
![]() Tip To find out more about DNS and name resolution support in Azure, see the article “Name Resolution for VMs and Role Instances” at http://msdn.microsoft.com/en-us/library/azure/jj156088.aspx.
Tip To find out more about DNS and name resolution support in Azure, see the article “Name Resolution for VMs and Role Instances” at http://msdn.microsoft.com/en-us/library/azure/jj156088.aspx.
Azure supports many of the foundational networking communication protocols, but a few are blocked. Broadcasts and multicast protocols are blocked in addition to IP-in-IP encapsulated packets. Again, referring back to the Hyper-V discussion in Chapter 1, Generic Routing Encapsulation (GRE) packets are also blocked. Many standard IP-based protocols used in VNets are supported. A few examples are
- TCP
- UDP
- ICMP
To support security in Azure VNets, you may perform standard testing such as pinging default routers in each subnet. This is also blocked. Additional blocked troubleshooting techniques include tracert, even for diagnostic support.
One other point in relation to the Open Systems Interconnect (OSI) model is that Azure VNets are on Layer-3, whereas traditional hardware VLANs are on Layer-2. Thus VLANs cannot cross from your on-premises datacenter into Azure.
This section teaches you about the specifics of Azure VNets and when to use them. By default, every Azure cloud service allows VMs to communicate with each other. However, to communicate with other VMs in another cloud service, you use a VNet. VNets are also required when you extend your network from an on-premises datacenter to Azure cloud services.
The steps for networking are as follows:
- Connect a single site or multiple sites.
- Plan your IP networks.
- Deploy and manage your networks.
Two types of VNet configuration are available in Azure:
- Cloud-only VNet: Lets you create an IP address space that allows VMs and PaaS entities to communicate with other IP addresses in the same Azure subscription or with another VNet in another Azure subscription. This provides subnet features to help coordinate and separately manage different business solutions in Azure, exactly as they are managed in an on-premises datacenter.
- Cross-premises VNet: Extends IP networks for many different configurations to support a requirement to extend your datacenter from a single building with limited resources to an Azure public cloud with unlimited resources. This is an amazing option for any network engineer—the ability to provide a secure VPN connection into a world-class, state-of-the-art datacenter.
With these two types of VNets, you can build many different types of IP subnet and networking configurations. Let’s walk you through the steps to complete a few Azure VNet tasks, including the following:
- VNet in Azure (cloud only)
- VNet from Azure to a client computer (one or many)
- VNets from Azure to a local datacenter (hybrid)
- VNets into multiple Azure regions
There are more options than these four, but all Azure network configurations use one or more of these standard network connections to build larger networks.
![]() Tip For a complete list of Microsoft Azure VNet configuration tasks, see http://msdn.microsoft.com/en-us/library/azure/jj156206.aspx.
Tip For a complete list of Microsoft Azure VNet configuration tasks, see http://msdn.microsoft.com/en-us/library/azure/jj156206.aspx.
Cloud-only VNets connect VMs and cloud services directly to other VMs and cloud services. Cloud-only VNets don’t require a lot of detailed network architecture and don’t use a VNet gateway to connect from one cloud service to another. Also recall the rule discussed earlier, that you must make sure the IP addresses used do not overlap other IP subnets.
Once the VNet is created, you can add new VMs and instances from a PaaS. All communication through the VNet is secure because the communication between two endpoints is carried over an Azure VNet.
CREATE A CLOUD-ONLY VNET
- In the Azure Management Portal, click New in the lower-left corner, as shown in Figure 8-4.
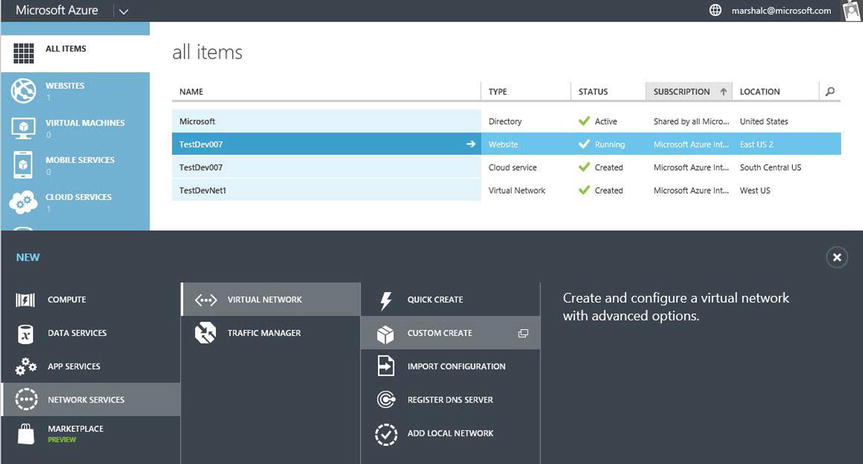
Figure 8-4. Creating a cloud-only VNet using the Custom Create wizard
- Select Network Services
 Virtual Network Custom Create.
 - In the Create A Virtual Network Wizard, enter the following VNet details as shown in Figure 8-5:
- Name (should be short and represent the service)
- Location (Azure region)
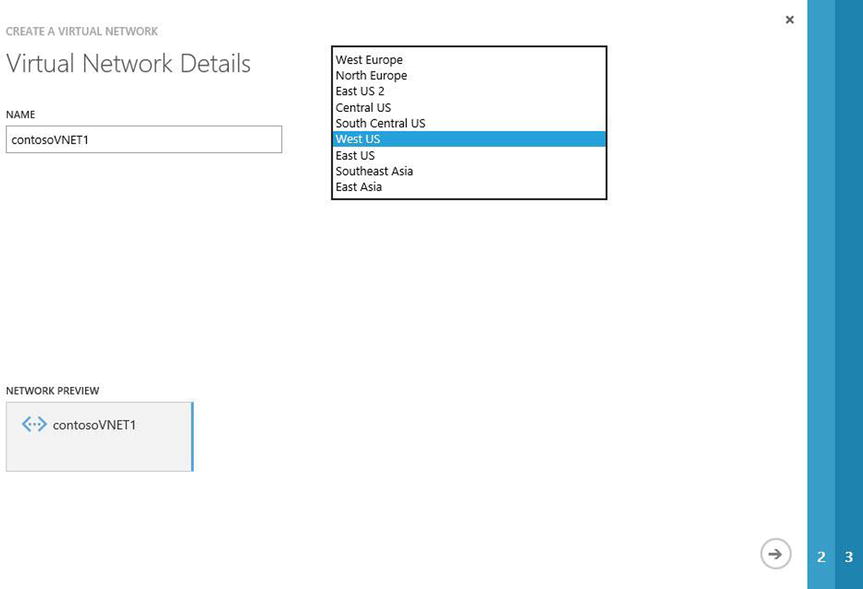
Figure 8-5. Enter the server name and Azure region using the VNet wizard
- Click the arrow in the lower-right corner to proceed.
- Leave the defaults on the DNS Servers and VPN Connectivity page empty for now. Azure provides DNS name resolution, but you can edit it later to add a dedicated DNS from your on-premises network. Click the arrow in the lower-right corner to proceed.
- Leave the defaults for the current address space, unless you plan to use another IP address range.
- Click the check mark in the lower-right corner to complete this wizard, as shown in Figure 8-6.
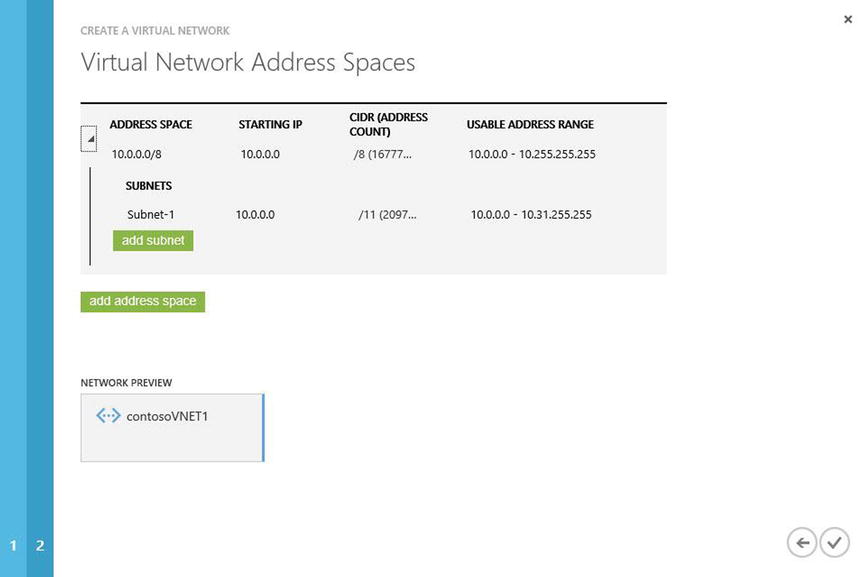
Figure 8-6. Complete the wizard to create this VNet
You can review the networks in the console. The final network settings should be similar to the final settings based on these steps.
Cross-Premises Virtual Network
There are differences between a cloud-only VNet and a cross-premises network connection. Currently, Azure supports three types of VPN connections:
- Point-to-site VPN
- Site-to-site VPN
- ExpressRoute
This VPN type is used as a simpler connection from an on-premises computer to an Azure VNet. It does not require a VPN device. A VPN client is installed on the computer and establishes a connection to the Azure VNet. This VPN connection is best used when only a few clients need to connect to an Azure VNet.
If you roam from different sites in a city, state, or country, the point-to-site connection is generally the easiest to connect and maintain. Many smaller development shops that do not have an external-facing IPv4 address or VPN device use point-to-site VPNs. The process for enabling a point-to-site connection is provided in two parts. In Part 1, you use the Azure Portal.
CONFIGURE A POINT-TO-SITE CONNECTION: PART 1
- In the Azure Management Portal, click New in the lower-left corner, as described in the “Create a Cloud-Only VNet” exercise earlier.
- Choose Network Services Virtual Network Custom Create to start the wizard.
- Provide the VNet details, including the name of the VNet and the location (Azure geographical region) where this VNet is to be enabled, as shown in Figure 8-7. Click the arrow in the lower-right corner to proceed.
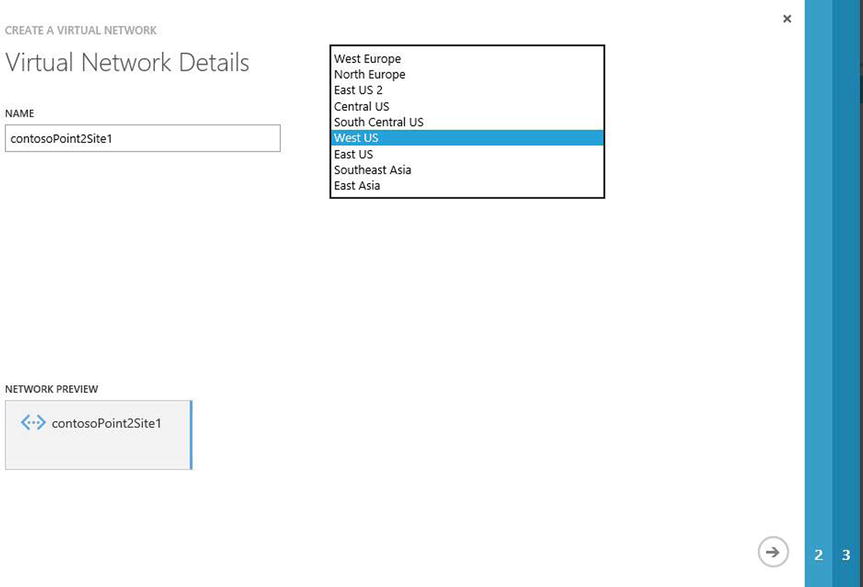
Figure 8-7. Creating a point-to-site VPN using the Virtual Network Wizard
- On the DNS Servers and VPN Connectivity page, you have two options:
- Leave it blank, and allow Azure to perform name resolution.
- Fill in the DNS Server and IP address fields. This option does not create a DNS server, but it allows you to use another DNS resource.
For this example, you’ll use Azure to perform name resolution.
- On the same page, under the Point-To-Site Connectivity heading, click the check box to enable the option to configure a point-to-site VPN, as shown in Figure 8-8. When you enable this option, the Network Preview icon completes the visual indicator. Click the arrow in the lower-right corner to proceed.
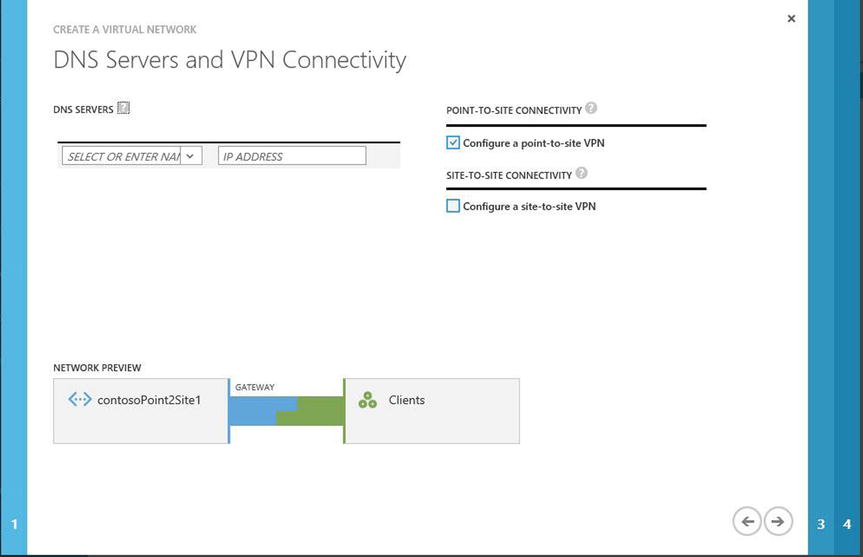
Figure 8-8. Option to choose to configure a point-to-site VPN
- On the Point-To-Site Connectivity Page, the default address space is provided. If needed, you can edit the address space by moving the mouse over the Starting IP field and using the drop-down menu, as shown in Figure 8-9. You may also edit the number of CIDR addresses using the drop-down menu. This page of the wizard also lets you add other address spaces. Click the arrow in the lower-right corner to proceed.
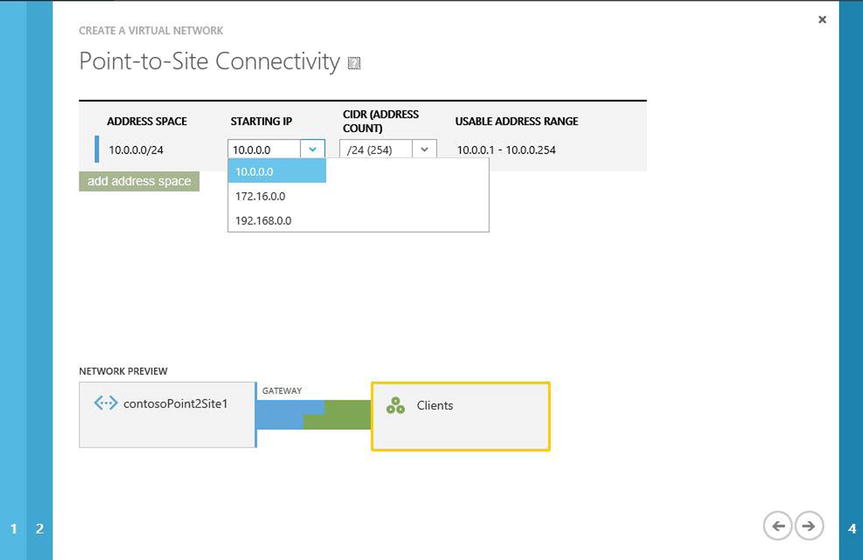
Figure 8-9. Enter the starting IP address using CIDR notation
- The Virtual Network Address Spaces page lets you edit the address space, subnets, and CIDR (address count) . Click the button to add a gateway subnet, as shown in Figure 8-10, because you need one gateway for this subnet. Additional subnets help in the organization of VMs in a separate subnet based on their roles: DC, SQL, and so forth.
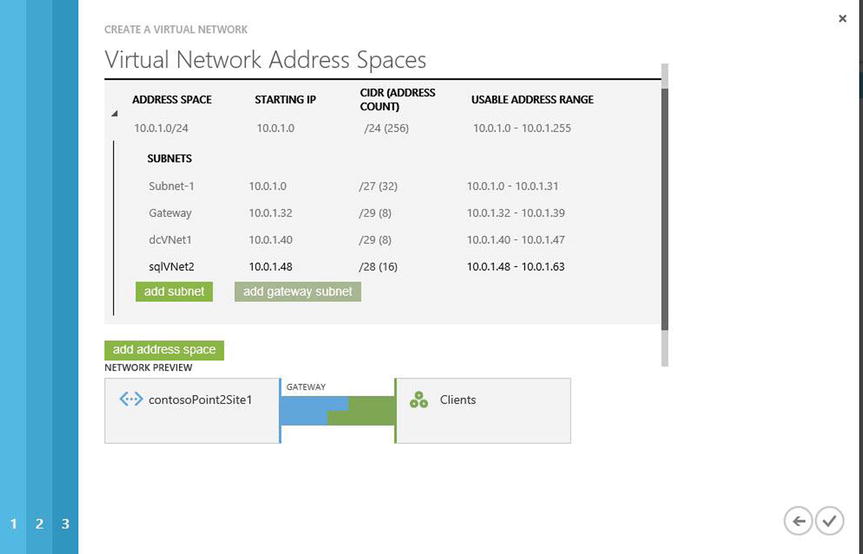
Figure 8-10. Final page to create the point-to-site configuration in the Virtual Network Wizard
- Click the check mark in the lower-right corner complete the wizard.
- In the Network pane view in your Azure Portal, select the point-to-site network that you just created, to view the dashboard.
- At the bottom of the page, click Create Gateway (see Figure 8-11).

Figure 8-11. Point-to-site configuration from the dashboard view of the Azure Network pane
- A gray pop-up window asks, “Do you want to create a gateway …?” as shown in Figure 8-12. Click Yes.

Figure 8-12. Pop-up window to create a gateway
It will take 15–20 minutes for the gateway creation to be completed. (Icons in the lower-right corner show the status of this process.)
Part 1 creates and enables a point-to-site VPN connection from the Azure Portal, but it is not the end of the entire process. Part 2 finalizes the secure client connection into Azure. The steps to do so are shown in the following exercise.
CREATE CERTIFICATES AND ENABLE THE CLIENT: PART 2
To authenticate the VPN client to the point-to-site VPN that you created in Part 1, you need to create an X.509 certificate root certificate that will be uploaded to the Azure point-to-site VNet. For lab purposes, you can use a self-signed certificate. The following steps describe how to create a certificate using the makecert utility that’s available with the free version of Visual Studio Express 2013 for Windows Desktop:
![]() Note Microsoft recommends using a self-signed certificate for lab testing only. When configuring point-to-site VPN connections in a production environment, we recommend purchasing a public certificate from a certificate provider. For testing, you can use the makecert utility that’s available with Microsoft Visual Studio Express 2013 for Windows Desktop, which you can download from www.visualstudio.com/products/visual-studio-express-vs.aspx.
Note Microsoft recommends using a self-signed certificate for lab testing only. When configuring point-to-site VPN connections in a production environment, we recommend purchasing a public certificate from a certificate provider. For testing, you can use the makecert utility that’s available with Microsoft Visual Studio Express 2013 for Windows Desktop, which you can download from www.visualstudio.com/products/visual-studio-express-vs.aspx.
- To create a self-signed certificate using makecert.exe, follow these steps:
- Download Visual Studio Express 2013 for Windows Desktop from www.visualstudio.com/products/visual-studio-express-vs.aspx, and install it by following the onscreen prompts.
- Once the Visual Studio Express for Windows Desktop installation is complete, open a developer command prompt for Visual Studio 2013.
- Run the following cmdlet, which creates the certificate in the CurrentUser personal certificate store and creates a corresponding .cer file and places it in the working folder:
makecert -sky exchange -r -n "CN=P2SRootCert" -pe -a sha1 -len 2048 -ss My "P2SRootCert.cer" - While still in the Visual Studio cmd window, run the following cmd to create the required client certificate in the CurrentUser personal certificate store:
makecert.exe -n "CN=P2SClientCert1" -pe -sky exchange -m 96 -ss My -in "P2SRootCert" -is my -a sha1
- With all the necessary certificates created, go back to the Azure Portal. On the Networks tab, select the point-to-site VPN network you just created:
- If you wish to install the client certificate on multiple computers, export the client certificate from the computer on which it was created. You can use the following PowerShell cmdlet to do so:
Get-ChildItem -Path cert:CurrentUserMy - First you need to find the certificate’s thumbprint. From the results, find the certificate that you created, and copy the thumbprint. Paste the thumbprint of the certificate into the next cmdlet:
$cert = (Get-ChildItem -Path cert:CurrentUserMy<Thumbprint>)Export-Certificate -Cert $cert -FilePath c: empcerts P2SClientCert1.cer - You can now take the .cer file and install it on other computers that need to connect to your point-to-site VPN.
- If you wish to install the client certificate on multiple computers, export the client certificate from the computer on which it was created. You can use the following PowerShell cmdlet to do so:
- From the dashboard view, select the Certificates tab. Click Upload A Root Certificate to upload your certificate file to the Azure Portal.
- On the Upload A Certificate page, browse to the location where the .cer file was created. Select the certificate file, and click Open. Click the check mark to upload the file.
- From the dashboard view of the point-to-site VNet that you created in Part 1, in the quick glance menu on the right side of the Azure Portal screen, as shown in Figure 8-13, download the VPN client configuration package:
Download the 32-bit Client VPN Package
Download the 64-bit Client VPN Package
Supported operation systems include the following:
- Windows 7 (32/64)
- Windows Server 2008R2 (64)
- Windows 8 / 8.1 (32/64)
- Server 2012 / R2

Figure 8-13. Dashboard view of the Network pane in Azure Portal
- When prompted, choose to save the file on your local computer. When the download completes, run the .exe program on each client computer to connect to the Azure point-to-site VPN.
 Tip The VPN client package is not signed by Microsoft or Azure. You can use the free SignTool to customize the package. This utility can be found at http://msdn.microsoft.com/en-us/library/windows/desktop/aa387764(v=vs.85).aspx
 - After the package is installed, navigate to the VPN connection and connect. A message about the certificate appears. Click Continue to use elevated privileges. Click Connect. Your client is now connected through your Azure VPN point-to-site connection.
Open a command prompt, and run the IPCONFIG/ALL command to show the Azure VNet connection. Your results should be similar to the following:
PPP adapter VNetEast:
Connection-specific DNS Suffix . :
Description . . . . . . . . . . . : contosoPoint2Site1
Physical Address. . . . . . . . . :
DHCP Enabled. . . . . . . . . . . : No
Autoconfiguration Enabled . . . . : Yes
IPv4 Address. . . . . . . . . . . : 10.0.1.4(Preferred)
Subnet Mask . . . . . . . . . . . : 255.255.255.255
Default Gateway . . . . . . . . . :
NetBIOS over Tcpip. . . . . . . . : Enabled
Using a site-to-site VPN allows the extension from your on-premises VNet to connect to your Azure VNet. This connection supports local on-premises resources, such as DNS and database servers, using the resources in Azure. The site-to-site VPN uses an on-premises VPN gateway device, which supports static and/or dynamic routing to connect to the Azure VNet gateway. A two-part procedure is required to complete the site-to-site connection.
In Part 1, you use a wizard in the Portal to configure the site-to-site connection in the Azure network. In Part 2, you complete the connection by creating a VNet gateway device in Azure and then download the configuration file to use with your on-premises VPN hardware.
![]() Caution Network engineers or the IT department normally manage on-premises gateway devices. Configuration of a gateway requires not only access to these devices, but also the experience to edit the configurations. If you do not currently manage these or other networking components, seek help from your peers to complete these exercises.
Caution Network engineers or the IT department normally manage on-premises gateway devices. Configuration of a gateway requires not only access to these devices, but also the experience to edit the configurations. If you do not currently manage these or other networking components, seek help from your peers to complete these exercises.
The steps to complete the site-to-site VPN connection include the following:
- Planning the IP subnet
- Enabling the Azure site-to-site connection
- Configuring the on-premises VPN device (public IPv4 IP)
- Enabling the gateway device
CONFIGURE A SITE-TO-SITE CONNECTION: PART 1
- In the Azure Management Portal, click New in the lower-left corner.
- Choose Network Services Virtual Network Custom Create to start the wizard.
- On the Virtual Network Details screen, enter the name for the VNet and choose a location, as shown in Figure 8-14. Click the arrow in the bottom-right corner to continue.
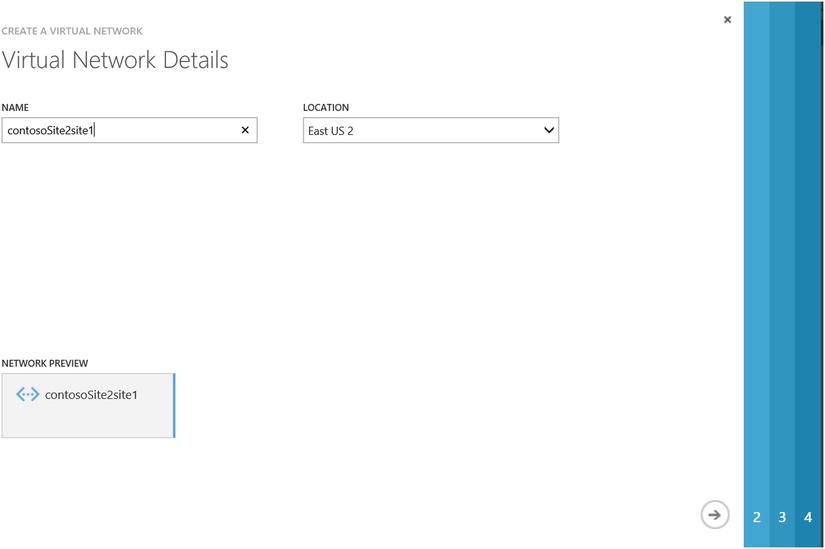
Figure 8-14. Virtual Network Wizard to create site-to-site VPN
- On the DNS Servers and VPN Connectivity page, click the check box to configure a site-to-site VPN, as shown in Figure 8-15. As with the configuration of a point-to-site VPN, this does not create a DNS server; rather, it enables editing for on-premises DNS lookup. In this example, leave the DNS option blank. Click the arrow in the bottom-right corner to continue.
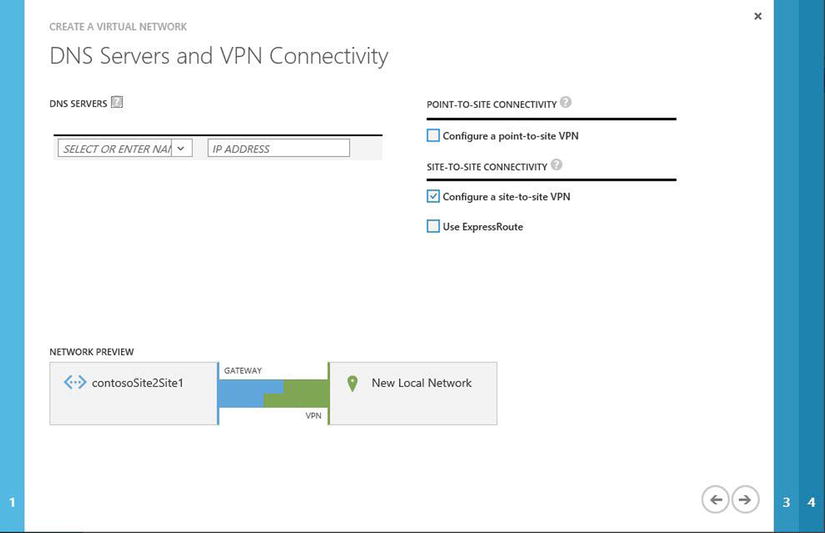
Figure 8-15. Option to configure a site-to-site VPN in the Virtual Network Wizard
- On the Site-to-Site Connectivity page, enter a friendly name for your on-premises datacenter, the IP address information of your on-premises datacenter, and the external-facing IP address of your VPN device. For this example, enter the IP address 10.0.0.0 to complete the wizard, as shown in Figure 8-16. Click the arrow in the bottom-right corner to continue.
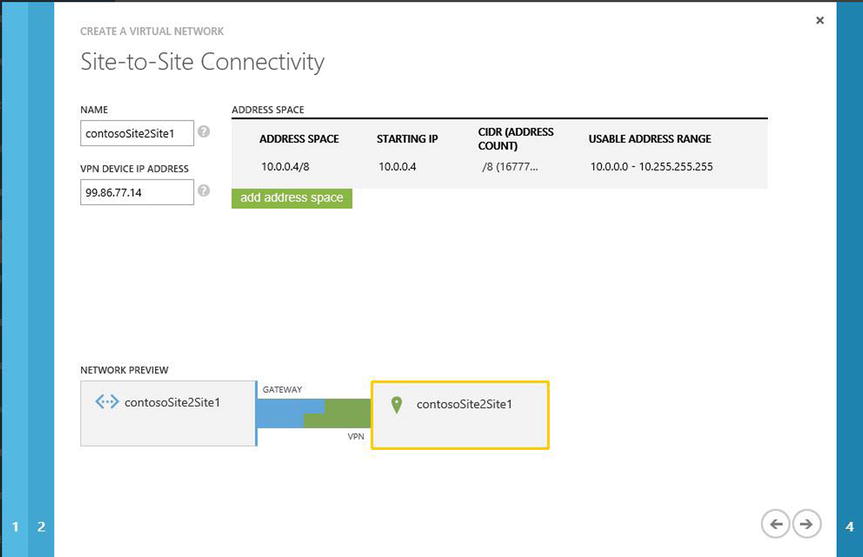
Figure 8-16. Enter the VPN device IP address and address space in the Virtual Network Wizard
- The Virtual Network Address Spaces page shown in Figure 8-17 lists the Azure dynamic IP addresses (DIPs) discussed earlier in this chapter. The gateway is a required configuration: it must be added to the subnet to allow communication from on-premises networks to Azure VNets. Click the check mark in the bottom-right corner to complete these steps. Azure takes 15–20 minutes to create the VNet configuration.
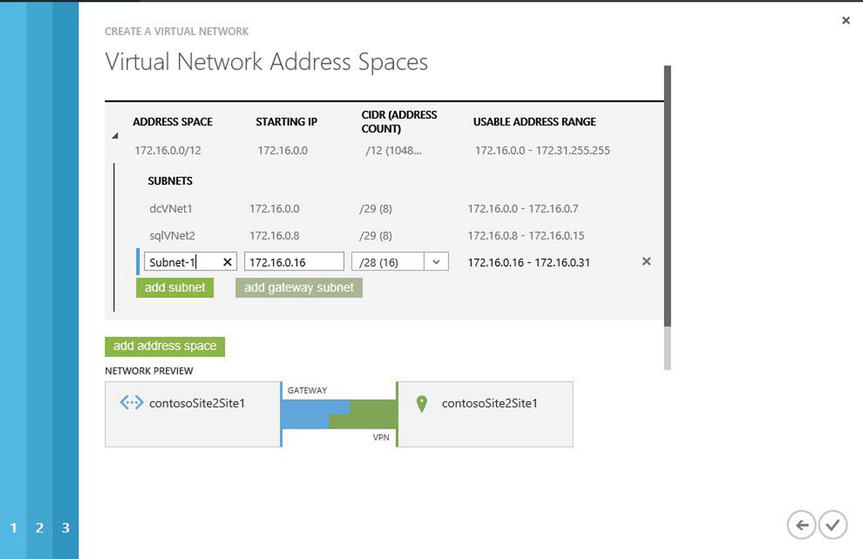
Figure 8-17. Final page to create a site-to-site VPN in the Virtual Network Wizard
This chapter has addressed using Azure VNet configurations, both in the cloud and extended into your on-premises datacenter. Network architects will agree that each of these configuration procedures is similar to that of physical networking on site.
In Part 2, you configure the VNet gateway both in Azure and on-premises in your datacenter. The gateway device in Azure supports connections using two types of routing: static and dynamic. If you would like to connect more VPNs to the end device, choose dynamic routing.
![]() Tip Microsoft has worked diligently with many hardware OEMs to provide support for an ever-growing list of devices and OS versions, including Cisco, Juniper, Brocade, Barracuda, F5, Dell, and others. You can find the latest list of supported vendors at http://msdn.microsoft.com/en-us/library/azure/jj156075.aspx.
Tip Microsoft has worked diligently with many hardware OEMs to provide support for an ever-growing list of devices and OS versions, including Cisco, Juniper, Brocade, Barracuda, F5, Dell, and others. You can find the latest list of supported vendors at http://msdn.microsoft.com/en-us/library/azure/jj156075.aspx.
CONFIGURE A SITE-TO-SITE CONNECTION: PART 2
- From the Azure Management Portal, return to the Network page to validate that the VNet was created. Click the name of the VNet, as shown in Figure 8-18.
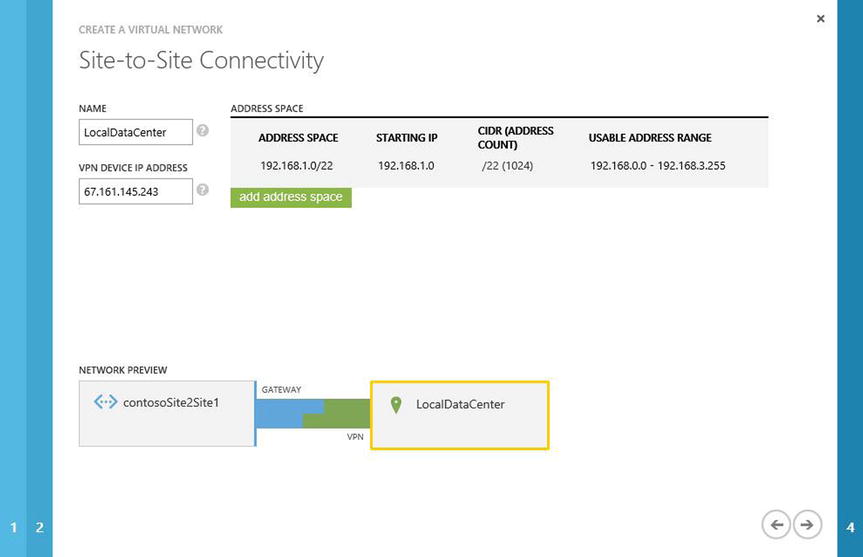
Figure 8-18. Validating a site-to-site VPN using the Virtual Network Wizard
Your view changes to the dashboard view. The VNet does not yet have a gateway configured, as shown in Figure Figure 8-19.
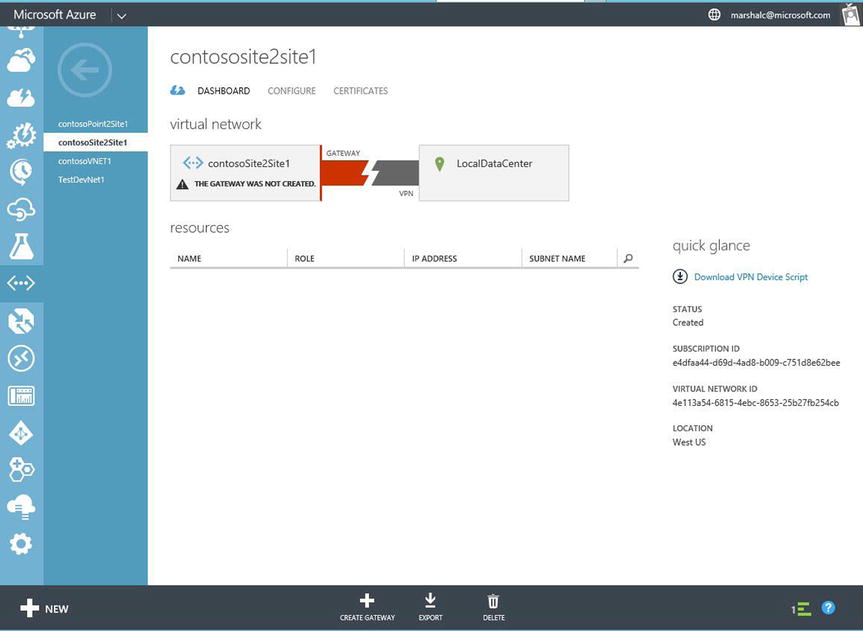
Figure 8-19. Dashboard view of the Network pane in Azure Portal, showing that a gateway has not been configured for the VNet
- At the bottom of the page, click Create Gateway, as shown in Figure 8-20. Choose Static Routing or Dynamic Routing, based on your device support.

Figure 8-20. Pop-up menu to create a routing gateway
- A pop-up asks if you want to configure the gateway, as shown in Figure 8-21. Click Yes. It may take 15–20 minutes to complete the gateway configuration.

Figure 8-21. Pop-up window confirming that you want to create a gateway
After the gateway device is created in Azure, there are many network components for which you need to collect information to supply to the supported VPN device in your local datacenter.
- Click the Manage Key option at the bottom of the dashboard to copy the keys to the clipboard. Save the keys locally.
- While in the dashboard view, in the quick glance section, select Download VPN Device Script. Select the vendor, platform, operating system, and version, as shown in Figure 8-22.

Figure 8-22. Options for downloading the VPN device on the local network
When prompted, choose to save the downloaded file to your local computer. After the download completes, this file is required to configure your on-premises hardware device, as shown in Figure 8-23.

Figure 8-23. Pop-up windows to save the configuration script based on the device option chosen
- Use the configuration information to complete the on-premises device configuration of the VPN appliance.
- After the VPN device is configured, in the Dashboard view in the Azure Portal, you can validate that the network connection is made into Azure. Notice the traffic from Azure to your on-premises network.
![]() Tip If you do not see IP traffic flowing from on-site into Azure, check to verify the gateway IP address both in Azure and on-site. Also verify the subnet address range of your local networks.
Tip If you do not see IP traffic flowing from on-site into Azure, check to verify the gateway IP address both in Azure and on-site. Also verify the subnet address range of your local networks.
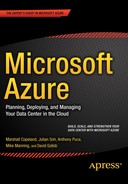
The final topic in this chapter, multiple Azure locations, takes you through the combination of the previous three VNet configurations. Figure 8-24 portrays multiple datacenters connecting to multiple Azure locations.
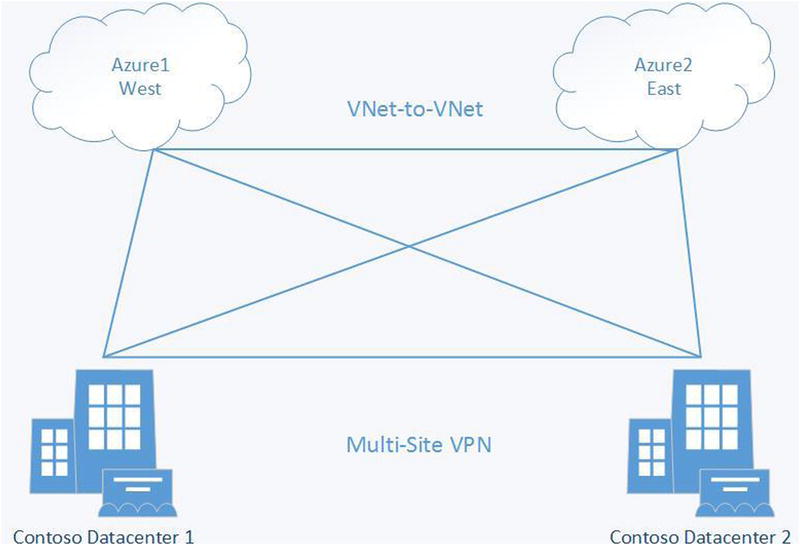
Figure 8-24. Multiple datacenters connecting to multiple Azure locations
Think about a business that uses two Azure locations to maintain redundancy or to reach another set of customers in a different geographic region. You can also use this type of connection if you have two on-premises datacenters and would like to connect to two Azure locations. Note that this configuration requires you to have selected a dynamic routing VPN option.
![]() Tip If you selected static routing earlier, you can change to dynamic routing without removing any of the other configuration components by deleting the existing gateway and re-creating it with the other option. To help you decide what type of routing gateway you should choose, see the article “About VPN Devices and Gateways for Virtual Network Connectivity” at https://msdn.microsoft.com/en-ca/library/azure/jj156075.aspx.
Tip If you selected static routing earlier, you can change to dynamic routing without removing any of the other configuration components by deleting the existing gateway and re-creating it with the other option. To help you decide what type of routing gateway you should choose, see the article “About VPN Devices and Gateways for Virtual Network Connectivity” at https://msdn.microsoft.com/en-ca/library/azure/jj156075.aspx.
Using this type of advanced connection into Azure and to multiple Azure locations provides redundancy for networks and Azure resources. To complete a multi-site VPN connection, you use XML files. The process currently is not completed using only the Azure Portal. This may change in the future, but today you’ll create this configuration manually, as described in the following exercise. Many of the steps required for this configuration are based on the steps covered previously in this chapter.
CREATE AN AZURE MULTI-SITE VPN
This exercise uses Contoso locations to connect multiple Azure locations to two Contoso datacenters:
- Create a site-to-site VPN, and select dynamic routing. Refer to the steps in the exercise “Configure a Site-to-Site Connection: Part 2.”
- In the Azure Portal, on the Network Management page, select the option to export the VNet configuration files. Click the check mark in the lower-right corner to proceed.
- Save the NetworkConfig.xml file.
- Open the NetworkConfig.xml file in an XML editor. The information should be similar to the following configuration file. In this case, you have two Contoso datacenters and two Azure locations:
<NetworkConfiguration xmlns:xsd="http://www.w3.org/2001/XMLSchema" xmlns:xsi="http://www.w3.org/2001/XMLSchema-
instance" xmlns="http://schemas.microsoft.com/ServiceHosting/2011/07/NetworkConfiguration">
  <VirtualNetworkConfiguration>
    <LocalNetworkSites>
      <LocalNetworkSite name="AzureSite1">
        <AddressSpace>
          <AddressPrefix>10.11.0.0/24</AddressPrefix>
          <AddressPrefix>10.12.0.0/24</AddressPrefix>
        </AddressSpace>
        <VPNGatewayAddress>131.2.3.4</VPNGatewayAddress>
      </LocalNetworkSite>
      <LocalNetworkSite name="AzureSite2">
        <AddressSpace>
          <AddressPrefix>10.12.0.0/24</AddressPrefix>
          <AddressPrefix>10.13.0.0/24</AddressPrefix>
        </AddressSpace>
        <VPNGatewayAddress>131.4.5.6</VPNGatewayAddress>
      </LocalNetworkSite>
    </LocalNetworkSites>
    <VirtualNetworkSites>
      <VirtualNetworkSite name="AzureVNet1" AffinityGroup="WestAfinGp1">
        <AddressSpace>
          <AddressPrefix>10.22.0.0/24</AddressPrefix>
          <AddressPrefix>10.23.0.0/24</AddressPrefix>
        </AddressSpace>
        <Subnets>
          <Subnet name="Azure-FE">
            <AddressPrefix>10.22.0.0/25</AddressPrefix>
          </Subnet>
          <Subnet name="Azure-BE">
            <AddressPrefix>10.22.0/25</AddressPrefix>
          </Subnet>
          <Subnet name="GatewaySubnet">
            <AddressPrefix>10.22.2.0/29</AddressPrefix>
          </Subnet>
        </Subnets>
        <Gateway>
          <ConnectionsToLocalNetwork>
            <LocalNetworkSiteRef name="AzureSite1">
              <Connection type="IPsec" />
            </LocalNetworkSiteRef>
          </ConnectionsToLocalNetwork>
        </Gateway>
      </VirtualNetworkSite>
    </VirtualNetworkSites>
  </VirtualNetworkConfiguration>
</NetworkConfiguration>
Edit the ConnectionsToLocalNetwork section, and add the multiple-site reference to the network configuration file. In this case, you make the following two edits:
<Gateway>
          <ConnectionsToLocalNetwork>
            <LocalNetworkSiteRef name="AzureSite1"><Connection type="IPsec" /></LocalNetworkSiteRef>
          </ConnectionsToLocalNetwork>
        </Gateway>

    <Gateway>
          <ConnectionsToLocalNetwork>
            <LocalNetworkSiteRef name="AzureSite1"><Connection type="IPsec" /></LocalNetworkSiteRef>
            <LocalNetworkSiteRef name="AzureSite2"><Connection type="IPsec" /></LocalNetworkSiteRef>
          </ConnectionsToLocalNetwork>
</Gateway> - Save the edited version of the NetworkConfig.xml file. From inside the Azure Portal, navigate to Network Services and Virtual Network. Select the Import option. This import action reads the XML file changes and creates the additional network components.
- New VPN tunnels are created and pass traffic for IP use. However, you need to use PowerShell to get the IPsec security keys for each tunnel and store them in a secure location. Use the following commands twice, because this exercise adds two locations and two datacenters:
PS C:> Get-AzureVnetGatewayKey -VNetName "contosoVNet1" -LocalNetworkSiteName "contosoDC1"

PS C:> Get-AzureVnetGatewayKey -VNetName "contosoVNet2" -LocalNetworkSiteName "contosoDC2" - Use PowerShell once more to verify that your connections were created correctly. Use the following command:
PS C:> Get-AzureVnetConnection - The results should be similar to the following:
PS C:UsersmarshallAzure> Get-AzureVnetConnection -VNetName contosVNet1

ConnectivityState         : Connected
EgressBytesTransferred    : 661530
IngressBytesTransferred   : 519207
LastConnectionEstablished : 12/12/2014 8:12:30 AM
LastEventID               : 23401
LastEventMessage          : The connectivity state for the local network site ’AzureSite1’ changed from Not
Connected to Connected.
LastEventTimeStamp        : 12/12/2014 8:12:30 AM
LocalNetworkSiteName      : Site1
OperationDescription      : Get-AzureVNetConnection
OperationId               : 7f68a8e6-51e9-9db4-88c2-16b8067fed7f
OperationStatus           : Succeeded

ConnectivityState         : Connected
EgressBytesTransferred    : 789398
IngressBytesTransferred   : 143908
LastConnectionEstablished : 12/12/2014 8:12:30 AM
LastEventID               : 23401
LastEventMessage          : The connectivity state for the local network site ’AzureSite2’ changed from Not
Connected to Connected.
LastEventTimeStamp        : 12/12/2014 8:12:30 AM
LocalNetworkSiteName      : Site2
OperationDescription      : Get-AzureVNetConnection
OperationId               : 7893b329-51e9-9db4-88c2-16b8067fed7f
OperationStatus           : Succeeded
Microsoft ExpressRoute takes advantage of the large number of partners that are Microsoft Network Service Providers to support connectivity from on-premises datacenters or co-locations into Azure. Figure 8-25 illustrates the traffic flow from an on-premises data center to Azure over an ExpressRoute connection.
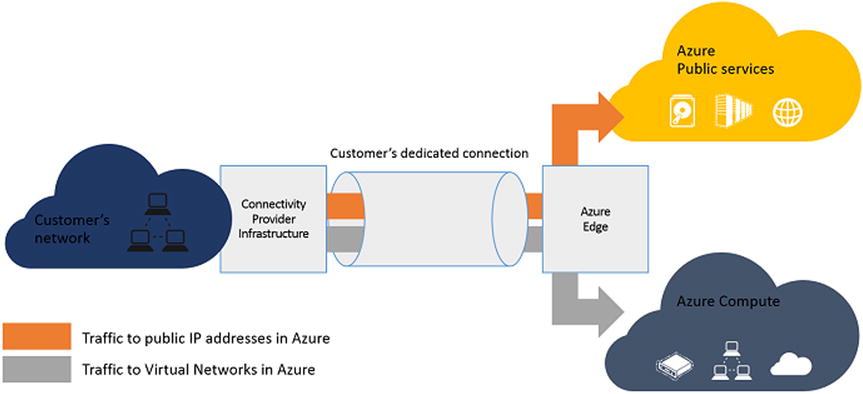
Figure 8-25. ExpressRoute provides network connectivity with guaranteed bandwidth backed by an SLA
Microsoft Network Service Providers support much greater bandwidth speeds and offer an SLA to support your business needs. Table 8-1 provides more detail about the ExpressRoute services.
Table 8-1. A Few of the Microsoft Network Service Providers that Provide Microsoft Azure ExpressRoute Connectivity
|
Properties |
Network Providers |
Exchange Providers |
|---|---|---|
|
Supported service providers |
Level 3, AT&T, Verizon, British Telecom, SingTel |
Equinox, Level 3, TeleCityGroup |
|
Bandwidth options |
10Mbps, 50Mbps, 100Mbps, 500Mbps, 1Gbps |
200Mbps, 500Mbps, 1Gbps, 10Gbps |
![]() Tip You can learn more about Microsoft security and compliance support at the Microsoft Azure Trust Center: http://azure.microsoft.com/en-us/support/trust-center.
Tip You can learn more about Microsoft security and compliance support at the Microsoft Azure Trust Center: http://azure.microsoft.com/en-us/support/trust-center.
Summary
This chapter introduced you to the many types of Microsoft Azure networking options and how they are virtually the same as their physical on-premises counterparts. Throughout the chapter, you were exposed to standard network connection components, such as IP addresses, IP subnets, network gateways, and VPNs.
In this chapter, you learned how to create many different types of Azure-to-Azure network connections (VNet-to-VNet connections). You went through the steps required to create a VNet connection from a client computer (point-to-site VNet connection). Finally, you learned to edit an XML file that used some of the other connection types to create multiple redundant connections. This multi-site VPN connection provides the largest number of connections from two or more datacenters to two or more Microsoft Azure locations.
The next chapter introduces you to identity management with Azure Active Directory, an Azure security feature. Security is a major focus of Microsoft Azure, and you learn more about Microsoft’s Trustworthy Computing initiative.