![]()
Identity Management with Azure Active Directory
Introducing Azure Active Directory
Azure Active Directory (AAD) is a service made available through Microsoft Azure for Microsoft cloud-based identity management and access capabilities. You can use this service to authenticate with other clouds. It is similar in function to Active Directory (AD), which is a service that runs in an on-premises datacenter on Windows Server.
AAD is the foundation for identity management in Office 365, and it can be used to provide single-sign on (SSO) access to more than 2,400 other cloud-based services such as Box, Dropbox for Business, and Salesforce, to name just a few.
Azure Active Directory Versions
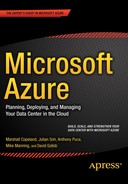
AAD is available in three versions: Free, Basic, and Premium. The features of each version of AAD are included in the next higher level, as shown in Table 9-1.
Table 9-1. AAD Features by Version
With the Free version of AAD, you can manage user accounts that are cloud-based accounts or synchronized with your on-premises AD. You can also use the Free version to enable SSO with up to ten of the software as a service (SaaS) application providers with whom Microsoft has partnered.
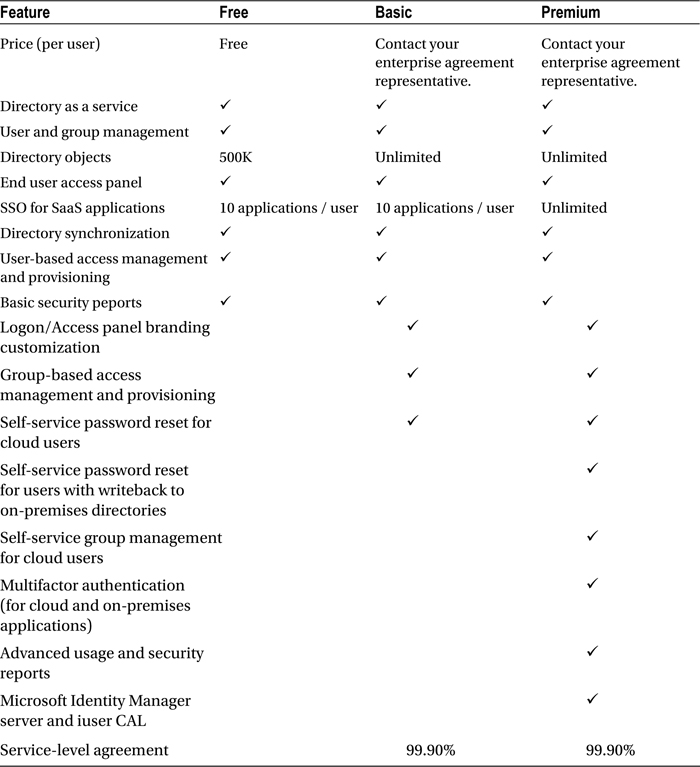
AAD Basic provides all the features that are available in the Free version and also introduces the ability to customize some of the pages with which users regularly interact. With the Basic version of AAD, you can customize the sign-in page and the access panel. This feature allows you to brand the portal with your company logo, which gives the service a personal look and feel.
The default sign-in page, shown in Figure 9-1, lets users access SaaS applications, such as when signing into Office 365.

Figure 9-1. Default Office 365 sign-in page
Figure 9-2 shows a customized Office 365 Portal sign-in page. Notice how support contact information is provided. Another common sign-in page configuration includes a legal disclaimer.
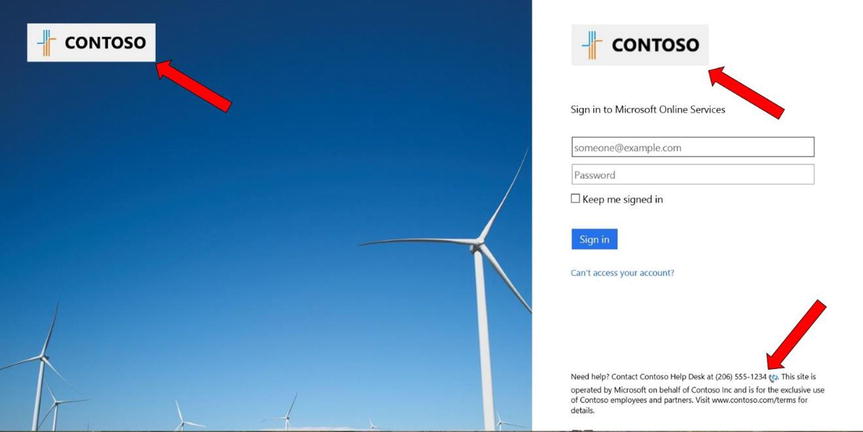
Figure 9-2. Customized Office 365 sign-in page
The access panel page in the Portal provides links to the SaaS applications to which a user has been granted access. You also get group-based access management and provisioning, which greatly simplifies the management of application access. By assigning access to SaaS-based applications to a single group, you only need to manage the membership of the group to provide access to the application to individual users.
The two biggest differences between the Free version and the Basic and Premium versions of AAD are the number of supported objects and the SLA. With the Free version, the default object quota is 150,000. It is possible, however, to go above this limit by contacting Azure support; they will increase the quota to a maximum of 500,000 on request. The Basic and Premium versions both support an unlimited number of objects. Also with the Free version, there is no SLA for the service; SLAs of 99.9% are available only when you purchase the Basic or Premium version of AAD.
AAD Premium Features
The highest level of AAD is the Premium version. With AAD Premium, Microsoft provides the following features in addition to those found in the Free and Basic versions.
Password write-back is an Azure Active Directory Synchronization Services (AAD Sync) tool feature that, when enabled, is used by your users to change a forgotten on-premises password in the cloud. It lets you configure your Azure tenant to write passwords back to your on-premises AD. When it’s configured, it provides a simple cloud-based way for users to reset their on-premises passwords without needing to be in the office or call the helpdesk.
Password write-back is supported for resetting passwords for users regardless of whether you use Active Directory Federation Services (AD FS) or another federation technologies for SSO and whether you are using password synchronization. With password write-back, as long as the user accounts are synchronized into your AAD tenant, the on-premises passwords can be managed from the cloud.
Enabling password write-back does not change your on-premises AD password policies. In the same manner as a user changes their password on-premises, when a user resets their password, AAD ensures that it meets the on-premises AD policy before committing it to that directory.
Password write-back doesn’t require any inbound firewall rules to work with your on-premises AD. It uses an Azure service bus relay as the communication channel into AD. This means you don’t have to open any inbound ports on your firewall for this feature to work.
![]() Note Password write-back is not supported for user accounts that are members of protected groups in your on-premises AD. For example, members of the Domain Administrators security group can’t use this feature.
Note Password write-back is not supported for user accounts that are members of protected groups in your on-premises AD. For example, members of the Domain Administrators security group can’t use this feature.
Self-Service Group Management for Cloud Users
Self-service group management lets users create and manage security groups in AAD and provides them with the ability to request security group memberships, which can then be approved or denied by the owner of the group. By using self-service group management features, you can delegate daily control of group membership to people who understand the business need for membership requests.
A benefit of self-service group management is that it removes the burden of a group manager having to know who requires access to a group and who does not. For example, if you have many SaaS applications and use the access-management feature, by using self-service group management, users can submit requests to join groups as they need. The group owner then approves or denies the membership based on the business need for joining the group.
Multifactor Authentication (for Cloud and On-Premises Applications)
Azure multifactor authentication (MFA) provides a second level of security when signing into cloud-based or on-premises applications. When enabled, Azure MFA can be configured to verify a user’s identity using a mobile app, a text message, or a call to a mobile or landline phone.
![]() Tip Using a mobile device for MFA allows you to use this second level of authentication when signing in to Azure while working remotely.
Tip Using a mobile device for MFA allows you to use this second level of authentication when signing in to Azure while working remotely.
You can use Azure MFA to secure cloud-based SaaS applications when authenticating with AAD or when using AD FS by configuring the AAD user account to require MFA. AAD security groups can also be configured to require MFA, which greatly simplifies its management, especially if you are also using the previously discussed self-service group management.
The MFA feature can also be used to secure on-premises applications. Doing so requires an MFA server to be installed and configured in your datacenter. MFA for on-premises applications provides the same MFA experience as Azure MFA when configured to provide a second layer of security to on-premises resources, such as IIS or AD.
When a user attempts to sign in to an on-premises application that has been configured to require a second level of authentication, the on-premises MFA server makes a call to the Azure MFA authentication service, which contacts the user by whatever method has been configured (mobile app, phone call, or text message).
Advanced Usage and Security Reports
All versions of AAD provide access and usage reporting to help administrators understand where potential security risks exist. The Azure Management Portal provides reports on five separate categories:
- Anomalous activity (an activity, such as a sign-in from an unknown source, that is inconsistent with what is normally expected)
- Activity logs
- Integrated applications
- Error reports
- User-specific reports
AAD Premium offers more advanced reporting than the Free version. The following lists provide information about each of the reports that are available with AAD Premium:
- Sign-Ins from Unknown Sources: Indicates users who have successfully signed in to your Azure tenant while assigned a client IP address that is recognized by Microsoft as an anonymous proxy IP address. Users who want to hide their computer’s IP address often use these proxies. They may be used for malicious purposes. For example, hackers sometimes use these proxies. This report shows the number of times a user has successfully signed in to your Azure tenant from that address and the proxy’s IP address.
- Sign-Ins After Multiple Failures: Indicates users who have successfully signed in after multiple, consecutive failed sign-in attempts. It also shows you the number of consecutive failed sign-in attempts made prior to the successful sign-in and a timestamp associated with the first successful sign-in. Possible causes include
- A user who forgot their password
- A successful password-guessing brute-force attack
- Sign-Ins from Multiple Geographies: Indicates successful sign-ins by a user originating from different countries when the travel time between those countries would prohibit the user from actually signing in from both places. Results of this report show the successful sign-in events, together with the time between the sign-ins, the countries from which the sign-ins originated, and the estimated travel time between the two locations. Possible causes include
- User sharing their password
- User using a remote desktop to launch a web browser for sign-in
- A hacker signed in to the account of a user from a different country
- Application Dashboard: Indicates cumulative sign-ins to the application by users in your organization over a selected time period. The chart on the dashboard page helps you identify usage trends for that application.
- Account Provisioning Errors: Lets you monitor errors that occur during the synchronization of accounts from SaaS applications to AAD.
- Activity: Shows the sign-in activity for a user. The report includes information such as the application signed in to, device used, IP address, and location. Microsoft does not collect the history for users who sign in with a Microsoft account.
- Audit: Shows a record of all audited events within the last 24 hours, last 7 days, or last 30 days. The report includes events in the following categories:
- Credential updates
- Device management
- Directory synchronization
- Domain management
- Group management
- Partner administration
- Policy management (MFA)
- Role changes
- User account changes
- User licensing
- User, group, and contact management
The AAD reports details the following:
- Sign-Ins from IP Addresses with Suspicious Activity: Includes sign-in attempts that have been executed from IP addresses where suspicious activity has been noted. Suspicious activity includes multiple failed sign-in attempts from the same IP address over a short period of time and other activity deemed suspicious, possibly indicating that a hacker has been trying to sign in from this IP address. The results of this report show sign-in attempts that originated from an IP address where the suspicious activity was noted, together with the timestamp associated with the sign-in.
- Irregular Sign-In Activity: Includes sign-ins that have been identified as irregular by the Azure machine-learning algorithms. Reasons for marking a sign-in attempt as irregular include unexpected sign-in locations or time of day and locations that could be an indication that a hacker has been trying to sign in using this account. The machine-learning algorithm classifies events as irregular or suspicious, where suspicious indicates a higher likelihood of a security breach. The results of this report show these sign-ins, together with the classification, the location, and a timestamp associated with each sign-in.
- Sign-Ins from Possibly Infected Devices: Shows sign-ins from devices on which malware (malicious software) may be running. A possible cause may be users with anomalous sign-in activity. Microsoft Azure correlates IP addresses of sign-ins against IP addresses from which an attempt was made to contact a malware server. Use this report when you want to view all user accounts for which anomalous sign-in activity has been identified. This report includes data from all other anomalous activity reports. The results show you details about the user, the reason why the sign-in event was flagged as anomalous, the date and time, and other relevant information about the event.
- Users with Anomalous Sign-In Activity: Lists accounts that have been flagged as having anomalous sign-ins. Anomalous sign-in activity includes sign-ins from unknown locations, multiple failed login attempts, sign-ins from more than one location, and sign-ins that are outside of the usual time of day.
- Application Usage: Summary: Shows summary usage data for all the SaaS applications in your directory. This report is based on the number of times users have clicked the application in the Access Panel.
- Application Usage: Detailed: Provides information on how often a specific SaaS application is being used. Like the Application Usage: Summary report, this report is based on the number of times users have clicked the application in the Access Panel.
- Devices: Shows the IP address and geographical location of devices that a specific user has used to access Azure AD.
- Groups Activity: Provides information on all the activity for the self-service managed groups in your directory.
- Password Reset Registration Activity: Shows all the password-reset registrations that have occurred in your organization.
- Password Reset Activity: Shows all password-reset attempts (both successful and failed) that have occurred in your organization.
Microsoft offers a financially backed service-level agreement (SLA) for AAD Premium customers for Azure services. Table 9-2 shows the financial credit for which Azure customers may be eligible based on the amount of time the service is unavailable.
Table 9-2. AAD Service-Level Agreement Credit Scale
|
Monthly Uptime Percentage |
Service Credit |
|---|---|
|
<99.9% |
25% |
|
<99% |
50% |
|
<95% |
100% |
The SLA is available on each of the following Azure services:
- Active Directory
- API Management
- Automation
- Backup
- BizTalk Services
- Cache
- CDN
- Cloud Services
- ExpressRoute
- HDInsight
- Media Services
- Mobile Services
- Multifactor Authentication
- RemoteApp
- Scheduler
- Service Bus
- Site Recovery
- SQL Database
- Storage
- StorSimple
- Traffic Manager
- Virtual Machines
- Virtual Network
- Visual Studio Online
- Web sites
The monthly recovery time objective (RTO) and SLA for on-premises-to-Azure failovers for the site recovery service includes an additional metric for determining the amount of credit for which you could be eligible. The formula for determining this credit is shown in Table 9-3.
Table 9-3. AAD Recovery Time Objective Schedule
|
Protected Instance |
Monthly Recovery Time Objective |
Service Credit |
|---|---|---|
|
Unencrypted |
> 4 hours |
100% |
|
Encrypted |
> 6 hours |
100% |
The full Azure SLA document is available for download at www.microsoft.com/en-us/download. Search for “Microsoft Azure SLA” at the Microsoft download site, and download the most current version of the document.
Adding and Managing Accounts in Azure Active Directory
AAD provides a great deal of flexibility in terms of adding and managing accounts. Adding accounts to AAD can be accomplished in a few ways.
MANUALLY CREATING USER ACCOUNTS
The first and most basic way to add an account to AAD is to do so manually in the Azure Portal. To add user accounts to AAD, do the following:
- Open the Azure Management Portal, click the Active Directory link, and then click the directory to which you wish to add the user, as shown in Figure 9-3.
Figure 9-3. AD domains
- In the directory Management Portal, click the Users tab, as shown in Figure 9-4.

Figure 9-4. Users tab
- In the Users Management Portal at the bottom of the page, click Add User as shown in Figure 9-5.

Figure 9-5. Add User button
- In the Tell Us About This User window, shown in Figure 9-6, select New User In Your Organization.
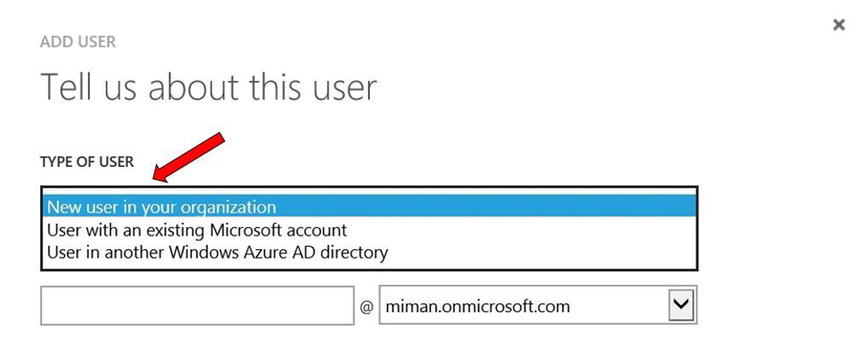
Figure 9-6. Selecting the user type
- Enter a user name, as shown in Figure 9-7. The user name may only contain alphanumeric characters. Spaces and symbols are not valid characters.
After entering a user name, select the appropriate domain for the user. If you have added a vanity domain (also known as a custom domain name, such as contoso.com) to your Azure tenant, you have a default domain that ends in .onmicrosoft.com as well as your own domain. Once all of this information is set, click the arrow to advance to the next step.
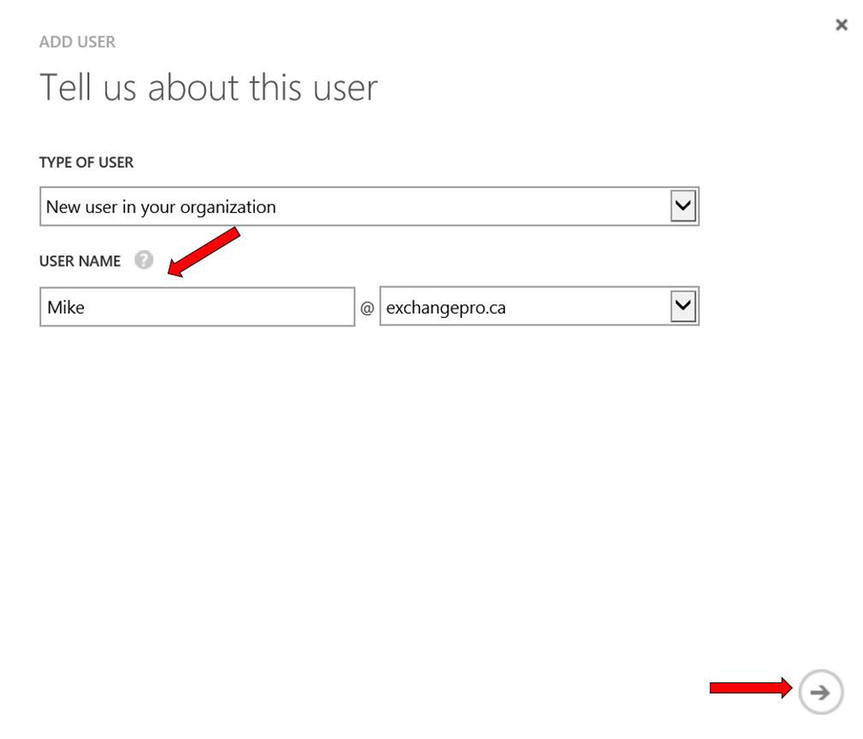
Figure 9-7. Adding the user name and selecting a domain
- At this point, you have the option to assign roles to the new user. As shown in Figure 9-8, there are many roles from which to choose. For more information about Azure administrator roles, see the MSDN article “Assigning Administrator Roles in Azure AD,” at http://msdn.microsoft.com/en-us/library/azure/dn468213.aspx.

Figure 9-8. Available Azure roles
- Also at this point in the new user-creation process, you have the option to enforce MFA for this new user, as shown in Figure 9-9. This chapter doesn’t go too deeply into MFA, as it is discussed further in the next chapter.
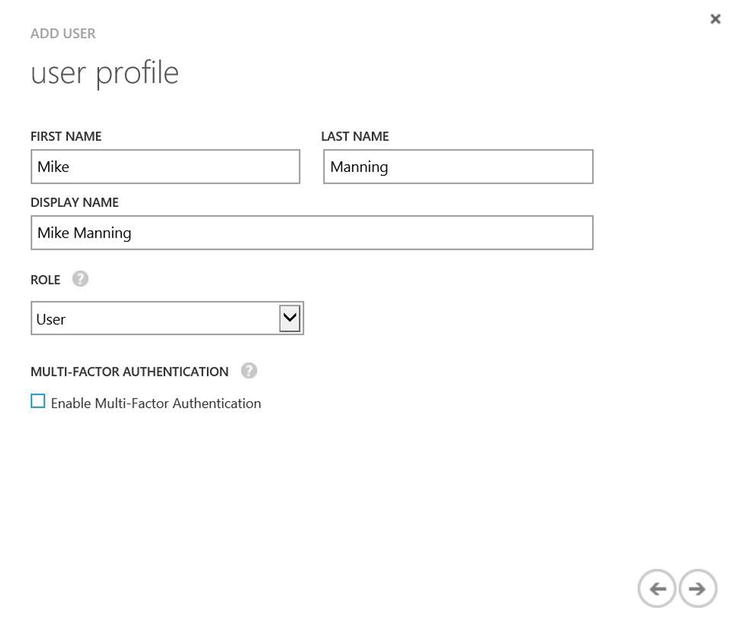
Figure 9-9. Filling in the user profile information and selecting a role
- After completing all the necessary fields, you can create the user account. Clicking the create button, as shown in Figure 9-10, generates the user account and assigns it a temporary password.
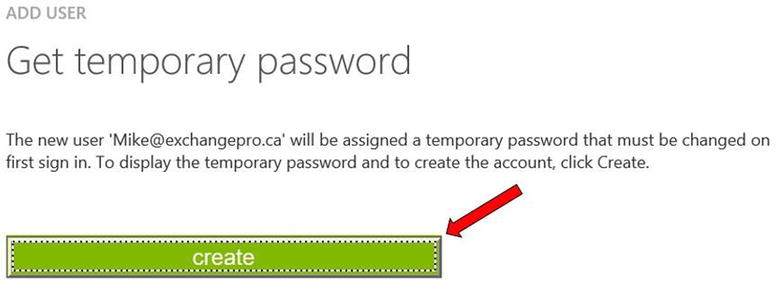
Figure 9-10. Creating the user account
- With the user account and password created, as shown in Figure 9-11, you have the option to record the password in a spreadsheet or other file. You also have the options to e-mail the password to a user account or to an administrator so that it can be shared with the user at a later time.
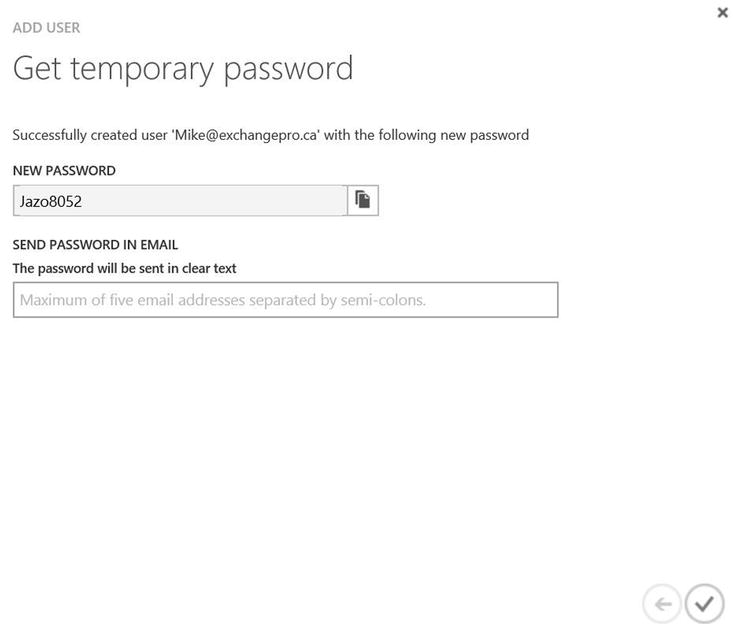
Figure 9-11. Displaying the temporary password
Adding users manually into AAD is convenient and simple, but it can be very time-consuming if there are a large number of users to be added. In cases where hundreds or even thousands of users need to be added in a single event, importing user accounts from a .csv file is quick and easy.
The bulk import option is not available in the Azure Portal or with Azure PowerShell. To perform these steps, a subscription to Office 365 is required. This book does not cover Office 365, but for the purposes of this exercise, you require an Office 365 subscription. You can obtain a trial Office 365 subscription at https://products.office.com/en-us/business/office-365-enterprise-e3-business-software.
![]() Note If you had a previous Office 365 trial subscription that has expired, it is recommended that you create a new one to complete this exercise.
Note If you had a previous Office 365 trial subscription that has expired, it is recommended that you create a new one to complete this exercise.
It is assumed that you already have an Azure subscription. If you need to sign up for an Office 365 trial tenant as well, you can use the same ID that you use to manage Azure. Office 365 and Azure share the same AD space, so when you add users via the Office 365 bulk-import processes, the accounts will also appear in your Azure Portal under the Users tab in the Domains window.
After you create your Office 365 tenant, you can use the bulk-import process through Windows PowerShell. To do so, you first need to download and install the Azure Active Directory Module for Windows PowerShell cmdlets (pronounced command-lets). These cmdlets let you perform and automate user- and domain-management functions with AAD.
The first step in using the AAD PowerShell module is to install it on a computer that will be used for AAD management. The Azure AD Module is supported in Windows 8.1, Windows 8, Windows 7, Windows Server 2012 R2, Windows Server 2012, and Windows Server 2008 R2. The default versions of .NET Framework and Windows PowerShell are required to be installed on the management computer as well.
The Microsoft Online (MSOL) Services Sign-In Assistant must also be installed on the computer. The Sign-In Assistant is available from the Microsoft Download Center at http://www.microsoft.com/en-us/download/details.aspx?id=41950.
After downloading and installing the Sign-In Assistant, the next step is to download and install the Azure Active Directory Module for Windows PowerShell. The module is available at: http://go.microsoft.com/fwlink/p/?linkid=236297.
![]() Note As of October 20, 2014, the 32-bit version of the AAD Module has been discontinued. All AAD Module installs should be done using the 64-bit version.
Note As of October 20, 2014, the 32-bit version of the AAD Module has been discontinued. All AAD Module installs should be done using the 64-bit version.
Now that the necessary components have been installed, you can connect to AAD using Windows PowerShell. First you need to connect to AAD. Use the following cmdlets to establish the connection:
$cred = get-credential
connect-msolservice -credential $cred
The first part of the cmdlet produces a credentials dialog window, as shown in Figure 9-12, where you enter your tenant Global Administrator or User Administrator name and password. These credentials are stored in the $cred variable, which is used by the second cmdlet to connect to Microsoft Online.
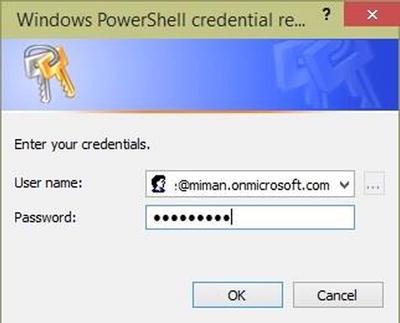
Figure 9-12. Credentials entry form
Once the connection to the MSOL service has been established, you can use other PowerShell cmdlets to manage your users and domains. To perform the bulk import, you first need to populate a .csv file with the required columns, as follows:
- UserPrincipalName
FirstName
LastName
DisplayName
A good recommendation, as shown in Figure 9-13, is to add the UsageLocation field to the .csv file as well. Doing so removes the prompt for the user to set it when they sign in for the first time or for the administrator to have to do this when licenses are applied. Additionally, the user’s preferred language can be set in advance of them logging in, which saves a mouse click.

Figure 9-13. Sample .csv file
You use two cmdlets to bulk-create the users in AAD from the .csv file: Import-csv and New-MsolUser. The following example imports users from a .csv file into a variable and then cycles through the information in the variable to create the accounts:
$users = Import-Csv C:	empO365Users.CSV

$users | ForEach-Object {

New-MsolUser -UserPrincipalName $_.UserPrincipalName -FirstName $_.FirstName -LastName $_.LastName -DisplayName $_.DisplayName -UsageLocation $_.UsageLocation}
The accounts are populated with the information in the .csv columns by reading the individual variables and then writing that information to the attributes in AAD.
Although you can’t do this in the Azure Portal, in Office 365 it is possible to add users via a .csv file import through a graphical user interface (GUI). This can be done by signing in to Office 365 as a Global Administrator or User Administrator, navigating to the Users ![]() Active Users page, and clicking the Bulk Add link, as shown in Figure 9-14.
Active Users page, and clicking the Bulk Add link, as shown in Figure 9-14.
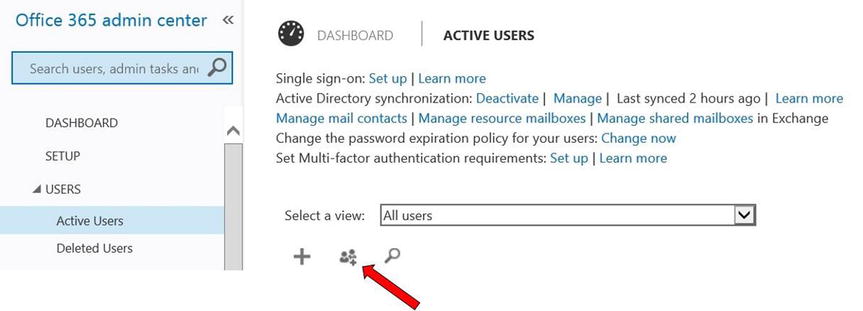
Figure 9-14. Bulk-import link
In addition to manually creating individual user accounts in Azure or bulk-creating them from a .csv file, another method in AAD to create them is through directory synchronization. With directory synchronization, objects are synchronized from your on-premises AD into AAD with the Azure Active Directory Synchronization Services (AAD Sync) tool, available free of charge from Microsoft. User objects, security groups, and distribution groups are synchronized with this tool.
The latest release of AAD Sync, released in the fourth quarter of 2014, offers many improvements over the previous version of the Directory Synchronization tool, known as DirSync. These improvements include an increase in the number of objects that can be synchronized before requiring a full SQL server installation from 50,000 to 100,000. Also, in the initial release of AAD Sync, password sync was not available; the current version makes this feature available.
PREPARING TO INSTALL AAD SYNC
To install AAD Sync, the computer on which it is to be installed must be running one of the following versions of Windows Server:
- Windows Server 2008
- Windows Server 2008 R2
- Windows Server 2012
- Windows Server 2012 R2
The computer can be standalone, a member server, or a domain controller with the following components installed:
- .NET 4.5.
- PowerShell (PS3 or better is required).
- The account to which you will install AAD Sync needs to be an administrator on the local machine.
Directory integration must be enabled on the Azure tenant:
- To enable directory integration, log in to the Azure tenant with a Global Administrator account.
- Go to the Active Directory tab, select the directory for which you are enabling integration, and click the Directory Integration tab, as shown in Figure 9-15.

Figure 9-15. Activating directory integration
- Under Integration With Local AD, click Activate.
The prior version of the Directory Synchronization tool, DirSync, required that an Enterprise Administrator account be used for the installation. This permission level was required so that installation operations, such as setting permissions for password sync or hybrid-enabled write-back, could be set. This level of permission was seen as excessive by many organizations’ security teams, because the credentials for an Enterprise Administrator account are often a closely guarded secret.
The AAD Sync tool today no longer requires these permissions for installation. Instead, you are now required to set these permissions manually before installing AAD Sync. In organizations where the Enterprise Administrator permissions are known by only a few AD administrators, the installation permissions can be set by those administrators and then the installation of AAD Sync can be carried out by another server administrator without the need to grant that person Enterprise Administrator permissions first.
It is recommended that you create an AAD Sync service account for connecting to your on-premises AD as well as one for connecting to AAD. The account requirements for each are as follows:
- AAD: This must be a Global Administrator account, and it should have the password set never to expire.
- On-premises AD: This can be a standard user account. If password sync, hybrid, or password write-back is required, the permissions must be applied to the service account separately for those features to work properly.
![]() Note To complete the steps that follow, you need to create a user account so you can apply the required permissions to it.
Note To complete the steps that follow, you need to create a user account so you can apply the required permissions to it.
The permissions required for password synchronization are as follows:
- Replicating Directory Changes
- Replicating Directory Changes All
MODIFYING PERMISSIONS FOR PASSWORD SYNCHRONIZATION
Follow these steps to modify the permissions required to enable the account to read the password hashes from the on-premises AD.
To set the permissions for password synchronization, do the following:
- Open Active Directory Users and Computers.
- On the View menu, click Advanced Features.
- Right-click the domain object, and then select Properties.
- On the Security tab, shown Figure 9-16, if the desired user account is not listed, click Add; if the desired user account is listed, proceed to step 7.

Figure 9-16. Setting permissions to read the password hash
- In the Select Users, Computers, Or Groups dialog box, select the desired user account, and then click Add.
- Click OK to return to the Properties dialog box.
- Click the desired user account.
- Click to select the Replicating Directory Changes and Replicating Directory Changes All check boxes from the list.
- Click Apply, and then click OK.
If a hybrid configuration is required for using the rich co-existence functionality with an Exchange on-premises server, the permissions shown in Table 9-4 are required.
![]() Note For each object type, the Permission/Access right must be Write. Inheritance must be set to The Child Objects Only.
Note For each object type, the Permission/Access right must be Write. Inheritance must be set to The Child Objects Only.
Table 9-4. Hybrid permission requirements
|
Object Type |
Data Source Attribute |
|---|---|
|
Contact |
proxyAddresses |
|
Group |
proxyAddresses |
|
User/InetOrgPerson |
msExchArchiveStatus |
|
msExchBlockedSendersHash | |
|
msExchSafeRecipientsHash | |
|
msExchSafeSendersHash | |
|
msExchUCVoiceMailSettings | |
|
msExchUserHoldPolicies | |
|
proxyAddresses |
These permissions are required to enable AAD Sync to update the on-premises objects when Exchange online makes changes to the objects in the cloud.
![]() Note Although it’s not a requirement, it is recommended that you keep your Exchange schema version close to that of AAD. As of this writing, the Exchange Online schema version is Exchange 2013, Service Pack 1.
Note Although it’s not a requirement, it is recommended that you keep your Exchange schema version close to that of AAD. As of this writing, the Exchange Online schema version is Exchange 2013, Service Pack 1.
To set the permissions for hybrid write-back, follow these steps:
- Open the ADSIEdit MMC snap-in.
- On the View menu, click Advanced Features.
- Right-click the domain object, and then click Properties.
- Click the Security tab, as shown in Figure 9-17.
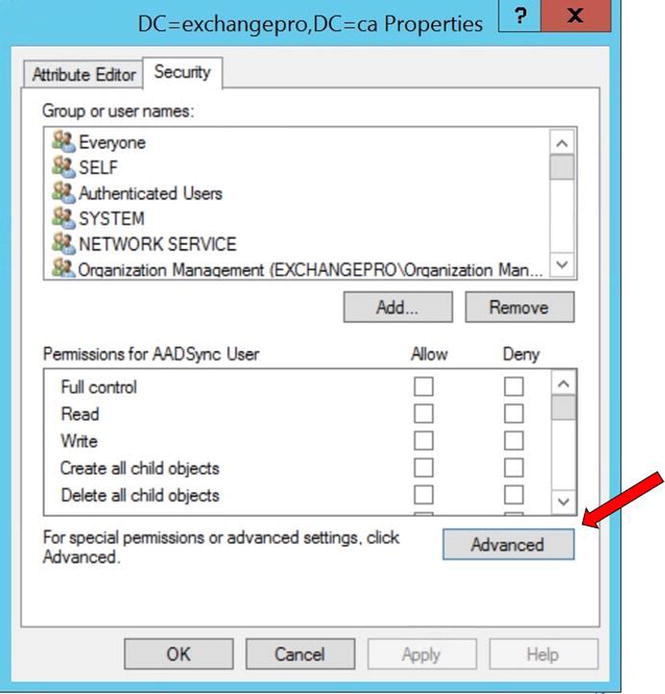
Figure 9-17. Accessing Advanced permissions
- Click the Advanced button.
- In the Advanced Security Settings window, click Add.
- In the Permission Entry window, click Select A Principal, as shown in Figure 9-18.

Figure 9-18. Selecting the account principal
- In the Select User, Computer, Service Account Or Group window, enter the name of the AAD Sync service account that you created previously, click Check Name, and then click OK.
- Following the permission requirements described in Table 9-4, select the object to which you will apply the permissions, as shown in Figure 9-19. The required objects are
- Descendant Contact Objects
- Descendant Group Objects
- Descendant InetOrgPerson Objects
- Descendent User Objects

Figure 9-19. Selecting objects the permissions apply to
- Set write permissions to enable the hybrid write-back permissions. For example, in Figure 9-20, the Write msExchArchiveStatus permission is enabled on the Descendant User object.

Figure 9-20. Setting Exchange hybrid permissions
- Complete the preceding process for all the remaining permissions listed in Table 9-4.
- When all the permissions have been applied, click Apply, and then click OK (twice).
- Close ADSTEdit.
If you wish to use the password write-back feature that is included with AAD Premium, your AAD Service account requires permissions to reset and change the on-premises password. You can grant these permissions by following these steps, as shown in Figure 9-21:
- Open Active Directory Users and Computers.
- Make sure Advanced Features are turned on.
- Right-click the domain, and select Properties.
- Select the Security tab, and click Advanced.
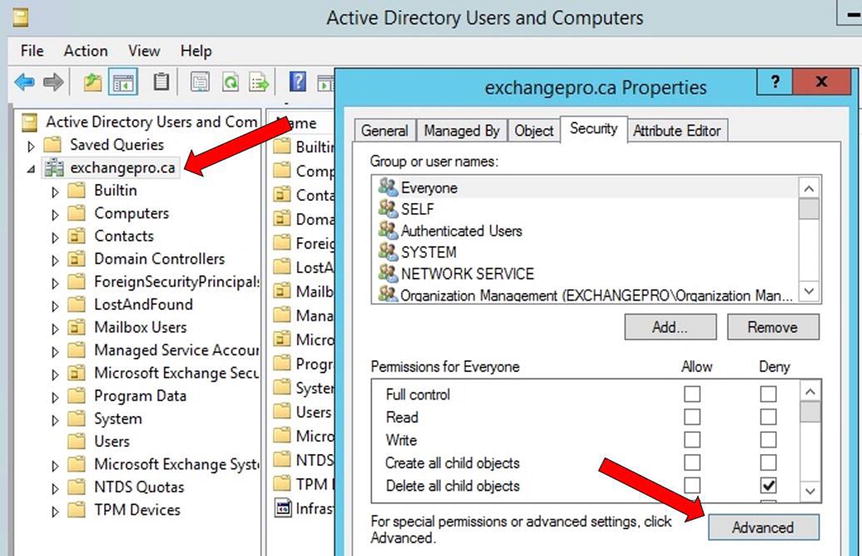
Figure 9-21. Accessing the Advanced permissions
- On the Permissions tab, click Add.
- Click Select A Principal, and select the AAD Sync service account, as shown in Figure 9-22.
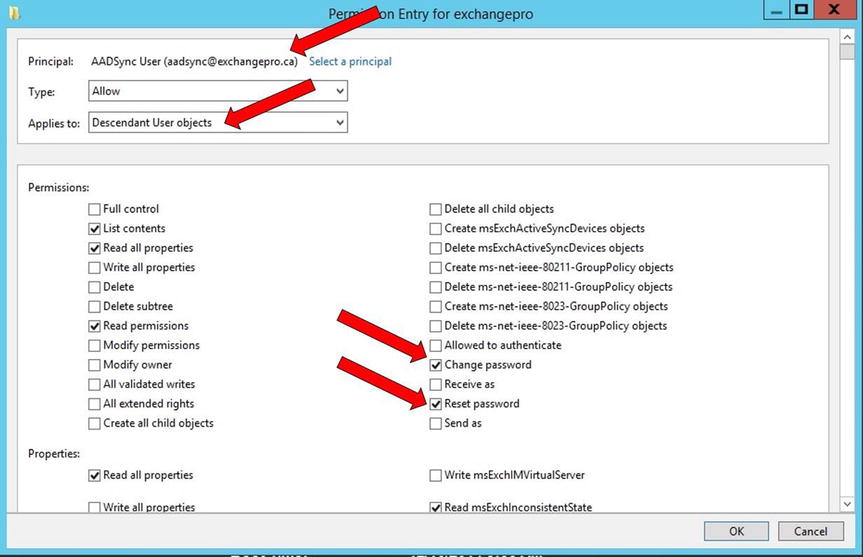
Figure 9-22. Setting password write-back permissions
- In the Applies To drop-down, select Descendant User Objects.
- In the Permissions section, select Reset Password and Change Password.
- Click Ok. Click Apply. Click OK.
Installing the Azure Active Directory Synchronization Service
Now that all the permissions for installing AAD Sync have been configured, you can proceed with the installation. Microsoft has worked hard to simplify the installation, whether it’s for a single forest or a multiforest environment. The installation is straightforward and easy to follow for most deployments.
INSTALLING AAD SYNC
You can download the current version of AAD Sync from www.microsoft.com/en-us/download/details.aspx?id=44225. Then follow these steps:
- After downloading the AAD Sync installer, double-click the executable MicrosoftAzureADConnectionTool.exe.
The executable is a self-extracting file that loads the binaries into a default folder called Microsoft Azure AD Connection Tool on the system drive. After the extraction completes, the actual installation launches.
- The Welcome window is displayed, as shown in Figure 9-23. Here you have the option to select the installation path if the default path is not to your liking. You also must accept the license agreement in order to proceed with the installation. After agreeing to the End User License Agreement (EULA), click Install.
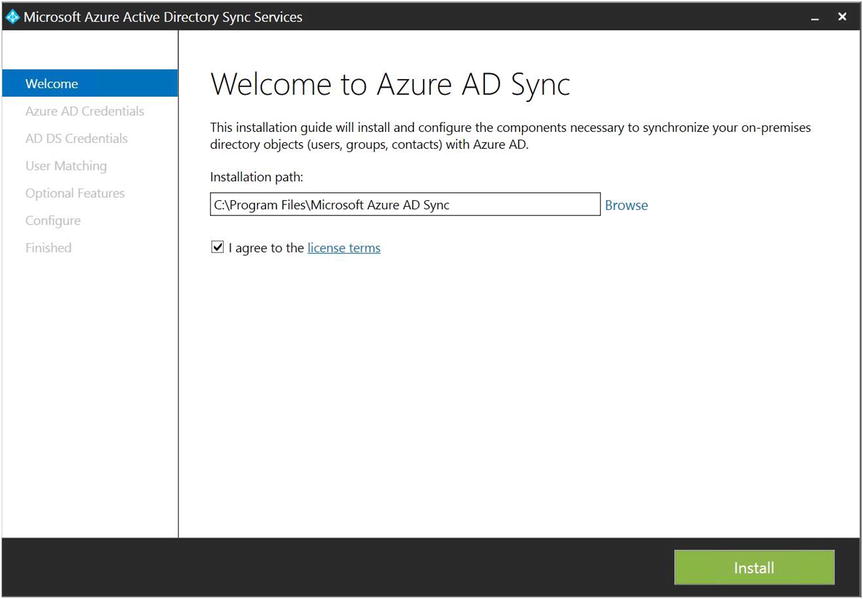
Figure 9-23. AAD Sync Welcome window
- The installation begins installing the AAD Sync binaries into the folder you chose, as shown in Figure 9-24. When the installation is complete, the Connection wizard launches. There you complete the steps required to configure AAD Sync to suit your environment.
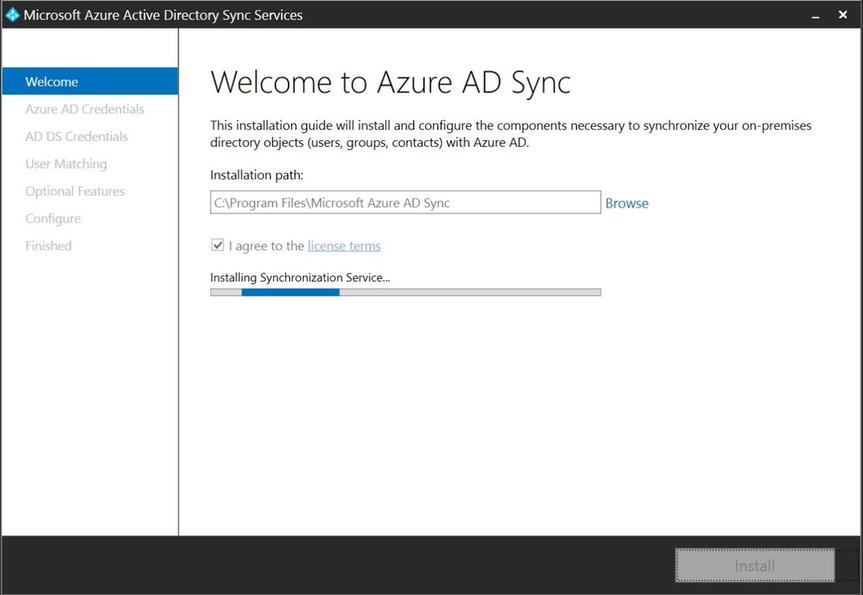
Figure 9-24. Installing the AAD Sync service
- The first configuration step is to enter your tenant Global Administrator user name and password, as shown in Figure 9-25. Then click Next.
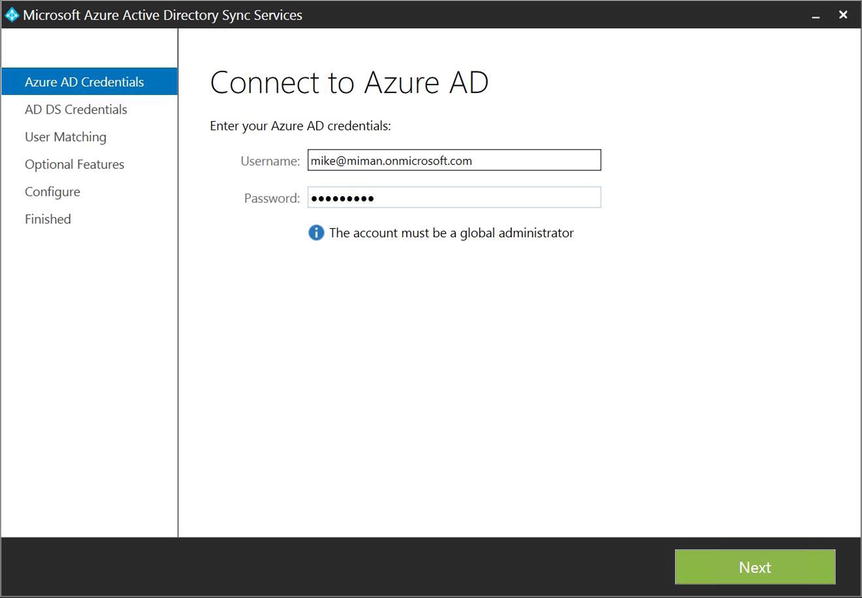
Figure 9-25. Connecting to Azure AD
- After the wizard verifies the credentials and connects to your Azure tenant, it moves to the on-premises AD connection page, as shown in Figure 9-26. On this page, enter the credentials of the AAD Sync service account for which you configured permissions previously to enable password sync, hybrid write-back, or password write-back.
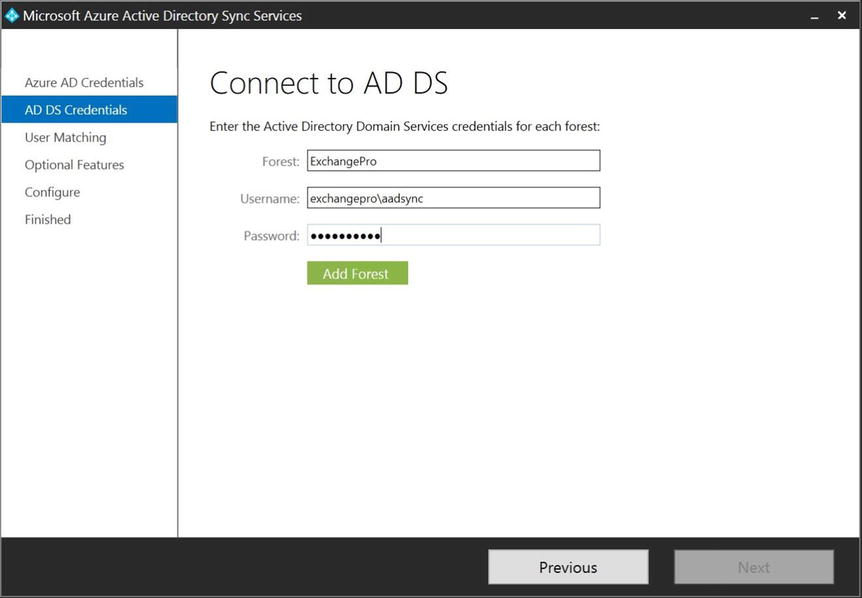
Figure 9-26. Connecting to the first AD DS forest
- In this example, you’re going to connect to a second on-premises AD forest, to illustrate the simplicity of using the new AAD Sync tools to do this. After entering the credentials for the first forest, as shown in Figure 9-25, click the Add Forest button; then repeat the same steps to connect to the second forest, as shown in Figure 9-27.
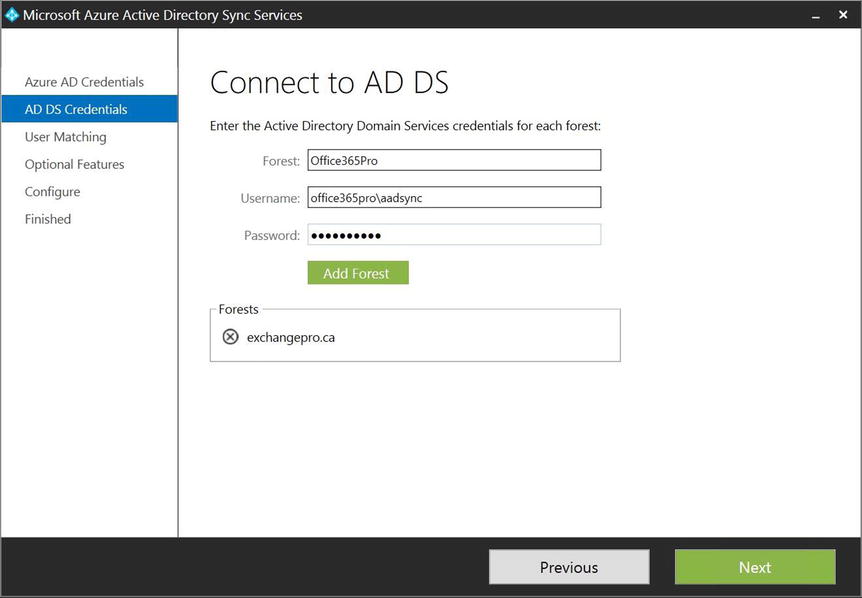
Figure 9-27. Connecting to the second AD DS forest
- After entering the AAD Sync service account information for the second forest, click the Add Forest button. With both AD DS forests added to the AAD Sync configuration wizard, click Next to begin the next step in the configuration procedure, as shown in Figure 9-28.
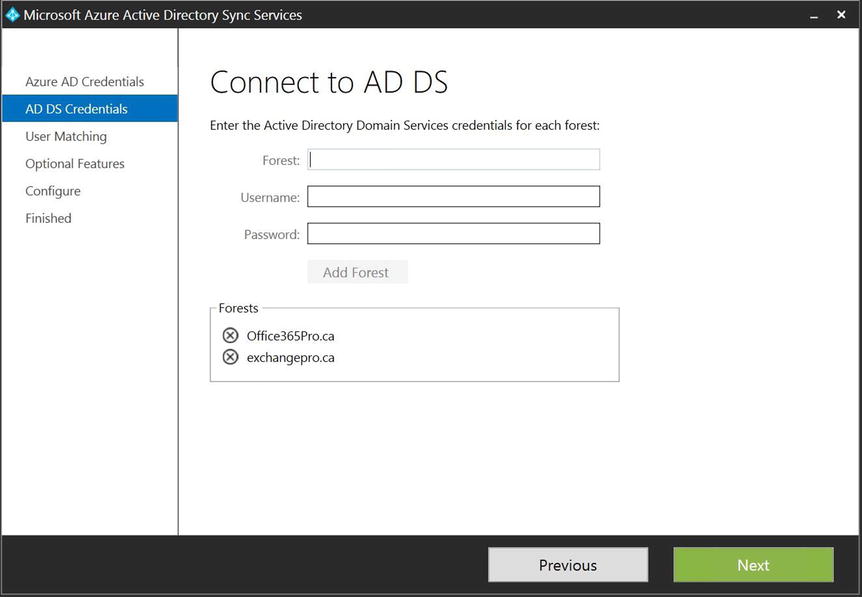
Figure 9-28. Completed AD DS window
Now that both forests are connected to AAD Sync, the next step is to configure user matching. User matching is the process that joins user objects, if they exist in multiple forests, into a single object for synchronizing to AAD. When user objects exist in multiple forests, such as in a resource forest model, AAD Sync needs to be able to match the objects in each forest before synchronizing them to AAD, to prevent the creation of duplicate objects in the cloud. If the object exists in one forest only, then matching is not required.
 Caution If a user object is to be moved across forests, then selecting a sourceAnchor attribute other than the default of objectGUID is recommended. The reason is that when an object moves across forests, the objectGUID changes. When the objectGUID changes, it no longer matches cloudAnchor or immutableID in AAD. immutableID is an AAD attribute that, by definition, never changes. This attribute is the security identifier in AAD in the same way the objectGUID is an object identifier in an on-premises AD.
The result of this mismatch is that a new user object is created in AAD, and the user loses access to the previous resources in the cloud. A good alternative sourceAnchor attribute would be one that is likely never to change, such as an employee ID.
- In this example, users will not move across AD forests, so leave the default selections, as shown in Figure 9-29, and click Next.
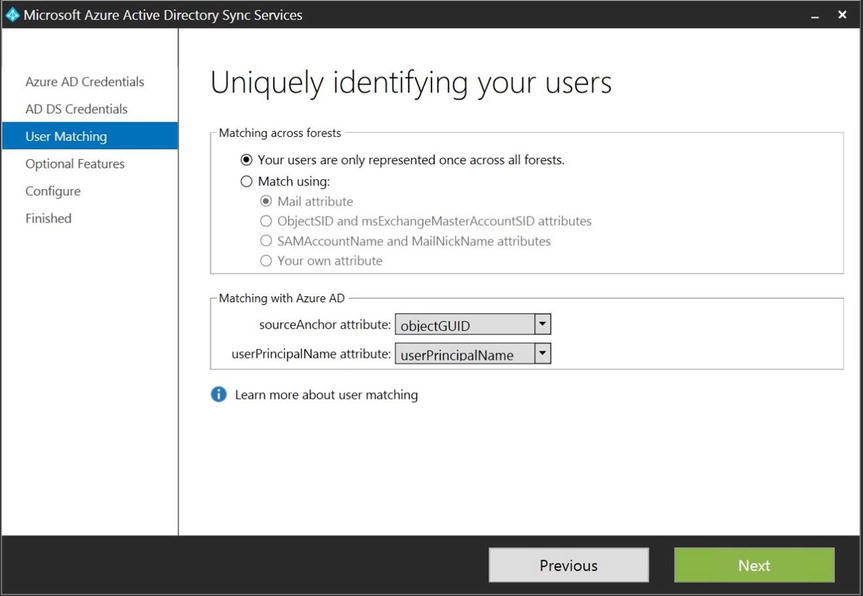
Figure 9-29. User matching
- The Optional Features page, shown in Figure 9-30, is where you select features like Exchange hybrid, password synchronization, password write-back, and AAD app and attribute filtering. App filtering lets you reduce the number of attributes that are being synchronized to AAD. For example, if you aren’t planning to use Exchange online, you may choose not to synchronize the attributes associated with Exchange on-premises to AAD.

Figure 9-30. Optional features
- Synchronizing all attributes, and enable the password synchronization and password write-back features. Click Next.
- At this point, AAD Sync is ready to complete the configuration for synchronizing your on-premises objects into AAD, as shown in Figure 9-31, so click Configure.

Figure 9-31. Ready to configure
- The application takes a few minutes to configure the settings based on the selections you made, as shown in Figure 9-32, but it finishes fairly quickly.
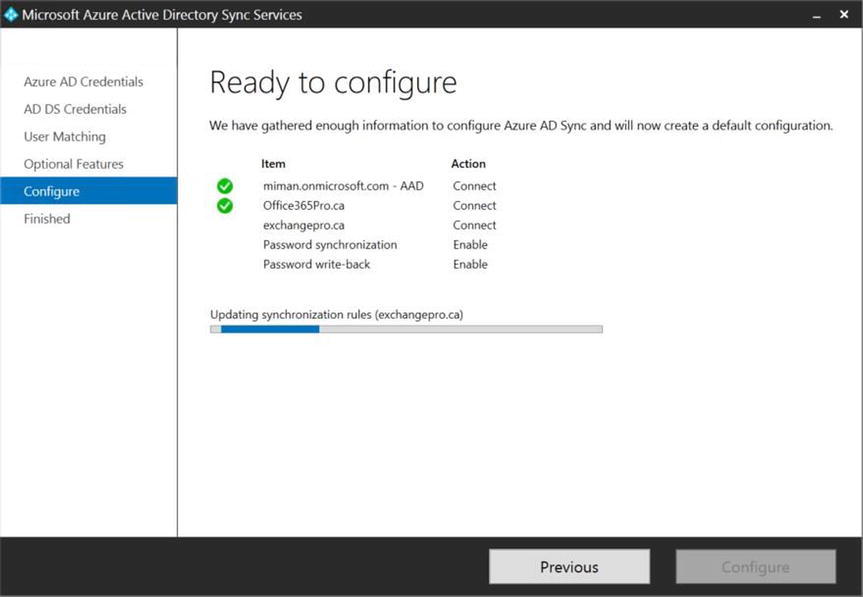
Figure 9-32. Performing the configuration
- Once the configuration completes, as shown in Figure 9-33, you have the option to synchronize your on-premises objects. You’re going to configure some filtering before synchronizing for the first time, so leave the Synchronize Now check box unchecked.
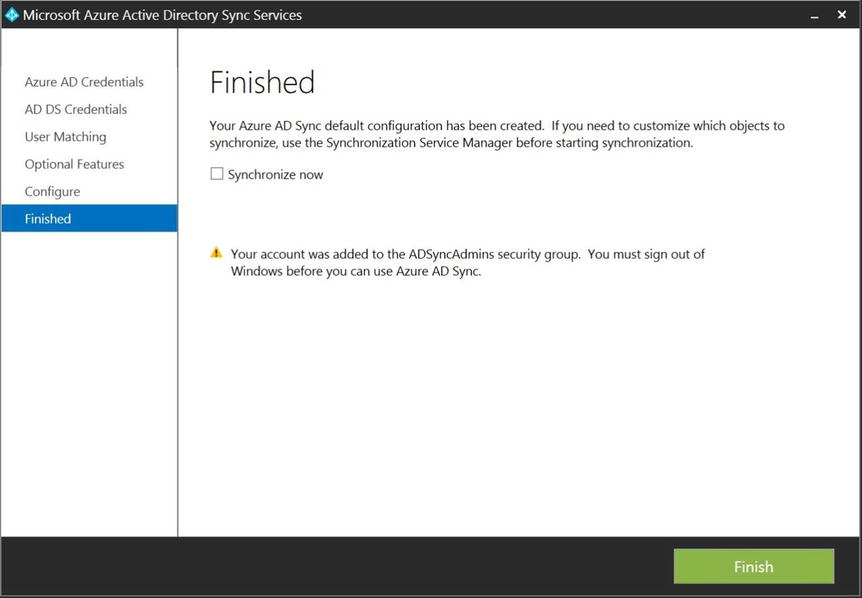
Figure 9-33. Finishing the installation and configuration
Be advised that one of the things the AAD Sync installation does is to create a scheduled task on the local computer that runs the Delta synchronization jobs every three hours. Unchecking the Synchronize Now check box causes the scheduled task to be created in a disabled state. In order to have the Delta synchronization jobs run as scheduled, you must enable the scheduled task once you have completed all the configurations.
Note The warning on this page is about the need to sign out and sign back in to the computer before you can use AAD Sync. This is due to the installation creating some security groups on the local server and adding the account that you used for the installation to the ADSyncAdmins local group. Only members of this group have the permissions to manage AAD Sync, so before you can configure the filtering, a sign out is required. - Click finish, and then sign out of the server.
![]() Important The AAD Sync installation creates a user account on the local server that is used as the service account for the Microsoft Azure AD Sync service. The account that is created starts with AAD, followed by randomly generated characters. The account also has the password set never to expire. If you chose to change the password or remove the password expiration setting, it is important to monitor the account password change frequency to avoid an interruption in the synchronization service.
Important The AAD Sync installation creates a user account on the local server that is used as the service account for the Microsoft Azure AD Sync service. The account that is created starts with AAD, followed by randomly generated characters. The account also has the password set never to expire. If you chose to change the password or remove the password expiration setting, it is important to monitor the account password change frequency to avoid an interruption in the synchronization service.
![]() Tip If you want a deeper understanding of the steps the AAD Sync installation performed, the installation and configuration log files are located in the C:WindowsTempAADSync folder.
Tip If you want a deeper understanding of the steps the AAD Sync installation performed, the installation and configuration log files are located in the C:WindowsTempAADSync folder.
Filtering AAD Sync
As in previous versions of the Directory Synchronization tool, there are three options for filtering objects to prevent them from synchronizing to AAD:
- Domain-based: Excludes an entire domain from your on-premises AD forest from synchronizing to AAD.
- Organizational unit-based filtering: Excludes an entire OU from synchronizing to AAD. As an example, you may have an OU that is specifically used for service accounts that don’t need to be synchronized to AAD.
- Attribute–based: Prevents accounts that have specific data in a certain attribute. For example, you can put “on-premises only” into an account attribute and then filter on that data within that attribute to prevent accounts with this data from synchronizing to AAD.
CONFIGURING DOMAIN-BASED FILTERING AAD SYNC
Domain-based filtering and OU-based filtering have not changed since the previous versions of the synchronization tool. They are still managed in the Synchronization Service Manager tool. To configure domain-based filtering, follow these steps:
- On Start, tap or click Synchronization Service to open the Synchronization Service Manager.
- Click Connectors in the Tools menu.
- In the Connectors list, select the connector that has AD Domain Service as Type.
- Click Properties in the Actions menu, or right-click the connector and select properties.
- Click Configure Directory Partitions.
- In the Select Directory Partitions list, shown in Figure 9-34, verify that only the partitions you want to synchronize are selected.
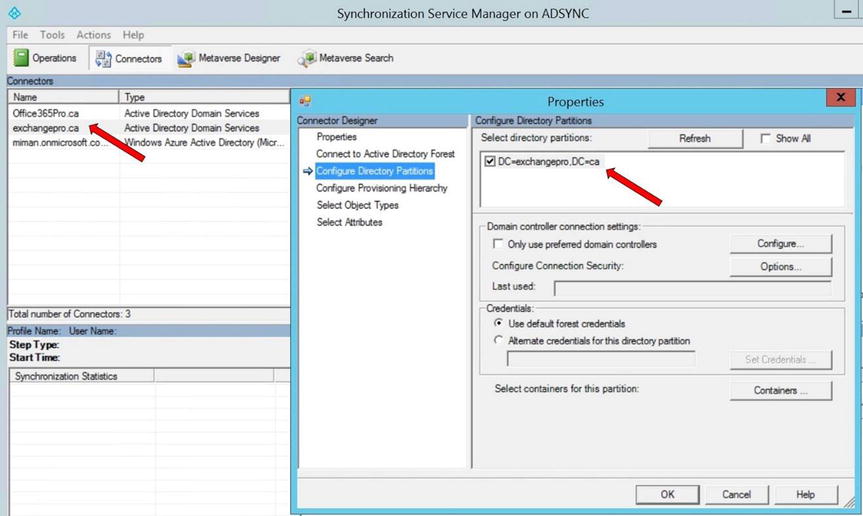
Figure 9-34. Selecting the domains to synchronize
- To remove a domain from the synchronization process, clear the domain’s check box.
- Click OK to close the Properties window.
- After updating the domain filter, you also need to update the following run profiles to remove the domains that were synchronizing previously:
- Full Import
- Full Synchronization
- Delta Import
- Delta Synchronization
- Export
Note If you have removed a partition from the directory partitions list, you need to make sure all run profile steps that are referencing this partition are also removed. For example, if there was a second domain in the example forest, you would see two domains to synchronize when looking at the domain partitions in Figure 9-33. If you only wanted to synchronize one of the domains, you would remove the second one from the domain partitions and from the run profiles that control what is synchronized, as shown in Figure 9-35.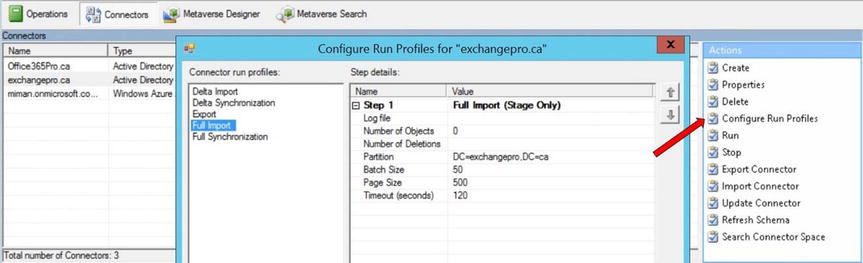
Figure 9-35. Configuring run profiles
CONFIGURING ORGANIZATIONAL UNIT–BASED FILTERING AAD SYNC
With AAD Sync, you also have the option not to synchronize individual OU’s. You might choose to do this if you have an OU that contains contact objects that you don’t want to synchronize into AAD. To configure domain-based filtering, follow these steps:
- On Start, tap or click Synchronization Service to open the Synchronization Service Manager.
- In the Synchronization Service Manager, click Connectors and then double-click the SourceAD management agent that you are filtering.
- Click the Configure Directory Partitions link, select the domain you want to configure (if you have more than one), and then click the Containers button.
- When prompted, enter your AD domain credentials.
Note When the credentials dialog box opens, the account used to import and export to AD DS is displayed. If you do not know the password for the account, you can enter another account to use. The account you use must have read permissions to the domain currently being configured.
- In the Select Containers dialog box, shown in Figure 9-36, clear the OUs that you don’t want to sync up to AAD, and then click OK.
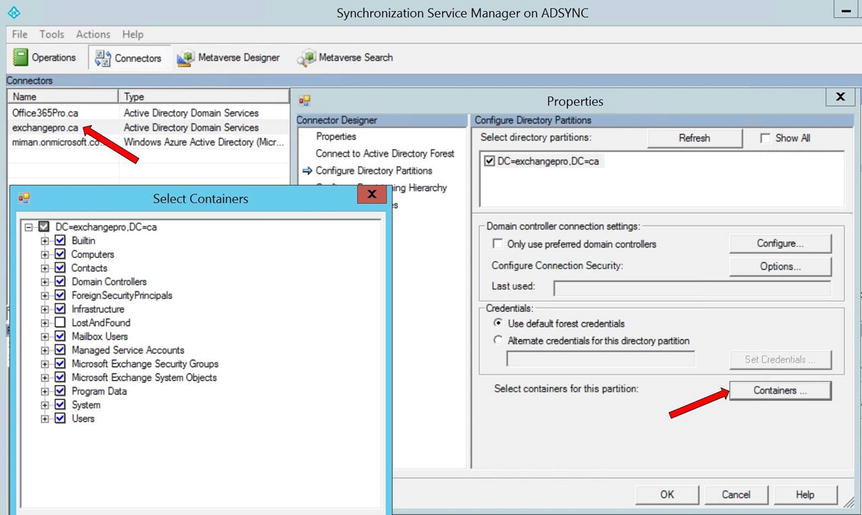
Figure 9-36. Selecting the organizational units to synchronize
- Click OK on the SourceAD Properties page.
- Right-click the SourceAD management agent, and select Run.
- Run a full import and a Delta synchronization.
Configuring Attribute-Based Filtering
There are several ways to configure filtering based on AD attributes. Configuration on inbound synchronization from AD is recommended because these configuration settings will be kept even after upgrading to a newer version. Configuration on outbound synchronization to AAD is supported, but these settings will not be kept after upgrading to a newer version; they should be used only when required to view the combined object in the metaverse to determine filtering. For this reason, this section only discusses inbound filtering.
![]() Note The metaverse is part of the AAD Sync database that is the staging area for objects being synchronized. As objects are pulled into AAD Sync from different sources, they are stored in the metaverse, where they are processed. For example, if a user has an account in two different forests, the accounts need to be joined before the final, single account is exported to its final destination.
Note The metaverse is part of the AAD Sync database that is the staging area for objects being synchronized. As objects are pulled into AAD Sync from different sources, they are stored in the metaverse, where they are processed. For example, if a user has an account in two different forests, the accounts need to be joined before the final, single account is exported to its final destination.
Inbound-based filtering is accomplished by using the default configuration, where objects going to AAD must not have the metaverse attribute cloudFiltered set to a value and the metaverse attribute sourceObjectType is set to either User or Contact.
When you are filtering objects so that they don’t synchronize to AAD, the attribute cloudFiltered must be set to True. In all other cases, the value should remain empty. This method is used to prevent synchronizing an object to AAD. This type of filtering is known as negative filtering.
In the following example, you filter out all contact objects that have an SMTP address ending in office365pro.ca. In the lab used in this example, there are two forests, and in each forest there are mailbox users who have contact objects in the other forest. Thus users in each forest are visible in the Global Address List.
CONFIGURING ATTRIBUTE-BASED FILTERING AAD SYNC
To configure attribute-based filtering, follow these steps:
- Open the Synchronization Rules Editor.
- Make sure that Inbound is selected, and click Add New Rule, as shown in Figure 9-37.

Figure 9-37. Creating a synchronization rule
- Give the rule a descriptive name, such as Filter out office365pro.ca contact objects. Also provide a description of the filter, such as Filter to prevent office365pro.ca contact objects from synchronizing to AAD, so it’s clear what the rule is doing.
- On the Create Inbound Synchronization Rule page, shown in Figure 9-38, for Connected System, select the correct forest, which is one of the forests that was added when AAD Sync was installed.
- For Connected System Object Type, select Contact.
- For Metaverse Object Type, select Person.
- For Link Type, select Join.
- For precedence, type a value currently not used by another synchronization rule—for example, 10. Click Next.
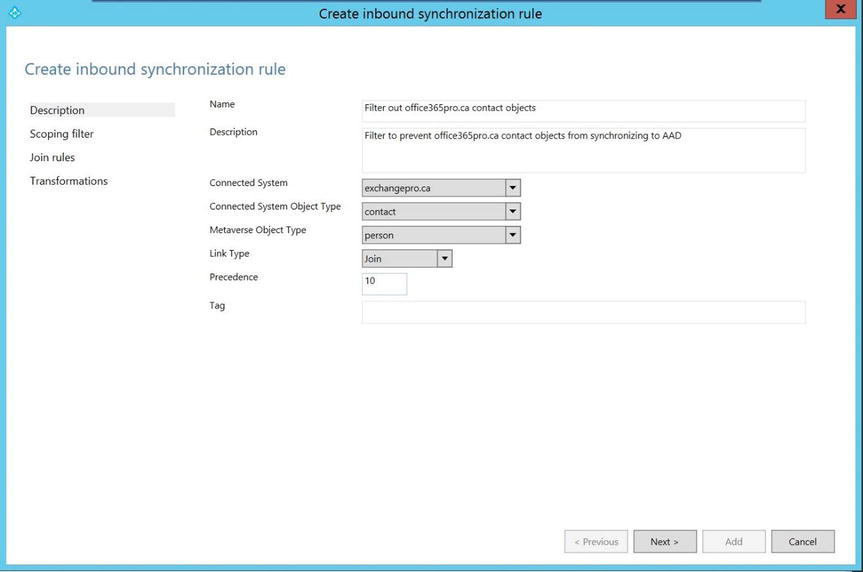
Figure 9-38. Selecting the objects to filter
- On the Scoping Filter page, click Add Group, click Add Clause, and for Attribute, select mail, as shown in Figure 9-39.
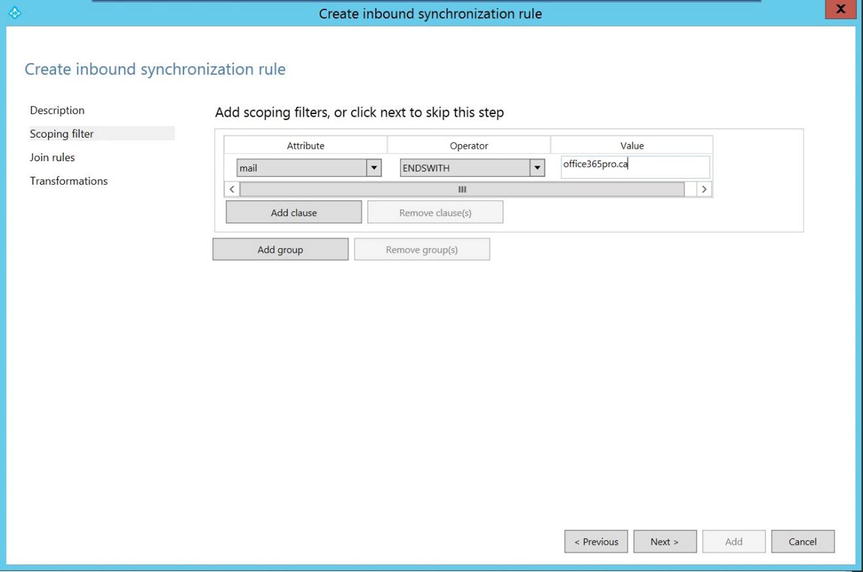
Figure 9-39. Scoping the filter
- Make sure Operator is set to ENDSWITH, and type the value office365pro.ca in the Value box. Click Next.
Note When practicing these steps in your own lab, instead of using office365pro.ca for the values, use your own domain for filtering objects.
- Leave the Join rules empty, and click Next.
- On the Transformations page, shown in Figure 9-40, click Add Transformation.
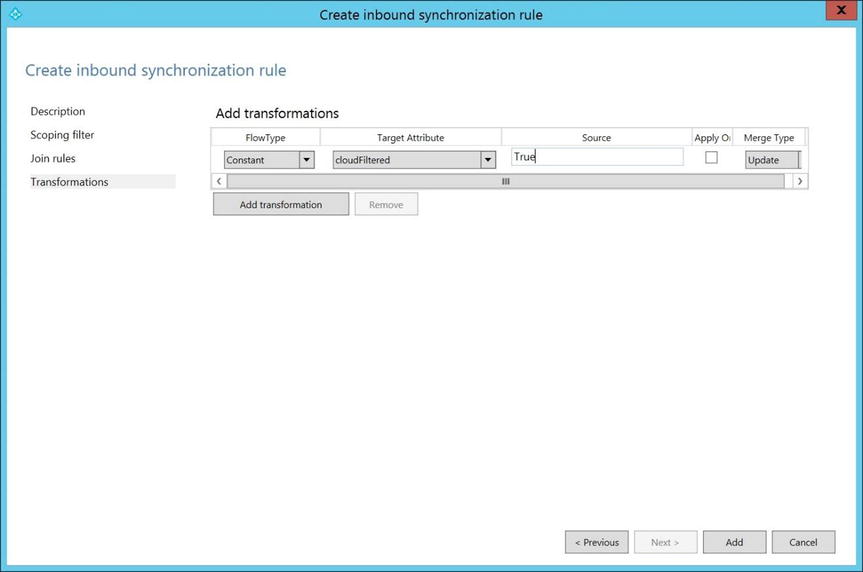
Figure 9-40. Adding a transformation
- For FlowType, select Constant:
- For Target Attribute, select cloudFiltered.
- In the Source text box, type True.
- Click Add to save the rule.
- A quick look at the inbound filters, shown in Figure 9-41, reveals that the newly added filter is present in the list. Now that you have your filtering in place, you can finally perform a synchronization.

Figure 9-41. Viewing the completed rule
- To force a synchronization of the objects, open a cmd window and navigate to the %ProgramFiles% Microsoft Azure AD SyncBin folder. There is a tool in the folder called DirectorySyncClientCmd. You have three options for running it:
- Nothing: Don’t supply any parameters.
- Initial: This is used to force a full import, full sync.
- Delta: This is used to force a Delta Import, Delta sync
Because this is the first synchronization you’re doing, use the initial parameter, as shown in Figure 9-42.

Figure 9-42. Forcing the initial synchronization
A look at the Synchronization Service Manager shows that the full import from one of the AD DS forests completed successfully; see Figure 9-43.
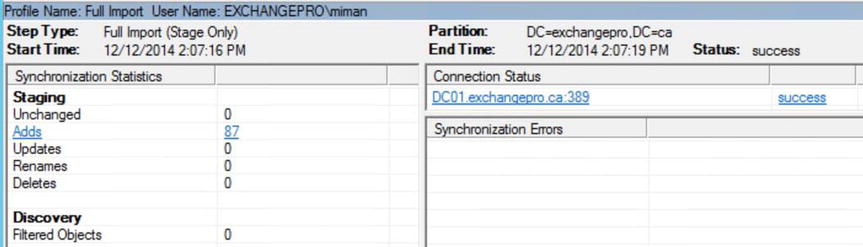
Figure 9-43. Viewing the synchronization results
You can also see in Figure 9-44 that the second AD DS forest import completed successfully.
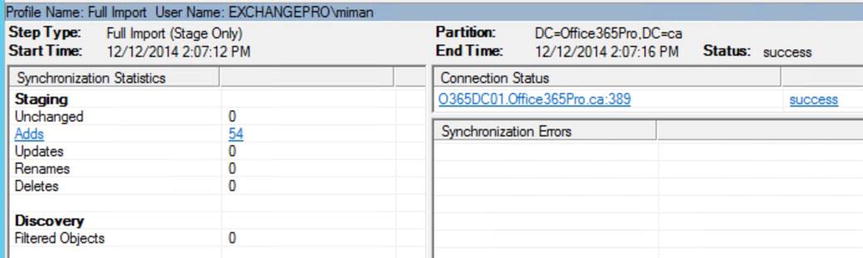
Figure 9-44. Viewing the synchronization results
Finally, in Figure 9-45, you can see that the export to AD AS completed successfully as well.
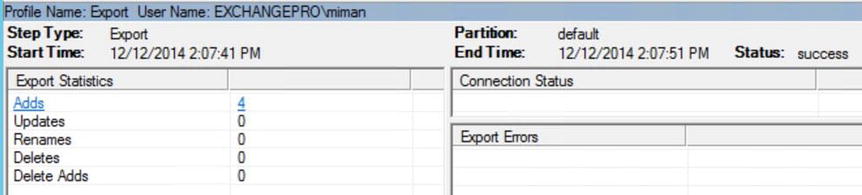
Figure 9-45. Viewing the synchronization results
As you can see, a large number of objects were pulled in from each of the on-premises domains, but only a small number of objects were pushed out to AAD. This is caused by some of the filtering done on the inbound filtering rule, as well as by some of the on-premises objects that were previously synchronized.
In this release, version 1.0.470.1023 of Microsoft’s directory synchronization tool, the object-filtering component is separated from the synchronization service manager, where it was previously. The filtering rules are now created and managed in a new tool called the Synchronization Rules Editor; it is located in the C:Program FilesMicrosoft Azure AD SyncUIShell folder, and it is called SyncRulesEditor.exe. A number of default rules are designed to prevent objects, such as system objects, from synchronizing to AAD.
AZURE AD CONNECT TOOL
Microsoft is currently working on a new tool called Azure AD Connect (AAD Connect). This tool is in the public preview stage as of this writing.
AAD Connect is designed to simplify the installation of the tools required to synchronize and authenticate with Windows AAD, whether you are using a single or multiple AD forests, password sync, or AD FS. The wizard deploys and configures all components required to get the connection up and running, including synchronization services, AD FS, and the Azure AD PowerShell module.
With the new AAD Connect tool, customers can connect their on-premises infrastructure to AAD in a single, wizard-driven procedure. Based on your selections in the wizard, the tool does the following:
- Connects to your on-premises AD FS servers and downloads and installs the prerequisites, including the .NET Framework, Azure AD PowerShell Module, and Microsoft Online Services Sign-In Assistant
- Connects to your on-premises web application proxy (WAP) servers and downloads and installs the prerequisites, including the .NET Framework, Azure AD PowerShell Module, and Microsoft Online Services Sign-In Assistant
- Installs AAD Sync and configures the sync options such as password sync, password write-back, and Exchange hybrid mode, depending on your deployment requirements
- Helps to verify that everything is working properly
You can download the public preview tool and AAD Connect documentation from http://connect.microsoft.com/site1164/program8612.
Summary
In this chapter, you were introduced to Azure Active Directory. You learned about the different versions of AAD and what each version offers. You also learned about the different methods used to add user accounts to AAD, along with how to install AAD Sync and how to configure the different filtering options.
In the next chapter, you learn about extending your on-premises AD to Azure by using the site-to-site VPN and installing a Windows server on an Azure virtual machine that will be configured as a domain controller in your domain.