Now that we understand the importance of platform automation and had a brief refresher on the key concepts of using Chef for configuration management, let’s have a look at what you need to know about the Azure platform in order to get automating!
In this chapter we’ll take a brief look at the history of Azure for the newcomer to the platform, then familiarize ourselves with key terminology for deploying to Azure and ensure you have all the tools installed to successfully automate Azure using Chef.
In this book we are focusing on the latest features of Azure, based around Azure Resource Manager (ARM) stack and the latest portal features that are available at https://portal.azure.com
We won't be looking at older features of Azure Virtual Machines (sometimes referred to as “Classic” compute resources) such as using the old management portal available from https://manage.windowsazure.com , or using the Service Management APIs although we may mention them from time to time if there is no other way to accomplish a task. These features have mostly been superseded now by the features in Azure Resource Manager (ARM) .
Note
The pace of updates to the Azure platform and tools from Microsoft will likely mean that the screenshots seen here may become out of date, so don’t be surprised if a button or some text cannot be found or doesn’t match the book exactly.
Deploying to the Microsoft Azure Platform
The Windows Azure platform was released in 2010, initially offering Platform-as-a-Service (PaaS) “Hosted services” such as Web and Worker roles, and storage capabilities such as queues and table storage for those organizations who had the capability to develop their solutions based on the .NET stack.
In April 2013, Microsoft released Windows Azure Infrastructure Services to general availability, allowing finally the creation of Infrastructure-as-a-Service (IaaS) solutions. Initially a limited set of Windows Server and Linux operating systems were available and since then more vendors have come to the platform.
In 2014 the platform was renamed to Microsoft Azure, to make it clear that it isn’t just Windows resources that you can create on their compute platform. Currently, Linux makes up over 25% of all IaaS compute resource on Azure, and as of November 2015 more than 57% of Fortune 500 companies are using Azure in their environment.
Much has been written on IaaS versus PaaS and the distinction is fairly well understood (see Figure 2-1 below). In a nutshell, with IaaS you get to manage and operate everything from the OS upwards, whereas with PaaS you only have to worry about deploying your Applications and Data on top of the platform.
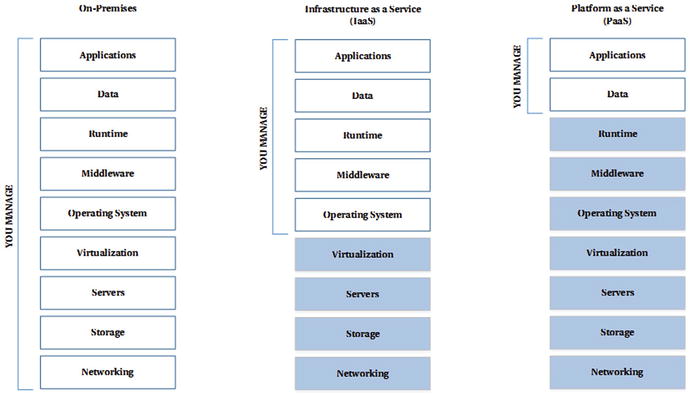
Figure 2-1. Separation of Responsibilities - On-Premises vs. IaaS vs. PaaS
One thing that is common to both IaaS and PaaS architectures is that deployment orchestration across different types of resources is the responsibility of the end user and you need automation tooling to help you do this. In Azure the primary way of achieving this orchestration is through the use of Azure Resource Manager (ARM) templates.
The majority of Azure Services are in the PaaS category, and with Azure Resource Manager we can combine IaaS and PaaS based deployments, which means we can deploy web sites or boot up virtual machines using the same set of underlying technologies. We’ll cover hybrid deployment scenarios like this in the advanced topics toward the rear of the book.
So remember that while we mostly talk about configuring IaaS environments in this book, the lines are now very much blurred, and it is easy to see how a single deployment can easily be made up of both PaaS and IaaS resources. PaaS generally has a lower surface area for management, which is great because it eliminates the need for patching and upgrading the platform; however it is not so great when you need to customize the underlying platform or manage intricate dependencies.
We’re going to use the rest of this chapter to make sure we are familiar with the Azure platform and the components and terminology you will need to work with when automating it.
Subscriptions, Tenants, and Regions
When we start to talk about management of Azure, the terms Subscription, Tenant, and Region often get confused and we’ll be using them quite a bit in this book; so this section will recap the terms. Figure 2-2 shows the relationships between the three terms. At a high level:

Figure 2-2. Regions, Tenants, and Subscriptions in Microsoft Azure
The subscriptionidentifies the owner of the subscription and the method of payment (you may see this referred to in Azure-parlance as the Payment Instrument). Subscriptions are given a name and ID and resources you create in Azure can be associated to this subscription. A subscription is not tied to a particular region and is associated with a tenant.
The tenantis the directory name that was created when you created your first Subscription (unless you added your custom domain already, it probably has a domain name like contoso.onmicrosoft.com).
The regiondescribes the location of the datacenter where you want your primary resources to be located: for example, ‘West US’ is the region identifier for resources that are hosted in the California datacenter.
Let’s drill into each one of these terms a little further.
Subscriptions
To follow the exercises and examples in this book, we’ll need to use an Azure subscription. There are many ways of purchasing Microsoft Azure and we won’t cover them here; but if you need a free trial you can visit https://azure.microsoft.com/en-us/pricing/free-trial/
For the examples in the book, you will need the Subscription GUID for the subscription you wish to work with. This can be obtained by following these steps:
1. Navigate to the Azure portal at https://portal.azure.com and log in remembering to use the account you signed up with.
2. Click the Browse All icon on the left-hand side of the portal.
3. In the menu that appears, click Subscriptions, as shown in Figure 2-3.

Figure 2-3. Finding the Subscription GUID in the Azure Management Portal
Note
If you are a developer or IT professional with a Microsoft Visual Studio with MSDN subscription, are a Microsoft Partner, or you are a startup who qualifies for BizSpark, then you are very likely to have access to free monthly Azure credits. See http://azure.microsoft.com/en-us/pricing/member-offers/ for further details.
Tenants
A tenantrefers to a dedicated instance of Azure Active Directory (Azure AD) for your organization. Typically, a tenant is referred to by its default directory name: for example, contoso.onmicrosoft.com and it also has a globally unique identifier (GUID) that in general is not used publicly, but is used in automation scenarios.
When you sign up to Microsoft Azure or Office 365, you are allocated a directory automatically, and custom domain names can be added afterwards. Your users and roles are created in the directory.
Active Directory properties are only accessible from the “old” portal at https://manage.windowazure.com (as shown in Figure 2-4) so this is one of the few times you may need to access this portal until the functionality can be replicated in the new portal located at https://portal.azure.com

Figure 2-4. Viewing a tenant in the management portal
Regions
At the time of writing, Microsoft Azure is available for purchase in 140 countries and from those countries you can provision and deploy compute resource in over 20 regions(plus China, which is managed independently and is not generally available unless your company has a legal entity located there). More regions have already been announced for 2016 in the United Kingdom and in Germany.
Note
Not all machine sizes and services are available in all regions, and this may also influence your decision about where to locate your compute resource. You can view the full list of services by region at http://azure.microsoft.com/en-us/regions/#services
When planning to deploy an application to Microsoft Azure it is important to take datacenter location and any usage restrictions into account. Table 2-1 lists the current Microsoft Azure regions. More are being added each year to provide better global coverage and lower latency.
Table 2-1. Global Microsoft Azure regions and corresponding datacenter locations, as of November 2015
Azure Region | Location |
|---|---|
Central US | Iowa |
East US | Virginia |
East US | Virginia |
US Gov Iowa | Iowa |
US Gov Virginia | Virginia |
North Central US | Illinois |
South Central US | Texas |
West US | California |
North Europe | Ireland |
West Europe | Netherlands |
East Asia | Hong Kong |
Southeast Asia | Singapore |
Japan East | Tokyo, Saitama |
Japan West | Osaka |
Brazil South | Sao Paulo State |
Australia East | New South Wales |
Australia Southeast | Victoria |
Central India | Pune |
South India | Chennai |
West India | Mumbai |
Note that Australian regions are available only to customers with billing addresses in Australia or New Zealand. For an up-to-date list of regions and service availability, visit http://azure.microsoft.com/en-us/regions/
Selecting Your Nearest Region
If you have some experience running applications that consume data from across the Internet, you’ll know that latency (typically measured as the gap in milliseconds between sending and receiving packets of data) is an important factor in the perceived performance of an application. This is also a key consideration when you select the location of your resources to minimize the latency when using the Microsoft Azure management portal or automation tools. So before we dive in to the exercises it is useful to find out your nearest datacenter location.
We can make an approximation of your nearest datacenter by visiting http://azurespeed.com (thank you, Blair Chen) in a web browser as seen in Figure 2-5.

Figure 2-5. Using azurespeed.com to determine your nearest datacenter
We can see from the screenshot that my nearest datacenter is in the Netherlands (West Europe). So for my examples I’ll be choosing ‘West Europe’ as the primary location for my resources.
Now we know where we’re going to host our resources (region name), the name of our active directory (tenant), and who is paying (subscription); now we can advance through the rest of the chapter and get our environment set up with the right tools.
Managing Azure from the Command Line
There are two ways to manage Azure from the command line - you can either use the Azure Command-line tools (referred to as azure-cli), which is a stand-alone, cross-platform (Windows, OS/X and Linux) application written in node.js, or you can use the Azure PowerShell cmdlets, which run natively on the Windows platform. There is no explicit feature parity between the two tools, but in general they both release at similar times as new functionality is released in Azure.
Note
Chef tools such as Chef-Provisioning communicate with Azure’s Resource Management API via a separate cross-platform library so these command-line tools are only required on your workstations to help you manage your subscriptions.
The tool you use will most likely be dictated by the platform you and your team generally work on - if your day-to-day job is mostly managed from the Windows environment then the PowerShell cmdlets are likely be most convenient to you. If you are running on OS/X or a Linux platform, then you are limited in choice to the Azure CLI only.
In this book, command-line examples are provided in both Azure-cliand PowerShell forms where possible. You should start by installing the tools you need. The tools are updated regularly so even if you think you’ve installed a recent version, it may not contain the latest updates. You should use this time to find the latest available versions and update if necessary.
To install the command-line tools, we need to start by visiting https://azure.microsoft.com/downloads , which will direct you to the correct language version of the site. You’ll need to scroll down to the Command-line tools section, which is at the bottom of the page, and select the installer you want as shown in Figure 2-6.

Figure 2-6. Download location for Azure Command-line tools
Installing the Tools (Windows)
In Windows , you can choose to install both the command-line tools and the PowerShell cmdlets via the same WebPI 5.0 installer. It actually doesn’t matter which installer you select first, because once installation of the first one is completed you are given the option to install the remaining tools.
Azure-cli
Let’s start by installing the command-line tools by running the installer and pressing Install (as shown in Figure 2-7 ).

Figure 2-7. Web Platform Installer 5.0 installation of Microsoft Azure Cross-platform Command-line tools
After installation of the command-line tools, you are given the opportunity to add the Microsoft Azure PowerShell tools to the installation. I recommend declining this option. Why? Because the PowerShell modules are now available on the PowerShell Gallery, so they are installable and updatable via the excellent PSGet (see http://psget.net ).
If you have a copy of Visual Studio installed on your machine, I recommend adding the Microsoft Azure SDK for .NET though - this will give you some visual help writing Azure Resource Manager deployment templates in JSON.
Now that we have the tools installed we can skip to the next stage, which is to verify the installation.
PowerShell (PSGet)
Note
If you do not have PSGet installed, you will need to install it from http://psget.net
To install the PowerShell cmdlets via PSGet, open an administrative/elevated PowerShell window and use the Install-Module AzureRM cmdlet:
PS C:WINDOWSsystem32> Install-Module AzureRM You may get a prompt about installing the modules from an untrusted repository:
You are installing the module(s) from an untrusted repository. If you trust this repository, change its InstallationPolicy value by running the Set-PSRepository cmdlet.Are you sure you want to install software from 'https://www.powershellgallery.com/api/v2/'?[Y] Yes [A] Yes to All [N] No [L] No to All [S] Suspend [?] Help (default is "N"): Y
The AzureRM PowerShell module has a number of dependent modules. We can install these using the Install-AzureRM command:
PS C:WINDOWSsystem32> Install-AzureRMInstalling AzureRM modules.AzureRM.Profile 0.10.0 installed [1/24]...Azure.Storage 0.10.1 installed [2/24]...AzureRM.ApiManagement 0.10.0 installed [3/24]...AzureRM.Automation 0.10.0 installed [4/24]...AzureRM.Backup 0.10.0 installed [5/24]...[...]AzureRM.StreamAnalytics 0.10.0 installed [20/24]...AzureRM.Tags 0.10.0 installed [21/24]...AzureRM.TrafficManager 0.10.0 installed [22/24]...AzureRM.UsageAggregates 0.10.0 installed [23/24]...AzureRM.Websites 0.10.0 installed [24/24]...
Installing the Tools (Mac OS X)
If you are a Node.js user already, you should be able to install the Azure-cli by using the Node.js package manager, NPM:
$ npm install -g azure-cliOtherwise you’ll have to install from the downloaded package, as shown in Figure 2-8. After launching the installer, accept all the defaults and proceed to the verification steps.

Figure 2-8. Installing the command-line tools on Mac OS X
Installing the Tools (Linux)
On the Linux platform we are basically restricted to the option of installing via the Node.js package manager (NPM) or via a separately downloaded package.
Ubuntu/Debian
$ sudo apt-get install nodejs-legacy$ sudo apt-get install npm$ sudo npm install -g azure-cli
RedHat /CentOS
$ sudo yum install nodejs-legacy$ sudo yum install npm$ sudo npm install -g azure-cli
Logging In and Verifying Command-line Tools Connectivity
Now that we have all tools we need installed, let’s see if we can connect to Azure and list the available subscriptions. We do this with the azure-cli by using the azure login command . In PowerShell we need to use the Add-AzureAccount cmdlet.
Azure-cli
First of all, we need to log in by using the azure login --username <your-username> command (note the use of two dashes --). The cli requests the password for your account.
PS C:UsersStuartPreston> azure login --username [email protected]info: Executing command loginPassword: **********info: Added subscription Microsoft Partner Networkinfo: Added subscription Pendrica Productioninfo: login command OK
To list the available subscriptions, use the azure account list command:
PS C:UsersStuartPreston> azure account listinfo: Executing command account listdata: Name Id Current Statedata: ------------------------- ------------------------------------ ------- --------data: Microsoft Partner Network b6e7eee9-YOUR-GUID-HERE-03ab624df016 true Enableddata: Pendrica Production bcf669fc-YOUR-GUID-HERE-e2d1f9f4b1c3 false Enabledinfo: account list command OK
If you want to change the active subscription, you can use the azure account set command. Below I am setting the active subscription to my Microsoft Partner Network subscription:
PS C:UsersStuartPreston> azure account set "Microsoft Partner Network"info: Executing command account setinfo: Setting subscription to "Microsoft Partner Network" with id "b6e7eee9-YOUR-GUID-HERE-03ab624df016".info: Changes savedinfo: account set command OK
We can view the Tenant ID for a given subscription by using the Subscription ID and passing it into the azure account show command:
PS C:UsersStuartPreston> azure account show b6e7eee9-YOUR-GUID-HERE-03ab624df016info: Executing command account showdata: Name : Microsoft Partner Networkdata: ID : b6e7eee9-YOUR-GUID-HERE-03ab624df016data: State : Enableddata: Tenant ID : 9c117323-YOUR-GUID-HERE-9ee430723ba3data: Is Default : truedata: Environment : AzureClouddata: Has Certificate : Yesdata: Has Access Token : Yesdata: User name : [email protected]data:
Finally, to make sure we are creating our resources in Azure Resource Manager mode we need to switch to ARM mode; for this we use the azure config mode arm command:
PS C:UsersStuartPreston> azure config mode arminfo: New mode is arm
To confirm we are in the correct (ARM) mode, we can use the azure config list command:
PS C:UsersStuartPreston> azure config listinfo: Getting config settingsdata: Setting Valuedata: ------- -----data: mode arm
We now have a fully configured azure-cli installation that we can use for the rest of the examples.
PowerShell
If you’re not on Windows, you are free to skip to the next section. We’re going to configure Windows PowerShell so we are ready to use it for the remaining examples in the book. First of all, we need to log in by using the Login-AzureRmAccount command. This should launch a browser window (as shown in Figure 2-9 ) to request credentials. You will need to provide your username and password.

Figure 2-9. Browser dialog launched during Login-AzureRmAccount cmdlet
PS C:UsersStuartPreston> Login-AzureRmAccount After entering your username and password, you will be logged in and now need to set a subscription to work with. To list the available subscriptions and their state using PowerShell, use the Get-AzureRmSubscription command:
PS C:UsersStuartPreston> Get-AzureRmSubscription | Select SubscriptionId, SubscriptionNameSubscriptionId SubscriptionName-------------- ----------------b6e7eee9-YOUR-GUID-HERE-03ab624df016 Microsoft Partner Networkbcf669fc-YOUR-GUID-HERE-e2d1f9f4b1c3 Pendrica Production
If you need to change which subscription is the active or current one using PowerShell, use the Select-AzureSubscription command:
PS C:UsersStuartPreston> Select-AzureRmSubscription -SubscriptionName "Microsoft Partner Network"Environment : AzureCloudAccount : [email protected]TenantId : 9c117323-YOUR-GUID-HERE-9ee430723ba3SubscriptionId : b6e7eee9-YOUR-GUID-HERE-03ab624df016CurrentStorageAccount :
We are now ready to create resources in the cloud with Azure Resource Manager, but before that we need to understand a bit more about Resource groups.
Azure Resource Groups
Resource Groups in Azure let you manage all resources (such as web sites, virtual machines, storage, databases, and networks) for an application together.
A resource group typically include all of the resources for an application, but you can also use them as a container for resources that are logically grouped together: perhaps a set of shared services that other applications use. You can decide how you want to allocate resources to resource groups based on what makes the most sense for your organization.
Resources in Azure are classified into providers, and there are three core providers for IaaS resources - Microsoft.Network, Microsoft.Compute, and Microsoft.Storage. An example of this is shown in Figure 2-10.

Figure 2-10. Resources inside a single Resource Group for a single application
One of the key benefits of Resource Groups is that you can reuse server names for the same resource but in different resource groups. This is a great advancement for testing purposes as the machine names will not change according to which environment you are in (of course there are some notable exceptions to this such as Storage Accounts and Public IP addresses).
Note
Deleting a resource group will delete all the resources contained within it.
As your application evolves over time you’ll need the ability to describe the entire resource group and its dependencies in a way where we can start with the application topology in one shape and end up in another. This is exactly the use case for Azure Resource Manager templates.
Azure Resource Manager Templates
Azure Resource Manager allows you to define a simple template (in JSON format) that defines deployment and configuration of your application. Using the template, you can repeatedly deploy your application throughout the application life cycle and have confidence your resources are deployed in a consistent state.
Resource Manager is declarative and idempotent - declarative in this case meaning the document describes the target state for each resource, and idempotent in our world means that we can execute the script multiple times and get the same result. Which is very useful for testing, of course!
Resource Manager ensures that the resources for a configuration are created in the correct order to preserve the dependencies and references. For example, Resource Manager will not create the NIC for a virtual machine until it has created the virtual network with a subnet and an IP address. You can specify parameters in your template to allow for customization and flexibility in deployment. For example, you can pass parameter values that tailor deployment for your test environment. By specifying the parameters, you can use the same template for deployment to all of your environments.
Finally, because it is a JSON document, you can check it in to your source code repository and update it as your architecture evolves.
Resource Manager Template Structure
It is important to understand the structure of a template before diving into hundreds of lines of code, so let’s have an in-depth look at a template. An empty Azure Resource Manager (ARM) deployment template looks like the following:
Listing 2-1. Blank ARM deployment template
{"$schema": "http://schema.management.azure.com/schemas/2015-01-01/deploymentTemplate.json#","contentVersion": "1.0.0.0","parameters": {},"variables": {},"resources": [],"outputs": {}}
Even if you don’t understand JSON just yet, don’t worry. A JSON document always has lots of curly brackets that are used to group items together, and brackets not being matched is one of the primary causes of template deployment failure.
There are some tools that will help you ensure you minimize mistakes with the files when you modify them, and we’ll discuss these as we get further into the book. For now, we just want to understand how a template is composed as understanding this is key to most of the automation techniques we’ll be using.
Table 2-2. Constituent parts of an ARM deployment template
Key | Description |
|---|---|
Parameters | Used to specify configuration parameters that you wish to expose to the command line or calling process for users to input. |
Variables | Used to specify internally scoped variables for use across the deployment template. |
Resources | Used to list an array of resources, and their type (identified by a provider name), and their dependencies. |
Outputs | Used to relay information back to the caller that is returned by the execution of the deployment (e.g., a generated SQL Server instance name). |
Example Resource Manager Template
Here’s one of the simplest ARM templates that can be created. It creates a Storage account, Network Interface, A VLAN with two subnets, and a VM in a specified location. Don’t worry if this looks daunting right now; there are tools to help ensure you don’t make too many mistakes with the file.
Listing 2-2. Populated ARM deployment template
{"$schema": "http://schema.management.azure.com/schemas/2015-01-01/deploymentTemplate.json#","contentVersion": "1.0.0.0","parameters": {"vnetLocation": {"type": "string","defaultValue": "West US","allowedValues": ["East US","West US","West Europe","East Asia","South East Asia"]},"storageName": {"type": "string"},"storageType": {"type": "string","defaultValue": "Standard_LRS","allowedValues": ["Standard_LRS","Standard_GRS","Standard_ZRS"]},"storageLocation": {"type": "string","defaultValue": "West US","allowedValues": ["East US","West US","West Europe","East Asia","South East Asia"]},"vmName": {"type": "string"},"vmAdminUserName": {"type": "string"},"vmAdminPassword": {"type": "securestring"},"vmWindowsOSVersion": {"type": "string","defaultValue": "2012-R2-Datacenter","allowedValues": ["2008-R2-SP1","2012-Datacenter","2012-R2-Datacenter","Windows-Server-Technical-Preview"]}},"variables": {"vnetPrefix": "10.0.0.0/16","vnetSubnet1Name": "Subnet-1","vnetSubnet1Prefix": "10.0.0.0/24","vnetSubnet2Name": "Subnet-2","vnetSubnet2Prefix": "10.0.1.0/24","vmImagePublisher": "MicrosoftWindowsServer","vmImageOffer": "WindowsServer","vmOSDiskName": "vmOSDisk","vmVmSize": "Standard_D1","vmVnetID": "[resourceId('Microsoft.Network/virtualNetworks', 'vnet')]","vmSubnetRef": "[concat(variables('vmVnetID'), '/subnets/', variables('vnetSubnet1Name'))]","vmStorageAccountContainerName": "vhds","vmNicName": "[concat(parameters('vmName'), 'NetworkInterface')]"},"resources": [{"name": "vnet","type": "Microsoft.Network/virtualNetworks","location": "[parameters('vnetLocation')]","apiVersion": "2015-05-01-preview","dependsOn": [ ],"tags": {"displayName": "vnet"},"properties": {"addressSpace": {"addressPrefixes": ["[variables('vnetPrefix')]"]},"subnets": [{"name": "[variables('vnetSubnet1Name')]","properties": {"addressPrefix": "[variables('vnetSubnet1Prefix')]"}},{"name": "[variables('vnetSubnet2Name')]","properties": {"addressPrefix": "[variables('vnetSubnet2Prefix')]"}}]}},{"name": "[parameters('storageName')]","type": "Microsoft.Storage/storageAccounts","location": "[parameters('storageLocation')]","apiVersion": "2015-05-01-preview","dependsOn": [ ],"tags": {"displayName": "storage"},"properties": {"accountType": "[parameters('storageType')]"}},{"name": "[variables('vmNicName')]","type": "Microsoft.Network/networkInterfaces","location": "[parameters('vnetLocation')]","apiVersion": "2015-05-01-preview","dependsOn": ["[concat('Microsoft.Network/virtualNetworks/', 'vnet')]"],"tags": {"displayName": "vmNic"},"properties": {"ipConfigurations": [{"name": "ipconfig1","properties": {"privateIPAllocationMethod": "Dynamic","subnet": {"id": "[variables('vmSubnetRef')]"}}}]}},{"name": "[parameters('vmName')]","type": "Microsoft.Compute/virtualMachines","location": "[parameters('vnetLocation')]","apiVersion": "2015-05-01-preview","dependsOn": ["[concat('Microsoft.Storage/storageAccounts/', parameters('storageName'))]","[concat('Microsoft.Network/networkInterfaces/', variables('vmNicName'))]"],"tags": {"displayName": "vm"},"properties": {"hardwareProfile": {"vmSize": "[variables('vmVmSize')]"},"osProfile": {"computername": "[parameters('vmName')]","adminUsername": "[parameters('vmAdminUsername')]","adminPassword": "[parameters('vmAdminPassword')]"},"storageProfile": {"imageReference": {"publisher": "[variables('vmImagePublisher')]","offer": "[variables('vmImageOffer')]","sku": "[parameters('vmWindowsOSVersion')]","version": "latest"},"osDisk": {"name": "vmOSDisk","vhd": {"uri": "[concat('http://', parameters('storageName'), '.blob.core.windows.net/', variables('vmStorageAccountContainerName'), '/', variables('vmOSDiskName'), '.vhd')]"},"caching": "ReadWrite","createOption": "FromImage"}},"networkProfile": {"networkInterfaces": [{"id": "[resourceId('Microsoft.Network/networkInterfaces', variables('vmNicName'))]"}]}}}],"outputs": {}}
Let’s now go through the constituent parts of this template to get an understanding of the patterns involved.
Parameters
Parameters are the external inputs to the template and can be set externally by both the command-line tools and Windows PowerShell. We can see in this case there are eight parameters added - vnetLocation, storageName, storageType, storageLocation, vmName, vmAdminUserName, vmAdminPassword, vmWindowsOSVersion.
"parameters": {"vnetLocation": {"type": "string","defaultValue": "West US","allowedValues": ["East US","West US","West Europe","East Asia","South East Asia"]},"storageName": {"type": "string"},"storageType": {"type": "string","defaultValue": "Standard_LRS","allowedValues": ["Standard_LRS","Standard_GRS","Standard_ZRS"]},"storageLocation": {"type": "string","defaultValue": "West US","allowedValues": ["East US","West US","West Europe","East Asia","South East Asia"]},"vmName": {"type": "string"},"vmAdminUserName": {"type": "string"},"vmAdminPassword": {"type": "securestring"},"vmWindowsOSVersion": {"type": "string","defaultValue": "2012-R2-Datacenter","allowedValues": ["2008-R2-SP1","2012-Datacenter","2012-R2-Datacenter","Windows-Server-Technical-Preview"]}}
Each parameter has a type, a default value, and optionally a list of allowed values. For example, the vmWindowsOSVersion parameter is a string type and has a default value of 2012-R2-Datacenter. It also has values that can be selected from the allowedValues list shown.
Variables
Variables are internally scoped to the template: that is, they are only settable from within the template. In the variables section, you construct values that can be used to simplify template language expressions. Typically, these variables will be based on values provided from the parameters. The example below demonstrates how to reference other elements, as well as introducing the concat() function:
"variables": {"vnetPrefix": "10.0.0.0/16","vnetSubnet1Name": "Subnet-1","vnetSubnet1Prefix": "10.0.0.0/24","vnetSubnet2Name": "Subnet-2","vnetSubnet2Prefix": "10.0.1.0/24","vmImagePublisher": "MicrosoftWindowsServer","vmImageOffer": "WindowsServer","vmOSDiskName": "vmOSDisk","vmVmSize": "Standard_D1","vmVnetID": "[resourceId('Microsoft.Network/virtualNetworks', 'vnet')]","vmSubnetRef": "[concat(variables('vmVnetID'), '/subnets/', variables('vnetSubnet1Name'))]","vmStorageAccountContainerName": "vhds","vmNicName": "[concat(parameters('vmName'), 'NetworkInterface')]"},
Resources
As you can see, a blank template requires one or more Resources added to it so that it has some work to do. Each resource follows a very similar structure. Let’s examine the resource for the Storage account in the example template:
{"name": "[parameters('storageName')]","type": "Microsoft.Storage/storageAccounts","location": "[parameters('storageLocation')]","apiVersion": "2015-05-01-preview","dependsOn": [ ],"tags": {"displayName": "storage"},"properties": {"accountType": "[parameters('storageType')]"}},
Each resource has a name, type, location, and properties. It also defines any dependencies it has so that Resource Manager can provision resources in order. As we spend more time with Resource Manager with more complex examples, we’ll delve deeper into how things work.
Outputs
In the Outputs section, you specify values that are returned from deployment. For example, you could return the URI to access a deployed resource.
The following example shows a value that is returned in the Outputs section.
{"outputs": {"siteUri" : {"type" : "string","value": "[concat('http://',reference(resourceId('Microsoft.Web/sites', parameters('siteName'))).hostNames[0])]"}}
Expressions and Functions
Expressions and functions extend the JSON that is available in the template and allow you to create values that are not strict literal values. Expressions are enclosed with brackets ([ and ]), and are evaluated at deployment time.
Listed in Table 2-3 are some common expression functions:
Table 2-3. Common Resource Manager template functions (from https://azure.microsoft.com/en-gb/documentation/articles/resource-group-template-functions)
Function | Description |
|---|---|
base64 | Returns the base64 representation of the input string. |
concat | Combines multiple string values and returns the resulting string value. This function can take any number of arguments. |
copyIndex | Returns the current index of an iteration loop. For examples of using this function, see Create multiple instances of resources in Azure Resource Manager. |
deployment | Returns information about the current deployment operation. |
listKeys | Returns the keys of a storage account. The resourceId can be specified by using the resourceId function or by using the format providerNamespace/resourceType/resourceName. You can use the function to get the primaryKey and secondaryKey. |
padLeft | Returns a right-aligned string by adding characters to the left until reaching the total specified length. |
parameters | Returns a parameter value. The specified parameter name must be defined in the parameters section of the template. |
provider | Return information about a resource provider and its supported resource types. If no type is provided, all of the supported types are returned. |
reference | Enables an expression to derive its value from another resource’s runtime state. |
replace | Returns a new string with all instances of one character in the specified string replaced by another character. |
resourceGroup | Returns a structured object that represents the current resource group. |
resourceId | Returns the unique identifier of a resource. You use this function when the resource name is ambiguous or not provisioned within the same template. |
subscription | Returns details about the subscription. |
toLower | Converts the specified string to lower case. |
toUpper | Converts the specified string to upper case. |
variables | Returns the value of variable. The specified variable name must be defined in the variables section of the template. |
The following example shows how to use several of the functions when constructing values:
"variables": {"location": "[resourceGroup().location]","usernameAndPassword": "[concat('parameters('username'), ':', parameters('password'))]","authorizationHeader": "[concat('Basic ', base64(variables('usernameAndPassword')))]"}
We can see the usernameAndPassword value uses the concat() function to join together the username and password, which are passed in as parameters. We also see the authorizationHeader key uses the base64() function to generate the base64 version of the usernameAndPassword variable.
For now, you know enough about expressions and functions to understand the sections of the template. For more detailed information about all of the template functions, including parameters and the format of returned values, see https://azure.microsoft.com/en-gb/documentation/articles/resource-group-template-functions/
Summary
In this chapter we learned about some of the key Microsoft terminology that will be required to automate the provisioning and configuration management of Azure using Chef. There is obviously a lot more to learn about Azure than I have covered in this chapter. There are some great resources available already so I have only touched on the basics here.
If you were able to follow through the examples and installations, then you have everything you need for the upcoming chapters.