
All this cookbook development is nice and simple when we’re following the demos in Chef Fundamentals, or being taught the ins and outs of attributes and data bags by a trainer. But what happens in the real world? That is what this chapter seeks to answer by summarizing some of the established patterns and practices from environments of varying shapes and sizes and highlighting some common mistakes and dead-ends.
Chef is a wonderfully flexible and extensible toolset; and because of this, many people have invented their own ways of working with it that work for them. In practice, there are a few tips, patterns, and practices that make sense to adopt and I’ll be presenting some of those here for consideration.
Let’s consider the case of a typical company that has a single instance of Chef and needs to implement a release process across three environments: Development (Dev), Test, and Production (Prod), as depicted in Figure 7-1.

Figure 7-1. Typical environment structure for releasing software within an organization
Releases need to progress in a rapid but stable manner through the environments, and we need to ensure that by making changes in lower environments (Dev and Test), we don’t impact any users of the Production system. Let’s step through some of the aspects of Chef you may want to look at.
Avoid Using the _default Environment
All those nodes you bootstrapped when doing your Chef training probably went into the _default environment , didn’t they? But did you know that version constraints cannot be applied to the _default environment? (as shown in Figure 7-2).

Figure 7-2. Setting a cookbook constraint on the _default environment is not possible
If we cannot version a cookbook, it means that every time we upload a cookbook to the Chef server, the latest version of the cookbook will always be used in the Chef run. For this reason, where possible move your nodes to a specific environment at the earliest opportunity. We’ll discuss how to create Chef environments in the next section.
Use Chef Environments to Reflect Your Internal Release Processes
It sounds simple, but having a set of Chef environments that match your application life cycle usually makes the most sense. If you run your code through development and test before you reach production, you should have Chef environments to match.
Listing Existing Environments
To list the available environments that are already created in your Chef organization, we use the knife environment list command:
PS C:UsersStuartPrestonchefazure-ch07> knife environment list -w_default: https://api.chef.io/organizations/pendrica-chefazure/environments/_default
We can see in our organization that we currently have only a _default environment.
Creating New Environments
Environments are specified via an environment.json file that is added to your repo. The environments file is usually stored in the environments folder within a Chef repository; however it does not take effect when you upload a cookbook. We must use the knife environment command to upload a new environment definition. This process is shown in Figure 7-3.

Figure 7-3. Environment file relationship to Environments
Environment File Contents
An environment file should be located in your repo at /environments/<environment>.json. Let’s have a look at an example file, test.json:
{"chef_type": "environment","name": "test","json_class": "Chef::Environment","description": "Test environment","cookbook_versions": {"couchdb": "= 11.0.0","my_cookbook": "= 1.2.0"},"default_attributes": {"apache2": {"listen_ports": ["80","443"]}},"override_attributes": {"apache2": {"min_spareservers": "5"}}}
In our example there are three sections after the name and description field that are self-explanatory:
1.cookbook_versions- in this section we can provide the specific list of cookbook versions to “pin” for this environment. Any cookbooks that do not appear in the list are essentially “unpinned” (i.e., the latest version will always be used).
2.default_attributes- environment default attributes take precedence over recipe or attribute file-defined attributes. This means that putting attributes here gives us a mechanism to define attributes such as the name of a database server where you have one per environment.
3.override_attributes- if you have a default attribute defined, and a role that overrides it with its own default attribute, you can use this section to define an override_attribute. Essentially this attribute will override all recipe/cookbook/role-defined default attributes. Useful when you need to enforce an attribute in a particular environment.
Uploading a New Environment File
Environments can be uploaded at the command line using the command knife environment:
PS C:UsersStuartPrestonchefazure-ch07> knife environment from file ./environments/test.jsonUpdated Environment test
Now that we’ve created a new environment, we need to move some Chef nodes to it. As we know, all nodes within Chef are assigned the _default environment if one isn’t specified; this can be changed from either the server or the client, at the command line, or by modifying the client.rb file.
Note
You may also create environments using the management portal but this is not recommended as it is a manual, non-repeatable action, and doesn’t lend itself to good continuous delivery practices.
Changing the Environment for a Node
Remembering that each node that runs Chef Client uses a configuration file client.rb, we can specify the environment in the client.rb and this has the effect of overriding the server-assigned environment for that run (and storing that value for future runs or for searches against the Chef server). We can also use the knife command or the Chef management portalin order to achieve this. We’ll use this section to go through each of the options.
Specifying the Environment for a Server in client.rb
It’s relatively simple to modify your client.rbto specify your environment. Simply add the following line:
environment <environment_name>for example:
environment prodOnce the file is saved, Chef Client will notify the server at the beginning of the client run that it is overriding the environment set on the server, and the server will save that environment for future runs.
Tip
If you are interested in managing your Chef Client configuration, have a look at the chef-client cookbook, available on the Chef Supermarket at https://supermarket.chef.io/cookbooks/chef-client
Specifying the Environment for a Server Using Knife
To change the server environment from Knife, you can issue the knife node environment_set command from your workstation. This runs against the configured Chef server as per your knife.rb file. The command takes the node name and environment_name parameters. So next is how to set a node called vm.chef-azure-book to the test environment:
PS C:UsersStuartPrestonchefazure-ch07> knife node environment_set vm.chef-azure-book testvm.chef-azure-book:chef_environment: test
The new environment will then be used from the next Chef Client run.
Specifying the Environment for a Server Using the Chef Management Portal
When using the Chef management portal , you will find an Environment field on the Nodes tab. Simply select the node and select the new environment, as shown in Figure 7-4.

Figure 7-4. Setting an environment using the Chef management portal
Searching for Servers in an Existing Environment
Imagine that if you wanted a list of all servers that are in the _default environment , you would issue the following knife search command, which will return the name attribute of servers in that environment:
PS C:UsersStuartPrestonchefazure-ch07> knife search "chef_environment:_default" -a name4 items foundDESKTOP-TIDJ3S8:name: DESKTOP-TIDJ3S8chefazurec8t1.ch08-test1:name: chefazurec8t1.ch08-test1stuartpreston-pendrica:name: stuartpreston-pendricavm.chef-azure-book:name: vm.chef-azure-book
Controlling Releases through Environments Using the Environment and Role Patterns
Environments are a way of logically grouping servers, commonly aligned to the testing stages of an application. Releases are sent through the environments and then tested at each stage. Figure 7-5 depicts this typical set of environments .

Figure 7-5. Typical set of environments within an organization
The environment pattern is simply a way of splitting out your environmental information from your application cookbooks, realizing that they may have a separate life cycle.
Remember that cookbooks can be versioned, and roles cannot. This means it is a bad practice to modify roles once deployed to a node, as any change to a role’s run list impacts all environments simultaneously. That would not be a controlled release process! So how we get around this? By sticking to the following principles during cookbook development:
1. No nesting of roles. Each role should refer to one or more “capability” recipes that are provided by an application cookbook.
Example role roles/myapp-frontend.rb:{"name": "myapp-frontend","chef_type": "role","json_class": "Chef::Role","default_attributes": {},"description": "This is a single role that points to the standard-app-a frontendcapability recipe","run_list": ["recipe[myapp_a::default]",],"env_run_lists" : {}}
2. Application cookbooks should include and manage the dependencies for that application (remembering that dependencies are specified in the application cookbook’s metadata.rb file).
Example metadata.rb:name 'myapp_a'maintainer 'Stuart Preston'maintainer_email '[email protected]'license 'all_rights'description 'Installs/Configures myapp_a'long_description 'Installs/Configures chefazure-ch07'version '0.1.0'depends 'mysql'depends 'rabbitmq'
3. Default attributes for each environment (e.g., location of database server in that environment) should be specified in the environment JSON file.
4. Default Role attributes should be avoided (as they override default environment attributes that are unlikely to be desirable).
5. Each node should be assigned the relevant roles that exist within the environment JSON file.
An overview diagram of how these principles work together is shown in Figure 7-6. If you manage to stick to these simple rules, you’ll have the basis for a continuous delivery solution, with controlled releases into production. The running version in each environment is now a composite of the application cookbook version, combined with the attributes and version constraints from the environment cookbook.

Figure 7-6. Node/Role/Recipe relationships
Attribute Precedence
There are 15 levels of attribute precedence that go from a default attribute in a cookbook through to a forced overridden attribute set at an environment level, as shown in Figure 7-7:

Figure 7-7. Attribute precedence in Chef. Source: https://docs.chef.io/attributes.html
When using the environment pattern we are generally interested in setting default attributes:
1.Attribute files(application cookbook) - here we are setting the default attributes for our application, generally pointing them at Dev values (just in case they are accidentally pushed to a Production environment).
2.Environment attributes(environment cookbook) - here we are setting the default attributes for an environment. Conveniently these override those set in an attribute file so we can use this mechanism to set environmental attributes (such as the connection string to the database in each environment).
3.Roles- Generally the use of role attributes is not a good practice as they override default Environment attributes. However, they can be a useful tool depending on your implementation scenario. Just remember that if you want to use Environment attributes over Role attributes in this scenario you’ll have to mark the environment attribute as an override_attribute.
Semantic Versioning Overview
As mentioned, we typically use Semantic Versioning in order to version our cookbooks. Semantic versioning is a standard for versioning, created in the community that brings a common understanding to version numbering. Full details can be found at http://semver.org/spec/v2.0.0.html .
The premise of Semantic versioning is simple; given a version number Major.Minor.Patch, increment the following:
Major version when you make incompatible API changes,
Minor version when you add functionality in a backwards-compatible manner, and
Patch version when you make backwards-compatible bug fixes.
Luckily, public cookbooks, environment cookbooks, and pretty much all versioning in the Chef and Ruby ecosystem follow this numbering scheme. This numbering scheme is shown in Figure 7-8 .
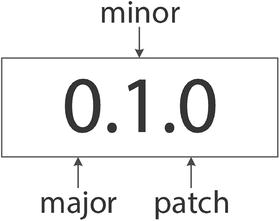
Figure 7-8. Semantic Versioning structure
The semantic version numbering scheme allows us to use version constraints in our cookbook metadata. A reminder of some of the more typical constraints is shown in Table 7-1.
Table 7-1. Typical version contraints used in Ruby and Chef cookbooks
Constraint | Meaning |
|---|---|
= 0.1.0 | Matches version 0.1.0 |
> 0.1.0 | Greater than version 0.1.0 |
>= 1.4.5 | Greater than or equal to version 1.4.5 |
∼> 2.6 | Greater than or equal to version 2.6 but less than version 3.0 |
∼> 2.6.5 | Greater than or equal to version 2.6.5 but less than version 2.7.0 |
< 1.1.0 | Less than version 1.1.0 |
<= 1.4.5 | Less than or equal to version 1.4.5 |
Summary
In this chapter, we highlighted some of the patterns and practices you should adopt when developing Chef cookbooks in the real world. Chapter 8 will take these concepts one stage further and build out a complete environment in Azure using Chef Provisioning, Jenkins, and Hosted Chef.