
Let’s get started in Chapter 1 by learning everything you can about the NetBeans 8.1 JSON integrated development environment (IDE), because that is the primary piece of software you use in this book to create JSON projects. I chose the NetBeans 8.1 IDE to use for the book, even though I cover all the major IDE software in the appendixes, because it has native JSON project-creation workflows that you see in this chapter. The other IDEs currently require plug-ins to support JSON development. You start by learning about the NetBeans 8 IDE is because it is the front end, or window, through which you look at JSON development projects. Each chapter builds on information from previous chapters, so a logical progression is from how an IDE works, to JSON concepts and terminology, to objects, data structures, applications, and so forth.
NetBeans 8.1 is the official IDE for the Java 8 JDK, and it’s rapidly growing in popularity for HTML5, CSS3, and JavaScript development as well; as such, this is the IDE you should use for this book. Also, a major player (Oracle) is behind the software, and it is freely available for commercial usage (open source). That is not to say you cannot use another IDE, such as Eclipse or IntelliJ. These are the official IDEs for Android 4.x (32-bit) and Android 6.x (64-bit), respectively; but I prefer to use NetBeans 8.1 for my new media apps and game development for Java, JavaFX, HTML5, CSS3, and JavaScript software development, as well as for HTML5, XML, JSON markup, and JS programming.
The first thing you do in this chapter is look at what has been added in NetBeans 8.1. Next you examine the various attributes of the NetBeans 8.1 IDE that make it an invaluable tool for JSON Development. You'll see all the cool things JSON will do for you during the course of this book. Finally, you learn how to create JSON projects by using the NetBeans 8.1 New Project dialogs, which specifically support the creation of JSON projects in NetBeans.
NetBeans 8.1: The Intelligent JSON IDE
I assume that you already have a professional-level workstation in place for new media content development and JSON development, as outlined in detail in Appendix A. IDE installations are covered in the appendixes, including each of the three open source IDEs. I also assume that you have removed all your outdated JDKs and IDEs and made sure you have the latest Java and IDE software installed on your PC.
If you’re new to coding and do not have the appropriate workstation, go to Walmart or PriceWatch.com, and purchase an affordable multicore (4-, 6-, or 8-core) 64-bit computer running Windows 10. It should have 4, 6, or 8 GB of DDR3 (1333 or 1600 memory-access speeds) system memory at the very least, and at least a 500 GB or even 1 TB hard disk drive.
NetBeans 8.1 Is Smart: Code Editing in Hyper-Drive
Although it is true that an IDE is essentially like a word processor, it is geared toward writing text for coding or markup rather than business documents. IDEs such as NetBeans 8.1 can lend a lot more power to your programming work process than a word processor brings to the document-authoring work process.
For instance, a word processor does not make suggestions in real time regarding the content you’re writing for your business, whereas the NetBeans 8 IDE actually looks at what you are coding while you’re actually writing the code and helps you write programming statements and constructs. One of the things NetBeans 8.1 will do is finish lines of code for you, as well as apply colors to your code statements to highlight different types of constructs.
NetBeans 8 also applies industry standards to your code, indenting the code to make it easier to read for both you and for the members of your JSON application development team.
NetBeans 8 can provide matching code -structure brackets, colons, and semicolons, so you don’t get lost when you are creating complex, deeply nested, or dense programming constructs found in modern programming languages, such as those supported by NetBeans 8.1. You create such constructs as this book progresses in complexity and you go from JSON beginner to JSON developer; I point out JSON code that is dense, complex, or deeply nested as you encounter it.
NetBeans 8.1 can also provide bootstrap code such as the JSON application bootstrap code you create a bit later in the chapter. (I know you’re eager to get started creating JSON projects and structures as soon as possible.)
As your code becomes more complex, it also becomes a far better candidate for code refactoring, which can make your code easier to understand, easier to upgrade, and far more efficient. NetBeans 8 can refactor your program’s code automatically. Code refactoring is the process of changing the structure of existing computer code so it is more efficient or scalable without changing its external behavior—that is, what the programming logic (your code) accomplishes. For instance, you could take Java 6 or Java 7 code and make it more efficient by implementing lambda expressions using Java 8, or even Java 9 when it is released later this year.
NetBeans includes pop-up helper dialogs containing methods, constants, asset references, and suggestions regarding how to construct programming statements. For instance, NetBeans 8.1 can suggest when it might be appropriate to use the powerful new Java 8 lambda expression features to make your code more streamlined and multithread compatible.
NetBeans 8.1 Is Extensible: Coding in All Languages
Another thing a word processor doesn’t do is allow you to add features to it. NetBeans does, using its plug-in architecture. This type of architecture is said to be extensible, which means if needed, it can be extended to include additional features. For instance, if you wanted to extend NetBeans 8.1 to allow you to program using Python, you could. NetBeans 8.1 also supports older languages such as COBOL and BASIC in this fashion, although the majority of popular consumer electronic devices today use Java, XML, JavaScript, and HTML5. I googled this to be sure, and there are people coding in both Python and COBOL in NetBeans 8; this is real-world proof that the NetBeans 8.1 IDE is indeed completely extensible.
Probably due to its extensibility, the NetBeans 8.1 IDE supports a number of powerful programming languages, including C, C++, Java SE, JavaDoc, JavaScript, XML, HTML5, and CSS on the client side; and PHP, Groovy, Java EE, and Java Server Pages (JSP) on the server side. Client-side software runs on the device the end user is holding or using (in the case of an iTV set), and server-side software runs remotely on a server somewhere and talks to the end user over the Internet or similar network. Client-side software is more efficient, because it is local to the device it is running on and thus is more scalable: no server is involved that might experience overload as more people use the software at any given point in time.
NetBeans 8.1 Is Efficient: Project-Management Tool
Your programming IDE needs to be able to manage projects that can grow to become massive, involving over a million lines of code, contained in hundreds of folders in the project folder hierarchy, and involving thousands of files or new media assets. Clearly, project-management features should be extremely robust for any mainstream IDE, and NetBeans 8.1 contains a plethora of project-management features. These allow you to look at JSON development projects and the corresponding files and their interrelationships in several different ways.
NetBeans 8.1 provides four primary project-management views, or panes, that you can use to see the various types of interrelationships in your project. I jumped ahead to the end of the chapter, where the example JSON project has already been created, and took the screen shot shown in Figure 1-1. It shows the primary project-management panes open in this new project; you can see the types of project-related information they show you.
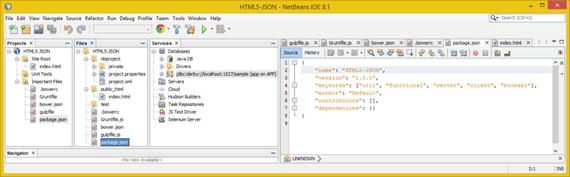
Figure 1-1. Projects, Files, and Services project-management panes
The Projects pane shows HTML5 and JSON source files and important files that make up your JSON project; it’s at far left in Figure 1-1. The next pane is Files, which shows the nbproject folder and file hierarchy on your hard disk drive. The Services pane, to the right of that, shows databases, servers, cloud, Hudson Builders, task repositories, JS Test Driver, and Selenium Server, if these are being used in the project. These are primarily server-side technologies, and technologies used with a development team, so this book doesn’t get into them in much detail.
The Projects pane should always be left open on the left side of your IDE, as you see in all the figures in this chapter. This pane is the primary access point for all of your project source code and assets (content). The Files pane shows not only the project folder and its file hierarchy but also data, HTML5 files, JSON files, and all related project files.
The Navigator pane, shown at the bottom of your NetBeans 8 IDE under the Projects, Files, and Services panes, shows the relationships that exist in your HTML5, JavaScript, CSS3, XML, XSL, and JSON code structures.
NetBeans 8.1 UI Design: Responsive Web Design
NetBeans 8 also has Design a GUI drag-and-drop design tools for a plethora of platforms, including Java SE, Java EE, Java ME, JavaFX, and Java Swing, as well as C, C++, PHP, HTML5, JavaScript, and CSS3. NetBeans 8.1 provides visual editors that can write the application’s UI code for you, so all you have to do is make what’s on the screen look the way you want it to look in your JSON application.
NetBeans 8 IDE supports the use of responsive web design architecture, allowing you to select among various form factors for your web page. NetBeans 8.1 can quickly lay out visual elements in your web design using your browser of choice with any form factor: portrait, widescreen, or super-widescreen. You can select from form-factor presets ranging from smartphones to tablets to laptops to iTV sets, and using a portrait or landscape screen display topology.
NetBeans 8.1 Styling: CSS3 Style Editing Support
In addition to enhancing browser capabilities, NetBeans’ CSS Style Editor is aware of any new media assets your browser is currently displaying and automatically places edits to the CSS markup referencing those new media assets. Editing support is included for LESS and SASS preprocessors is also provided, including syntactic and semantic coloring for CSS language constructs, automatic indentation, reformatting, intelligent code folding, and file templates.
Code-completion and refactoring tools are available with variables and mixins. The deep integration of WebKit browsers allows you to preview changes that you make in a CSS Style Edit window live in your browser as they happen. No more guessing what CSS3 changes will look like until you refresh the browser; the changes are real-time, taken directly from the source code.
You can also inspect using the browser, and the NetBeans CSS Style Editor window can automatically display CSS rules for each style element you select in the browser window. It does all this automatically. You can edit CSS3 from the CSS Style Editor window using properties fields, or you can go into the CSS3 source code and edit the code directly, using the NetBeans code-completion and inline documentation helpers.
CSS3 Style Editor previews are also available for mobile devices. These include the Google Chrome embedded WebKit browser, Chrome on Android, and Safari on iOS mobile devices. There’s an excellent chance this feature will soon work on other WebKit browsers as well, such as in Opera OS.
NetBeans 8.1 Debugging : Squash Those Bugs!
There’s a logical assumption across computer programming languages that the negative impact of a bug on a programming project—that is, code that does not do exactly what you want it to—increases in magnitude the longer it remains unfixed. For this reason, bugs must be squashed as soon as they are born, so to speak. NetBeans 8’s bug-finding code-analysis tool, an integrated NetBeans debugger, and NetBeans 8.1 integration with the third-party FindBugs project on SourceForge.net (http://findbugs.sourceforge.net, if you want the stand-alone version) supplement NetBeans’ code-correcting and efficiency tools, discussed at the beginning of this section.
Your JSON, HTML5, CSS3, and JavaScript code probably will not become complicated until later in the book, so later chapters cover how these advanced tools work when you need to use them and your knowledge is more advanced.
NetBeans 8.1 Optimization: Program Code Profiler
NetBeans has a profiler that looks at your JSON code while it is running and tells you how efficiently it uses memory and CPU cycles. This allows you to refine your code and make it more efficient in its use of key system resources, which is important for JSON development because it affects the smoothness of play on systems that are not as powerful (single-core and dual-core CPUs, for instance).
The profiler is a dynamic software-analysis tool. It looks at your Java code while it’s running, whereas the FindBugs code-analysis tool is static: it looks at your code in the editor, when it is not compiled and running in system memory. The NetBeans debugger lets you step through your code while it is running; this tool can be viewed as a hybrid of static (editing) and dynamic (executing) code-analysis modes.
Creating a JSON Project: A Bootstrap Project
Let’s get down to business and see how to create a bootstrap JSON project foundation automatically using NetBeans 8.1. This takes you toward the ultimate goal of being up to speed regarding JSON development tool options, terms, principles, structures, and projects. This example shows you how to create an empty JSON and HTML5 project using the NetBeans New Project dialog.
Click the Quick Launch icon on your taskbar (or double-click the NetBeans icon on your desktop), and launch NetBeans 8. You see the NetBeans startup screen , shown in Figure A-11 in Appendix A. Close the Welcome startup screen using the X in the tab. In the new (empty) IDE, click the New Project icon at upper left; it’s shown selected in Figure 1-2. Doing so opens the NetBeans New Project dialog.
Figure 1-2. Launch NetBeans 8.1, and click the New Project icon
In case you’re wondering, you can access the start page and its tutorials at any time! To do this, in the NetBeans 8.1 IDE, choose Help ➤ Start Menu.
To create an empty skeleton or bootstrap NetBeans 8 JSON project, you can use the NetBeans 8.1 New Project series of dialogs. This is one of those helpful JSON programming features that I talked about in the previous section; it creates a starting-point project with all the correct JSON files (ending in .json), HTML5 files (ending in .html), and JavaScript files (ending in .js), as you saw in Figure 1-1. You learn about these components in the rest of this book.
The first dialog in the series is Choose Project, shown in Figure 1-3, where you select the HTML5/JavaScript option. The JS in JSON stands for JavaScript, so this is the logical place to start. Click the Next button to proceed to the next in the series of New Project dialogs, where you can name your project and set its location on your JSON development workstation.
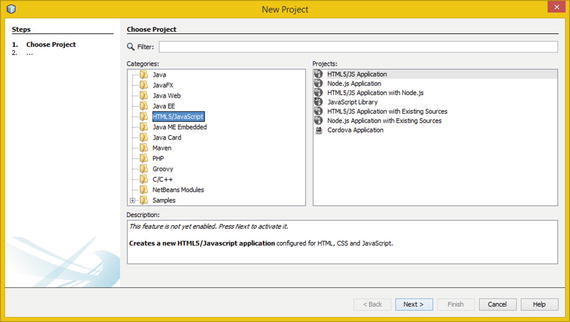
Figure 1-3. Select HTML/JavaScript in the Choose Project dialog
In the Name and Location dialog, shown in Figure 1-4, enter a Project Name of HTML5+JSON. Leave the Project Location and Project Folder fields set with the default data specified by NetBeans 8.1. Once everything is configured, click Next to advance.
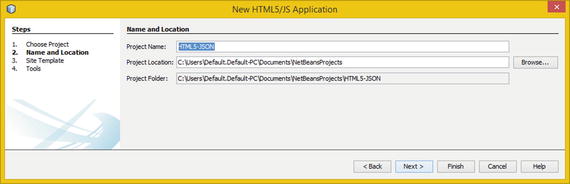
Figure 1-4. Name the project HTML5-JSON , and click the Next button
In the Site Template dialog, shown in Figure 1-5, select the first radio button, labeled No Site Template. I recommend that you shy away from using site templates —they make your site look like everyone else’s, when your objective may be to have a uniquely branded web site design (look and feel).
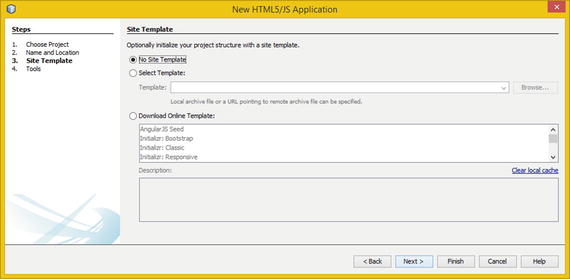
Figure 1-5. Select No Site Template, and click Next
Click the Next button to advance to the fourth dialog, which allows you to select tools you wish to use for your JSON and JavaScript development. Select the JSON and JavaScript tools that NetBeans 8.1 suggests, as shown in Figure 1-6. I will be sure to cover these so you know what they do for your HTML5, JavaScript, and JSON application project-development workflow, although I prefer to code JS from scratch.
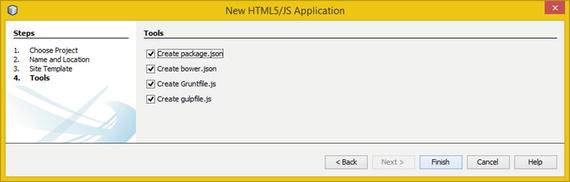
Figure 1-6. The Tools dialog in the New Project series
package.json is for the Node.JS Package Manager (NPM) ; this file holds various metadata relevant to your project. You can use the file to give information to NPM that allows it to identify the project as well handle project dependencies. project.json can contain metadata such as the project description, the project’s versioning, licensing information, configuration data, and so on, all of which is important to NPM and its end users.
Here’s a sample project.json file with lots of goodies:
{"name" : "jsonproject","description" : "Sample JSON Project NPM description format using JSON","homepage" : "example://cloudy.github.com/fakejsonprojectexample/wj/","keywords" : ["util", "functional", "server", "client", "browser"],"author" : "Apress Author Wallace Jackson <[email protected]>","contributors" : [],"dependencies" : [],"repository" : {"type": "git", "url": "git://github.com/cloudy/wj.git"},"main" : "jsonproject.js","version" : "1.1.6"}
This package.json file would normally be located in the root directory for your NetBeans 8 JSON project, as highlighted in Figure 1-1. Bower is another package-management system you can use to define project packages, much like the NPM project.json file you just learned about.
Gruntfile.jsis for Grunt, which also works with NPM and is a task-running utility. Grunt and its plug-ins are installed and managed via NPM. A Grunt 0.4.x installation requires stable Node.js versions greater than 0.8. Odd version numbering for Node.js is considered to be unstable. gulpfile.js is used for the Gulp streaming build system, which is a Grunt alternate. (I selected these to show you the tool options.)
Click the Finish button in the last New Project dialog, and NetBeans 8.1 creates the entire project as shown in Figure 1-7, with folders, subfolders, and files. Now this JSON project is ready for you to populate with your own code and new media assets that the code references.
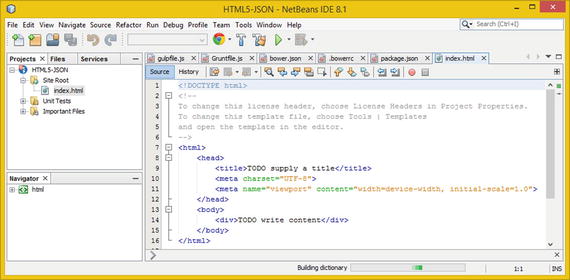
Figure 1-7. Your bootstrap JSON project, created by NetBeans 8.1
As you can see, NetBeans 8.1 created the project and opened the index.html file and the Bower, Grunt, Gulp, and NPM tool-related files in the IDE. Figure 1-8 shows package.json with name, version, keywords, author, contributors, and dependencies entries, which you can populate if you’re going to use Node.js.
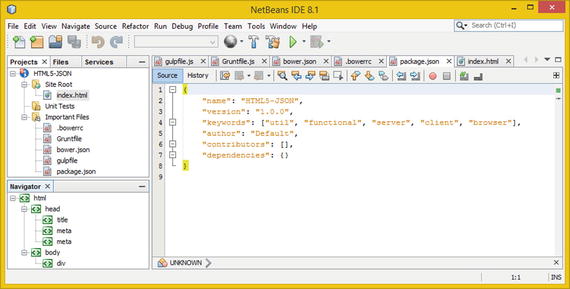
Figure 1-8. The package.json file defines package-level options
Figure 1-9 shows the bower.json file, featuring the name, version, main, ignore, dependencies, and devDependencies data entries. You can customize these if you are using Bower. It is important to note that you are not required to use Node, Bower, Grunt, or Gulp; I’m just showing you the NetBeans tools.
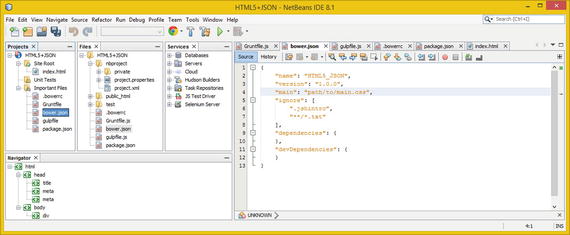
Figure 1-9. The bower.json file defines a project-level CSS path
Figure 1-10 shows the gulpfile.js file , which defines a variable named gulp and then designates it as requiring the Gulp engine. It then calls the .task() method from this gulp object, defining a 'default' string and an empty function() that you can fill with your own functional program logic.

Figure 1-10. The gulpfile.js file defines project Gulp tasks
Figure 1-11 shows a Gruntfile.js file that instantiates an object named grunt in the function() parameter area, calls the .initConfig() method from the grunt object, and includes an empty {} code structure in an initialization configuration method parameter area body, which you can code.
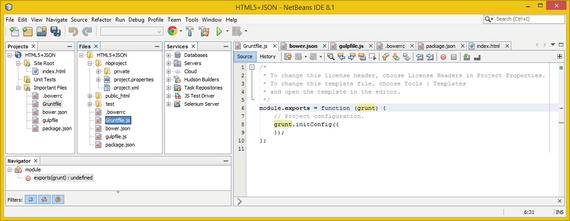
Figure 1-11. The Gruntfile.js file defines project Grunt tasks
Now that you’ve seen how to create an empty JSON, JS, and HTML5 project that supports Node.js, Grunt, Gulp, NPM, and Bower, let’s take a look at what happens to the NetBeans 8 IDE when you choose the Run ➤ Run Project menu sequence. This is shown at the top of Figure 1-12.
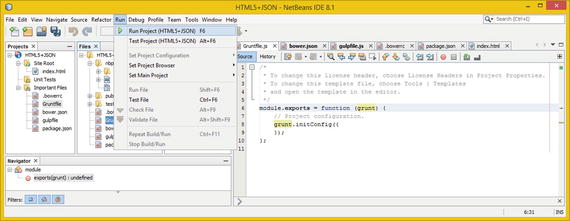
Figure 1-12. Use the NetBeans Run ➤ Run Project menu sequence
The first time you run any NetBeans 8 HTML5-related project, you need to establish a bridge to your Chrome browser using the NetBeans Connector plug-in , which you can get at the Google Chrome Web Store for free; see Figure 1-13.
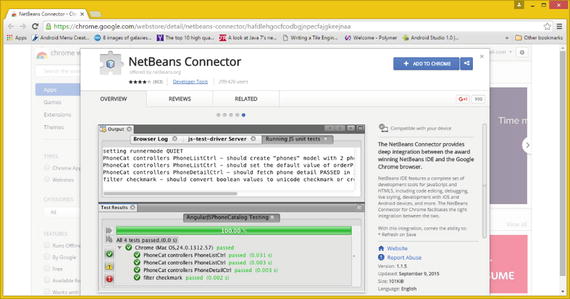
Figure 1-13. Add your NetBeans Connector plug-In to Chrome
Instead of trying to enter a cryptic URL like the one shown in Figure 1-13 (which, because it is algorithmically generated, could change at any time), you should let the NetBeans 8 IDE do the shopping for you, as shown at far left in Figure 1-14. Simply click the Go To Chrome Web Store button, and NetBeans will automatically open the Google Chrome Web Store page in Figure 1-13.
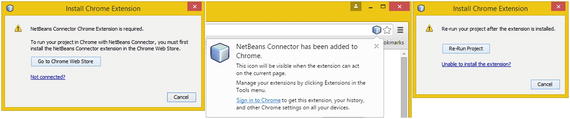
Figure 1-14. Install Chrome Extension dialog and work process
Once you click the blue Add To Chrome button, shown at upper right in Figure 1-13, you see the pop-up dialog in the middle of Figure 1-14, advising you of the install completion. When you return to NetBeans, you see the dialog shown at right in Figure 1-14; click the Re-Run Project button to run your (empty) bootstrap code. Running empty projects doesn’t produce an application, but NetBeans opens a few more (CSS Styles, Output, Browser DOM) panes. You have now previewed the JSON-capable IDE from Oracle!
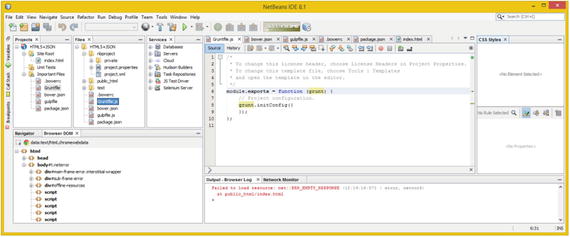
Figure 1-15. Several new panes have been opened by NetBeans 8.1
Summary
In this first chapter, you looked at the NetBeans 8.1 JSON-capable IDE. You saw NetBeans’ powerful, intuitive features and learned how to have NetBeans create JSON projects. I wanted to make sure you understood your software tools before proceeding!
In the next chapter, you start learning about JSON: what it is, what it’s used for, and similar foundational information you need throughout the rest of this reference book.