
In the previous chapters, I talked about what Xamarin.Forms is and where it fits within the existing Xamarin technology. Xamarin.Forms was never intended to replace the Xamarin technology as a whole. Forms is merely offering another alternative to maximize code sharing by making it possible to define the UI in a unified way.
Soon after the introduction of Xamarin.Forms, the original approach of building apps with Xamarin was renamed “traditional Xamarin”. This chapter explains when to choose which approach and what you have to keep in mind when you do.
What Is Traditional Xamarin?
The answer to this question might already be apparent to you from reading the previous chapters, but I want to describe it in more detail. Initially, Xamarin offers a way for developers to create cross-platform applications backed by the .NET technologies and all the wonderful things that come with it. By the means of the C# language, people can reach out to users with all kinds of devices.
Way back when I started my career, mobile development piqued my interest. From my study, I had some experience with a variety of languages, but C# stuck and I knew that was where I wanted to go. At that time, there was little choice and I started looking into the world of Windows Phone development. However, I had an iPhone and am still very fond of them to this day.
At some point, I got word of a program that allowed you to receive a phone, the infamous Nokia Lumia 800 , on which you could develop and test. If you successfully published three apps to the store by a certain date, the phone would be yours. All you had to do was pitch these three apps to Microsoft. And so, I did. I came up with three apps, which were approved, got the phone, and started developing. It was great! I had a good time, but the Windows Phone just wasn’t for me. The development was a breeze, though, and I could create applications that ran on a phone with the tools and language that I know and love.
After a little while I decided to give iOS development a try. I bought an iMac and opened Xcode; I was scared! Of course, I did look into Objective-C. I figured if thousands of people could do it, so could I. But the Xcode IDE is much different than the Microsoft .NET ecosystem. I did give it a go, but it never took off.
A similar thing happened with Android, but the tools were more alike and I had some experience with Java. The tooling and Android as an OS just doesn’t really cut it for me. Besides, I just didn’t have the time or resources to master two more languages and the accompanying tools.
In the meantime, I visited some conferences and learned that MonoTouch was transforming into Xamarin. I started looking into this interesting company and their techniques and now, here I am, writing another book on the subject.
The point of all this is that I believe Xamarin has made cross-platform development accessible to a lot more people. If they had not made it possible to create apps with C#, a lot of people would probably never have gotten into mobile development.
But back to traditional Xamarin. Xamarin basically created a lot of wrappers around the native APIs and is maintaining them. That means that you are still using a lot of Java and Objective-C kind of types, but by the means of C#, including all the great features that C# offers and with the rich IDE that Visual Studio offers. There is still a learning curve for picking up some platform-specific methodologies, but Xamarin has taken away most of the pain.
The only thing that was standing in the way of sharing most of your code was the user interface. Apple has multiple options for iOS, but the common way to design the UI is by using storyboards. In Figure 4-1, you can see the storyboard designer.
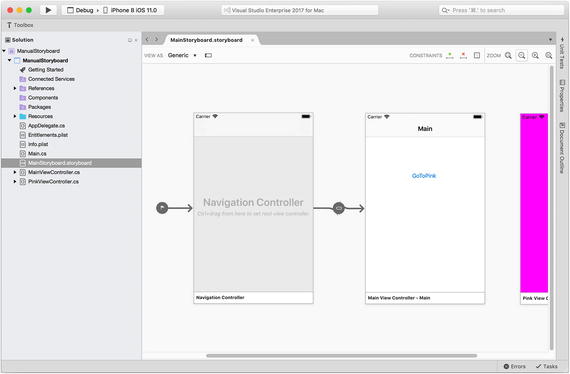
Figure 4-1 iOS storyboard designer showing some screens and the flow between them
To facilitate the development process, Xamarin made the Xcode storyboard designer available from the plugin in Visual Studio for Windows and Mac. That way, you still have the power and ease that Apple put into the designer, but you won’t have to leave the safety of Visual Studio.
The same goes for Android. Actually, designing screens on Android is similar to XAML in Xamarin.Forms. Google also implemented the building of screens by using XML. Note that on Android these files have the default .xml extension, whereas on Xamarin.Android you will need to use the .axml extension. An Android designer is available as well; it’s included in Visual Studio by Xamarin, just like the iOS one.
Since this book focuses on the use of Xamarin.Forms, I won’t go into the Xamarin.iOS and Xamarin.Android designers . To read more on these, refer to the respective Xamarin documentation pages at https://developer.xamarin.com/guides/ios/user_interface/designer/ and https://developer.xamarin.com/guides/android/user_interface/android-designer/ .
Knowing all this, the main difference between traditional Xamarin and Xamarin.Forms is the fact that the UI code isn’t shared among the different platform projects.
Which One Do You Choose?
Xamarin has an official statement on when to choose traditional Xamarin and when to choose Xamarin.Forms. Figure 4-2 shows this statement.
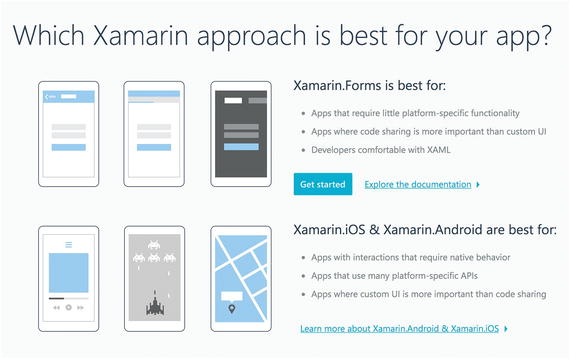
Figure 4-2 When to choose traditional and when to choose Forms according to the Xamarin web site
When you value code sharing over platform-specific features, you should choose Forms. The vice versa is true as well. Moreover, Xamarin specifically talks about choosing a custom UI over code sharing.
This opinion that Forms is valuable only when code sharing is important seems to be shared by a fair amount of people. Xamarin.Forms would not be fit with polished user interfaces. Therefore, apps built with Xamarin.Forms could never be truly popular.
Personally, I think the claim that Forms is not ideal for creating polished interfaces is only partly true. I think the issue is more one of mindset. Sure, when working with traditional Xamarin applications, it will probably be a bit easier to create polished interfaces for each platform. Creating custom tailored user interfaces with native tools will probably feel more intuitive. But this will automatically mean that no code sharing will happen at this point.
What is definitely not true is that by using Xamarin.Forms, you will not have full access to every API needed to create a great user interface. Remember, Xamarin.Forms is only a helper that provides you with an abstraction layer to define the UI in a shareable manner. If you want to divert from this, you can!
Using Custom Renderers
You can use custom renderers to override the implementation that Xamarin provides and write your own implementation in a custom renderer. You will see how to use this in practice later on, but let me fill you in on the basics here.
As you might remember, each on-screen visual element has its own renderer. The renderer will take in the abstract Xamarin.Forms control and instantiate the native control for you, mapping the properties that you specified. Figure 4-3 illustrates this concept using the Entry control.
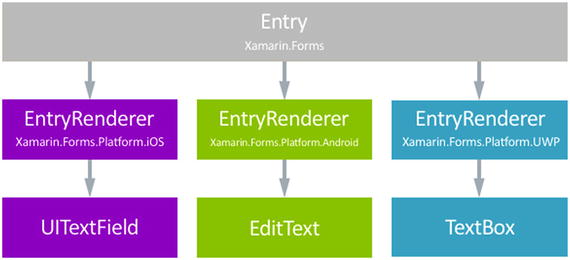
Figure 4-3 How the Entry control is rendered into its native counterpart
If you’re not completely satisfied with the way the control looks after it goes through the renderer, you can hook into it and customize it. Creating a custom renderer is actually pretty easy. Let’s stick with the Entry control as an example. If you wanted to change anything about the border of the input field, you have to use a custom renderer, as the Xamarin.Forms APIs don’t account for this.
To do this, you create a new class in the platform project that you want to customize the control for. Remember, you only have access to native code—and thus to native properties and methods—from within the platform project. Listing 4-1 shows a sample implementation of the custom renderer in the iOS project .
Listing 4-1 Implementation of the Custom Renderer for the Entry Control on iOS
using Xamarin.Forms.Platform.iOS;using CustomRendererSample.iOS;using Xamarin.Forms;[assembly: ExportRenderer (typeof(Entry), typeof(CustomEntryRenderer))]namespace CustomRendererSample.iOS{public class CustomEntryRenderer : EntryRenderer{protected override void OnElementChanged (ElementChangedEventArgs<Entry> e){base.OnElementChanged (e);if (Control != null){// do whatever you want to the UITextField here!Control.BorderStyle = UITextBorderStyle.None;}}}}
Let me point out the things to notice here, from top to bottom. First, look at the assembly attribute. You might remember this one from the DependencyService. You might think of a custom renderer as a dependency service for visual changes. This attribute is very important. With the assembly attribute, you specify the control that this renderer targets and the renderer that has to handle the rendering. In this case, the Entry control has to be rendered by the CustomEntryRenderer class. If you forget this, the default Xamarin.Forms renderer will be used.
The next thing to notice is that the CustomEntryRenderer inherits from the EntryRenderer class, which is the one Xamarin has implemented for us. Since we inherit the original class, we do not need to reimplement the whole rendering process again. We can just overwrite the parts that we want.
Lastly, look at the OnElementChanged method and its implementation. This is usually the method you want to override whenever you are making changes to a control. The first thing you want to do is call the base method, so Xamarin.Forms will do all the default rendering, and after that you can add your own customizations. Then there is a check if the Control property is not null, and if not, the border is set to none.
The Xamarin.Forms control, in this case the Entry, is provided through the method’s argument. The Control property of the render class holds the native control.
And that’s it! This is all that is needed to create a custom renderer for all the Entry controls in your application. However, there will likely be situations where you do not want to override the renderer on all controls of one type. Because of that, it is pretty common to create an inheritance of the control that you want to customize first. If we would have created a custom control named MyEntry first and named the renderer MyEntryRenderer, the result (when implementing custom renderers for each platform) would look like Figure 4-4.
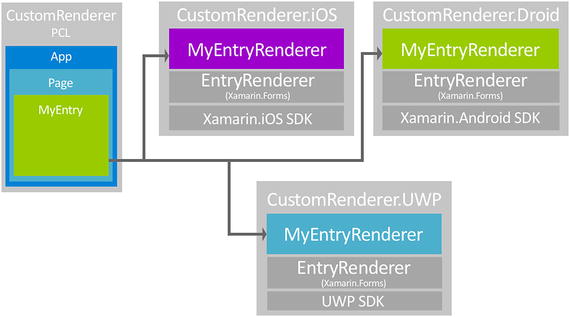
Figure 4-4 Overview of the implementation of custom renderers on all platforms
You don’t have to implement a custom renderer on all platforms. If you want to adjust something on iOS, but not on Android, you can implement the renderer on the one and not the other. The default renderer will then be used on the Android platform.
Recall that custom renderers are not always needed. There are other more lightweight solutions, like using an Effect, which is recommended for minor UI tweaks.
Tip
here is some misconception in the community about the “no custom UI with Xamarin.Forms” statement. For example, Steven Thewissen and Adam Pedley have written blog posts in which they try to prove this statement wrong. They try to do this by recreating the user interfaces of popular apps in the store. Look at this link for a recreation of Twitter: https://www.thewissen.io/xamarin-forms-ui-twitter/ . Or take a look at Runkeeper at https://www.thewissen.io/xamarin-forms-ui-runkeeper/ and finally, Instagram, at https://xamarinhelp.com/creating-instagram-ui-xamarin-forms/ . All of this goodness is built in pure Xamarin.Forms.
Summary
Choosing traditional Xamarin versus Xamarin.Forms is dependent on your requirements, previous experience, and taste. I like to think that you can always start with Xamarin.Forms as a base and, whenever you need some more customizations in your UI, you can implement custom renderers or effects. That way, you still have at least some shared code. The implementation with custom renderers, however, does adversely impact the performance, because there has to be a translation from one control to another at some point. Also, customization through a separate renderer might be considered more complicated than doing it directly on the native UI elements.
This chapter explained what traditional Xamarin is all about and how it relates to Xamarin.Forms. Most importantly, it showed you how you can still achieve customization in your user interfaces when using Xamarin.Forms.
This concludes the first part of this book. The first part was mainly about explaining what Xamarin is as a company and a technology. I tried to mix some storytelling with the technical details, so that you would be entertained and be prepared for going hands-on in the next part of this book.
The next part of the book starts looking at an actual app that is built with the help of Xamarin.Forms. By describing how I worked on this app and how certain things were implemented, I hope you will get a better understanding of how to build a Xamarin.Forms app yourself.