© Yiyi Sun 2019
Yiyi SunPractical Application Development with AppRunhttps://doi.org/10.1007/978-1-4842-4069-4_5

5. Event Patterns

Yiyi Sun1 
(1)
Thornhill, ON, Canada
 

When the JavaScript runtime in a browser executes application code written in JavaScript, it uses the techniques of events and event handling. When the browser accesses web pages from back-end servers and when the users interact with the browser, the JavaScript runtime publishes the DOM events. The application code handles the DOM events in the event handlers. The DOM event handlers are the entry points to developing web applications.1 Events and event handling are part of the programming model of JavaScript web application development.

AppRun application development uses the event publication and subscription (event pub-sub) pattern as the primary programming model. The AppRun programming model matches perfectly with the event-driven programming model of JavaScript. To develop AppRun applications, we need to connect the DOM events to the AppRun events. The AppRun events have two categories: global and local events. The global events are the events that are broadcast to all modules and components. The local events are the events that are broadcast and scoped only within the components.

This chapter demonstrates some of the commonly used DOM events, including a button click event, an input event, keyboard events, mouse events, a browser history event, and web workers. You will learn all the event-handling techniques necessary for your application development projects.

We will start with reviewing the concept of events.

Event Concept

There are two types of events: DOM events and AppRun events.

DOM Events

The JavaScript runtime in browsers uses DOM events . Browsers are multithreaded themselves. The browser code is running on multiple threads to interact with the operating system and the hardware to capture events. An event is a signal that something has happened.2 Examples include the user clicking a button, pressing a key, and moving the mouse; a system time ticker; network I/O; and so forth. The browser adds a message into the message queue of the JavaScript runtime. The message queue is like a to-do list. Therefore, it allows the JavaScript runtime to run on a single thread. The JavaScript runtime continually monitors the message queue. It picks up the messages one by one from the message queue and invokes the functions that are associated with the messages. It repeats the loop until the message queue is empty. The functions that the JavaScript runtime invokes upon events are the event listeners or event handlers. JavaScript programming mostly is creating DOM event handlers and registering them with DOM events.

AppRun Events

AppRun has a built-in event engine. It follows the event pub-sub pattern. It also has unique features. First, it connects to the AppRun state history. When invoking AppRun event handlers, it passes the current application state along with other event parameters. Second, the event lifecycle includes a few unique steps. It checks whether there is any data returned from the event handlers. If there are, it invokes the view function. It then checks whether the view returns the virtual DOM. If it does, AppRun renders the virtual DOM to the actual DOM. It also checks whether there is an optional rendered callback function defined. If there is, it invokes the rendered function before it ends the event lifecycle (see Figure 5-1).
../images/467411_1_En_5_Chapter/467411_1_En_5_Fig1_HTML.png
Figure 5-1

AppRun event engine

Figure 5-1 shows the AppRun architecture and breaks down the application logic. It also shows the interaction between the application code and AppRun. The application code is developed as event handlers and the view function piece by piece. There is no direct relationship between the event handlers and the view function. We rely on AppRun events to trigger the AppRun event lifecycle, which means we can publish an AppRun event and expect the DOM to be updated .

Connect the Events

After learning about DOM event handling and AppRun event handling, you can easily understand that developing AppRun applications is mostly making connections from the DOM events to the AppRun events, as summarized in Figure 5-2.
../images/467411_1_En_5_Chapter/467411_1_En_5_Fig2_HTML.png
Figure 5-2

Connecting DOM events to AppRun events

To connect DOM events to AppRun events, first we create a DOM event handler and subscribe to the DOM event. Then we publish the AppRun events in the DOM event handlers. For example, to subscribe to the onclick event of an existing button and publish an AppRun foo event, we can use the addEventListener function, as shown here:
document.getElementById('foo').addEventListener('click',  () => app.run('foo'));
We can also subscribe to the DOM event while creating the button using JSX in the view function, as shown here:
<button onclick={ ()=>app.run('foo') }>foo</button>
Notice that using JSX, we assign an anonymous function as the event handler to the onclick attribute of the button. We can also publish the DOM event parameter as the AppRun event parameter.
<button onclick={ (e)=>app.run('foo', e) }>foo</button>

Publishing the AppRun events in the DOM event handlers is a commonly used pattern in AppRun application development.

Global and Local Events

In Chapter 4, you learned that we can develop AppRun applications using a global architecture, which has a global state and uses global events. For example, Listing 5-1 shows a global architecture and a global event named foo.
1.   const state = {};
2.   const view = state => <button onclick={ ()=>app.run('foo') }>foo</button>;
3.   const update = {
4.       'foo': state => state
5.   };
6.   app.start('my-app', state, view, update);
Listing 5-1

The AppRun Global Architecture and Global Event

The foo event in Listing 5-1 is a global event. We publish the foo event from the button’s onclick event handler by calling the app.run function (line 2 of Listing 5-1). The event is broadcast globally to all code modules.

You also learned that we can develop AppRun applications using the component architecture. Each component has its event engine. Events inside components are limited inside the components as local events. The local events are broadcast only within the components. Listing 5-2 shows the component architecture and a local event named bar.
1.   import app, { Component } from 'apprun';
2.   export default class MyComponent extends Component {
3.       state = {};
4.       view = state => <button onclick={ ()=>this.run('bar') }>foo</button>;
5.       update = {
6.           'bar': state => state
7.       };
8.   }
Listing 5-2

The AppRun Component Architecture and Local Event

The bar event is a local event that is only scoped in the component in Listing 5-2. We publish the bar event from the button’s onclick event handler by calling the this.run function (line 4 of Listing 5-2).

The general rule is that we use the app.run function to publish the global events and use the this.run function to publish the local events. However, AppRun has a convention that if the event has a special name that starts with # or /, the event is a global event. Global events with special names can be published using the this.run function inside components. The components can also subscribe to and handle the global events with the special names (Listing 5-3).
1.   import app, {Component} from 'apprun';
2.   class MyComponent extends Component {
3.       state = {};
4.       view = (state) => <div>
5.           <button onclick={()=>this.run('event')}>{state}</button> // publish local event
6.           <button onclick={()=>this.run('#event')}>{state}</button> // publish global event
7.           <button onclick={()=>app.run('event')}>{state}</button> // publish global event
8.       </div>
9.       update = {
10.          'event': state => state // local event handler
11.          '#event': state => state // global event handler
12.      }
13.  }
Listing 5-3

Global Events in a Component

To demonstrate how to handle the global events with special names, we will develop a clock application (see Figure 5-3).
../images/467411_1_En_5_Chapter/467411_1_En_5_Fig3_HTML.jpg
Figure 5-3

The clock application

The clock application uses the window.setInterval function to publish the #tick event using the app.run function every second. The clock component of the clock application subscribes to and handles the #tick event (Listing 5-4).
1.   import app, { Component } from 'apprun';
2.   class ClockComponent extends Component {
3.       state = new Date();
4.       view = state => <h1>{state.toLocaleTimeString()}</h1>;
5.       update = {
6.           '#tick': state => new Date()
7.       };
8.   }
9.   window.setInterval(() => { app.run('#tick') }, 1000);
10.  new ClockComponent().start('my-app');
Listing 5-4

Clock Application

In the clock application (Listing 5-4), we use the system timer to publish an AppRun global event named #tick (line 9). The #tick event triggers the AppRun event lifecycle of ClockComponent to display the current time every second.

So far, you learned about AppRun events and the event lifecycle. Next, you will learn more about the various DOM events and learn how to use them in AppRun applications. All the example applications in the next sections are developed using the component architecture.

User Input

User input starts with the keyboard and mouse. Modern web browsers also support advanced technologies such as drag and drop and touch. They all follow the same event-driven programming model: when user input happens, the browsers publish DOM events. Our general approach to handle user input is to publish the AppRun events in the DOM event handlers to trigger the AppRun event lifecycle.

Click Events

We will first develop a Hello World application that takes user input and displays it on the screen. The Hello World application has a text input box for the user to type into and a button to display the user input (see Figure 5-4 and Listing 5-5).
../images/467411_1_En_5_Chapter/467411_1_En_5_Fig4_HTML.jpg
Figure 5-4

Hello World application

We will handle the onclick event of the Go button by assigning an anonymous function as the DOM event handler, as mentioned earlier in the section “Connect the Events.” Listing 5-5 shows the source code of the Hello World application.
1.   import app, { Component } from 'apprun';
2.   class HelloComponent extends Component {
3.       state = 'World';
4.       view = (state) => <div>
5.           <h3>Hello {state}</h3>
6.           <input id="text"/>
7.           <button onclick={() => this.run("input")}>Go</button>
8.       </div>;
9.       update = {
10.          'input': (state) => (document.getElementById('text') as HTMLInputElement).value
11.      }
12.  }
13.  new HelloComponent().start('my-app');
Listing 5-5

The Click Event

The Hello World application shown in Listing 5-5 publishes the AppRun event input in the button’s onclick event handler (line 7). The AppRun event handler of the input event creates a new state using the value of the input box (line 10). The view function creates the virtual DOM using the new state (lines 4–8).

There is one more detail that is worth mentioning. When AppRun renders the DOM, it encodes the user input to prevent cross-site scripting attacks. For example, if the user types a script, the application displays it as text, not as a runnable script (see Figure 5-5).
../images/467411_1_En_5_Chapter/467411_1_En_5_Fig5_HTML.jpg
Figure 5-5

User input encoding

Input Event

In the previous Hello World application , the application displays the user’s input after a button click. Sometimes we want to process user input while users are typing such as for a live update to the web page content and input validation. The next application, an echo application, will update the <h3> element to include the user’s input (see Figure 5-6).
../images/467411_1_En_5_Chapter/467411_1_En_5_Fig6_HTML.jpg
Figure 5-6

Live update application

To get users’ input while they are typing, we can subscribe to the DOM input event of the text input and then publish the AppRun input event and use the DOM event as the AppRun event parameter (Listing 5-6).
1.   import app, { Component } from 'apprun';
2.   class EchoComponent extends Component {
3.       state = 'World';
4.       view = (state) => <div>
5.           <h3>Hello {state}</h3>
6.           <input oninput={ e => this.run("input", e)}/>
7.       </div>;
8.       update = {
9.           'input': (state, e) => e.target.value
10.      }
11.  }
12.  new EchoComponent().start('my-app');
Listing 5-6

The Input Event

The AppRun event handler in Listing 5-6 receives the DOM event as the function parameter. We can get the value of the input box from event.target (line 9). The value of the input box is synchronized with the state.

In some cases, we want to postpone publishing the AppRun events until after a certain period has elapsed. Delaying the event handling is a useful feature. It is also called debouncing. Often this is used in a type-ahead scenario. AppRun supports delaying the event handling. To use the feature, we use a tuple in the update object. The tuple includes the event handler function and an options object where we can define a delay value in milliseconds. For example, the following tuple delays the event handling for 1,000 milliseconds, or one second:
'input': [(state, e) => e.target.value, {delay: 1000}]
We can modify the echo application to delay the display of the user’s input for a second, in which the user can continue to type. The <h3> element updates only every second. It is like throttling the user input. Listing 5-7 shows the delayed echo application.
1.   import app, { Component } from 'apprun';
2.   class DelayedEchoComponent extends Component {
3.       state = 'World';
4.       view = (state) => <div>
5.           <h3>Hello {state}</h3>
6.           <input oninput={ e => this.run("input", e)}/>
7.       </div>;
8.       update = {
9.           'input': [(state, e) => e.target.value, {delay: 1000}]
10.      }
11.  }
12.  new DelayedEchoComponent().start('my-app');
Listing 5-7

The Delayed Input Event

Next, we will develop a type-ahead application to demonstrate the delayed event handling along with the keyboard events.

Keyboard Events

Type-ahead is also known as auto-complete suggestions. It can help the user to find out what they want. Like the live update example, the type-ahead example needs to get a user’s input while typing to search and retrieve a list of options. The main difference is that type-ahead also needs to handle a few special keys, such as the Enter key to select an item from a list of options, the up and down arrows for moving the selection within the options, and the Esc key to cancel the search. We can develop a simple type-ahead experience that allows users to type and search the U.S. states (see Figure 5-7).
../images/467411_1_En_5_Chapter/467411_1_En_5_Fig7_HTML.jpg
Figure 5-7

Type-ahead

First, we will develop a generic type-ahead component, the TypeAhead component . We want it to be generic, which means that it mainly handles user interaction with the keyboard and shows or hides the data options in a drop-down list. It does not search for data or handle the selected data. It requires two callback functions for searching the data and for processing the selected data passed in from the main program as JSX properties.
    <TypeAhead  onSearch={search}  onSelect={text => this.run('input', text)}/>
The onSearch property is a function that searches a data source. The onSelect property is a function that processes the selected data. By using the two JSX properties, it makes the TypeAhead component focus on handling the keyboard events (Listing 5-8).
1.   import app, { Component } from 'apprun';
2.   export default class TypeAheadComponent extends Component {
3.       view = state => {
4.       return (
5.           <div className="typeahead">
6.               <input
7.                   type="text"
8.                   placeholder=" Search:"
9.                   autocomplete="off"
10.                  value={state.selected || "}
11.                  oninput={e => this.run('search', e)}
12.                  onkeydown={e => this.run(`keydown`, e)}
13.              />
14.              <ul>{state.show && state.options.length ?
15.                  state.options.map(option => (
16.                      <li className={option === state.selected ? 'selected' : "}
                    onclick={() => this.run('select', option)}>{option} </li>
17.                  )) : "}</ul>
18.              </div>
19.          );
20.      };
21.      update = {
22.          search: [(state, e) => {
23.              const options = this.state.onSearch(e.target.value);
24.              return {
25.                  ...state,
26.                  show: true,
27.                  selected: e.target.value,
28.                  options
29.              };
30.          }, { delay:200}],
31.          popup: (state, show) => (state.show === show ? null : { ...state, show }),
32.          keydown: (state, e) => {
33.              if (!state.options) return;
34.              let selectedIdx = state.options.indexOf(state.selected);
35.              switch (e.keyCode) {
36.              case 27: // ESC key to hide the popup
37.                  return { ...state, show: false };
38.              case 38: // Up key to move the selection up
39.                  selectedIdx--;
40.                  if (selectedIdx < 0) selectedIdx = 0;
41.                  return { ...state, selected: state.options[selectedIdx] };
42.              case 40: // Down key to move the selection up
43.                  selectedIdx++;
44.                  if (selectedIdx>=state.options.length) selectedIdx = state.options.length - 1;
45.                  return { ...state, selected: state.options[selectedIdx] };
46.              case 13: // Enter key to select the data
47.                  e.preventDefault();
48.                  this.run('select', state.selected);
49.              }
50.          },
51.          select: (state, selected) => {
52.              this.state.onSelect(selected);
53.              return { ...state, selected, show: false };
54.          }
55.      };
56.  }
Listing 5-8

TypeAhead Component

The TypeAhead component shown in Listing 5-8 has the majority of code to handle the DOM keyboard events of the text input control.

The search event is for taking the user’s input when the user is typing (lines 22–30). It has a delay of 200 milliseconds. The keydown event is for handling the Esc key, the up and down arrow keys, and the Enter key (lines 32–49).

While the user is typing, the TypeAhead component calls the onSearch function to let the main program decide how to search and retrieve the options. When the user has selected one item, the TypeAhead component calls the onSelect function to let the main program decide what to do with the selected item. We will use it in the main program (Listing 5-9).
1.   import app, { Component } from 'apprun';
2.   import TypeAhead from './typeahead';
3.   const states = ['Alabama', 'Alaska', 'Arizona', 'Arkansas', 'California',
4.       'Colorado', 'Connecticut', 'Delaware', 'Florida', 'Georgia', 'Hawaii',
5.       'Idaho', 'Illinois', 'Indiana', 'Iowa', 'Kansas', 'Kentucky', 'Louisiana',
6.       'Maine', 'Maryland', 'Massachusetts', 'Michigan', 'Minnesota',
7.       'Mississippi', 'Missouri', 'Montana', 'Nebraska', 'Nevada', 'New Hampshire',
8.       'New Jersey', 'New Mexico', 'New York', 'North Carolina', 'North Dakota',
9.       'Ohio', 'Oklahoma', 'Oregon', 'Pennsylvania', 'Rhode Island',
10.      'South Carolina', 'South Dakota', 'Tennessee', 'Texas', 'Utah', 'Vermont',
11.      'Virginia', 'Washington', 'West Virginia', 'Wisconsin', 'Wyoming'
12.  ];
13.  const search = text => states.filter(s => s.toLowerCase().indexOf(text.toLowerCase()) >= 0);
14.
15.  class HelloComponent extends Component {
16.    state = ";
17.    view = (state) => <div>
18.      <h3>Hello {state}</h3>
19.      <TypeAhead
20.        onSearch={search}
21.        onSelect={text => this.run('input', text)}/>
22.    </div>;
23.    update = {
24.      'input': (state, text) => text
25.    }
26.  }
27.  new TypeAheadApp().start('my-app');
Listing 5-9

Type-Ahead Application

The type-ahead application in Listing 5-9 has the U.S. states in an array (lines 3–12) and the search function for searching the states (lines 13–14). It also has an AppRun event input for updating the state (line 24). The main program uses the TypeAhead component (Listing 5-9) by setting the two callback functions for searching the options and for handling the selected item (lines 19–21).

So far, we have developed the TypeAhead component as a generic component and used it in an application for selecting U.S. states. You can use the application as an example to reuse the TypeAhead component in other applications.

Mouse Events

The mouse is one of the most used interaction tools. We will develop an application that connects the DOM mouse events to AppRun events to implement a draggable button, also known as float action button (see Figure 5-8). The float action button can be dragged around on the web page.
../images/467411_1_En_5_Chapter/467411_1_En_5_Fig8_HTML.jpg
Figure 5-8

Float action button

The float action button is also a reusable component. We use it in the main program (Listing 5-10).
1.   import app, { Component } from 'apprun';
2.   import Fab from './fab';
3.   class FabApp extends Component {
4.       state = 0;
5.       view = (state) => <div>
6.           <h3>Clicked: {state}</h3>
7.           <Fab id="fab" position={{x: 500, y:300}}
8.                    onClick={text => this.run('action')} />
9.       </div>;
10.      update = {
11.          'action': state => state + 1
12.      }
13.  }
14.  new FabApp().start('my-app');
Listing 5-10

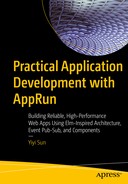
Float Action Button Application

The main program sets the initial location of the float action button (line 7). It also sets the callback function to publish the AppRun event, called action (line 8), which will record the number of times the button is clicked.

The float action button is also developed as a reusable component (Listing 5-11).
1.   import app, { Component } from 'apprun';
2.   export default class FabComponent extends Component {
3.       view = (state) => {
4.           const style = {
5.               'left': `${state.position.x}px`,
6.               'top': `${state.position.y}px`,
7.           };
8.           return <div className='fab-btn' style={style}
9.               onpointerdown={e => this.run('drag', e)}
10.              onpointermove={e => this.run('move', e)}
11.              onpointerup={e => this.run('drop', e)}> + </div>
12.      };
13.      update = {
14.          drag: (state, e) => ({
15.              ...state,
16.              dragging: true,
17.              start: { x: e.pageX, y: e.pageY },
18.              last: { x: e.pageX, y: e.pageY }
19.          }),
20.          move: (state, e) => {
21.              if (!state.dragging) return;
22.              e.target.setPointerCapture(e.pointerId);
23.              const last = { x: e.pageX, y: e.pageY }
24.              const position = {
25.                  x: state.position.x + e.pageX - state.last.x,
26.                  y: state.position.y + e.pageY - state.last.y
27.              }
28.              return ({ ...state, position, last });
29.          },
30.          drop: (state, e) => {
31.              if (state.last.x - state.start.x === 0 &&
32.                  state.last.y - state.start.y === 0) state.onClick();
33.              e.target.releasePointerCapture(e.pointerId);
34.              return { ...state, dragging: false };
35.          }
36.      }
37.  }
Listing 5-11

Float Action Button Component

The float action button component shown in Listing 5-11 tracks the button position in its state (lines 4–7). The position is applied to the button in the view function (line 8). It creates a <div> element and subscribes to its three DOM pointer events: pointerdown, pointermove, and pointerup. It is the same as using the DOM events: mousedown, mousemove, and mouseup. The DOM Pointer API is the unified API that incorporates more forms of input, including mouse, touchscreens, and pen input.

Brower History Event

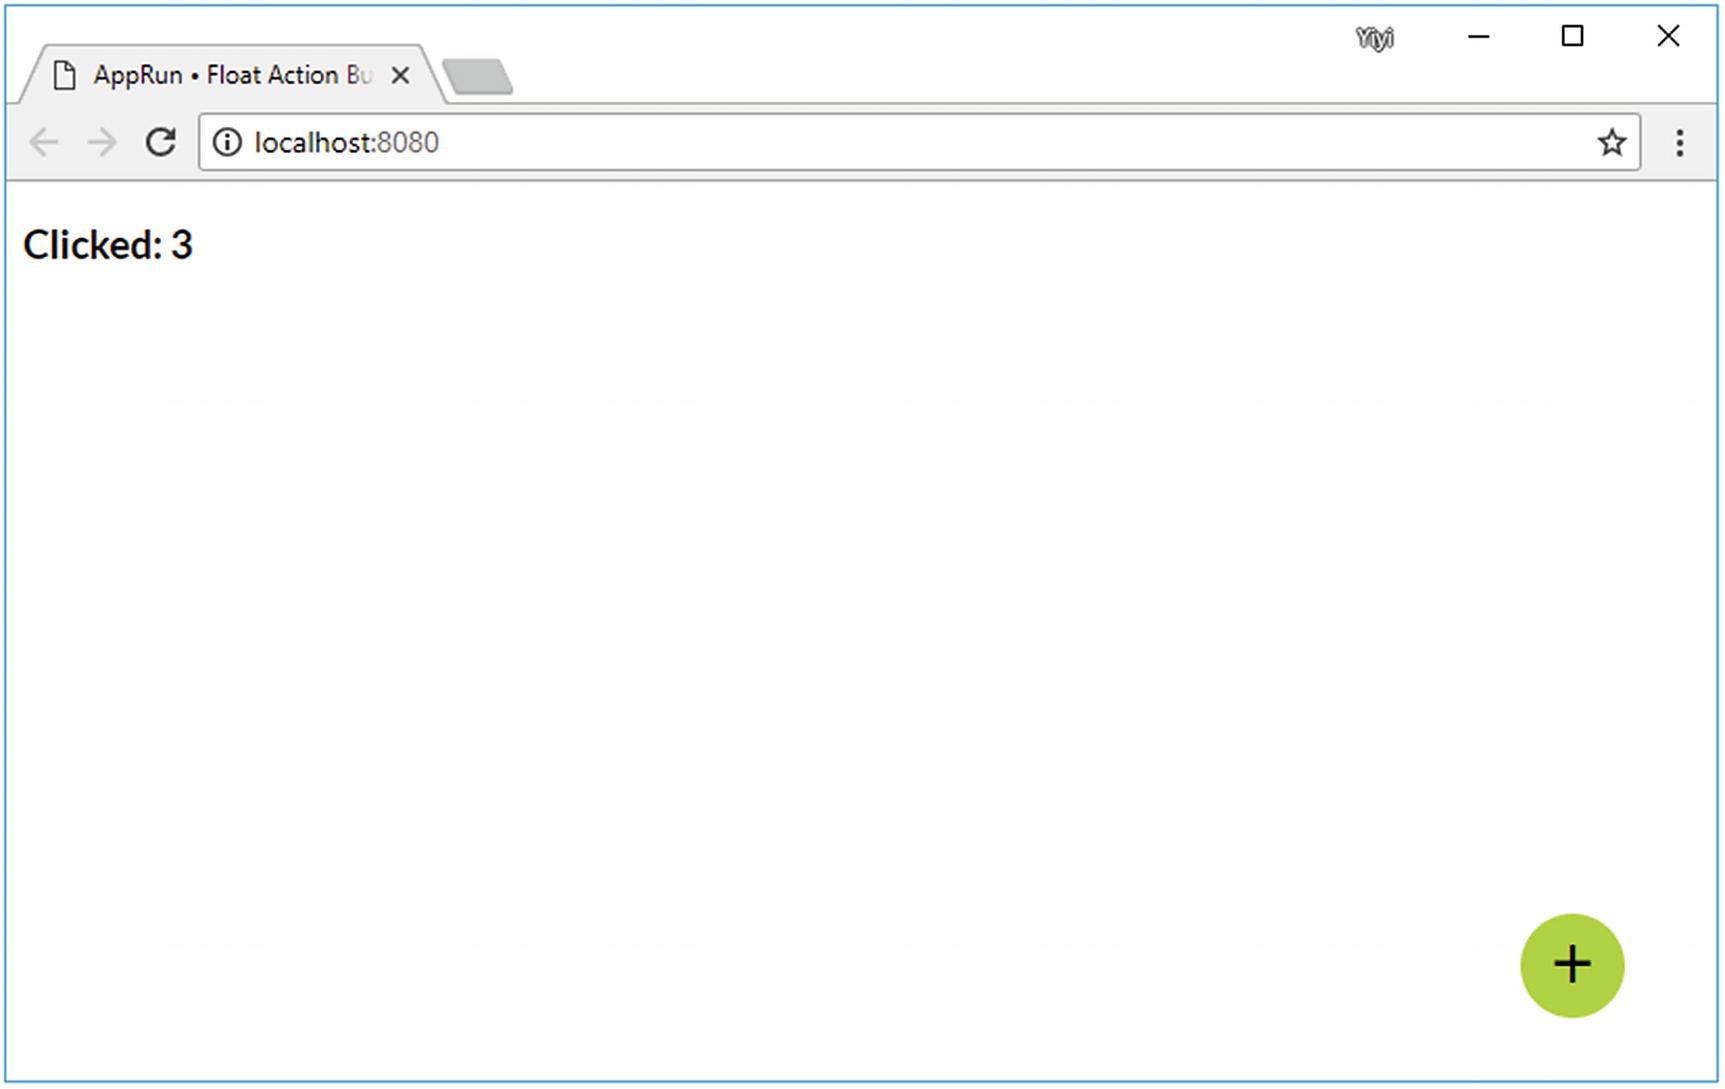
Web browsers record and keep a history of the URLs that users visit. When the user enters a URL in the browser’s address bar, clicks a hyperlink in a web page, or clicks the back/forward button, the browser saves the corresponding URL in the browser history and publishes a DOM event: the popstate event.

A URL is the web address of web resources, such as web pages. Also, the URL can identify a specific location within the web pages. The location within the web pages is identified by a fragment identifier, which is anything in the URL after the # sign. We can navigate to different locations of web pages by changing this fragment identifier. Changing the fragment identifier does not make the browser navigate to other web pages, but it does create browser history entries and publish the popstate events. We can subscribe to the popstate event and use window.location.hash to retrieve the fragment identifier.

AppRun has built-in code that subscribes to the popstate event. AppRun parses the URL into the event parameters and publishes the # event. For example, if the browser address URL is http://.../#/a/b/c, AppRun publishes the # event as app.run('#', ['a', 'b', 'c']).

To demonstrate the AppRun # event, we will modify the echo application to subscribe to the # event and manipulate the browser history. Every time a user enters a new word in the input box, the application pushes the user input into the history; therefore, the # event is also published (see Figure 5-9).
../images/467411_1_En_5_Chapter/467411_1_En_5_Fig9_HTML.jpg
Figure 5-9

Saving user input as the fragment identifier

Running the application , the user can type into the input box. When a user presses the Enter key or moves the input focus away from the input box, what the user typed is shown in the browser address with the # sign. The <h1> element is also updated accordingly. Listing 5-12 shows the source code of the application.
1.   import app, { Component } from 'apprun';
2.   class HelloComponent extends Component {
3.       state = 'World';
4.       view = state => <div>
5.           <h1>Hello {state}</h1>
6.           <input onchange={e => this.run('change', e)} value={state} />
7.       </div>;
8.       update = {
9.           '#': (state, hash) => hash || state,
10.          "change': (_, e) => {
11.              const text = e.target.value;
12.              history.pushState(null, text, '#/' + text);
13.          }
14.      };
15.  }
16.  new HelloComponent().start('my-app');
Listing 5-12

Handling Browser History

There are a few interesting points to explain in Listing 5-12. The view function displays the state to the <h1> element (line 5). The <input> element’s DOM event, the change event , is converted to the AppRun change event (line 6). The event handler for the # event sets the location hash as the current state (line 9). In the event handler of the change event, we take the user’s input and push it into the browser history as a new fragment identifier (lines 11–12). Notice the change event handler does not return anything. Therefore, the event lifecycle ends. However, because we pushed data into the browser history, the browser publishes the DOM popstate event. AppRun then converts it to the # event. We have another event lifecycle. The event handler for the # event returns the new state, which is displayed in the <h1> element.

The AppRun # event often is used as the main entry point of AppRun applications. It is also commonly used in single-page applications, which you will learn more about in Chapter 7.

Web Workers

Because the main JavaScript runtime inside web browsers executes application code in a single thread, it could slow down the user interface or even make it become unresponsive when the application code is computationally heavy and time-consuming. A web worker is a new JavaScript runtime with which we can spawn web workers to execute application code in the background. Web workers provide a way to create a multithreaded architecture in which the browser can execute multiple tasks at once. Web workers are often able to utilize multicore CPUs more effectively.

To allow multithreaded execution, the web workers do not have direct access to the DOM. The web page and the web workers communicate with each other by passing messages. The process of sending and processing messages again falls into the AppRun sweet spot. AppRun is an event engine that abstracts away the complexity of dispatching events and messages.

Using AppRun, we can publish events from the web page to a web worker.
worker.run('+1', state);  // in web page
The web worker subscribes to and handles the event.
app.on('+1', state => value = state + 1);  // in web worker
We can also publish events from a web worker to a web page.
page.run('#', value);  // in web worker
AppRun dispatches the # event from the web worker into the AppRun application’s event handler (see Figure 5-10).
../images/467411_1_En_5_Chapter/467411_1_En_5_Fig10_HTML.png
Figure 5-10

AppRun events between web page and web worker

We will change the counter application from Chapter 3 (see Listing 3-1) to use a web worker to do the calculation in a separate thread. Listing 5-13 shows the web page code, and Listing 5-14 shows the web worker code.
1.   import app, { Component } from 'apprun';
2.   const worker = new Worker("worker.js") as any;
3.   worker.onmessage = e => {
4.       const { name, parameters } = JSON.parse(e.data);
5.       app.run(name, ...parameters);
6.   }
7.   worker.run = (name, ...parameters) =>
8.       worker.postMessage(JSON.stringify({ name, parameters }));
9.   class CounterComponent extends Component {
10.      state = 0;
11.      view = (state) => <div>
12.          <h1>{state}</h1>
13.          <button onclick={() => worker.run("-1", state)}>-1</button>
14.          <button onclick={() => worker.run("+1", state)}>+1</button>
15.      </div>;
16.      update = {
17.          '#': (state, val) => val
18.      };
19.  }
20.  new CounterComponent().start('my-app');
Listing 5-13

Web Page Using Web Worker

1.   importScripts('//unpkg.com/apprun@latest/dist/apprun.js');
2.   onmessage = function (e) {
3.       const { name, parameters } = JSON.parse(e.data);
4.       app.run(name, ...parameters);
5.   };
6.   const page = {
7.       run: (name, ...parameters) => postMessage (
8.           JSON.stringify({ name, parameters }))
9.   };
10.  app.on('+1', n => page.run('#', n + 1));
11.  app.on('-1', n => page.run('#', n - 1));
Listing 5-14

Web Worker

Although the counter calculation is not heavy-computational code, it demonstrates the architecture of using a web worker with AppRun.

Source Code and Examples

You can get the source code of this chapter by cloning the GitHub project at https://github.com/yysun/apprun-apress-book . You can run the seven examples in this chapter using the npm scripts in Table 5-1.
Table 5-1

npm Scripts of This Chapter

Example

Script

The button click event (Listing 5-5)

npm run hello

The input event (Listing 5-6)

npm run echo

The delayed input event (Listing 5-7)

npm run echo-delayed

The keyboard event (Listings 5-8 and 5-9)

npm run typeahead

The mouse events (Listings 5-10 and 5-11)

npm run fab

The browser history events (Listing 5-12)

npm run echo-hash

The web worker event (Listings 5-13 and 5-14)

npm run worker

Summary

JavaScript programming on the web platform is event-driven. From the system timer and user input to the browser history and web workers, we respond to various events, attach callbacks, and send messages. When developing AppRun applications, we mainly connect the DOM events to the AppRun events.

AppRun has an event engine that supports event publication and subscription. Associated with the event engine, it has state management and a DOM rendering engine. When AppRun events are published, AppRun not only invokes the event handlers but also manages the states and renders the DOM. We can publish an AppRun event and expect the web page to be updated.

By using AppRun events, code is well organized, modularized, and decoupled. It solves the problem that code is like spaghetti in the event-driven world.

The events discussed in this chapter are all synchronous events. We will introduce the asynchronous events in the next chapter.

..................Content has been hidden....................

You can't read the all page of ebook, please click here login for view all page.
Reset
18.222.210.166