Using AppRun in a <script> tag and coding in plain JavaScript is perfect when developing small applications, prototyping, and trying ideas. However, in a complex AppRun application development scenario, we need a well-equipped development environment to achieve better code quality and better coding productivity.
In this chapter, we will introduce the AppRun development environment, which includes development tools such as a compiler, bundler, and testing framework. The compiler allows us to use advanced JavaScript/TypeScript language features. The bundler lets us transform, combine, optimize, and produce the code for production use. The testing framework enables a test-driven approach. The development environment also has automated scripts to invoke the development tools and to form a build process.
You will learn to use the AppRun command-line interface (CLI) to create the AppRun development environment that has all the tools configured to support the advanced technologies required in AppRun application development.
The AppRun CLI
The AppRun CLI is essentially a script tool to initialize projects, scaffold project folders and files, and configure the development tools. It runs in the terminal or in the command shell.
To use the AppRun CLI, we will need to have node.js, npm, and npx installed first. We can download node.js from its download page. Installing node.js also installs npm and npx. npm is the package manager of the world’s largest JavaScript reusable package registry. npx is the tool to execute code in the npm package.

AppRun CLI –i command
After running the AppRun CLI -i command , the current folder has a local git repository, a Hello World application (index.html and main.tsx), and three configuration files (package.json, tsconfig.json, and webpack.config.js).
Project Boilerplate
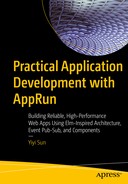
index.html
main.tsx
Listing 2-1 and Listing 2-2 are the starting points of AppRun application development. We are not just taking the JavaScript code from the HTML to compile and build. We can use many advanced development technologies available via the compiler and bundler that aren’t available when embedding JavaScript in an HTML page.
Compiler
AppRun application development requires all the ECMAScript 2015 (ES 6) features plus a few other advanced syntax and language features provided by the TypeScript compiler discussed in this section.
JSX
In AppRun applications, the HTML-like view function is not a mix of HTML markup and JavaScript code. The TypeScript compiler compiles the JSX into JavaScript functions. You will learn how to compose the functions to make complex views in Chapter 4.
Class
A Class with Fields
The TypeScript compiler can compile the classes that have fields to ES 5 to make the browsers happy; it also makes the developers happy because it is easier to understand and more familiar based on their knowledge of other languages.
async and await
async and await are standardized in ECMAScript 2017 (ES 8). They solved the asynchronous execution problem that many developers seem to struggle with. JavaScript is single-threaded, but the user interface in the browser is nonblocking, which means executions like network requests should not block and freeze the user interface. Those executions should be asynchronous. The JavaScript engine in browsers uses the event loop and the callback queue to manage asynchronous execution. It is difficult to write the callback functions in application development, especially when combining them with error handlings.
async and await make the asynchronous execution code look like synchronous execution to the degree that we almost do not have to understand any internal mechanism of the asynchronous execution.
Asynchronous Event Handler
Module Bundler
Large application code could grow into hundreds and thousands of lines. The best practice to manage the vast codebase is to divide it into modules. Although ECMAScript 2015 has defined a module format standard, modules are not supported in any browser.
The AppRun development environment includes webpack ( https://webpack.js.org ), a leading module bundler, to process the modules, resolve the module dependencies, and bundle the modules into the optimized code for browsers to run. webpack is the most feature-complete bundler. It has an ecosystem of many plug-ins. Through its plug-in ecosystem, webpack can minify and optimize the code for production. It can also integrate the TypeScript compiler into the build process.
When developing AppRun applications, we can use the ECMAScript 2015 module format freely to organize the codebase and let webpack bundle the modules, including bundling other third-party modules, which you will learn about in later chapters.
Development Server
The AppRun development environment includes the webpack development server to help the development workflow. The webpack development server compiles, bundles, and serves the application code from memory. During the development, there are no files saved to disk. The compiled code is in the memory. The webpack development server monitors the source code file changes and recompiles the source code automatically. It also injects a web-socket connection into the browser to let the browser refresh automatically when the source code is changed and recompiled.
A traditional web application workflow is that when the developers change the source code, they have to refresh the browser to verify the effects of the change. Although it sounds a really simple step to refresh the browser, the time adds up by the end of the day. The fact that the webpack development server makes the browser automatically refresh when the code changes is a significant time-savings for developers. It makes the development workflow more efficient.
A typical development setting is to have a split screen. In one part of the screen, developers edit the source code. In the other part of the screen, they verify the browser refreshes and run the application. If the developers have two monitors, they can use one monitor for editing code and the other monitor for running the application. This can save both time and effort.
Visual Studio Code
Visual Studio Code ( https://code.visualstudio.com ) is one of the best code editors for developing AppRun applications. It has detailed documentation that describes its features for development; it also has an ecosystem of many extensions. The extensions add many other features to Visual Studio Code.
Visual Studio Code
When editing AppRun application code in Visual Studio Code, you will notice the TypeScript code is syntax highlighted. The code elements have different colors that are visually distinct according to their roles. You can quickly identify and distinguish keywords, variables, parameters, and string literals. You can install and switch to use different Visual Studio Code themes to make the background and color scheme best suitable to your preferences.
In addition, Visual Studio Code provides many other features to improve developer productivity. We will discuss the most relevant features related to AppRun application development next.
IntelliSense
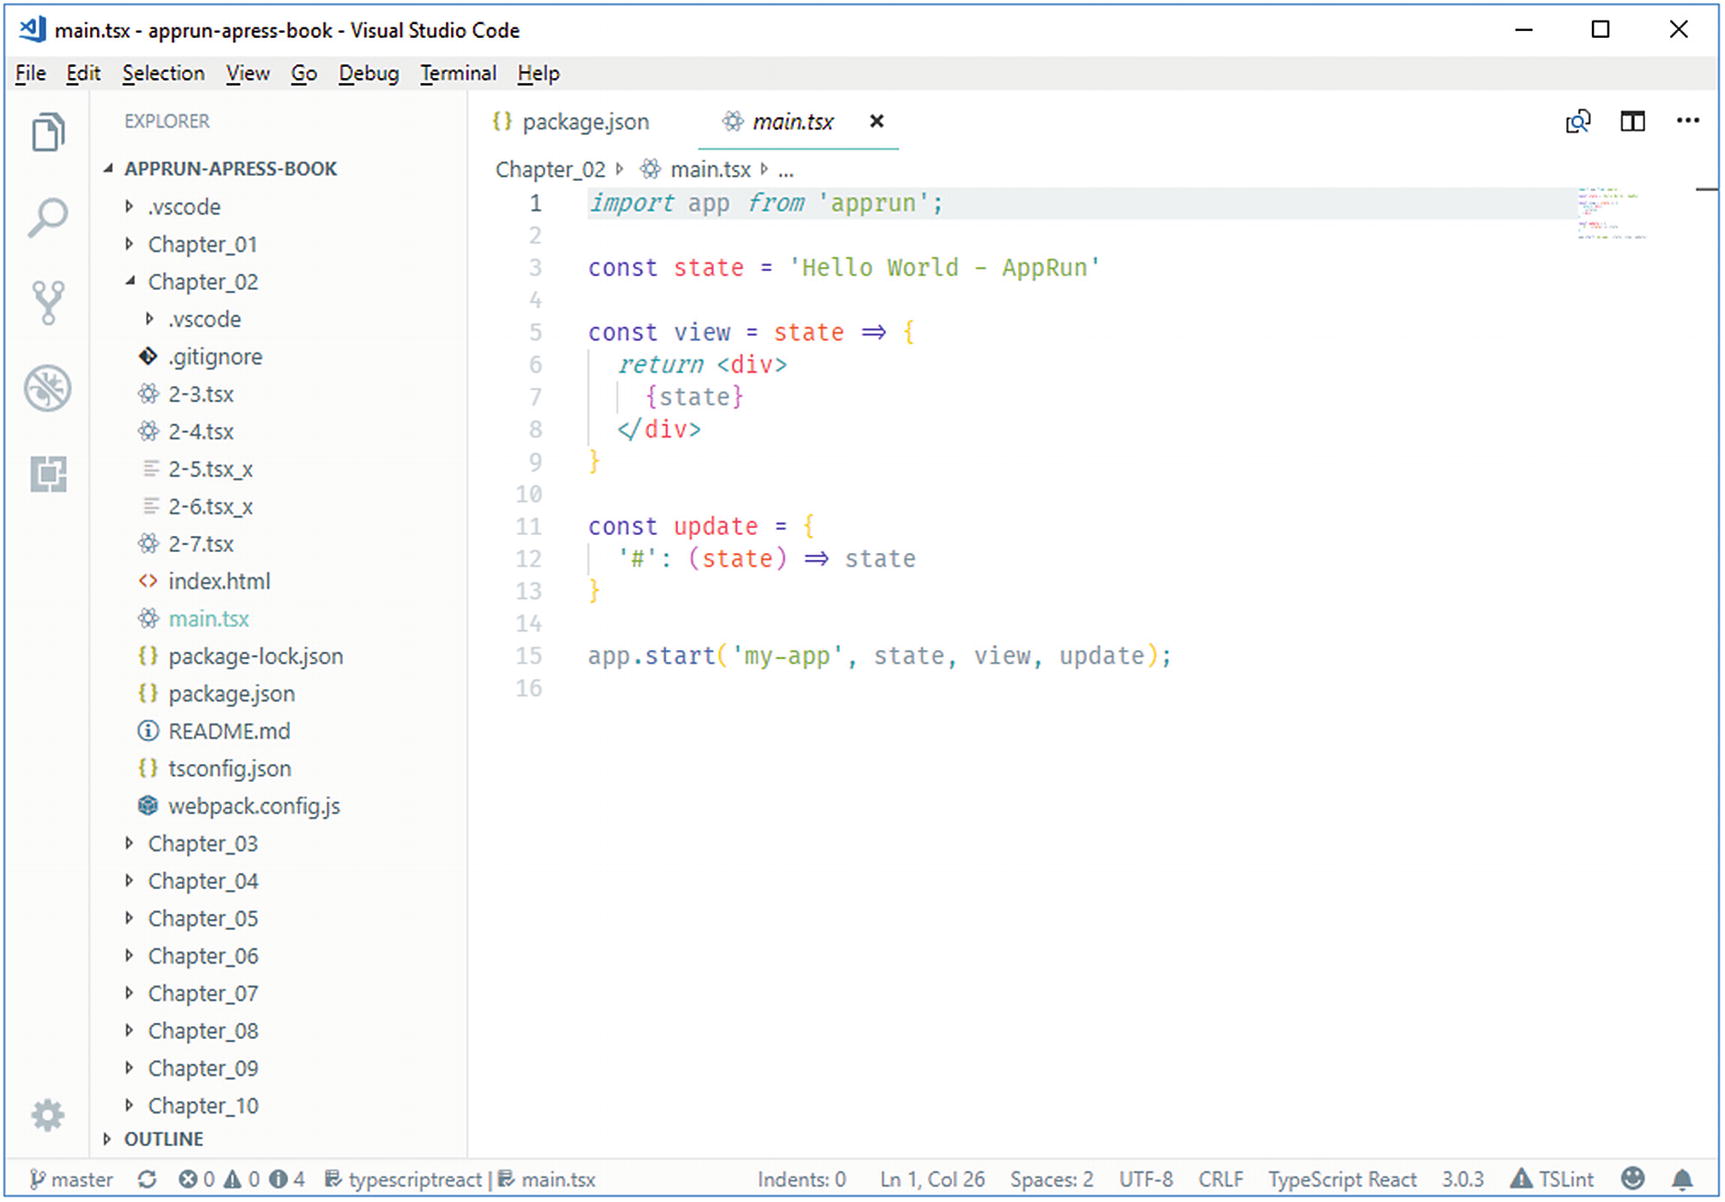
IntelliSense
Figure 2-3 shows that Visual Studio Code has detected and displays the signature of the app.start function. You can see the app.start function has a generic type of any.
Gradually Adding Types
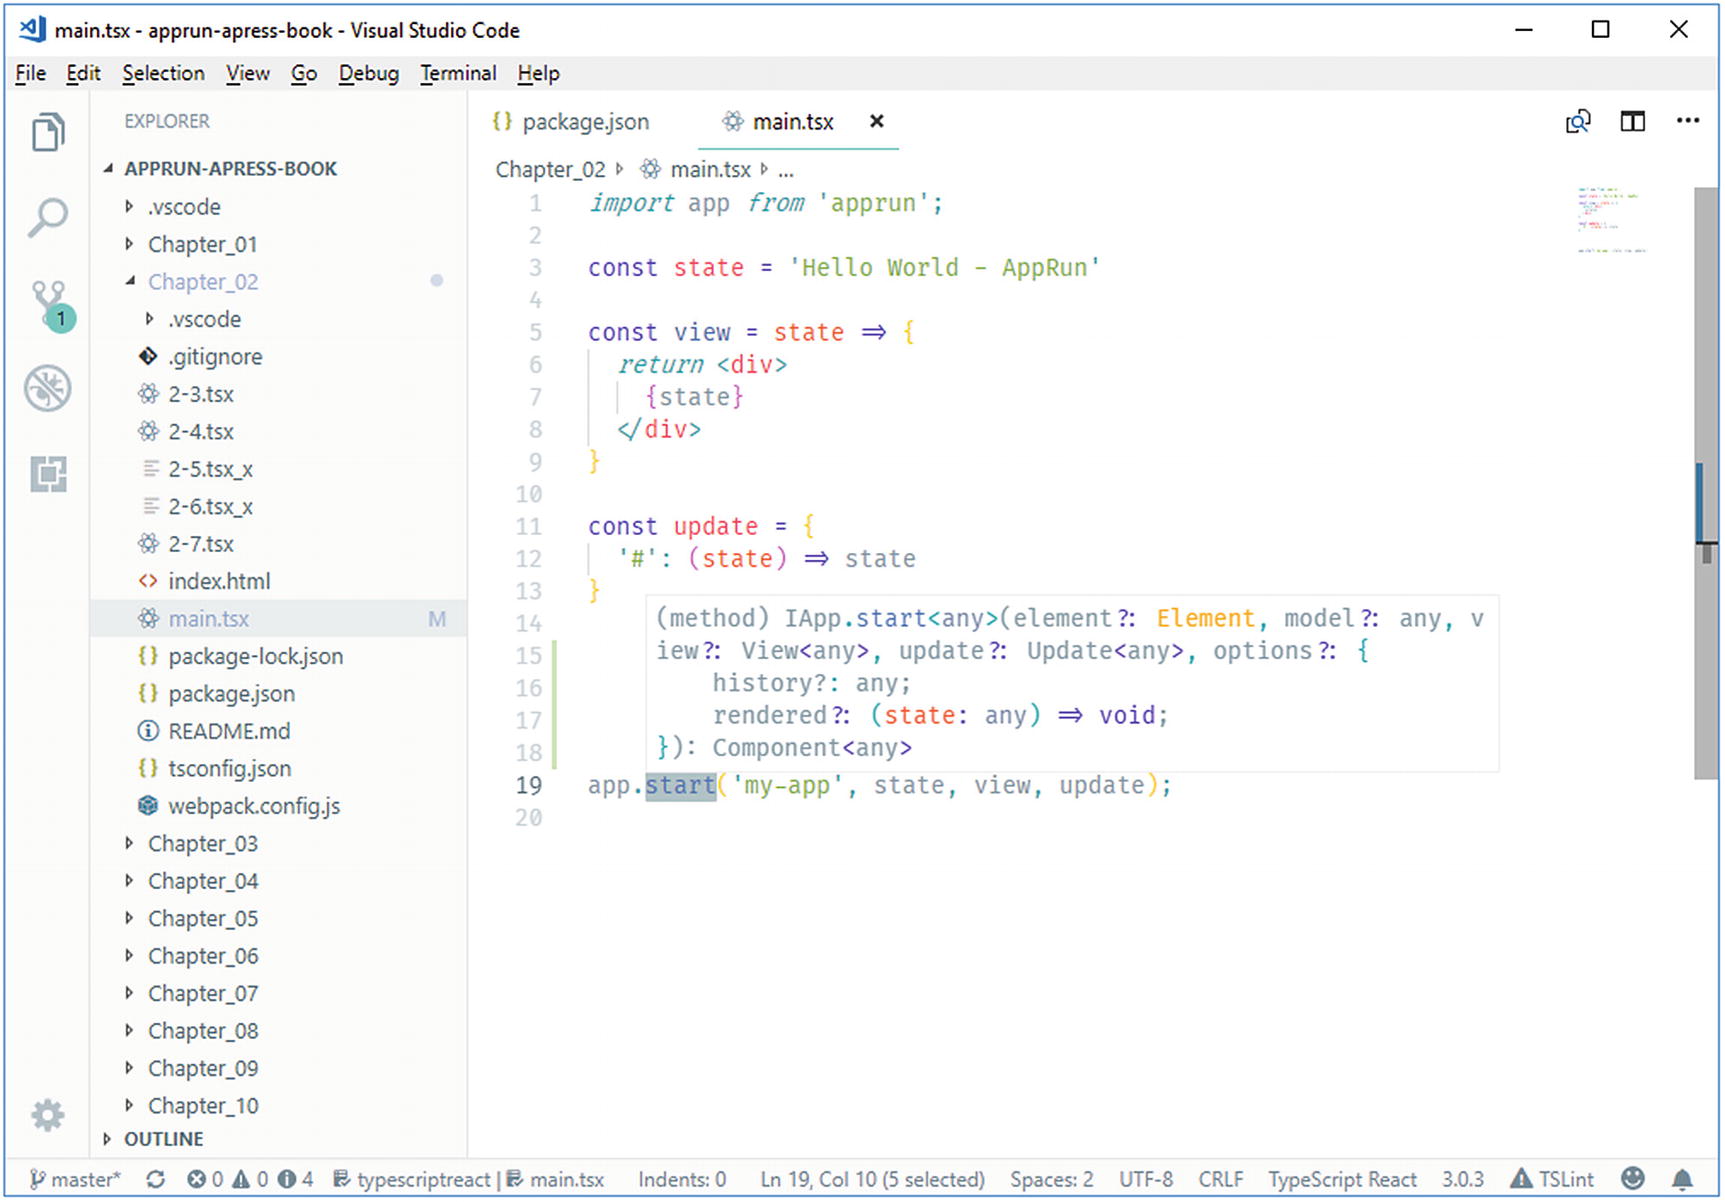
Importing AppRun types
We define the state to be a string (line 3). Then we apply View<typeof state> to the view function (line 5) and apply <typeof state> to the update object (line 11). Visual Studio Code uses the type inference feature of TypeScript to find out that app.start should have the state parameter be a string, the view parameter be View<string>, and the update parameter be Update<string>.
Type Checking
While we are writing the code, Visual Studio Code checks and verifies the types automatically behind the scenes. If we make a mistake, Visual Studio Code reports the type checking error.

Type checking of the update object
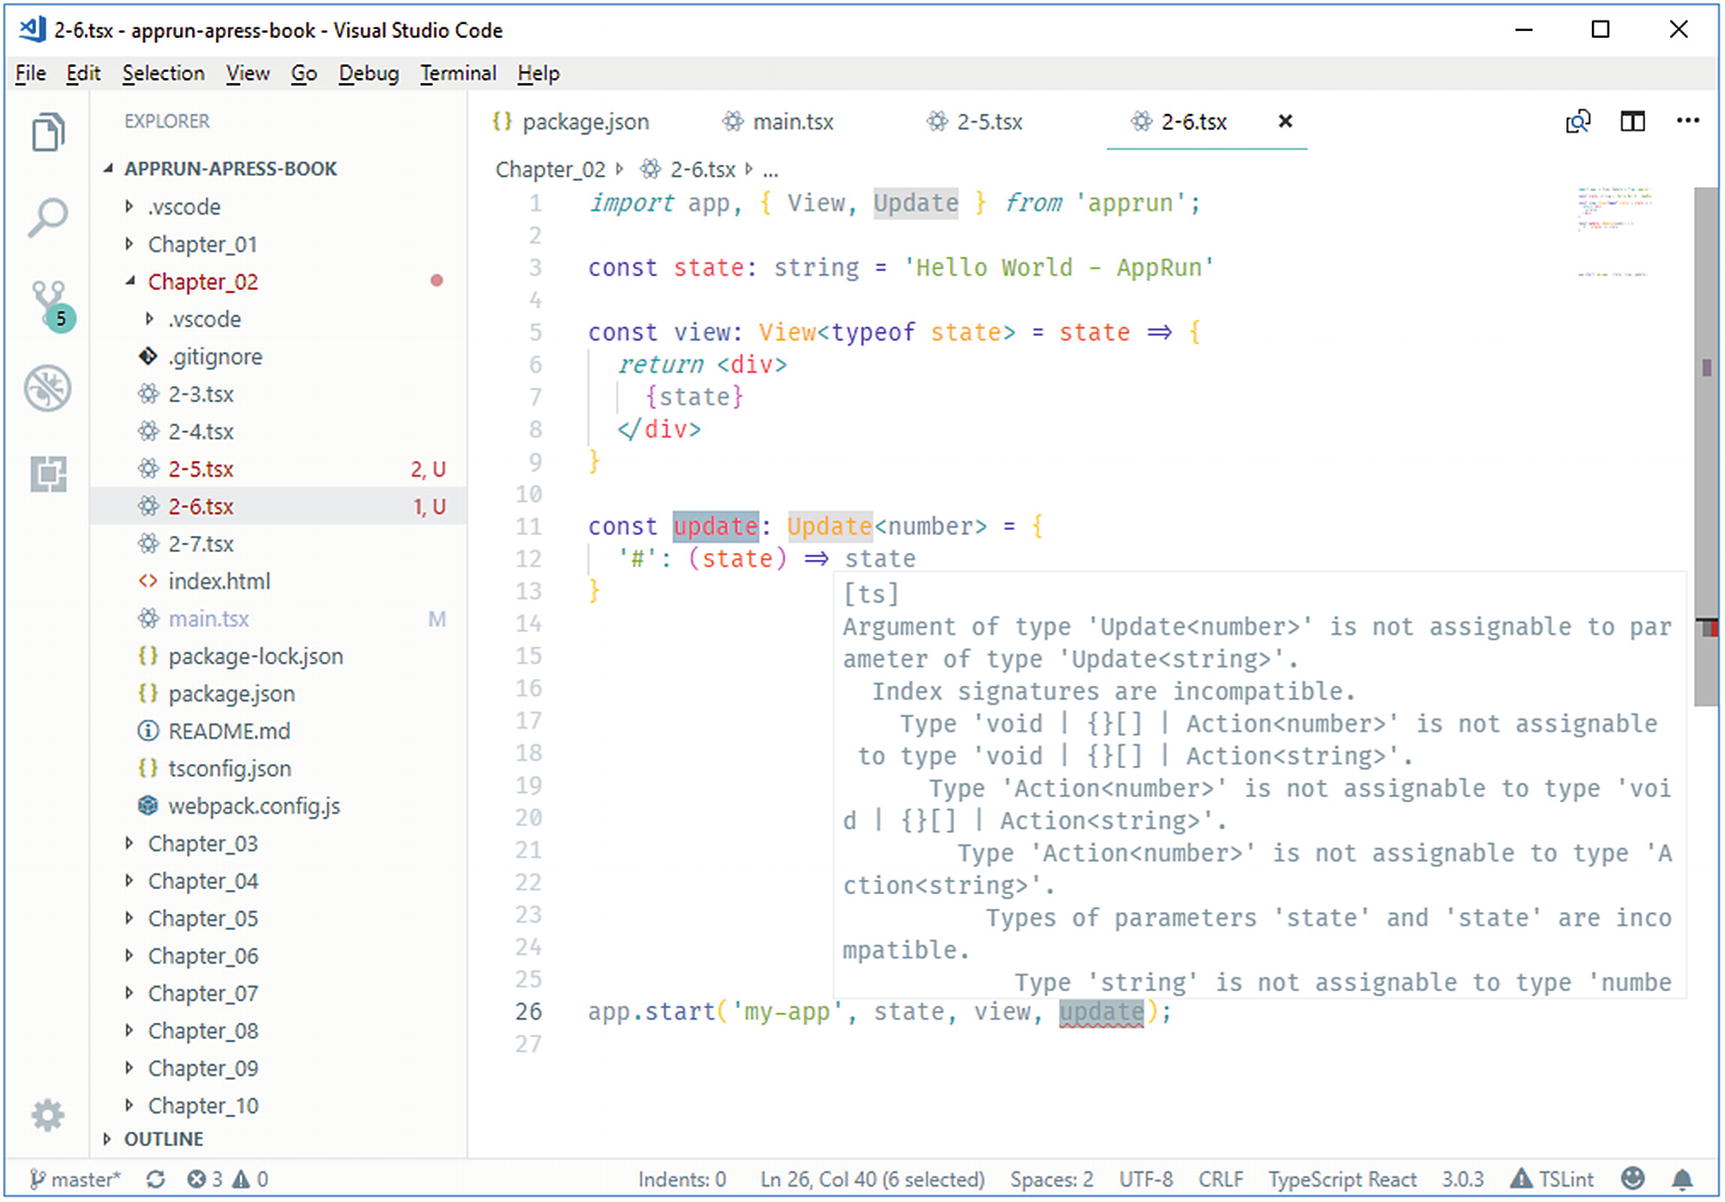
Type checking of the app.start function
Visual Studio Code uses TypeScript checks and reports the type checking error behind the scenes. Automated type checking is a great way to catch code mistakes.
Code Snippets
Code snippets are commonly used code blocks displayed in the IntelliSense suggestions. It can insert code blocks by using the Tab key, so it is also called tab completion or auto code completion.

Code snippet of AppRun
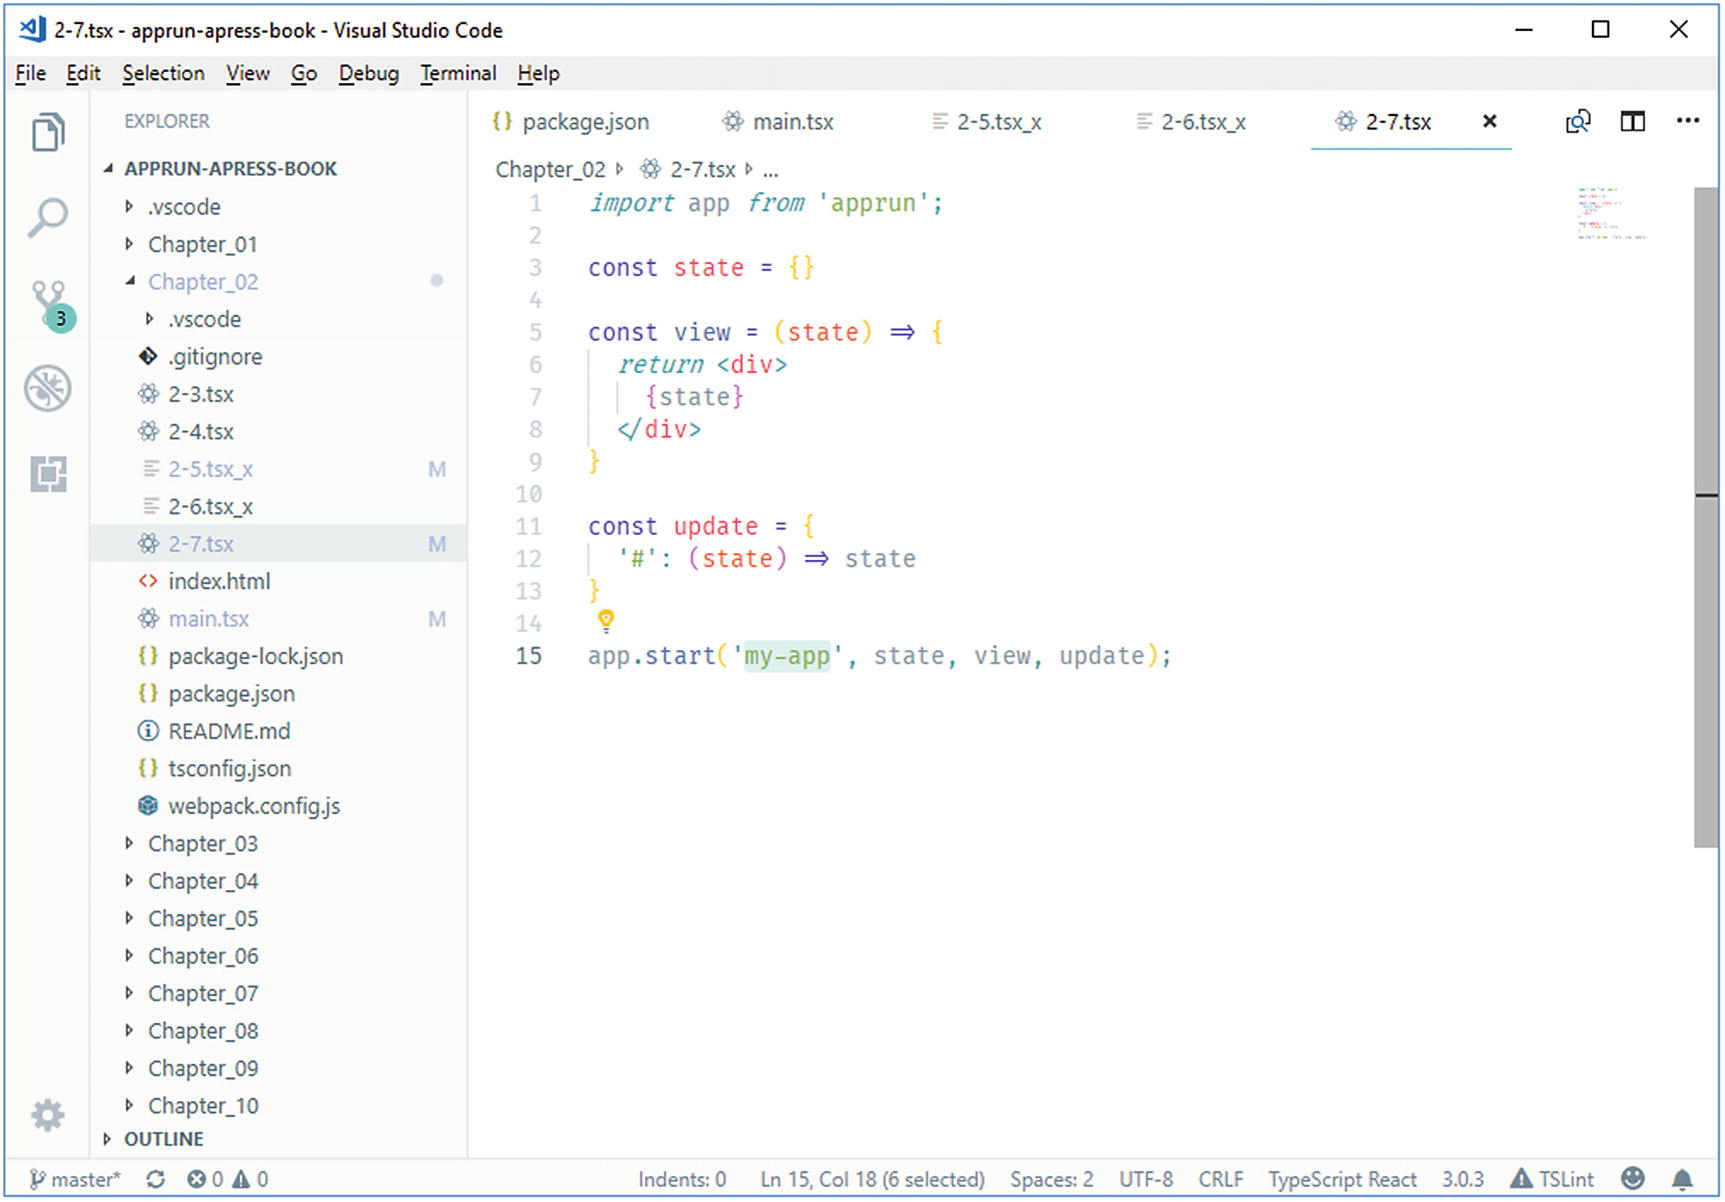
Code snippet result
AppRun Code Snippets
Keyword | Code | Description |
|---|---|---|
apprun | import app from 'apprun'; const state = {} const view = state => { return <div> {state} </div> } const update = { '#': (state) => state } app.start('my-app', state, view, update); | Inserts global application |
component | import app, { Component } from 'apprun'; export default class MyComponent extends Component { state = {} view = state => { return <div> {state} </div> } update = { '#': (state) => state } } | Inserts component |
on | app.on(", () => { }) | Inserts event subscription |
run | {e => this.run(", e)} | Inserts event publication |
pfc | const Tag = ({ prop }) => { return <div> </div> } | Inserts pure function component |
@on | @on(") fn = (state, e) => { return { ...state, e } } | Inserts update function in component using the @on decorator |
@event | @event('') function (state, e) { return { ...state, e } } | Inserts update function in component using the @event decorator |
log | console.log(state) | Logs the state |
These code snippets provide a quick way to enter the code. IntelliSense also supports the undo feature (Ctrl+Z or Command+Z).
Integrated Terminal
The other helpful feature of Visual Studio Code is that it has an integrated terminal. We can run AppRun CLI commands and other development commands right inside Visual Studio Code without switching between Visual Studio Code and the terminal windows.
npm test: Starts unit testing
npm start: Starts the development server
npm run build: Builds the production-ready code
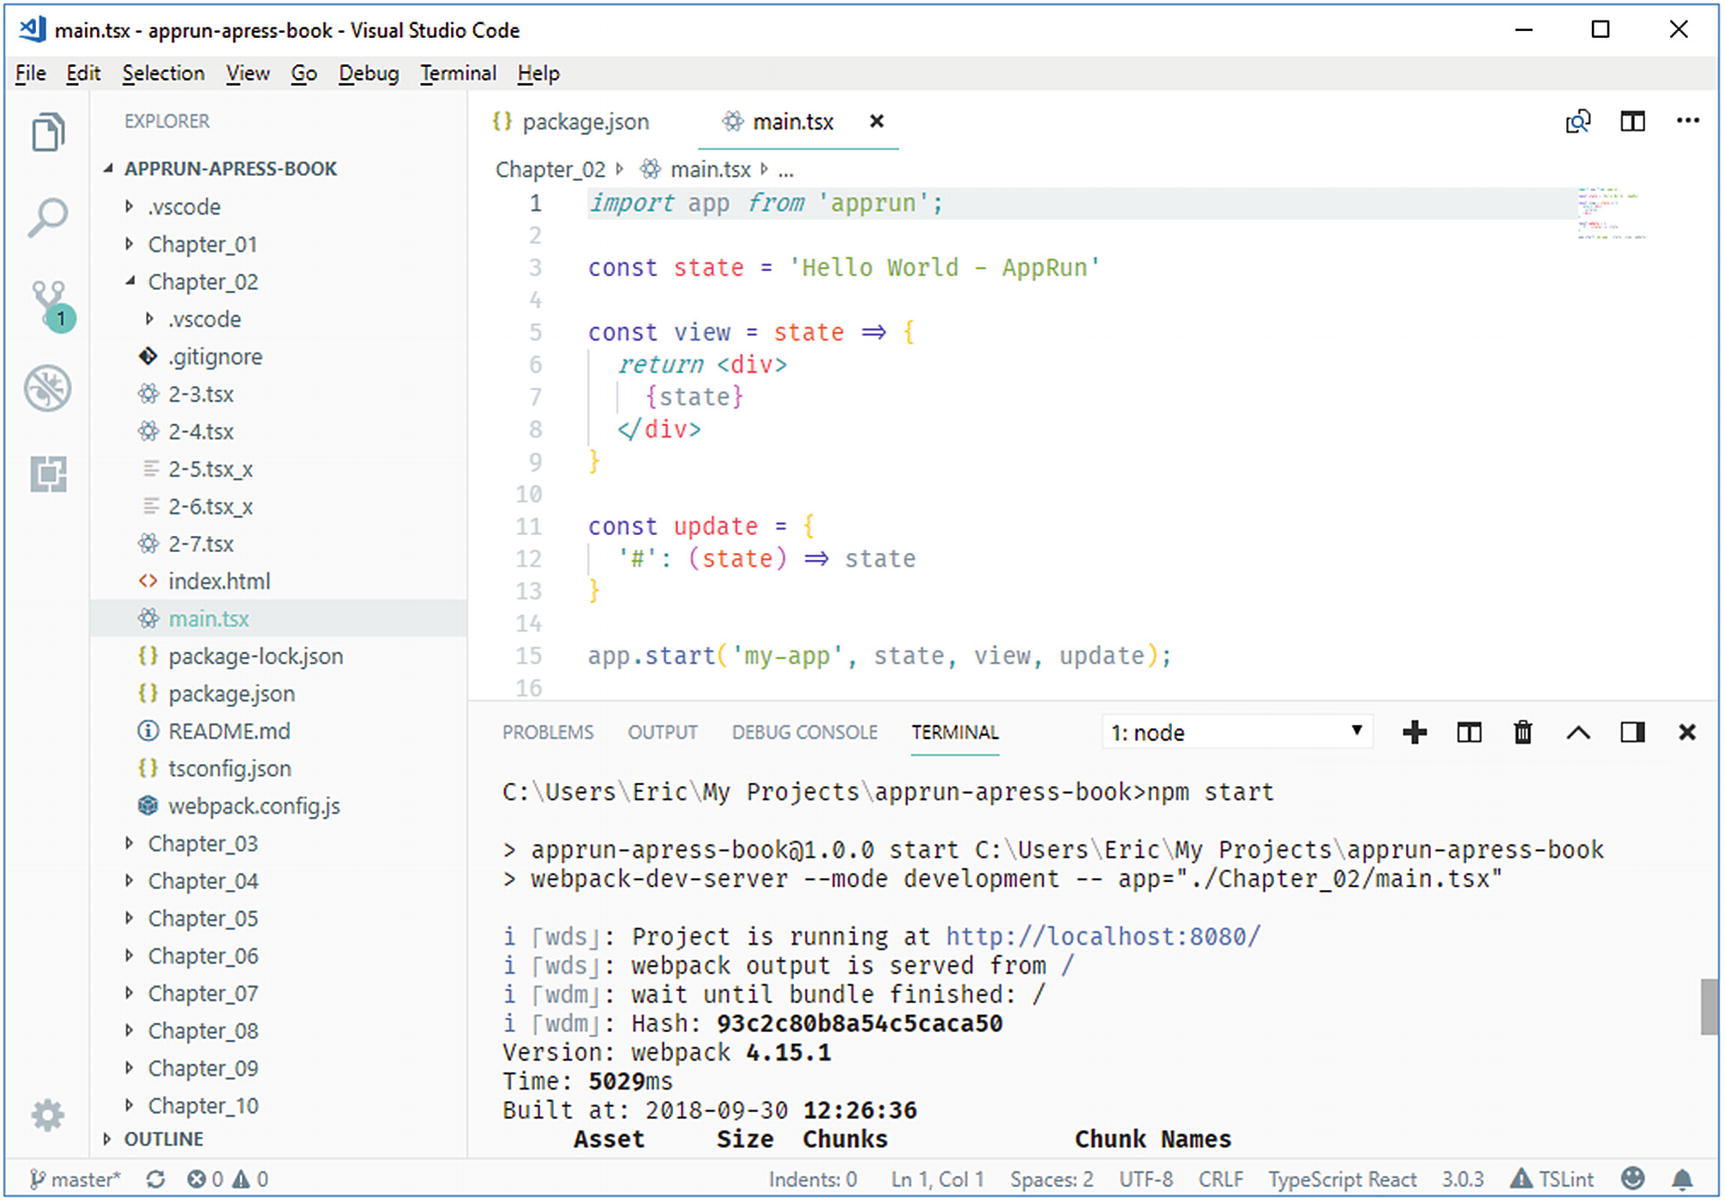
Visual Studio integrated terminal
Debugging
- 1.
Click the extension icon, shown here:
 .
. - 2.
Search for Debugger for Chrome (see Figure 2-10)
- 3.
Click Install and reload Visual Studio Code.

Debugger for Chrome
- 1.
Click the debug icon, shown here:
 .
. - 2.
Click the debug configuration icon, shown here:
 .
. - 3.
Set the environment to Chrome (see Figure 2-11).

Choosing the debugger environment

Debugger configuration (launch.json)
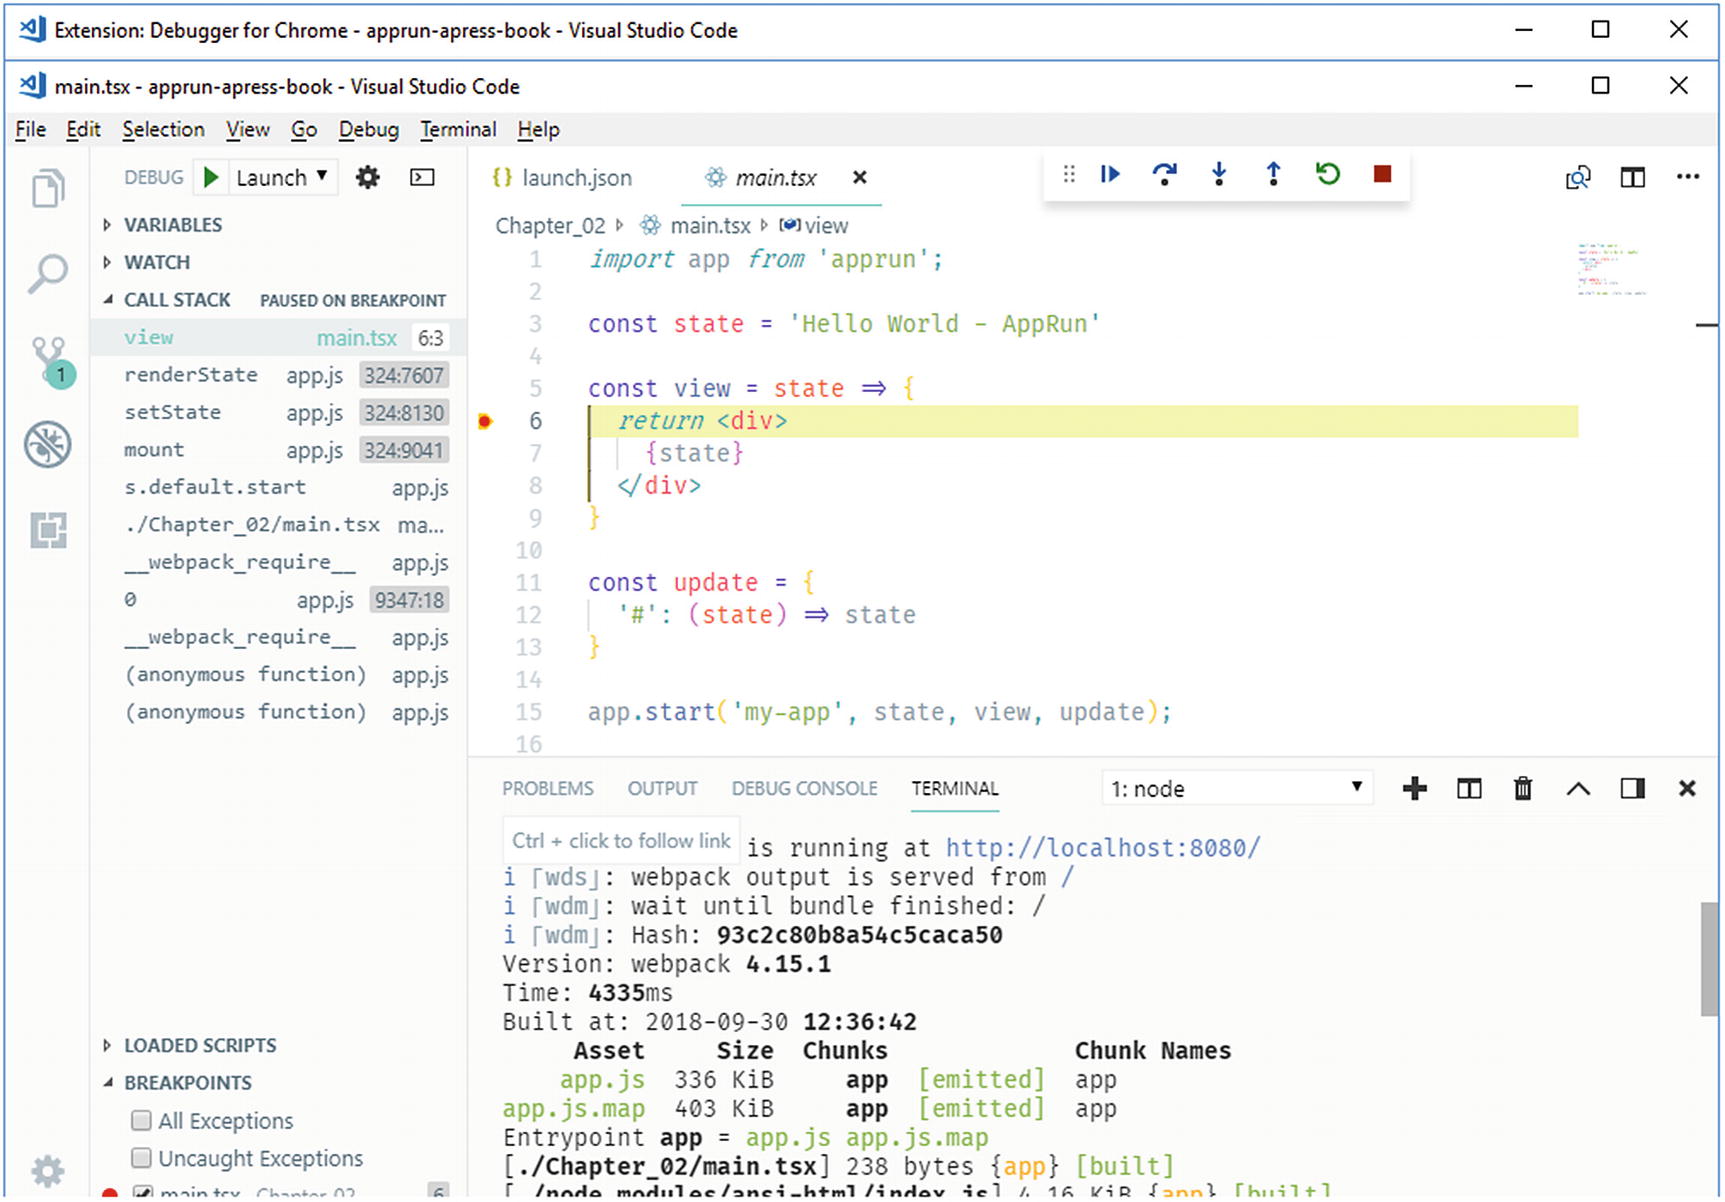
Visual Studio Code breakpoint
So far, we have completed creating and exploring the AppRun development environment by using the AppRun CLI and Visual Studio Code. Now we have an AppRun development environment that has the development server and debugging enabled.
Summary
The AppRun development environment uses TypeScript as the compiler to compile advanced language features to the code that browsers can run. We can add types gradually. It is the recommended approach because we want to focus on the application logic instead of getting lost in defining data types. The AppRun development environment uses webpack as the bundler. We can develop AppRun applications utilizing the ECMAScript 2015 module format. Visual Studio Code is the recommended tool for developing AppRun applications. It provides features such as IntelliSense, type checking, code snippets, an integrated terminal, and the Debugger for Chrome extension.
With the AppRun CLI and Visual Studio Code, we are ready for some serious application development.