With the key background knowledge from the previous chapter, we’re ready to really dig in and start taking some truly important steps to being more secure. If you were to do nothing else but follow the tips at the end of this chapter, you would be miles ahead of most people.
Backups
What if you had a time traveling device…Doctor Who’s TARDIS, Hermione’s Time Turner necklace, Doc Brown’s DeLorean, or the classic HG Wells contraption? Then you really wouldn’t have to worry about security, right? If something bad happened, you just go back in time, before it happened, and then avoid it the second time around. Short of maybe death, there would be really nothing from which you couldn’t recover. You would have the wondrous power of the Do-Over!
This is the same principle behind backing up your data. If you keep regular backups of your data, then you can really never lose anything. While backing up your data can’t prevent someone from copying and abusing your data (e.g., identity theft), it can at least prevent you from losing your data to a virus or a crashed hard drive or even a natural disaster. Backing up your data is one of the best techniques for mitigating the damage from an attack or random stroke of bad luck. Luckily, in today’s world, it’s pretty easy to do, though it does cost money. Think of it as insurance, and it’s money well spent.
You have two main options: a local, external backup hard drive or an online backup service. Let’s look at the local external backup hard drive option first.
As we discussed in the previous chapter, all your data—your files, documents, digital photos, downloaded music, and home movies—lives on your computer’s hard drive. Unlike all the crap in your garage, you can create perfect and free copies of all of this data anytime you want. Keeping a backup copy of this data is as easy as buying an external hard drive, plugging it into your computer, and then telling your computer to use this drive for backup.
Both Windows and Macintosh computers come with software built in for this purpose. This software is even smart enough to keep multiple backups. It’s not just a single copy of your data—it’s a rolling copy of your data as it changes. The first backup will obviously need to make a copy of every single file, but subsequent backups only need to make copies of the files that have changed. This technique will allow you to get older versions of files, in case you realize that you somehow messed up a file or just want to undo a bunch of changes you made. Having a full backup of your entire hard drive, with multiple versions, is really just like having a time machine (and in fact, Apple cleverly dubbed its backup software Time Machine). You can return your computer to just about any point in time—on a per-file basis, if necessary. You can even completely restore your entire system to a new computer if your current computer bites the dust.
Sounds pretty foolproof, right? The external hard drive option is a good solution for most people. However, there are at least two problems with this option. First, it doesn’t protect you from natural disasters. If your house burns down or floods with water, the hard drive sitting right next to your computer is going to suffer the same fate as the hard drive that’s inside your computer. Second, viruses and malware can mess up an attached external backup drive just as easily as they can mess up the drive inside your computer. However, external drives are still excellent protection against hard drive crashes, accidental file deletion, or any problem that affects only the main computer. They also tend to be the cheapest solution over time because they require only a one-time cost (buying the external hard drive).
Now let’s look at the second option: online backup (also called cloud backup ). This includes services such as iDrive, Backblaze, Carbonite, and many others. This sort of service is slightly easier than the external hard drive option in that you don’t have to buy an external drive. You sign up for the service, you download their application, and you tell it to start backing up your stuff. The cost varies from service to service and even varies over time for a given service because of competition and falling costs of storage. (At the other end of your Internet connection, they have a hard drive with your name on it—so essentially you just paid them to buy the external drive and keep it off-site for you.) Unlike the fixed cost of buying your own external hard drive, these services make money by charging you an ongoing fee to keep your data for you. So over time, this option is going to cost more than the previous option.
Online backups solve the natural disaster problem because the storage is outside your home. It also usually solves the malware problem because there is no direct access to the external backup drive from your computer. But the online backup solution has other drawbacks. First, there’s just the problem of logistics. Let’s do the math. (Don’t worry, I’ll do the math; you just follow along.) Let’s say you have a one terabyte hard drive, which is fairly common. Let’s also assume you have a modest Internet connection that allows you to upload 10 megabits per second.1 That means when everything is working perfectly, under ideal conditions, you can upload 10 megabits of data to your online backup service every second. How long would it take you to copy your entire hard drive to the online backup provider? First, note that your drive is one terabyte, but your upload speed is measured in megabits. If you recall from the previous chapter, there are eight bits in a byte—so one terabyte is eight terabits. If you divide eight terabits (8 trillion bits) by 10 megabits (10 million bits) per second, you will see that it will take 800,000 seconds…which is more than nine days! Recall that this assumes ideal conditions, which will never happen for nine straight days. If you have better broadband service, you can cut that time down quite a bit, but just realize that it may take quite a while for that first backup to complete. And what happens when you need that data back? Luckily, most people’s Internet connections are much faster for downloads than for uploads, but it could still take many days to get all that data back.
So, why would anyone bother with an online backup solution? First, you’re probably not going to upload your entire hard drive to the cloud. For example, you don’t really need to back up your operating system, which takes a lot of space. You probably don’t need to even back up most of your software applications, since you can probably just reinstall them from disk or re-download them from the Internet. You might not even need to back up your music, if you use a streaming service like Spotify or Apple Music. This could greatly reduce the amount of data you really need to back up. Most people really only need to back up the files that they simply cannot replace—documents (which are usually very small), personal photos, and maybe home movies. Second, you only need to upload everything one time. It will take a while, but once it’s done, you only need to upload the changed files and new files. So while it may take a week or more for that initial backup, it will be much faster after that. Finally, your hard drive is probably not 100 percent full. Our calculations were based on worst case.
The second problem with online backup is the creepy factor. That is, you’re giving all your data to a bunch of complete strangers…those embarrassing spring break pics, the “love letters” from that psycho you dated from Match.com, your tax returns, and potentially even things like your browsing history and emails. If you back up your cell phone data to your computer, you could be exposing your text messages, contacts, and location history, too. But wait, surely all your data is encrypted, right? Yes… but who holds the key? Any service worth considering will encrypt your data during transit (from your computer’s drive to their off-site drive), which will prevent someone like your Internet service provider from seeing any of the data as it flies by (data in motion). And most services will encrypt your data on their hard drives, too (data at rest). If they do this properly (and that’s an important “if”), this would protect your data from any unauthorized access, including hacking. However, if served a warrant2 from the police or FBI or a National Security Letter from the US government, they would be required by law to decrypt your data and hand it over (and probably also be strictly prohibited from telling you that they did it). And if they’re able to decrypt it for legal reasons, then they can decrypt it for any reason, meaning that employees of the company may also be able to look through your stored data. However, most companies now allow you (and only you) to hold the encryption key, though it’s almost never the default option. I will tell you how to do this, of course.
So…which option is the best? Honestly, if you can afford it, I recommend you do both. They each solve the same problem but in slightly different ways, with various pros and cons. If you do both, you get the best of both and address the shortcomings of each.
However, if cost is a problem, I recommend using an external hard drive . It’s quicker, it’s cheaper over the long run, and it keeps your data in your own control. If you want to go the extra mile to protect against natural disasters or anything that could destroy both your computer and your external hard drive at the same time, then use two external hard drives: swap them once a month and keep one drive off-site somewhere.
If the computer you’re backing up is a laptop, having an external hard drive that is always connected isn’t really practical. If you don’t mind paying an ongoing fee and want to know that your data will always be safely held off-site, then using a cloud backup solution is probably your best option. The first backup will take some time, but after that, it should perform similarly to a local hard drive.
To ensure your privacy when using a cloud backup, you should choose your own encryption key (i.e., a password)—meaning that all the cloud storage company will see is an indecipherable blob of bits. However, that means if you lose the key, your data is effectively gone; even though the online service technically still has your information, neither you nor they can read it. However, I will show you in a later chapter how to solve this problem.
I would like to make one further recommendation. Computers need electricity to run, and if that electricity gets yanked with no notice, it can really cause serious problems for your computer, including corrupting your data. It doesn’t have to be a complete power outage, either—just a flicker or “brownout” can cause your computer to shut down abruptly. For this reason, if you have a desktop computer, I strongly suggest buying an uninterruptible power supply (UPS) . This is basically a big battery that can be used to power your computer if the power to your house goes out. You plug this battery into the wall and then plug your computer into the battery box. When the power goes out, the box will supply power to your computer for a short amount of time—the bigger the battery you buy, the longer it will let your computer run. But all you really need is enough power to give your computer the time to properly shut down. Most of these UPS boxes have a data connection to your computer, as well, and can tell the computer when it should shut down. This means it will work without you being there to monitor it.
Spring Cleaning
It’s time for a spring cleaning of your computer! It’s time to purge the things you don’t need or don’t use. If the software in question was a free download or something you’ve installed from a disk, then you can just reinstall it if you find later that you need it. Also, you have a complete backup of your system (right?), so in the absolute worst case, you can always dial the clock back and get right back to where you were.
Awww, but I don’t wanna clean my computer! Do I hafta?
As we discussed in the previous chapter, one of the most important things you can do to protect yourself is to reduce the number of places where you are exposed (in the security biz, this is referred to as your attack surface). Every single piece of extra software you have installed—every application, utility, plugin, and extension—is just one more place that an attacker can probe for vulnerabilities. All software has bugs. Adding more software adds more bugs, and bad people can exploit those bugs. Therefore, you should take every opportunity to close the gaps, reduce the number of vulnerabilities, and lower the risk of bad guys getting in.
There are actually other good reasons to clean up your system. First, those extra apps take up space on your hard drive. Second, many applications and utilities have components that run in the background, whether you’re actively using them or not. That chews up memory resources, for sure, and potentially processing power and Internet speed. Also, many of these utilities and extensions are started automatically every time you boot your computer, which can significantly increase the time it takes to start up. Have you felt like your system has been running more slowly than it used to? Do you find it slower to surf the Web? Does your computer take forever to restart? Getting rid of the junk might very well speed things up.
But there’s one other major reason to remove any unused or unneeded software: these applications (particularly free ones) may be spying on you. It’s not uncommon these days for applications to sell your data to marketing companies and data brokers.
Update Everything
Once you’ve backed up all the important stuff and you’ve gotten rid of all the excess stuff, then the last thing you need to do before we proceed is to update the software that’s left after the dust settles.
It’s extremely important to keep your software applications and utilities up to date, particularly your operating system and Internet applications. New bugs, exploits, and other vulnerabilities are found in software all the time, every day… 24/7/365. The bad guys are plentiful and highly motivated, and they don’t honor business hours or national holidays. Mature and responsible software companies are diligently patching these holes and making updates available as soon as they can. While it’s true that any time you change software—even if you’re trying to fix a bug—you may well end up creating some new bug, it’s still best to keep up to date.
Both Microsoft and Apple have made keeping your operating system up to date easier over the years, even automating the process. If you turn on the right options (and I’ll show you how), your computer will keep itself up to date. Apple has even managed to provide a mechanism to keep non-Apple applications up to date automatically, as well. Individual software companies have implemented proprietary methods for keeping their software updated—usually popping up a dialog that tells you there’s a newer version of your software and giving you the option of installing it. While sometimes annoying, this is a good thing.
I strongly recommend you enable these automatic update mechanisms. Yes, it’s possible that an updated version of your operating system or cherished software application will remove some feature you love or totally change the look and feel, but from a security standpoint, it’s essential that you stay up to date.
Since Apple and Microsoft no longer charge money for these upgrades, there aren’t many reasons not to upgrade. The main reason you might not want to upgrade is if you’re running a really old but crucial piece of software that is not compatible with the newer OS version (and doesn’t have a free update that makes it compatible). Nevertheless, there are many important security features in the newer OS versions, and if possible, I would upgrade. And that may mean buying a new version of that critical application or finding a different application that can take its place.
The recommendation to upgrade to the latest OS is purely for security reasons. The most recent OS will almost always have the best security technology. While Apple and Microsoft will also try to patch older versions with security updates, there are quite often key new security techniques built into the OS that are not included in those updates to older versions.
You may recall that Microsoft offered a free upgrade from Windows 7 to Windows 10 for a period of time after Windows 10 was announced. That offer expired years ago, but as of the writing of this book, you can still get a legitimate free upgrade to the latest version of Windows using the Windows 10 Media Creation Tool. See this guide:
Upgrading your operating system is outside the scope of this book. So if you decide to do this and you have any reservations about doing it yourself, you might want to find a tech-savvy friend or relative to help you. Before you upgrade, be sure to perform a full backup! See the first section of this chapter’s checklist for instructions.
If you don’t want to turn on automatic updates, then you will need to periodically run through all your software and update it manually. I recommend at least once a month for most applications and weekly for your operating system and crucial applications like your web browser, email program, and any “office suite” software (word processing, spreadsheet, or presentation software).
Summary
One of the best ways to insure yourself against catastrophic loss is to make full backups of all your files, or at least the truly irreplaceable ones. You can do this using an external hard drive or using a cloud backup service (or both).
Once you’ve backed everything up, you should take some time to clean up your hard drive—remove unused applications and utilities. Every piece of software has bugs and holes, so if you’re not using something, it’s safest to just get rid of it. You can always reinstall it later if you find you still need it.
You need to keep your operating system and key applications up to date. Software bugs and security holes are discovered all the time, and keeping up to date should help to mitigate your risk.
Checklist
For this checklist and every checklist in this book, I will assume that you have not read the preceding parts of the chapter that explain why you should do the things listed in the checklist. Nevertheless, I highly recommend you do read the explanation part of the chapter, if you can find the time. For you to know which of these tips will make the most sense for you, you’ll need to understand why they’re important.
Operating System Configuration
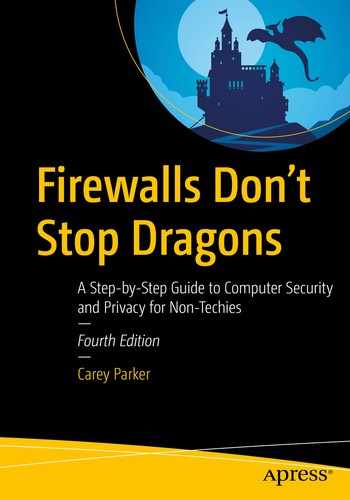
For many of the operations in this book, you will need to be able to open the system settings to configure something. To do this, follow these instructions.
Microsoft Windows 10
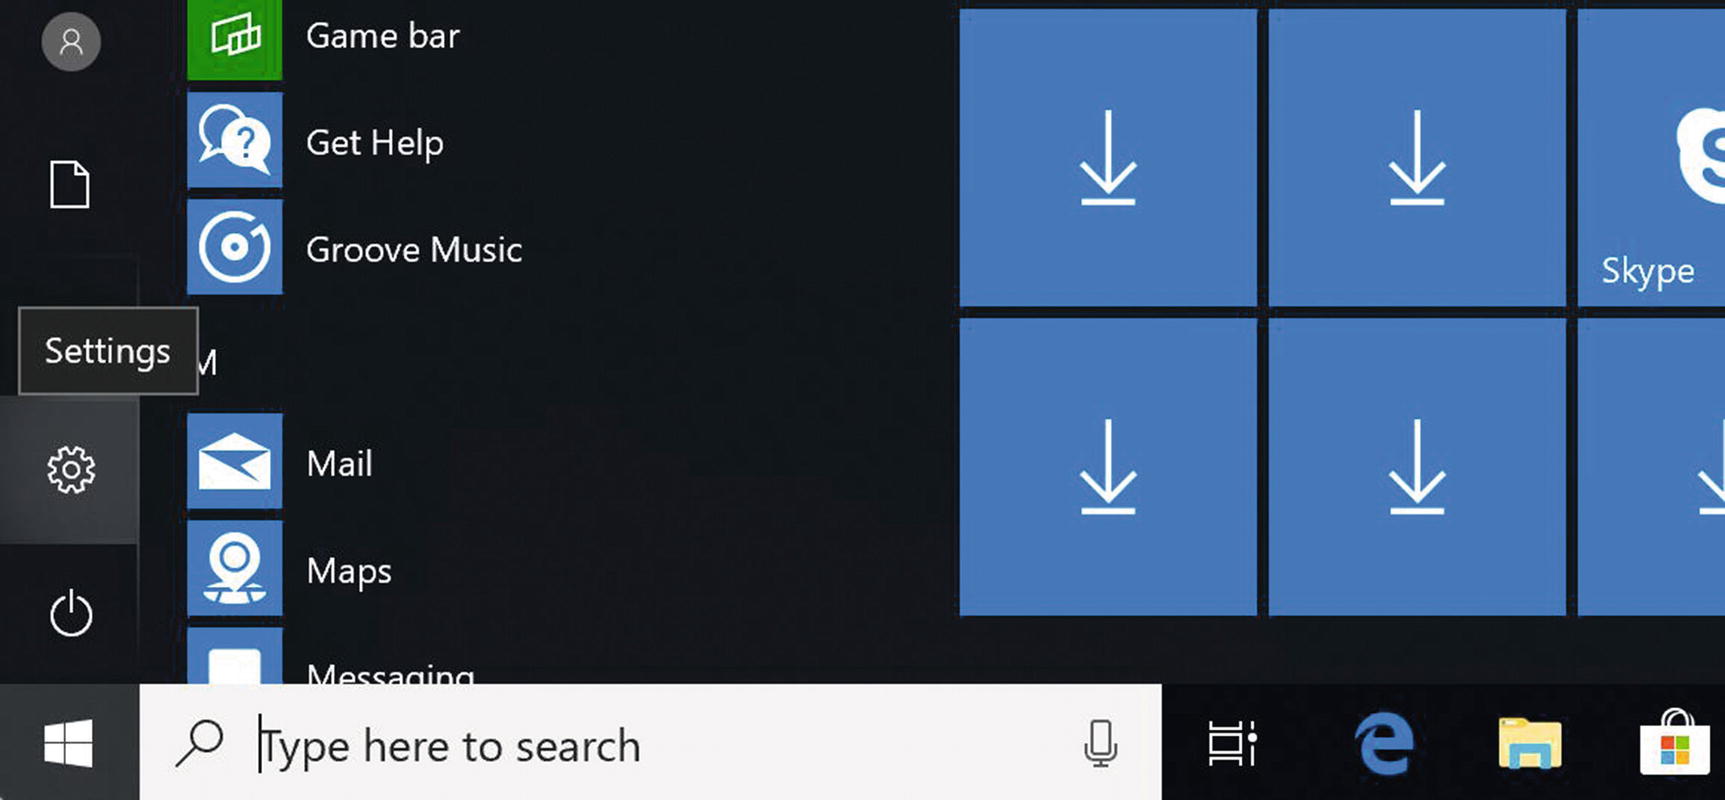
In Windows 10, there are two places to change settings: Control Panel and Settings.
Accessing Windows 10 Settings
Accessing the Windows 10 Control Panel
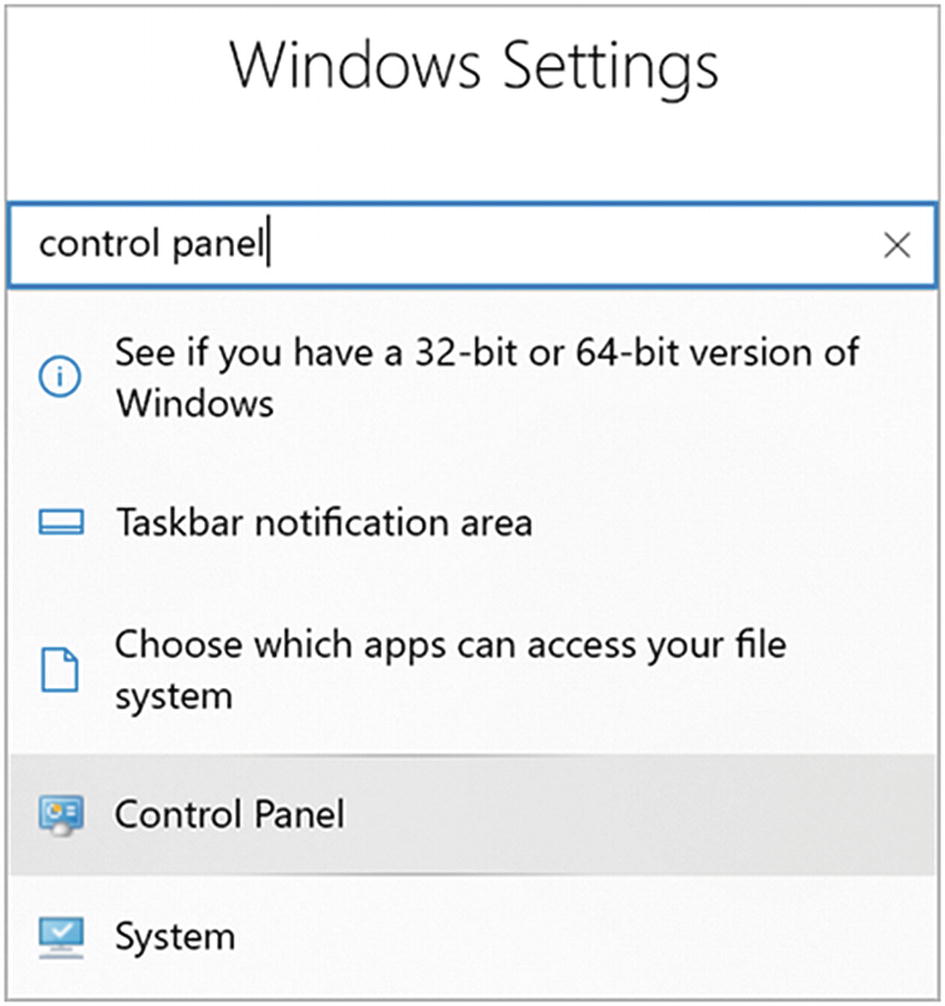
Mac OS
Accessing Mac OS System Preferences
Tip 3-1. Back Up to an External Drive
Backing up your computer is one of the best ways to protect your important computer files and data from getting lost or messed up (either maliciously or accidentally). If you have a solid backup of all your important files, you can always replace them if something should go horribly wrong.
You have two main options for backup: an external hard drive or an online (cloud) backup service. If you can afford it, I would do both. If you feel you have to choose just one option, I would read the section of the chapter on backups to help you choose which one would be best for you.
Buy an External Hard Drive
USB-powered (“portable”) vs. AC-powered: Hard drives require power to run. This power can be provided by the computer itself (USB-powered portable drives) or via a standard AC wall adapter. I recommend a USB-powered drive because they reduce a lot of clutter and tend to be a lot smaller in overall size. However, if you go with a USB-powered drive, the drive must be plugged into a powered USB port. That would be a port on the computer itself or a port on a powered USB hub (i.e., one that is itself plugged into the wall via AC adapter).
USB version : Be sure to get a drive that uses USB version 3.0 or higher, even if you have an older computer. Most recent PCs and Macs support USB 3. USB 3 drives will still work on older USB 2 ports, and it will “future proof” your next computer upgrade. USB 3 is a lot faster than USB 2, and USB 3.1 is faster than USB 3.0. (Note that if you plan to use this drive with a newer Apple MacBook laptop, you’ll need the connecting cable to have the smaller USB-C type connector on the end that plugs into the laptop.)
Drive size : I would plan to buy a drive that is at least twice the size of your computer’s internal hard drive. If you have very few files, you can probably get away with a drive that’s the same size as your computer’s drive, but you might want to also plan for the future.
Connect the Drive to Your Computer
Once you have the new shrink-wrapped hard drive box in your hands, open it up and take out the contents. The drive will almost surely come with some instructions for attaching the drive to your computer—a “quick-start guide” or similar. Follow these instructions for connecting the drive to your computer, but it’s pretty straightforward: the USB cable can connect only one way. That is, the ends of the cable are different—one will connect to your computer (or USB hub), and the other will connect to the hard drive. If the drive requires wall AC power, then it will have a separate power cable: one end will fit into the hard drive, and the other will be a typical AC wall plug. Note that you should leave this drive connected to the computer at all times so that the backup software can do its thing when it needs to.
On a Mac, when you first plug in a new hard drive, it may pop up a window that asks you if you want to use it for Time Machine. Don’t click anything yet—wait until the “Configure Your Backup” section. You can close this window for now.
Many external drives come with bundled software, often including backup software. In this book, I will walk you through using the free and effective backup software that already comes with Microsoft Windows and Mac OS. If you decide to use the included backup software, then you can ignore the rest of the steps for this tip and just use the instructions that come with your hard drive. However, I strongly suggest you not use the proprietary backup software. It usually has all sorts of extra stuff you don’t need and just confuses matters. Some drives also come with some cloud backup service, as well—often free or discounted to begin with, and of course the cost goes up later. Again, I would not use anything that comes with it. It’s probably more expensive, and I doubt it’s functionally better than the ones I will refer you to in this book.
Configure Your Backup
This will differ depending on your operating system and OS version. Choose the following section for the OS type you have. Be sure that your new external hard drive is connected properly before continuing.
Tip 3-1a. Microsoft Windows 10
- 1.
Open Settings. Search for backup. Click “Backup settings” (Figure 3-4).
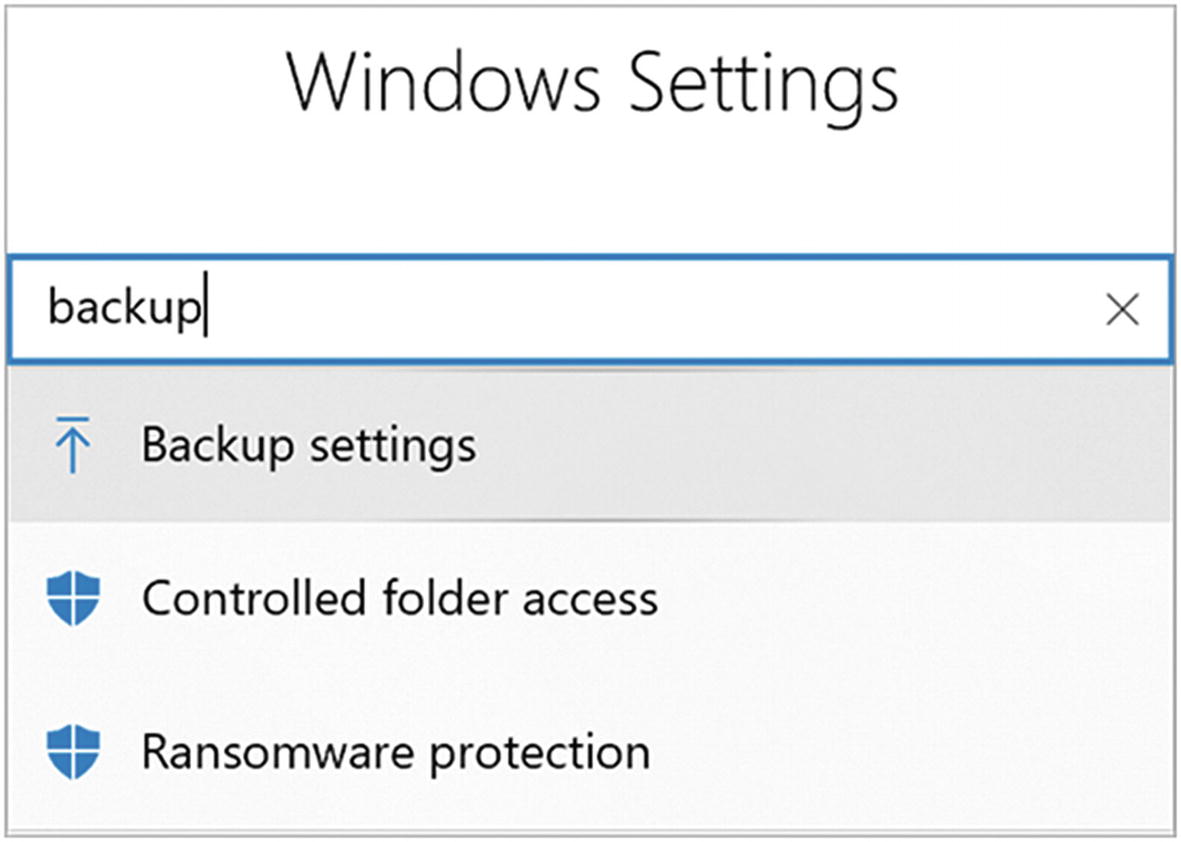
Windows 10 Search for backup
- 2.
This should bring up the Backup settings. Click “Add a drive”. You will see your hard drive there—select it. In the following example, this drive is called “BACKUP”. (Figure 3-5).
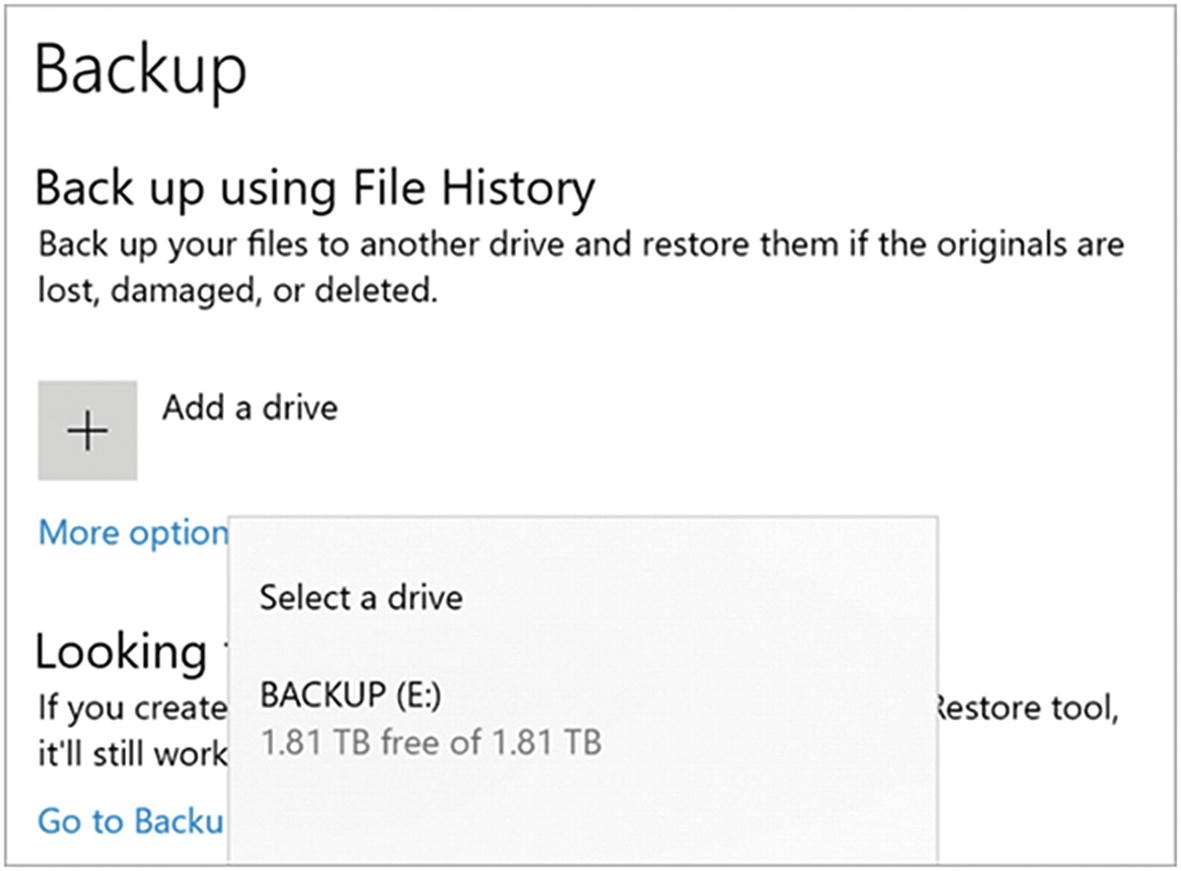
Windows 10 backup drive selection dialog

Tip 3-1b. Mac OS

Mac OS Time Machine backup confirmation dialog
For now, do not select Encrypt Backup Disk. We’ll do this later when I explain how to create and safely store a seriously strong password.
- 2.Click “Use as Backup Disk” button. You may see the confirmation dialog shown in Figure 3-8. This drive will be solely for backup, and anything else on the drive will be permanently erased. So, click the scary Erase button. If this is a new drive, there’s obviously no harm in this.
 Figure 3-8
Mac OS Time Machine disk erase confirmation dialog
- 3.
Mac OS will then prepare your drive for backup and start your first backup. You will see a progress window like the one in Figure 3-9. Be sure that the Back Up Automatically box is selected! You can also select the “Show Time Machine in menu bar” option so you can quickly see when it’s backing up and check on your backup status periodically (Figure 3-9).
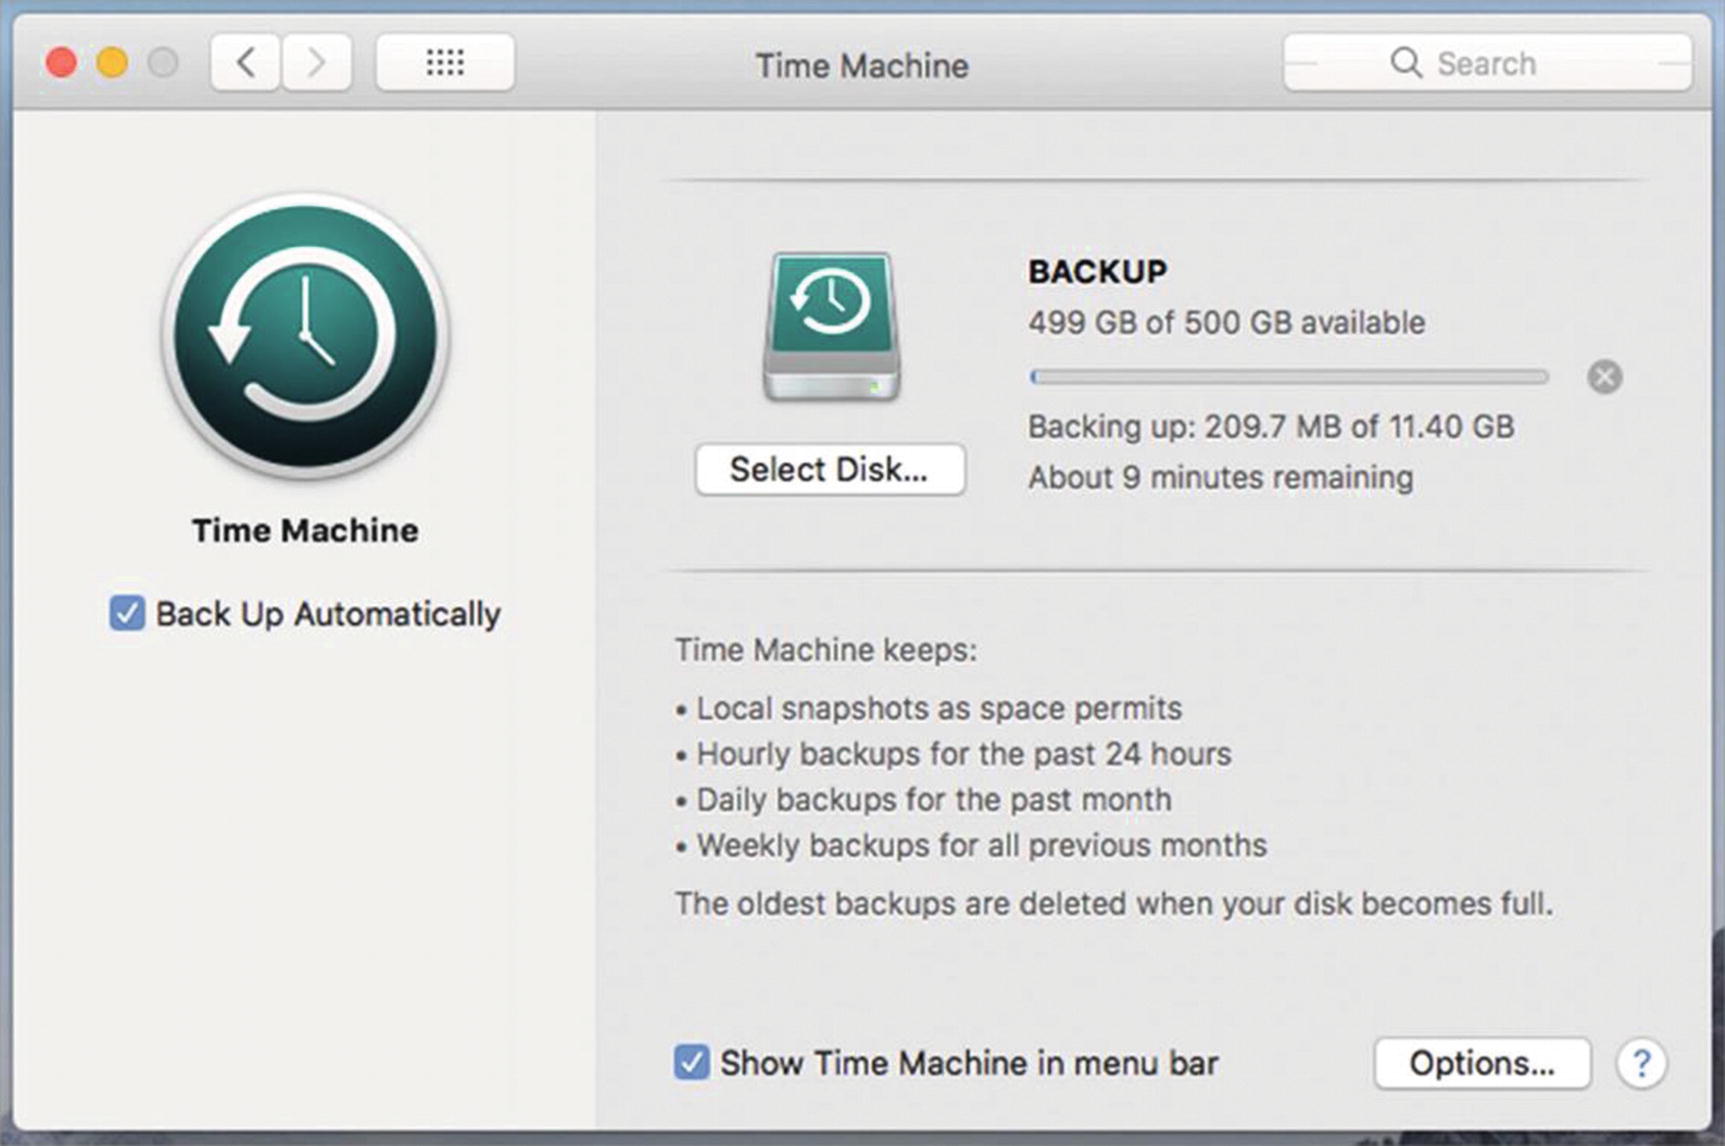
Mac OS Time Machine progress dialog
- 4.
You can close this window at any time; you don’t have to wait for the backup to finish. That’s it, you’re done!
Tip 3-2. Back Up to the Cloud
Recommending a specific cloud backup service is tough. The features and prices for online backups are changing all the time. This is good because the features are increasing and the prices are decreasing. But trying to do a cost-benefit analysis when the costs and the benefits are in a constant state of flux is like trying to hit a moving target. I’ve done a good bit of research, and I believe that the best option currently available for the average user is Backblaze . It’s dead simple to use, and the company has an excellent reputation. For $60/year, you can back up unlimited files from a single computer. If you would like to back up multiple computers if for some reason Backblaze doesn’t work for you, I suggest using iDrive instead. However, I’m going to go with Backblaze for this tip.
Tip 3-2a. Windows 10
- 1.
Download the free trial of the personal backup software from Backblaze. Go to the following website and select “Personal Backup” at the top menu. Select the free trial option and create your account. Then download the installer.
- 2.
Run the installer. It may ask you if you want allow this app to make changes to your device—say yes. Then click “Install Now”.
It will go through a phase of “analyzing your drive” that may take a while. It’s figuring out what you have to back up; just wait for it to complete. Click “OK”.
- 3.
When done installing, it will automatically begin backing up all of your files. It’s that simple! If you open up the Backblaze app, you will see something like Figure 3-10.
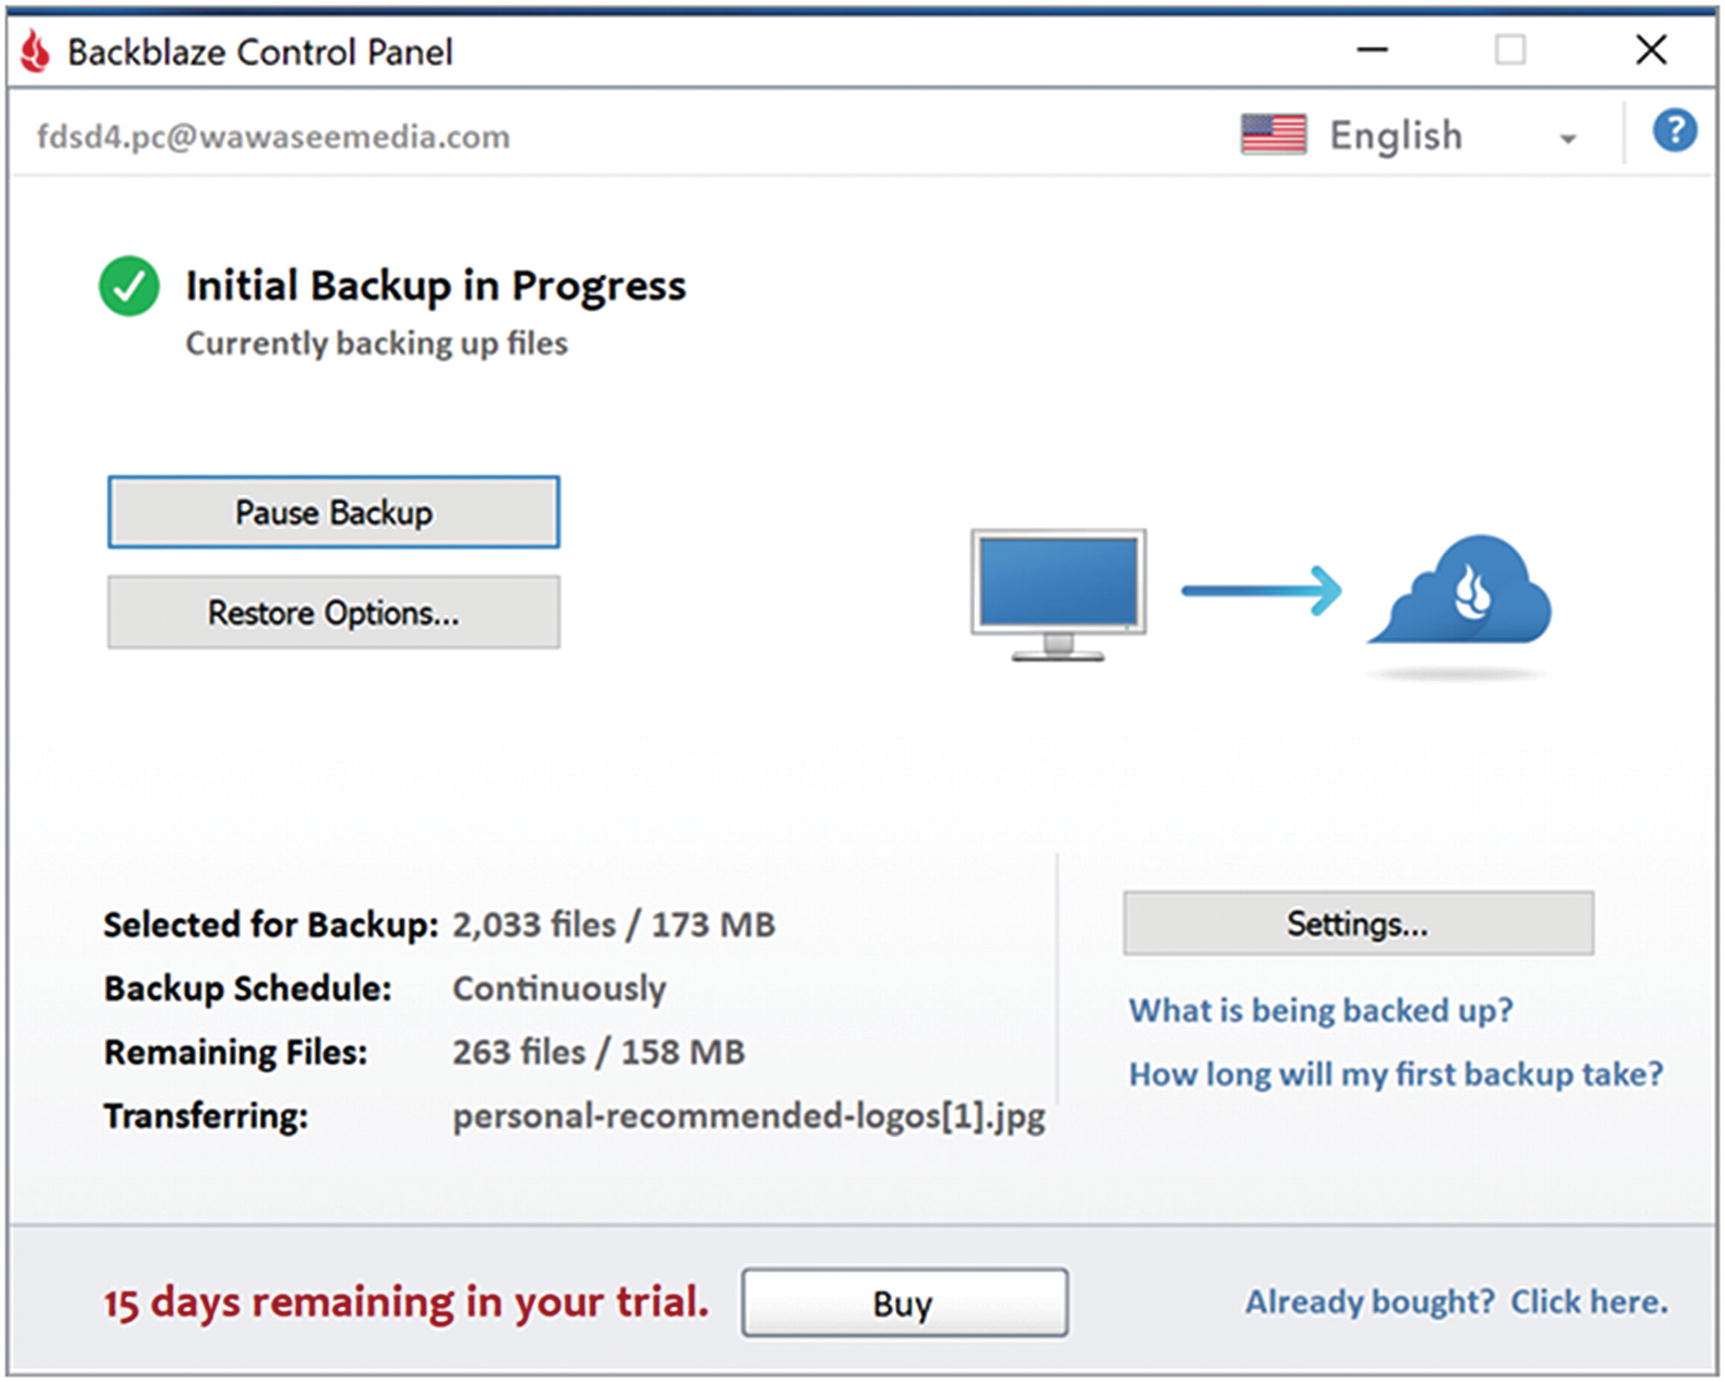
Windows 10 Backblaze Initial Backup in Progress dialog
- 4.
If you decide to stick with the service, you will eventually give them your credit card or other payment information. Shortly after clicking “create account,” you will receive an email with instructions.
- 5.
In most cases, you can simply accept the default settings, which will back up all the data for the current computer user (documents, photos, music, etc.). However, one option you might want to seriously consider is setting a private encryption key (on the Security tab in Settings). Even though your files will be encrypted in the cloud, Backblaze will have the key. If you’d like to make sure that even they cannot access your files, read Chapter 4 and then use your password manager to generate a killer password and store it safely—then enter it via the Settings page shown in Figure 3-11. You can return here after you’ve completed the steps in Chapter 4 .
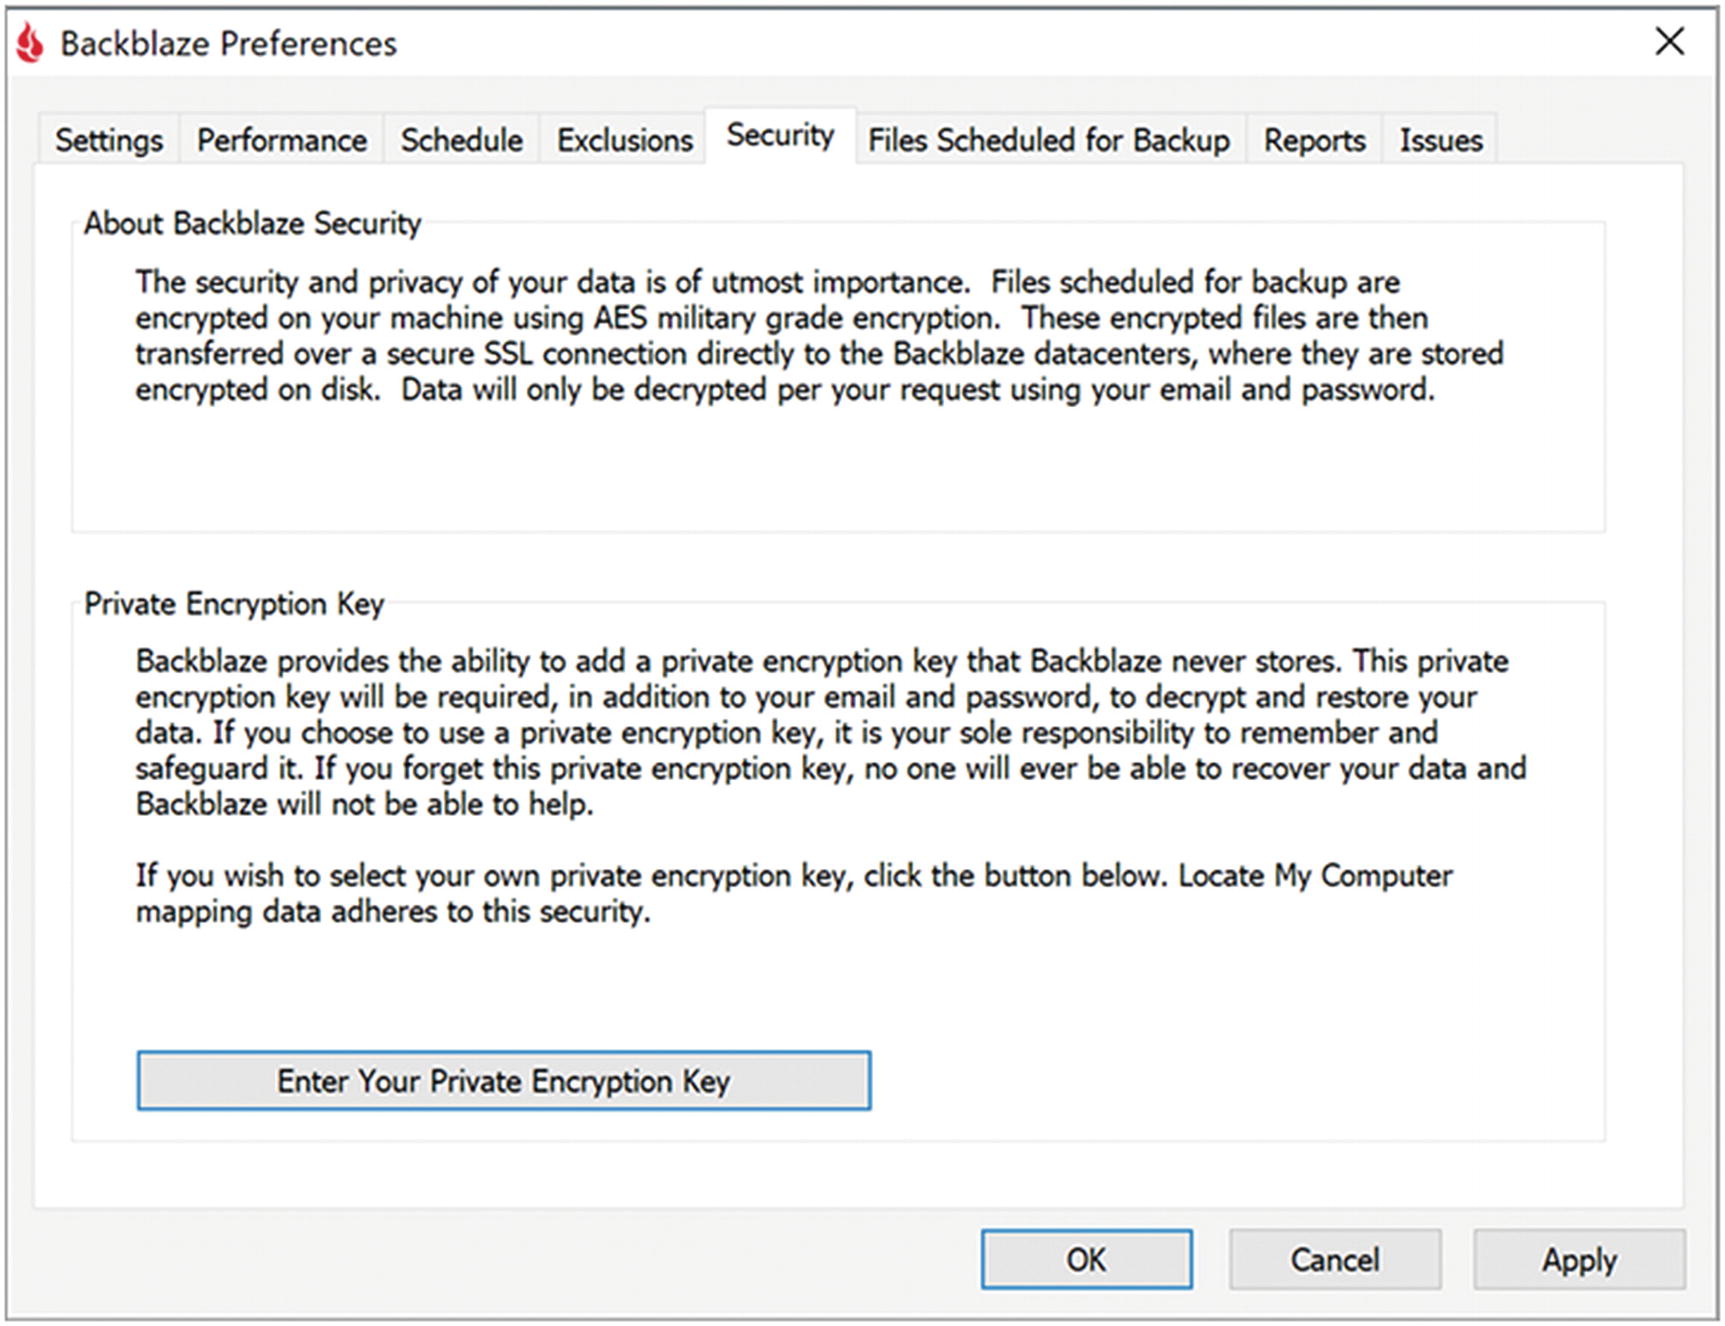
Windows 10 Backblaze Preferences dialog
Tip 3-2b. Mac OS
- 1.
Download the free trial of the personal backup software from Backblaze. Go to the following website and select “Personal Backup” at the top menu. Select the free trial option and create your account. Then download the installer.
- 2.
Run the installer. You may be prompted to allow the installer access to various folders—say yes. If prompted for an administrator password, go ahead and do this.
It may go through a phase of “analyzing your drive” that may take a while. It’s figuring out what you have to back up; just wait for it to complete. Click “OK”.
You may also see an interesting animated dialog like the one in Figure 3-12. This is a newer security feature of macOS, requiring that you give explicit access to certain things. This is a good thing, but it can be annoying. Follow the directions given: open System Preferences and then Security & Privacy. Unlock this panel by clicking the padlock at the lower left and enter your password. Then drag the Backblaze app into the “Files and Folders” tab, like it shows. Note that if you said yes to the dialogs, Backblaze should already be there.
- 3.
When done installing, it will automatically begin backing up all of your files. It’s that simple! If you open up the Backblaze app, you will see something like Figure 3-12.
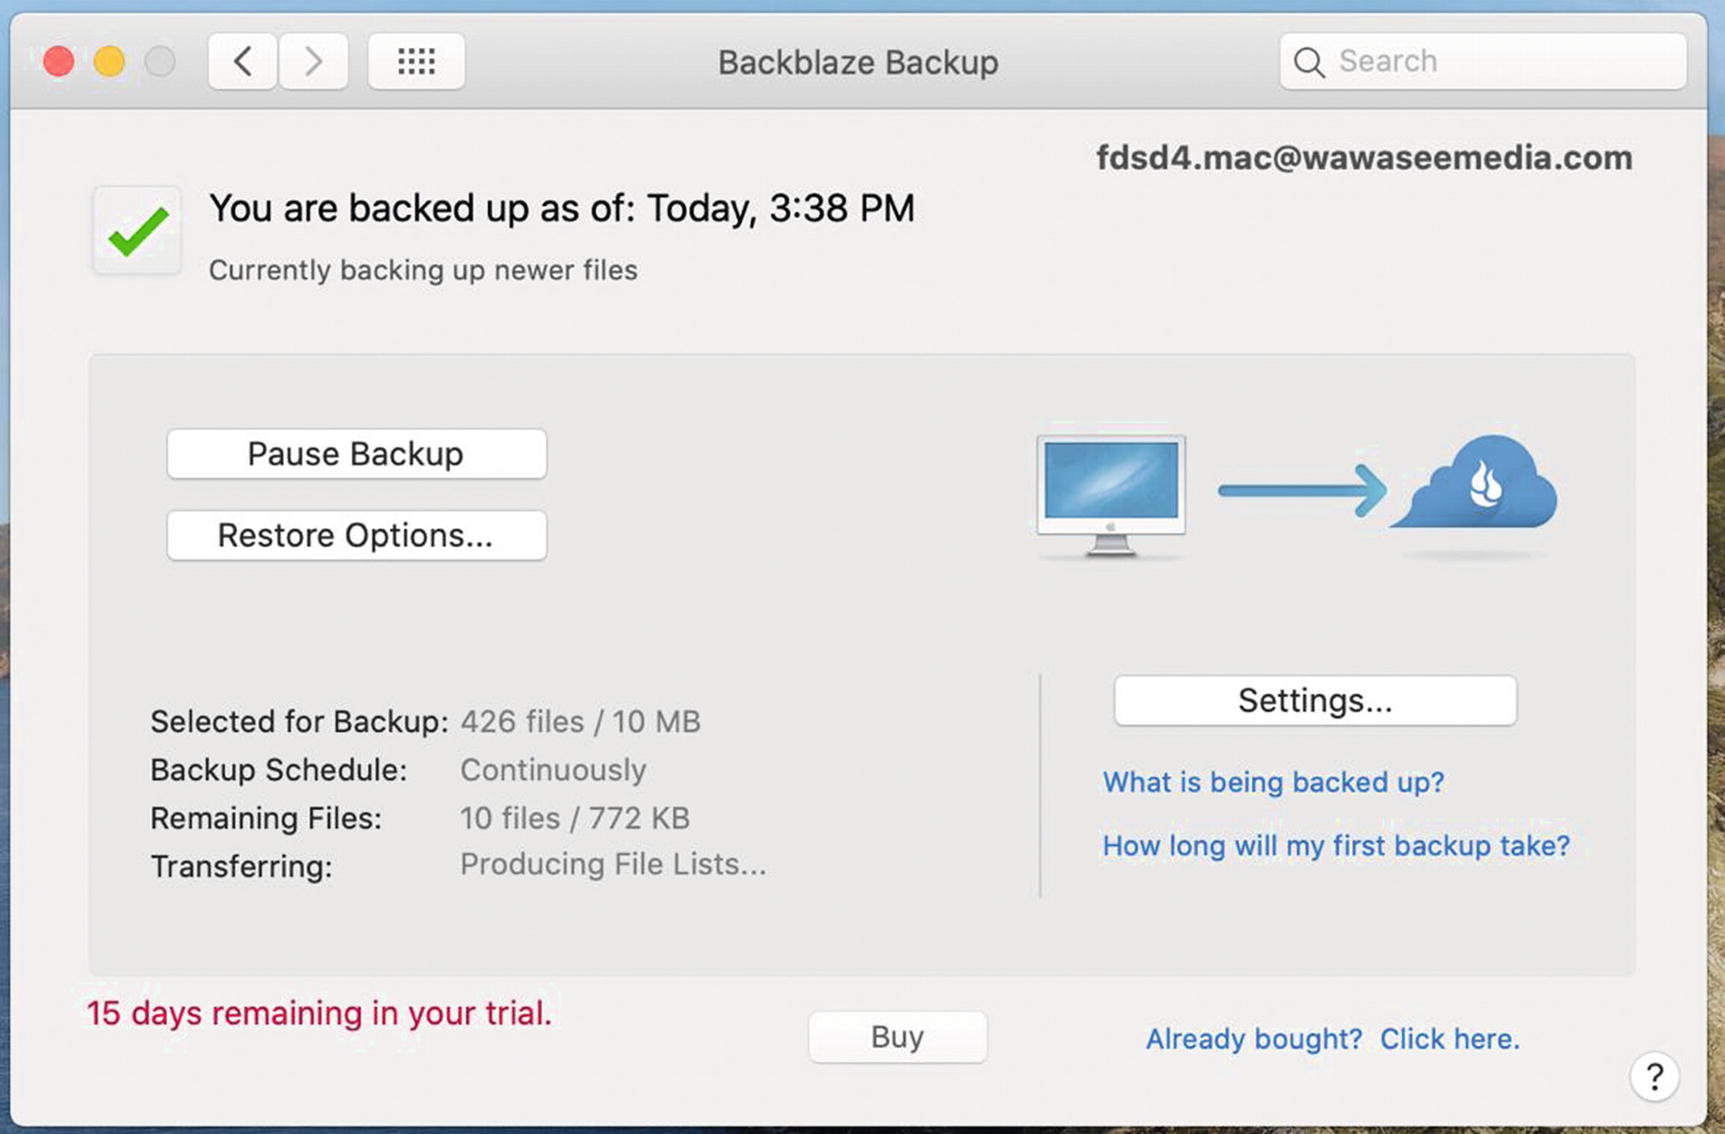
Backblaze Initial Backup in Progress dialog
- 4.
If you decide to stick with the service, you will eventually give them your credit card or other payment information. Shortly after clicking “create account,” you will receive an email with instructions.
- 5.
In most cases, you can simply accept the default settings, which will back up all the data for the current computer user (documents, photos, music, etc.). However, one option you might want to seriously consider is setting a private encryption key (on the Security tab in Settings). Even though your files will be encrypted in the cloud, Backblaze will have the key. If you’d like to make sure that even they cannot access your files, read Chapter 4 and then use your password manager to generate a killer password and store it safely—then enter it via the Settings page shown in Figure 3-13. You can return here after you’ve completed the steps in Chapter 4.
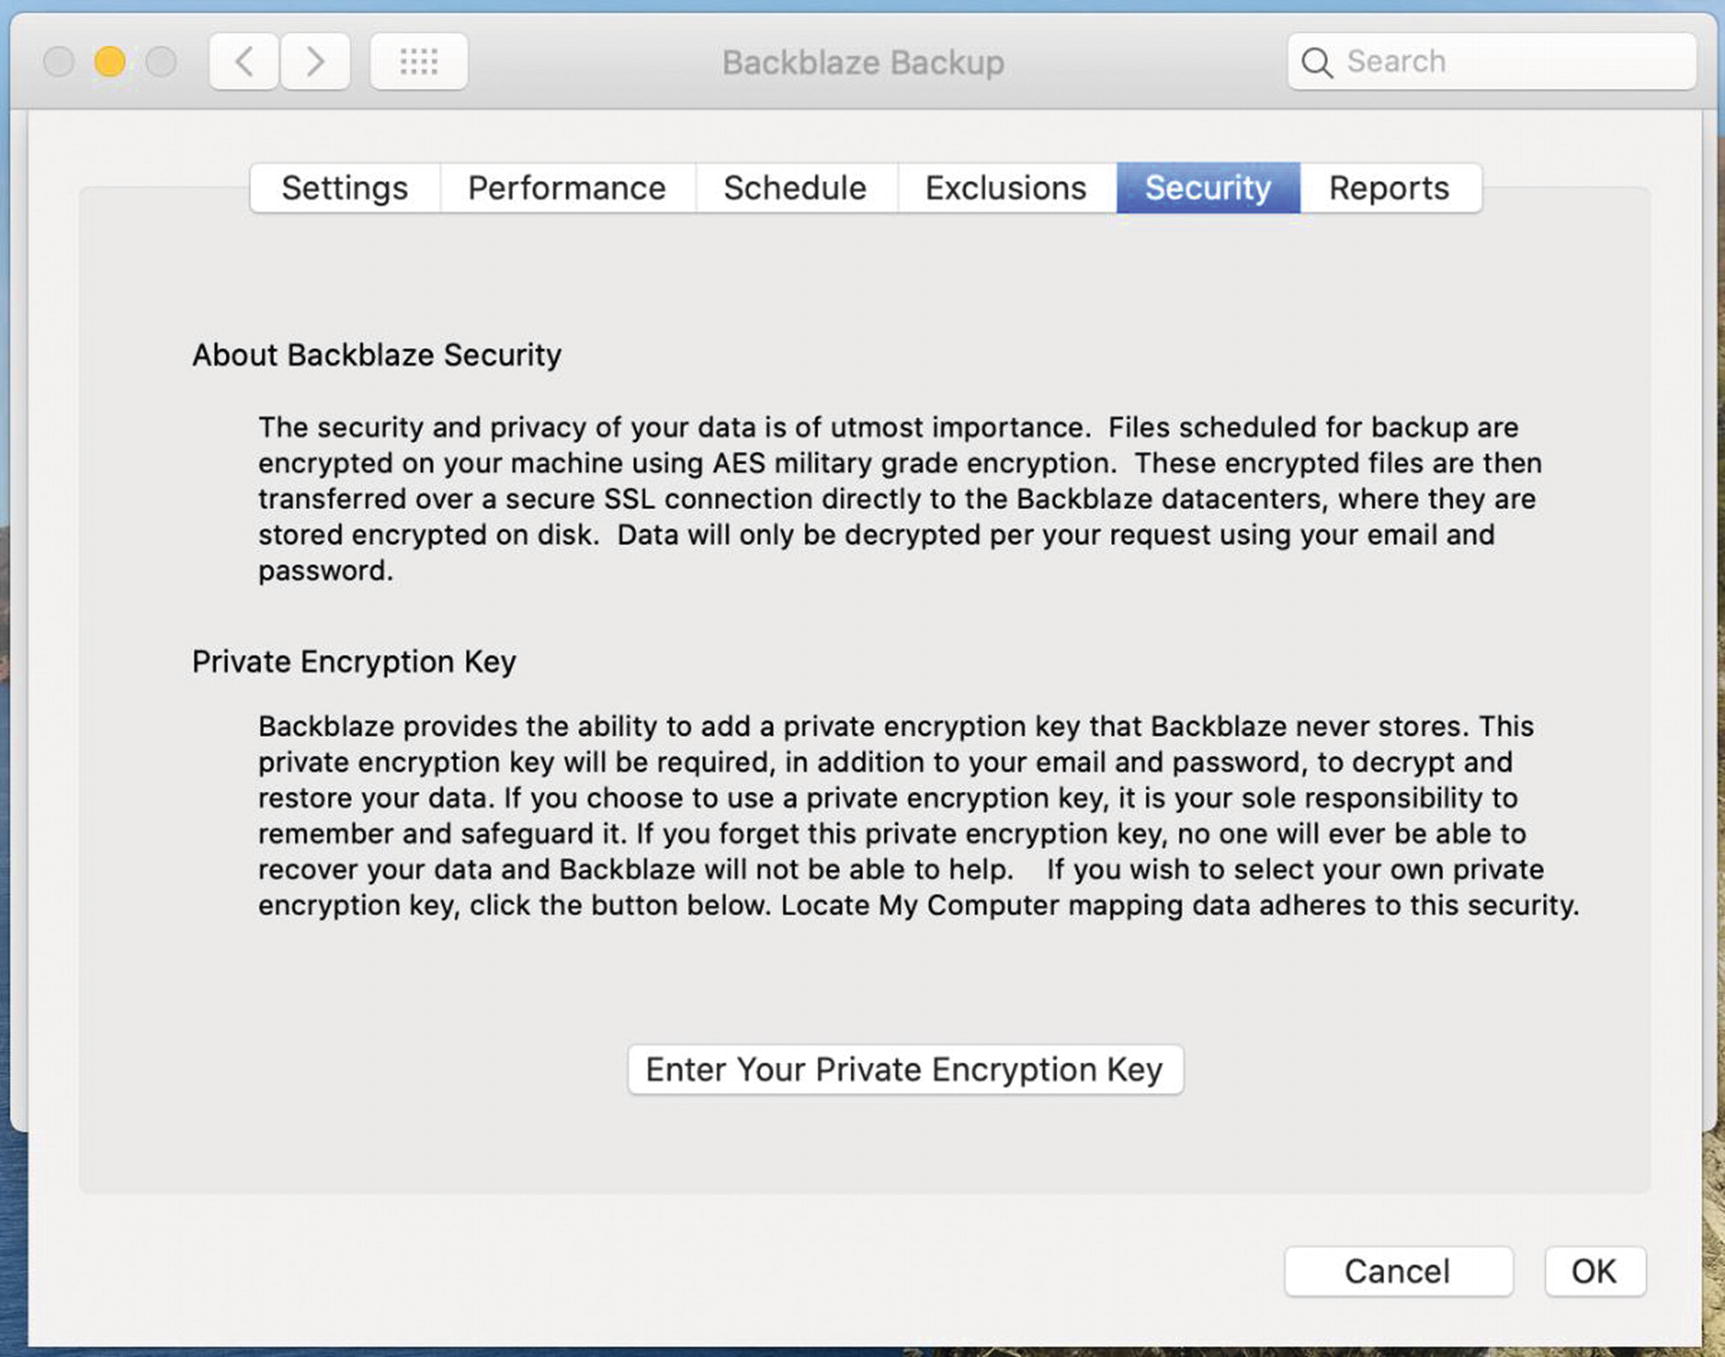
Backblaze Preferences dialog
Tip 3-3. Buy a UPS
If you have a desktop computer, you should seriously consider buying an uninterruptible power supply (UPS) . (Laptops have built-in batteries and do not need this.) Most UPSs are just big batteries that sit between your computer and the AC wall outlet. Some are big, heavy lead-acid batteries (like the one in your car), and some are smaller, lighter Li-Ion batteries (like in smartphones and laptops). When there’s a power spike, glitch, brownout, or complete outage, the device provides juice to your computer from the battery. Most UPSs have a separate data cable that allows it to talk to your computer so that if the power is out and the battery is running low, the UPS can tell your computer to shut down gracefully before power runs out. A UPS can be expensive, but suddenly cutting the power to a computer while it’s running can cause real harm, including corrupting data on the hard drive. Look for name brands like APC or CyberPower. Generally speaking, the more you spend, the bigger the battery—and the longer your computer can run without wall power. However, for most of the protection benefits, you just need one that will smooth out the power glitches and give your computer a chance to shut down gracefully. If possible, buy a UPS that has automatic voltage regulation (AVR) .
Tip 3-4. Clean Up Your Apps
The goal of this step is to remove software you’re not using. This includes utilities, games, and anything else you might have added over the years. I wouldn’t remove any applications that were preinstalled and were made by Microsoft or Apple3—I would focus on the ones that you (or someone) installed. If you are unsure of what a particular application is or what it does, use your web browser to search for more information. If you’re not sure about any specific piece of software, just leave it be.
Be sure to complete the previous step (backing up) before moving on to this one! And by “complete” I mean that a full backup has occurred. If you accidentally “clean up” something that you later realize you actually need, you can recover it from your backup. If necessary, skip ahead and come back to this step later.
Before uninstalling anything, exit all other applications. Some applications have strange interdependencies, and it’s best to quit everything while you’re uninstalling stuff. (If you’re reading the electronic/digital version of this book on your computer, you might want to print out these few pages or even take a picture of the text so you can quit your e-reader app, as well.) If you really want to be sure, you might restart your computer here and then quit any applications that automatically start.
Tip 3-4a. Microsoft Windows 10
- 1.
Open Settings. See the earlier “General” section for help with this.
- 2.
Select “Add or remove programs”. Search for remove to help find it (Figure 3-14).

Windows 10 Search for remove
- 3.
Scroll through the list of applications and uninstall any applications that you would like to remove. To remove a particular application, select it by clicking it with the mouse. This will give you the “Uninstall” option. Some applications will launch a special, custom uninstaller application. In this case, just follow the instructions to remove/delete the application (Figure 3-15).
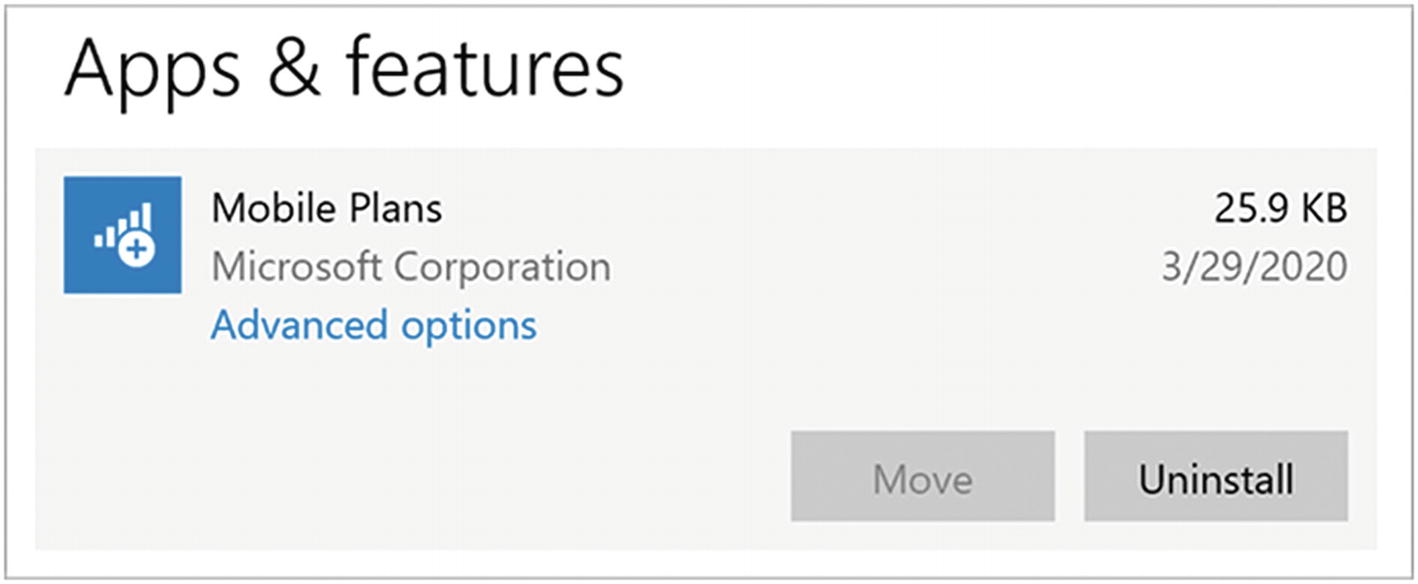
Windows 10 uninstall progress dialog
Tip 3-4b. Mac OS
- 1.
Download and install AppCleaner. You can find this application here:
- 2.
Drag and drop apps to delete them. Open the newly installed AppCleaner application. Then open your Mac’s Application folder and simply drag and drop every app you want to delete onto this window (Figure 3-16). It will not only delete the app itself but find all the little extra files that the app may have scattered around. When you drop the app, it will show you all the files that it found and will delete.
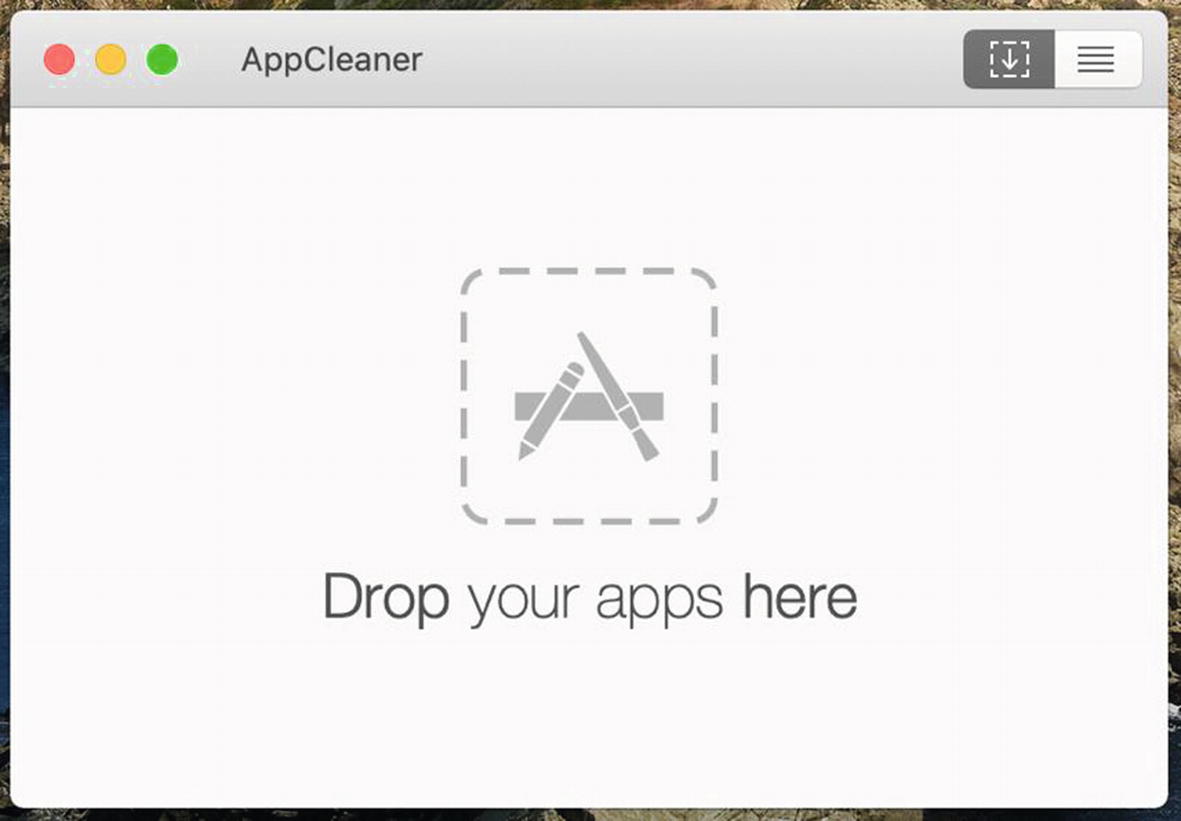
AppCleaner drag-and-drop dialog for removing applications
Update Everything
You should try to keep your operating system and key software applications as up to date as possible. Operating system updates in particular are important because they usually contain important bug fixes, including security fixes. The most popular applications and utilities are often the target of hackers, and therefore you should be sure to keep these applications up to date.
Many hackers will attempt to trick you into installing “updates” that are really just malware. If you get a pop-up message telling you to “click here” to update anything, just close the window without clicking anything. If you think it might have been legitimate, you can go to the proper website to download the update and install it manually.
This section will only cover updating your operating system software. Microsoft and Apple applications (like Office, Edge, Safari, Mail) will usually update on their own (using the settings in the following tip). Other applications will have a built-in “check for updates” menu option—you can try that for apps not made by Apple or Microsoft. If the application you want to update doesn’t appear to have this option, you may need to go to the software maker’s website and download the installer/updater directly. Note that you’re upgrading to a new major version of the software, you may have to pay for the upgrade.
Tip 3-5. Turn on Auto-Update for Your OS
Both Microsoft and Apple have mechanisms for automatically updating their operating systems. Apple and Microsoft also have methods for updating applications purchased through their official “app” stores. I strongly recommend you turn on all automatic updates, at least critical and security updates.
Tip 3-5a. Microsoft Windows 10
Windows 10 Home is automatically set to download and install Windows updates for you. I’m not usually in favor of your operating system taking choices away from you, but in this case, it’s the right move.

Windows 10 Windows Update dialog
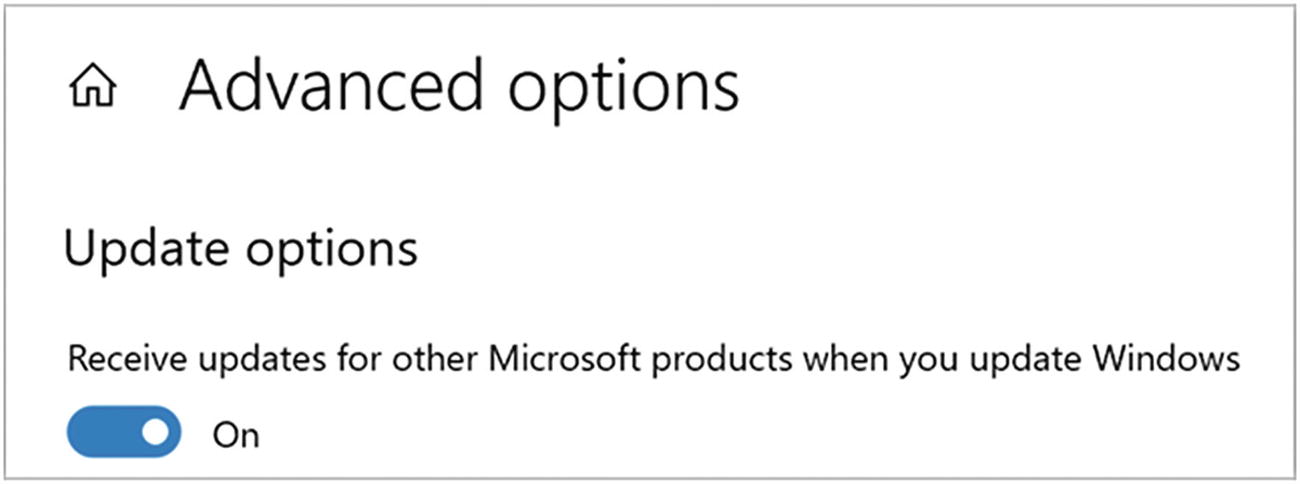
Advanced update options dialog
Tip 3-5b. Mac OS
- 1.
Open System Preferences. See the “General” section for help with this.
- 2.
Open Software Update panel (Figure 3-19). You can use the search bar to find it quickly by searching on “update”.
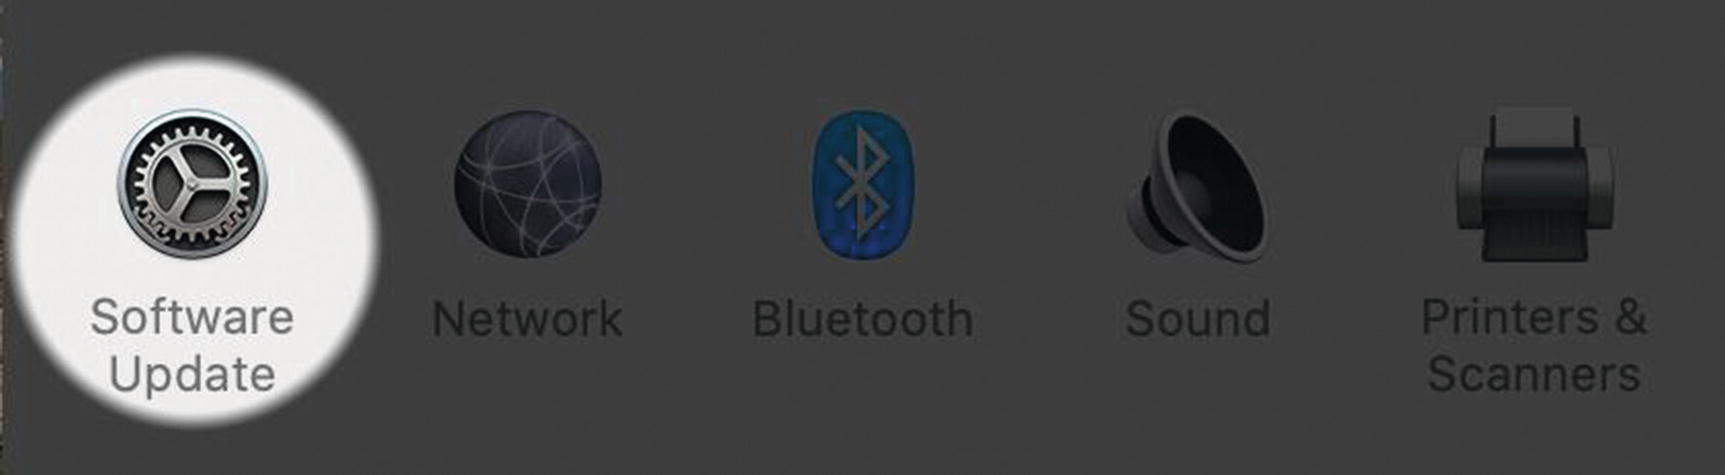
Mac Software Update in System Preferences
- 3.
Enable “Automatically keep my Mac up to date” (Figure 3-20).
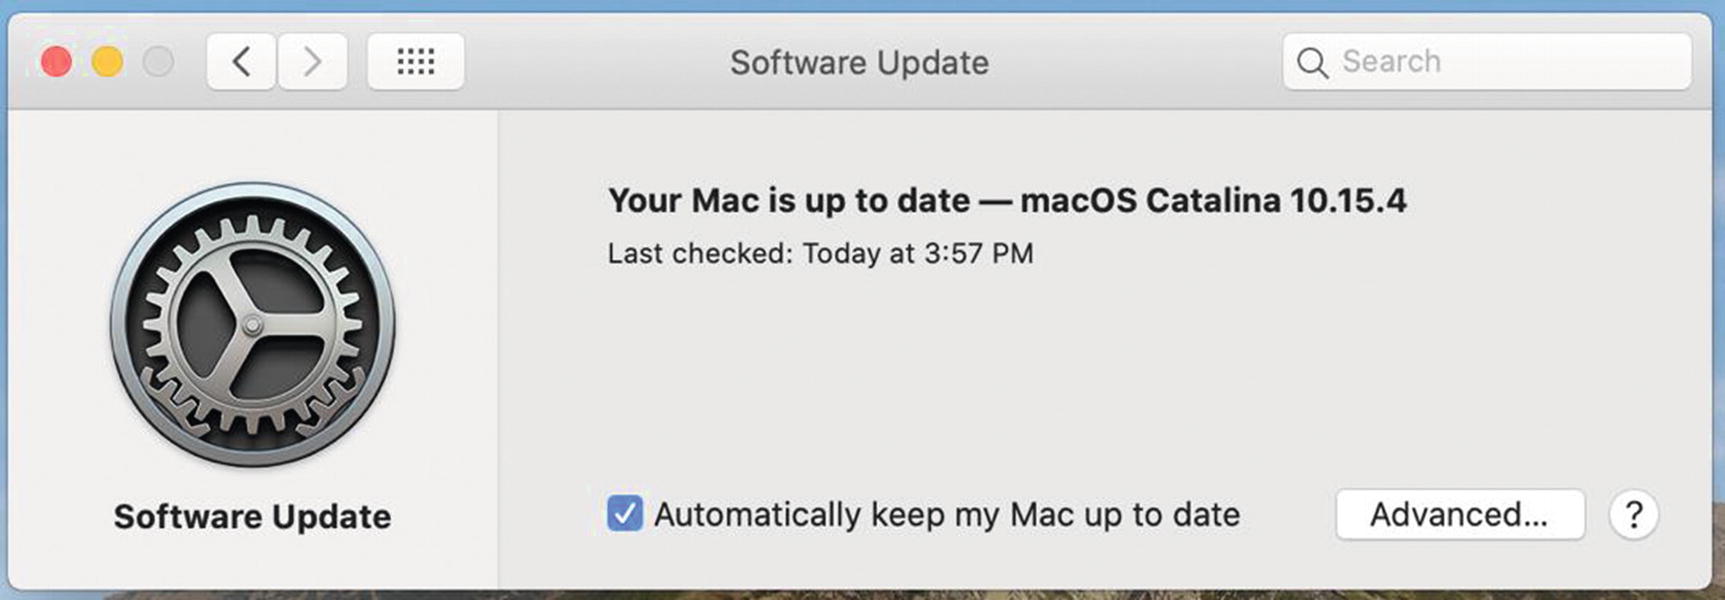
Mac Software Update in System Preferences
- 4.
If you’d like to have more fine-grained control, you can click the “Advanced…” button. From this window, I would check all the options (Figure 3-21).

Mac OS App Store automatic updates preferences dialog