We can’t go much further in this book without discussing passwords. I hate passwords. I hate them with a passion. And I know I’m not alone. But despite a lot of new-fangled technology, I’m here to tell you that they’re still your best option for authentication, particularly if you use them correctly. By the time you finish this chapter, you’ll know everything you need to know.
How Did We Get Here?
Passwords have become the bane of our modern computer existence. Just about every website we visit requires that we create an account to use any of its features. That means creating and remembering yet another password. To make it interesting, every website has a slightly different set of rules for its passwords. Your password has to be long, but not too long. You have to use upper and lower case and throw in a least one number. Most require you to use a “special character ,” but only certain ones. Some sites don’t let you use special characters at all. Some of them are even more restrictive. You can’t use any dictionary words. It can’t have repeated letters. It can’t contain your name or user ID or anything that looks like a date. In short, they all require that your password be very hard to guess and yet somehow also be something you can easily remember. And just to add insult to injury, some systems require that you change your password on a regular basis.
It would be bad enough if we had to do this only once, but in our modern online world, most of us have dozens if not hundreds of different websites that require us to log in. And so we all do the same thing: we come up with one or two favorite passwords that meet all the stupid rules, and we use them for everything. How else can we possibly remember them all? And yet, that’s precisely what you should not do. I’ll explain why in a bit.
So, how did we get into this horrid state of affairs? Why do we need all of these passwords? In some cases, it’s obvious—you don’t want just anyone to have access to things like your online bank accounts. Somehow you need to convince your bank’s website that you are who you say you are and prevent someone else from impersonating you. This process is called authentication . We use these credentials (username and password) to prove our identity. It’s not foolproof, of course—someone could steal or guess your password and then gain access to your account. It’s like the key to your house. Ideally, only you have the key that opens your front door, but if you lose your key or lend it to someone who secretly makes their own copy, then someone else can open the lock. It’s better than nothing, but it’s not perfect.
However, there are many websites that have nothing of yours that needs protecting, and yet they still require you to sign up for a “free” account, meaning you have to create a set of login credentials. Why is that? Because they want to track you and they want to be able to send you emails with advertisements. They may tell you it’s for your own benefit—allowing you to customize your settings, share things with your friends, save info for later, get customer support, and so on. But in the end, it’s probably about tracking what you do and building up a profile on you that they may use for themselves or sell to others or both.
There has to be a better way, though, right? Isn’t there something else besides passwords? Let’s look at this a bit because it’s good to understand how we got where we are.
Something you know (like a password or PIN)
Something you have (like a key, a badge, or your smartphone)
Something you are (like your fingerprint, your face, or your eye’s iris pattern)
Most people immediately think that the best method is “something you are.” You can’t forget it! You can’t lose it! However, biometrics have some serious drawbacks as a primary means of identification. For one thing, you can’t change something that you are. It’s really more of a username than a password: it uniquely identifies you. The assumption is that your fingerprint or face can’t be faked or copied, but that’s a bad assumption. In 2015, the US Office of Personnel Management (OPM) had 5.6 million digitized fingerprints stolen via computer hack. It’s not like those 5.6 million can change their fingerprints. They’re screwed for life. And on the other hand, what if you have a disfiguring accident?
But there’s actually a more important problem: you can’t hide or change who you are. There are many situations where you want to prove to the website that you are the same person who was here last time, but you don’t actually want them to know who you are specifically. That is, you want anonymity. That’s not possible with biometrics, but there are many valid reasons to be authenticated without being personally identified.
What about “something you have”? The problem with this solution is that, until recently, it was not common for computers to have any sort of mechanism for detecting and identifying something you have in your possession. Computers of old were pretty much guaranteed to have one form of user input: a keyboard. Whatever technique they came up with had to be something that every computer could do, which is why they settled on a secret string of characters (i.e., a password).
Nowadays, computers have many other sources of input, which opens more options in the “something you have” category. Using Bluetooth wireless technology, we can program our smartphones and smartwatches to automatically unlock our computers when we’re close enough. Technically, though, you have to first authenticate yourself to these devices (enter a passcode or PIN—something you know) before they can be used to transitively vouch for your identity.
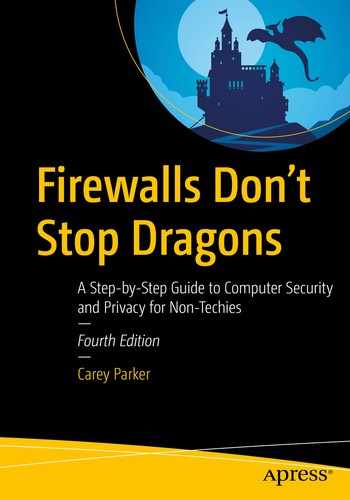
A sample FIDO hardware key (YubiKey)
The technology behind this is called Fast Identity Online (FIDO). How it works is very technical, but let me use a grossly oversimplified analogy to explain how it works at a high level.
First, I create a totally unique question that has two important properties. First, no one else could possibly answer correctly but myself—only I know the answer and it can’t be figured out independently. Second, if you ask me the question and I give you the answer, you can then verify that the answer is correct. Basically, it’s an answer that no one can guess, but once you hear it, you know it’s correct. I write down this question and give it to you (the question itself is not secret). But I also give you the answer, locked in a box using a super secret key that I keep well guarded. In the future, I meet you again and I want to prove to you that I’m the same person you met before and not an imposter. You ask me the question and give me the locked box. I unlock the box and read you the answer. Now, because (a) I was capable of unlocking the box and (b) I gave you the correct answer, you believe that I am the same person who gave you that box in the first place. I am now authenticated!
Why bother locking the answer in a box and giving it to the other person to keep? Because FIDO devices don’t have much digital memory space. They can’t physically hold all the answers for every site.
This standard is being used by some large companies and people who are big hacking targets (CEOs, politicians, etc.), but the hope is that it will catch on for everyday users. The standard recently got a big boost when Apple joined the FIDO Alliance board. You can use this hardware key technology today. You can buy them from YubiKey and Google (Titan). But now you have to have this hardware key with you whenever you need to log in to a website, and you can’t ever lose it. For the average person, I think this is too restrictive and cumbersome.
There is another interesting technology called Secure, Quick, Reliable Login, or SQRL1 (pronounced “squirrel”). It works similarly to FIDO, with a couple key differences. First, it runs as a software app on your computer and/or smartphone, not a physical hardware key. This allows it to be run on and synchronized to multiple devices simultaneously. SQRL also has a way to revoke your identity in case you lose control of one of your devices.
Second, SQRL doesn’t require the website to remember anything (no locked boxes containing answers). SQRL generates its answers based on a combination of secret key and the name of the website. This means that your password can’t be stolen by hackers if (when) the website has a data breach. (However, anything else the website may store for you, like credit card numbers, still could be stolen.)
SQRL was created originally by a single guy (Steve Gibson) and has recently been finalized with the help of several devotees. It will be free and open, though it remains to be seen if it will be adopted (and perhaps folded into the FIDO standard).
It may be that someday soon a technology like these will be simple and convenient enough for the masses. But until then, the plain old password is still, sadly, our best option.
Understanding Password Strength
So, if we’re stuck with passwords as our primary form of authentication, then we need to understand what constitutes a “good” password. To truly understand this, first we need to understand how the bad guys try to guess our passwords and hack into our accounts. There are two key scenarios to consider: I will call them online attacks and offline attacks . I think when most people consider the threats to their accounts, they think of online attacks: a live human being sitting at a computer somewhere trying to log into your bank account. They try to guess your password over and over till they either get in or give up. That’s actually not very common, but let’s discuss it because it does happen. In this case, a human has somehow picked you out of the billions of people out there and decided they want to hack your account. So, they figure out or guess where you do your banking (there aren’t that many big banks), guess your user ID (maybe it’s just your email address), and then slowly and methodically try to guess your password. If they know you (or maybe if they’ve found your Facebook page), they can make some educated guesses: your pet’s name, your kid’s name or grandkid’s name, your address, your anniversary, your alma mater, your favorite sports team, and others. While this is a real risk, it’s actually a small one (statistically), and I think most of us realize this. What are the chances that someone is going to target little old me? Unless you’re rich or famous (or you ticked off a hacker), there’s really not much of a reason for someone to attack you, specifically. This sort of attack is also just not that efficient—it’s hard to pull off.
The more common threat for John Q. Public is the offline attack. We’ve all seen the news stories about companies having their servers hacked and then asking all their customers to reset their passwords. In these situations, hackers break into the computer systems of a large company, and they steal their customers’ information. This often includes names, addresses, phone numbers, credit card numbers, and passwords. The passwords are almost always scrambled, but unfortunately it’s not always done properly. So at this point, the bad guys have this juicy vault full of information in their possession, and they have all the time in the world to try to crack it open. That is, they have copied thousands or millions of encrypted passwords to their local computer and can now try to crack them all.
Let’s compare this to the previous case. In the online attack, a human (or perhaps a computer) is trying to log into a single person’s online account by guessing individual passwords. The website input form is slow, so you can’t roll through a long list of different passwords quickly. And if the website is secure, they will cut you off after you fail too many times anyway. But in an offline attack, the bad guys have a massive collection of scrambled passwords in their hot little hands, and they can just crank up a computer to guess billions of passwords per second until they start finding matches.
Most Used Passwords from 2019’s Hacked Passwords
Rank | Password |
|---|---|
1 | 123456 |
2 | 123456789 |
3 | qwerty |
4 | password |
5 | 1234567 |
6 | 12345678 |
7 | 12345 |
8 | iloveyou |
9 | 111111 |
10 | 123123 |
11 | abc123 |
12 | qwerty123 |
13 | 1q2w3e4r |
14 | admin |
15 | qwertyuiop |
16 | 654321 |
17 | 555555 |
18 | lovely |
19 | 7777777 |
20 | welcome |
21 | 888888 |
22 | princess |
23 | dragon |
24 | password1 |
25 | 123qwe |
So, the bad guys aren’t starting from scratch. They know human nature, and they know that most people will choose something they can remember, probably something pronounceable. That significantly reduces the number of guesses they have to make. The scrambling process for the passwords they’ve stolen is not directly reversible, but the scrambling process (known as hashing ) is well known and repeatable—so all they need to do is take a guess, scramble it the same way the passwords were scrambled, and see whether it matches one of the stolen scrambled passwords.
7c4a8d09ca3762af61e59520943dc26494f8941b
So if I find “7c4a8d09ca3762af61e59520943dc26494f8941b” somewhere in my stolen list of scrambled passwords, then I know the password for that account is 123456. (There are techniques that make it harder to do this, but sadly they’re not used as much as they should be.)
The first passwords the bad guys try are the popular ones, based on much larger lists like the one in Table 4-1. In fact, this list is so useful that hackers usually have all the scrambled versions of these passwords precalculated to save time. If these don’t work, they have also precalculated the scrambled versions of most dictionary words, common names, phrases from pop culture, sports teams, and so on. They try them all forward and backward. They replace some letters with numbers or symbols (zero for O, @ for a, etc.). Believe it or not, this process is usually enough to guess most of the stolen, scrambled passwords.
But surely this must take a lot of time, you say. It doesn’t. Computers can crank out these guesses and compare them to every stolen password millions or even billions of times per second. Using common guessing techniques like this, hackers can usually recover most of the stolen passwords in a matter of hours. This is why companies that have been hacked will often immediately lock all their user accounts and force everyone to reset their password.
That would seem to be pretty effective, right? If we just invalidate all the stolen passwords, then this must stop the hackers dead in their tracks. What’s the point of guessing these passwords if they’re almost immediately reset? The problem is that people tend to reuse their passwords. If you used “CowboyUp!” as your password for one website, the bad guys know that it’s very likely that you used that same password for some of your other online accounts. While hacked-site.com has invalidated that password on their system, what about other-site.com and still-another-site.com where you used that same password? This hacking method has become so common that it’s been completely automated. The bad guys have computers trying these cracked passwords on dozens or even hundreds of high-value websites. They call it credential stuffing .
This is why it’s crucially important that you use a strong, unique password for each and every online account you have, at least the ones that are important. Important ones would be your financial accounts, any website that has your credit card or medical information, your social media accounts, and your email accounts. You might not think your Facebook and Gmail accounts are that important, but they can be used to impersonate you, luring people you know into clicking links or giving up information that will get them in trouble. Also, when you forget your password, many websites use your email account to send you a link to reset your password. If a bad guy can get to your email account, they can log into your banking site and request a password reset—and then intercept the password reset email and set the password to whatever they want. Worse yet, they can change your email password and lock you out, preventing you from fixing the problem. It’s very hard to convince your email provider that you are the true owner of your account when you can’t even log in. (And good luck getting them on the phone.)
Now we come to the crux of the chapter: what makes a strong password? When choosing a new password, many websites will tell you to include numbers, uppercase and lowercase characters, and “special characters ,” like punctuation marks. They will often have a little password strength indicator that will indicate, as you type, how strong your password is. These “strength meters” are handy, but they’re often too simplistic and may give you a false sense of security. So I want to educate you on what truly makes a strong password. We’re going to get into a little math here, but don’t be afraid… I’ve got you covered.
Let’s start with a simple case: a personal identification number (PIN). These are most often used with ATM and debit cards, but we also use them on our phones and tablets. They’re often only four digits long—some sequence of numbers from 0000 to 9999. Each character in this PIN has ten possible values: 0 through 9. If you take all possible combinations of four digits, that’s 10,000 total possible values. To get that value (10,000), you take the number of possible choices for each digit (in this case ten) and multiply by itself for each digit in the PIN (four). That’s 10 times 10 times 10 times 10, or 10,000. This is the same as 10 to the 4th power. (I know, your eyes are starting to glaze over and you’re having horrible flashbacks to middle school math… just bear with me a bit longer; I promise you won’t actually have to think this stuff through.)
Ten thousand possibilities may seem like a lot, but a computer can crank through those values in a fraction of a second. However, PINs are almost always used in cases that require human input, and that’s why they’re good enough. That is, trying to guess a PIN would be an example of an “online” attack—the hacker would have to be there, in person, entering all of these guesses into the ATM by hand. (The attacker would need to steal or somehow copy your card, as well.) Finally, most systems will lock the user out (and probably keep the card) if there are too many wrong guesses. For these reasons, PINs are usually good enough for these in-person situations.
Now let’s consider the case of passwords. Remember that the worst-case scenario for guessing passwords is an offline attack where the bad guys can just sic a computer on the problem and walk away. Assuming we avoid the common passwords as we discussed earlier and choose a truly random password, then the attackers have no choice but to just try to guess all the possible passwords, that is, start with a, then b… eventually aa and ab and bb, and so on, and on, and on. This is known as a brute-force attack and is limited only by the speed of the computer and the complexity of the password. This is enormously more difficult to do, as long as the password is sufficiently long and random. In fact, for all practical purposes, if you choose a strong password, then it’s effectively unbreakable.
To understand this, we have to use the same mathematical approach we used earlier on PINs to judge the strength of a password. First, we’re adding more possible values for each character—not just numbers but letters and other keyboard characters. There are 10 numbers and 26 letters in the English alphabet. Each letter can be uppercase or lowercase. If you’re keeping count, we’re now at 62 possible values (10 letters + 26 lowercase letters + 26 uppercase letters). Let’s stop right there and check our math. If we have an 8-character password that is only made up of letters and numbers, that means we have 628 (62 to the 8th power) possible values.
628 = 221,919,451,578,090
That’s more than 200 trillion! Wow, surely that’s good enough, right?
Not really. A fast computer performing an offline attack could conceivably guess 100 billion passwords per second, meaning that it could try all 221 trillion values in just under 37 minutes. That’s not really good enough, especially when you have to assume that the supercomputers at the NSA are probably at least 1000 times faster (100 trillion guesses per second). Such a computer could chew through all those possible values in just 2.21 seconds. In the age of government surveillance, we need to consider the worst case—and we need better passwords.
Estimated Brute-Force Time to Crack Passwords by Length
Password Length | Computer Time | Supercomputer Time |
|---|---|---|
8 | 18.62 hours | 1.12 minutes |
9 | 2.43 months | 1.77 hours |
10 | 19.24 years | 1.00 weeks |
11 | 18.28 centuries | 1.83 years |
12 | 1074 centuries | 1.74 centuries |
You can see from Table 4-2 that at ten characters, we’ve pretty much gone beyond what regular hackers might be able to guess in a reasonable amount of time. But we need to use at least 12 characters to really feel good about protecting ourselves from the big boys! Remember that computers are doubling in computing power about every 18 months and realize that you might want to protect certain things at least until you’re dead.
So, how can we possibly come up with dozens if not hundreds of unique, strong passwords and expect to remember them? The obvious answer is: you can’t. And that’s why you need a password manager.
Managing Your Passwords
The bottom line is that you should not know any of your passwords. Any password you can readily remember will have some sort of inherent pattern, and the bad guys have gotten really, really good at predicting those patterns. The human brain is just not up to this task. The only possible way to create an unguessable, unique password for every online account you have—and be able to instantly recall them all—is to use a password manager.
What is a password manager? A password manager is a software application or web browser plugin that helps you generate crazy, long, and truly random passwords and then remembers them all for you. A good password manager will automatically fill in these passwords for you on websites that require a login and even synchronize your “password vault” across multiple computers and devices so you can access them anywhere.
Now, if I’ve done my job here, there should be all sorts of sirens going off in your head. If you’re properly paranoid, you must be screaming right now: “Why on Earth would I trust all of my passwords to some unknown third party? What if they get hacked? All my eggs are in one digital basket!” And guess what… you’re absolutely correct. However, I’m here to tell you that it’s still the best option available to you. The pros far outweigh the cons; the benefits trump the risks. Think of putting all your valuables in a big safe. Yes, all the goodies are in one box…but that one box is really, really strong. People who make these vaults are experts in making them secure; it’s what they do, and they wouldn’t be in business very long if they didn’t do it well.
Password managers are built for the express purpose of being secure. Password managers will encrypt all of your precious data on your local machine, using a master key or password that you provide. The password manager company will have no way to access your passwords, and neither would a hacker that got hold of your password vault. That’s the whole point, really. You open your vault with one master password that only you know, and then you put all your other passwords and sensitive information inside this vault and lock it. The locked (encrypted) vault can be safely sent between your devices and even stored on the password manager’s company servers. Yes, it’s scary—and you should be nervous about trusting any third party with all your passwords. But in reality, they don’t have your passwords; they have a blob of scrambled data that is completely inscrutable to them or to any hacker that manages to steal it.
As a side note, many cloud storage companies will tell you that they lock up your data with “military-grade” encryption. That may well be true, but the real question is: who holds the keys? Here’s a little test for whether you can trust a third party with your sensitive encrypted data. Call up their technical support staff and ask them what they can do to recover your data if you forget your password. The answer better be “nothing.” If they have any way to get to your encrypted data back for you, then they can get at your data any time they want because you don’t have the real master key—they do.
Dropbox is a good example of this. If you haven’t heard of Dropbox, it’s a cloud storage provider that allows you to synchronize files and folders across multiple computers through the Internet. If you place a file in your Dropbox folder at home, it will magically appear in your Dropbox folder on your work computer—and vice versa. It’s sort of like having a magic folder that can be seen by any computer where you’ve installed Dropbox. It’s an extremely useful tool if you want to share files between multiple computers and devices. I have no doubt that they use heavy-duty encryption on the copies of your files that they store on their servers, but they also have full access to those files. That is, they can decrypt them whenever they want. They need to be able to decrypt them in order to provide many of the services they offer, such as letting you log in to a web page where you can see the file names and search the content of the files. If the feds come knocking with a search warrant, Dropbox can give them full access—even though they are locked with “military-grade encryption.” If you’re not worried about that, then also realize that at least some employees of Dropbox can also rifle through your data, if they want to. This is true of most popular cloud storage services, including Apple’s iCloud. (We’ll talk about ways to work around this later.)
A password manager can also hold other sorts of sensitive information for you: credit card and bank account info, PINs, medical and healthcare data, Wi-Fi passwords, driver’s license number, passport info, lock combinations, Social Security numbers, and any other secrets you may want to store in a safe place. Where do you store this info now? Slips of paper in your wallet? Notes in your address book? Sticky notes on your computer monitor? This information is much safer in a secure digital vault, and as an added bonus, your passwords will be accessible anywhere you have a computer or a smartphone (even without an Internet connection).
Some password managers will allow you to securely share specific bits of information with friends and family, as well. It’s even possible to allow them to log in to one of your online accounts (i.e., use your password) without actually letting them see your password! When hooked up to your web browser, you can use password managers to automatically fill in credit card and address forms, saving you the hassle. Once you’ve installed a password manager, you’ll be amazed at all the things it can do for you, and you’ll wish you had done it sooner.
You might know that most web browsers will also offer to store your passwords for you and automatically fill them in. Some will even sync them across computers for you. But I strongly recommend that you do not use these built-in services—use a separate password manager and turn this feature off in your web browser. We’ll talk more about that later.
Spoiler alert: when we get to safe web surfing later in the book, we’ll learn about how the bad guys often try to trick you with fake websites. Another major plus for using a password manager is that they aren’t fooled by look-alike web addresses!
Choosing a Master Password
While a password manager can be used to remember all your website passwords and other secret info, you will still need to memorize at least one password: the master password for your password vault. So now we’re back to the drawing board, right? You still have to find some way to come up with a really tricky password that you can easily remember but the bad guys can’t guess. However, you only need to remember one such password, not hundreds.
There are various techniques for generating a really good password that you can still remember easily. I’m going to discuss some options here to get you started, but you should then come up with your own personal technique. It can be a combination of these ideas, or something you come up with on your own that’s similar. The key is to find a string of letters, numbers, and special characters that do not have any obvious patterns, like words in the English dictionary, dates, ZIP codes, phone numbers, names, and so on.
A popular method for coming up with a strong password is to think of a phrase from a movie, poem, song lyric, or book—a phrase that you can easily memorize, perhaps one you already know by heart. It shouldn’t be a phrase that people would associate with you, though, because you don’t want anyone to be able to guess it. Then take the first letter of every word in that phrase to create your password. Include things like punctuation that exists in the phrase—capitalization, commas, question marks, and exclamation points. Change some letters to numbers or symbols, too—like 3 instead of E, $ instead of S, and so on.
There’s a lady who’s sure all that glitters is gold.
Talwsatgig.
T@lw$@tg1g.
I changed a to @, changed s to $, and changed i to 1 (one). Now, you don’t have to do all of these changes, you might just do some of them. The key is that you must remember which changes you made.
T's@lw's$@tg1g.
T@lw$@tg1g.;;;
That’s a 14-character password that includes uppercase and lowercase letters, numbers, and symbols. That’s plenty strong enough for our purposes. The semicolon trick may seem trivial—it may even seem wrong. It’s a repeated character! Isn’t that a no-no for passwords? Yes, usually, but in this case you’re adding them to an already strong password. You just made the password three characters longer with almost zero effort. This is the concept of password haystacks , which I referenced in the previous section. If a bad guy is trying to guess your password and can’t figure it out using the standard English dictionary–type attacks, then they will have no choice but to brute force it (i.e., try every possible combination of letters, numbers, and symbols). And at that point, every character you add multiplies the guessing effort by almost 100. Adding three semicolons to your already-hard-to-guess password just made it almost a million times harder to guess!
Now you need to come up with your own technique. Maybe you put your three extra characters at the beginning. Maybe you put a period between every letter. Maybe you repeat every punctuation character twice. But just make sure that whatever you come up with is something you’ll remember, something that “makes sense” to you.
Doing the Two-Step
Earlier in this chapter, we talked about the various factors we use to prove our identities: something we know, something we have, or something we are.4 When you require more than one of these, we call it multifactor authentication . In the case where two factors are required, we call it two-factor authentication . Many websites now offer a two-factor authentication option, which is a fantastic way to increase security with only a little extra effort. The primary factor is your password (something you know); the second factor is something you have (usually your smartphone).
Let’s look at a couple of examples to see how it works. Google offers various ways to add a second authentication factor to your Gmail account. This second factor can be required all the time or, more commonly, only for “untrusted” computers and devices. That is, the first time you try to log in from a device that Google doesn’t recognize, Google will require that you use a second factor to prove you are really you. At that point, you can decide to tell Google that this device is trusted, and whenever you log in from this device in the future, you can skip the second factor. But if you were logging in from a public computer, say at a library or a cybercafe, you would not “bless” this device, leaving it as untrusted.
One method for doing two-factor authentication is to send a text message to a cell phone that you registered with the website. After registering your cell phone, the website will send you a text message with a one-time PIN code that you will have to enter in addition to giving your regular login credentials. This PIN code usually expires after a short amount of time (probably minutes).
A much better method, which is very cool, uses a special smartphone authenticator app such as Google Authenticator (though I will recommend a better one in the checklist Tips). This authenticator app, once properly registered and synchronized with the website, will generate a six-digit PIN that you will need to enter along with your regular credentials. The PIN code will change every 30 seconds or so. When you registered your app with the website, you synchronized an algorithm for generating PIN codes based on time. So the website and your authenticator app will generate the same PIN code at the same time. Each website registration is unique and therefore each website has its own PIN code. The authenticator app will have a list of all your registered websites and their current PIN codes.
The key thing to realize about two-factor authentication is that now the bad guys have to beat you two ways in order to crack your accounts. Even if they somehow manage to guess or hack your password, now they also need to have your cell phone. That makes their job a hell of a lot harder. Also, if you have an account that is protected with two-factor authentication and that company’s servers are hacked, you don’t have to rush to change your password.
Note that there have been several successful attacks against the texting services. It’s not easy, but it’s possible. A technique involves a person convincing your cellular provider that they are you and claiming they’ve lost their phone. They convince your provider to give them a new phone with a copy of your SIM card. And now the cloned phone is getting all your calls and text messages. This is called SIM jacking . Another technique is to hack the cellular communication network itself, which isn’t as hard as it should be. So…if you have the choice, you should always go for the time-based PIN (authenticator app) over text/SMS.
Periodically Changing Passwords
If you’ve ever worked at a large company with an information technology (IT) department, then you’ve probably had to have a password to log in to your work computer. Furthermore, you’ve probably also been required to change that password every three to six months.5 You can’t reuse old passwords, and sometimes they even check to see that your new password is sufficiently different from your previous one.
You’re probably wondering (a) why they do this and (b) whether you should do the same thing yourself for your personal passwords. For companies, the real issue is not preventing employees from getting access to sensitive information; it’s to prevent nonemployees from getting in—not just hackers but previous employees. Companies will also compartmentalize information so that some people can access things and others can’t. If your personal login credentials were somehow stolen or cracked, then someone could get to whatever company resources that you can access. Someone with these credentials in hand would usually try to snoop around without being caught—that is, they probably wouldn’t do anything that would draw attention. If they allow themselves to be discovered, then your IT department will lock your account, and they will lose their access. Your password will be reset, and you will be allowed back in, but they won’t know that new password. To combat this, companies try to limit these windows of opportunity. Forcing you to change your password every so often will also mean that someone else who managed to figure out your password will have only a short time to use it.
For your personal accounts, the problem is usually different. Someone who wants access to your accounts will probably want to use them (as opposed to just spying on you without leaving a trace). They may buy things in your name or try to transfer your money to their accounts, for example. If they were breaking into your email account, they may be satisfied to just read your emails, in which case changing your password every so often would help. But generally speaking, you will probably know if someone hacks your account because they will probably do something with it.
So, should you periodically change your passwords? And if so, how often? This is completely up to you. Generally, I don’t think it does much good to change passwords periodically for no reason. If you’re worried that someone might be lurking on your account, just reading information but not actually changing anything, then you might want to change that password. If you have ever given out your password to someone else for any reason, you should change your password when they’re done using it. When one of your online service providers is hacked and the password database is compromised, they should send you an email telling you to change your password, and of course you should do that right away. They may even reset it for you or lock you out until you reauthenticate. But beyond that, you can probably just leave your passwords alone, as long as they’re strong (and particularly if you have two-factor authentication turned on).
Summary
Passwords and PINs are used to authenticate us to someone else: an online account, our computer, our mobile device, an ATM, and others. Passwords are “something we know” and currently are the best primary form of authentication. Other factors like “something you have” and “something you are” are good as secondary forms of authentication.
Password strength depends on a few things. First, you should never use regular words, phrases, or guessable numbers like birth dates. Second, you need a wide variety of characters: uppercase and lowercase letters, numbers, and special characters. Third, you need at least 12 characters to prevent a brute-force attack.
You should have a unique password for every website. If you reuse a handful of passwords and one of those passwords is compromised (possibly without you knowing it), then bad guys will try using that same password for your other accounts.
You should not know any of your online passwords—you should instead generate and save passwords using a password manager. It’s impossible for humans to remember more than a few truly strong passwords, and we all have dozens if not hundreds of online accounts.
You will still need to remember at least one strong password: the master password for your password vault. We discussed some techniques for generating a strong password that you can easily remember.
When possible, protect your critical accounts using two-factor authentication. These include email and financial accounts, social media websites, and any sites that have your credit card or medical information.
While it’s fine to change your key passwords periodically, it’s not that crucial, especially if you have two-factor authentication enabled.
You should use two-factor authentication wherever you can, at least for your most important accounts. It greatly increases your protection over just a password. Prefer using a time-based rolling PIN for this (i.e., an authenticator app) vs. text, SMS, or email.
Checklist
This checklist covers one of the most important, most powerful defensive steps in the entire book. Please do not skip this one!
There are a handful of good password managers out there, each with their own pros and cons. You are of course free to choose whatever password manager you want, but for this book I am recommending LastPass. LastPass has been vetted by people I trust: independent third parties who know a lot about security were given access to the source code and spent serious time scrutinizing the tool for security holes. LastPass has some really nice features that we will be using that may not be available with other products. LastPass is supported by all major web browsers on all major operating systems and also has strong support on both iOS (iPhone and iPads) and Android devices. For web browsing on a computer or mobile device, the service is completely free. This includes securely synchronizing your password vault to multiple computers and your mobile devices. This service is sufficient for just about everyone. It offers some premium features for a few dollars a month that are worth considering, but the basic service is totally free.
So, feel free to use the password manager of your choice, but all the examples and suggestions in this book will use LastPass. Some other options to consider, if you’d like to do some research and make your own choice here, are 1Password, Dashlane, Bitwarden, and Keeper. The good news is that all of these choices do pretty much the same thing in pretty much the same way—so even if you choose something other than LastPass, all of the recommendations in this chapter (and most of the password manager advice in the rest of this book) will work with whatever you choose.
that we have a little bit of a chicken-and-egg situation here. The LastPass installer will install a plugin for your current web browser, but in a later chapter, you may be installing a new web browser. At that point, you’ll have to install the LastPass plugin on that new browser. Unfortunately, we need LastPass before then to help us generate and save some kick-butt passwords. But I’m just giving you a heads-up that you may have to do this more than once.
Tip 4-1. Choose a Strong Master Password
Use the techniques we discussed in this chapter to come up with your master password. You will use this password to log in to your password manager. (If you skipped the chapter, then you should at least go back and read the section on choosing a good master password.) Do not use this password for anything else! If necessary, you can write this password down on paper and store it in a safe place where you can find it but where others won’t see it. You don’t need to label this piece of paper, just write the password on it—you’ll know what it’s for. Don’t keep it right next to your computer, but know where you can find it if you get stuck.
Tip 4-2. Get Started with LastPass
- 1.
Go to the LastPass home page. You should see a big red button saying “Get LastPass Free”. Click that.
- 2.
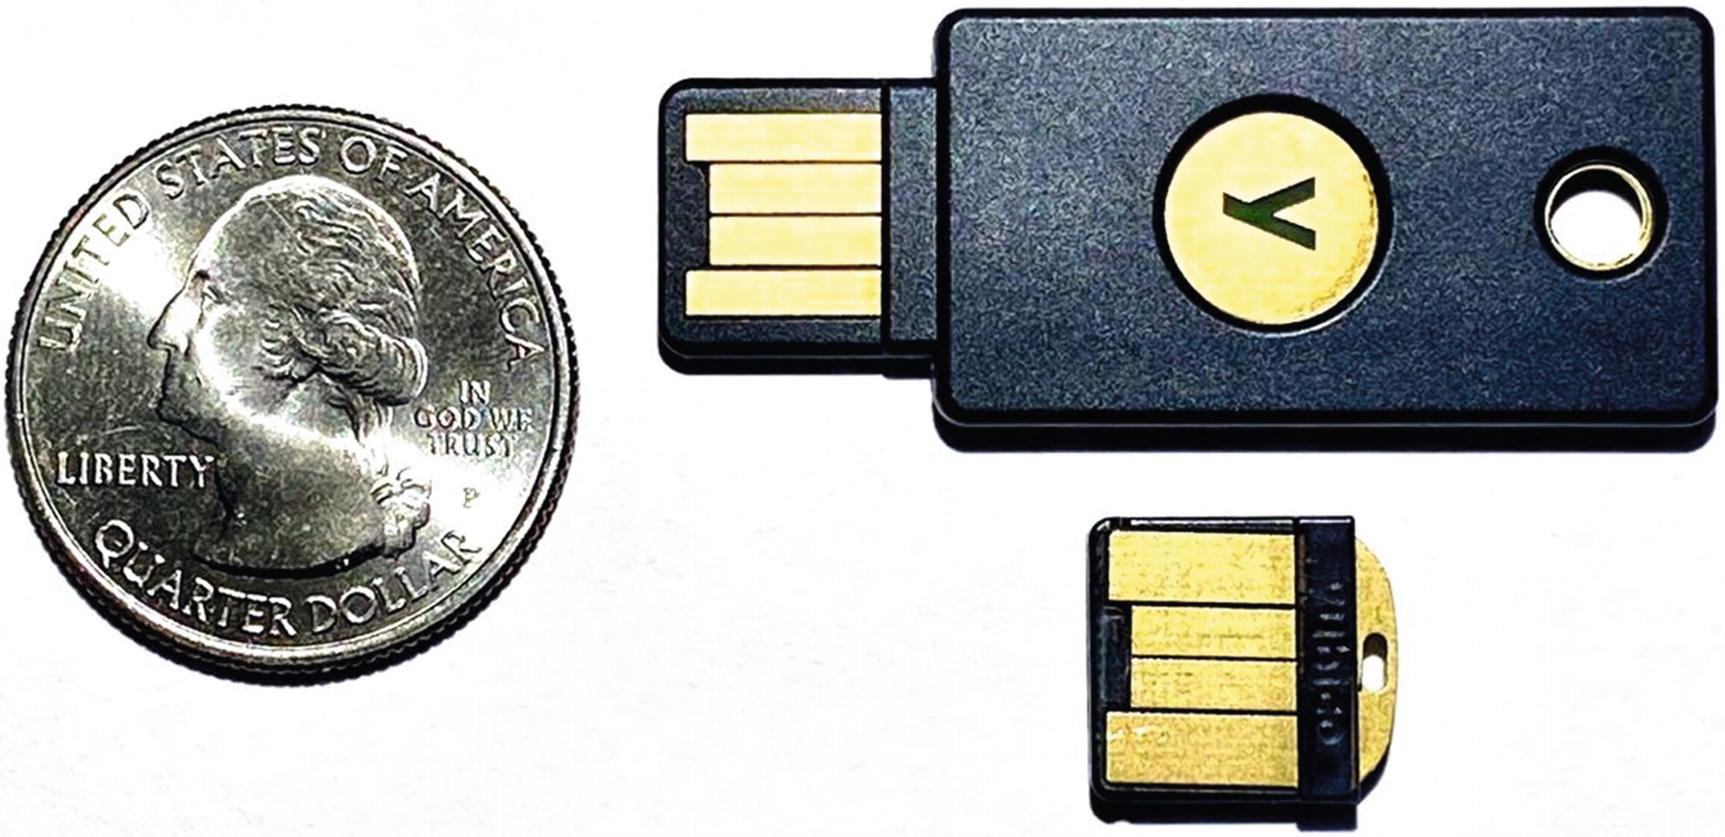
You should see a form to sign up (Figure 4-2). Give them your email address and the master password you created in the previous step. For the Reminder, I would not give any hints about the password itself. However, if you printed off your password and stored it somewhere safe, you might make a vague reference here to where you stored it that you would understand but others wouldn’t. Don’t click “Sign Up” just yet.
LastPass account sign-up form
- 3.
When you click “Sign Up”, your browser will probably offer to save this password for you—but resist the temptation to say yes. We will no longer be using your browser to store passwords and this password in particular is one we do not want it to save. (If you did say yes, don’t worry, we’ll fix that later in this checklist.) Now click the “Sign Up” button.
- 4.
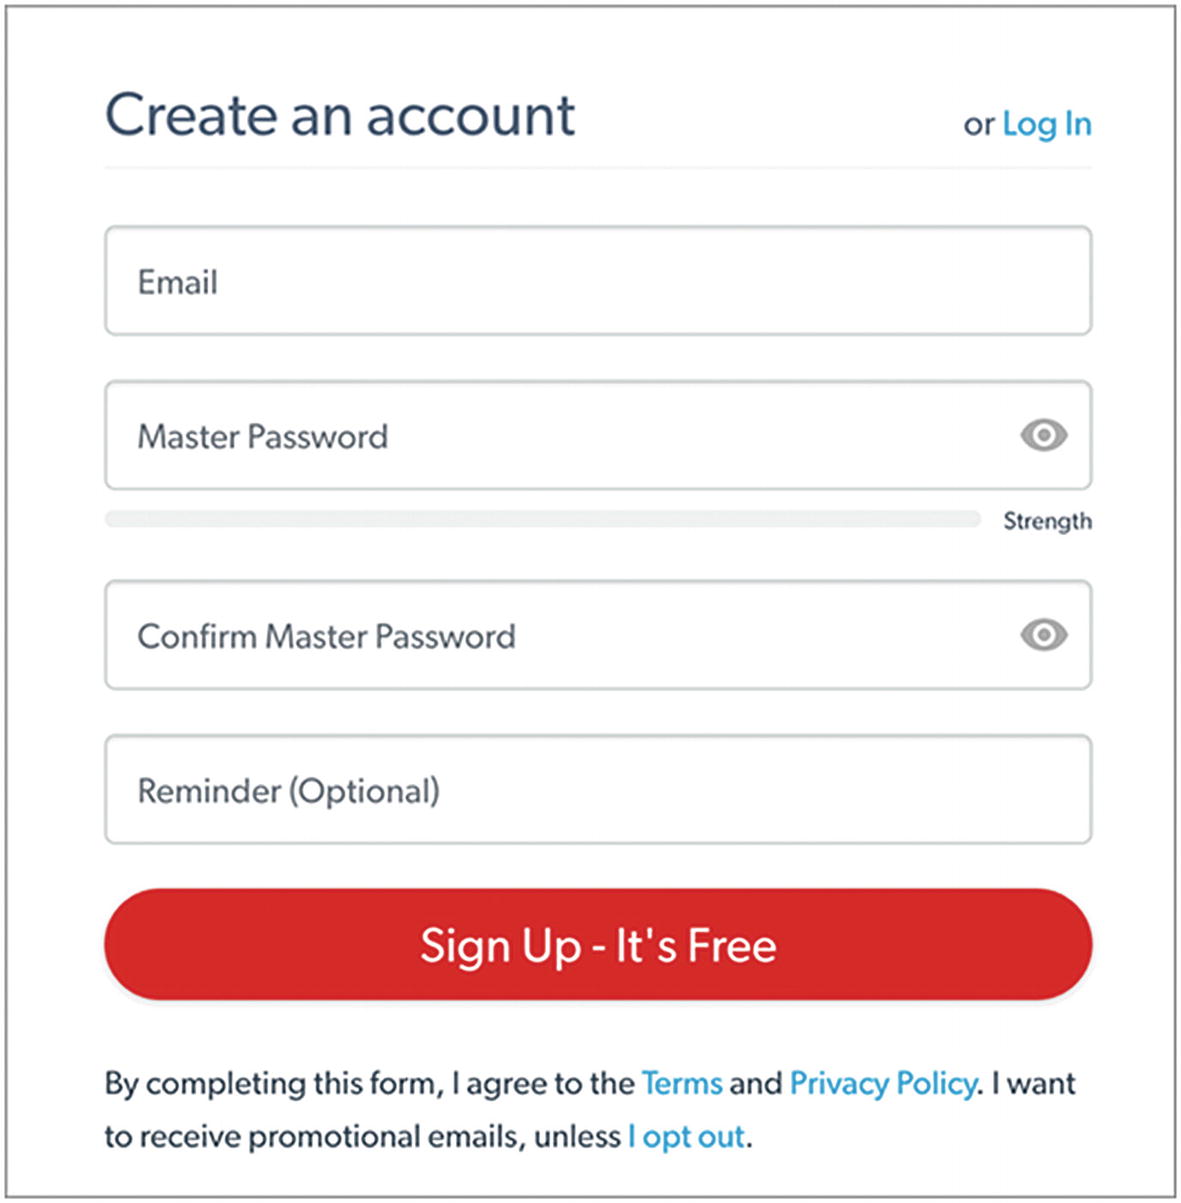
Now you should see something like Figure 4-3. The instructions for installing the browser extension (also called an “add-on” or a “plugin”) differ depending on your operating system and browser. See the next tip to continue with this installation.
LastPass welcome message
Tip 4-3. Install LastPass in Your Web Browser
Since you use your web browser to log in to websites, you will want to have the LastPass browser extension (plugin, add-on) installed. This will allow LastPass to automatically fill in your login credentials, so you don’t have to type anything.
The four most common web browsers are Safari (default for macOS), Edge (default for Windows 10), Chrome, and Firefox. (If you happen to still be using Internet Explorer, you should definitely upgrade to Edge.) In Chapter 7, I will be recommending that you install and use Firefox as your default web browser. If you are already using Firefox, great! If not, proceed with installing LastPass on whatever browser you’re currently using.
The installation process is similar for all of these browsers with the exception of Apple’s Safari browser. In every other case, you should just be able to click that “Install LastPass” button as shown in Figure 4-3 and follow the instructions. Go ahead and do that now.
If you’re on a Mac and using the (default) Safari browser, you have to do things a little differently. You’ll need to download and install the LastPass Universal Mac Installer. To do that, follow the instructions here:
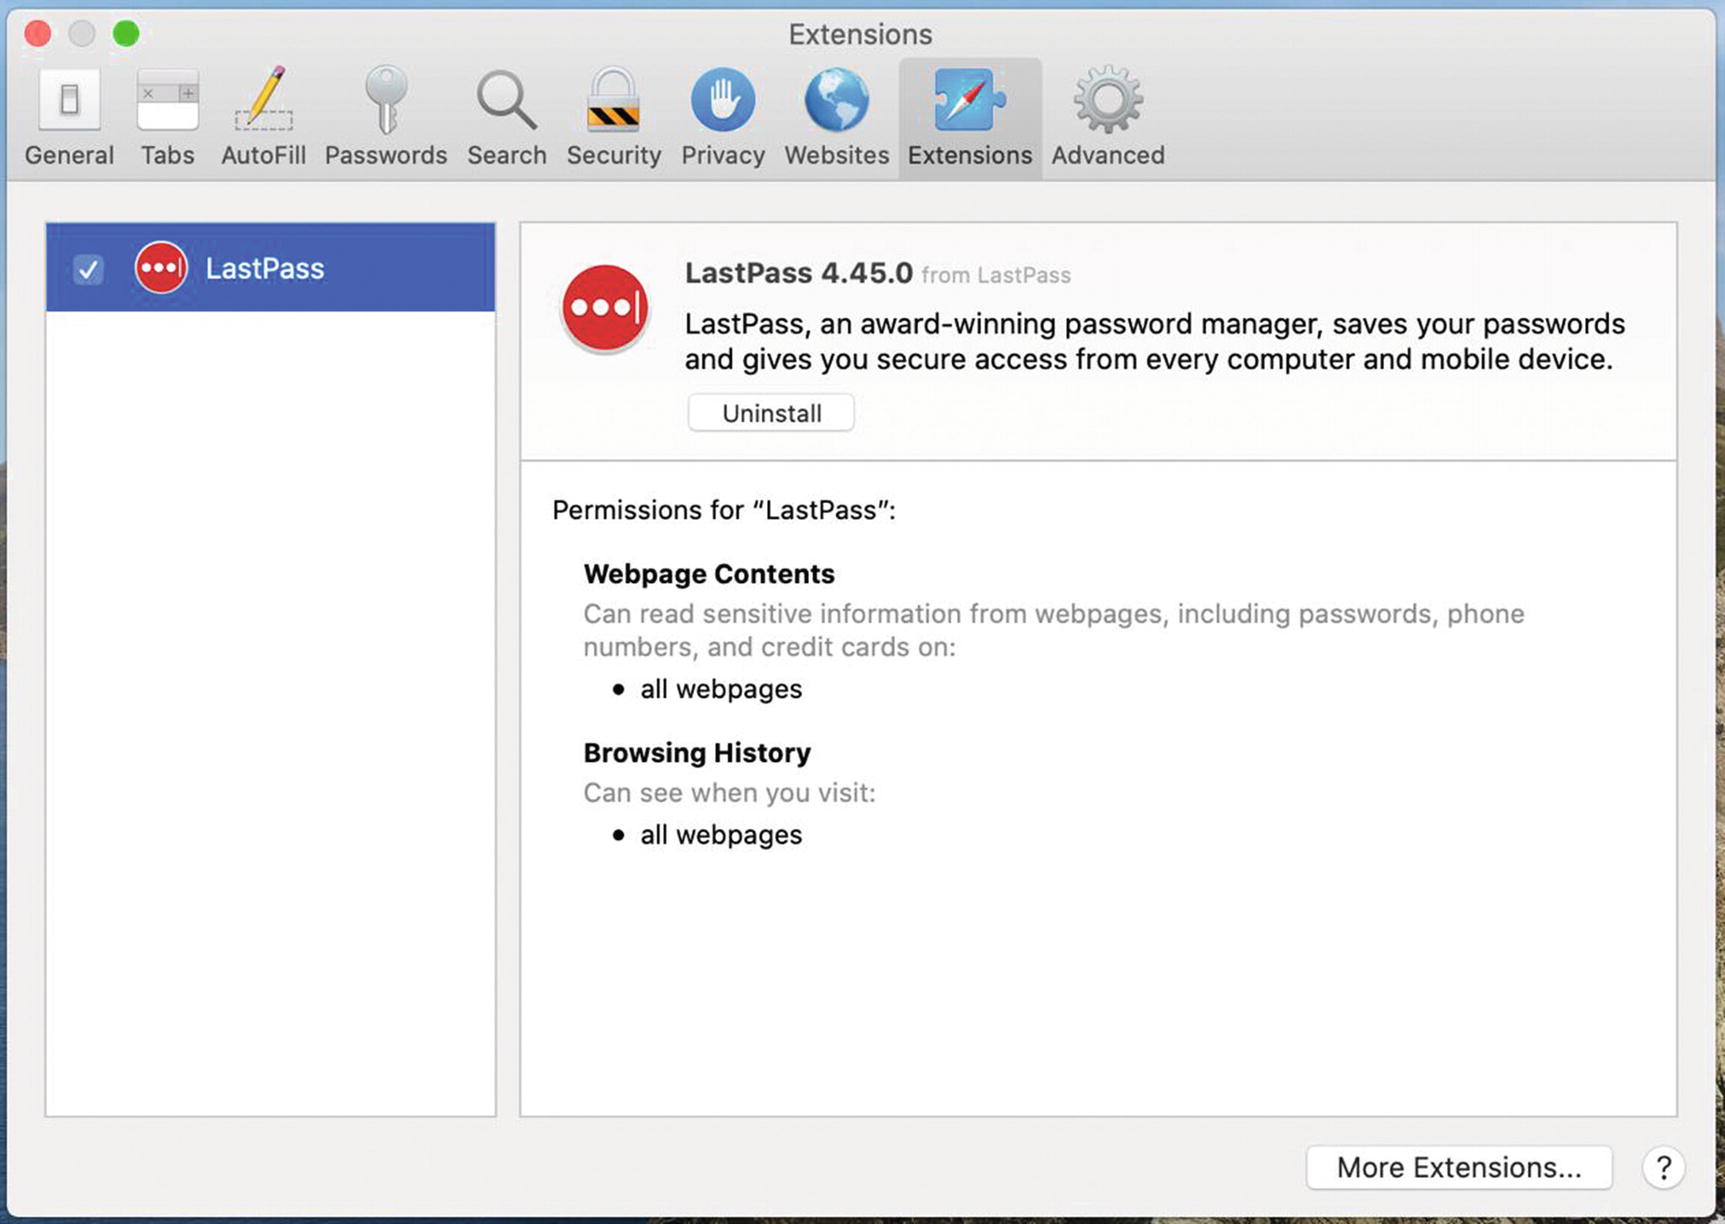
Safari Extensions Preferences
Tip 4-4. Take the LastPass Tour

LastPass browser icons (right, Safari; left, all others)

New, empty LastPass password vault
LastPass Vault Tour
Tip 4-5. Install the LastPass App on Your Smartphone
I would go ahead and install the LastPass app for your mobile phone using either the App Store (iPhone) or the Google Play Store (Android). You may not think you’ll need it, but I’ll bet you will, and it’s part of the free service, so why not? Just search the appropriate app store for “LastPass” and be sure to choose the one from LogMeIn, Inc. (the owner of LastPass).
Once you have installed the application, launch it and sign in using your email address and LastPass master password. If you have a phone with a fingerprint reader or a face scanner, you may be asked whether you want to allow the password vault to be opened using these biometric methods. This is really a personal choice. Personally, I’m fine using this because I’m not worried about being coerced into unlocking my phone (say, by the police or a border agent).
It’s frankly not settled law yet as to whether it’s legal to compel you to open your phone if it’s locked, though at the time of this writing, the general trend in the United States is that passwords and PIN codes are considered “testimony” and therefore are protected under the Fourth Amendment. Biometric locks are (so far) not protected in the same way. If you’re at all concerned about this, you should do your own research before you decide.
Tip 4-6. Enable Two-Factor Authentication
Turning on two-factor authentication (2FA) is strongly recommended. You’re going to be putting all of your passwords in a single place—all your eggs will be in one digital basket. You should protect it well. It’s essential to have some “defense in depth.” But you also want to do this before the bad guys do. If they manage to hack your account and set up 2FA on your account, it can be nearly impossible to regain control.
Note that once you enable two-factor authentication, you must have your cell phone with you whenever you want to log into LastPass on any “new” computer or device (one from which you have not logged into before). I know that sounds like a pain, but you honestly get used to it pretty quickly. And most of us keep our cell phones with us all the time.
LastPass uses the time-based PIN code method for two-factor authentication,6 which means that you will need to download and install an authenticator app on your smartphone. There are actually several such apps to choose from. The most popular is probably Google Authenticator—and for many years, that was my personal choice. However, Google Authenticator has one big drawback: it doesn’t have any way to back up your codes. That means that if you get a new phone, there will be no easy way to transfer your codes to the new phone.
- 1.
Download and install the Authy app on your smartphone from either the Apple App Store or Google Play Store. Launch the app and set up your Authy account. This will require setting up a primary phone number via a call or a text message.
- 2.
Using your computer’s web browser, click the LastPass icon in the toolbar and open your LastPass vault. Open Account Settings.
- 3.
Click the “Multifactor options” tab at the top of the Settings window. You probably won’t see Authy listed as an option there, but it’s perfectly compatible with Google Authenticator. So find Google Authenticator and click the pencil icon at the right side to enable this service (Figure 4-8).

LastPass Multifactor Options
- 4.
On the next screen (Figure 4-9), set “Enabled” to Yes and “Permit Offline Access” to Allow.
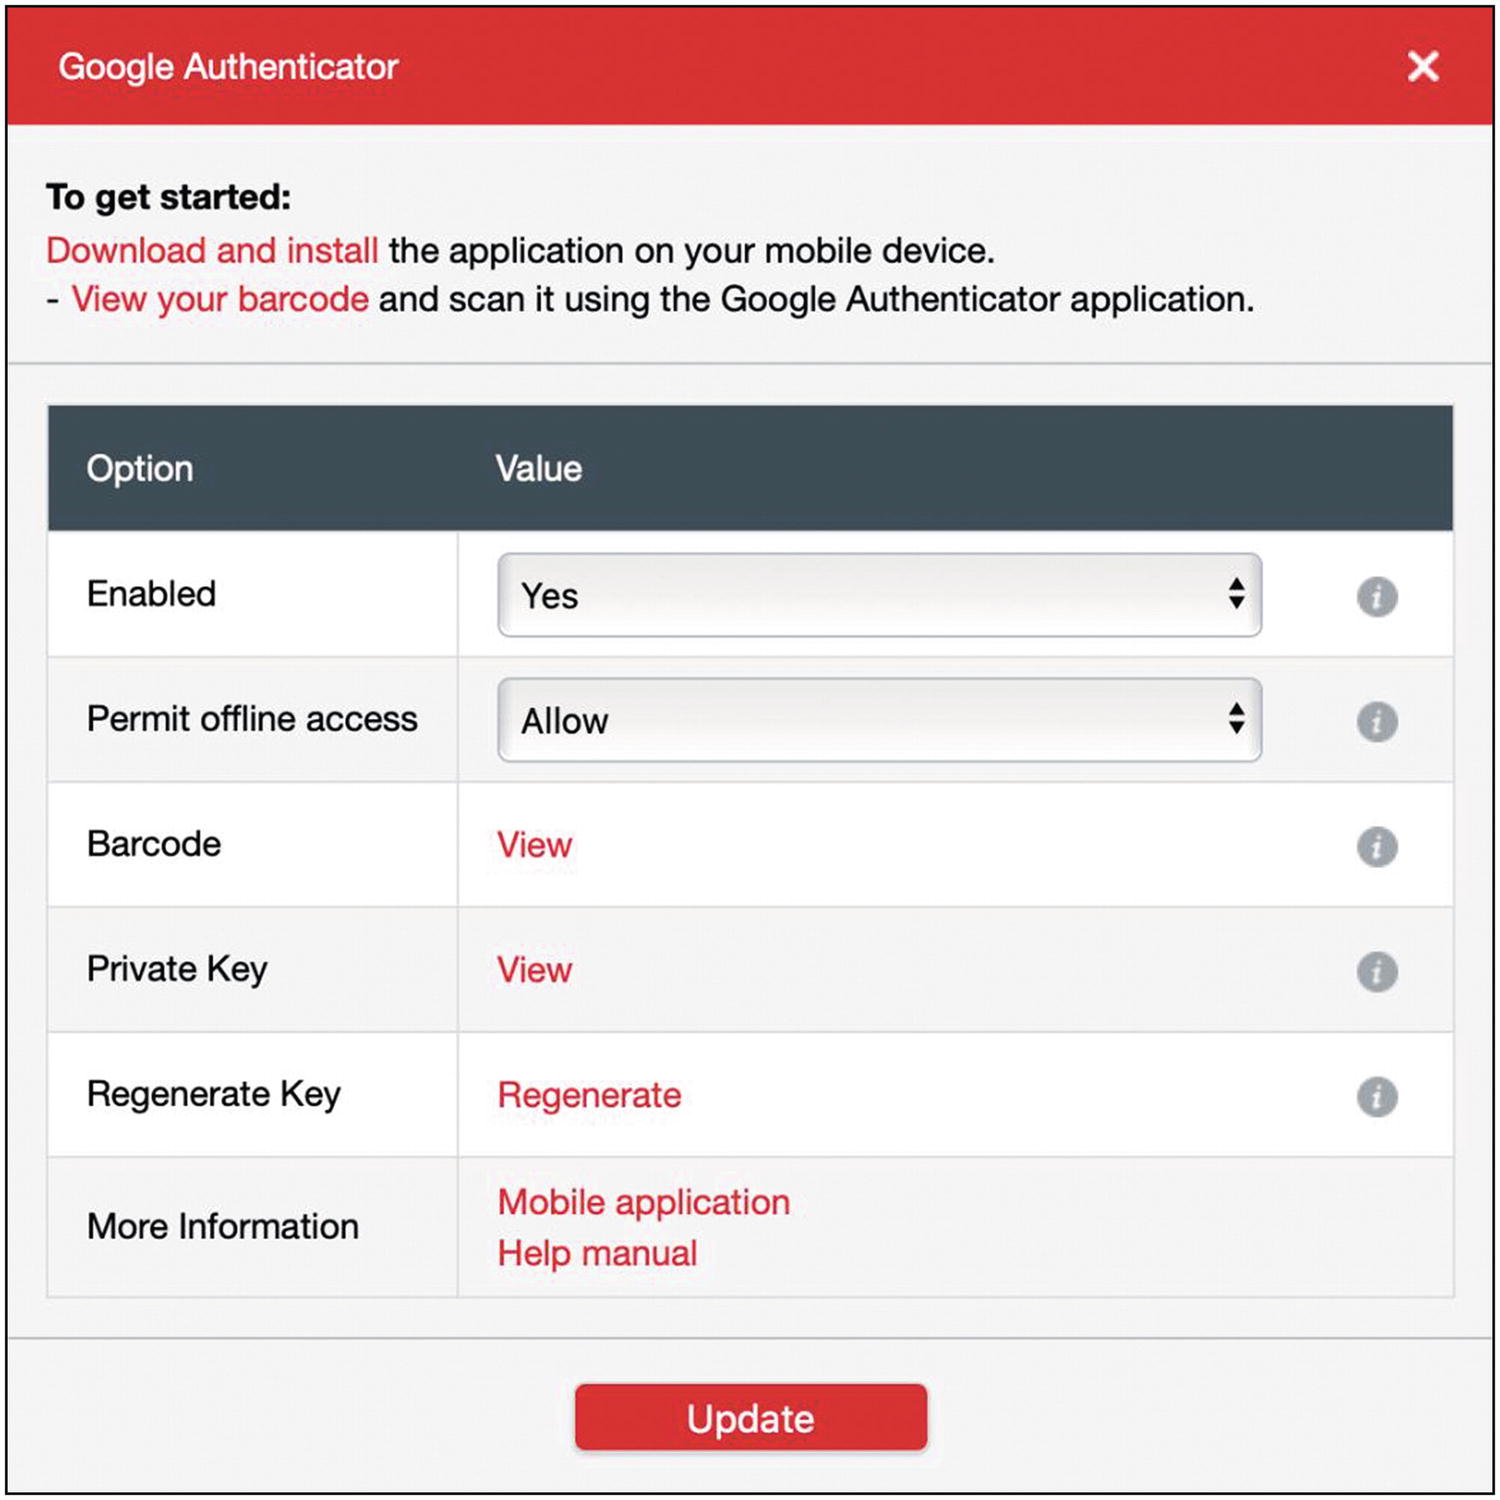
LastPass Authenticator Setup
- 5.
The easiest way to set this up is using your smartphone’s camera. (If your smartphone doesn’t have a camera, see the following.) Click the “View” link next to “Barcode” to reveal your barcode. If asked, enter your LastPass master password. You should then see a square QR code similar to the one in Figure 4-10.

Sample QR code for initializing authenticator
- 6.
Open the Authy app on your phone. Click the plus sign to add a new account.
- 7.
Click the “scan barcode” button, which will turn on your camera. Hold the phone up to the QR code on your computer screen until it scans. You should then start seeing the 30-second PIN codes on your screen.
- 8.
At this point you will need to enter one of your six-digit codes to verify that your app and LastPass are in sync.
If your phone doesn’t have a built-in camera, you can click the Private Key link to get a manual code. Then select “enter key manually” on the Authy app to enter this code (this option is just below the “Scan QR code button”).
Note that this is exactly the process you’ll use when adding other accounts to Authy. Whenever you see the option to use Google Authenticator, you can select that and use Authy instead.
Tip 4-7. Add Passwords to LastPass
You already have a lot of passwords. Many of them may be memorized by your web browser, but some may be written down somewhere or just in your own head. But you now have a highly secure vault in which to put these things, and you should take some time now to add at least the most important ones to LastPass.
- 1.
Make sure that you are logged into LastPass in your web browser.
- 2.
Go to a website that requires a password. If you’re already logged in, you’ll need to log off first. (Just make sure you know what the password is before you log off!)
- 3.
Find the sign-in form for the website and enter your credentials, and log in. When LastPass detects you logging into a website, it will pop up a window offering to save that website’s login information—click “Add” (Figure 4-11).
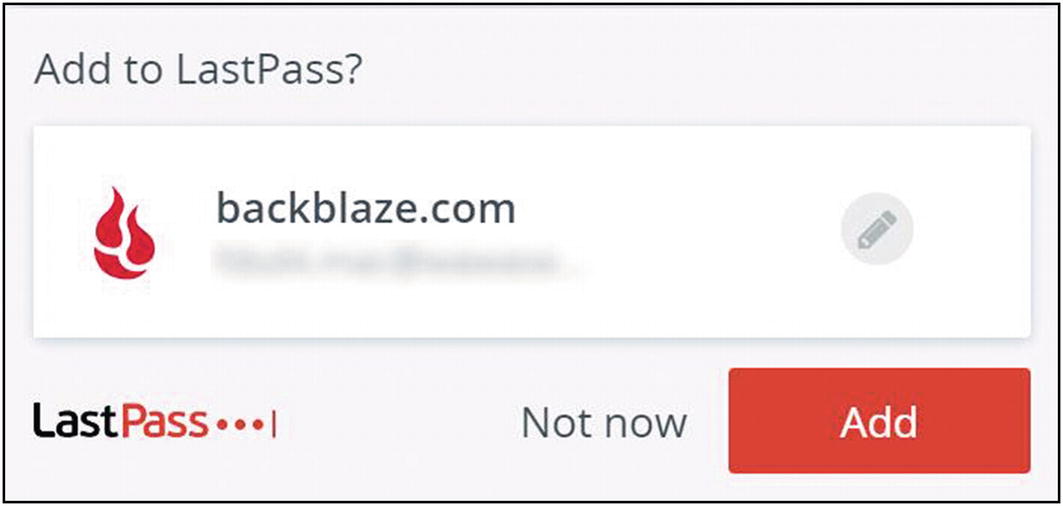
Add to LastPass dialog
Repeat this process for all your important websites: email, calendar, financial, medical, insurance, benefits, social media, and any other site that’s important to you.
- 1.
Once you’ve logged into the website (see previous steps), click the LastPass icon at the upper right of the browser. Select “Add Item” and then “Password”.
- 2.
In the “Add password” page, you’ll see several fields. Some key fields (URL and name) will be prepopulated. Fill in your username (could just be your email address) and the password (Figure 4-12).
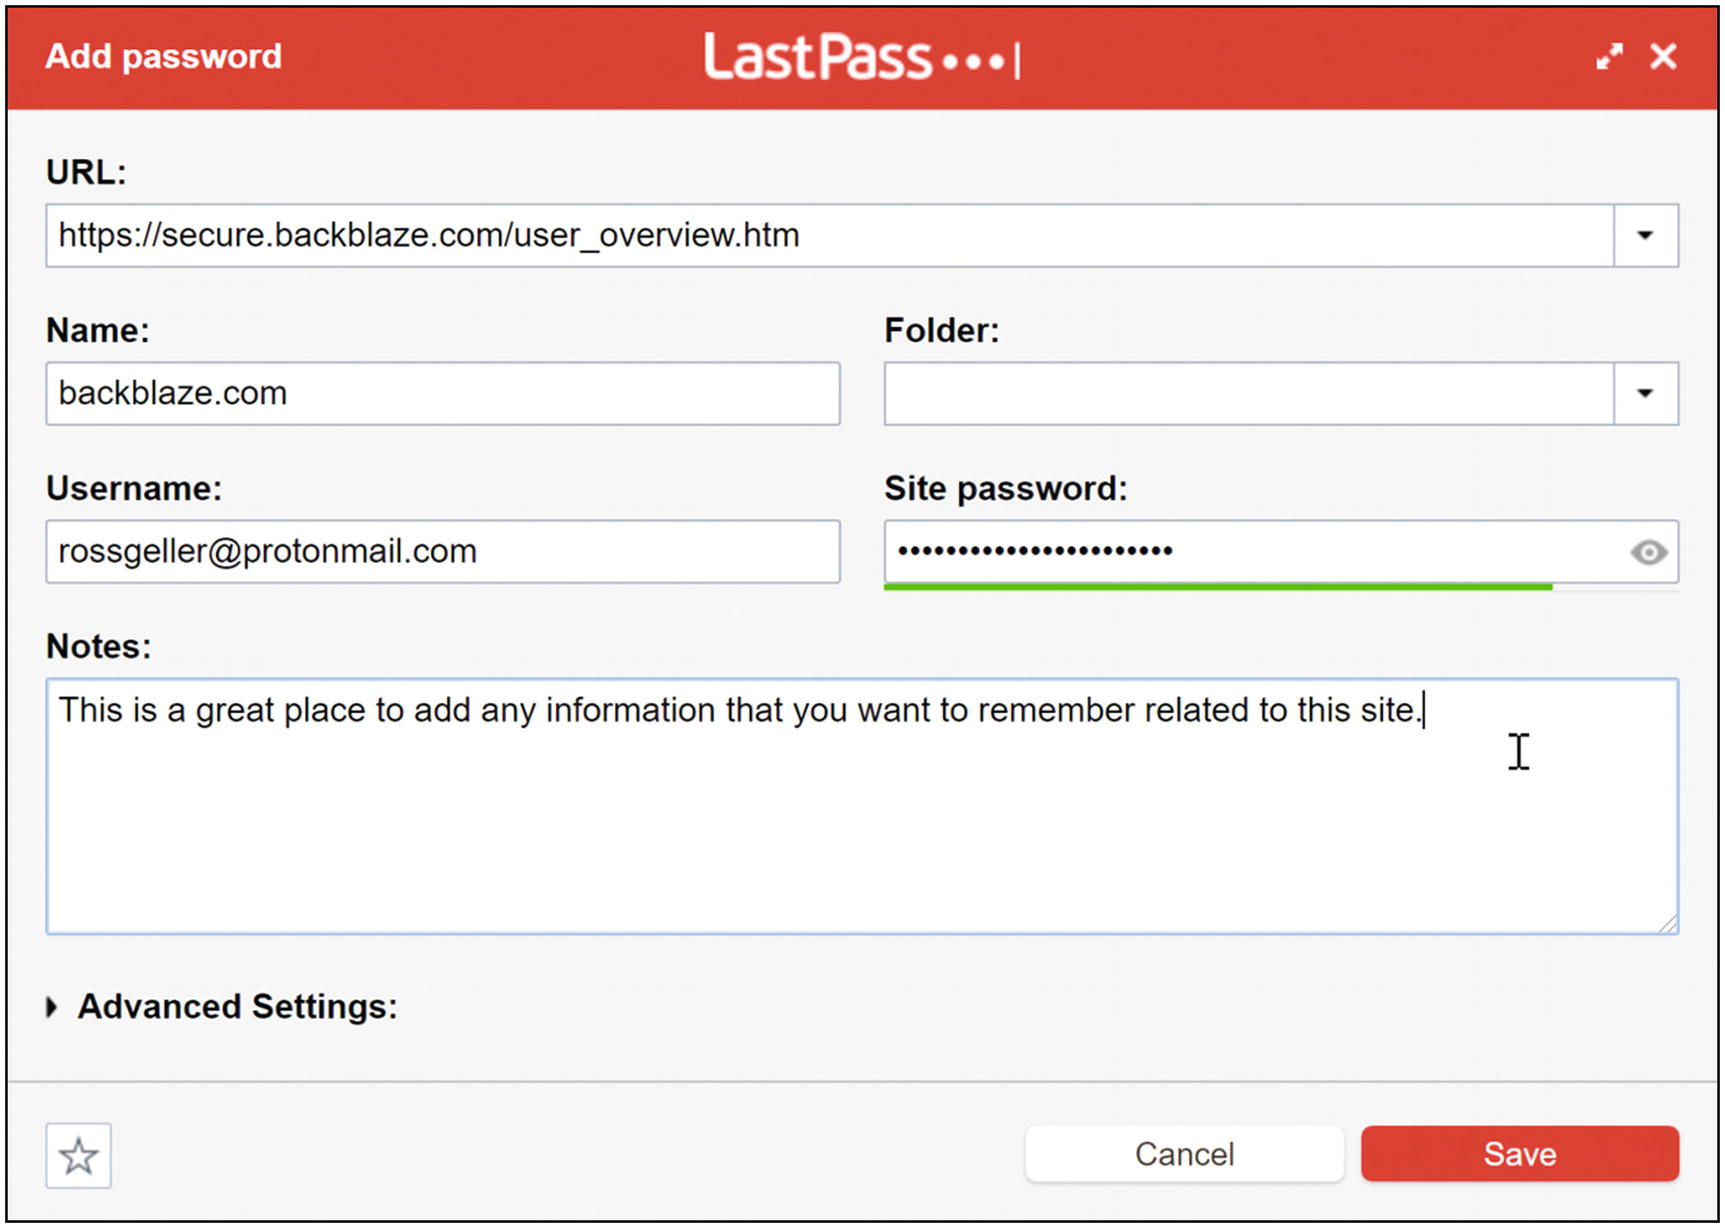
Manually adding a website password to LastPass
- 3.
If you want, you can also add notes. You can change the Name to anything you want. You can remove any extraneous stuff at the end of the URL, too—just don’t change the main website (host) name. For example, in Figure 4-12, you could take off the “user_overview.htm” part of the URL.
If you’ve been using your web browser to remember your passwords up until now, you can jump through some hoops to import them all into LastPass in one fell swoop. However, it’s not a simple process. You will probably have to first export the saved passwords from your browser’s vault to a file and then import that file’s contents into LastPass. But if all those passwords are crappy, you’re frankly going to want to reset them to something better anyway. And when you do that, LastPass will save those new passwords.
However, you can continue to use your web browser to fill in the passwords—and when you log in next time, LastPass should offer to save it into your new LastPass vault.
Once you’ve managed to transfer all your old passwords to LastPass, you should then delete all the passwords saved in your browser (which is a later step in this list).
Tip 4-8. Use LastPass to Fill in Passwords
- 1.
In your web browser, go to a website that you know you’ve saved in LastPass.
- 2.
When you go to that site, you should see a little number on your LastPass icon (except on Safari). You may also see a little LastPass icon in the login form field (Figure 4-13). This indicates that you have a saved password for this site.
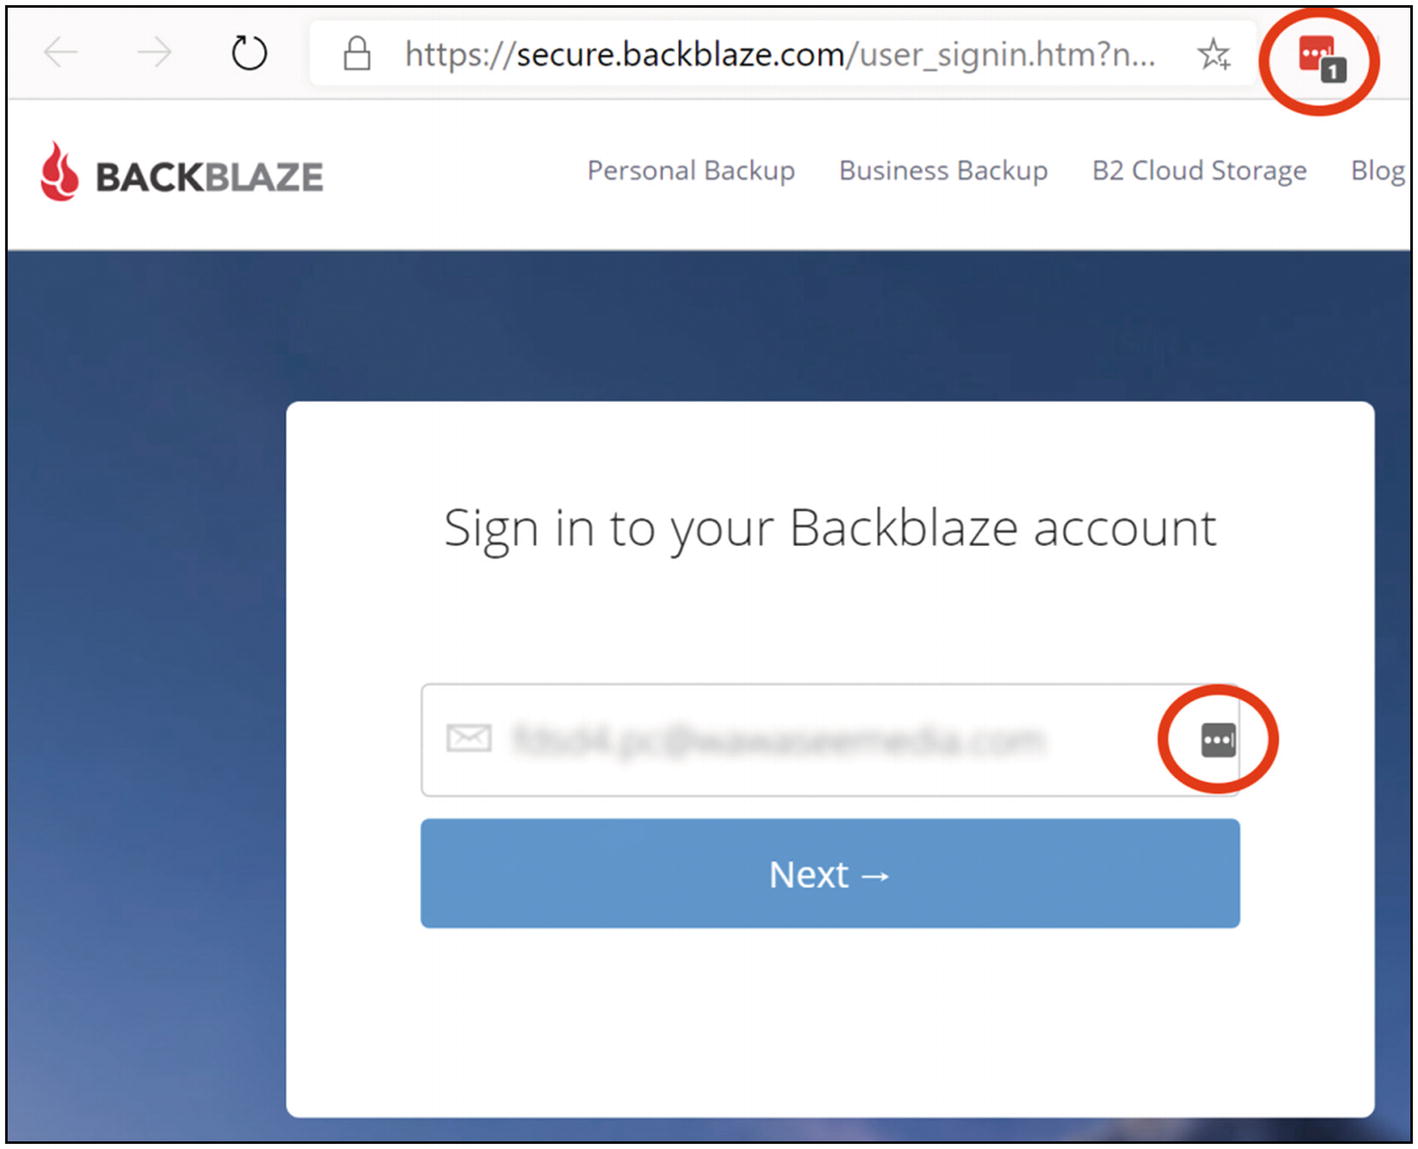
LastPass icon showing saved passwords
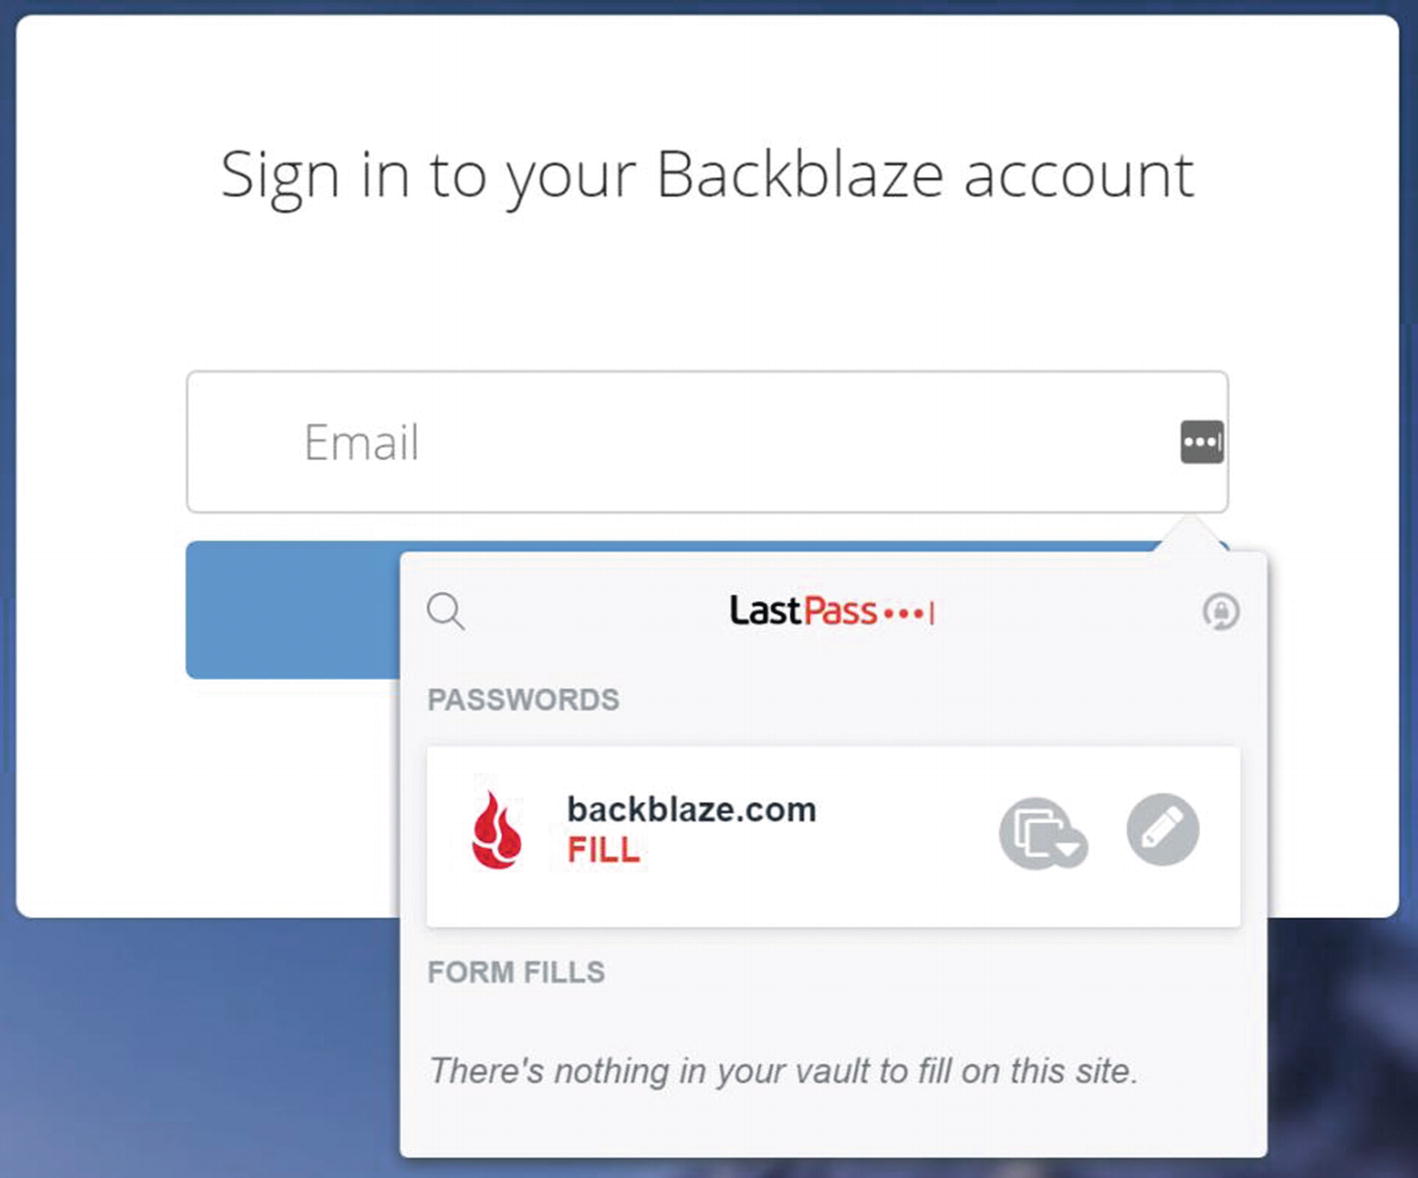
“Fill” button on LastPass form menu
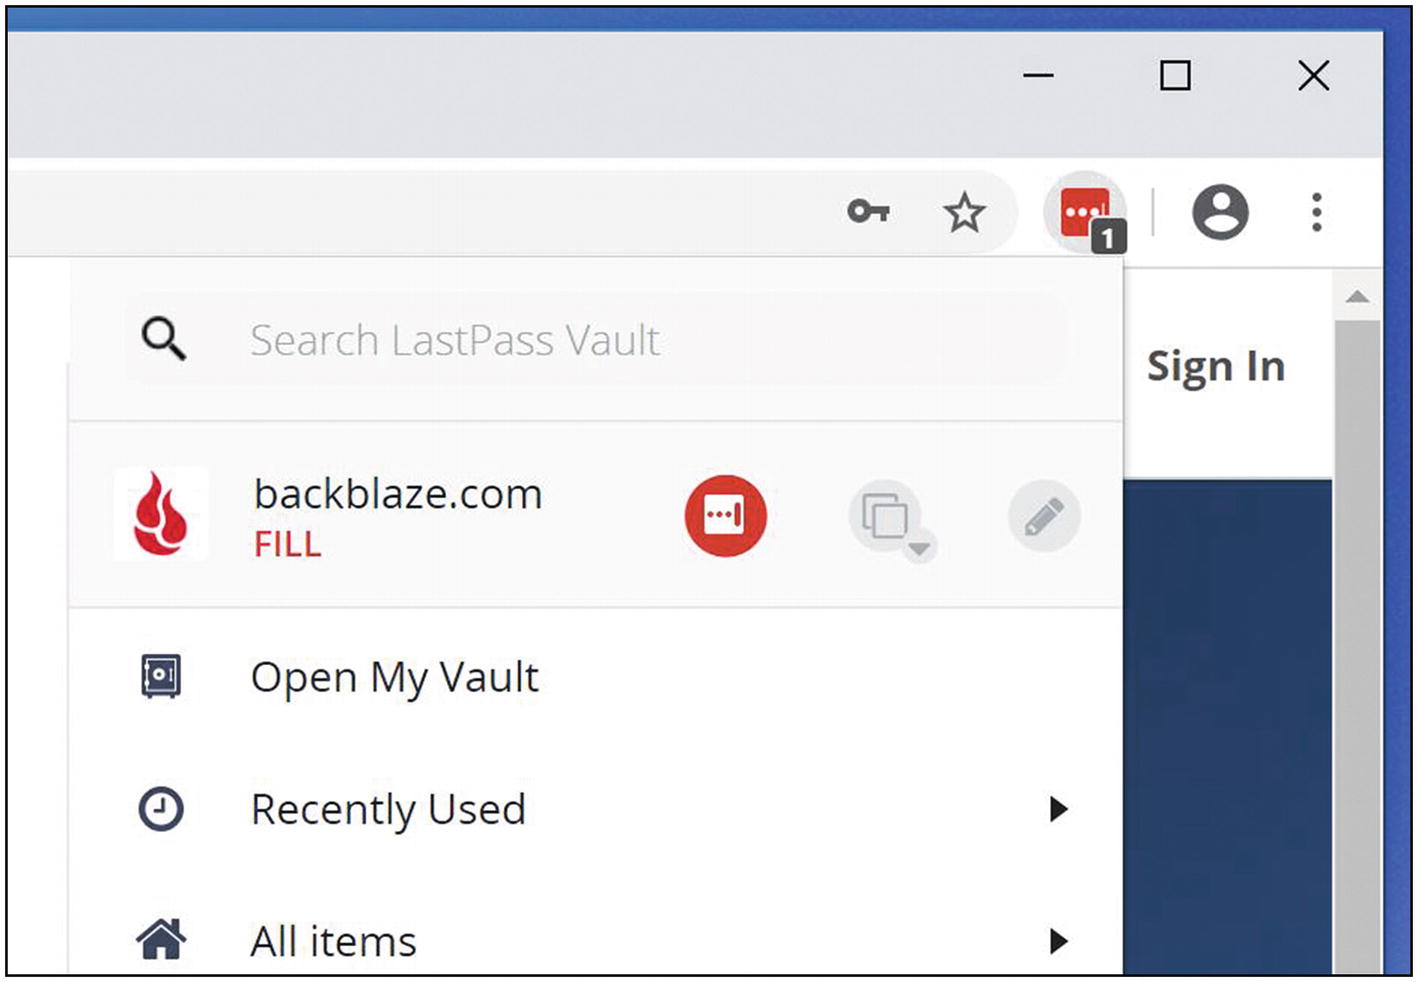
“Fill” button on LastPass browser menu

“Copy password” on LastPass form menu
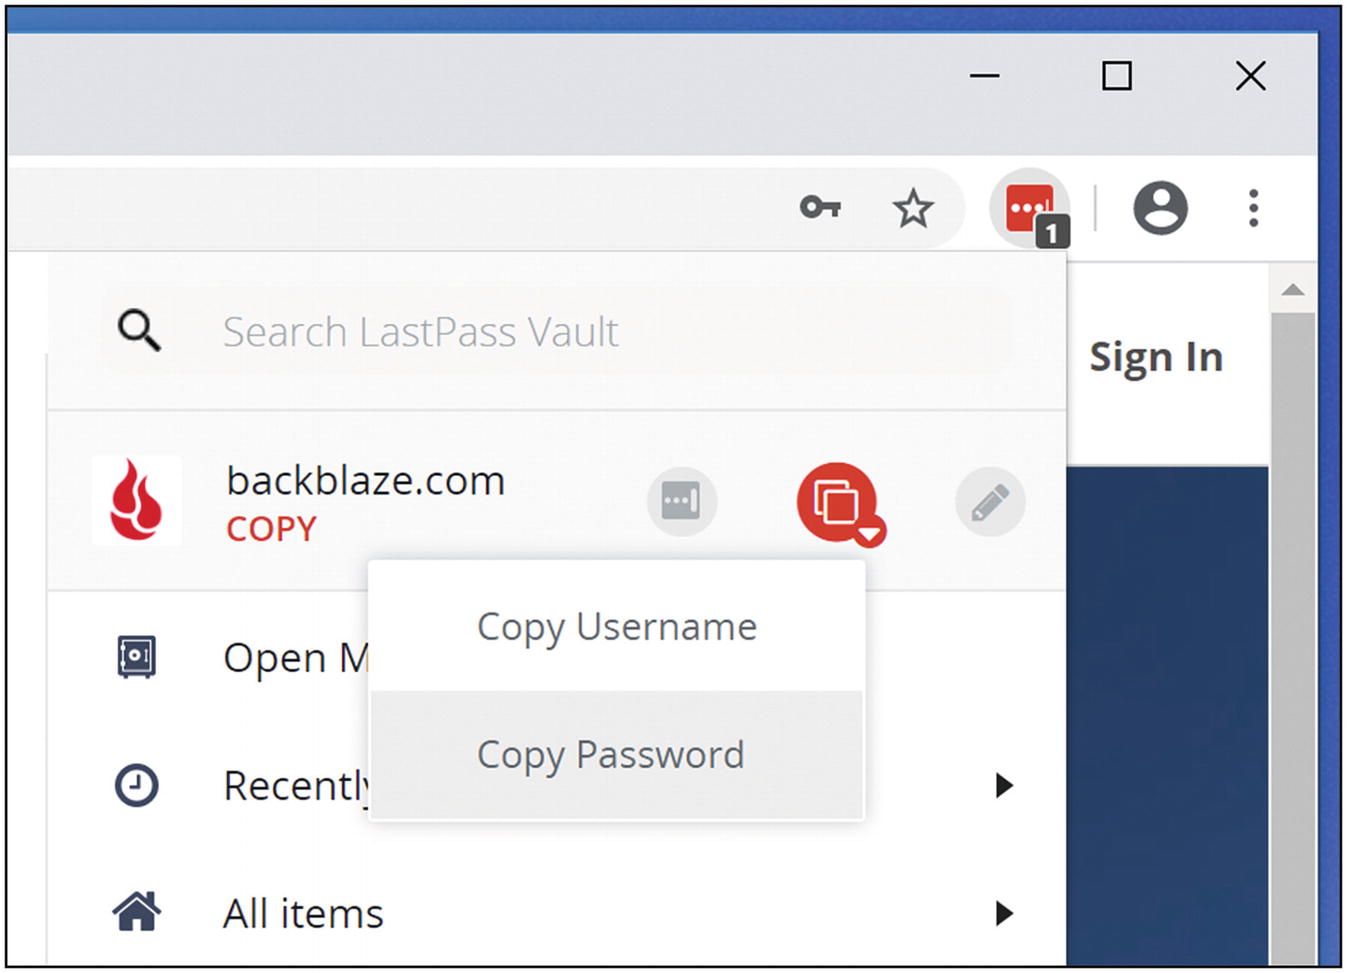
“Copy password” on LastPass browser menu
Tip 4-9. Disable Password Saving on Your Browser
Since you will now be using LastPass to save your passwords, you should disable the autosave feature in your web browser so they don’t compete with each other. How you do this will differ depending on which browser you use. If you have multiple browsers, you should disable this on all of them. Browsers change constantly, so the instructions here may be stale. If so, search for “disable password saving <browser>”, where <browser> is your particular web browser application.
- 1.
Open the Edge menu at the upper right (unfortunately, looks like the LastPass icon: three dots).
- 2.
Select “Settings”.
- 3.
Click “Profiles” and select your profile.
- 4.
Uncheck the box next to “Offer to save passwords.”
- 1.
Select Preferences from the Safari menu.
- 2.
Click the Autofill tab.
- 3.
Uncheck the box next to “User names and passwords”.
- 1.
Open the Chrome menu at the upper right (three vertical dots) and select “Settings”.
- 2.
Select “Autofill” tab and then “Passwords”.
- 3.
Disable the switch next to “Offer to save passwords”.
- 1.
Open the Firefox menu at the upper right (three horizontal bars) and select “Options”.
- 2.
Select the “Privacy & Security” tab.
- 3.
Scroll down to the “Logins and Passwords” section.
- 4.
Uncheck the box next to “Ask to save logins and passwords for websites”.
Tip 4-10. Delete Saved Passwords from Your Browser
Once you feel confident that you have transferred all the passwords from your browser to your LastPass vault, you should then delete all the saved passwords from your browser.
- 1.
Open the Edge menu at the upper right (unfortunately, looks like the LastPass icon: three dots).
- 2.
Select “Settings”.
- 3.
Click “Profiles” and select your profile.
- 4.
Under “Saved passwords”, use the menu at the right of each password listed (three horizontal dots) and select “delete”.
- 1.
Select Preferences from the Safari menu.
- 2.
Click the “Passwords” tab. If necessary, enter your macOS password.
- 3.
Select each password in the list and click the “Remove” button.
- 1.
Open the Chrome menu at the upper right (three vertical dots) and select “Settings”.
- 2.
Select “Autofill” tab and then “Passwords”.
- 3.
Under “Saved passwords”, use the menu at the right of each password listed (three horizontal dots) and select “remove”.
- 1.
Open the Firefox menu at the upper right (three horizontal bars) and select “Options”.
- 2.
Select the “Privacy & Security” tab.
- 3.
Scroll down to the “Logins and Passwords” section.
- 4.
Click the “Saved Logins…” button.
- 5.
Select each saved password and click the “remove” button at the upper right.
Tip 4-11. Store Credit Cards in LastPass
- 1.
Open the LastPass menu or vault and click “Add Item”.
- 2.
Choose “Payment card”.
- 3.
Enter the credit card information. I usually give it a name like “Capital One Visa x1234” (the bank, the type of card, and the last four digits of the card number). This makes it easy to find later.
When you later come to a page that asks you to enter your credit card information, you should see a little icon at the right side of the first field in the form. If you click this icon, it should give you all your addresses and credit cards in LastPass—simply click the one you want to use.
Note again that credit card forms aren’t standardized (though they’re working on this), so you may find that some fields don’t fill properly. This is particularly true for drop-down menus for expiration date. For this, you’ll need to view the stored information in LastPass and manually copy the missing information.
Tip 4-12. Perform a Security Check in LastPass
This is one of the best features of LastPass: the Security Challenge. This tool will analyze all your saved passwords to see which ones are bad and also help you find websites that were hacked (meaning you should probably change those passwords). In many cases, LastPass can also automate the process of changing weak/old passwords for you with a single click!
- 1.
From your web browser, open your LastPass vault using the icon on the toolbar.
- 2.
At the left, click Security Challenge.
- 3.
Click “Show My Score” on the security challenge page. It will prompt you for your master password. Then it will decrypt your vault and analyze all your passwords.
- 4.
On the email page, click Continue. LastPass will check to see if any of your email addresses have been associated with a hacked server.
- 5.
Heed any warnings you’re given here and follow the instructions to fix any serious problems.
- 6.
Review your passwords and see how strong your passwords are.
- 7.
Run this check periodically and do what you can to improve your score!

My personal LastPass challenge scores
Tip 4-13. Generate Strong Passwords for Key Accounts
- 1.
Go to the website for which you’d like to change your password and log in (either manually or using LastPass).
- 2.
Every website is different here. You’ll need to figure out how you change your password for each site. It’s usually in your “account” or “profile” or “security” settings. Click whatever links/buttons you need to bring up the form for entering a new password.
- 3.
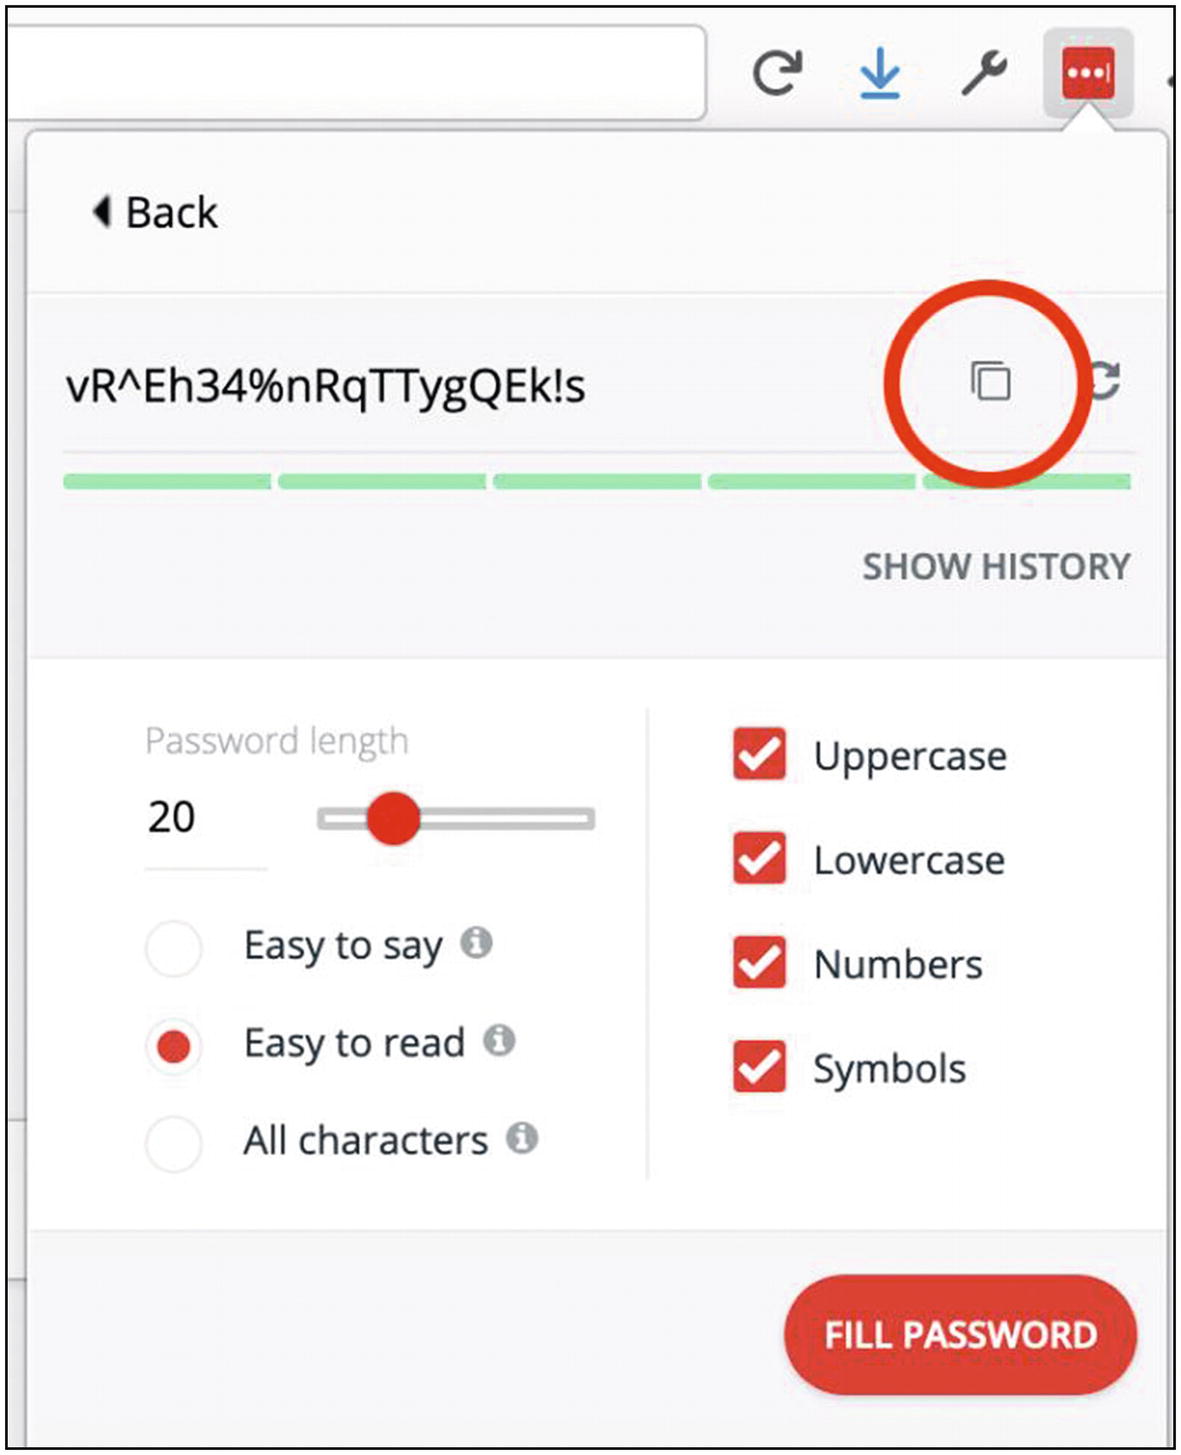
In the new password form fields, you should see another little icon at the right side like a lock with a circular arrow around it. (If you don’t see this, you can find this same menu using the LastPass browser icon at the upper right.) This is the button that will ask LastPass to generate a kick-butt random password for you. When you click this icon, it will pop up the “Generate password” dialog box. If you click the More Options button, you will see something that looks like Figure 4-19.

LastPass password generator for web form/account
- 4.
For most websites, I recommend a password of at least 20 characters. You’ll probably never need to type this in by hand, so why not? If you are unlucky enough to be on a website that does not allow certain types of characters or passwords of a certain length, you can make adjustments using the settings under More Options. LastPass will remember these settings as your defaults, so be sure to change them back to better settings the next time you change a password. That’s why I always like to show the expanded options.
Note If this password is something you know you will have to sometimes enter by hand, either on a smartphone or worse yet something like an Apple TV, Roku, smart TV, or some other device without a full keyboard, you might want to consider unchecking that last box for symbols—they can be a real pain to get to on smartphone keyboards or using a remote control. You might even want to remove capital letters. If you do this, you might want to increase the length of the password to offset the smaller password character alphabet.
- 5.
If you changed any settings, the password should automatically regenerate. But if not or if for some reason you want to create a different one, just click the little circular arrow button to generate another password. Do this as many times as you want.
- 6.
When ready, click “Fill Password”. This should automatically fill the new password into the form field(s) on the page (many password change forms have a “new password” box and a “confirm new password” box; LastPass should fill both).
- 7.
LastPass should then pop up a little banner at the top of the web page to ask if you want to save this password. You will obviously want to do this.
- 8.
Note that at any time you can edit this login information directly in your LastPass vault. You can see your password history, too, in case for some reason the change didn’t “take” or if you just want to see what your previous passwords were. You can also add handy little notes to a site in your LastPass vault (see the next item).
Tip 4-14. Generate and Store Offline Passwords
There will be some situations where you need to generate a strong, random password for things besides websites. We’ll have such a situation in the checklist of the next chapter, in fact. So, you need to know how to generate and save passwords without having a corresponding web password form to fill out.
- 1.
Using the LastPass browser icon menu, generate a secure password. Then use the copy button to save it to your clipboard (looks like two overlapping squares) (Figure 4-20).
Copying a generated password to your clipboard
- 2.
Now, in your LastPass menu, select “Add Item” and then “Secure Note”. The password was saved by your computer clipboard in the previous step, so just paste it in the big open space. Give the note a descriptive name and feel free to add more info in the note with the password; you want to be sure you know what this is for, and you also want to make it easy to search for (Figure 4-21). Then click “Save”.
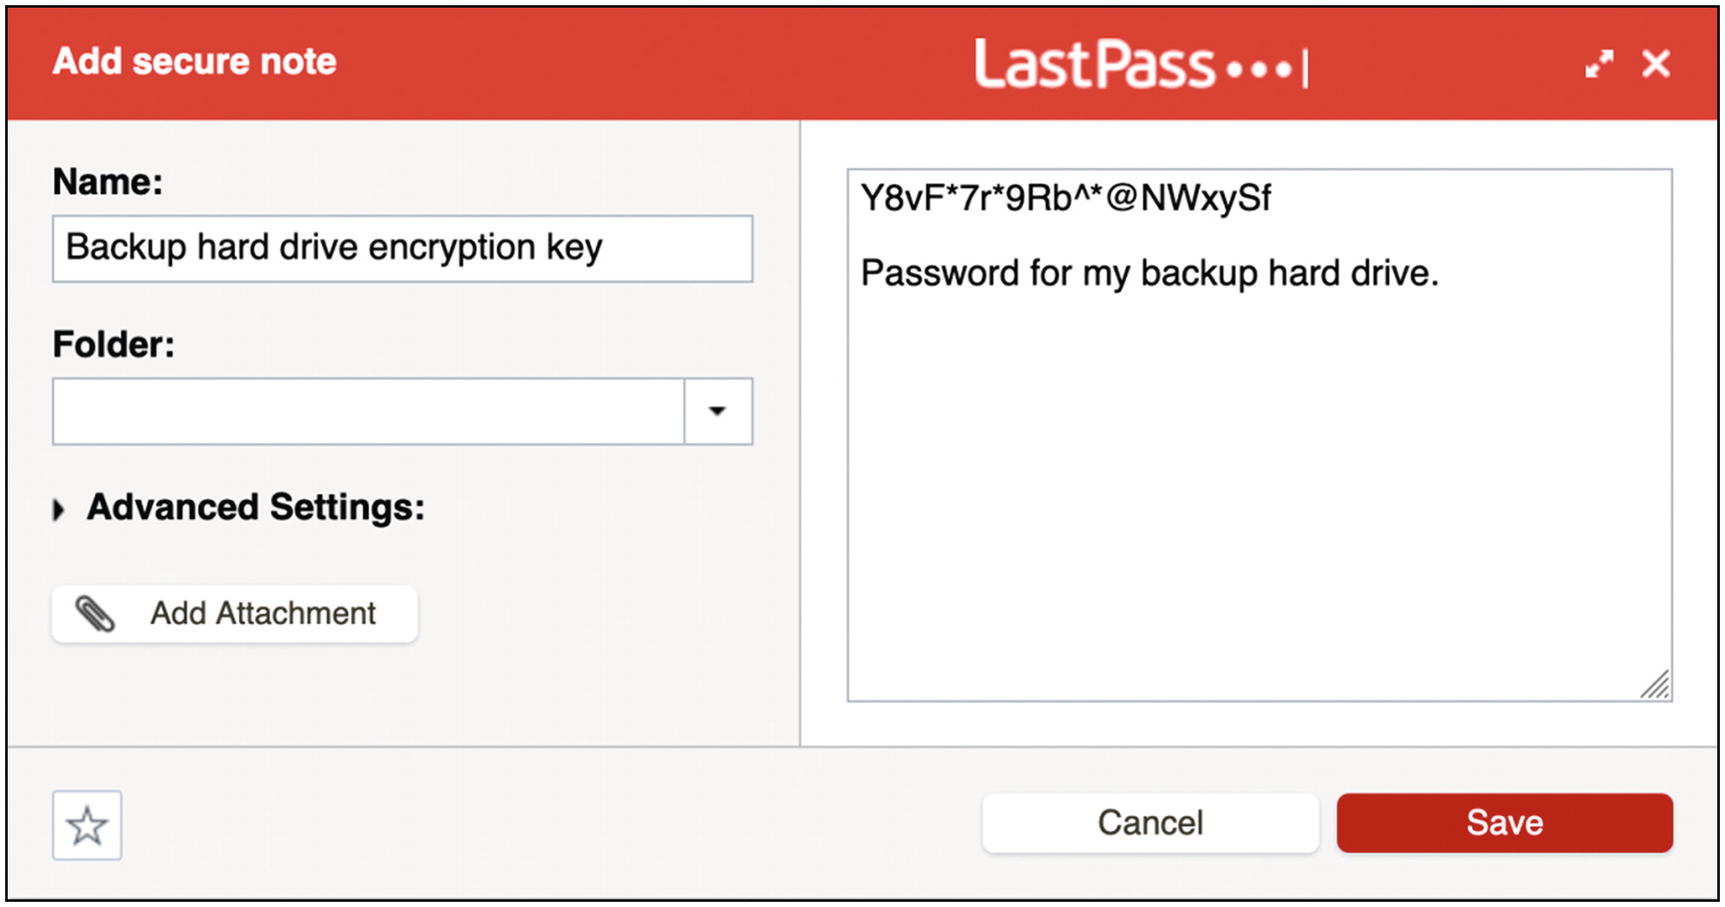
Saving generated passwords in a LastPass secure note
Tip 4-15. Create Some One-Time Passwords
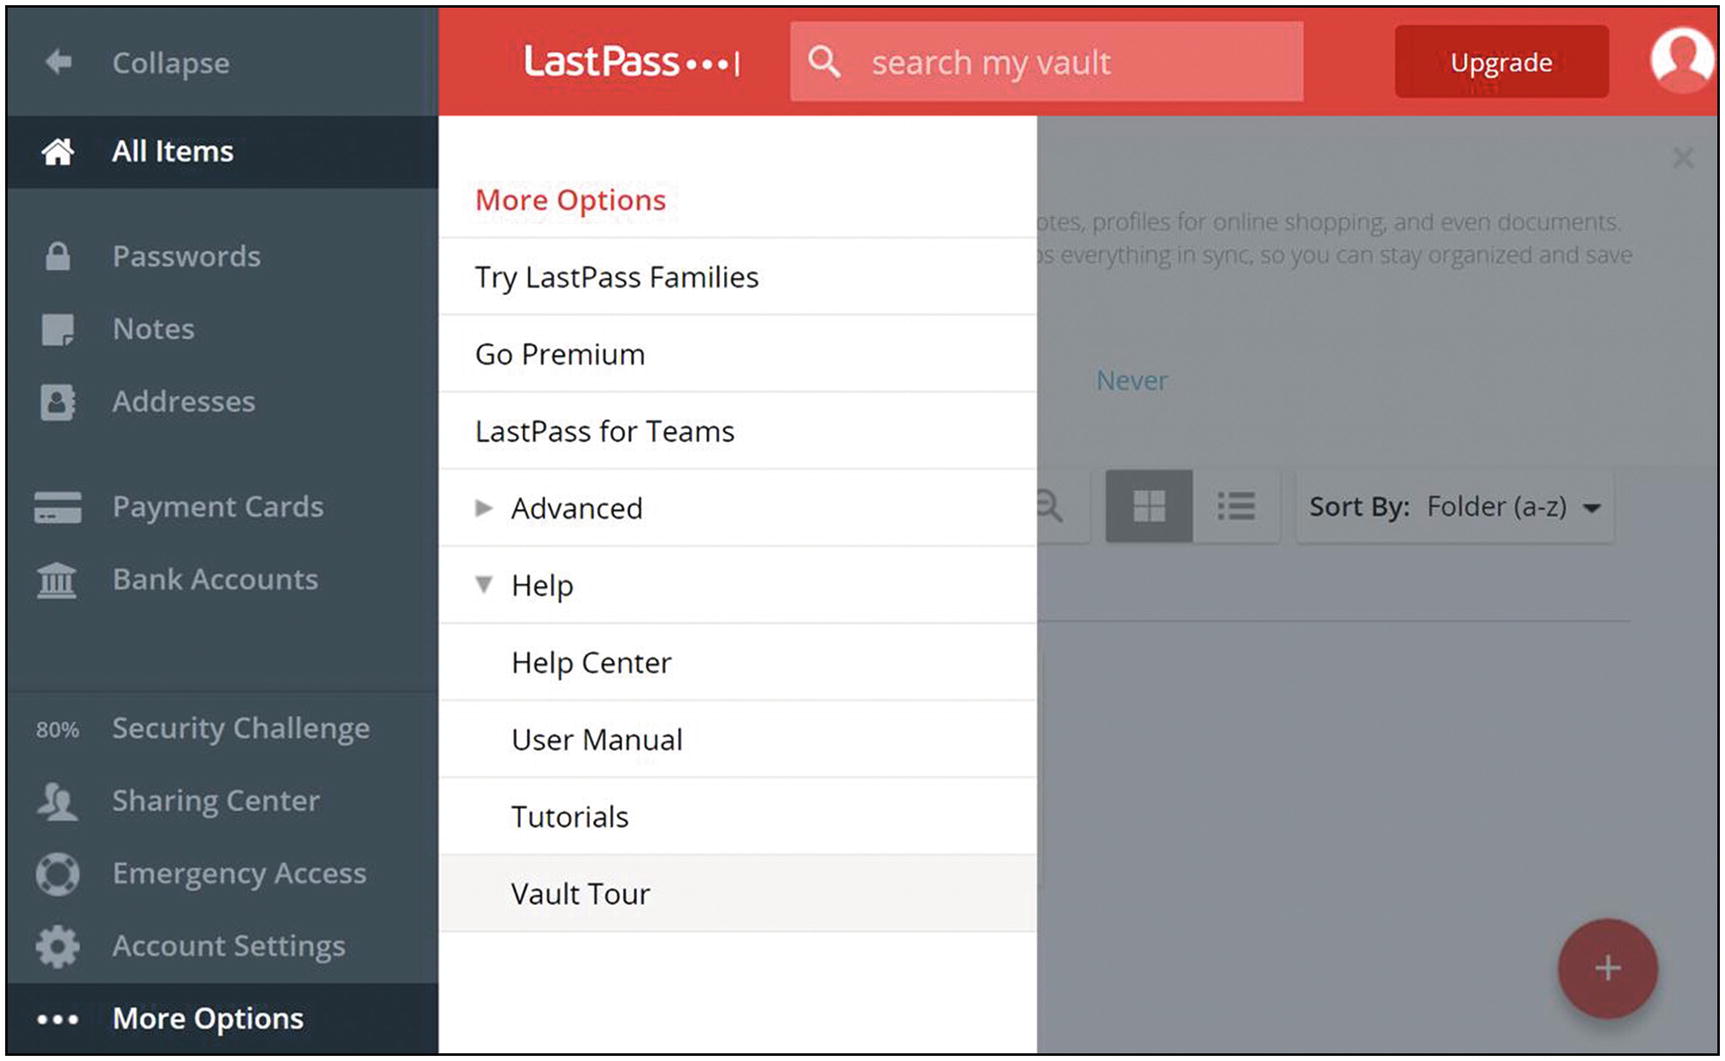
- 1.
Open your LastPass vault. Select “More Options” menu at the lower left and then “Advanced”.
- 2.
Select “One-Time Passwords”. Enter you master password, if prompted.
- 3.Click the link “Generate a one-time password” to generate a single one-time password. You may again be prompted for your master password (Figure 4-22). Repeat this as often as you like. I would suggest maybe a half dozen.
 Figure 4-22
LastPass one-time password generation
- 4.
When done, you should print off the list by clicking the “Print” link. Put these in a safe place. If you decide to carry some of these in your wallet or purse, do not label what they are!
- 1.
With a web browser, go to the following login website. (Don’t worry about memorizing this web page address, you can just search for “LastPass login one-time password” using Google or any other search engine.)
- 2.
Enter the email address you used to sign up for LastPass and one of the passwords from your list, and then click the “Log In” button (Figure 4-23).
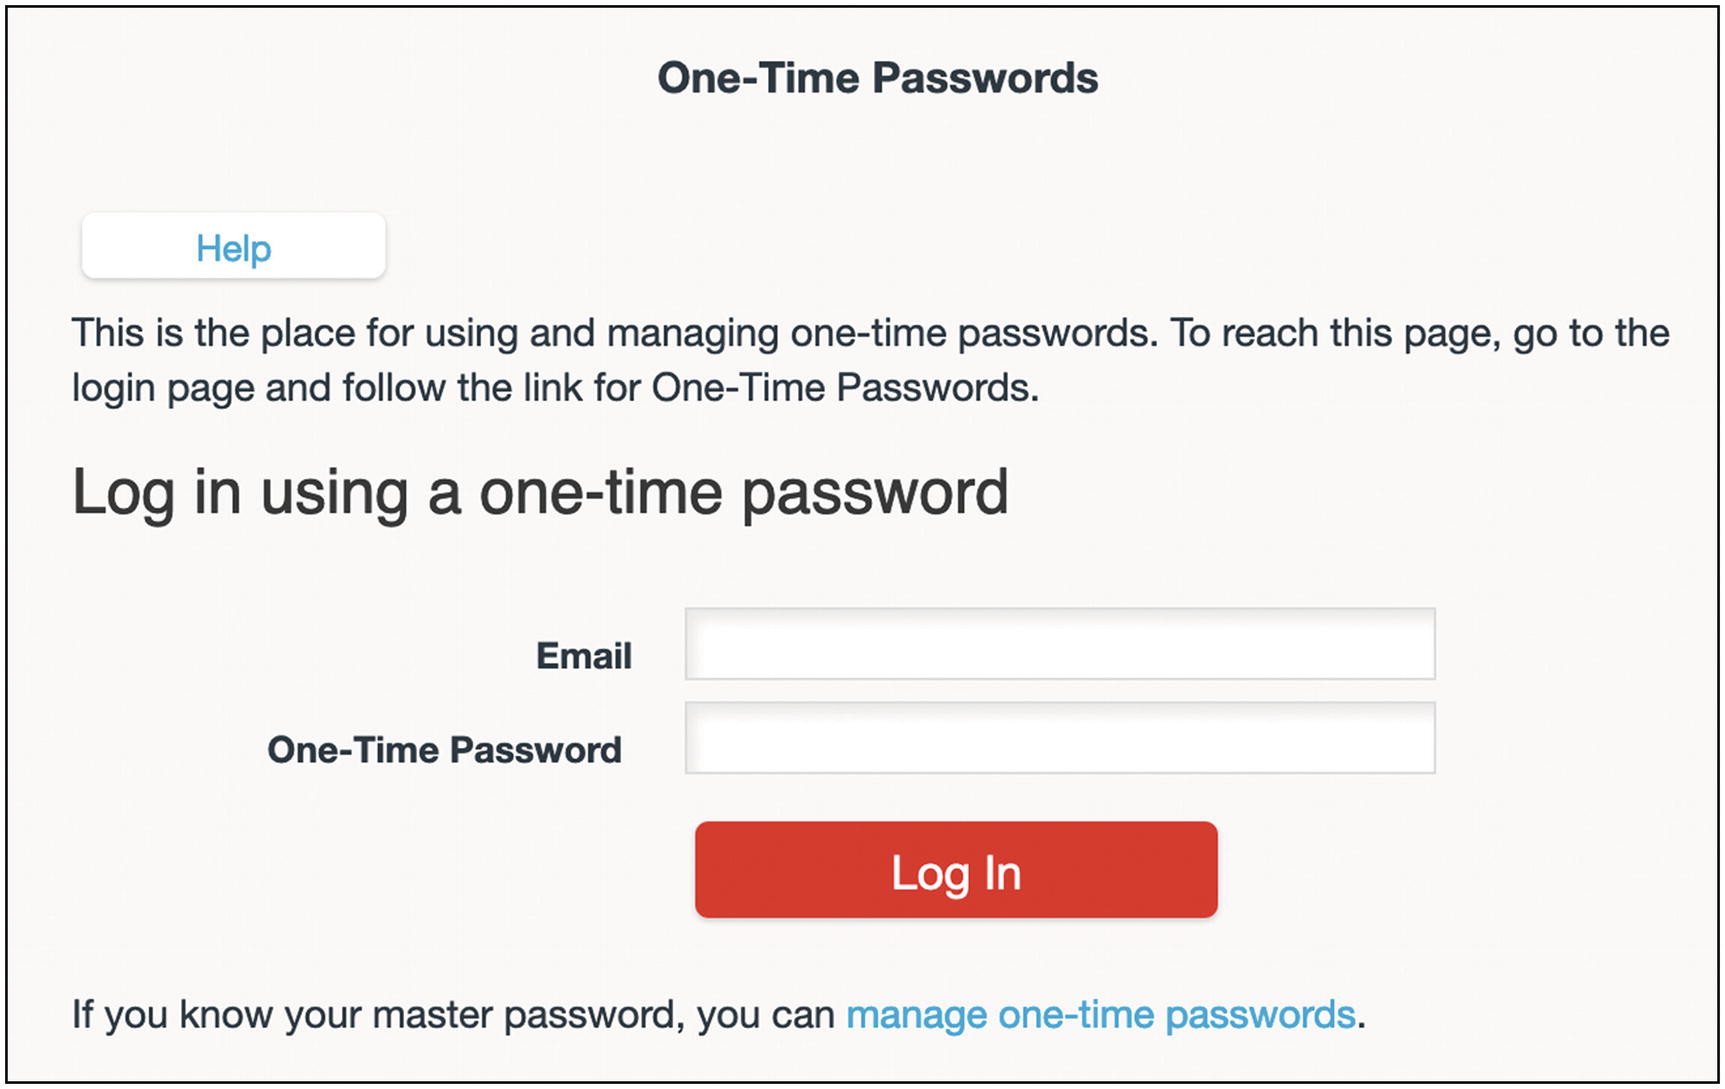
LastPass one-time password login page
- 3.
This will give you access to your password vault. You can then jot down the password you need or even change your master password if you forgot it.
- 4.
Once you successfully log in to your LastPass vault using a one-time password, cross it off your list!
Tip 4-16. Disallow LastPass Login from Foreign Countries
- 1.
Open your LastPass vault, as before. Open Account Settings.
- 2.
Under the General tab, first click the Show Advanced Settings at the bottom. Then you should see an area for “Only allow login from selected countries”. Check this box and then check off all the countries from which you might log in (Figure 4-24). Then click the “Update” button.

LastPass security, country restrictions