© The Author(s), under exclusive license to APress Media, LLC, part of Springer Nature 2022
A. PajankarPython Unit Test Automationhttps://doi.org/10.1007/978-1-4842-7854-3_8

8. Tips and Tricks

Ashwin Pajankar1  
(1)
Nashik, Maharashtra, India
 

In the first chapter of this book, you about learned the history and philosophy of Python. Subsequent chapters explored the features of various test automation frameworks in Python. The frameworks you explored included doctest, unittest, nose, nose2, and pytest. Later, you learned about Selenium and logging in detail. This chapter looks at coding conventions that will make the test discovery easier across these frameworks. Then, you will look at the concept of test-driven development and learn how it can be implemented in Python 3 projects with the help of pytest.

Coding and Filenaming Conventions for Easier Test Discovery

You have seen that all the xUnit-style frameworks include test discovery, that is, the automated detection, execution, and report generation of tests. This is a very important feature, as it makes life easier for code testers. You can even schedule the test discovery process using OS schedulers (for example, cron in Linux-based operating systems and Windows Scheduler in Windows), and they will automatically run tests at scheduled times.

In order to ensure that the test discovery system detects all the tests successfully, I usually follow these code and filename conventions:
  • The names of all the test modules (the test files) should start with test_

  • The names of all the test functions should start with test_

  • The names of all the test classes should start with Test

  • The names of all the test methods should start with test_

  • Group all the tests into test classes and packages

  • All the packages with test code should have an init.py file

It is always a good idea to follow the PEP 8 convention for the code. It can be found at https://www.python.org/dev/peps/pep-0008/.

If you use these conventions for your code and filenames, the test discovery feature of all the test automation frameworks—including unittest, nose, nose2, and pytest—will detect the tests without any problem. So, the next time you write your tests, follow these conventions for best results.

Test-Driven Development with pytest

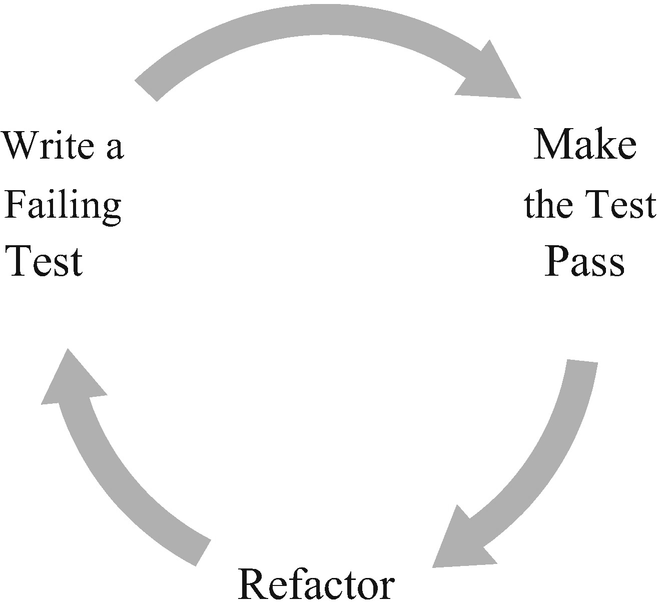
Test-driven development (TDD) is a paradigm whereby you implement a new feature or requirement by writing tests first, watch them fail, and then write the code to make the failed tests pass. Once the basic skeleton is implemented this way, you then build on this by altering the tests and changing the development code to accommodate the added functionality. You repeat this process as many times as needed to accommodate all new requirements.

Essentially, TDD is a cycle where you write the tests first, watch them fail, implement the required features, and repeat this process until the new features are added to the existing code.

By writing the automated tests before the development code, it forces you to think about the problem at hand first. As you start to build your tests, you have to think about the way you write the development code that must pass the already-written automated tests in order to be accepted.

Figure 8-1 sums up the TDD approach.
../images/436414_2_En_8_Chapter/436414_2_En_8_Fig1_HTML.png
Figure 8-1

TDD flow

To see how TDD is implemented in Python with pytest, create a directory called chapter08 for this TDD in the code directory. You will use this directory for the TDD exercise.

Create the test module shown in Listing 8-1 in the chapter08 directory.
class TestClass01:
   def test_case01(self):
      calc = Calculator()
      result = calc.add(2, 2)
       assert 4 == result
Listing 8-1

test_module01.py

Run the code in Listing 8-1 with the following command:
py.test -vs test_module01.py
The output will be as follows:
===================== test session starts =====================
platform linux -- Python 3.4.2, pytest-3.0.4, py-1.4.31, pluggy-0.4.0 -- / usr/bin/python3
cachedir: .cache
rootdir: /home/pi/book/code/chapter08,
inifile:
collected 1 items
test_module01.py::TestClass01::test_case01 FAILED
=========================== FAILURES ==========================
____________________ TestClass01.test_case01___________________
self = <test_module01.TestClass01 object at 0x763c03b0>
   def test_case01(self):
>      calc = Calculator()
E      NameError: name 'Calculator' is not defined
test_module01.py:4: NameError
==================== 1 failed in 0.29 seconds =================
From this output, you can see that the problem is that Calculator has not been imported. That is because you have not created the Calculator module! So let’s define the Calculator module in a file called calculator.py , as shown in Listing 8-2, in the same directory.
class Calculator:
   def add(self, x, y):
       pass
Listing 8-2

calculator.py

Make sure that there are no errors in calculator.py by running the following command every time you modify the module:
python3 calculator.py
Now import Calculator in the test module, as shown in Listing 8-3.
from calculator import Calculator class TestClass01:
def test_case01(self):
calc = Calculator() result = calc.add(2, 2) assert 4 == result
Listing 8-3

test_module01.py

Run the test_module01.py again. The output will be as follows:
===================== test session starts =====================
platform linux -- Python 3.4.2, pytest-3.0.4, py-1.4.31, pluggy-0.4.0 --
/usr/bin/python3
cachedir: .cache
rootdir: /home/pi/book/code/chapter08,
inifile:
collected 1 items
test_module01.py::TestClass01::test_case01 FAILED
========================= FAILURES ============================
___________________ TestClass01.test_case01____________________
self = <test_module01.TestClass01 object at 0x762c24b0>
   def test_case01(self):
      calc = Calculator()
      result = calc.add(2, 2)
>     assert 4 == result
E     assert 4 == None
test_module01.py:9: AssertionError
=================== 1 failed in 0.32 seconds ==================
The add() method returns the wrong value (i.e., pass), as it does not do anything at the moment. Fortunately, pytest returns the line with the error in the test run so you can decide what you need to change. Let’s fix the code in the add() method in calculator.py, as shown in Listing 8-4.
class Calculator:
   def add(self, x, y):
      return x+y
Listing 8-4

calculator.py

You can run the test module again. Here is the output:
===================== test session starts ====================
platform linux -- Python 3.4.2, pytest-3.0.4, py-1.4.31, pluggy-0.4.0 --
/usr/bin/python3
cachedir: .cache
rootdir: /home/pi/book/code/chapter08,
inifile:
collected 1 items
test_module01.py::TestClass01::test_case01 PASSED
================== 1 passed in 0.08 seconds ===================
Now you can add more test cases to the test module (as shown in Listing 8-5) to check for more features.
from calculator import Calculator
import pytest
   class TestClass01:
      def test_case01(self):
         calc = Calculator()
         result = calc.add(2, 2)
          assert 4 == result
      def test_case02(self):
         with pytest.raises(ValueError):
             result = Calculator().add(2, 'two')
Listing 8-5

test_module01.py

The modified code shown in Listing 8-5 is trying to add an integer and a string, which should raise a ValueError exception.

If you run the modified test module, you get the following:
===================== test session starts ====================
platform linux -- Python 3.4.2, pytest-3.0.4, py-1.4.31, pluggy-0.4.0 -- / usr/bin/python3
cachedir: .cache
rootdir: /home/pi/book/code/chapter08,
inifile:
collected 2 items
test_module01.py::TestClass01::test_case01 PASSED test_module01.py::TestClass01::test_case02 FAILED
========================= FAILURES ============================
__________________ TestClass01.test_case02_____________________
self = <test_module01.TestClass01 object at 0x7636f050>
   def test_case02(self):
      with pytest.raises(ValueError):
>     result = Calculator().add(2, 'two')
test_module01.py:14:
_ _ _ _ _ _ _ _ _ _ _ _ _ _ _ __ _ _ _ _ _ _ _ _ _ _ _ _ _ _ _
self = <calculator.Calculator object at 0x7636faf0>, x = 2, y = 'two'
   def add(self, x, y):
>      return x+y
E      TypeError: unsupported operand type(s) for +: 'int' and 'str'
calculator.py:4: TypeError
============= 1 failed, 1 passed in 0.33 seconds ==============
As you can see in the output, the second test fails because it does not detect a ValueError exception . So, let’s add the provision to check if both the arguments are numeric, or otherwise raise a ValueError exception—see Listing 8-6.
class Calculator:
   def add(self, x, y):
      number_types = (int, float, complex)
         if isinstance(x, number_types) and isinstance(y, number_types):
            return x + y
        else:
           raise ValueError
Listing 8-6

calculator.py

Finally, Listing 8-7 shows how to add two more test cases to the test module to check if add() is behaving as expected.
from calculator import Calculator
import pytest
class TestClass01:
   def test_case01(self):
      calc = Calculator()
      result = calc.add(2, 2)
       assert 4 == result
   def test_case02(self):
      with pytest.raises(ValueError):
         result = Calculator().add(2, 'two')
   def test_case03(self):
      with pytest.raises(ValueError):
         result = Calculator().add('two', 2)
   def test_case04(self):
       with pytest.raises(ValueError):
         result = Calculator().add('two', 'two')
Listing 8-7

test_module01.py

When you run the test module in Listing 8-7, you get the following output:
===================== test session starts =====================
platform linux -- Python 3.4.2, pytest-3.0.4, py-1.4.31, pluggy-0.4.0 -- / usr/bin/python3
cachedir: .cache
rootdir: /home/pi/book/code/chapter08,
inifile:
collected 4 items
test_module01.py::TestClass01::test_case01 PASSED test_module01.py::TestClass01::test_case02 PASSED test_module01.py::TestClass01::test_case03 PASSED test_module01.py::TestClass01::test_case04 PASSED
============== 4 passed in 0.14 seconds ================

This is how TDD is implemented in real-life projects. You write a failing test first, refactor the development code, and continue with the same process until the test passes. When you want to add a new feature, you repeat this process to implement it.

Conclusion

In this chapter, you learned the coding and filename conventions for easy test discovery; these conventions can be implemented across all the automation frameworks. You also read a brief introduction to TDD.

This book began with an introduction to Python, including how to install it on the various OSs and the differences between Python versions 2 and version 3. Subsequent chapters explored the most commonly used test automation frameworks for Python.

Chapter 2 explored docstrings and explained how they are useful in writing doctests.

You learned that the doctest is not a very powerful test framework, as it lacks many essentials of a true test framework.

In Chapter 3, you were introduced to Python's batteries-included test automation framework, unittest. You learned how to write xUnit-style test cases for Python with unittest.

In Chapter 4, you explored a more advanced, but defunct, test automation framework called nose. You learned about the advanced features and plugins offered by nose. Because nose is not under active development, the chapter used nose2 as a test-runner for running nose and unittest tests.

In Chapter 5, you studied and explored one of the best unit test automation frameworks for Python, pytest. You learned how and why it is better than unittest and nose. You also explored its plugins and modular fixtures.

In Chapter 6, you studied and explored the Selenium browser automation framework, which is very useful in automating test cases for various web-related programming using web browsers.

Chapter 7 explored logging with logger and loguru. Logging is a very useful feature for developers and testers.

You have practiced numerous examples throughout the book, the goal of which is to instill you with confidence in Python test automation. You also learned to work with codebases where they have implemented test automation with unittest, doctest, or nose and plan a migration to pytest. You can now write your own routines and use logging to log the errors. You can also automate web-related test cases. Also, if you are a career Python developer or an automation expert, you can follow the TDD approach in your projects. I hope you have enjoyed reading this book as much as I enjoyed writing it. Happy Pythoning and testing!!

..................Content has been hidden....................

You can't read the all page of ebook, please click here login for view all page.
Reset
18.118.128.226