Locking is an essential aspect of any RDBMS, because it allows concurrent users to access the same data, without the risk of their updates conflicting and causing data integrity issues. This chapter discusses how locking, deadlocks, and transactions work in SQL Server; it then moves on to discuss how transactions impact In-Memory transaction functionality and how the DBA can observe lock metadata regarding transactions and contention.
Understanding Locking
The following sections discuss how processes can take locks at various levels of granularity, which types of lock are compatible with others and features for controlling lock behavior during online maintenance operations and lock partitioning, which can improve performance on large systems.
Lock Granularity
Locking Granularity
Level | Description |
|---|---|
RID/KEY | A row identifier on a heap or an index key. Use locks on index keys in serializable transactions to lock ranges of rows. Serializable transactions are discussed later in this chapter. |
PAGE | A data or index page. |
EXTENT | Eight continuous pages. |
HoBT (Heap or B-Tree) | A heap of a single index (B-Tree). |
TABLE | An entire table, including all indexes. |
FILE | A file within a database. |
METADATA | A metadata resource. |
ALLOCTION_UNIT | Tables are split into three allocation units: row data, row overflow data, and LOB (Large Object Block) data. A lock on an allocation unit locks one of the three allocation units of a table. |
DATABASE | The entire database. |
An operation requires more than 5000 locks on a table, or a partition, if the table is partitioned.
The number of locks acquired within the instance causes memory thresholds to be exceeded.
LOCK_ESCALATION Values
Value | Description |
|---|---|
TABLE | Locks escalate to the table level, even when you are using partitioned tables. |
AUTO | This value allows locks to escalate to a partition, rather than the table, on partitioned tables. |
DISABLE | The value disables locks being escalated to the table level except when a table lock is required to protect data integrity. |
Locking Behaviors for Online Maintenance
Blocking Behaviors
Option | Description |
|---|---|
MAX_DURATION | The duration, specified in minutes, that an online index rebuild or SWITCH operation waits before the ABORT_AFTER_WAIT action is triggered. |
ABORT_AFTER_WAIT | These are the available actions: • NONE specifies that the operation will continue to wait, with normal priority. • SELF means that the operation will be terminated. • BLOCKERS means that all user transactions that are currently blocking the operation will be killed. |
WAIT_AT_LOW_PRIORITY | Functionally equivalent to MAX_DURATION = 0, ABORT_AFTER_WAIT = NONE. |
The script in Listing 19-1 creates the Chapter19 database, which includes a table called Customers that is populated with data. The script then demonstrates configuring LOCK_ESCALATION before rebuilding the nonclustered index on dbo.customers, specifying that any operations should be killed if they are blocking the rebuild for more than one minute. Note that the script requires either Enterprise or Developer edition to run.
Be sure to change the file paths to match your own configuration, before running the script.
Configuring Table Locking Options
Lock Compatibility
Lock Types
Type | Description |
|---|---|
Shared (S) | Used for read operations. |
Update (U) | Taken out on resources that may be updated. |
Exclusive (X) | Used when data is modified. |
Schema Modification (Sch-M)/Schema Stability (Sch-S) | Schema modification locks are taken out when DDL statements are being run against a table. Schema stability locks are taken out while queries are being compiled and executed. Stability locks only block operations that require a schema modification lock, whereas schema modification locks block all access to a table. |
Bulk Update (BU) | Bulk update locks are used during bulk load operations to allow multiple threads to parallel load data to a table while blocking other processes. |
Key-range | Key-range locks are taken on a range of rows when using pessimistic isolation levels. Isolation levels are discussed later in this chapter. |
Intent | Intent locks are used to protect resources lower in the lock hierarchy by signaling their intent to acquire a shared or exclusive lock. |
Intent Lock Types
Type | Description |
|---|---|
Intent shared (IS) | Protects shared locks on some resources at the lower level of the hierarchy |
Intent exclusive (IX) | Protects shared and exclusive locks on some resources at the lower level of the hierarchy |
Shared with intent exclusive (SIX) | Protects shared locks on all resources and exclusive locks on some resources at the lower level of the hierarchy |
Intent update (IU) | Protects update locks on all resources at the lower level of the hierarchy |
Shared intent update (SIU) | The resultant set of S and IU locks |
Update intent exclusive (UIX) | The resultant set of X and IU locks |
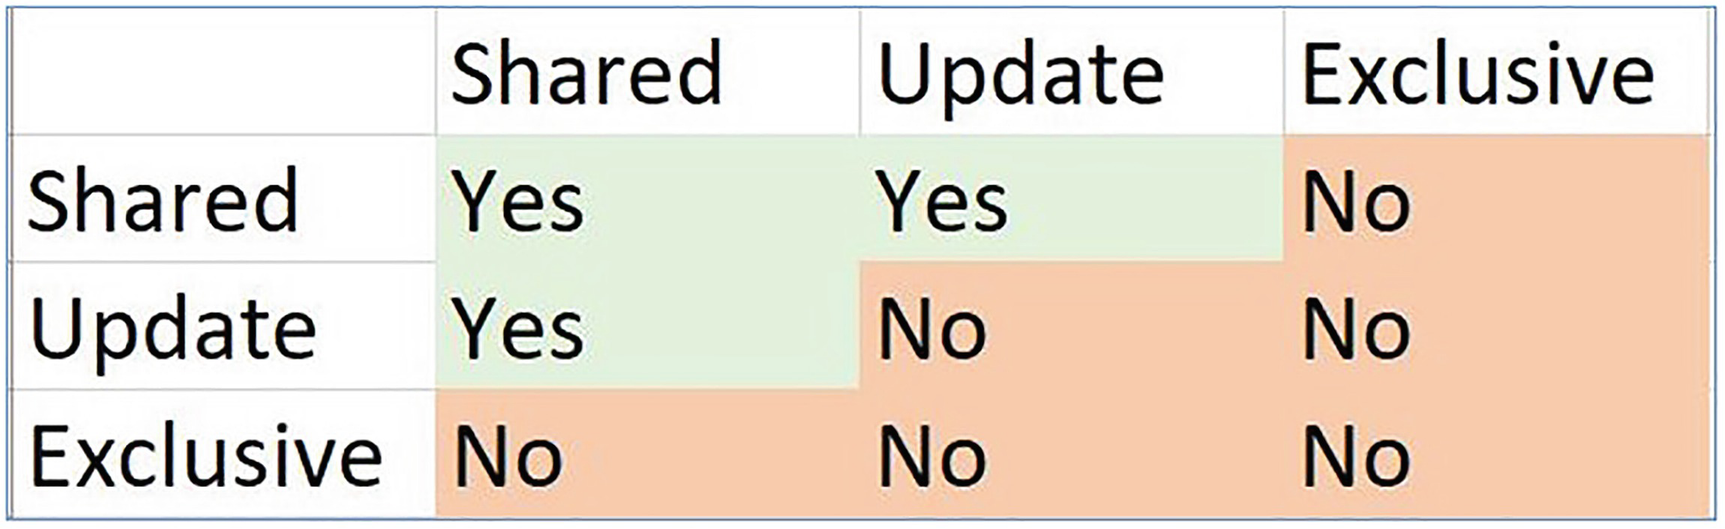
Lock compatibility matrix
Lock Partitioning
It is possible for locks on frequently accessed resources to become a bottleneck. For this reason, SQL Server automatically applies a feature called lock partitioning for any instance that has affinity with more than 16 cores. Lock partitioning reduces contention by dividing a single lock resource into multiple resources. This means that contention is reduced on shared resources such as the memory used by the lock resource structure.
Understanding Deadlocks
Because of the very nature of locking, operations need to wait until a lock has been released before they can acquire their own lock on a resource. A problem can occur, however, if two separate processes have taken out locks on different resources, but both are blocked, waiting for the other to complete. This is known as a deadlock. Most blocks are resolved automatically with time, so that both queries complete. With deadlocks, however, only one of the queries can complete.
How Deadlocks Occur
Deadlock Chronology
Process A | Process B |
|---|---|
Acquires an exclusive lock on Row1 in Table1 | |
Acquires an exclusive lock on Row2 in Table2 | |
Attempts to acquire a lock on Row2 in Table2 but is blocked by Process B | |
Attempts to acquire a lock on Row1 in Table1 but is blocked by Process A |
In the sequence described here, neither Process A nor Process B can continue, which means a deadlock has occurred. SQL Server detects deadlocks via an internal process called the deadlock monitor. When the deadlock monitor encounters a deadlock, it checks to see if the processes have been assigned a transaction priority. If the processes have different transaction priorities, it kills the process with the lowest priority. If they have the same priority, then it kills the least expensive process in terms of resource utilization. If both processes have the same cost, it picks a process at random and kills it.
Generating a Deadlock

Deadlock victim error
Minimizing Deadlocks
Your developers can take various steps to minimize the risk of deadlocks. Because it is you (the DBA) who is responsible for supporting the instance in production, it is prudent to check to make sure the development team’s code meets standards for minimizing deadlocks before you release the code to production.
Optimistic isolation levels are being used where appropriate (you should also consider the trade-offs regarding TempDB usage, disk overhead, etc.).
There should be no user interaction within transactions (this can avoid locks being held for extended periods).
Transactions are as short as possible and within the same batch (this can avoid long-running transactions, which hold locks for longer than necessary).
All programmable objects access objects in the same order (this can offset the likelihood of deadlocks and replace at the expense of contention on the first table).
Understanding Transactions
Every action that causes data or objects to be modified happens within the context of a transaction. SQL Server supports three types of transaction: autocommit, explicit, and implicit. Autocommit transactions are the default behavior and mean that each statement is performed in the context of its own transaction. Explicit transactions are started and ended manually. They start with a BEGIN TRANSACTION statement and end with either a COMMIT TRANSACTION statement, which causes the associated log records to be hardened to disk, or a ROLLBACK statement, which causes all actions within the transaction to be undone. If implicit transactions are turned on for a connection, then the default autocommit behavior no longer works for that connection. Instead, transactions are started automatically, and then committed manually, using a COMMIT TRANSACTION statement.
Transactional Properties
Transactions exhibit properties known as ACID (atomic, consistent, isolated, and durable). Each of these is discussed in the following sections.
Atomic
For a transaction to be atomic, all actions within a transaction must either commit together or roll back together. It is not possible for only part of a transaction to commit. SQL Server’s implementation of this property is slightly more flexible, however, through the implementation of save points.
Save Points
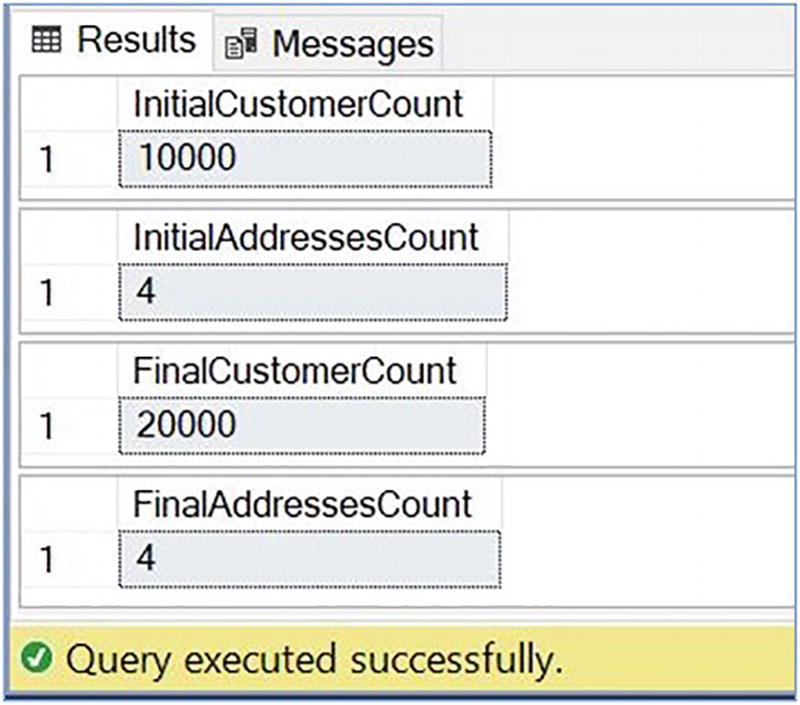
Row counts
Consistent
The consistent property means that the transaction moves the database from one consistent state to another; at the end of the transaction, all data must conform to all data rules, which are enforced with constraints, data types, and so on.
SQL Server fully enforces this property, but there are workarounds. For example, if you have a check constraint, or a foreign key on a table, and you wish to perform a large bulk insert, you can disable the constraint, insert the data, and then reenable the constraint with NOCHECK. When you use NOCHECK, the constraint enforces the rules for new data modification, but it does not enforce the rule for data that already exists in the table. When you do this, however, SQL Server marks the constraint as not trusted, and the Query Optimizer ignores the constraint until you have validated the existing data in the table using an ALTER TABLE MyTable WITH CHECK CHECK CONSTRAINT ALL command.
Isolated
Isolation refers to the concurrent transaction’s ability to see data modifications made by a transaction before they are committed. Isolating transactions avoids transactional anomalies and is enforced by either acquiring locks or maintaining multiple versions of rows. Each transaction runs with a defined isolation level. Before we discuss available isolation levels, however, we first need to examine the transactional anomalies that can occur.
Transactional Anomalies
Transactional anomalies can cause queries to return unpredictable results. Three types of transaction anomalies are possible within SQL Server: dirty reads, nonrepeatable reads, and phantom reads. These are discussed in the following sections.
Dirty Reads
A Dirty Read
Transaction1 | Transaction2 |
|---|---|
Inserts row1 into Table1 | |
Reads row1 from Table1 | |
Rolls back |
In this example, because Transaction1 rolled back, Transaction2 read a row that never existed in the database. This anomaly can occur if shared locks are not acquired for reads, since there is no lock to conflict with the exclusive lock taken out by Transaction1.
Nonrepeatable Read
A Nonrepeatable Read
Transaction1 | Transaction2 |
|---|---|
Reads row1 from Table1 | |
Updates row1 in Table1 | |
Commits | |
Reads row1 from Table1 |
In this example, you can see that Transaction1 has read row1 from Table1 twice. The second time, however, it receives a different result, because Transaction2 has updated the row. This anomaly can occur if Transaction1 takes out shared locks but does not hold them for the duration of the transaction.
Phantom Read
Phantom Reads
Transaction1 | Transaction2 |
|---|---|
Reads all rows from Table1 | |
Inserts ten rows into Table1 | |
Commits | |
Reads all rows from Table1 |
In this example, you can see that Transaction1 has read all rows from Table1 twice. The second time, however, it reads an extra ten rows, because Transaction2 has inserted ten rows into the table. This anomaly can occur when Transaction1 does not acquire a key-range lock and hold it for the duration of the transaction.
Isolation Levels
SQL Server provides four pessimistic and two optimistic transaction isolation levels for transactions that involve disk-based tables. Pessimistic isolation levels use locks to protect against transactional anomalies and optimistic isolation levels use row versioning.
Pessimistic Isolation Levels
Read Uncommitted is the least restrictive isolation level. It works by acquiring locks for write operations but not acquiring any locks for read operations. This means that under this isolation level, read operations do not block other readers or writers. The result is that all transactional anomalies described in the previous sections are possible.
Read Committed is the default isolation level. It works by acquiring shared locks for read operations as well as locks for write operations. The shared locks are only held during the read phase of a specific row, and the lock is released as soon as the record has been read. This results in protection against dirty reads, but nonrepeatable reads and phantom reads are still possible.
In some circumstances, shared locks may be held until the end of the statement. This occurs when a physical operator is required to spool data to disk.
In addition to acquiring locks for write operations, Repeatable Read acquires shared locks on all rows that it touches and then it holds these locks until the end of the transaction. The result is that dirty reads and nonrepeatable reads are not possible, although phantom reads can still occur. Because the reads are held for the duration of the transaction, deadlocks are more likely to occur than when you are using Read Committed or Read Uncommitted isolation levels.
Serializable is the most restrictive isolation level, and the level where deadlocks are most likely to occur. It works by not only acquiring locks for write operations, but also by acquiring key-range locks for read operations, and then holding them for the duration of the transaction. Because key-range locks are held in this manner, no transactional anomalies are possible, including phantom reads.
Optimistic Isolation Levels
Optimistic isolation levels work without acquiring any locks for either read or write operations. Instead, they use a technique called row versioning. Row versioning works by maintaining a new copy of a row in TempDB for uncommitted transactions every time the row is updated. This means that there is always a consistent copy of the data that transactions can refer to. This can dramatically reduce contention on highly concurrent systems. The trade-off is that you need to scale TempDB appropriately, in terms of both size and throughput capacity, since the extra I/O can have a negative impact on performance.
Snapshot isolation uses optimistic concurrency for both read and write operations. It works by assigning each transaction a transaction sequence number at the point the transaction begins. It is then able to read the version of the row from TempDB that was current at the start of the transaction by looking for the closest sequence number that is lower than the transaction’s own sequence number. This means that although other versions of the row may exist with modifications, it cannot see them, since the sequence numbers are higher. If two transactions try to update the same row at the same time, instead of a deadlock occurring, the second transaction throws error 3960 and the transaction is rolled back. The result of this behavior is that dirty reads, nonrepeatable reads, and phantom reads are not possible.
The Read Committed Snapshot uses pessimistic concurrency for write operations and optimistic concurrency for read operations. For read operations, it uses the version of the row that is current at the beginning of each statement within the transaction, as opposed to the version that was current at the beginning of the transaction. This means that you achieve the same level of isolation as you would by using the pessimistic Read Committed isolation level.
Turning On Optimistic Isolation
Durable
For a transaction to be durable, after it has been committed, it stays committed, even in a catastrophic event. This means that the change must be written to disk, since the change within memory will not withstand a power failure, a restart of the instance, and so on. SQL Server achieves this by using a process called write-ahead logging (WAL). This process flushes the log cache to disk at the point the transaction commits, and the commit only completes once this flush finishes.
The log cache becomes full and automatically flushes to disk.
A fully durable transaction in the same database commits.
The sp_flush_log system stored procedure is run against the database.
Support Levels for Delayed Durability
Support Level | Description |
|---|---|
ALLOWED | Delayed durability is supported within the database and specified on a transaction level basis. |
FORCED | All transactions within the database will use delayed durability. |
DISABLED | The default setting. No transactions within the database are permitted to use delayed durability. |
Allowing Delayed Durability
Committing with Delayed Durability
The most important thing to remember, when using delayed durability, is the potential for data loss. If any transactions have committed but the associated log records have not been flushed to disk when the instance goes down, this data is lost.
In the event of an issue, such as an I/O error, it is possible for uncommitted transactions to enter a state where they cannot be committed or rolled back. This occurs when you are bringing a database back online and it fails during both the redo phase and the undo phase. This is called a deferred transaction. Deferred transactions stop the VLF that they are in from being truncated, meaning that the transaction log continues to grow.
Resolving the issue depends on the cause of the problem. If the problem is caused by a corrupt page, then you may be able to restore this page from a backup. If the issue is caused because a filegroup was offline, then you must either restore the filegroup or mark the filegroup as defunct. If you mark a filegroup as defunct, you cannot recover it.
Transaction with In-Memory OLTP
Memory-optimized tables do not support locks to improve concurrency; this changes the way isolation levels can work, since pessimistic concurrency is no longer an option. We discuss isolation levels supported for In-Memory OLTP, along with considerations for cross-container queries, in the following sections.
Isolation Levels
Because all isolation levels used with In-Memory OLTP must be optimistic, each isolation level implements row versioning. Unlike row versi
oning for disk-based tables, however, row versions for memory-optimized tables are not maintained in TempDB. Instead, they are maintained in the memory-optimized table that they relate to.
Read Committed
The Read Committed isolation level is supported against memory-optimized tables, but only if you are using autocommit transactions. It is not possible to use Read Committed in explicit or implicit transactions. It is also not possible to use Read Committed in the ATOMIC block of a natively compiled stored procedure. Because Read Committed is the default isolation level for SQL Server, you must either ensure that all transactions involving memory-optimized tables explicitly state an isolation level, or you must set the MEMORY_OPTIMIZED_ELEVATE_TO_SNAPSHOT database property. This option elevates all transactions that involve memory-optimized tables but do not specify an isolation level to Snapshot isolation, the least restrictive isolation level, which is fully supported for In-Memory OLTP.
Elevating to Snapshot
Read Committed Snapshot
The Read Committed Snapshot isolation level is supported for memory-optimized tables, but only when you are using autocommit transactions. This isolation level is not supported when the transaction accesses disk-based tables.
Snapshot
The Snapshot isolation level uses row versioning to guarantee that a transaction always sees the data, as it was at the start of the transaction. Snapshot isolation is only supported against memory-optimized tables when you use interpreted SQL if it is specified as a query hint as opposed to at the transaction level. It is fully supported in the ATOMIC block of natively compiled stored procedures.
If a transaction attempts to modify a row that has already been updated by another transaction, then the conflict detection mechanism rolls back the transaction, and Error 41302 is thrown. If a transaction attempts to insert a row that has the same primary key value as a row that has been inserted by another transaction, then conflict detection rolls back the transaction and Error 41352 is thrown. If a transaction attempts to modify the data in a table that has been dropped by another transaction, then Error 41305 is thrown, and the transaction is rolled back.
Repeatable Read
The Repeatable Read isolation level provides the same protection as Snapshot, but additionally, it guarantees that rows read by the transaction have not been modified by other rows since the start of the transaction. If the transaction attempts to read a row that has been modified by another transaction, then Error 41305 is thrown and the transaction is rolled back. The Repeatable Read isolation is not supported against memory-optimized tables when using interpreted SQL, however. It is only supported in the ATOMIC block of natively compiled stored procedures.
Serializable
The Serializable isolation level offers the same protection that is offered by Repeatable Read, but in addition, it guarantees that no rows have been inserted within the range of rows being accessed by queries within the transaction. If a transaction using the Serializable isolation level cannot meet its guarantees, then the conflict detection mechanism rolls back the transaction and Error 41325 is thrown. Serializable isolation is not supported against memory-optimized tables when using interpreted SQL, however. It is only supported in the ATOMIC block of natively compiled stored procedures.
Cross-Container Transactions
Joining Disk and Memory Tables with Automatic Elevation
Turning Off MEMORY_OPTIMIZED_ELEVATE_TO_SNAPSHOT

Join disk and memory tables without automatic elevation
Joining Disk and Memory-Optimized Tables Using Query Hints
Using Serializable Isolation in a Natively Compiled Stored Procedure
Retry Logic
Whether you are using interpreted SQL or a natively compiled stored procedure, always ensure that you use retry logic when you are running transactions against memory-optimized tables. This is because of the optimistic concurrency model, which means that the conflict detection mechanism rolls transactions back, as opposed to managing concurrency with locking. It is also important to remember that SQL Server even rolls back read-only transactions if the required level of isolation cannot be guaranteed. For example, if you are using serializable isolation in a read-only transaction, and another transaction inserts rows that match your query filters, the transaction is rolled back.
Retry Logic for Memory-Optimized Tables
Observing Transactions, Locks, and Deadlocks
SQL Server provides a set of DMVs that expose information about current transactions and locks. The following sections explore the metadata available.
Observing Transactions
Columns Returned by sys.dm_tran_active_transactions
Column | Description |
|---|---|
transaction_id | The unique ID of the transaction. |
name | The name of the transaction. If the transaction has not been marked with a name, then the default name is displayed—for example, "user_transaction". |
transaction_begin_time | The date and time that the transaction started. |
transaction_type | An integer value depicting the type of transaction. • 1 indicates a read/write transaction. • 2 indicates a read-only transaction. • 3 indicates a system transaction. • 4 indicates a distributed transaction. |
transaction_uow | A unit of work ID that MSDTC (Microsoft Distributed Transaction Coordinator) uses to work with distributed transactions. |
transaction_state | The current status of the transaction. • 0 indicates that the transaction is still initializing. • 1 indicates that the transaction is initialized but has not yet started. • 2 indicates that the transaction is active. • 3 indicates that the transaction has ended. This status is only applicable to read-only transactions. • 4 indicates that the commit has been initiated. This status is only applicable to distributed transactions. • 5 indicates that the transaction is prepared and awaiting resolution. • 6 indicates that the transaction has been committed. • 7 indicates that the transaction is being rolled back. • 8 indicates that the rollback of a transaction has finished. |
dtc_state | Indicates the state of a transaction on an Azure database. • 1 indicates that the transaction is active. • 2 indicates that the transaction is prepared. • 3 indicates that the transaction is committed. • 4 indicates that the transaction is aborted. • 5 indicates that the transaction is recovered. |
Undocumented columns have been omitted from DVMs in this chapter.
The script in Listing 19-13 indicates how to use sys.dm_tran_active_transactions to find details of long-running transactions. The query looks for transactions that have been running for longer than ten minutes and returns information including their current state, the amount of resources they are consuming, and the login that is executing them.
In a test environment, begin a transaction but do not commit it ten minutes before running this query.
Long-Running Transactions
sys.dm_tran_session_transactions Columns
Column | Description |
|---|---|
session_id | The ID of the session in which the transaction is running. |
transaction_id | The unique ID of the transaction. |
transaction_descriptor | The ID used to communicate with the client driver. |
enlist_count | The number of active requests in the session. |
is_user_transaction | Indicates if the transaction is a user or a system transaction. 0 indicates a system transaction and 1 indicates a user transaction. |
is_local | Indicates if the transaction is distributed. 0 indicates a distributed transaction and 1 indicates a local transaction. |
is_enlisted | Indicates that a distributed transaction is enlisted. |
is_bound | Indicates if the transaction is running in a bound session. |
open_transaction_count | A count of open transactions within the session. |
Joining to sys.dm_exec_requests and cross applying sys.dm_exec_sql_text will also provide you with the SQL statement that was executed.
Observing Locks and Contention
sys.dm_tran_locks
Column | Description |
|---|---|
resource_type | The resource type on which the lock has been placed. |
resource_subtype | The subtype of the resource type that has a lock placed on it. For example, if you are updating the properties of a database, then the resource_type is METADATA and the resource_subtype is DATABASE. |
resource_database_id | The ID of the database that contains the resource that has a lock placed on it. |
resource_description | Additional information about the resource that is not contained in other columns. |
resource_associated_entity_id | The ID of the database entity with which the resource is associated. |
resource_lock_partition | The partition number of the lock, if lock partitioning is being used. |
request_mode | The locking mode that has been requested or acquired. For example, S for a shared lock, or X for an exclusive lock. |
request_type | The request_type is always LOCK. |
request_status | The current status of the lock request. Possible values are ABORT_BLOCKERS, CONVERT, GRANTED, LOW_PRIORITY_CONVERT, LOW_PRIORITY_WAIT, and WAIT. |
request_reference_count | The number of times that the requestor has requested a lock on the same resource. |
request_session_id | The session ID that currently owns the request. It is possible for the session ID to change if the transaction is distributed. |
request_exec_context_id | The execution ID of the process that requested the lock. |
request_request_id | The Batch ID of the batch that currently owns the request. This ID can change if Multiple Active Result Sets (MARS) are being used by the application. |
request_owner_type | The type of the owner of the lock request. Possible vales are TRANSACTION, SESSION, and CURSOR for user operations. Values can also be SHARED_TRANSACTION_WORKSPACE and EXCLUSIVE_TRANSACTION_WORKSPACE, which are used internally to hold locks for enlisted transactions; or NOTIFICATION_OBJECT, which is used by internal SQL Server operations. |
request_owner_id | The ID of the transaction that owns the lock request, unless the request was made by a FileTable, in which case -3 indicates a table lock, -4 indicates a database lock, and other values indicate the file handle of the file. |
request_owner_guid | A GUID identifying the request owner. Only applicable to distributed transactions. |
lock_owner_address | Memory address of the request’s internal data structure. |
sys.dm_os_waiting_tasks Columns
Column | Description |
|---|---|
waiting_task_address | The address of the task that is waiting. |
session_id | The ID of the session in which the waiting task is running. |
exec_context_id | The ID of the thread and subthread that is running the task. |
wait_duration_ms | The duration of the wait, specified in milliseconds. |
wait_type | The type of wait that is being experienced. Waits are discussed in Chapter 18. |
resource_address | The address of the resource the task is waiting for. |
blocking_task_address | Indicates the address of the task that is currently consuming the resource. |
blocking_session_id | The Session ID of the task that is currently consuming the resource. |
blocking_exec_context_id | The ID of the thread and subthread of the task that is currently consuming the resource. |
resource_description | Additional information about the resource, which is not contained in other columns, including the lock resource owner. |
Using sys.dm_tran_locks
To stop the blocking, run ROLLBACK in the first query window.

sys.dm_tran_locks results
Observing Deadlocks
You can capture details of deadlocks and have them written to the error log by turning on trace flags 1204 and 1222. Trace flag 1204 captures details of the resources and types of lock involved in a deadlock. It contains a section for each node involved in the deadlock, followed by a section detailing the deadlock victim. Trace flag 1222 returns three sections. The first gives details of the deadlock victim; the second gives details of the processes involved in the deadlock; and the final section describes the resources that are involved in the deadlock.

Deadlock Graph
If the system health session has a rollover size limit, then details of deadlock can be lost.
Summary
Locks can be taken at different levels of granularity. Locking at a lower level reduces contention but uses additional resources for internal lock memory structures. Locking at a higher level can increase the wait time of other processes and increase the likelihood of deadlocks. SQL Server supports features that give DBAs the ability to control locking behaviors for online maintenance operations, such as index rebuilds and partition switching operations. On large systems with 16 or more cores available to the instance, SQL Server automatically implements lock partitioning, which can reduce contention by splitting a single lock resource into multiple resources.
Transactions have ACID properties, making them atomic, consistent, isolated, and durable. SQL Server offers the functionality to relax some of these rules, however, in order to improve performance and make coding easier. Six isolation levels are available against disk tables, two of which are optimistic and the others are pessimistic. Pessimistic isolation levels work by acquiring locks to avoid transactional anomalies, whereas optimistic concurrency relies on row versioning.
Because memory-optimized tables do not support locks, all transactions against memory-optimized tables use optimistic concurrency. SQL Server has implemented optimistic isolation levels, which can only be used against memory-optimized tables. Because of the optimistic nature of the transactions, you should implement retry logic for both read-only and read/write transactions.
SQL Server offers a wide array of metadata that can help you, as a DBA, observe transactions, locks, contention, and deadlocks. Sys.dm_tran_active_transactions show details of transactions that are currently active on the instance. Sys.dm_tran_locks expose information about locks that have currently been requested or granted within the instance. You can capture deadlock information in the SQL Server error log by enabling trace flags 1204 and 1222, but the system health trace also captures deadlock information by default. This means that you can retrieve deadlock information after the fact, without having to perform upfront configuration or tracing.