Policy-Based Management (PBM) is a system DBAs can use to report on or enforce standards across the enterprise, when used with a Central Management Server. This chapter first introduces you to the concepts used by PBM and then demonstrates how to use PBM to effectively manage an estate through the GUI and with PowerShell.
PBM Concepts
Policy-Based Management uses the concepts of targets, facets, conditions, and policies. Targets are entities PBM manages, such as databases or tables. Facets are collections of properties that relate to a target. For example, the database facet includes a property relating to the name of the database. Conditions are Boolean expressions that can be evaluated against a property. A binds conditions to targets. The following sections discuss each of these concepts.
Facets
Finding a List of Facets
Conditions
=
!=
LIKE
NOT LIKE
IN
NOT IN
For example, you can use the LIKE operator to ensure that all database names begin with Chapter by using the following expression Database.Name LIKE 'Chapter%'.
Targets
A target is an entity to which a policy can be applied. This can be a table, a database, an entire instance, or most other objects within SQL Server. When adding targets to a policy, you can use conditions to limit the number of targets. This means, for example, if you create a policy to enforce database naming conventions on an instance, you can use a condition to avoid checking the policy against database names that contain the words “SharePoint,” “bdc,” or “wss,” since these are your SharePoint databases and they may contain GUIDs that may be disallowed under your standard naming conventions.
Policies
A policy contains one condition and binds it to one or more targets (targets may also be filtered by separate conditions) and an evaluation mode. Depending on the evaluation mode you select, the policy may also contain a schedule on which you would like the policy to be checked. Policies support four evaluation modes, which are discussed in the following section.
Evaluation Modes
On Demand
On Schedule
On Change: Log Only
On Change: Prevent
If the evaluation mode is configured as On Demand, then the policies are only evaluated when you (the DBA) manually evaluate them. If the evaluation mode is configured as On Schedule, then you create a schedule when you create the policy; this causes the policy to be evaluated periodically.
A policy can be evaluated On Demand even if it has been configured with a different evaluation mode.
If you select the On Change: Log Only evaluation mode, then whenever the relevant property of a target changes, the result of the policy validation is logged to the SQL Server log. In the event that the policy is fired but not validated, a message is generated in the log. This occurs when a target has been configured in such a way that one of your policies is violated. If the policy is violated, then Error 34053 is thrown with a severity level of 16 (meaning the problem can be fixed by the user).
When you create an object, this causes the properties to be evaluated in the same way that they are when an existing object’s properties are altered.
If you choose On Change: Prevent as the evaluation mode, then when a property is changed, SQL Server evaluates the property, and if there is a violation, an error message is thrown and the statement that caused the policy violation is rolled back.
Listing Supported Execution Types per Facet
Central Management Servers
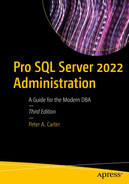
SQL Server Management Studio provides a feature called a central management server. This feature allows you to register an instance as a central management server and then register other instances as registered servers of this central management server. Once you have registered servers under a central management server, you can run queries against all servers in the group or run policies against all servers within a group.
CMS is a great feature, when used with Policy Based Management, but also in its own right. I always implement CMS when I am looking after medium or large SQL Server estates, for purposes such as running ad hoc queries against multiple servers. This allows me to quickly answer management and capacity questions, such as “How many databases do we have in our estate?”
The Registered Servers window
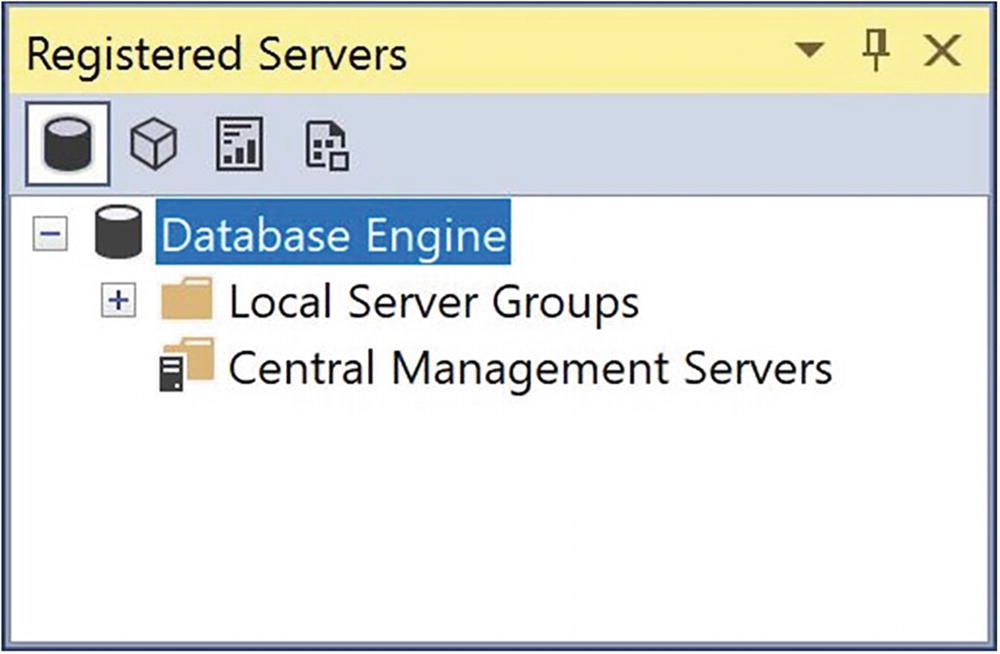
The General tab
On this tab, we enter the server/instance name of the central management server in the Server name box. This causes the Registered server name field to update, but you can edit this manually to give it a new name if you wish. Optionally, you can also add a description for the instance.
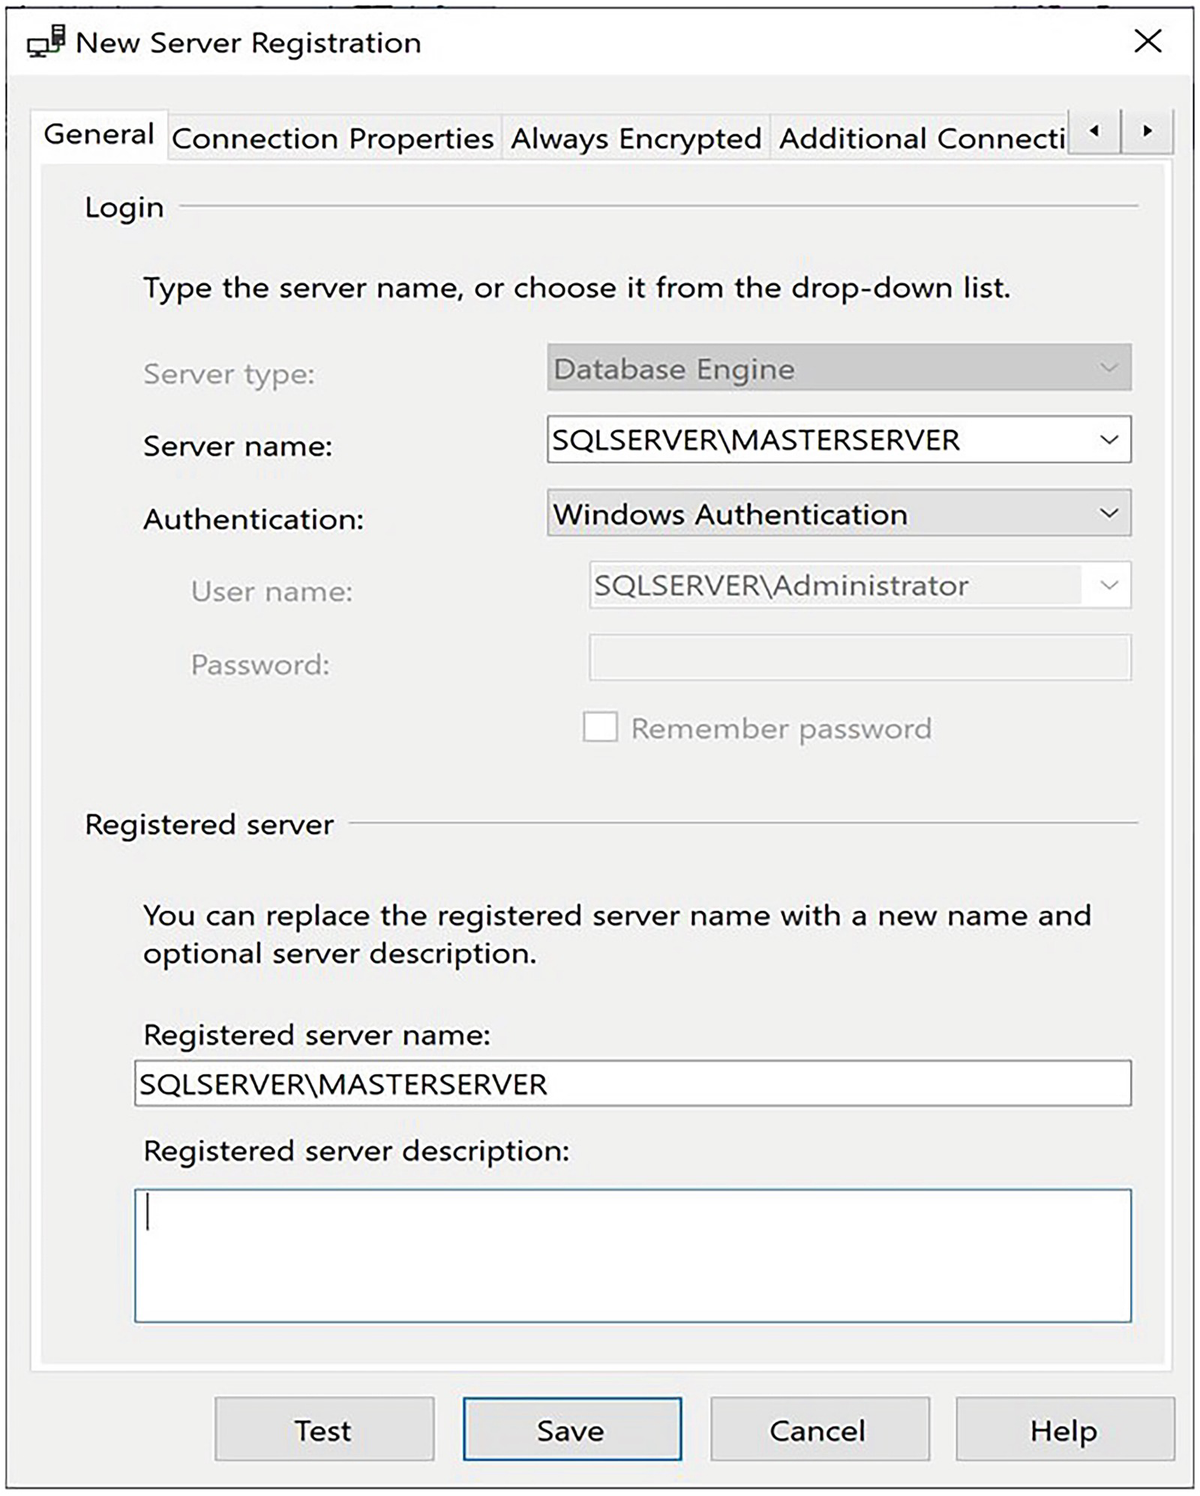
The Connection Properties tab
On this tab, we enter a database as a landing zone. If we leave the option as Default, then the connection is made to our default database. In the Network section of the tab, you can specify a specific network protocol to use, or leave the setting as Default, which is what we have done here. Leaving this as Default causes the connection to use the highest priority protocol specified in the instance’s network configuration. Although changing the network packet size is not normally advised, because in most scenarios, it will have a negative effect, doing so can improve performance in atypical scenarios by allowing the connection to benefit from jumbo frames, which are Ethernet frames that can support a larger payload and therefore cause less fragmentation of traffic.
In the Connection section of the screen, we specify durations for connection time-outs and execution time-outs. You can also specify whether to encrypt connections made to the central management server. If you are managing multiple instances within a single instance of SQL Server Management Studio, the Use custom color option is very useful for color coding the instance. Checking this option and specifying a color helps avoid queries accidently being run against an incorrect server. I find color coding instances particularly useful when I’m troubleshooting failed code releases, since I don’t want to accidently run Dev/Test code against production!
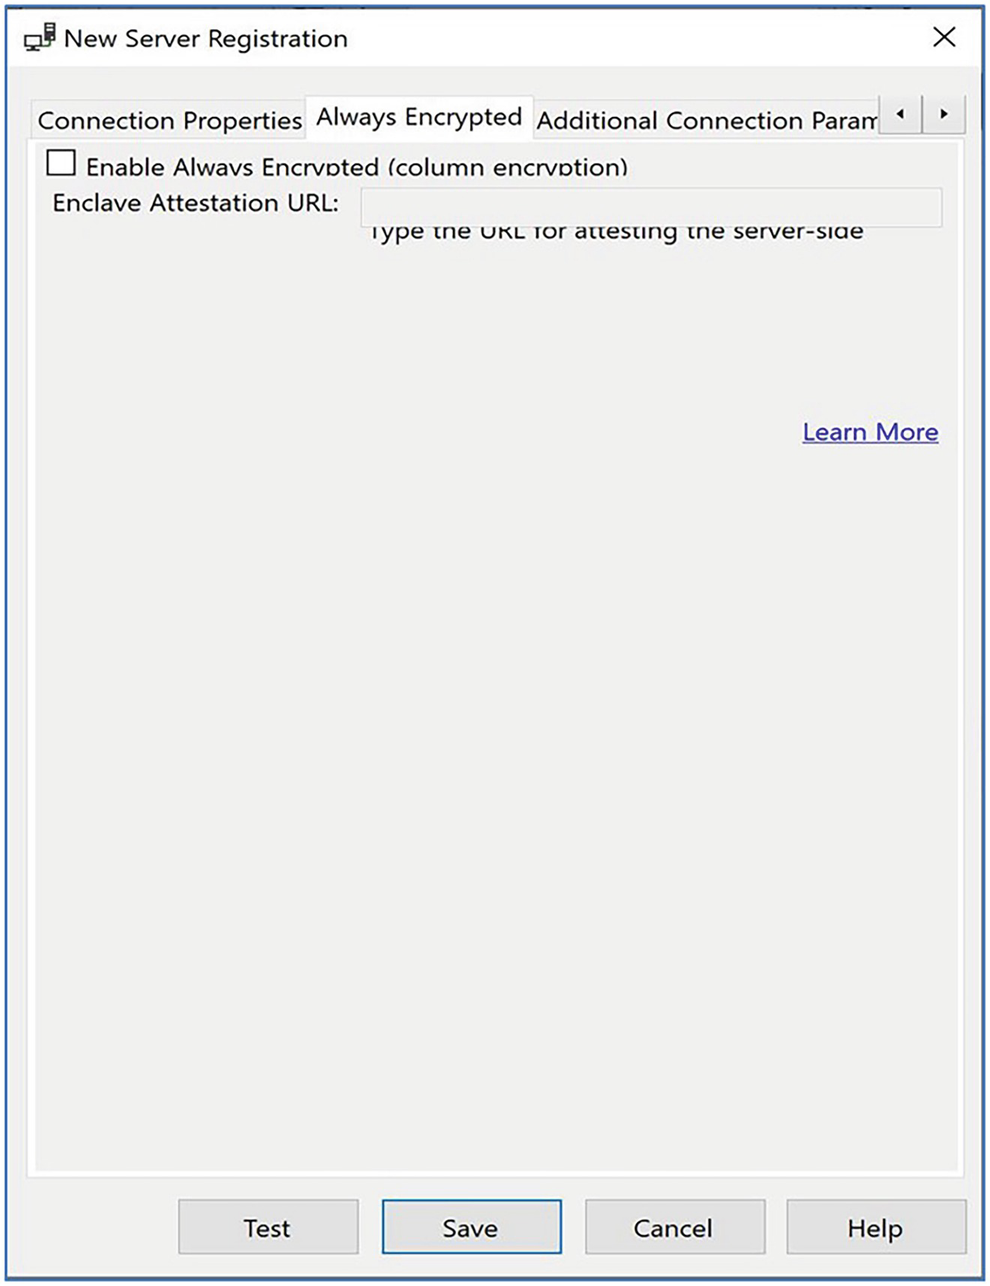
Always Encrypted tab
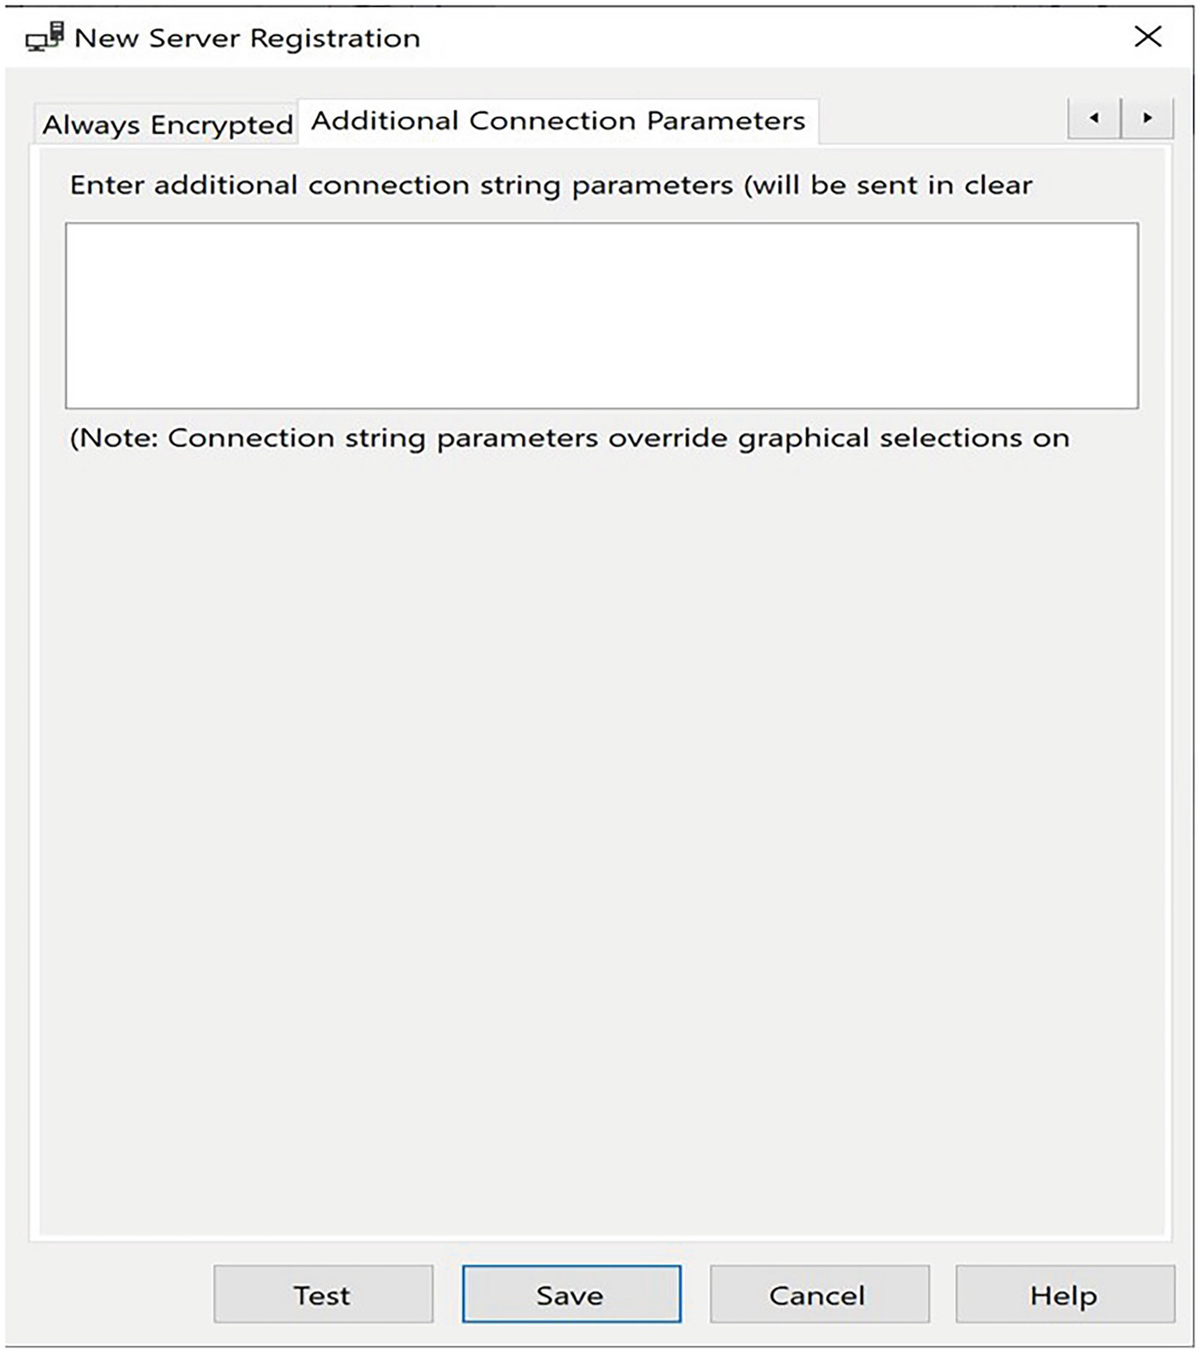
Additional Connection Properties tab
Clicking the Test button at the bottom of the New Server Registration window allows you to test the connection to the instance before you save it. This is always a good idea because it helps you avoid unnecessary troubleshooting at a later date.
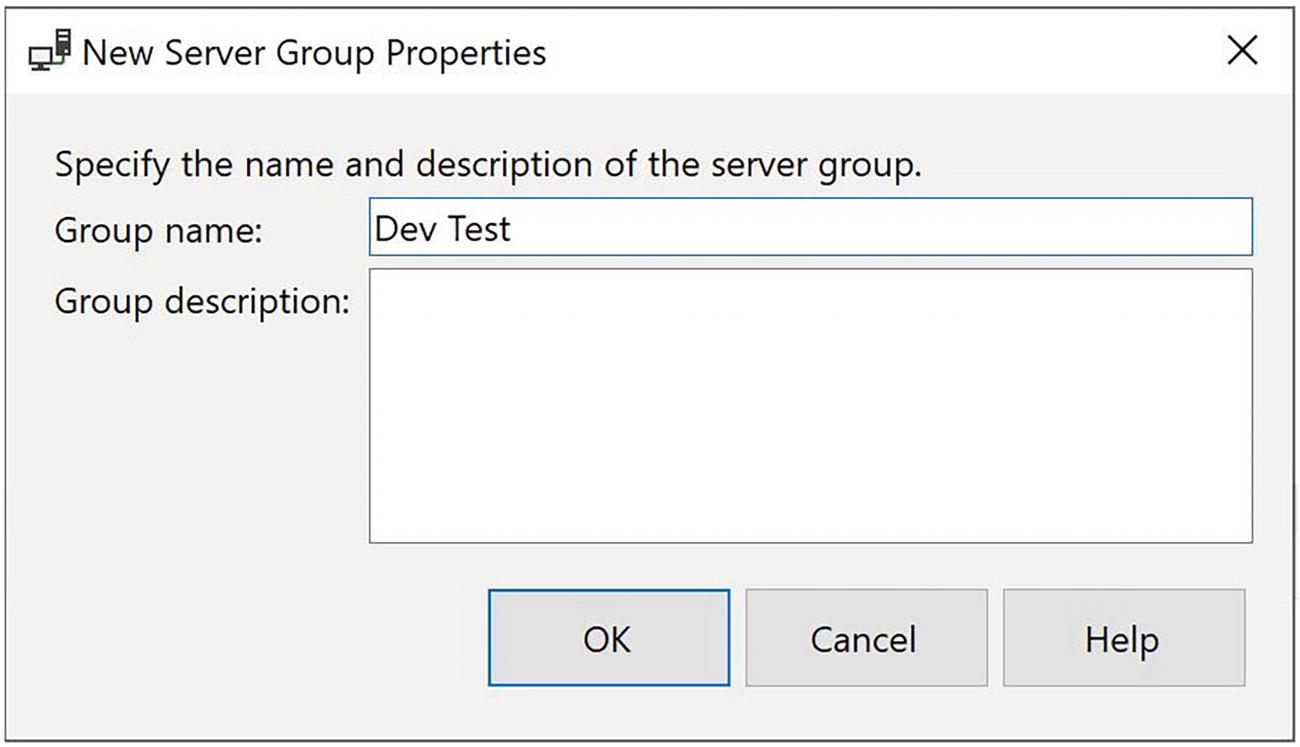
New Server Group Properties dialog box
You can see that we are using this dialog box to enter the name and description of the server group that will group our Dev/Test servers together. After exiting the dialog box, we repeat the process to create a server group for our production servers, which we name Prod.
You can also nest server groups. Therefore, in more complex topologies, you can have a server group for each geographical region, which contains a server group for each environment.
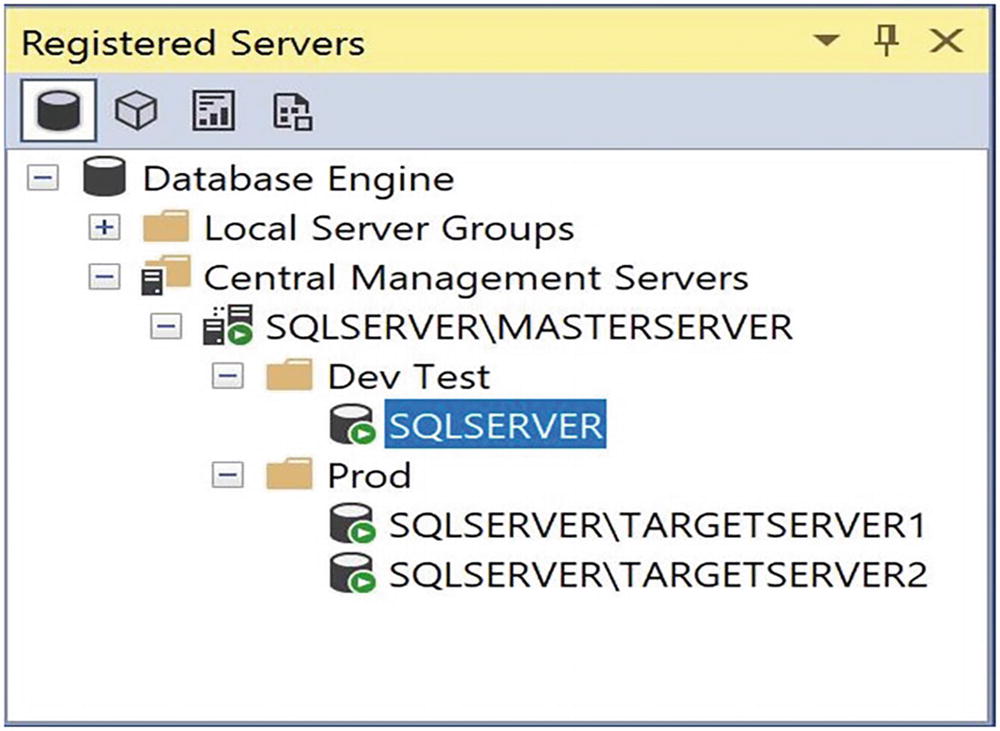
The Registered Servers window
Listing All Database in the Server Group
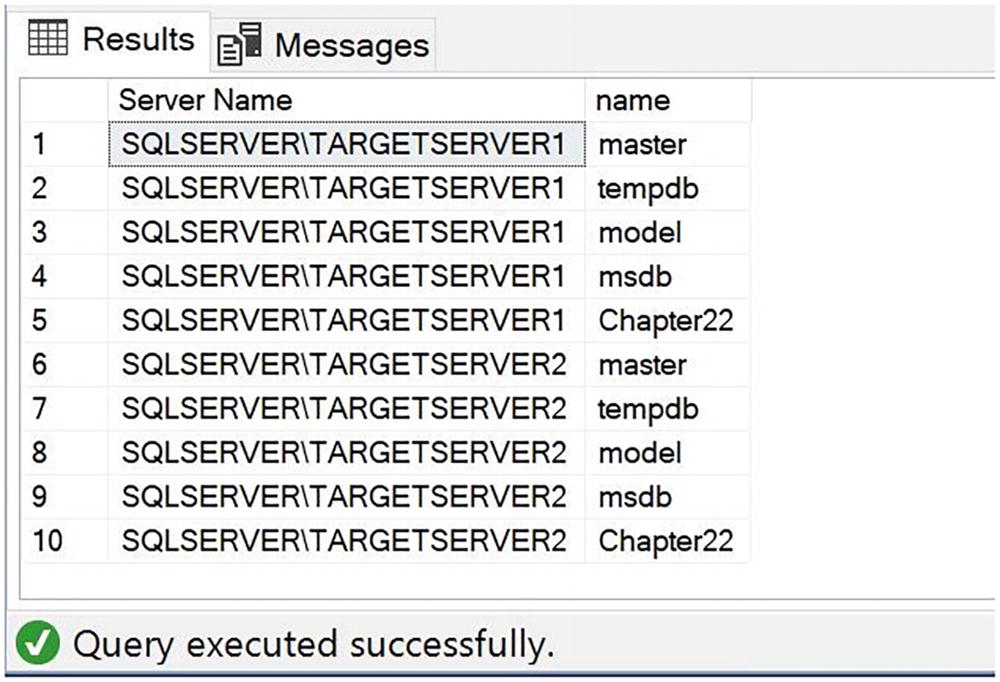
Results of listing all servers in the server group
The first thing you notice is that the status bar below the query results is pink instead of yellow. This indicates that the query has been run against multiple servers. Second, instead of displaying an instance name, the status bar displays the server group that the query has been run against; in our case, this is Prod. Finally, notice that an additional column has been added to the result set. This column is called Server Name, and it indicates which instance within the server group the row returned from. Because no user databases exist on SQLSERVERTARGETSERVER1 or SQLSERVERTARGETSERVER2, the four system databases have been returned from each instance.
Creating Policies
You can create policies using either SQL Server Management Studio or T-SQL. The following sections discuss how to create a simple static policy, before they go on to discuss how to create advanced, dynamic policies.
Creating Simple Policies
PBM offers a great deal of flexibility within its predefined facets, properties, and conditions. You can use this flexibility to create a comprehensive set of policies for your enterprise. The following sections discuss how to use PBM’s built-in functionality to create simple policies.
Creating a Policy That You Can Manually Evaluate
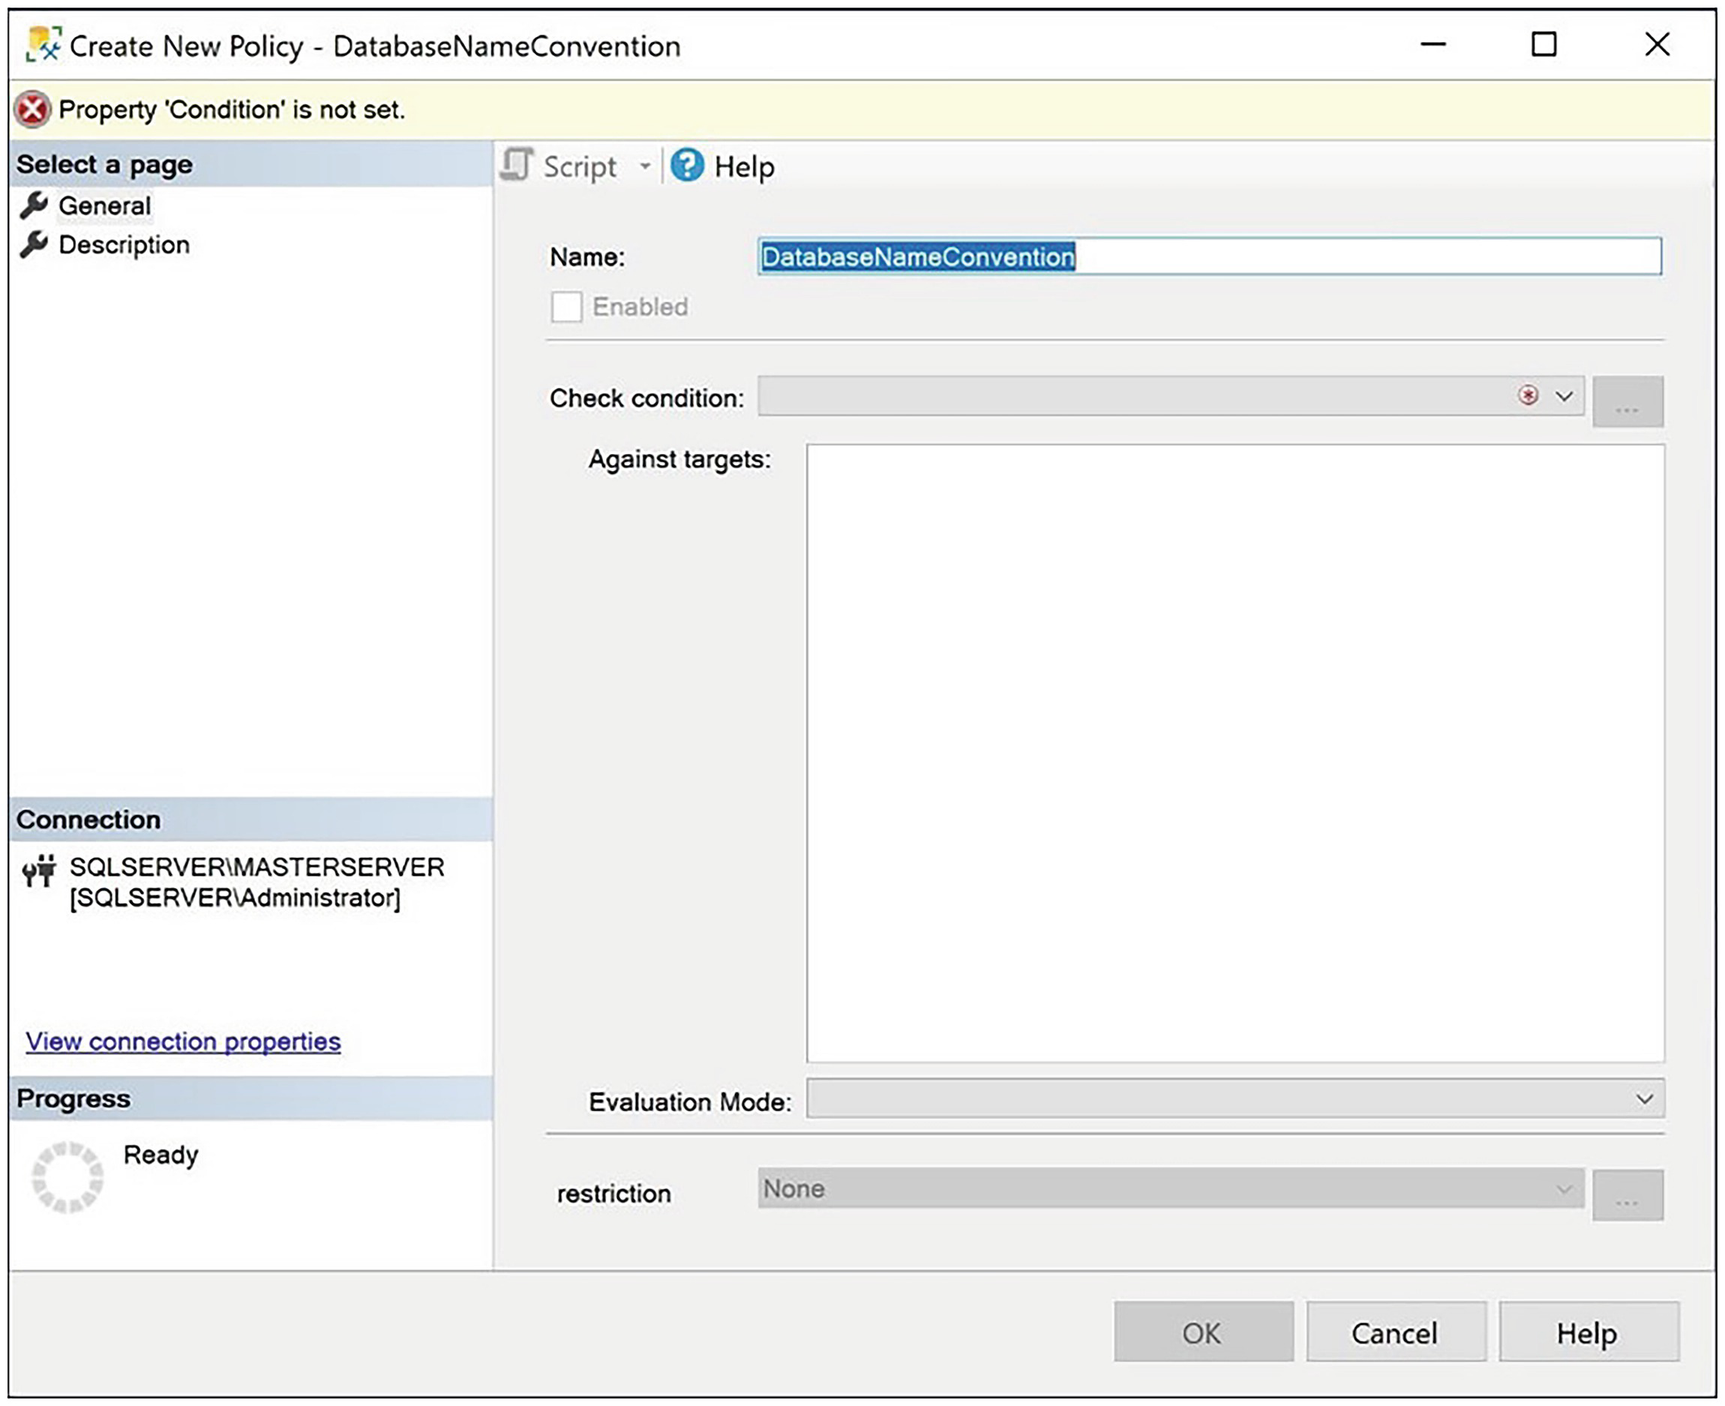
New Policy dialog box, General page

Create New Condition dialog box, General page
On this page, we give the condition a name and select the Database facet. In the Expression area of the screen, we select that the @Name field should be LIKE 'Chapter%', where % is a zero-or-more-character wildcard. On the Description page, we are optionally able to specify a textual description for the condition.
Back on the General page of the Create New Policy dialog box, we ensure that the Evaluation Mode drop-down is set to select On Demand, which means that the policy is not evaluated unless we explicitly evaluate it. The only other option available is to schedule the evaluation. This is because the Database facet does not support the On Change: Log Only or On Change: Prevent evaluation modes.
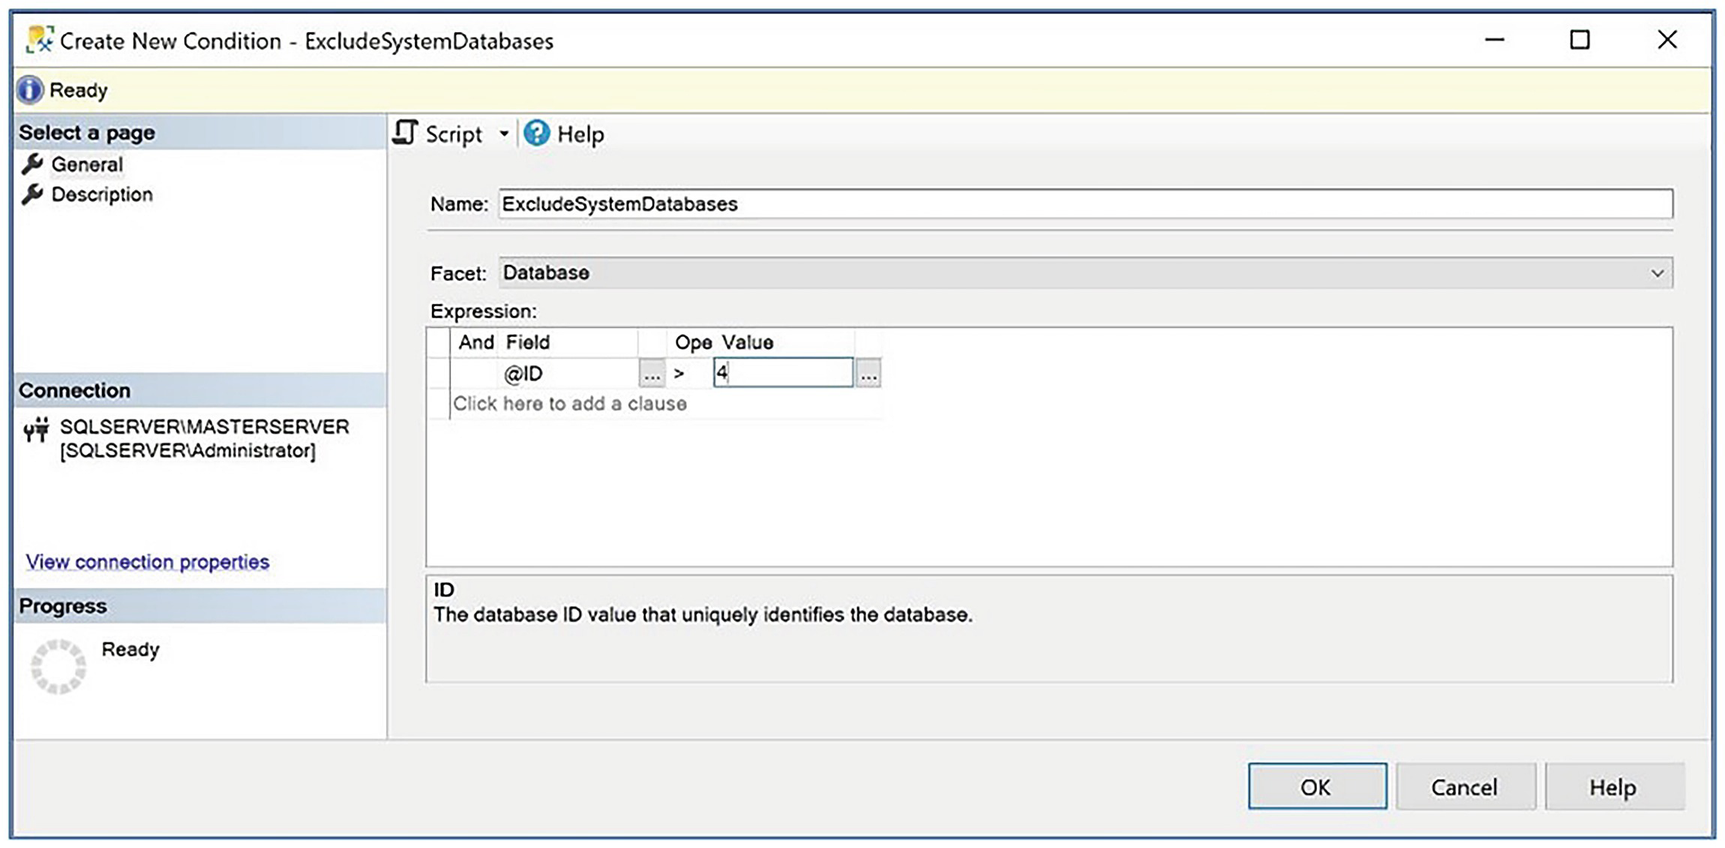
Create an ExcludeSystemDatabases condition
The Description page
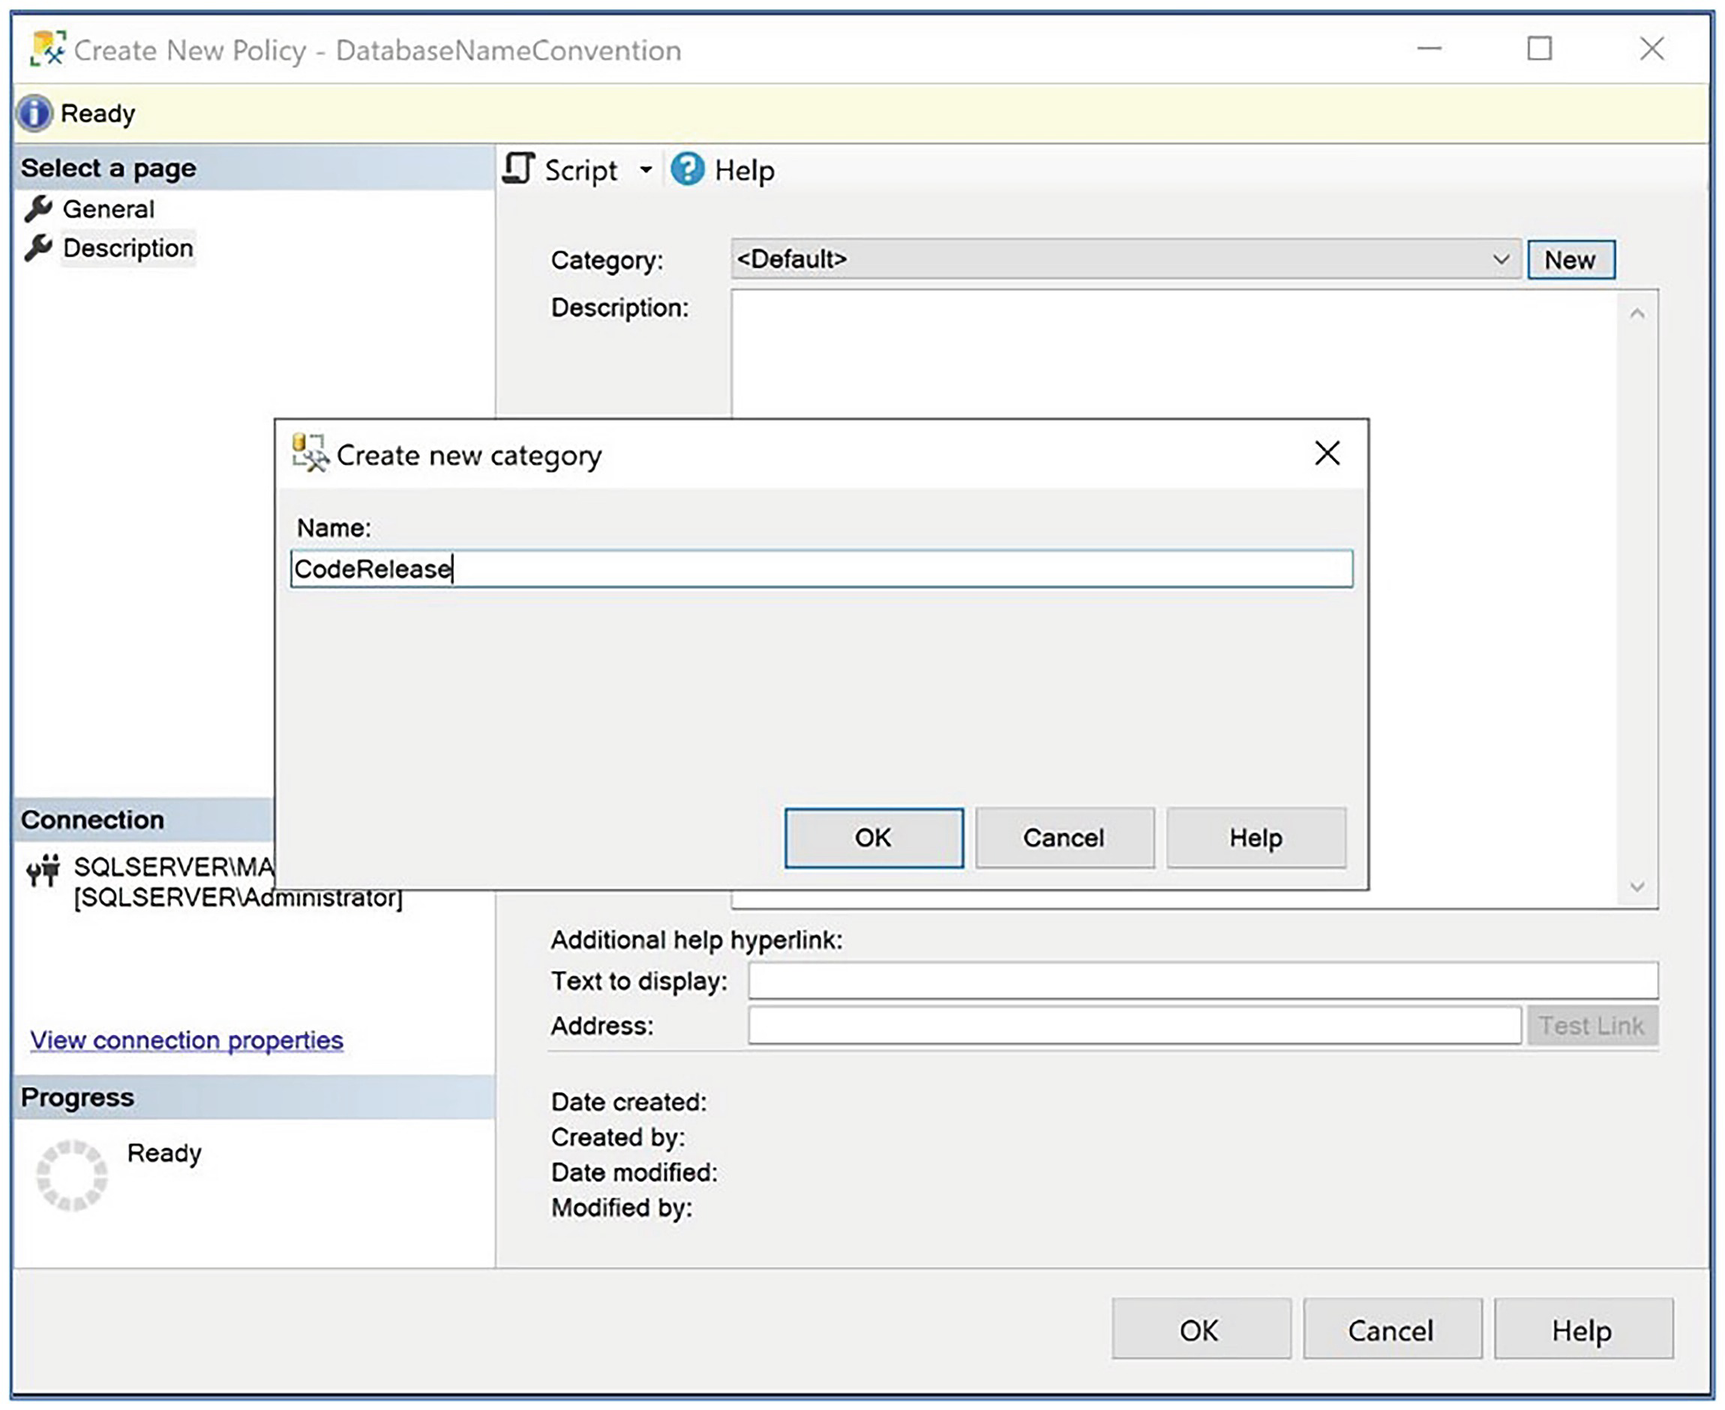
On this page, we use the New button to create a new category, CodeRelease, which helps us check code quality in a UAT (user acceptance testing) or OAT (operational acceptance testing) environment before the code is promoted to production. Optionally, we can also add a free text description of the policy and a help hyperlink, alongside a website address or e-mail link.
Manually Evaluating a Policy
Creating a BrokenPolicy Database
We can evaluate our new policy against our instance by using the Evaluate Policies dialog box, which we can invoke by drilling through Management ➤ Policy Management ➤ Policies and by selecting Evaluate from the context menu of our policy.
You can manually evaluate the policy even if it is disabled.
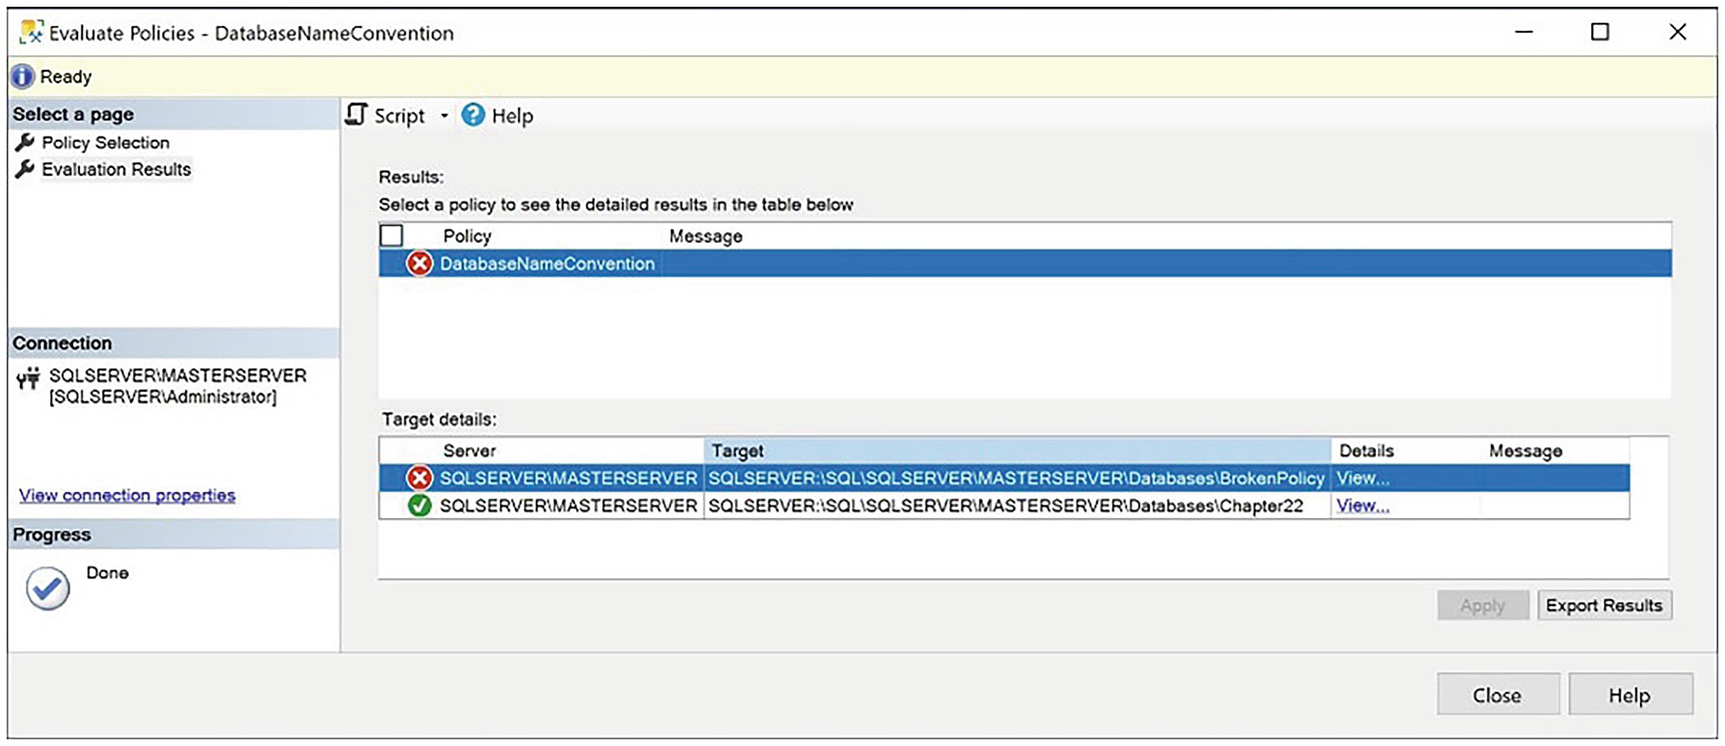
The Evaluate Policies dialog box
If you wish to evaluate multiple polices, select Evaluate from the context menu of the Policies folder in Object Explorer, and then select which policies you would like to evaluate. All selected policies are then evaluated and displayed in the Evaluation Results page.
We created the Chapter22 database in Chapter 22 of this book. If you do not have a Chapter22 database, you can create it using the statement CREATE DATABASE Chapter22 ;.
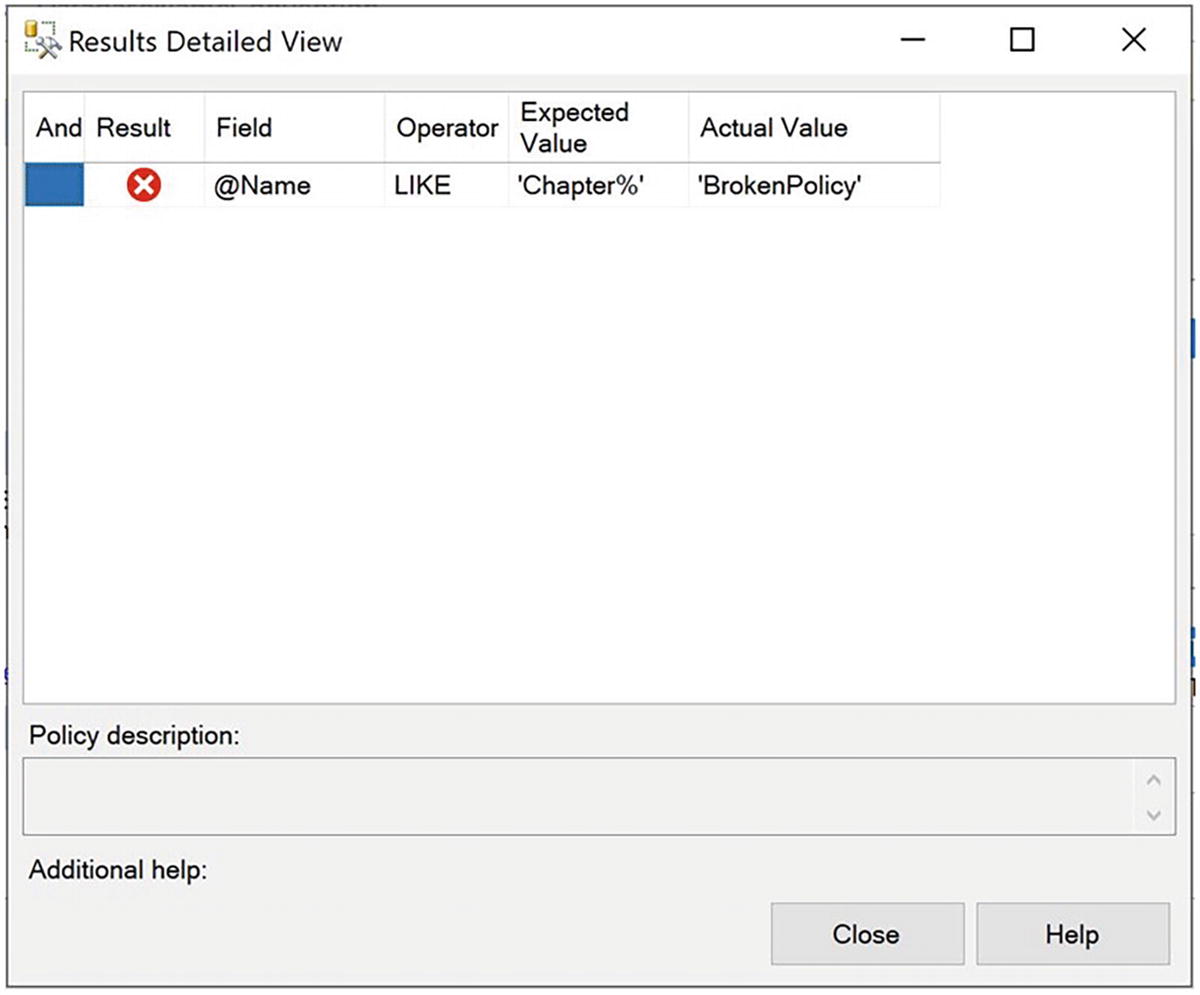
The Results Detailed View dialog box
Creating a Policy That Prevents Unwanted Activity
Another very useful simple policy is one that helps you prevent developers from obfuscating their stored procedures. Procedure obfuscation arguably has a place in third-party software, in order to prevent the theft of intellectual property. For in-house applications, however, there is no need to use obfuscation, and doing so can lead to issues with diagnosing performance issues. Additionally, if the development teams are not using source control, it can lead to the loss of code, in the event of a disaster. In this instance, rather than just evaluating the policy on an ad hoc basis, we want to prevent stored procedures that are obfuscated from being created. This means that during code releases, you do not need to review every stored procedure for the WITH ENCRYPTION syntax. Instead, you can expect the policy to be evaluated and the CREATE PROCEDURE statement to be rolled back, preventing this from occurring.
Enabling Nested Triggers
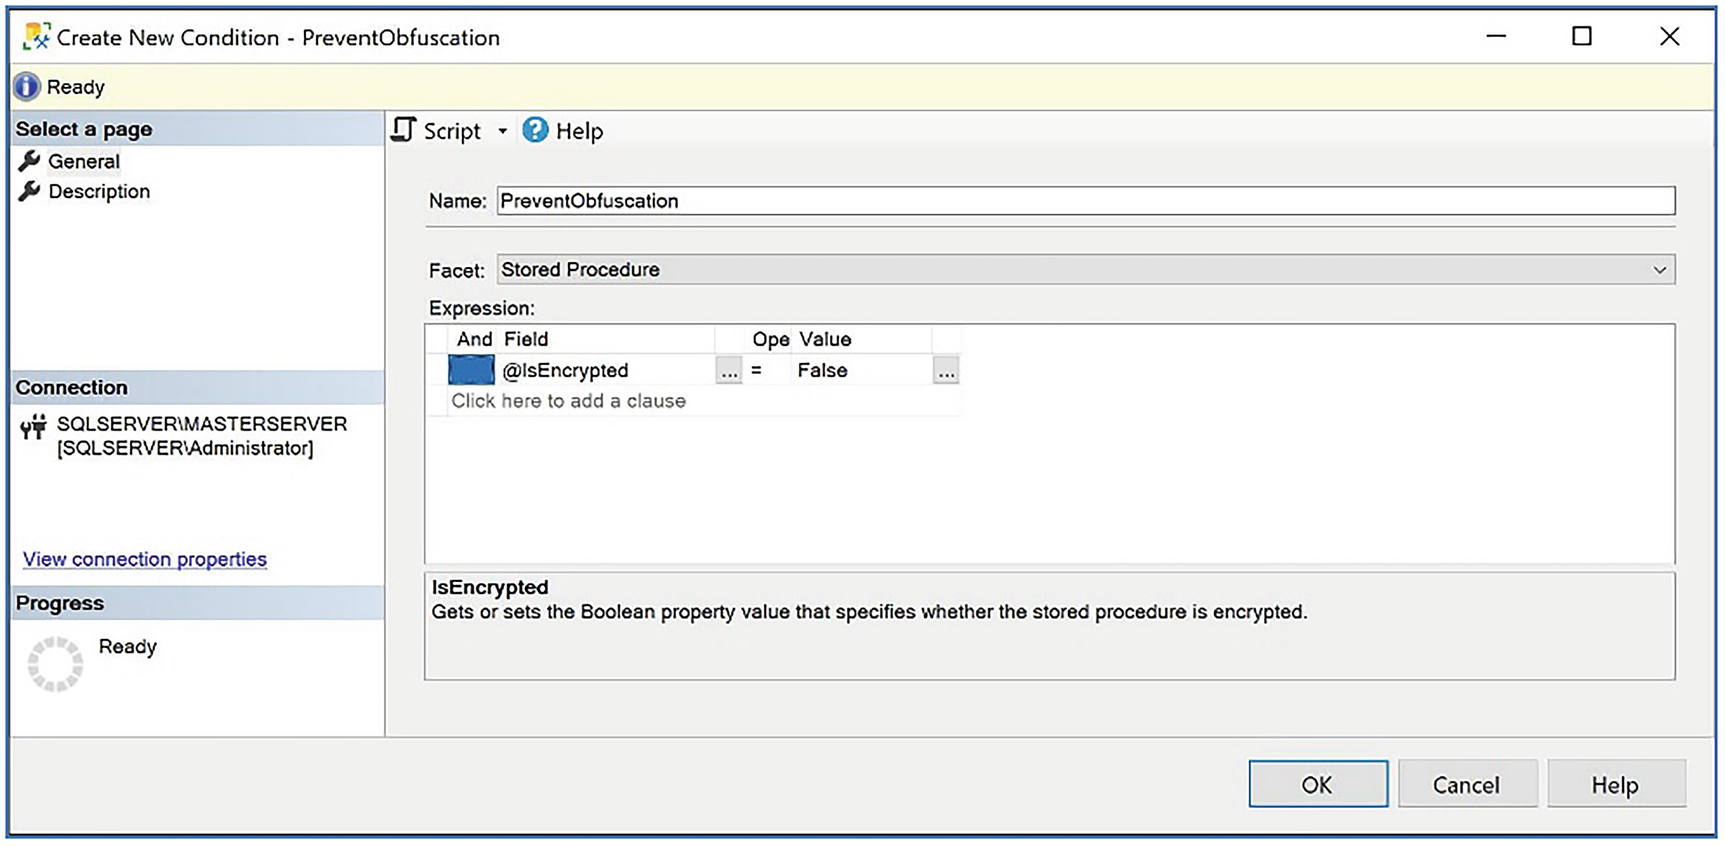
The Create New Condition dialog box
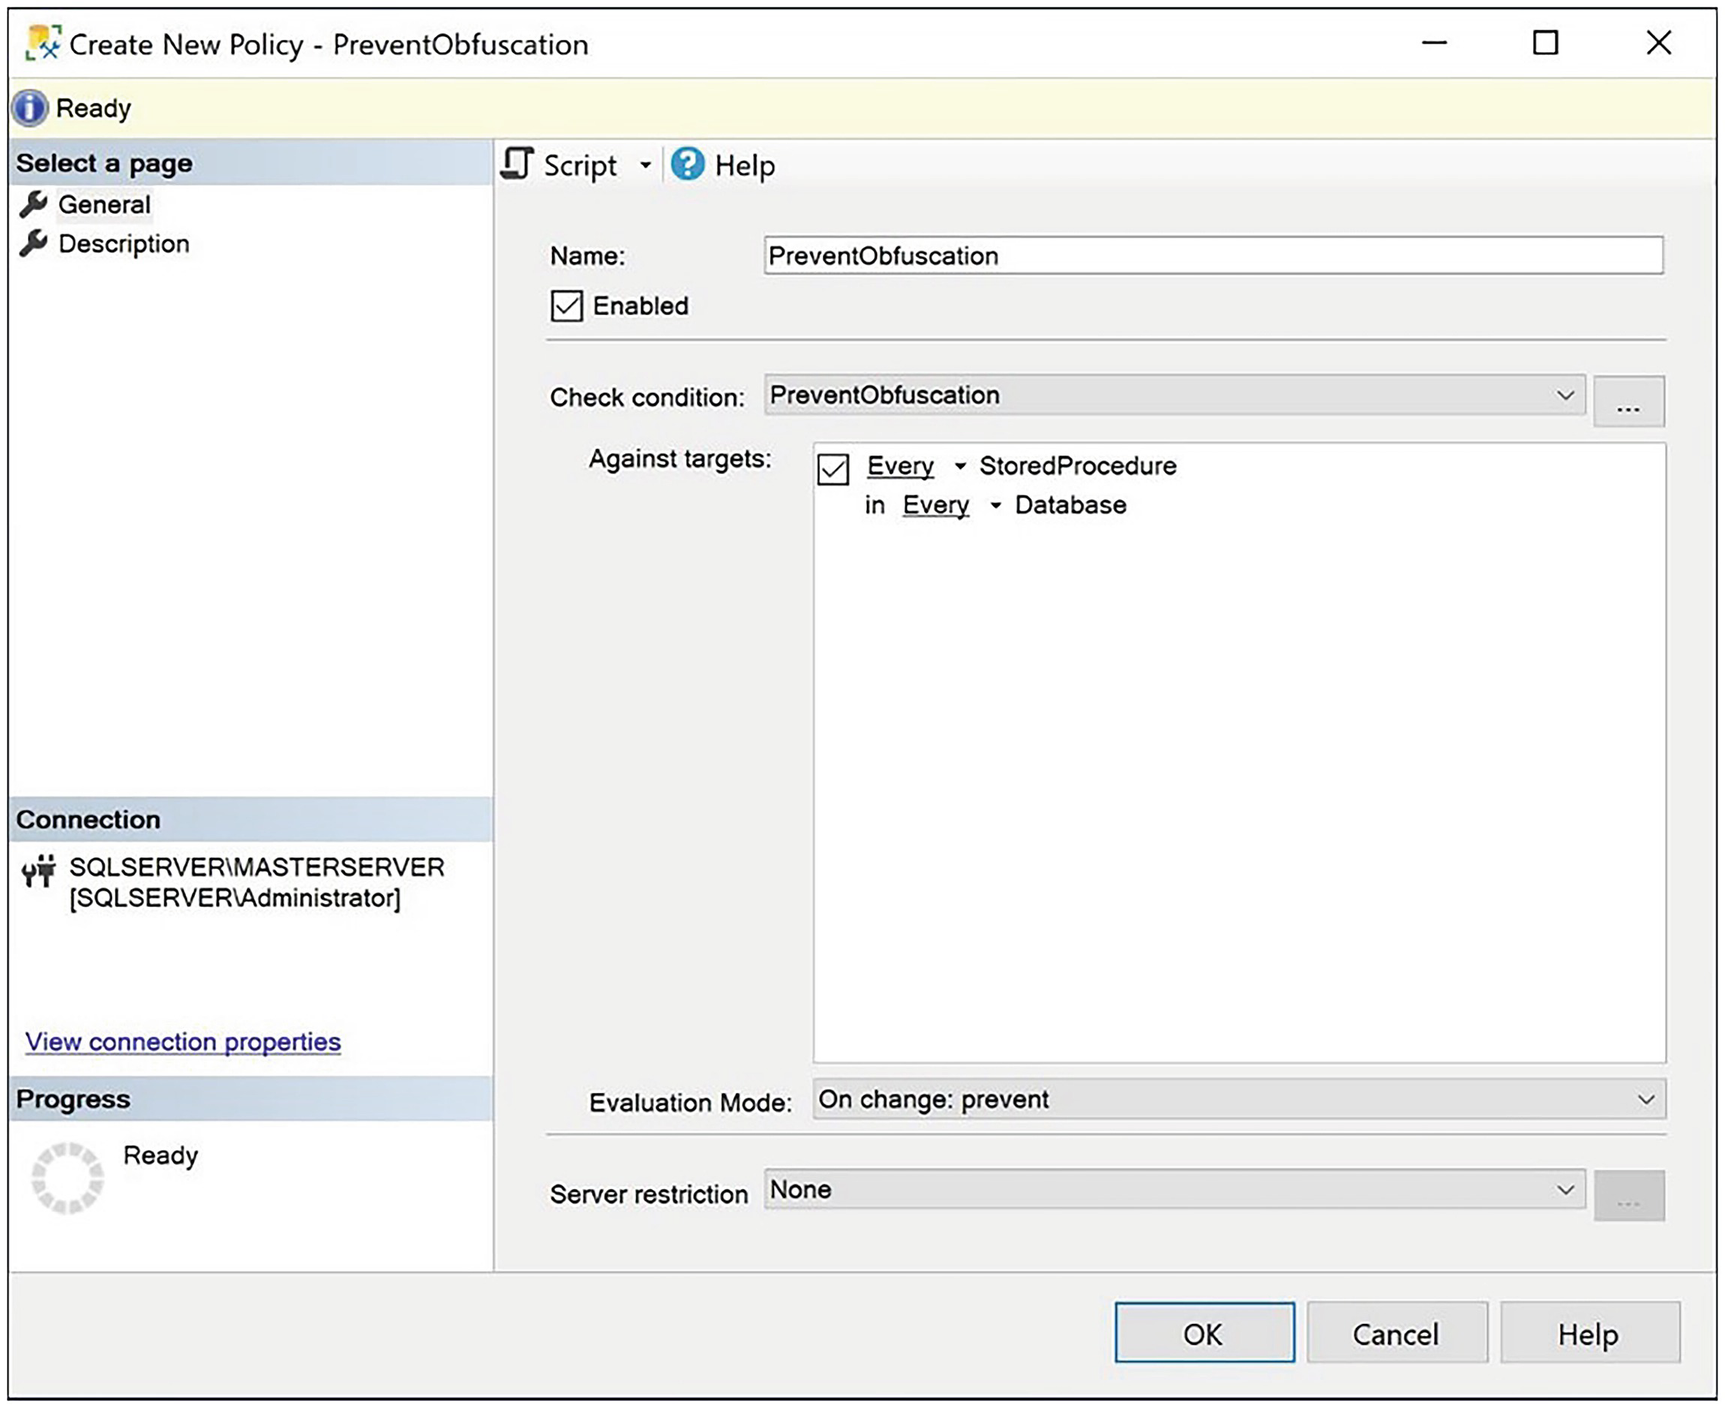
The Create New Policy dialog box
Creating a Stored Procedure with NOLOCK
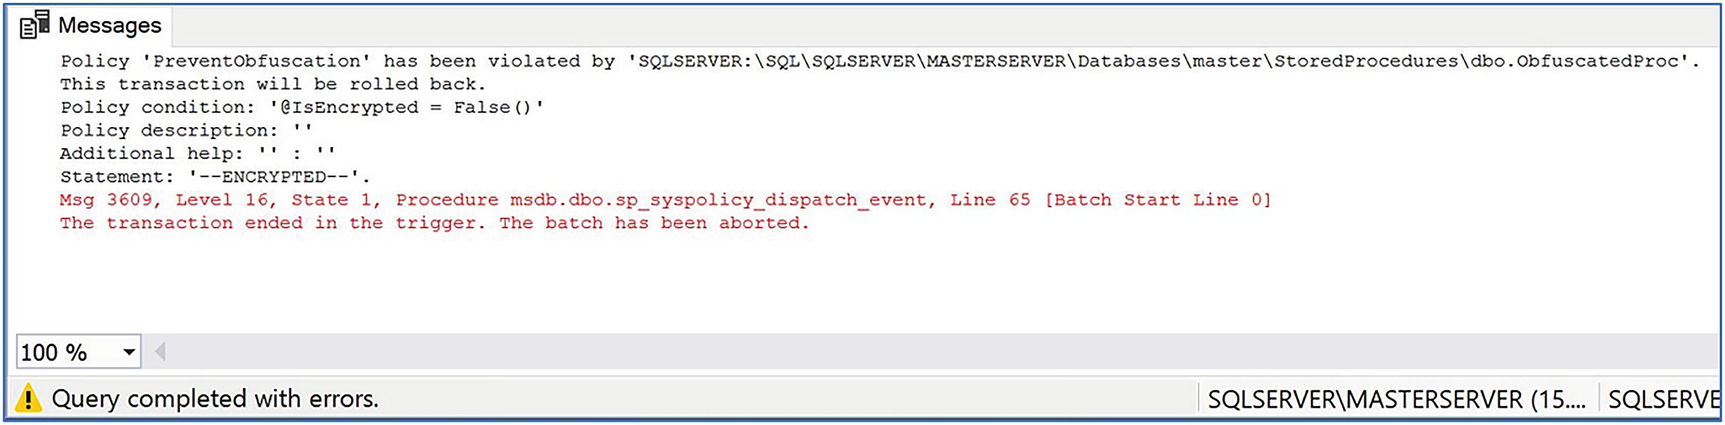
The error thrown by the policy trigger
Creating an Advanced Policy
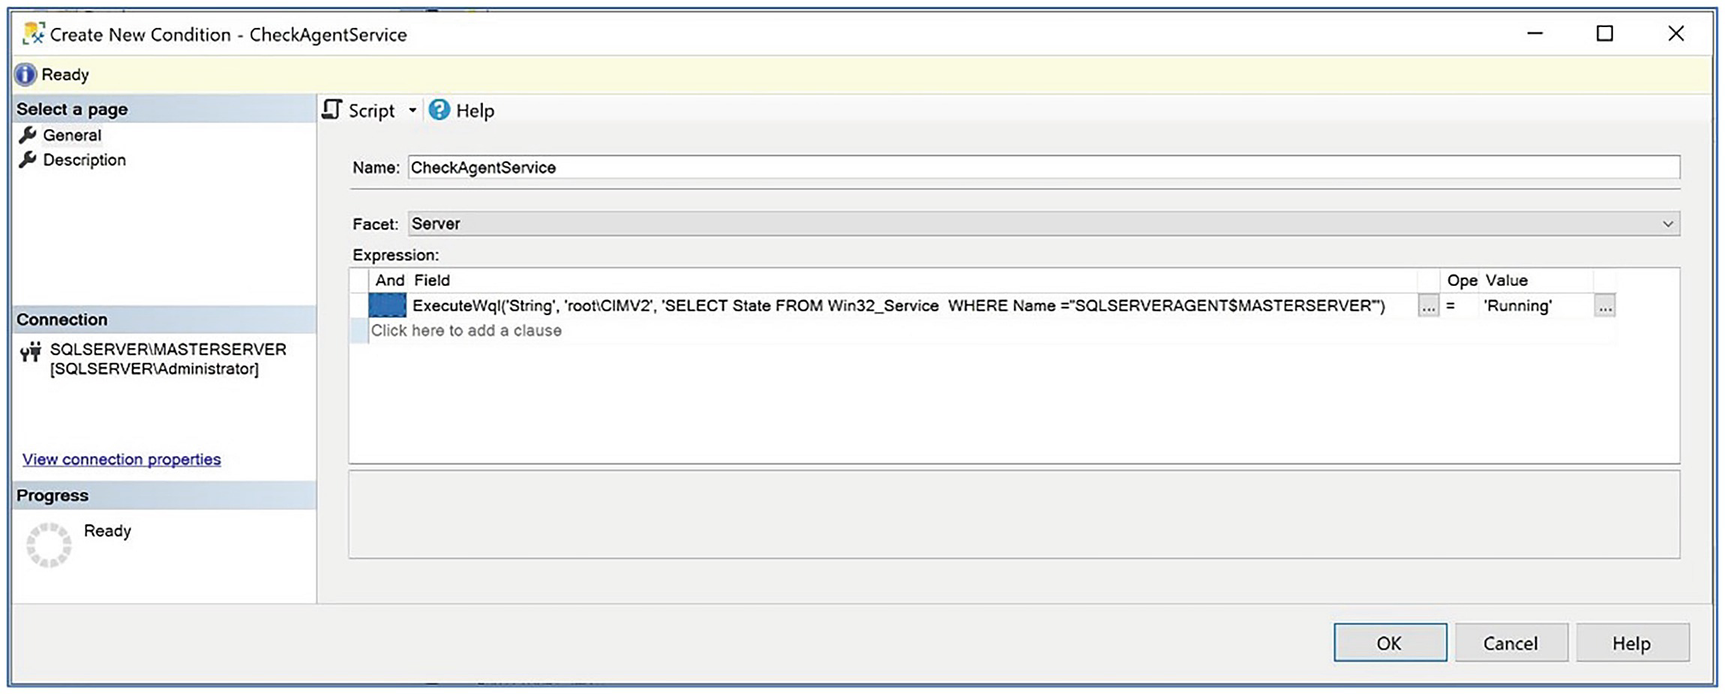
PBM is extensible, and if you can’t create the required condition using the built-in facet properties, the Expression Advanced Editor allows you to use a wide range of functions. These functions include ExecuteSql() and ExecuteWql(), which allow you to build your own SQL and WQL (Windows Query Language), respectively. The ExecuteSql() and ExecuteWql() functions are not T-SQL functions. They are part of the PBM framework.
Checking to Make Sure SQL Server Agent Is Running with T-SQL
Or alternatively, you can achieve the same result by using the WQL query in Listing 24-8.
You can find an WQL reference at https://msdn.microsoft.com/en-us/library/aa394606(v=vs.85).aspx.
Checking That SQL Server Agent Is Running with WQL
ExecuteSQL() Parameters
Parameter | Description |
|---|---|
returnType | Specifies the return type expected from the query. Acceptable values are Numeric, String, Bool, DateTime, Array, and GUID. |
sqlQuery | Specifies the query that should run. |
ExecuteWQL() Parameters
Parameter | Description |
|---|---|
returnType | Specifies the return type expected from the query. Acceptable values are Numeric, String, Bool, DateTime, Array, and GUID. |
namespace | Specifies the WQL namespace that the query should be executed against. |
wqlQuery | Specifies the query that should run. |
ExecuteSQL()
It is important to note here that we had to escape the single quotes in our query, to ensure that they are recognized during execution.
ExecuteWQL()
Creating the condition with ExecuteWql()
Because of the power and flexibility of the ExecuteWql() and ExecuteSql() functions, it is possible that they will be abused to create security holes. Therefore, make sure you carefully control who has permissions to create policies.
Managing Policies
Policies are installed on an instance of SQL Server, but you can export them to XML files, which in turn allows them to be ported to other servers or to central management servers so that they can be evaluated against multiple instances at the same time. The following sections discuss how to import and export policies, as well as how to use policies in conjunction with central management servers. We also discuss how to manage policies with PowerShell.
Importing and Exporting Policies
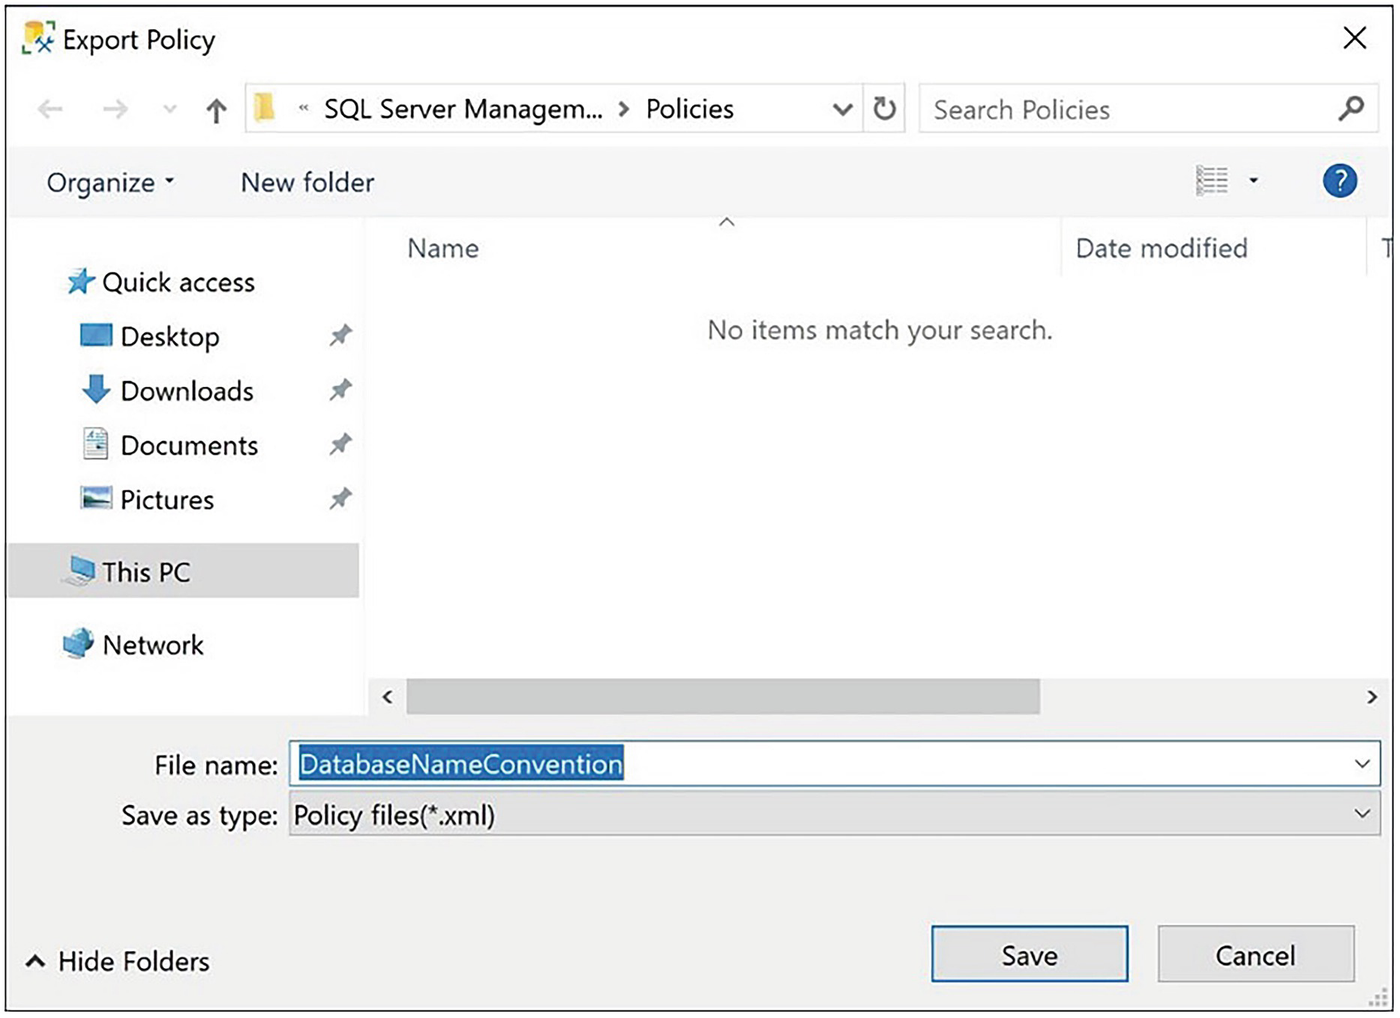
The Export Policy dialog box
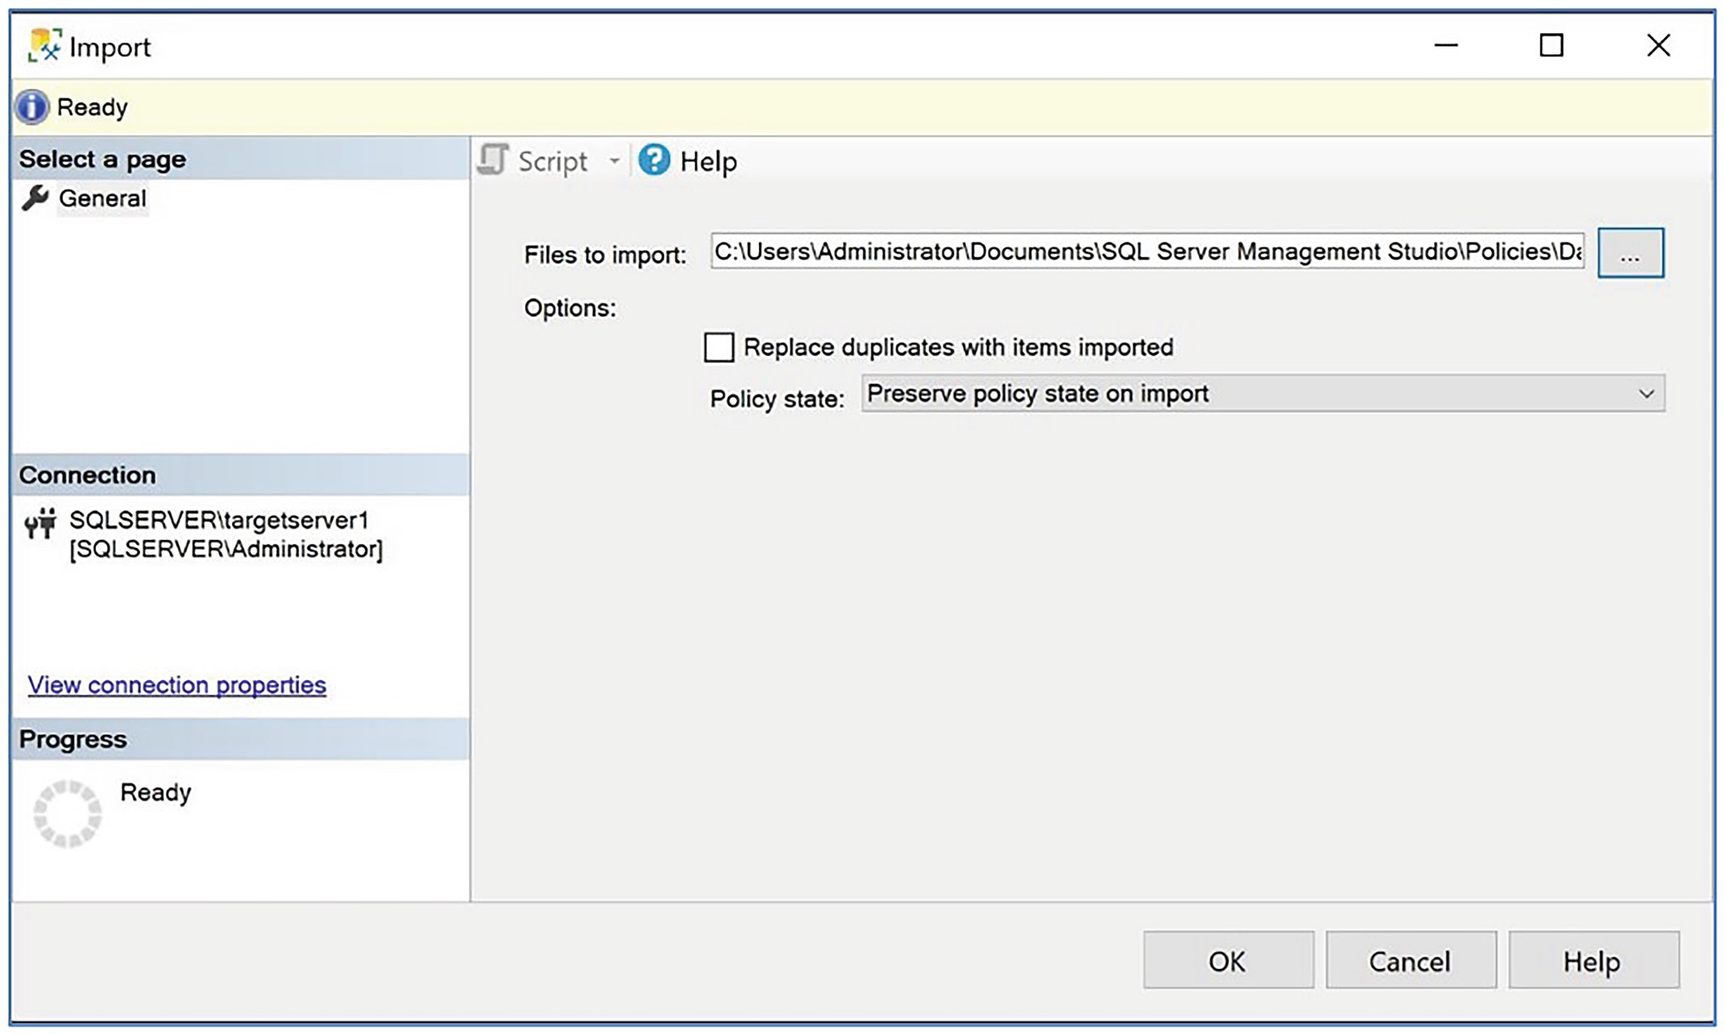
The Import dialog box
In this dialog box, we use the Files to import ellipses button to select our DatabaseNameConvention policy. We can also choose the state of the policy after it is imported from the Policy State drop-down and specify whether policies that already exist on the instance with the same name should be overwritten.
Enterprise Management with Policies
Although being able to evaluate a policy against a single instance of SQL Server is useful, to maximize the power of PBM, you can combine policies with central management servers so that the policy can be evaluated against the SQL Server Enterprise in a single execution.
For example, imagine that we want to evaluate the DatabaseNameConvention policy against all servers within the Prod group that we created when we registered the SQLSERVERMASTERSERVER instance as a central management server. To do this, we drill through Central Management Servers ➤ SQLSERVERMASTERSERVER in the Registered Servers window before we select Evaluate Policies from the Prod context menu.

The Evaluate Policies dialog box
In the Select Source dialog box, either select policies stored as XML files from the file system or specify the connection details of an instance where the policy is installed. In our case, we select the DatabaseNameConvention by clicking the Files ellipses button.

The Evaluate Policies dialog box
Evaluating Policies with PowerShell
When policies are installed on an instance, they can be evaluated using the methods already described in this chapter. If your policies are stored as XML files, however, then you can still evaluate them using PowerShell. This can be helpful if your SQL Server enterprise includes SQL Server 2000 or 2005 instances, as many still do. Because PBM was only introduced in SQL Server 2008, policies cannot be imported into older instances, but PowerShell offers a useful workaround for this issue.
To evaluate our DatabaseNameConvention policy against our SQLSERVERMASTERSERVER instance, from the XML file using PowerShell, we need to run the script in Listing 24-11. The first line of this script changes the path to the folder where the policy is stored. The second line actually evaluates the policy.
Evaluating a Policy with PowerShell
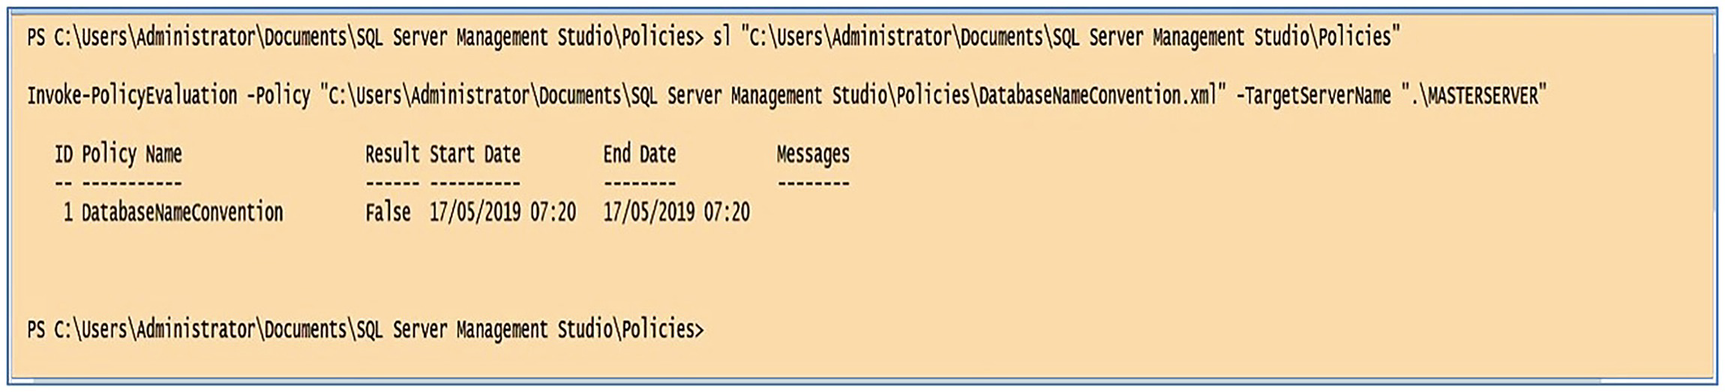
Results of policy evaluation
To evaluate multiple properties, provide a comma-separated list for the -Policy parameter.
Summary
Policy-Based Management (PBM) offers a powerful and flexible method for ensuring coding standards and hosting standards are met across your enterprise. A target is an entity managed by PBM. A condition is a Boolean expression that the policy evaluates against the targets, and a facet is a collection of properties that relate to a specific type of target.
Depending on the facet you use, a policy offers up to four policy evaluation modes: On Demand, On Schedule, On Change: Log Only, and On Change: Prevent. On Demand, On Schedule, and On Change: Log Only can be thought of as reactive, whereas On Change: Prevent can be thought of as proactive, since it actively stops a configuration from being made, which violates a policy. Because On Change modes rely on DDL triggers, you must enable nested triggers at the instance level, and they are not available for all facets.
Policies are extensible, through the use of the ExecuteSql() and ExecuteWql() functions, which allow you to evaluate the results of T-SQL or WQL queries. These functions offer massive flexibility, but their power can also cause security holes to be opened, so exercise caution when granting permissions to create policies.
An instance can be registered as a central management server, and other servers can be registered underneath it, either directly or in groups. This gives DBAs the ability to run a query across multiple instances at the same time, and it also offers them the ability to evaluate policies against multiple servers at the same time. This means that you can use Policy-Based Management at the Enterprise level to enforce standards.
You can evaluate policies from within SQL Server or using PowerShell with the -InvokePolicyEvaluation cmdlet. This offers you increased flexibility for managing estates that have older SQL Server instances, such as 2000 or 2005. This is because PowerShell allows DBAs to evaluate the policies from XML files, instead of only being able to evaluate them after importing them to MSDB.