
Chapter 12. Consuming Data Streams: Integrating External APIs in Your Application
In this chapter we are going to integrate two external APIs into our Walks application. We are going to see how integrating external services is somewhat similar to integrating an internal API. There are some issues regarding the way we consume and offer external content that need to be considered, however.
Creating a Weather Service
Imagine that our Walks application could be enriched with a weather forecast, or that our Citywalks API could also suggest that users pack an umbrella or sunscreen before leaving the house. If you are thinking what I am thinking right now, you would agree that this would be a nice feature to have.
The problem with this is that you actually need a simple weather forecasting service to implement it—yet you may want to code a way to get weather forecasts in your app yourself. The ideal solution would be a third-party service that you could talk to to get a weather forecast for a particular city or location.
Luckily for us, there are a number of APIs that offer this service on the Web. Most of these also allow your app to make a certain number of calls per day for free, which is our ideal situation since we are just starting with a test project.
I have chosen to use the OpenWeatherMap project, since it adopts an approach to its business and service that is inspired by OpenStreetMap and Wikipedia and involves making its information available to everybody to use. OpenWeatherMap collects data from weather stations and forecasts from meteorological services and research laboratories, combining long-term and short-term forecasts with real-time data from weather stations. It processes all of this data and immediately updates the current weather and forecasts in its API.
Of course, you are free to integrate another service if you find something else that you like more. Please note that in this case the JSON returned will probably require different parsing, but in the end you should be able to easily adapt the code in the repository. As usual, you are encouraged to fork and modify what you see fit.
If This Then Something
To be able to provide weather recommendations through the Citywalks API we will need to create a new endpoint. We are going to call this suggestions. When a user calls the suggestions endpoint, this will consult the OpenWeatherMap API; if the percentage of cloud cover is predicted to be over 40% it will suggest some videos from YouTube, and otherwise it will return places of interest in the area. Figure 12-1 illustrates this configuration.
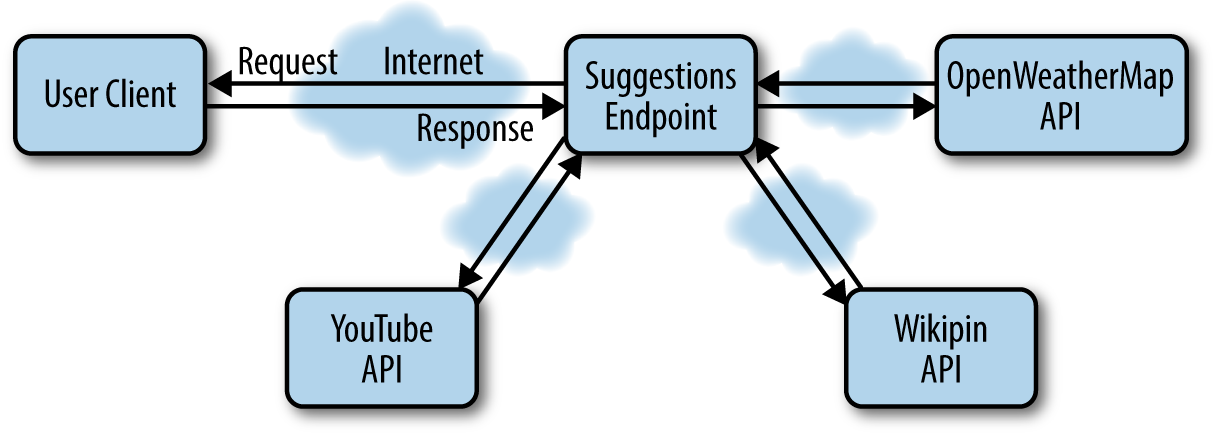
Figure 12-1. The Citywalks API extended with the suggestions endpoint
To search YouTube videos, the user can pass a category parameter. If the user doesn’t pass the category param, the API will search for Radiohead videos.
To begin, we are going to create a new controller in api/v1/:
classApi::V1::SuggestionController<ApplicationControllerrespond_to:jsonincludeMakeSuggestiondefindexif@suggestionsrender:json=>@suggestions.to_jsonelse@error=Error.new(:text=>"404 Not found",:status=>404,:url=>request.url,:method=>request.method)render:json=>@error.serializerendendend
MakeSuggestion is the concern that is going to handle part of the logic behind the suggestion controller. Therefore, we need to create a file in controllers/concerns called make_suggestion.rb. First we need to define an entry action that takes place as soon as we hit the endpoint:
defentry_action@suggestions=[]ifparams[:location]location=params[:location].split(',')@suggestions<<make_forecast(location[0],location[1])else@suggestions<<suggestions_by_ipendend
Then we define the make_forecast function:
defmake_forecast(latitude,longitude)forecast=get_weather(latitude,longitude)ifforecast[:forecast].doc["clouds"]["all"]>40request_youtube_videos(params[:category]||"Radiohead")elserequest_pins("#{longitude},#{latitude}")endend
Both the get_weather and request_youtube_videos methods will be defined in their respective modules.
The last method that we will need to define is suggestions_by_ip. This method will simply find out the request IP and corresponding location before calling the make_forecast method:
defsuggestions_by_ipifip=="127.0.0.1"get_weather("41.23","2.09")elseblock=Walk.request_block(ip).doc["ip_block"]ifblocklongitude=block["point"].scan(/(([^)]+))/).last.first.split(" ")[0]latitude=block["point"].scan(/(([^)]+))/).last.first.split(" ")[1]make_forecast(latitude,longitude)endendend
Now we can create the modules that we need in the lib/ folder. We start with the Weather module by creating a file called weather.rb:
moduleWeatherWEATHER_URL="http://api.openweathermap.org/data/2.5/weather?"defget_weather(lat,lon)forecast={forecast:send_request("#{WEATHER_URL}lat=#{lat}&lon=#{lon}")}endend
WEATHER_URL defines our endpoint on the OpenWeatherMap API; then we just define a method to call the API and pass latitude and longitude information.
The Youtube module is going to be a little bit more complicated to define. This is because to be able to use the YouTube Data API, our application must have authorization credentials. The Google Developers Console supports different types of authentication methods that need to be configured for your project.
Start by visiting the Google Developers Console and selecting or creating a new project. In the sidebar on the left, select “APIs & auth.” In the list of APIs, make sure the status is “ON” for the YouTube Data API v3.
Again in the sidebar on the left, select “Credentials.” The API supports two types of credentials. Create whichever credentials are appropriate for your project.
If you choose OAuth 2.0, your application must send an OAuth 2.0 token with any request that accesses private user data. Your application sends a client ID and, possibly, a client secret to obtain a token. You can generate OAuth 2.0 credentials for web applications, service accounts, or installed applications.
If you choose to authenticate with API keys, you will use a developer key to authenticate your request. We will use this method. The key identifies your project and provides API access, quotas, and reports.
If the key type you need does not already exist, create an API key by selecting “Create New Key” and then selecting the appropriate key type, which in our case is a server key. Then enter the additional data required for that key type: in our case, the list of IPs that are allowed to use that key. If you are running your application in your local machine, this list will probably need to include only:
- 0.0.0.0
- 127.0.0.1
Otherwise, you will need the IP of the server where your app is running.
Once you have finished configuring your app in the Developers Console, you can start writing the module:
require"net/http"require"json"require"google/api_client"require"trollop"moduleYoutubeDEVELOPER_KEY=<YourDeveloperKey>YOUTUBE_API_SERVICE_NAME="youtube"YOUTUBE_API_VERSION="v3"defget_serviceclient=::APIClient.new(:key=>DEVELOPER_KEY,:authorization=>nil,:application_name=><YourApplicationName>,:application_version=>'1.0.0')youtube=client.discovered_api(YOUTUBE_API_SERVICE_NAME,YOUTUBE_API_VERSION)returnclient,youtubeenddefwrap_search_results(videos,channels,playlists)search_results={videos:videos,channels:channels,playlists:playlists}enddefwrap_json(search_result)result={title:search_result.snippet.title,description:search_result.snippet.description,url:make_video_url(search_result)}enddefmake_video_url(search_result)casesearch_result.id.kindwhen'youtube#video'"https://www.youtube.com/watch? v=#{search_result.id.videoId}"when'youtube#channel'"https://www.youtube.com/channel/#{search_result.id.channelId}"when'youtube#playlist'"https://www.youtube.com/playlist? list=#{search_result.id.playlistId}"endenddefrequest_youtube_videos(query)opts=Trollop::optionsdoopt:q,'Search term',:type=>String,:default=>queryopt:max_results,'Max results',:type=>:int,:default=>25endclient,youtube=get_servicebegin# Call the search.list method to retrieve results matching the specified# query term.search_response=client.execute!(:api_method=>youtube.search.list,:parameters=>{:part=>'snippet',:q=>opts[:q],:maxResults=>opts[:max_results]})videos=[]channels=[]playlists=[]# Add each result to the appropriate list, and then display the lists of# matching videos, channels, and playlists.search_response.data.items.eachdo|search_result|casesearch_result.id.kindwhen'youtube#video'videos<<wrap_json(search_result)when'youtube#channel'channels<<wrap_json(search_result)when'youtube#playlist'playlists<<wrap_json(search_result)endendwrap_search_results(videos,channels,playlists)rescue::APIClient::TransmissionError=>eputse.result.bodyendendend
Now we can call our new endpoint:
$curlhttp://0.0.0.0:3001/api/v1/suggestion?location=41.23,2.09
You can try different locations to see how the results change with the cloud coverage.
Adhering to the Terms of Service
Every API defines some terms of service stating what users can do and what they cannot do with the service offered. You will have to consider the terms of the services you decide to integrate to better understand if the APIs you have decided to use are a good fit for your purposes.
When you review different services you might find that some APIs are a good fit technically, but will not scale as your app starts growing and serving more users. Some other APIs might instead provide very few limits in terms of traffic or the number of requests that you can send them, but restrict how you use the information provided.
While you’re thinking about the terms of service of the APIs integrated into your app, you should also be thinking about how to develop your own terms of service for when you publish your API. The terms of service are a way to tell your users that you are offering your API under specific conditions. If those conditions are not met, you can decide to stop users from using your service.
This is particularly important if you are offering subscriptions to use your service. When the users subscribe, they agree to a contract, and the terms of service can also be part of this contract.
Thinking about your terms of service might also help you define your business model. For example, you might have published your API under some conditions for a certain amount of time. If you now recognize that you might offer a different kind of service, with the same infrastructure, you might as well offer it as an additional plan for your users to subscribe to. This is a typical scenario when you start developing an application that users can subscribe to for free, and then you have to figure out a way to scale this into a business and make money out of it.
In cases like this it sometimes makes sense to offer a pay-per-use plan or a paid subscription offering some additional features to the free plan.
Ramen Profitable
If you are thinking about setting up a startup and considering ways to get funded, you might find there are periods in which you have to live off your savings because your business isn’t profitable yet.
Paul Graham wrote some years ago about the notion of being “ramen profitable,” or just profitable enough to survive and for founders to have time to develop the business.
Asynchronous REST
Up to this moment we have relied on the concept that every time we make a request to the server we are able to receive an answer almost immediately (allowing for small communication delays between the client and the server). This unfortunately isn’t always the case.
Consider a situation where your users need to create resources, and these operations might take a considerable amount of time to complete. This could be the case when there is some image processing, for example, that happens in your backend. If you let the client wait for the request to finish, this might time out and return an error instead.
In cases like this you could have your API return a 202 (Accepted) response. This will tell the client that the request has been accepted for processing, but the processing has not been completed yet. When the server returns a 202 response, the client doesn’t know exactly what will happen to its request, since there is no facility for status returns from asynchronous operations such as this. The request is not guaranteed to eventually be acted upon, as it may be disallowed when processing actually takes place. Therefore, you can also return a Location: /resources/xxxxxx field in your response telling the client where to ask for the actual status of the request.
Note
For more on HTTP responses, see “HTTP Semantics”.
When the resource has finally been created and the request has completed, this temporary resource can return a 303 (See Other) response and the URI to the definitive resource.
To create a temporary resource, you might consider writing a model in your application that is not persisted to your database. Although you do not need to persist data to your database, the client might have to query the server, possibly more than once, to know the status of the requested resource and to ensure that the action being processed in the backend has actually completed.
In situations like this you might consider writing your object to a Redis instance. Redis is a key/value cache and store, released under the open source BSD license. It is also referred to as a data structure server since keys can contain strings, hashes, lists, sets, sorted sets, bitmaps, and hyperloglogs. In our case Redis will function as a normal database, storing our temporary resources for the time we need them.
To install Redis you will have to download and compile the source. A complete installation guide can be found at http://redis.io/topics/quickstart.
Under OS X with Homebrew you can just run:
$brewinstallredis
We will use an object-hash mapping library for Redis called Ohm. Ohm comes packed in a gem for Ruby on Rails. You can install it by adding the following to your Gemfile:
gem'ohm'gem'ohm-contrib'
We are now going to define our temporary resource model under app/models:
require'ohm'require'ohm/contrib'classProcess<Ohm::ModelincludeOhm::Versionedattribute:process_idattribute:messageattribute:locationattribute:statusattribute:codeindex:temp_idOhm.redis=Redis.new(ENV['REDIS_URL'])defserialize{process:{id:process_id,location:location},response:{message:message,code:code.to_i},status:status.to_i}endend
and define a processes controller in api/v1:
classAPI::V1::ProcessesController<ApplicationControllerincludeProcessOperationsdefshow@process=Process.find(process_id:params[:id]).firstif@processrenderjson:@process.serialize,status:@process.serialize[:status]elserenderjson:process_not_found,status:404endenddefcreateiflong_action_to_be_performed@process=create_process(params)renderjson:@process,status:@process[:status]elserenderjson:process_error,status:500endendend
The show action fetches the process and displays its status. The create action triggers the long_action_to_be_performed method and creates our temporary process to track it.
We are not going to define the method long_action_to_be_performed since it can be a worker triggered or a service.
We are instead going to define the ProcessOperations module:
moduleProcessOperationsextendActiveSupport::Concerndefcreate_process(params)process=Process.create(process_id:params[:id],message:"Accepted",location:"processes/#{params[:id]}",code:202,status:202)ifprocessprocess.serializeelseprocess_errorendenddefprocess_errorerror={response:{message:"Internal Server Error",code:500},status:500}enddefprocess_not_founderror={response:{message:"Not Found",code:404},status:404}endend
The ProcessOperations module creates the process and returns structured errors when called.
Finally, we are going to define the routes for the new model and controller we’ve introduced:
namespace:apidonamespace:v1,format::jsondopost'processes/create',to:'processes#create'get'processes/:id',to:'processes#show'endend
The asynchronous REST implementation shown here implies that the client will use polling to query the temporary resource until a 303 response is returned. The client itself can also implement some logic to perform the polling after a certain amount of time. Another option would be to implement web hooks on the server side and trigger an HTTP callback notifying the client that the resource is ready.
Wrapping Up
In this chapter we discussed how to integrate external data streams into our application. In the next chapter we will see how this leads us to design and develop products independently from the devices where they will be run. This approach to software development can be considered valid for web, mobile, or even IoT applications.