
Chapter 3. First Adventures in API Design
RESTful architectures follow a set of principles defining how agents can communicate by exchanging resource representations.
This set of general rules has created tremendous possibilities for applications to exchange streams of data and contribute to building a Web that is more open and accessible.
In the Dark Ages of the Web it was common to meet websites that would declare their preferred, or best supported, browsers. “This website is best viewed with <browser_name_and_version>” was a popular tagline to insert in your page.
It wasn’t only a matter of preferences. Every browser would parse and display HTML code differently, and some features wouldn’t work as expected. Although we have left the Middle Ages of the Internet (mostly), web developers continue to struggle to create web applications that behave consistently across a wide range of devices.
It is important to note that the Web was invented to make computers able to communicate with each other easily, so that humans and software agents alike could act on the information shared across the system. The Web, and subsequently REST, was therefore designed with the core principles of simplicity and uniformity repeated and implemented at different layers of its architecture.
Application Programming Interfaces
An API is an interface specifying how some software components should interact with each other. A RESTful API is therefore just a REST interface exposing some internal functionality of a software system to developers and external applications. These can now consume and interact with specific resources through the API itself.
APIs are not exactly a novelty, or something that has been developed only in the web world. In fact, an API simply specifies a set of functions that can be used to interact with some components. These actions and components can be a database system that needs to be accessed by a web server, or a video card exposing some of its functionality through a software library. In REST architectures, APIs define actions that access or modify resources through the exchanged representations (Figure 3-1).
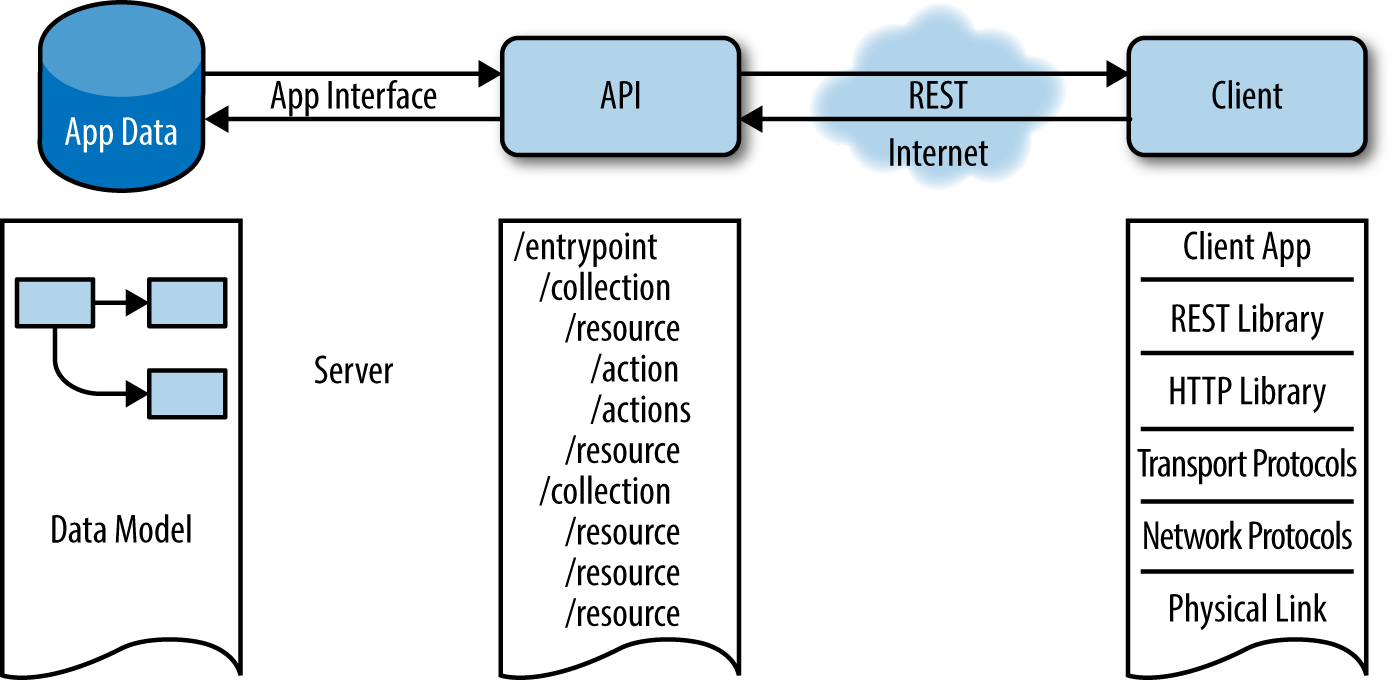
Figure 3-1. An API exposing some application data to a client through a RESTful interface
The API design process therefore starts with some application data that needs to be accessed by one or a collection of clients or services that need to act on the data.
APIs have become a fundamental aspect of software development. Exposing some functionality through an API hides internal system complexity from the user and enforces separation of concerns.
APIs are starting to be fundamental to product development and business execution, so much so that the concept of API-first development is rapidly being adopted.
Developing the product API before anything else actually means defining how users are going to interact with our platform. The API is the skeleton of an application, and in the case of distributed applications, the API defines the way the app interacts with the outside world.
Designing the API before anything else will enable you to start customer discussions and create user stories early on, and use the API to quickly create your app interface mockups.
API-first development can be summarized as the idea that a service should be exposed as a RESTful API to the outside world before anything else. An API-first strategy encourages the use and adoption of your platform amongst developers, while also making access and integration easier for potential customers and partners.
Rather than having to import a specific library or plug-in in their code bases, developers can interface through the API to consume all the required functionality. The API is an application interface that enables developers and services to use your product, consume your data, and easily integrate your service.
One of the easier examples of API-first development is the separation of the backend of an application from its frontend. An API could be built to expose the application data and the actions to act on the app modules, hence operating at the backend level, while the application frontend could just consume the API and present the data to the final user.
There are many more possible examples. For instance, microservices architectures expose different components of their systems through APIs that are implemented and consumed not only by external applications, but also by other components.
In this chapter we are going to start designing an API. Although we are not going to implement hypermedia controls just yet, we will start building our API as a RESTful service, implementing all the principles and architectural constraints of the REST architectural style.
Our service will be developed organically and incrementally. We will start mapping our application data to resources and actions, proceeding with modularity and possible encapsulation of different modules in mind to easily enable resource exploration.
Although there are different opinions and lively discussions on what the best practices are for designing and developing an API, our objective is to adopt a pragmatic approach and cover the topics that will lead to informative decisions through the process of creating and deploying a simple application and its programming interface.
Throughout this chapter and the next ones, we will take the point of view of building microapplications while adopting many microservices paradigms and borrowing some service-oriented architecture (SOA) patterns. We will see how these microapps can cooperate in more complex systems and integrated together with external APIs.
That said, let’s start designing and developing our first API.
Dos of API Development
There are many dos (and don’ts) of API development, but some essential requirements revolve around just a few points that can be considered the “good coding standards” of API development. These are the basics that every programmer should take into consideration.
Do KISS and DRY
For every complex problem there is an answer that is clear, simple, and wrong.
Henry Louis Mencken,
American journalist
KISS is an acronym that stands for “Keep It Stupid Simple” or “Keep It Simple, Stupid,” or even the more polite “Keep It Simple and Straightforward.” KISS describes a design principle according to which simplicity should be a key goal, and unnecessary complexity should be avoided. KISS is a mantra that is sometimes repeated over and over and can be easily abused.
Although keeping any design neat, clean, and uncomplicated is usually a good thing, you will sooner or later face a case in which a software project or IT system carries an inherent complexity that cannot be eliminated and inevitably will be carried over from the initial requirements to the final result.
Also, any API grows in size and complexity as the number of use cases grows, and maintaining a clear interface that users can feel comfortable with over time is certainly a challenge. However, this does not mean that size and complexity are fundamentally related and it will not be possible to scale the methods and actions of a large or complex API.
Therefore, the KISS concept could be described as stating that a good API is easy to read, to use, and to extend, and is complete and consistent.
Another acronym often encountered in software development is “Don’t Repeat Yourself” (DRY). The DRY principle was formulated by Andy Hunt and Dave Thomas in their book The Pragmatic Programmer, and states that “Every piece of knowledge must have a single, unambiguous, authoritative representation within a system.”
Rails provides a set of tools to “DRY up your code” and avoid duplication, including partials and filters. Partials are used in views and filters in controllers.
From a REST architectural point of view, KISS and DRY translate at the API level to the constraints of uniformity, modularity, and extendability. Both can be summarized into two fundamental principles of API design in particular and system development in general:
- Do simple syntax.
- Do simple semantics.
Do simple syntax
Adopting a simple syntax means making any user’s life easier. Start from a base URL that is simple and intuitive. A straightforward base URL will encourage early adopters to just try simple operations with your API (without needing to dive into tedious documentation), thus creating a sense of instant gratification. The rule of thumb in this case is: if you cannot call your API from cURL with a neat and quick line of shell, then maybe your API isn’t ready yet and you should rethink one or two of your design choices.
Another aspect to consider is that different people will find different syntax more or less natural to use and remember. A number of syntax choices might just be subjective, so you should always be consistent, and once you choose a convention, stick with it. Don’t use mixed upper- and lowercase characters to name a resource; be consistent by using lowercase only. Don’t confuse your users with the use of dashes and underscores; keep your resource names short and concise. Another good habit is to use concrete plural nouns when defining resources, avoiding, for example, verbs. If you try to describe method calls to address possible actions regarding a certain resource, you will end up with a long list of URLs and no consistency.
Resource URLs need to be focused on two main things:
- Accessing a collection of elements
- Accessing a specific element
Do simple semantics
Create a small number of powerful commands. Your API methods should be self-documenting, and hence easy to understand. Your users should not need to read several pages of documentation to start using your service, and you should not have exposed your internal models and methods. Use HTTP verbs to operate on collections and elements, and avoid putting verbs in your base URLs.
Do URI Design
URI design is a problem of syntax and semantics. URIs define a hierarchical and logical structure for accessing resources in your API and acting on them through actions.
The very first step in URI design is deciding on your API endpoint and versioning method (i.e., subdomain or directory):
- api.example.com/
- dev.example.com/api
With subdomain consolidation you can easily run your API completely decoupled from everything else and concentrate all API requests under one API subdomain. Generally speaking, subdomain consolidation makes things cleaner, easier, and more intuitive, while also providing an API gateway for developers wishing to explore the documentation and start using your service.
Another option is to serve all your API documentation with your dev subdomain and use the api/ directory as your endpoint. This is also a common approach.
Versioning is usually indicated right after the endpoint through directory structures. This way, if you were going to build a different version of your API, the API version, like v1/ or v2/, would be the root of your URI tree.
Versioning deals with the problem of keeping your API both forward and backward compatible, at least for a certain amount of time. This is particularly important so that you can make the changes you need to your service, without telling your developers they will lose access or their applications will be unusable if they do not update within a certain time of the release date of your upgraded product. API versioning opens up some issues regarding API compatibility and the future of the service you are designing and planning to develop. You are in fact trying to plan for and foresee an unknown future that will inherently bring unknown changes to the service you are designing at present. Generally speaking, you can adopt two opposite strategies: not doing any versioning and actually doing versioning. Of course, you are free to decide not to do any versioning, but in case you will want to provide different versions of your API, here is what you should consider.
First of all, you should decide where you want to version your API. Some APIs are versioned directly in the endpoint, but versioning with a directory makes it easier to change and evolve your URI structure. There are several possibilities here. You can version in the URL:
- Through the hostname: v1.api.example.com
- With a path prefix: api.example.com/v1/
- With a path suffix: api.example.com/products/21345/v1/
- With a query parameter: api.example.com/products/21345?version=v1
Or you can version in the HTTP request:
- With the content negotiation
- With a custom header
HTTP content negotiation is a mechanism defined by the HTTP protocol specification that allows a web server to return a different version of a document (or, more generally, a different resource representation) through the same URI. It was designed such that a user agent, like an application or a web browser, can specify which version of the same resource best fits its capabilities. This is defined in the Accept header of the HTTP request.
Note
An interesting read about content negotiation is provided by the Mozilla Developer Network.
You can also version through the content of your response, like with XML namespaces or HTML doctype declarations. This can be done through server-side or transparent content negotiation techniques.
Another aspect you should consider is what you want to version. For example:
- You can version through the release date: 2013-04-12
- You can version through the version number: v1, v1.1, v1.1.2
Usually a single version digit is used, although the common software practice of decimal notation sometimes extends into API versioning and most of the time there are minor changes for minor versions.
Note
Always, always, always version your API. Versioning is one of the most important (yet sometimes overlooked) aspects of designing an API. Versioning appropriately makes iterating faster, preventing invalid requests from hitting outdated endpoints.
It also helps in providing a smoother service through any API version transition, since you can continue offering the old version for a given period of time, while your users update their applications.
Following the API version, the URI structure starts identifying resources. It is often said that concrete names to identify resources are better than abstract ones, although API architects are sometimes obsessed with abstraction. In general, taking a pragmatic approach can help in situations like this. If you think about your users, they would probably prefer to see self-documenting URIs like api.example.com/v1/products or api.example.com/stores instead of something more abstract like api.example.com/v1/objects or api.example.com/v1/items, even if by going through your documentation they will eventually understand that every item or object in your application is either a product or a store.
Abstraction is hence not always useful to developers, and could actually lead to confusing URI structures. The level of abstraction that you might want to achieve will vary based on your application or service architecture.
A pragmatic API architect should consider a balance between concrete names and abstraction, keeping the number of resources in the namespace from growing beyond a healthy limit of maybe 20 or 30 different resources in most cases. A good approach in this case is considering that users will have to remember what URIs they should use to consume a specific resource (or at least, that they will probably try to do so). Limit your URI space as much as possible for the sake of simplicity and usability.
During the API design process, and specifically while you are deciding on your URI structure, you should concentrate on the resources you want developers to access, and how this should be accomplished, always remembering that good URI design improves usability and therefore community adoption. Let’s look at a few examples. This will list all products:
$curlapi.example.com/v1/products
This will show product 21345:
$curlapi.example.com/v1/products/21345
And this will list all sneaker products for brand “sneak”:
$curlapi.example.com/v1/products?type=sneakers&brand=sneak
This last example illustrates the use of a search query to list all products of a certain type and manufacturer. That is, we used attribute parameters to search through and filter our products resource. One might thus think that query parameters can also be used to alter the state of a resource. You must not do this! You must instead use HTTP verbs to alter state. Remember that anyone can call a URI through a browser (or a crawler), so you do not want to use GET requests to delete or modify resources. Otherwise, even a simple crawler, or the Google bot, could end up compromising your service and deleting resources from your database simply by visiting a URI.
Why You Should Use Rails to Build APIs
The API created in the previous chapter was a simple “Hello Rails” application with a small twist. If a parameter user is passed to the URL, the API will say “Hello <user>” instead. In this chapter we are going to design a more complex API, starting from some application data.
You may have been asking yourself if using Rails just to generate some JSON isn’t maybe overkill. Why not use something more lightweight like Sinatra instead?
While this may be true, especially for very simple APIs, there are two aspects of developing a RESTful API to take into consideration:
- Designing a RESTful API presumes more code logic than any application just replying to HTTP requests in JSON format.
- Rails provides a set of defaults that speed up prototyping and development and allow the programmer to concentrate on the application logic, hence avoiding many trivialities.
Rail’s default middleware layer handles many aspects of an application’s lifecycle. It includes the following features:
- It supports transparent reloading.
- Smart defaults are available in development mode.
- Test-driven development is provided out of the box.
- Logging verbosity is always appropriate for the current mode: development/test/production.
- You have the freedom to decide if you want to specify parameters as JSON, or as a URL-encoded string. Also, if you prefer to use nested URL-encoded parameters, Rails handles this for you.
- Rails handles all the HTTP protocol details to make conditional GET requests; it processes request headers by returning the correct response header and status quote.
- It provides automatic response caching. The cache store can be easily configured in Rails.
- HEAD requests are transparently converted to GETs.
While these features can certainly be built in Rack middleware, the default Rails middleware stack already provides them out of the box. Therefore, even if your application is “just generating JSON,” Rails delivers value from the moment you run rails new <myapp>.
Note
Rack provides a minimal interface between web servers supporting Ruby and Ruby frameworks. Rack wraps HTTP requests and responses in the simplest way possible; it unifies and distills the API for web servers, web frameworks, and software in between (the so-called middleware) into a single method call.
More information on Rack can be found at https://github.com/rack/rack.
Rails also provides a framework for handling and responding to web requests: Action Pack. In the MVC paradigm, Action Pack represents the VC part. Therefore, some aspects handled at the Action Pack layer are:
- Routing and URLs
-
This means you will not have to spend time thinking about how to design your API in terms of HTTP requests. You will not have to think about URL generation either. Everything will be cleanly and conventionally mapped from HTTP to controllers by the Rails router.
- Headers and redirection responses
- HTTP authentication
-
Rails supports three types of authentication out of the box: basic, digest, and token.
- Active Support instrumentation
-
Active Support provides an instrumentation API allowing developers to provide hooks that other developers may subscribe to.
Also, ActiveSupport provides generators to quickly create models, controllers, routes, and test stubs, and supports plug-ins and third-party libraries that reduce the cost of setting up an application or prototyping a new feature.
In short, Rails has a lot to offer even if we strip out the view layer.
The WikiCat API
The application we are going to design uses the Wikipedia category system to produce the category tree of a given keyword. The Wikipedia category system is a taxonomy, or classification of concepts (in this case, the Wikipedia articles).
The Wikipedia category system is the result of the activity of all users editing and classifying Wikipedia entries. The result is a graph of categories that isn’t strictly a tree or a hierarchy, but allows multiple classifications of topics simultaneously, meaning some categories might have more than one supercategory.
The Wikipedia category system can be considered as a thesaurus that is collaboratively developed and used by crowds for indexing Wikipedia articles.
We are not going to use Wikipedia’s entire database for our API; we are just going to pretend we have some prepopulated data with category extracts and links between categories.
Given this data, we are going to import it in our app, and subsequently we are going to create the models and controller to access and act on it.
With our API, we will aim to find all subcategories of a given category that is passed as a parameter in the URL. In the next few chapters we will continue extending our API and develop it incrementally as a RESTful interface for the Wikipedia category system.
Preparing the Database
Free copies of all available content on Wikipedia are available for users and multi-licensed under the Creative Commons Attribution-ShareAlike 3.0 License (CC-BY-SA) and the GNU Free Documentation License (GFDL).
Snapshots of Wikipedia categories and Wikipedia category links pre-prepared to be imported into this application can be found at the WikiCat GitHub repository.
Because the English category links table contains a large number of records, an extract of the whole dump has also been prepared for testing purposes, so that you do not have to wait several hours for the dump to be imported into your development database.
Wikipedia uses MySQL for its database, so although the dumps can be translated to another SQL dialect or NoSQL language, we are going to use MySQL for the WikiCat API.
The first step is making sure that MySQL is installed on your system. Run:
$mysql--versionmysqlVer14.14Distrib5.6.20,forosx10.9(x86_64)usingEditLinewrapper
It may be the case that MySQL is not installed on your system. In this case, you will have to install it.
Mac OS X users can use brew and run:
$brewinstallmysql
On Linux you will probably have to install the necessary libraries first:
$apt-getinstalllibmysqlclient18libmysqlclient-dev
Then install MySQL Server:
$apt-getinstallmysql-client-5.5mysql-server-5.5
On Windows, you can use MySQL Installer. Instructions can be found in the MySQL documentation.
MySQL Installer simplifies the installation and updating process for a set of MySQL products. It allows the user to see which products have been installed, and configure, update, or remove them if needed. Through the installer it is also possible to install plug-ins, documentation, and tutorials; it includes a GUI and a command-line interface.
Once you’ve made sure MySQL is installed on your system and tested it is working with the command mysql --version, it is time to install the mysql gem for Rails, to allow our Rails app to interface with our database. Run:
$geminstallmysql
Now we are going to create a Rails app with MySQL support instead of SQLite3. Because we want to create an API-only application, we are going to use Rails::API. To install rails-api, run:
$geminstallrails-api
The application can then be generated by running:
$rails-apinewwikicat-dmysql
As before, the command will create our Rails application.
Note
Rails::API generates a subset of a normal Rails application. It was designed specifically for creating API-only apps, where you usually don’t need the entire Rails middleware.
Now that our application has been created, we have to initialize the database:
$cdwikicat$rakedb:create
rake db:create creates our development and test databases. The command is run only the first time the database is created. Subsequently we will instruct our application to run the specified database migrations. We’ll discuss this in the next section.
Scaffolding the Models
Once our database has been prepared, we can start coding our application logic.
The categories table contains the following columns:
cat_id:<Integer>,cat_title:<String>;,cat_pages:<Integer>,cat_subcats:<Integer>,cat_files:<Integer>;
Each of these columns describes a property of a certain category. Let’s take a look at these in order:
cat_id- The unique category ID from Wikipedia
cat_title- The actual category title, as in “Sports” or “Science”
cat_pages- The number of pages belonging to that category
cat_subcats- The number of subcategories belonging to that category
cat_files- The number of files belonging to that category
We are going to generate the Category model accordingly:
$railsgeneratemodelCategorycat_id:integercat_title:stringcat_pages:integercat_subcats:integercat_files:integer
The command will generate the Category model and a number of defaults:
invokeactive_recordcreatedb/migrate/20140821090455_create_categories.rbcreateapp/models/category.rbinvoketest_unitcreatetest/models/category_test.rbcreatetest/fixtures/categories.yml
Tip
You can also simply use rails g instead of writing the entire command rails generate.
The first file to be generated is the migration file to create the categories table. Migrations are a feature provided by Active Record to evolve the database schema over time, in a consistent and easy way. The idea is that the developer doesn’t have to write schema modification code in SQL, but can use Ruby syntax to describe the changes he wants to apply to the database or a single table.
The database schema initially has nothing in it; consequently, each time a migration is run, tables, columns, or single entries are added to or removed from the database. Active Record will then update the schema accordingly, and modify the db/schema.rb file to match the up-to-date structure.
Migrations are stored in the db/migrate folder and sorted by time of creation. A timestamp is added to the filename.
We can now open our first migration file to check how it looks:
# db/migrate/<timestamp>_create_categories.rbclassCreateCategories>ActiveRecord::Migrationdefchangecreate_table:categoriesdo|t|t.integer:cat_idt.string:cat_titlet.integer:cat_pagest.integer:cat_subcatst.integer:cat_filest.timestampsendendend
If we want to add more columns to our tables, we can generate a migration file. Or, as we have not applied our migration yet, we can just edit our create_categories migration file.
What we want to do is use the Wikipedia category ID as the primary ID, without generating another ID field. Also, we want to add the created_at and updated_at columns. We will therefore modify the migration file:
# db/migrate/<timestamp>_create_categories.rbclassCreateCategories>ActiveRecord::Migrationdefchangecreate_table:categories,{:id=>false}do|t|t.integer:cat_idt.string:cat_titlet.integer:cat_pagest.integer:cat_subcatst.integer:cat_filest.date:created_att.date:updated_att.timestampsendexecute"ALTER TABLE categories ADD PRIMARY KEY (cat_id);"endend
Now we are going to create the Link model. We again start with the Wikipedia SQL dump to see what the CategoryLinks table looks like:
cl_from:<Integer>,cl_to:<String>,cl_sortkey:<VarBinary>,cl_timestamp:<Date>,cl_sortkey_prefix:<VarBinary>cl_collation:<VarBinary>cl_type:<String>
Again, each of these columns describes a property of a certain category link:
cl_from- The page ID of the article where the link was placed.
cl_to- The name (excluding namespace prefix) of the desired category. This is the actual category title, as in “Sports” or “Science.”
cl_sortkey- The title by which the page should be sorted in a category list. For a subcategory this is equivalent to the category title.
cl_timestamp- The time at which that link was last updated in the table.
cl_sortkey_prefix- This is either the empty string if a page is using the default sortkey (aka the sortkey is unspecified), or it is the human-readable version of
cl_sortkey. cl_collation- What collation is in use.
cl_type- The type of link: page/subcategory/file.
Note
In the Wikipedia SQL dump, columns are specified as VARBINARY. In MySQL the BINARY and VARBINARY types can be compared to CHAR and VARCHAR; the difference is that they contain binary strings instead of nonbinary strings. That is, a BINARY or VARBINARY type contains a byte string rather than a character string. Since byte strings have no character set, operations like sorting and comparison are based on the numeric values of the bytes in the string.
In Rails, specifying a column as binary generates a BLOB column in MySQL. A BLOB is a binary large object that can hold a variable amount of data. BLOB values are treated by the database as byte strings, but they are a bit different from VARBINARY objects. Since they have no character set, for our simple API we will consider the two types equivalent, although you should know that they are allocated differently than any other MySQL column type. Please refer to the MySQL documentation for more information.
Starting from the SQL dump schema of the categorylinks table, we are going to generate the Link model:
$railsgeneratemodelLinkcl_from:integercl_to:stringcl_sortkey:binarycl_timestamp:datecl_sortkey_prefix:binarycl_collation:binarycl_type:string
Let’s take a look at our new migration file:
# db/migrate/<timestamp>_create_links.rbclassCreateLinks>ActiveRecord::Migrationdefchangecreate_table:linksdo|t|t.integer:idt.integer:cl_fromt.string:cl_tot.binary:cl_sortkeyt.date:cl_timestampt.binary:cl_sortkey_prefixt.binary:cl_collationt.string:cl_typet.timestampsendendend
Again, we want to slightly modify the create_links migration file before applying it. We will edit the file as follows:
# db/migrate/<timestamp>_create_links.rbclassCreateLinks>ActiveRecord::Migrationdefchangecreate_table:links,{:id=>false}do|t|t.integer:cl_fromt.string:cl_tot.binary:cl_sortkeyt.date:cl_timestampt.binary:cl_sortkey_prefixt.binary:cl_collationt.string:cl_typet.date:created_att.date:updated_att.timestampsendexecute"ALTER TABLE links ADD PRIMARY KEY (cl_from);"endend
We can now run the migrations:
$rakedb:migrate
At this point we have two choices. The first one would be to import the two SQL dumps from Wikipedia. This will take a while, and you probably just want to go ahead with coding the WikiCat API at this point.
If you want to go ahead with the MySQL dumps, though, you can download the preprocessed zipped files.
Then unzip the file and run:
$mysqld&$mysql-uroot-pwikicat_development<~/Downloads/enwiki-latest-category.sql$mysql-uroot-pwikicat_development<~/Downloads/enwiki-latest-categorylinks.sql
Note
You can also find the actual Wikipedia dumps at http://dumps.wikimedia.org/enwiki/latest/.
Alternatively, if you don’t want to wait several hours to have the whole Wikipedia dumps imported into your database, you can always populate it with seeds.rb.
Note
The file db/seeds.rb in the repository for this chapter has been prepopulated with some category data and links so that you can quickly develop and test your API.
To populate the database this way, run the command:
$rakedb:seed
Coding Controllers and Serializers
Once our database has been set up and our models generated, we can start coding our controllers.
We are going to use ActiveModel::Serializers to encapsulate the JSON serialization of objects.
A common way to generate a JSON API in Rails is to add a respond_to block to the controller action so that we can see the JSON representation of the returned object.
Suppose, though, we would like to have total control over the returned JSON. We could do this by overriding the as_json method, or by passing some options through the controller.
The problem with both these approaches is that they will not provide the level of customization and simplicity that ActiveModel::Serializers delivers. So, we are going to use it in our application by adding it to the Gemfile:
source'https://rubygems.org'# Bundle edge Rails instead: gem 'rails', github: 'rails/rails'gem'rails','4.1.4'gem'rails-api'# Use mysql as the database for Active Recordgem'mysql2'# Serializer for JSONgem'active_model_serializers'group:docdo# bundle exec rake doc:rails generates the API under doc/api.gem'sdoc','~> 0.4.0'endgroup:developmentdo# Spring speeds up development by keeping your application# running in the background. Read more:# https://github.com/rails/springgem'spring'end
and running Bundle to install it:
$bundleinstall
We are now going to generate the serializer for our models by using the Serializers generator:
$railsgserializercategory$railsgserializerlink
The generator will create a file in the folder serializers/ under app/. Here we can specify which attributes we want to serialize in our JSON replies.
For our category serializer we would like to include the category title and the number of subcategories. We are therefore going to specify the attributes cat_title and cat_subcats:
# serializers/category_serializer.rbclassCategorySerializer<ActiveModel::Serializerattributes:title,:sub_categoriesend
We will now start coding our controllers. This is a good point to think about how we would like our API to be served and what URI structure we are going to use to identify our resources.
From a Rails perspective we are going to provide an api/ directory as our endpoint, followed by the API version, v1.
We are going to generate a category controller in the api/v1 namespace with one action:
$railsgeneratecontrollerapi/v1/categoryshow
This will generate an empty controller with a single empty action called show. We can modify the controller to return the category requested through a parameter:
classApi::V1::CategoryController<ApplicationControllerrespond_to:jsondefshowcategory=params[:category]?params[:category]:"sports"@category=Category.where(:cat_title=>category.capitalize).firstrender:json=>@category,serializer:CategorySerializer,root:"category"endend
Let us examine the controller bit by bit (not literally :).
First of all, we are instructing Rails to return only JSON by using the line respond_to :json.
Secondly, we are telling the controller that if the category param is not defined, the default category “sports” can be used.
Finally, we want the controller to return a category using the category serializer. We are also telling the serializer to use the string “category” as the root for the returned JSON.
Once the controller has been defined, we can define our routes. By default Rails fills the config/routes.rb file with some defaults and basic documentation on how to build routes for your application. Every time a controller is generated through the rails generate command, the routes file is modified with the default routes.
Therefore, we will go ahead and delete (or comment out, if you wish) all the defaults added to the routes file and replace them with the following:
Rails.application.routes.drawdonamespace:apidonamespace:v1doget'/category/:category',:to=>'category#show'endendend
The routes defined will instruct Rails to route the show action of the category controller within the api/v1 namespace. Furthermore, the portion of the path defined after /category/ will be considered as the category parameter to pass the controller.
Finally, it is time to test our serializer, controller, and routes:
$curlhttp://0.0.0.0:3000/api/v1/category/science
If everything is going according to plan, we should receive the JSON string:
<p>{"category":{"cat_title":"SCIENCE","cat_subcats":34}}
We would like, though, to use different names in our JSON replies, and to add some text preprocessing.
We modify the serializer to force ISO-8859-1 and UTF-8 conversion and to replace any possible spaces left in the category titles with underscore characters.
Furthermore, we modify the attributes named cat_title and cat_subcats:
# serializers/category_serializer.rbclassCategorySerializer<ActiveModel::Serializerattributes:title,:sub_categoriesdeftitleURI::encode(object.cat_title.force_encoding("ISO-8859-1").encode("utf-8",replace:nil).downcase.tr(" ","_"))enddefsub_categoriesobject.cat_subcatsendend
We can test again to see if the changes have been applied:
$curlhttp://0.0.0.0:3000/api/v1/category/science{"category":{"title":"science","sub_categories":34}}
Now that we can check single categories, we would like to display all subcategories of a given category passed as a parameter.
We are going to create a controller that will use the link serializer and build the category graph:
$railsgeneratecontrollerapi/v1/graphshow
Then we are going to modify it as follows:
classApi::V1::GraphController<ApplicationControllerrespond_to:jsondefshowcat=params[:category]||'sports'@category=Category.where(:cat_title=>cat.capitalize).first@links=Link.where(:cl_to=>@category.cat_title,:cl_type=>"subcat")render:json=>@links,each_serializer:LinkSerializer,root:@category.cat_title.downcaseendprivatedefgraph_paramsparams.require(:category).permit(:cl_to,:cl_type)endend
As for the category controller, we are asking Rails to respond only with JSON. Then we define an index action where we retrieve a category and find all the corresponding subcategories. We render the JSON using the link serializer defined earlier. The category title is our root.
We also define a private function where we specify the permitted attributes for the Link model and the required category parameter.
Next, we modify the link serializer to rename the cl_sortkey attribute to sub_category. We also enforce UTF-8 and ISO-8859-1 encoding while removing whitespaces:
classLinkSerializer<ActiveModel::Serializerattributes:sub_categorydefsub_categoryURI::encode(object.cl_sortkey.force_encoding("ISO-8859-1").encode("utf-8",replace:nil).downcase.tr(" ","_"))endend
Then we test:
$curlhttp://0.0.0.0:3000/api/v1/graph/science
And if everything was set up correctly, we receive the graph JSON:
{"science":[{"sub_category":"_%0Ascientific_disciplines"},{"sub_category":"_%0Ascientists"},...]}
Testing
Now we are at the boring and tedious step of setting up an app: testing.
We want to make sure that our controllers will behave according to our design even if something changes in the future. So, we are going to write two simple tests to assure the default behavior for both controllers:
# test/controllers/api/v1/category_controller_test.rbrequire'test_helper'classApi::V1::CategoryControllerTest<ActionController::TestCasetest"should get show"doget:show,{'category'=>'science'}assert_response:successassert_equal"{"category":{"title":"science","sub_categories":1}}",@response.bodyendend
require'test_helper'classApi::V1::GraphControllerTest<ActionController::TestCasetest"should get show"doget:show,{'category'=>"sports"}assert_response:successassert_equal"{"sports":[{"sub_category":"culture_and_sports_culture"}]}",@response.bodyendend
Before running the tests we also need to prepare the fixtures. This is fake data that will populate our test database in order for the tests to work.
We are going to create two links and two categories. The two fixtures were already generated when we scaffolded the models, but we are going to modify both as follows:
# test/fixtures/links.ymlone:cl_from:1cl_to:Sportscl_sortkey:CULTUREANDSPORTSCULTUREcl_timestamp:2005-04-2910:32:42cl_sortkey_prefix:Culturecl_collation:uppercasecl_type:subcattwo:cl_from:2cl_to:Sciencecl_sortkey:SCIENTIFICDISCIPLINEScl_timestamp:2013-09-0222:56:59cl_sortkey_prefix:Scicl_collation:uppercasecl_type:subcat
# test/fixtures/categories.ymlone:cat_id:1cat_title:Sportscat_pages:1cat_subcats:1cat_files:1two:cat_id:2cat_title:Sciencecat_pages:1cat_subcats:1cat_files:1
Note
You can read more on fixtures in the Ruby on Rails documentation.
We can then run the tests as usual:
$raketest
Note
We haven’t defined errors in the graph controller. What happens if the category isn’t found?
You can find the solution in the WikiCat GitHub repository.
Wrapping Up
In this chapter we learned how to create a first Rails application. In the next chapter we will explore how you can use Rails to build RESTful applications and, more specifically, how it is possible to reconcile CRUD with REST.