
Chapter 11. Building Real-Time Apps and Services
Throughout the book we have been looking at various ways microservices accept input and produce output. We’ve seen the traditional RESTful services and we’ve seen services that consume and produce messages in queues.
Users of modern web and mobile applications often demand more than the eventual consistency we discussed in Chapter 6 (ES/CQRS). They want to know about things that are important to them, and they want to know about them immediately.
This brings us to the topic of this chapter: real-time services. This chapter will discuss what the phrase “real-time” means and the types of applications most consumers consider to be within that category. Then we’ll look at websockets and how traditional websocket programming models fall short in the cloud, and build a sample real-time application that demonstrates the power of adding real-time messaging to an event-sourced system.
Real-Time Applications Defined
Before we can define a real-time application we need to define real-time. Just like the term microservices, real-time is overloaded, overused, and usually has at least two different meanings for every person in the room discussing it.
Definithing.com defines it as:
A term used to describe computer systems that update information at the same rate as they receive data.
Other definitions of real-time suggest that something is real-time if it can process input and produce output within a few milliseconds. To me this seems like a fairly arbitrary value. Some systems with ultra-low latency requirements might consider real-time to be a processing time of a few hundred microseconds, not milliseconds.
The event processor we created in Chapter 6 is more than capable of processing input (member location events), detecting proximity, and emitting proximity detected events within a few milliseconds. By either of the definitions we’ve covered so far, our location event processor can be considered a real-time system.
I think a slightly broader definition of real-time might be to say that events occur with little to no delay between receipt and processing. The definition of “little” here has to be one that is agreed upon by the development team based on the system requirements and application domain and can’t be some arbitrary value of some randomly chosen unit of measure.
One source says that examples of real-time applications might be a missile guidance system or an airline booking application. I can completely understand the real-time nature of a missile guidance system—an embedded processor performing millions of calculations per second based on input from dozens or hundreds of sensors in order to control the flight of a projectile and report feedback to the ground. Other real-time applications that fall into a similar category might be autonomous cars, hobby and commercial drone autopilot software, and pattern recognition software applied to live video feeds.
But what about an airline booking system? I think this is a step too far. Most of us have experienced the eventual consistency (or rarely consistent) nature of these systems. You can book a ticket, and your mobile device might take 24 hours to receive your boarding pass. You may get notifications of a flight delay or gate change an hour after that information might have been relevant to you. There are exceptions of course, but for a large number of cases, these are batch mode systems and time-polling systems that rarely exhibit the traits of a real-time application.
This brings up another anti-pattern of real-time systems. Here are some characteristics of applications that disqualify them from the real-time category:
- Your application collects input and waits before producing output.
- Your application only produces output on timed intervals or upon external stimuli that occur on any kind of schedule or are random in nature.
A really common trait or characteristic of real-time systems is that interested parties are notified of events concerning them via push notification, rather than the interested party performing a poll or timed query to check for updates. We’re going to be talking about push notifications of various kinds throughout the rest of the chapter.
Websockets in the Cloud
We’ve already covered one form of messaging extensively throughout this book—the use of message queues via a messaging server like RabbitMQ. When developers think about real-time applications, one thing that often comes to mind is the use of websockets to push data and notifications to a live (real-time) web-based UI.
Just a few years ago, using a website that would update and react to you dynamically would have seemed remarkable and been labeled as “the future.” Nowadays we take this kind of thing for granted.
When we go to a website that sells products, we take it as given that we should be able to have a live chat with support people. It’s no big surprise when Facebook pops up notifications letting us know that someone’s commented on our post or we see the site change and react dynamically when someone retweets one of our tweets.
While not all of this functionality is supported explicitly through websockets, most of it was a few years ago and much of it is still supported through either websockets or something designed to appear like a websocket to developers.
The WebSocket Protocol
The WebSocket protocol showed up around 2008 and defines the means by which a persistent, bidirectional socket connection can be made between a browser and a server. This allows data to be sent to a server from a web application running in the browser, and it allows a server to send data down without requiring the application to “poll” (periodically check for updates, usually on a sliding/exponential fall-off scale).
At a low level, the browser requests a connection upgrade of the server. Once the handshake finishes, the browser and server switch to a separate, binary TCP connection for bidirectional communication.
From the specification, and the corresponding Wikipedia page, an HTTP request asking for a connection upgrade looks something like this:
GET/chatHTTP/1.1Host:server.example.comUpgrade:websocketConnection:UpgradeSec-WebSocket-Key:x3JJHMbDL1EzLkh9GBhXDw==Sec-WebSocket-Protocol:chat,superchatSec-WebSocket-Version:13Origin:http://example.com
The websockets are then used to do everything from pushing pop-up notifications on social media websites to updating live, streaming dashboards and monitoring consoles and even playing interactive multiplayer games with little more than HTML and clever use of graphics and CSS.
Deployment Models
What does any of this have to do with the cloud? In a traditional deployment model, you spin up a server (physical or virtual), you install your hosting product (an IIS web server or some J2EE container like WebSphere, for example) and then you deploy your application. If your application is scalable and works on a farm, you then repeat this process over again for each server in your farm or cluster.
When a user connects to a page on your site that opens a websocket connection, that connection stays open with whatever server was chosen to handle the initial request. Until the user hits refresh or clicks another link, that websocket should work just fine, though there are other issues that might come up with proxies and firewalls.
Let’s say now that all of your servers are running on EC2 instances in AWS. When a cloud-based infrastructure is hosting your virtual machines, they are subject to relocation, destruction, and reconstruction at any moment. This is a good thing, and designed to allow your application to scale virtually without limit. Unfortunately, this means that these “live” websocket connections can be broken or become stale and unresponsive without notice.
Furthermore, the use of always-up TCP connections to individual servers can impact your own application’s ability to scale. Depending on the volume of requests and data your application code is servicing, also managing these connections and the data exchange for them can become a troublesome burden.
The solution here is usually to externalize the use of websockets—to offload the management of websocket connections and data transfer to something that exists (and scales) outside your application code. Another solution that helps with scaling is avoiding websockets entirely and using HTTP-based messaging systems.
In short, rather than your application managing websockets on its own, you should let the experts manage websockets and use a cloud messaging provider. It’s worth remembering that you’re building an application for your business; you’re not (usually) planning on specializing in the art of websocket management.
Whether you host your own cloud messaging server within your infrastructure or your use a separate messaging provider hosted elsewhere in the cloud is up to you and will depend on your requirements and business domain.
Using a Cloud Messaging Provider
We know that we want our application to have real-time capabilities. We want our microservices to be able to push data down to clients, knowing that those clients will not have a live TCP connection to the microservice. We also want applications to be able to use the same or a similar message pipeline to send messages into our back-end.
In order for our microservices to remain cloud native and retain the ability to scale and move around freely in the cloud, we need to pick a messaging provider to manage some of our real-time capabilities out of process.
The list of companies that provide messaging services is enormous and growing every day. The following are just a few of the many companies that offer cloud messaging either as a standalone product or as part of a larger suite of services:
- Apigee (API gateway and real-time messaging)
- PubNub (real-time messaging and presence)
- Pusher (real-time messaging and presence)
- Kaazing (real-time messaging)
- Mashery (API gateway and real-time messaging)
- Google (Google Cloud Messaging)
- ASP.NET SignalR (real-time messaging hosted in Azure)
- Amazon (Simple Notification Service)
The criteria you use to select your messaging provider will be based entirely on your needs, the type of application you’re building, budget, expected volume, whether you’re incorporating mobile devices or IoT components, and so on.
Regardless of which mechanism you choose, you should invest a little time in insulating your code from the exact provider so that you can change this without having too much of a far-reaching impact. An anti-corruption layer (ACL) would be a pretty good recommendation here to insulate your app from implementation models from specific providers bleeding into your codebase.
In this chapter, we’re going to use PubNub. I chose it somewhat arbitrarily, but also because of the simple SDK, excellent documentation, ready availability of public samples, and the fact that we can use it for demonstration purposes without having to hand over a credit card number.
Building the Proximity Monitor
In Chapter 6, in the course of our discussion of Event Sourcing and the Command Query Responsibility Segregation pattern, we built an application made up of multiple microservices that detected whenever teammates moved within range of each other.
When this system detects two nearby teammates, it emits a ProximityDetectedEvent onto a queue—but that’s where we stopped designing and coding. What we want to do now is build a monitor that updates in real time whenever the backend system detects one of these proximity events.
For the purposes of our example, we’ll be keeping the UI to something simple, but it shouldn’t take much imagination to envision some of the potential real-time user interfaces that might be possible here. We could create a maps integration where the current positions of all of the team members are plotted, and we might bounce or animate team members’ avatars when the system has detected that they are within range of each other. These team members might also receive notifications on their mobile devices at the same time.
Creating a Proximity Monitor Service
Our proximity monitor sample will have a couple of different components. The first thing that we want to do is consume the ProximityDetectedEvent that comes off of the queue from the services written in Chapter 6.
Once we do that, we want to grab the raw information on this event and make calls to the team service (written earlier in the book as well) to grab user-friendly information like team and member names. Finally, once we’ve obtained this augmented data, we want to send a new message out on our real-time messaging system (in our case, this will be PubNub).
The code for the entire proximity monitor is available on GitHub.
In another implementation of a pattern used a few times in this book, we’re going to create a broad-scoped processor class. This class will have a bunch of other subordinate utilities injected into it. The single main “processing” function of this class should read almost like documentation of the high-level logic flow gleaned from our requirements.
Example 11-1 shows the code for our ProximityDetectedEventProcessor, the high-level coordinator behind the proximity monitor.
Example 11-1. ProximityDetectedEventProcessor.cs
usingSystem;usingMicrosoft.Extensions.Logging;usingMicrosoft.Extensions.Options;usingStatlerWaldorfCorp.ProximityMonitor.Queues;usingStatlerWaldorfCorp.ProximityMonitor.Realtime;usingStatlerWaldorfCorp.ProximityMonitor.TeamService;namespaceStatlerWaldorfCorp.ProximityMonitor.Events{publicclassProximityDetectedEventProcessor:IEventProcessor{privateILoggerlogger;privateIRealtimePublisherpublisher;privateIEventSubscribersubscriber;privatePubnubOptionspubnubOptions;publicProximityDetectedEventProcessor(ILogger<ProximityDetectedEventProcessor>logger,IRealtimePublisherpublisher,IEventSubscribersubscriber,ITeamServiceClientteamClient,IOptions<PubnubOptions>pubnubOptions){this.logger=logger;this.pubnubOptions=pubnubOptions.Value;this.publisher=publisher;this.subscriber=subscriber;logger.LogInformation("Created Proximity Event Processor.");subscriber.ProximityDetectedEventReceived+=(pde)=>{Teamt=teamClient.GetTeam(pde.TeamID);MembersourceMember=teamClient.GetMember(pde.TeamID,pde.SourceMemberID);MembertargetMember=teamClient.GetMember(pde.TeamID,pde.TargetMemberID);ProximityDetectedRealtimeEventoutEvent=newProximityDetectedRealtimeEvent{TargetMemberID=pde.TargetMemberID,SourceMemberID=pde.SourceMemberID,DetectionTime=pde.DetectionTime,SourceMemberLocation=pde.SourceMemberLocation,TargetMemberLocation=pde.TargetMemberLocation,MemberDistance=pde.MemberDistance,TeamID=pde.TeamID,TeamName=t.Name,SourceMemberName=$"{sourceMember.FirstName} {sourceMember.LastName}",TargetMemberName=$"{targetMember.FirstName} {targetMember.LastName}"};publisher.Publish(this.pubnubOptions.ProximityEventChannel,outEvent.toJson());};}publicvoidStart(){subscriber.Subscribe();}publicvoidStop(){subscriber.Unsubscribe();}}}
The first thing to notice in this code listing is the long list of dependencies that we’ll be injecting into the constructor from the DI service provider:
- Logger
- Real-time event publisher
- Event subscriber (queue-based)
- Team service client
- PubNub options
The logger is self-explanatory. The real-time event publisher, a class that conforms to the IRealtimePublisher interface, allows us to publish a string message on a given channel (also specified by a string). We will be publishing events of type ProximityDetectedRealtimeEvent on this channel, serializing the data into JSON.
The event subscriber listens to our queue (RabbitMQ), awaiting messages of type ProximityDetectedEvent. When we start and stop our event processor, we subscribe and unsubscribe the event subscriber accordingly.
The team service client is used to query the team service for team and member details. We use the team and member service details to populate the member properties (first and last name) and the team name property on the real-time event.
Finally, the PubNub options class holds information like the name of the channel on which the message will be published. While our underlying implementation is PubNub, the vast majority of cloud messaging providers have some concept of a channel for message publishing, so we should be relatively safe swapping PubNub out for a different provider if we choose.
Creating a real-time publisher class
A good refactor for the future might be to create another small class that is responsible for creating a new instance of a ProximityDetectedRealtimeEvent class from every ProximityDetectedEvent received. This is not just an anti-corruption function, but also augmentation that grabs the team member’s name and other user-friendly information. From a functional purist’s perspective, this code doesn’t really belong in the high-level processor, but rather should be delegated to a supporting tool that’s been tested in isolation.
Moving on from the high-level processor, let’s take a look at the implementation of our IRealtimePublisher interface in Example 11-2, one that uses the PubNub API.
Example 11-2. PubnubRealtimePublisher.cs
usingMicrosoft.Extensions.Logging;usingPubnubApi;namespaceStatlerWaldorfCorp.ProximityMonitor.Realtime{publicclassPubnubRealtimePublisher:IRealtimePublisher{privateILoggerlogger;privatePubnubpubnubClient;publicPubnubRealtimePublisher(ILogger<PubnubRealtimePublisher>logger,PubnubpubnubClient){logger.LogInformation("Realtime Publisher (Pubnub) Created.");this.logger=logger;this.pubnubClient=pubnubClient;}publicvoidValidate(){pubnubClient.Time().Async(newPNTimeResultExt((result,status)=>{if(status.Error){logger.LogError($"Unable to connect to Pubnub {status.ErrorData.Information}");throwstatus.ErrorData.Throwable;}else{logger.LogInformation("Pubnub connection established.");}}));}publicvoidPublish(stringchannelName,stringmessage){pubnubClient.Publish().Channel(channelName).Message(message).Async(newPNPublishResultExt((result,status)=>{if(status.Error){logger.LogError($"Failed to publish on channel {channelName}:{status.ErrorData.Information}");}else{logger.LogInformation($"Published message on channel {channelName}, {status.AffectedChannels.Count}affectedchannels,code:{status.StatusCode}");}}));}}}
The code here is pretty straightforward. It is just a simple wrapper around the PubNub SDK. The instance of the Pubnub class from the SDK is configured through some extensions I wrote that register a factory with ASP.NET Core.
Injecting the real-time classes
You can see how the Pubnub client and other classes are enabled through DI in the Startup class in Example 11-3.
Example 11-3. Startup.cs
usingMicrosoft.AspNetCore.Builder;usingMicrosoft.AspNetCore.Hosting;usingMicrosoft.Extensions.Configuration;usingMicrosoft.Extensions.DependencyInjection;usingMicrosoft.Extensions.Logging;usingStatlerWaldorfCorp.ProximityMonitor.Queues;usingStatlerWaldorfCorp.ProximityMonitor.Realtime;usingRabbitMQ.Client.Events;usingStatlerWaldorfCorp.ProximityMonitor.Events;usingMicrosoft.Extensions.Options;usingRabbitMQ.Client;usingStatlerWaldorfCorp.ProximityMonitor.TeamService;namespaceStatlerWaldorfCorp.ProximityMonitor{publicclassStartup{publicStartup(IHostingEnvironmentenv,ILoggerFactoryloggerFactory){loggerFactory.AddConsole();loggerFactory.AddDebug();varbuilder=newConfigurationBuilder().SetBasePath(env.ContentRootPath).AddJsonFile("appsettings.json",optional:false,reloadOnChange:false).AddEnvironmentVariables();Configuration=builder.Build();}publicIConfigurationRootConfiguration{get;}publicvoidConfigureServices(IServiceCollectionservices){services.AddMvc();services.AddOptions();services.Configure<QueueOptions>(Configuration.GetSection("QueueOptions"));services.Configure<PubnubOptions>(Configuration.GetSection("PubnubOptions"));services.Configure<TeamServiceOptions>(Configuration.GetSection("teamservice"));services.Configure<AMQPOptions>(Configuration.GetSection("amqp"));services.AddTransient(typeof(IConnectionFactory),typeof(AMQPConnectionFactory));services.AddTransient(typeof(EventingBasicConsumer),typeof(RabbitMQEventingConsumer));services.AddSingleton(typeof(IEventSubscriber),typeof(RabbitMQEventSubscriber));services.AddSingleton(typeof(IEventProcessor),typeof(ProximityDetectedEventProcessor));services.AddTransient(typeof(ITeamServiceClient),typeof(HttpTeamServiceClient));services.AddRealtimeService();services.AddSingleton(typeof(IRealtimePublisher),typeof(PubnubRealtimePublisher));}publicvoidConfigure(IApplicationBuilderapp,IHostingEnvironmentenv,ILoggerFactoryloggerFactory,IEventProcessoreventProcessor,IOptions<PubnubOptions>pubnubOptions,IRealtimePublisherrealtimePublisher){realtimePublisher.Validate();realtimePublisher.Publish(pubnubOptions.Value.StartupChannel,"{'hello': 'world'}");eventProcessor.Start();app.UseMvc();}}}
The AddRealtimeService method is a static extension method that I created to simplify the injection of the implementation of an IRealtimePublisher by the service provider.
So far in the book we’ve been using only the simplest and most basic features of ASP.NET Core’s dependency injection. What we’re trying to do now is make sure that we can create a class (like the PubnubRealtimePublisher) that can have a ready-made instance of the PubNub API injected into it.
To do this cleanly and still allow all of our configuration to be injected, including the secret API keys, we need to register a factory. The factory is going to be a class that dispenses configured instances of the Pubnub class from the PubNub SDK.
Example 11-4 shows the relatively simple factory class.
Example 11-4. PubnubFactory.cs
usingMicrosoft.Extensions.Options;usingPubnubApi;usingMicrosoft.Extensions.Logging;namespaceStatlerWaldorfCorp.ProximityMonitor.Realtime{publicclassPubnubFactory{privatePNConfigurationpnConfiguration;privateILoggerlogger;publicPubnubFactory(IOptions<PubnubOptions>pubnubOptions,ILogger<PubnubFactory>logger){this.logger=logger;pnConfiguration=newPNConfiguration();pnConfiguration.PublishKey=pubnubOptions.Value.PublishKey;pnConfiguration.SubscribeKey=pubnubOptions.Value.SubscribeKey;pnConfiguration.Secure=false;}publicPubnubCreateInstance(){returnnewPubnub(pnConfiguration);}}}
Given PubNub options (we have these in our appsettings.json file, which can be overridden via environment variables), this class creates a new instance of the Pubnub class. The real trick, and the code that will likely come in handy in your development projects, is the static extension method to plug this factory into the DI mechanism, shown in Example 11-5.
Example 11-5. RealtimeServiceCollectionExtensions.cs
usingSystem;usingMicrosoft.Extensions.DependencyInjection;usingPubnubApi;namespaceStatlerWaldorfCorp.ProximityMonitor.Realtime{publicstaticclassRealtimeServiceCollectionExtensions{publicstaticIServiceCollectionAddRealtimeService(thisIServiceCollectionservices){services.AddTransient<PubnubFactory>();returnAddInternal(services,p=>p.GetRequiredService<PubnubFactory>(),ServiceLifetime.Singleton);}privatestaticIServiceCollectionAddInternal(thisIServiceCollectioncollection,Func<IServiceProvider,PubnubFactory>factoryProvider,ServiceLifetimelifetime){Func<IServiceProvider,object>factoryFunc=provider=>{varfactory=factoryProvider(provider);returnfactory.CreateInstance();};vardescriptor=newServiceDescriptor(typeof(Pubnub),factoryFunc,lifetime);collection.Add(descriptor);returncollection;}}}
A good rule of thumb when trying to work within the constraints of a DI system is to ask yourself what your class needs to work. If it needs a thing that you cannot yet inject, create something (a wrapper, perhaps) that allows it to be injectable, and then reevaluate. This process usually results in several small wrapper classes but a pretty clean and easy-to-follow injection path.
The key bit of work in the preceding code was creating a lambda function that accepts an IServiceProvider as input and returns an object as output. This is the factory function that we pass into the service descriptor when we register the factory.
Hereafter, any time any object requires an instance of a Pubnub object, it will be dispensed through the factory we registered in the line:
vardescriptor=newServiceDescriptor(typeof(Pubnub),factoryFunc,lifetime);
This descriptor indicates that a request for Pubnub will be satisfied by invoking the factory function in the variable factoryFunc, with the given object lifetime.
Putting it all together
To see this in action and make sure everything is working, we can fake the output of the services from Chapter 6 by manually dropping a ProximityDetectedEvent JSON string into the proximitydetected queue, as shown in the following screenshot from the RabbitMQ console (Figure 11-1).
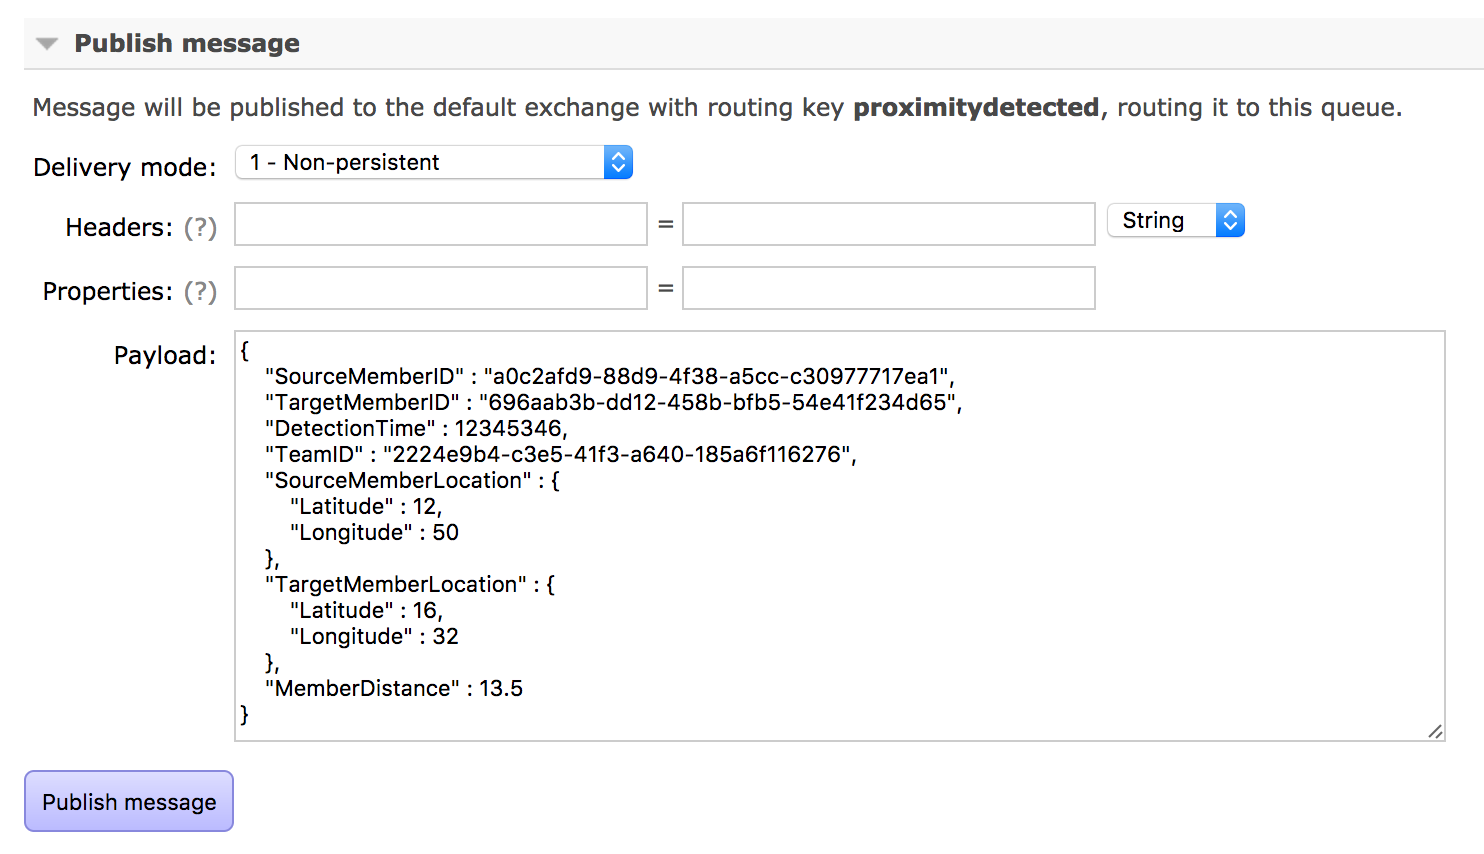
Figure 11-1. Manually submitting a proximity detected event
If our proximity monitor service is running and subscribed to the queue when this happens, and our team service is running and has all the appropriate data in it (there are some sample shell scripts in the GitHub repository that show you how to seed the team service with test data), then the proximity monitor will pick up the event, augment it, and then dispatch a real-time event through PubNub.
Using the PubNub debug console, we can see the output of this process show up immediately (technically it’s almost immediate) after processing (Figure 11-2).

Figure 11-2. PubNub channel view in the debug console
You can copy and modify the script file in the GitHub repository that populates the team service with sample data as well as a sample JSON file containing a test proximity event so you can run through this yourself without having to start any of the code from Chapter 6.
Creating a Real-Time Proximity Monitor UI
Having a microservice that picks up proximity events, augments them, and then sends them out for dispatch to our real-time messaging system is great, but at this point we haven’t done anything meaningful with the real-time message.
As mentioned earlier, we could use this message to move thumbtacks on a map UI, we could dynamically update tables or charts, or we could simply create little toasts or pop-up notifications in a web UI. Depending on our messaging provider, we could also have these messages automatically converted into push notifications and sent directly to team members’ mobile devices.
To keep things simple and to hide the fact that I have no artistic skills whatsoever, I’ll just use a very simple HTML page that has no graphics and doesn’t require a server of any kind.
For a full set of details on how to interact with PubNub messages and channels using JavaScript, please check out their JavaScript SDK documentation.
Example 11-6 is our very simple example that listens for proximity events and adds the information to a div element dynamically and in real time.
Example 11-6. realtimetest.html
<html><head><title>RT page sample</title><scriptsrc="https://cdn.pubnub.com/sdk/javascript/pubnub.4.4.0.js"></script><script>varpubnub=newPubNub({subscribeKey:"yoursubkey",publishKey:"yourprivatekey",ssl:true});pubnub.addListener({message:function(m){// handle messagevarchannelName=m.channel;varchannelGroup=m.subscription;varpubTT=m.timetoken;varmsg=JSON.parse(m.message);console.log("New Message!!",msg);varnewDiv=document.createElement('div')varnewStr="** ("+msg.TeamName+") "+msg.SourceMemberName+" moved within "+msg.MemberDistance+"km of "+msg.TargetMemberName;newDiv.innerHTML=newStrvaroldDiv=document.getElementById('chatLog')oldDiv.appendChild(newDiv)},presence:function(p){// handle presence},status:function(s){// handle status}});console.log("Subscribing..");pubnub.subscribe({channels:['proximityevents']});</script></head><body><h1>Proximity Monitor</h1><p>Proximity Events listed below.</p><divid="chatLog"></div></body></html>
Here we have an HTML div called chatLog. Every time we receive a message from the PubNub channel proximityevents we create a new div and append it as a child. This new div has the name of the team as well as the names of the source and target members, as shown in Figure 11-3.

Figure 11-3. Receiving real-time messages via JavaScript
It’s worth pointing out that you don’t need to host this file on a server; you can open it in any browser and the JavaScript just runs. When you look at the documentation for PubNub’s other SDKs (including mobile), you’ll see how easy it is to achieve real-time communication between backend services, end users using web browsers, mobile devices, and other integration points. This ease of use isn’t limited to just PubNub, either; most cloud messaging providers (including Amazon, Azure, and Google) have very easy to use SDKs and their documentation is typically rich and full of good examples.
Summary
In this chapter we added some clarity to the definition of real-time—what it means and what it doesn’t. We also talked about how we’ve already done some near-real-time programming in this book in Chapter 6, with our use of queues and immediate subscriptions.
This chapter showed you how to build on the knowledge you’ve accumulated so far to seamlessly integrate third-party cloud messaging providers into your codebase. The use of cloud messaging providers can give you dynamic and real-time-updating UIs for web and desktop as well as enabling fully interactive mobile applications that run on semi-connected devices.
Real-time messaging systems are often the glue that makes the independent components of a highly scalable, distributed, and eventually consistent system work.
There are even messaging providers that have special accommodations for the IoT, so you could use the patterns in this chapter to integrate your army of evil robots (or a smart fridge, whichever you prefer) with your ASP.NET Core backend.