
2
PROGRAMMING BASICS

In this chapter, we’ll explore the basics of crafting Minecraft robots, or turtles. We’ll create our first turtle and name it. Then we’ll fuel it up and try out a few programming instructions! You’ll also learn some basic programming concepts and how you can practice coding in Minecraft.
GETTING STARTED WITH TURTLES
The Logo programming language, created in the 1960s, introduced programmable turtles. In Logo, turtles were dots on the screen that you could program to move around and draw lines, creating amazing patterns. Using Logo, you could learn to program while creating art with your computer! Figure 2-1, made using a program from Teach Your Kids to Code by Bryson Payne (No Starch Press, 2015), shows an example of Logo-style art written in the Python programming language.
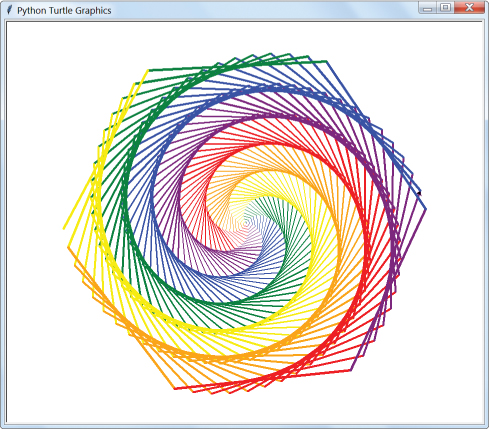
Figure 2-1: An example of colorful turtle art
ComputerCraft brings the same idea to the Minecraft world, where turtles are robots that can mine and craft according to programs you write. Figure 2-2 shows what these block-shaped turtle robots (also called bots) look like.

Figure 2-2: A turtle equipped with a pickaxe (left) and what turtles look like from different sides
These boxy bots may not look like much, but they have a lot of potential. Turtles can move in all directions. They can hover, survive underwater, carry items, and move through lava. Once you’ve mastered some programming skills, your turtles will carry out complex tasks at your command.
CRAFTING A MINING TURTLE
When you’re in Creative mode, you can spawn a turtle just like any other item. You spawn a turtle by pressing E to open your inventory, clicking the compass tab, and then typing turtle to find all the different types of turtles, as shown in Figure 2-3. This book uses the gray basic turtles instead of the gold advanced turtles, but they work similarly.

Figure 2-3: Spawning a turtle in Creative mode
NOTE
To switch to Creative mode, press T or the / key to bring up the chat/command window; then enter /gamemode creative and press ENTER. To switch to Survival mode, press T or the / key and enter /gamemode survival.
But we want to use turtles in Survival mode, where we’ll need to craft turtles (along with everything else) from scratch. Here’s how to do it.
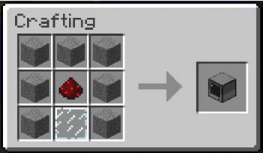
Craft a computer. The turtle-crafting recipe requires a computer, so before we can craft a turtle, we must craft a computer using stone, redstone, and a glass pane. (If you don’t know how to make stone or glass panes, or where to find redstone, open a web browser to a search engine site and enter “minecraft find redstone” or “minecraft craft glass pane.”) To craft a computer, we’ll follow the recipe in Figure 2-4.
Figure 2-4: Crafting a computer with seven stone blocks, one redstone block, and one glass pane
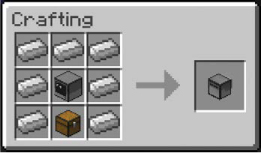
Use the computer to craft a turtle. We won’t bother placing the computer in the world because we won’t be using it in this book. We just need it as a crafting item in the turtle recipe. We’ll use the computer, some iron, and a chest to craft a basic turtle, as shown in the recipe in Figure 2-5.
Figure 2-5: Crafting a turtle with seven iron blocks, one chest, and one computer
Equip the turtle with tools! So far, we just have a basic turtle. It can move around, but it can’t mine, dig, or do much else until we give it a tool. We can equip turtles with diamond pickaxes, shovels, axes, hoes, or swords. These tools must be diamond tools and brand new. An iron tool or a diamond tool with wear and tear won’t work. We can also equip turtles with crafting tables.
For our first turtle, let’s use a diamond pickaxe to craft a mining turtle by following the recipe in Figure 2-6.
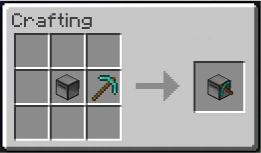
Figure 2-6: Crafting a mining turtle with one turtle and one diamond pickaxe
RUNNING PROGRAMS IN THE TURTLE GUI
To use the turtle, right-click to place it in the world, just as you would place any other block. Then, right-click the turtle to open its graphical user interface (GUI), which is where you’ll program the turtle and manage its inventory. Keep in mind that Minecraft isn’t paused while you’re looking at the GUI, so you need to be careful that monsters don’t sneak up behind you while you’re entering commands. Figure 2-7 shows what the turtle’s GUI looks like.
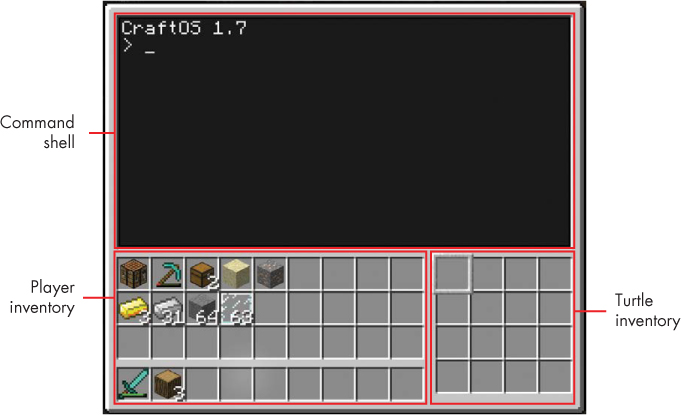
Figure 2-7: The turtle’s GUI
The GUI consists of your inventory, the turtle’s inventory, and the command shell, which is where you’ll write your programs and enter commands. (Oddly enough, the terms shell and turtle are just a coincidence.) You can store multiples of the same items in a single inventory slot to create a stack of items. For most items, you can stack up to 64 items in a single slot. Turtles have 16 inventory slots, and you can easily drag items between your inventory and the turtle’s.
Turtles come preloaded with some programs, including label, dance, refuel, go, and lua. We should first name our turtle using the label program. In this book, I’ve named the turtles after four Italian Renaissance painters: Sofonisba, Lavinia, Artemisia, and Elisabetta. You can use these names or choose different ones.
Right-click the turtle to open the GUI, and run the label program by entering label in the command shell, followed by the words to set the turtle’s name, which in this case are set Sofonisba. Then press ENTER:
> label set Sofonisba
Computer label set to "Sofonisba"
The words set Sofonisba are called command line arguments, and they tell the label program what do to. Together, the label program and set Sofonisba command line arguments form a command for the turtle to carry out.
The > symbol at the start of the code is called the prompt. We type our commands at the prompt, and after the turtle has carried them out, a new > prompt will appear and wait for our next command.
WARNING
You can mine the turtle with a pickaxe to put it in your inventory, but only do this after you’ve set a label for it. Otherwise, it will lose all its fuel and erase any programs it had. (Fuel is described in the next section.) Mining a turtle also causes it to drop its inventory, much like mining a chest.
Now that the label program has set the turtle’s name to Sofonisba, run the dance command to start another preloaded program:
> dance
Preparing to get down...
Press any key to stop the groove
Press ESC to close the turtle GUI. You’ll see that as the dance program runs, the turtle bot randomly spins around. Right-click the turtle to bring up the turtle GUI again. The dance program is still running, but it is programmed to stop when you press any key. You can also stop any program by holding down CTRL-T for one full second while the GUI is open.
FUELING THE TURTLE
Turtles can move forward, backward, up, or down (and they can fly!). But in order to move, they need fuel. Any items you can burn in a furnace can be consumed as fuel, and one unit of fuel can move the turtle one block. Table 2-1 shows how many units of fuel each item provides.
Table 2-1: Turtle Fuel Sources
Item |
Item name |
Units of fuel |
|
Stick |
5 |
|
Wooden tools (pickaxe, shovel, and so on) |
10 |
|
Wood |
15 |
|
Planks |
15 |
|
Coal or charcoal |
80 |
|
Blaze rod |
120 |
|
Coal block |
800 |
|
Lava bucket |
1,000 |


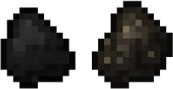


The item that provides the most fuel is a bucket of lava. Notice that wood and planks both provide 15 fuel units. You can craft a wood block into four planks, so you can get four times as much fuel if you turn wood blocks into planks before you use them as fuel. In general, using coal or charcoal is usually the easiest way to fuel your turtles. Coal provides 80 fuel units, but coal blocks provide 800 units. Because it takes only nine coal items to craft a coal block, it’s more efficient to craft coal into coal blocks before fueling. Blaze rods are rare (they’re only dropped by defeated blaze mobs in the Nether) and don’t give that much fuel, so you should save them for crafting instead.
A basic turtle can store up to 20,000 units of fuel. Only moving uses fuel. You don’t need fuel for turning, mining, crafting, digging, and everything else a turtle does. Hovering in the air doesn’t require fuel either; it’s just like being on the ground.
To burn an item for fuel, it must be in the turtle’s inventory and in the selected slot, which has a thick border around it, as shown in Figure 2-8.
When you have an item to burn in the selected slot, run the refuel program. If you have more than one item to burn for fuel, enter the number of items you want to burn after refuel.
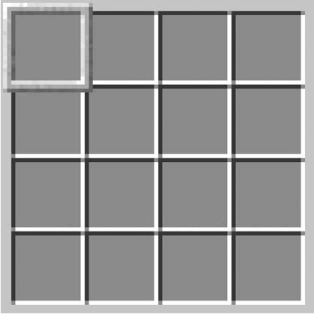
Figure 2-8: The currently selected slot of the turtle’s inventory has a thicker border than the other slots.
For example, enter the following in the command shell:
> refuel 64
Fuel level is 5120
This command will run the refuel program and burn up to 64 items in the currently selected slot. The amount of fuel units this produces depends on the type of item in the slot. To find out how much fuel the turtle has, just run refuel 0:
> refuel 0
Fuel level is 5120
This command will display how much fuel the turtle has without burning any fuel items in the inventory.
WARNING
If you mine a turtle with a pickaxe to put it in your inventory before setting a label for the turtle, it will lose all the fuel it had. Be sure to run the label program to give it a label first.
MOVING THE TURTLE
Now that the turtle is fueled up, let’s move it. From the command shell, we can run the go program to tell it to move forward and backward. Enter the following into the command shell:
> go forward
When you press ESC to close the GUI, the turtle will have moved forward one space. Note that if a block is in front of the turtle blocking its path, the turtle will wait until it is cleared. If you want to terminate the program, hold down CTRL-T for a full second.
To tell the turtle to go backward, enter the following:
> go back
The turtle will move back one space. Enter a number after forward or back to move the turtle that number of spaces, as in the following example:
> go forward 2
The turtle will move forward two spaces.
Turning the turtle is similar. Enter the words left or right followed by a number to make the turtle turn left or right that number of times. For example, go left will make the turtle turn to face left. Entering go right 2 will make the turtle turn right twice so it’s facing the opposite direction.
We can even chain multiple movements together, as in the following example:
> go forward 2 up right forward down back 3 left
The turtle will move forward two spaces, move up one space, turn right, move forward one space, move down one space, move back three spaces, and then turn left.
There are a few shortcut words you can use for the go program: fd for forward, bk for back, lt for left, rt for right, and dn for down. Enter the following example into the command shell:
> go fd 2 up rt fd dn bk 3 lt
This moves the turtle the same way the previous example did, except there is much less to type.
GETTING STARTED WITH LUA PROGRAMMING
Running the programs that turtles come with is useful, but the real power comes when you write your own programs in the Lua programming language. A programming language is a language that you can use to write instructions that a computer can understand. At this point, it might be difficult to determine what these instructions and programming words are used for, but keep in mind that they’re just the building blocks for useful programs you’ll make later. You’ll learn these Lua instructions one at a time.
RUNNING THE LUA SHELL
Lua has a Lua shell, which allows you to enter and run Lua instructions in the turtle’s GUI. You’ll need to run the lua program to access it:
> lua
Interactive Lua prompt.
Call exit() to exit.
lua>
This command opens the Lua shell, as shown in Figure 2-9, and this is where you’ll enter your Lua instructions. The Lua shell is handy for seeing what each instruction does because you can enter one instruction at a time, which saves a lot of work.
NOTE
In this book, the Lua shell is where you enter Lua code. It displays the lua> prompt at the front of each line where you enter your instructions in the Lua language. The command shell is where you enter commands to run programs. It has the simpler > prompt. It’s easy to confuse the two. If you get error messages when you run your code, double-check which prompt you’re using.
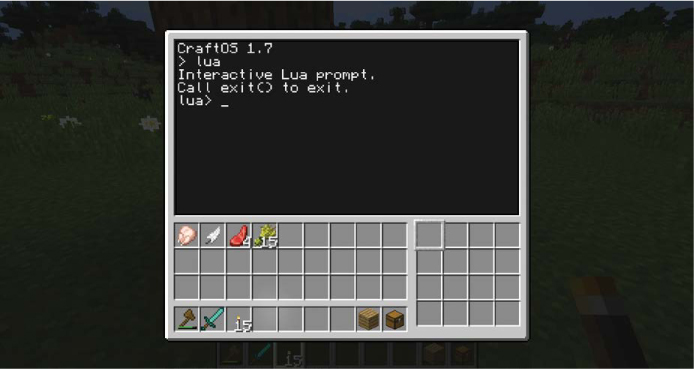
Figure 2-9: The Lua shell in the turtle’s GUI
Let’s start with a simple instruction that tells a turtle to turn left. Enter this instruction into the Lua shell:
lua> turtle.turnLeft()
true
As you type, Lua will autofill the instruction it thinks you’re typing. You can press TAB to use the autocomplete suggestion and save time. In Figure 2-10, I’ve typed turtle.tu, and the autocomplete suggests turtle.turnLeft(. Pressing TAB will fill in the rnLeft( highlighted part, and then I can type the remaining ).
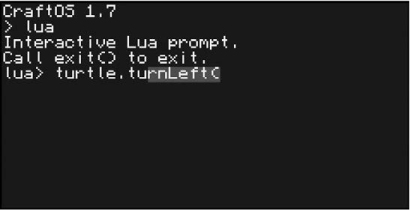
Figure 2-10: Autocomplete suggests turtle.turnLeft( when you enter turtle.tu.
The word true that appears after you enter the command is called a return value, and it lets you know the turtle was successfully able to turn left. Many turtle instructions will return true if they can carry out your instruction and false if they can’t. (The true and false values are called Boolean values and are explained in Chapter 5.)
After returning true, the lua> prompt appears again, waiting for your next instruction. Press ESC to see that the turtle has turned to the left, as shown in Figure 2-11.
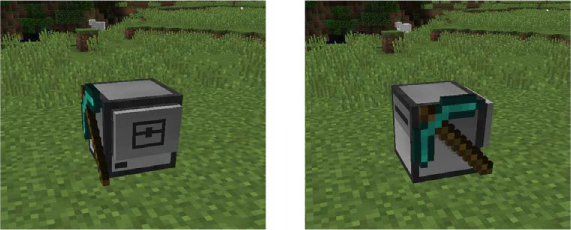
Figure 2-11: The turtle before and after running turtle.turnLeft()
Right-click the turtle to bring up the turtle’s GUI again, and enter the following into the Lua shell:
lua> turtle.turnRight()
true
Now when you press ESC, you’ll see that the turtle has turned to the right and is facing its original direction. The turtle.turnLeft() and turtle.turnRight() instructions are functions. In programming, a function is a kind of miniprogram inside a program. Functions contain a set of instructions to perform a small action. When a function is run as a Lua instruction, we say that we are calling the function.
The turtle.turnLeft() and turtle.turnRight() functions are in the turtle module. A module is a collection of functions. To call the functions inside the turtle module, you need to type turtle with a period before the function name. The turtle module has many functions for making the turtle move, mine, dig, place blocks, and do everything else. You’ll learn many of these functions and modules throughout this book!
GOODBYE LUA: EXITING LUA’S PROMPT
Notice that pressing ESC will exit the GUI, but the next time you right-click the turtle, you’ll still be in the Lua shell. You can exit the Lua shell and go back to the command shell prompt by calling the exit() function. Enter the following into the Lua shell:
lua> exit()
>
After exiting back to the command shell prompt, you’ll see that the lua> prompt has been replaced with the command shell’s > prompt.
LETTING LUA DO THE MATH
Don’t worry if you think you’re not good at math—Lua will do all the math for you! Lua can solve math problems just like a calculator if you give it the right instructions.
Return to the Lua prompt and enter the following:
lua> 2 + 2
4
We call these math problems expressions. The 2s in the expression are called values. Specifically, they are number values. The + sign in the expression is called an operator. When you give these values and operators to Lua as an expression, Lua will evaluate the expression to a single value, which is the answer to the math problem. The expression 2 + 2 evaluates to 4.
Spacing doesn’t matter in an expression. You can use as many or as few spaces as you want. Enter the following into the Lua shell:
lua> 3+4
7
lua> 3 + 4
7
Even though you can use as many spaces as you like, most programmers will use a single space between values and operators to make their code easier to read.
Lua recognizes the math operators for addition (+), subtraction (-), multiplication (*), division (/), and exponentiation (^). Enter the following into the Lua shell to see examples of these operators in use:
lua> 100 + 1
101
lua> 10 – 4
6
lua> 7 * 5
35
lua> 21 / 3
7
lua> 3^2
9
Although some of these operations don’t use the same symbols you would use in math class, they work in the same way.
A value by itself is also an expression: it evaluates to itself. Enter the following into the command shell to see an example:
lua> 42
42
You can see that the value 42 by itself evaluates to 42. Expressions always evaluate to a single value, even for a small expression like 42.
Expressions can be as long as you like. Enter the following into the Lua shell:
lua> 1 + 2 + 3 + 4 + 5
15
This expression has five values and four operators, but Lua can evaluate it to the single value 15. Lua evaluates the expression one step at a time, working from left to right, but you don’t see all these steps on your computer.
ORDER OF OPERATIONS
The rules that determine which parts of an expression are evaluated first are called the order of operations. The order of operations in Lua is the same as the order of operations in mathematics. Going from left to right, operations in parentheses are done first, then the ^ operations, then the * and / operations, followed by the + and – operations. Enter the following into the command shell:
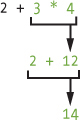
lua> 2 + 3 * 4
14
The expression 2 + 3 * 4 evaluates to 14 instead of 20 because the 3 * 4 evaluates to 12 first, making the expression 2 + 12, which evaluates to 14.
Lua evaluates this expression one step at a time, as shown here:
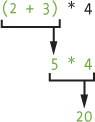
You can change the order of operations by using parentheses. Enter the following into the Lua shell:
lua> (2 + 3) * 4
20
Now the (2 + 3) part evaluates to 5 first, making the expression 5 * 4, which evaluates to 20. Lua evaluates this expression as shown here:
THAT’S SO RANDOM: GENERATING RANDOM NUMBERS
One other way Lua can help you do your math is by providing random numbers. Lots of games and programs use random numbers (think of how many board games use random numbers generated from rolling dice), so at times you’ll need to generate random numbers for your programs, too. To do so, you’ll use the math.random() function, which returns a random number every time you call it. Notice that the random() function is inside the math module. Enter the following into the Lua shell:
lua> math.random(1, 6)
6
lua> math.random(1, 6)
1
lua> math.random(1, 6)
1
lua> math.random(1, 6)
3
lua> math.random(100, 200)
142
Because the return values are random, your numbers will probably be different from the ones in this example. Notice that when we call the random() function, we include two numbers inside the parentheses. These values are the function call’s arguments. Arguments are values given to the function call that tell the function how to behave. When you put arguments inside a function call’s parentheses, you’re passing arguments to the function call. The random() function takes two arguments: the minimum and maximum random number that the function call should return. When you pass 1 and 6 to the function call, the return value will always be between 1 and 6. When you pass it 100 and 200, the return value will be between 100 and 200.
Whenever you need to add a random element to your program, you’ll use the random() function. We’ll do this in the mydance program we’ll write in Chapter 4.
STORING VALUES WITH VARIABLES
To use values multiple times, you can store them in variables. A variable is like a box in the computer’s memory in which you can store a single value (see Figure 2-12). To make a variable, you write the variable name, followed by an equal sign (=), followed by the value you want to store in the variable. For example, if you wanted to keep track of how much coal you have, you could use the instruction coal = 10 to store the value 10 in a variable named coal. (Perhaps this variable keeps track of how much coal the turtle has mined.) This kind of instruction is called an assignment statement, and the equal sign (=) is called the assignment operator.
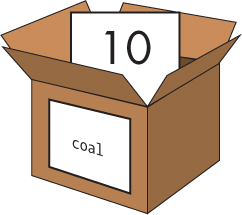
Figure 2-12: The instruction coal = 10 is like telling the program, “The variable coal now has the number value 10 in it.”
You can use a variable in expressions wherever you would use the value of the variable. For example, enter the following into the Lua shell:
lua> coal = 10
lua> coal + 4
14
lua> coal + 10
20
lua> 12 – coal + 3
5
You set the coal variable to 10 on the first line. After you do this, the value 10 is used wherever you use coal.
You can put an expression on the right side of the assignment operator to assign the variable’s value, too. The value that the expression evaluates to is then stored in the variable. When coal = 2 * 3 + 4, Lua calculates coal to be the value 10, as shown here:

Also, just like how a value by itself evaluates to itself, you can see what value is in a variable by entering the variable name into the Lua shell:
lua> coal
10
We previously assigned coal the number 10, so when we enter coal, it evaluates to the value 10.
Let’s change the value stored in the coal variable using another assignment statement. This is called overwriting the variable. Enter the following into the Lua shell:
lua> coal = 100
lua> 2 + coal + 3
105
lua> coal = 200
lua> 2 + coal + 3
205
Variables can store only one value at a time. When a variable’s value is overwritten with a new value, the old value is discarded and forgotten, as shown in Figure 2-13.
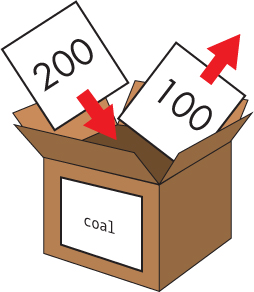
Figure 2-13: The coal variable is overwritten with the value 200, and the old 100 value is forgotten.
Once a variable has a value, you can use the variable in its own assignment statement. Using a different variable named counter, enter the following into the Lua shell:
➊ lua> counter = 0
lua> counter
0
➋ lua> counter = counter + 1
lua> counter
➌ 1
➍ lua> counter = counter + 1
lua> counter
2
➎ lua> counter = counter + 100
lua> counter
102
You first assign counter the value of 0 ➊, and then assign counter to be equal to itself plus 1 ➋. The result is that counter is now equal to 1 ➌. You can continue adding 1 to counter ➍ by pressing the up arrow to display previous instructions, just like you did in the command shell. Adding 1 to counter lets you use counter to count up. This technique will be useful in your future programs when, for example, you need to count the number of times you’ve run a command. You can reassign counter as many times as you want, and you can even modify it with values other than 1, such as 100 ➎.
Variables are useful for storing the results of calculations or other data that you want to use later in a program. Most programs you’ll write (and almost every program in this book) use variables.
CHECKING THE TURTLE’S FUEL LEVELS
Let’s use variables and expressions in the Lua shell to calculate the amount of coal needed to completely fuel the turtle. The turtle.getFuelLevel() function returns the current fuel level, and the turtle.getFuelLimit() function returns the maximum amount of fuel the turtle can hold. Enter the following into the Lua shell:
lua> turtle.getFuelLimit()
20000
lua> turtle.getFuelLevel()
968
➊ lua> spaceLeft = turtle.getFuelLimit() – turtle.getFuelLevel()
lua> spaceLeft
19032
➋ lua> coalNeeded = spaceLeft / 80
lua> coalNeeded
237.9
The expression turtle.getFuelLimit() – turtle.getFuelLevel() calculates the amount of space left in the turtle’s fuel tank ➊. The value this expression evaluates to is stored in the spaceLeft variable. Because one coal item can fuel 80 units, the amount of coal needed is spaceLeft / 80. This value is stored in the coalNeeded variable ➋.
You can see how function calls, expressions, and variables can be combined into useful code for a turtle robot. As you learn more programming concepts, the code you create will become more sophisticated.
WHAT YOU LEARNED
In this chapter, you learned how to create and control turtles. Turtle robots can be crafted just like any other item in Minecraft, and they can be equipped with brand-new diamond tools. Turtles need to be fueled with items such as wood or coal to be able to move. Right-clicking the turtle brings up its GUI, which shows its inventory and command shell. The command shell is where you enter commands and programs. Turtles come with some programs, such as label, dance, and refuel.
You also learned some basic Lua programming with the Lua shell. The simplest type of Lua instructions are expressions, such as 2 + 2. Expressions are made up of values (like 2) and operators (like +), and they evaluate to a single value.
Lua code also includes functions, which are miniprograms inside your Lua program. By calling these functions, you can perform simple actions, such as turning the turtle around or generating a random number. Function calls evaluate to values, and these values are known as return values.
Values can be stored in variables to be used later in a program, and almost every program uses variables. You use an assignment statement, such as coal = 10, to store a value in a variable.
Although the programming concepts you’ve learned in this chapter may seem boring compared to making awesome robots, they’re the building blocks of software. In Chapter 3, you’ll use them in real programs.