CHAPTER 8. Using Natural Language Processing (NLP) with LUIS
In the world of chatbots, there are plenty of opportunities for buttons, cards, and quick commands, but the essential aspect of chatbots is that they have conversational interfaces. With the Microsoft Bot Framework, you’re able to target multiple channels, where text conversation is the defacto standard. In fact, some channels like email and SMS are primarily text, where any attempts to make them graphical would look and feel like an old comfortable tool with new technology bolted onto its side. What you’ll find is that a lot of applications can naturally fit into this conversational world and often yield a superior solution.
To see the benefit of the conversational interface, this chapter discusses a branch of Artificial Intelligence (AI) known as Natural Language Processing (NLP). While just mentioning sophisticated computer science subjects like AI might sound complex, it really isn’t. That’s because Microsoft has an NLP service that does all the work for us. It’s called Language Understanding Intelligence Service (LUIS). The LUIS API is part of Microsoft’s Cognitive Services, a suite of AI services you can use, which I’ll talk more about in Chapter 14, Integrating Cognitive Services. LUIS is a NLP API that translates plain language text into objects that a chatbot can recognize and act on.
In this chapter, you’ll learn important concepts of how LUIS works. Then you’ll learn how to visit the LUIS site to use graphical and text tools to train what is called a model that will recognize commands for a chatbot. With a model, you’ll learn how to add code to a chatbot that receives commands from the user and act on those commands. You’ll see how easy it is to get a chatbot up and running quickly with LUIS, and will learn how to improve the model afterwards.
Learning Essential LUIS Concepts
The goal of LUIS is to translate human text into something a computer program can understand. As demonstrated in Figure 8-1, chatbots send messages from the user to LUIS, LUIS performs the translation into something the chatbot can understand, and the chatbot processes the LUIS results to formulate a response to the user.

FIGURE 8-1 How Chatbots Use LUIS.
In Figure 8-1, Channel represents the client application that the user interacts with to communicate with a chatbot. Since the Bot Framework supports a growing list of channels, this means that it’s easier for users to find a preferred client to communicate with a chatbot.
As normal, the Channel sends messages, with the user’s plain language text, to Bot Connector, which then routes that message to a Chatbot. At this point in time, the Chatbot can handle the user’s text as it sees fit. More specifically, in this chapter you’ll learn about the last component in Figure 8-1, LUIS, which translates utterance text into intents and entities. The Chatbot extracts utterance text from the message received from Bot Connector.
These intents and entities that LUIS returns arrive in the form of JSON text. Bot Framework translates that JSON into objects for it to operate on and provide data in parameters for a chatbot to make decisions upon. The intents map to a goal that the user wants to accomplish. Entities map to facts inside of the utterance text that a chatbot needs as parameters of the intent. Later in this chapter, you’re going to see how intents map to methods and entities are extracted from parameters to those methods. Based on intent and entities, the Chatbot processes logic to determine what action to take and what response to send to the user.
The next section explains how to train a LUIS model that translates utterances into intents and entities.
Setting up LUIS and Training Models
The existence of NLP doesn’t mean that a chatbot will be able to understand anything a user says. Rather, the developer needs to train an NLP model to understand very specific tasks belonging to a chatbot’s domain. In the case of this chapter’s example, the domain is searching for wine. It isn’t about farming, shopping, health or any other type of general conversation, just searching for wine. Not only is this good because chatbots targeting a specific domain make early success easier, but because it limits the amount of work by the developer to train a model. For this reason, WineBot will limit conversation to its domain, making the process of training an NLP model with LUIS easier.
This section explains how to build, train, and deploy a LUIS model. Let’s start by visiting the LUIS Web site and creating a new model.
Creating Models
Working with LUIS, you need a model, which is a set of intents, entities, and utterances that train the model. To get started, visit https://www.luis.ai, sign in, and go to the My apps tab. Click the button to create a new app and you’ll see a screen similar to Figure 8-2.

FIGURE 8-2 Creating a New LUIS Model.
 Note
Note
LUIS uses the term app and you see me using the term model. For the purposes of this text, they’re synonymous. I prefer the term model because it’s based on the underlying implementation, which is a machine learning model.
In Figure 8-2, add a meaningful name for the chatbot, which will appear in a list of LUIS models for your login. The Culture is English, but you can change it to one of a growing list of cultures. The optional Description lets you explain what the model is for.
The Key to use can be any pre-configured key or, since it’s optional, no key at all. Click Create and observe the page for your new model, shown in Figure 8-3.

FIGURE 8-3 A New LUIS Model Page.
Figure 8-3 shows a Dashboard with a menu on the left side of the page. In that menu are Intents and Entities. The next couple of sections show how to create intents and entities.
Note
As you might already know, Web pages change over time and the LUIS site is no exception. Rather than reviewing the exact makeup of a given page for a snapshot in time, it’s more important to have a sense of what you’re looking for to accomplish a task. LUIS continues to evolve and add new and interesting features, which you’ll want to explore over time. However, for the purposes of this book, intents and entities are the essential features of a LUIS model that you’ll learn how to write code for in this chapter.
Building Intents
As its name suggests, an intent represents the user’s intention. In other words, an intent is the user’s goal or a task they wish to accomplish. An intent consists of an intent name and a set of utterances that a user would typically ask or say to accomplish the goal the intent is designed to recognize. In the current example, we want an intent to represent the goal of searching for wine.
To add an intent, click on the Intents menu item. Figure 8-4 shows the next steps in how to create an intent.
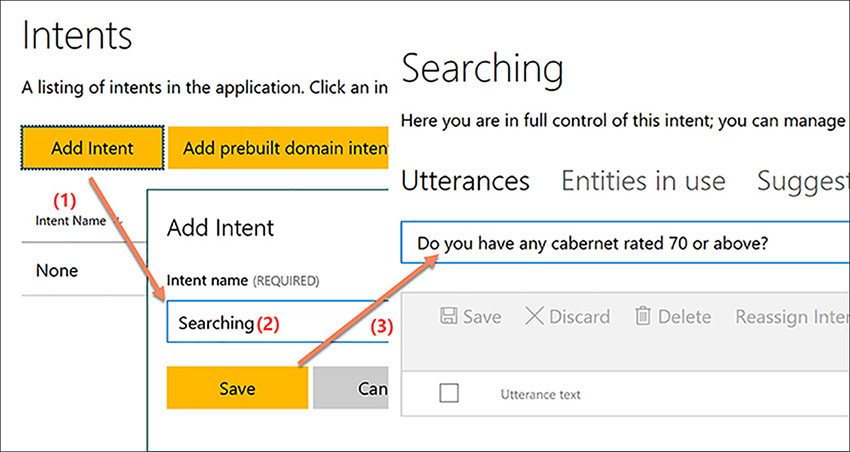
FIGURE 8-4 Creating a New Intent.
The Intents page, in Figure 8-4, has a list of intents and a button for creating a new intent. Notice that there is also a None intent, which is a default intent that LUIS assigns utterances to whenever it can’t figure out which intent a user’s utterance maps to.
Clicking Add Intent opens a pop-up, Add Intent, to type the name of the event. Step 2 of Figure 8-4, shows the Searching intent name, because its purpose will be to search for wines.
After adding an Intent Name, click Save and you’ll see a page that allows you to add utterances for the intent. The Searching page, Step 3 of Figure 8-4, shows a possible utterance: “Do you have any cabernet rated 70 or above?”. On this page, type several possible things that the user can say that can match this intent. For example, “Please search for champaigne rated fifty,” or “What white wines do you have rated 80 or above?”.
At this point, we’re not ready to start adding utterances yet. Besides knowing that the user wants to do a search, we need to know the facts (aka entities) associated with a search request, which is discussed next.
Specifying Entities
Just having the user’s intent is not necessarily sufficient to know what the user is asking. The utterance in Figure 8-4, “Do you have any cabernet rated 70 or above?” let’s us know that the user wants to do a search, but we really need to know that the type of wine is “cabernet” and the rating is “70.” We also don’t want to manually write code to parse these values ourselves. This is the role of entities.
Simple Entities
To add a new entity, click on the Entities menu item. Figure 8-5 shows how to create an entity.

FIGURE 8-5 Creating a New Entity.
As shown in Figure 8-5, you can create an entity by clicking Add custom entity, opening the Add Entity pop-up.
Type the Entity name, which is WineType in Figure 8-5. LUIS has different types of entities, but taking the default of Simple is sufficient enough to extract a value that a chatbot can act on.
Note
LUIS Entity type is an evolving feature with some items in beta. These things can change between the time of this writing and when you read this. Fortunately, once you understand how the Simple entity type works and can extract values in code, it will be easier to review and experiment with other entity types as they come online.
Clicking Save closes the Add Entity pop-up and shows the new entity in the list.
Prebuilt Entites
In addition to custom entities, LUIS has prebuilt entities, which are more sophisticated in that they can recognize different ways to type an entity. The prebuilt entity this example uses is number, which can not only recognize numbers like “70,” but also variations spelled out like “seventy.” This saves a lot of time in writing custom code to try to recognize what an entity means. To get started, click the Add prebuilt entity button on the Entities page, to reveal the Add prebuilt entities pop-up, shown in Figure 8-6.

FIGURE 8-6 Creating a New Prebuilt Entity.
Scanning the different options in Figure 8-6: Geography, Money, Number, Ordinal, Percentage, and more. You can get a feel for the benefits of using a prebuilt entity—they recognize text in each of their domains in several different forms. Check your choice, number in Figure 8-6, and click the Save button, closing the pop-up and showing the new number entity in the list.
Now that you can create intents and entities, it’s time to pull them together and train the model, which is discussed next.
Training and Deploying
LUIS models are based on machine learning, which you must train by providing data. In the case of LUIS, the data is a list of utterances that a user can possibly ask or say. You classify utterances into intents, representing what the user desires to accomplish. Each of these utterances has zero or more entities, which are placeholders for the facts your code needs to fulfill the user’s request. This section explains how to train the model by adding utterances to intents and specifying entities.
Adding Utterances
To train a model, click on the Intents menu, click on the intent to train (Searching in this example), and ensure you’re on the Utterances tab. As shown in Figure 8-7, type an utterance in the text box and press Enter.

FIGURE 8-7 Adding Utterances.
For the example in Figure 8-7, you must type Do you have any cabernet rated 70 or above? LUIS normalized the sentence by lower casing and spacing the ending punctuation. While this isn’t proper grammar, it doesn’t matter for training. In fact, for better training you’ll want to provide different examples that aren’t necessarily grammatically correct because users won’t use perfect grammar. More examples make a better model.
Sometimes, just an intent is sufficient and you won’t need entitites. For example, if you have an OpeningHours intent, people might ask “What are your hours of operation?” and the only answer is, “We’re open from 8 to 5.” That doesn’t require entities because the intent is already clear.
For the Searching intent, we need to know WineType and Rating, which is why earlier examples created entities for these values. Figure 8-7 shows what happens when clicking a word, cabernet, showing the associated context menu. Clicking WineType, designates that word as an entity.
A single utterance is insufficient because people will say things to a chatbot that you never planned for. To increase the chances of recognition, add several more utterance variations, as shown in Figure 8-8.

FIGURE 8-8 Utterances with Entites.
Figure 8-8 shows several examples of things a user might say to a chatbot if their intent was to search for wine. Notice how assigning the WineType entitity shows in the list as [$WineType] and Rating appears as the [$number] entity. There isn’t an entity called Rating – it’s just that the meaning of the number entity is that it will be used in the chatbot for Rating.
What you might notice is that the prebuilt entities, number in this example, don’t appear in the context list when defining an utterance. That’s because the current LUIS interface automatically recognizes prebuilt entities and replaces them with the placeholder for you, which is [$number] in this example. At this point, you’re ready to test and finish training the model.
Training and Testing a Model
As you’ve seen earlier, a LUIS model consists of intents, entities, and utterances. LUIS uses machine learning to create the model, which means you must train it. To get started, click the Train And Test menu item, which takes you to the Test Your Application page, shown in Figure 8-9.

FIGURE 8-9 Training and testing a model.
To train, click the Train Application button, shown in Figure 8-9. Until you train the model, any changes since the last training (or new model creation) won’t be available to applications.
This Train and Test page lets you test too. As the text box in Figure 8-9 suggests, Type A Test Utterance & Press Enter. You can see how search for champaigne with a 90 or higher rating has been typed. The LUIS UI normalized that utterance, added entity placeholders, and scored the results.
![]() Tip
Tip
Notice that the test utterance in Figure 8-9 doesn’t match any of the example utterances from Figure 8-8. This is important because it demonstrates how the trainined model generalizes enough to recognize many different ways to say the same thing. With only a few utterances, you have a working model that’s sufficient for building code to support that intent without a lot of initial effort.
The score on the right side, under Current Version Results, shows that the utterance matched the Searching intent, along with a parenthesized probability score. It also shows losing intents and their score, for example, the None intent lost with a probability score of 0.05.
Publishing a Model
Before using the LUIS model, you must publish it. To do so, click the Publish menu item and click the Publish button. In the resulting list, you’ll see an Endpoint url with the following format:
https://westus.api.cognitive.microsoft.com/luis/v2.0/apps/<model-id>?subscription-key=<subscription-key>&verbose=true&timezoneOffset=0&q=
Copy and paste the contents of where you see <model-id> and <subscription-key>, because you’ll need them to tell the chatbot how to communicate with this model, which you’ll learn about next.
Using LUIS in Your Chatbots
Now that you have a LUIS model, it’s time to write code to use it. In this section you’ll learn how to create a LuisDialog<T> that knows how to handle user text and communicate with LUIS. Then you’ll see how to create methods that map to intents. Inside those intent handling methods, you’ll write code to read entities, extracting more details about what the user wants to accomplish. Let’s start by reviewing the example program for this chapter, WineBotLuis.
Introducing WineBotLuis
WineBotLuis is an adaptation of the WineBot program, started in Chapter 5 and continued for each chapter thereafter. It uses the WineApi library, created in Chapter 5, to communicate with the Wine.com API. Remember that you’ll need an API key from Wine.com for this program to work. Listing 8-1 shows the WineBotDialog class, which is part of the WineBotLuis project in the accompanying source code.
LISTING 8-1 A LuisDialog<T>-Derived Type for Handling Natural Language Input
using System;
using System.Threading.Tasks;
using Microsoft.Bot.Builder.Dialogs;
using Microsoft.Bot.Builder.Luis.Models;
using Microsoft.Bot.Builder.Luis;
using WineBotLib;
using System.Collections.Generic;
using System.Text.RegularExpressions;
using System.Linq;
using Microsoft.Bot.Connector;

namespace WineBotLuis.Dialogs
{
    [LuisModel(
        modelID: “<model-id>”,
        subscriptionKey: “<subscription-key>”)]
    [Serializable]
    public class WineBotDialog : LuisDialog<object>
    {
        [LuisIntent(“”)]
        public async Task NoneIntent(IDialogContext context, LuisResult result)
        {
            string message = @”
Sorry, I didn’t get that.
Here are a couple examples that I can recognize:
‘What type of red wine do you have with a rating of 70?’ or
‘Please search for champaigne.’”;

            await context.PostAsync(message);
            context.Wait(MessageReceived);
        }

        [LuisIntent(“Searching”)]
        public async Task SearchingIntent(IDialogContext context, IAwaitable<IMessageActivity> activity, LuisResult result)
        {
            if (!result.Entities.Any())
                await NoneIntent(context, result);

            (int wineCategory, int rating) = ExtractEntities(result);

            var wines = await new WineApi().SearchAsync(
                wineCategory, rating, inStock: true, searchTerms: string.Empty);
            string message;

            if (wines.Any())
                message = “Here are the top matching wines: “ +
                          string.Join(“, “, wines.Select(w => w.Name));
            else
                message = “Sorry, No wines found matching your criteria.”;

            await context.PostAsync(message);

            context.Wait(MessageReceived);
        }

        (int wineCategory, int rating) ExtractEntities(LuisResult result)
        {
            const string RatingEntity = “builtin.number”;
            const string WineTypeEntity = “WineType”;

            int rating = 1;
            result.TryFindEntity(RatingEntity, out EntityRecommendation ratingEntityRec);
            if (ratingEntityRec?.Resolution != null)
                int.TryParse(ratingEntityRec.Resolution[“value”] as string, out rating);

            int wineCategory = 0;
            result.TryFindEntity(WineTypeEntity, out EntityRecommendation wineTypeEntityRec);

            if (wineTypeEntityRec != null)
            {
                string wineType = wineTypeEntityRec.Entity;

                wineCategory =
                    (from wine in WineTypeTable.Keys
                     let matches = new Regex(WineTypeTable[wine]).Match(wineType)
                     where matches.Success
                     select (int)wine)
                    .FirstOrDefault();
            }

            return (wineCategory, rating);
        }

        Dictionary<WineType, string> WineTypeTable =
            new Dictionary<WineType, string>
            {
                [WineType.ChampagneAndSparkling] = “champaign and sparkling|champaign|sparkling”,
                [WineType.DessertSherryAndPort] = “dessert sherry and port|desert|sherry|port”,
                [WineType.RedWine] = “red wine|red|reds|cabernet|merlot”,
                [WineType.RoseWine] = “rose wine|rose”,
                [WineType.Sake] = “sake”,
                [WineType.WhiteWine] = “white wine|white|whites|chardonnay”
            };
    }
}
A chatbot that uses LUIS to translate user text can derive from LuisDialog<T>, like WineBotDialog in Listing 8-1. WineBotDialog has a Serializable attribute, which the Bot Framework requires for all dialogs needing to persist state in the Bot State Service . The LuisModel attribute specifies the model id and subscription key that you learned about in the previous, Publishing a Model, section. Replace <model-id> and <subscription-key> with the values from the LUIS Endpoint url. The following sections explain each of the parts of the WineBotDialog.
Adding Intents
As described in Figure 8-1, WineBotDialog forwards the user input, utterance text, to LUIS for translation. LuisDialog<T>, WineBotDialog’s base class, handles that message and takes care of communicating with LUIS so you don’t have to write that code. When the response comes back, LuisDialog<T> evaluates the JSON, picks the intent with the highest score and calls the derived class (WineBotDialog) method that can handle that intent. LuisDialog<T> uses reflection to examine LuisIntent attributes and invokes the matching method.
Whenever LUIS can’t map an utterance to an intent, it picks the None intent. The first method in WineBotDialog handles the None intent, repeated here for convenience:
        [LuisIntent(“”)]
        public async Task NoneIntent(IDialogContext context, LuisResult result)
        {
            string message = @”
Sorry, I didn’t get that.
Here are a couple examples that I can recognize:
‘What type of red wine do you have with a rating of 70?’ or
‘Please search for champaigne.’”;

            await context.PostAsync(message);
            context.Wait(MessageReceived);
        }
For the None intent, give the LuisIntent attribute a blank string. Intent handler methods have two or three parameters. IDialogContext and LuisResult for context and result are required. Optionally, you can also add a second Awaitable<T> parameter, as shown for the SearchingIntent method of Listing 8-1. The context parameter is the same IDialogContext type described in depth in Chapter 5. LuisResult is a special type for holding entity information. These examples use a suggested Bot Framework convention of adding the Intent suffix to the method name.
This implementation of the None intent simply explains that it doesn’t understand and gives a couple suggestions on what the user should do. After posting the message to the user, and before completing the method, call context.Wait(MessageReceived). You might have noticed that WineBotDialog doesn’t have a MessageReceived method, but it does inherit MessageReceived from LuisDialog<T>.
![]() Tip
Tip
Whenever handling situations for when the chatbot doesn’t understand the user, the response should give the user some idea on what the chatbot expects. Over time, you’ll want to write logic that adapts to the user and gets better at understanding them, but it’s still good to try to help them out when something isn’t working.
That was the method for the None intent and there’s also the SearchingIntent method. The Searching intent has the same LuisIntent attribute, but with the Searching string and the same parameters. The next section discusses how the Searching intent method handles entities.
![]() Tip
Tip
You could declare multiple LuisModel attributes, each with a separate model. This can be useful if you encounter limitations in the number of intents your chatbot needs or if you prefer to organize via separate models. Just make sure your intent names are unique, possibly using a namespace-like approach like pseudonamespace.myspecificintent. LUIS ranks intent matches by probability and LuisDialog selects the intent handler with the highest probability. This works with multiple models because intents that don’t match should have lower probabilities.
Handling Entities
The Searching intent method, SearchingIntent, handles the LuisResult parameter, result, to extract parameters it needs for the WineApi. Here’s SearchingIntent, repeated below for convenience:
        [LuisIntent(“Searching”)]
        public async Task SearchingIntent(IDialogContext context, IAwaitable<IMessageActivity> activity, LuisResult result)
        {
            if (!result.Entities.Any())
                await NoneIntent(context, result);

            (int wineCategory, int rating) = ExtractEntities(result);

            var wines = await new WineApi().SearchAsync(
                wineCategory, rating, inStock: true, searchTerms: string.Empty);
            string message;

            if (wines.Any())
                message = “Here are the top matching wines: “ +
                          string.Join(“, “, wines.Select(w => w.Name));
            else
                message = “Sorry, No wines found matching your criteria.”;

            await context.PostAsync(message);

            context.Wait(MessageReceived);
        }
LuisResult has an Entites property that is a List<EntityRecommendation>. If this list is empty, that means either the user didn’t provide those values or LUIS is unable to recognize any entities. Though SearchingIntent calls NoneIntent in this case, it’s possible that in the future you might want to write additional logic to see if it can figure out what is missing. Calling NoneIntent was a simple mitigation strategy, but the main point is that you need input validation because LUIS won’t always recognize entities correctly. Remember, the user can literally say anything to the chatbot.
SearchingIntent gets wineCategory and rating values from the entities and uses WineApi to perform a wine search. The ExtractEntities, repeated below, reads a LuisResult instance and returns a wineCategory and rating:
        (int wineCategory, int rating) ExtractEntities(LuisResult result)
        {
            const string RatingEntity = “builtin.number”;
            const string WineTypeEntity = “WineType”;

            int rating = 1;
            result.TryFindEntity(RatingEntity, out EntityRecommendation ratingEntityRec);
            if (ratingEntityRec?.Resolution != null)
                int.TryParse(ratingEntityRec.Resolution[“value”] as string, out rating);

            int wineCategory = 0;
            result.TryFindEntity(WineTypeEntity, out EntityRecommendation wineTypeEntityRec);

            if (wineTypeEntityRec != null)
            {
                string wineType = wineTypeEntityRec.Entity;

                wineCategory =
                    (from wine in WineTypeTable.Keys
                     let matches = new Regex(WineTypeTable[wine]).Match(wineType)
                     where matches.Success
                     select (int)wine)
                    .FirstOrDefault();
            }

            return (wineCategory, rating);
        }
The two const string values at the top of the ExtractEntities method map to the entity names in the LUIS model: number and WineType. Those are the first parameters to TryFindEntity, a LuisResult method for extracting an EntityRecommendation from the results.
Notice that the RatingEntity const in ExtractEntities, Listing 8-1, has a “builtin.” Prefix, as in builtin.number. This differs from the number in Figure 8-6 and the [$number] from Figure 8-8. All prebuilt entities, from the same dialog in Figure 8-6, have this prefix. Additionally, all prebuilt/builtin entities and intents will have some form of prefix that you’ll need to ensure are added to code properly. For entities, one way to double-check the spelling is to set a breakpoint in an intent handling method and use the Visual Studio debugger to drill into the LuisResult parameter instance and manually inspect entities.
The out parameter to TryFindEntity is an EntityRecommendation and you’ll need to check that for null in case the entity isn’t present. EntityRecommendation has two properties for results: Entity and Resolution. Whenever you’ve defined your own custom entity, you can read the Entity property, as with the WineType entity. When you use a prebuilt entity, it’s best to use the Resolution property. That’s because while you can read the value from the Entity property, it will be the string representing what the user typed in. In the case of builtin.number, a user could spell out 50 as fifty and it would be recognized. That means trying to parse Entity won’t work on the string respresentation, but will work if the user typed the numeric representation, which could be confusing. LUIS provides the numeric representation of the string in Resolution[“value”], which will always be a parsable number.
The next dilemma is how to get an int representation of whatever word the user typed in for the WineType entity. Essentially, we need to figure out how to map the user’s input to the WineType enum, shown here:
    public enum WineType
    {
        None = 0,
        RedWine = 124,
        WhiteWine = 125,
        ChampagneAndSparkling = 123,
        RoseWine = 126,
        DessertSherryAndPort = 128,
        Sake = 134
    }
WineType assigns the wineCategory id to a matching member and those IDs match a category in the Wine.com API. The problem is that the user can type anything, such as red, cabernet, rose, and more. This is where a good regular expression skill set can help. One of many potential techniques is to use a dictionary table that maps regular expressions to the proper category, from the WineTypeTable from Listing 8-1, shown here:
        Dictionary<WineType, string> WineTypeTable =
            new Dictionary<WineType, string>
            {
                [WineType.ChampagneAndSparkling] = “champaign and sparkling|champaign|sparkling”,
                [WineType.DessertSherryAndPort] = “dessert sherry and port|desert|sherry|port”,
                [WineType.RedWine] = “red wine|red|reds|cabernet|merlot”,
                [WineType.RoseWine] = “rose wine|rose”,
                [WineType.Sake] = “sake”,
                [WineType.WhiteWine] = “white wine|white|whites|chardonnay”
            };
The keys in WineTypeTable are WineType members and values are regular expressions, using the or operator to match potential options. Clearly, this list and regular expressions are incomplete, but demonstrate the approach.
ExtractEntites has a LINQ expression that does this mapping for us, shown here:
                wineCategory =
                    (from wine in WineTypeTable.Keys
                     let matches = new Regex(WineTypeTable[wine]).Match(wineType)
                     where matches.Success
                     select (int)wine)
                    .FirstOrDefault();
The wineCategory variable is an int, to hold the one of the values of WineType that maps to an ID in the Wine.com API. The from clause reads each WineTypeTable key, wine, which is a member of the WineType enum. The let clause uses the Regex class to match the wineType entity value with the regular expression value returned by WineTypeTable[wine]. If the regular expression contains a value matching wineType, matches will be true and the select clause casts the WineType key to its underlying int representation. Depending on how your regular expressions matched and the number of matches, you could potentially want to write more logic to score and find the winning WineType. However, this example takes a first match wins approach with the FirstOrDefault clause. When the query finds a match, wineCategory will have an int representation for a category to search for, otherwise it will be the default value of 0, which won’t return any results from WineApi.
There is no one-size-fits-all solution for recognizing user input. While this technique might not be perfect for every situation, and you might need to code more of your own logic to interpret user input, it can move you far along the road in many scenarios. Figure 8-10 shows how WineBotLuis works, translating conversational text into actionable logic.
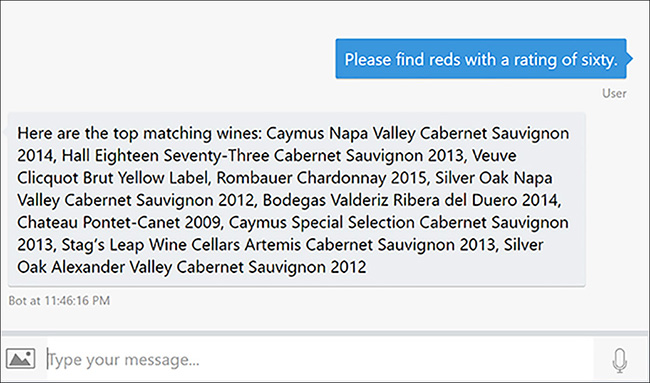
FIGURE 8-10 Testing WineBotLuis.
Now you have a working chatbot that understands natural language input. The next section explains how to make it better.
Continuous LUIS Model Improvement
Earlier sections in this chapter explain how to create a LUIS model. It was a minimal model and good to start off with. Though this is quick and powerful, you’ll want to make it more robust and resilient to the unpredictability of user input. Fortunately, LUIS has additional tools to improve models.
To improve the model, visit the https://luis.ai Web page, navigate to the WineBot Searching intent, and click the Suggested Utterances tab, as shown in Figure 8-11.

FIGURE 8-11 Reassigning Intents.
Notice the Suggested Utterances in Figure 8-11. If you choose to create a Hello or Greeting intent, these items might belong there, but they don’t belong in the Searching intent. In this case, they should be reassigned. You can reassign by checking the utterances to reassign, click the Reassign Intent menu, and click the intent to move each item to. This reclassifies the utterances properly.
Sometimes LUIS doesn’t recognize entities or mis-recognizes enties and you’ll need to fix those problems too. The None intent, in Figure 8-12, shows some utterances that LUIS should have classified as Searching intents.

FIGURE 8-12 Fixing Entities.
Figure 8-12 shows how some of the utterances that clearly belong to the Searching intent appear in the None intent. In this case, LUIS didn’t recognize sake as a WineType, and you need to click on sake and assign the WineType entity to it. After fixing entities, reassign the utterance to the proper intent, as explained previously.
The Suggested Utterances tab appears for all intents and entities and it’s useful to re-visit them to see new utterances and fix them to improve the model. Additionally, you can re-visit the Utterances tab for any intent and add new utterances as you think about them. Once you’ve worked through suggestions and added more of your own utterances, test and do more training, as explained in previous sections. Finally, publish the newly trained model, making it immediately available for the chatbot.
Remember that working on chatbots is an iterative process. Working with LUIS models is the same and by periodically revisiting the model and improving, you’re also improving the user experience.
Summary
In this chapter, you learned how to build a LUIS model and build chatbot code to handle plain language text from the user. To build a model, you need to create intents and entities, where intents are what the user wants to accomplish and entities are facts to extract from a user utterance. You saw how to enter utterances. On each utterance, you can label words that need to be recognized as entities.
Once you have intents, entities, and utterances defined, it’s time to test, train, and publish the model. Training creates a machine learning model that recognizes generalized utterances from the user. The testing interface lets you try different utterances to see if your model is recognizing user input correctly. After training, visit the Publish tab and publish the model so that it can be used by your chatbot.
After creating the LUIS model, you learned how to write code to handle the model. You learned about the LuisIntent attribute, letting code know how to communicate with the LUIS model. Deriving from LuisDialog<T> handles the chatbot communication with LUIS automatically. Inside of the LuisDialog<T>-derived type, WineBot, you saw how to define methods to handle intents. You also learned how to process entities and write logic to handle the user’s request.
Now you know how to work with natural language and LUIS. The next chapter builds upon all of the different dialogs, including LuisDialog<T>, showing some advance Bot Builder communication support.