CHAPTER 15. Adding Voice Services
The Bot Framework runs on many platforms and all of the channels you’ve configured so far involve text interaction. Users type into an interface for the channel, often a messaging app, and the chatbot responds in text. However, text isn’t the only medium available with chatbots – another is voice.
Using voice, users can talk to a chatbot directly without typing. The chatbot can respond with voice and/or text. Cortana is one such interface where users can summon Cortana and ask her to interact with a chatbot. This chapter starts off by showing how to add speech capabilities with different types of responses to a user. You’ll see how to implement input hints to indicate the chatbot’s listening state, and then you’ll learn how to deploy the chatbot to Cortana.
Adding Speech to Activities
The first chatbot example in this book used the connector.Conversations.ReplyToActivityAsync(reply) to send a message back to a user. The reply argument was an Activity instance, whose Text property contained the message. You might have noticed this technique throughout the book, especially in building the welcome message during the ConversationUpdate event handling.
In addition to Text, the Activity type has a Speak property. Channels, like Cortana, use the text in the Speak property to talk to the user. Listing 15-1 is a modified version of the RockPaperScissors program, from Chapter 4, that adds speech to Activities.
LISTING 15-1 Adding Speech to Activities: MessagesController.cs
using System;
using System.Net;
using System.Net.Http;
using System.Threading.Tasks;
using System.Web.Http;
using Microsoft.Bot.Connector;
using RockPaperScissors4.Models;
using System.Web;

namespace RockPaperScissors4
{
    [BotAuthentication]
    public class MessagesController : ApiController
    {
        public async Task<HttpResponseMessage> Post([FromBody]Activity activity)
        {
            HttpStatusCode statusCode = HttpStatusCode.OK;

            var connector = new ConnectorClient(new Uri(activity.ServiceUrl));

            if (activity.Type == ActivityTypes.Message)
            {
                string message = await GetMessage(connector, activity);

                Activity reply = activity.BuildMessageActivity(message);
                reply.Speak = message;
                reply.InputHint = InputHints.AcceptingInput;

                await connector.Conversations.ReplyToActivityAsync(reply);
            }
            else
            {
                try
                {
                    await new SystemMessages().Handle(connector, activity);
                }
                catch (HttpException ex)
                {
                    statusCode = (HttpStatusCode) ex.GetHttpCode();
                }
            }

            HttpResponseMessage response = Request.CreateResponse(statusCode);
            return response;
        }

        async Task<string> GetMessage(ConnectorClient connector, Activity activity)
        {
            var state = new GameState();

            string userText = activity.Text.ToLower();
            string message = “”;

            if (userText.Contains(value: “score”))
            {
                message = await state.GetScoresAsync(connector, activity);
            }
            else if (userText.Contains(value: “delete”))
            {
                message = await state.DeleteScoresAsync(activity);
            }
            else
            {
                var game = new Game();
                message = game.Play(userText);

                if (message.Contains(value: “Tie”))
                {
                    await state.AddTieAsync(activity);
                }
                else
                {
                    bool userWin = message.Contains(value: “win”);
                    await state.UpdateScoresAsync(activity, userWin);
                }
            }

            return message;
        }
    }
}
The Post method, in Listing 15-1, adds speech to an Activity, repeated here.
                Activity reply = activity.BuildMessageActivity(message);
                reply.Speak = message;
This assigns the message, which is the user’s reply text, to the Speak property of the Activity.
![]() Tip
Tip
The examples in this chapter implement speech with plain text. You can also use Speech Synthesis Markup Language (SSML). Voice synthesizers can often mispronounce and misunderstand text to the point that some parts of a sentence might be unintelligible. SSML is an XML markup language that helps with special attributes that specify emphasis, prosidy, aliasing, and more to make the text more understandable when spoken. You can learn more at the Microsoft page at https://aka.ms/ssmlref or the W3C Standard at http://www.w3.org/TR/speech-synthesis/.
That was Activity and you can also add speech to prompts – discussed next.
Adding Speech with SayAsync
Another way to respond to the user is with PromptAsync. However, there’s a speech equivalent, SayAsync, that allows you to specify both text and speech. Wine Bot, from Chapter 8, used PromptAsync and Listing 15-2 shows how it was modified to use speech.
LISTING 15-2 Adding Speech with SayAsync: WineBotDialog.cs
using System;
using System.Threading.Tasks;
using Microsoft.Bot.Builder.Dialogs;
using Microsoft.Bot.Builder.Luis.Models;
using Microsoft.Bot.Builder.Luis;
using WineBotLib;
using System.Collections.Generic;
using System.Text.RegularExpressions;
using System.Linq;
using Microsoft.Bot.Connector;

namespace WineBotLuis.Dialogs
{
    [LuisModel(
        modelID: “<your model ID goes here>”,
        subscriptionKey: “<your subscription key goes here>”)]
    [Serializable]
    public class WineBotDialog : LuisDialog<object>
    {
        [LuisIntent(“”)]
        public async Task NoneIntent(IDialogContext context, LuisResult result)
        {
            string message = @”
Sorry, I didn’t get that.
Here are a couple examples that I can recognize:
‘What type of red wine do you have with a rating of 70?’ or
‘Please search for champaigne.’”;

            await context.SayAsync(text: message, speak: message,
                options: new MessageOptions
                {
                    InputHint = InputHints.AcceptingInput
                });
            context.Wait(MessageReceived);
        }

        [LuisIntent(“Searching”)]
        public async Task SearchingIntent(IDialogContext context, LuisResult result)
        {
            if (!result.Entities.Any())
            {
                await NoneIntent(context, result);
                return;
            }

            int wineCategory;
            int rating;
            ExtractEntities(result, out wineCategory, out rating);

            var wines = await new WineApi().SearchAsync(
                wineCategory, rating, inStock: true, searchTerms: string.Empty);
            string message;

            if (wines.Any())
                message = “Here are the top matching wines: “ +
                          string.Join(“, “, wines.Select(w => w.Name));
            else
                message = “Sorry, No wines found matching your criteria.”;

            await context.SayAsync(text: message, speak: message,
                options: new MessageOptions
                {
                    InputHint = InputHints.AcceptingInput
                });

            context.Wait(MessageReceived);
        }

        void ExtractEntities(LuisResult result, out int wineCategory, out int rating)
        {
            const string RatingEntity = “builtin.number”;
            const string WineTypeEntity = “WineType”;

            rating = 1;
            EntityRecommendation ratingEntityRec;
            result.TryFindEntity(RatingEntity, out ratingEntityRec);
            if (ratingEntityRec?.Resolution != null)
                int.TryParse(ratingEntityRec.Resolution[“value”] as string, out rating);

            wineCategory = 0;
            EntityRecommendation wineTypeEntityRec;
            result.TryFindEntity(WineTypeEntity, out wineTypeEntityRec);

            if (wineTypeEntityRec != null)
            {
                string wineType = wineTypeEntityRec.Entity;

                wineCategory =
                    (from wine in WineTypeTable.Keys
                     let matches = new Regex(WineTypeTable[wine]).Match(wineType)
                     where matches.Success
                     select (int)wine)
                    .FirstOrDefault();
            }
        }

        Dictionary<WineType, string> WineTypeTable =
            new Dictionary<WineType, string>
            {
                [WineType.ChampagneAndSparkling] = “champaign and sparkling|champaign|sparkling”,
                [WineType.DessertSherryAndPort] = “dessert sherry and port|desert|sherry|port”,
                [WineType.RedWine] = “red wine|red|reds|cabernet|merlot”,
                [WineType.RoseWine] = “rose wine|rose”,
                [WineType.Sake] = “sake”,
                [WineType.WhiteWine] = “white wine|white|whites|chardonnay”
            };
    }
}
Instead of PromptAsync, both NoneIntent and SearchingIntent use SayAsync, shown here:
await context.SayAsync(text: message, speak: message);
SayAsync has parameters for both text and speak.
It’s okay to use the speech related syntax, like SayAsync, even if you don’t intend to use speech. It still works for text-only chatbots and can make the transition easier if you still want to deploy to a voice channel, like Cortana, later.
That’s how to add speech to prompts. Next, we’ll look at the PromptDialog types.
Adding Speech to PromptDialog
Another interaction with users comes via PromptDialog. The PromptDialog.Choice option offers voice options for both the basic message and the retry option. The Music Chatbot, from Chapter 10, uses PromptDialog in several places and Listing 15-3 shows how to implement speech.
LISTING 15-3 Adding Speech to PromptDialog: ProfileDialog.cs
using Microsoft.Bot.Builder.Dialogs;
using Microsoft.Bot.Connector;
using MusicChatbot.Models;
using MusicChatbot.Services;
using Newtonsoft.Json.Linq;
using System;
using System.IO;
using System.Linq;
using System.Net.Http;
using System.Threading.Tasks;

namespace MusicChatbot.Dialogs
{
    [Serializable]
    public class ProfileDialog : IDialog<object>
    {
        public string Name { get; set; }
        public byte[] Image { get; set; }

        public Task StartAsync(IDialogContext context)
        {
            context.Wait(MessageReceivedAsync);
            return Task.CompletedTask;
        }

        Task MessageReceivedAsync(IDialogContext context, IAwaitable<object> result)
        {
            ShowMainMenu(context);
            return Task.CompletedTask;
        }

        void ShowMainMenu(IDialogContext context)
        {
            var options = Enum.GetValues(typeof(ProfileMenuItem)).Cast<ProfileMenuItem>().ToArray();

            string promptMessage = “What would you like to do?”;
            string retryMessage = “I don’t know about that option, please select an item in the list.”;

            var promptOptions =
                new PromptOptions<ProfileMenuItem>(
                    prompt: promptMessage,
                    retry: retryMessage,
                    options: options,
                    speak: promptMessage,
                    retrySpeak: retryMessage);

            PromptDialog.Choice(
                context: context,
                resume: ResumeAfterChoiceAsync,
                promptOptions: promptOptions);
        }

        async Task ResumeAfterChoiceAsync(IDialogContext context, IAwaitable<ProfileMenuItem> result)
        {
            ProfileMenuItem choice = await result;

            switch (choice)
            {
                case ProfileMenuItem.Display:
                    await DisplayAsync(context);
                    break;
                case ProfileMenuItem.Update:
                    await UpdateAsync(context);
                    break;
                case ProfileMenuItem.Done:
                default:
                   context.Done(this);
                    break;
            }
        }

        Task UpdateAsync(IDialogContext context)
        {
            PromptDialog.Text(context, ResumeAfterNameAsync, “What is your name?”);
            return Task.CompletedTask;
        }

        async Task ResumeAfterNameAsync(IDialogContext context, IAwaitable<string> result)
        {
            Name = await result;
            string message = “Please upload your profile image.”;
            await context.SayAsync(text: message, speak: message,
                options: new MessageOptions
                {
                    InputHint = InputHints.AcceptingInput
                });
            context.Wait(UploadAsync);
        }

        async Task UploadAsync(IDialogContext context, IAwaitable<object> result)
        {
            var activity = await result as Activity;

            if (activity.Attachments.Any())
            {
                Attachment userImage = activity.Attachments.First();
                Image = await new HttpClient().GetByteArrayAsync(userImage.ContentUrl);

                StateClient stateClient = activity.GetStateClient();
                BotData userData = await stateClient.BotState.GetUserDataAsync(activity.ChannelId, activity.From.Id);
                userData.SetProperty(nameof(Name), Name);
                userData.SetProperty(nameof(Image), Image);
                await stateClient.BotState.SetUserDataAsync(activity.ChannelId, activity.From.Id, userData);
            }
            else
            {
                string message = “Sorry, I didn’t see an image in the attachment.”;
                await context.SayAsync(text: message, speak: message,
                    options: new MessageOptions
                    {
                        InputHint = InputHints.IgnoringInput
                    });
            }

            ShowMainMenu(context);
        }

        async Task DisplayAsync(IDialogContext context)
        {
            Activity activity = context.Activity as Activity;

            StateClient stateClient = activity.GetStateClient();
            BotData userData =
                await stateClient.BotState.GetUserDataAsync(
                    activity.ChannelId, activity.From.Id);

            if ((userData.Data as JObject)?.HasValues ?? false)
            {
                string name = userData.GetProperty<string>(nameof(Name));

                await context.SayAsync(text: name, speak: name);

                byte[] image = userData.GetProperty<byte[]>(nameof(Image));

                var fileSvc = new FileService();
                string imageName = $”{context.Activity.From.Id}_Image.png”;

                string imageFilePath = fileSvc.GetFilePath(imageName);
                File.WriteAllBytes(imageFilePath, image);

                string contentUrl = fileSvc.GetBinaryUrl(imageName);
                var agenda = new Attachment(“image/png”, contentUrl, imageName);

                Activity reply = activity.CreateReply();
                reply.Attachments.Add(agenda);

                await
                    new ConnectorClient(new Uri(reply.ServiceUrl))
                        .Conversations
                        .SendToConversationAsync(reply);
            }
            else
            {
                string message = “Profile not available. Please update first.”;
                await context.SayAsync(text: message, speak: message);
            }

            ShowMainMenu(context);
        }
    }
}
The ShowMainMenu, from Listing 15-3, adds speech to PromptDialog.Choice, repeated below:
            string promptMessage = “What would you like to do?”;
            string retryMessage = “I don’t know about that option, please select an item in the list.”;

            var promptOptions =
                new PromptOptions<ProfileMenuItem>(
                    prompt: promptMessage,
                    retry: retryMessage,
                    options: options,
                    speak: promptMessage,
                    retrySpeak: retryMessage);

            PromptDialog.Choice(
                context: context,
                resume: ResumeAfterChoiceAsync,
                promptOptions: promptOptions);
The way to implement speech with PromptDialog is via PromptOptions. Notice that the PromptOptions type has parameters for both prompt and speak and retry and retrySpeak pairs. Then use the overload of PromptDialog.Choice that accepts the promptOptions argument.
Now that you know various techniques for adding speech to responses, let’s look at input hints.
Specifying Input Hints
Input hints communicate a chatbot’s assumptions on when the user should communicate. The following InputHints class, from the Bot Framework, describes what input hints are available and what they mean:
    /// <summary>
    /// Indicates whether the bot is accepting, expecting, or ignoring input
    /// </summary>
    public static class InputHints
    {
        /// <summary>
        /// The sender is passively ready for input but is not waiting on a response.
        /// </summary>
        public const string AcceptingInput = “acceptingInput”;

        /// <summary>
        /// The sender is ignoring input. Bots may send this hint if they are
        /// actively processing a request and will ignore input
        /// from users until the request is complete.
        /// </summary>
        public const string IgnoringInput = “ignoringInput”;

        /// <summary>
        /// The sender is actively expecting a response from the user.
        /// </summary>
        public const string ExpectingInput = “expectingInput”;
    }
The default InputHint for an Activity or SayAsync call is AcceptingInput. Here’s the Activity example from Listing 15-1, repeated below:
                Activity reply = activity.BuildMessageActivity(message);
                reply.Speak = message;
                reply.InputHint = InputHints.AcceptingInput;
Just set the Activity.InputHint to an InputHints member. SayAsync is a little different because there isn’t an explicit parameter for input hints. Here’s how to add an input hint to SayAsync, from Listing 15-2, repeated below:
            await context.SayAsync(text: message, speak: message,
                options: new MessageOptions
                {
                    InputHint = InputHints.AcceptingInput
                });
In the case of SayAsync, we instantiate a MessageOptions, setting its InputHint property.
If a chatbot sends a message to a user and expects a response, they would use InputHints.ExpectingInput. An example of this would be the PromptDialog type, where it makes sense because the purpose of the prompt is to obtain a response from the user. The default for PromptDialog is always InputHints.ExpectingInput, making it unnecessary to explicity set an input hint.
Listing 15-3 has an example of how to use InputHints.IgnoringInput, repeated below:
                string message = “Sorry, I didn’t see an image in the attachment.”;
                await context.SayAsync(text: message, speak: message,
                    options: new MessageOptions
                    {
                        InputHint = InputHints.IgnoringInput
                    });
In this example, the user didn’t upload an image when building their profile. The message is information only and doesn’t require a response, making InputHints.IgnoringInput the appropriate choice. Additionally, the next code to execute is ShowMainMenu, which does prompt the user and accepts input.
Setting up Cortana
Once a chatbot has speech capabilities, you can deploy it to a voice channel. In this example, we’ll deploy the chatbot to Cortana. Like many of the other channels, setup isn’t too difficult for Cortana, but there are a couple extra steps that are important to know. The first step is to make sure the chatbot is registered with the Bot Framework, as described in Chapter 2. After that, you can visit My bots, select the registered chatbot, and click the Cortana channel. You’ll see a window similar to Figure 15-1.
 Note
Note
Remember to deploy the chatbot before testing with Cortana.
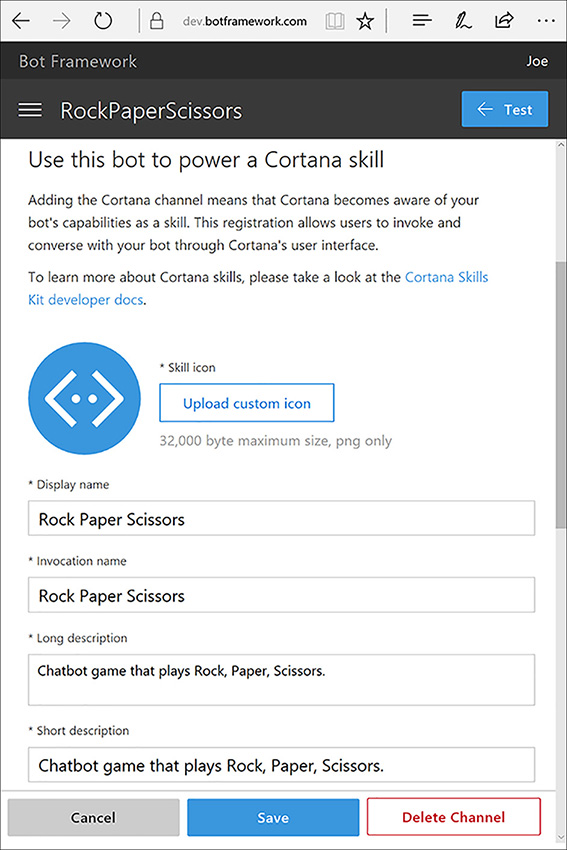
FIGURE 15-1 Configuring the Cortana Channel with the Bot Framework.
The Bot Framework pre-populates fields based on chatbot registration and you should review the values to ensure they’re correct or accurate. The most interesting field here is Invocation Name, which is the name users say to Cortana to invoke the chatbot.
Clicking the Save button brings you back to the Channel page for the chatbot, where there’s a link for the Cortana dashboard. Click the link that says Manage In Cortana Dashboard, and you’ll see a window similar to Figure 15-2.
Note
You may be asked to create an account to manage Cortana Skills. If so, make sure you log in with the same Microsoft accout that you used to register the chatbot, allowing you to test prior to publishing.
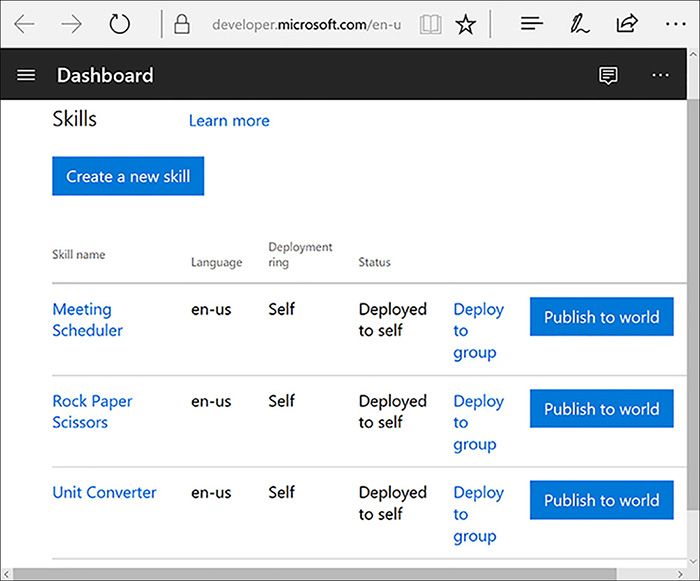
FIGURE 15-2 Publishing a Cortana Skill.
The RockPaperScissors chatbot is now a Cortana Skill. Clicking Publish to world and filling out the submission form makes it available for use with Cortana.
RockPaperScissors doesn’t have a LUIS model. However, if a chatbot does have a LUIS model, visit the chatbot Settings page, shown in Figure 15-3, and prime the chatbot for speech recognition.

To prime speech recognition, visit the luis.ai web page to get the application ID for the LUIS model to prime, add that ID to the Enter A LUIS pplication ID box, in Figure 15-3, and check the box by the matching LUIS model. This helps Cortana, or any other voice channel recognized user utterances.
Note
To make Cortana available for testing, open the Cortana menu, on the task bar, click the Settings icon, and ensure that the Let Cortana Respond To “Hey Cortana” option is turned on.
To test the new chatbot, get Cortana’s attention and use the chatbot invocation phrase to start the chatbot, by saying this:
Hey Cortana! Ask Rock Paper Scissors to play!
![]() Tip
Tip
We’ve found that it works better if you use the invocation phrase immediately after saying Hey Cortana. If you hesitate too long between the two phrases, Cortana defaults to a Bing search.
If this is the first time you’ve used a chatbot, Cortana will ask for permission, as shown in Figure 15-4.
FIGURE 15-4 Giving Cortana permission to invoke a chatbot.
Clicking Yes in Figure 15-4 invokes the RockPaperScissors chatbot. Click the microphone to speak and Cortana translates the text to words and sends that through Bot Connector, which arrives at the RockPaperScissors chatbot as a new message activity. Figure 15-5 shows open possible output when the user says Rock.
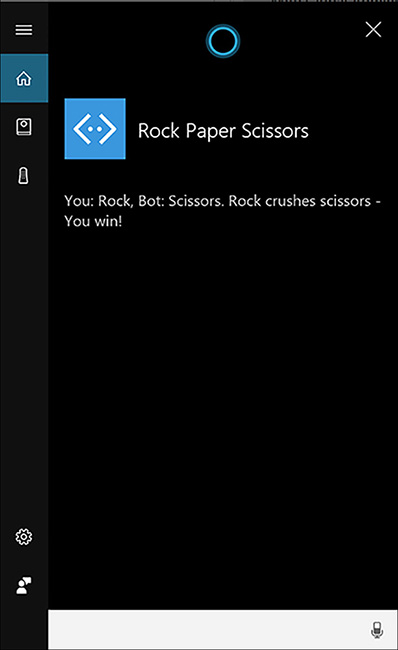
While Figure 15-5 shows the text on the screen, this isn’t a normal messaging interface. In real life, you will hear Cortana read the text. Also, the comments don’t scroll, but display the last thing Cortana says.
Summary
Now you know how to build a chatbot that users can interact with via voice. You saw how each of the main chatbots built throughout this book were refactored to implement speech. The RockPaperScissors chatbot adds speech to the Speak property of an Activity. Wine Bot replaced PostAsync with SayAsync and added a speak parameter. Music Chatbot added additional options to PromptDialog that included speak and retrySpeak parameters.
In addition to specifying speech, you can add input hints that tell when a chatbot is listening to user input.
Finally, you learned how to register with the Cortana channel and transform the chatbot into a Cortana Skill. You then learned how to invoke the chatbot via Cortana and then interact with it via voice.
In many ways, voice exemplifies the promise of chatbots. Rather than needing to learn a new user interface for apps of the past, users can now talk to their computers via chatbots. Combined with everything you’ve learned throughout this book, you can build different types of chatbots with various navigation schemes, using NLP and other AI services, with advanced conversational and voice interfaces that are easy for everyone to use.