
Solutions in this chapter:
Once you have OpenWrt installed on your Linksys device, you can use either the GUI or the command line to configure its settings. We strongly recommend that you use the command line to configure OpenWrt. It is very powerful and allows you to very easily implement advanced configurations. The GUI, covered briefly in Chapter 2, allows you to access only a small subset of functionality and configure only basic settings. This was not intentional; OpenWrt was intended primarily for developers in the beginning and is still working on becoming more “user friendly” with respect to a Web interface. This chapter will also cover X-Wrt, a Web interface that is full-featured and mirrors the functionality of the command line. The sections that follow will show you how to use the OpenWrt command-line interface and implement numerous configuration changes to perform various tasks such as enabling the Universal Serial Bus (USB), Syslog, Samba, and more!
Note
The version of OpenWrt used throughout this book is Whiterussian version 0.9 (which uses BusyBox vl.OO), based on a Linux 2.4 kernel (2.4.30). The version of DD-WRT used throughout the book is DD-WRT V23 SP2.
The OpenWrt command line is Linux/UNIX-based, so readers who are familiar with those platforms should be very comfortable. For those just getting started with the Linux/UNIX command line, remember one thing: Don’t be afraid of it. Think of the command line as merely a different way to configure the device. Instead of clicking your way around, you need to know which commands to enter. The following sections offer a good introduction to the command line, for even the most novice user.
Tip
The command line in OpenWrt is handled by BusyBox (www.busybox.net). BusyBox is a small, single executable that combines many Linux/UNIX commands. It has a small footprint and is extremely modular, allowing you to add or remove components to suit your needs. For complete documentation on all of its commands, see www.busybox.net/downloads/BusyBox.html. Please note that not all of these commands may be built into OpenWrt.
The nvram command allows you to manipulate the configuration settings contained within the reserved 64KB of flash memory known as NVRAM. Issuing the nvram show command will display a list of the configuration variables and their value. The nvram get <variable> command will show you this variable’s value, and nvram set <variable> = <value> is the command to change the variable’s value. Here is an example of how to change the device SSID (or wireless network name):
# nvram get wl0_ssid
OpenWrt
# nvram set wl0_ssid="GetPwn3dHere"
# nvram get wl0_ssid
GetPwn3dHere
# nvram commit
First, we issue the nvram get wl0_ssid command command to retrieve the current SSID assigned to the access point. Next, we change the default SSID (always a good idea) using the nvram set command from “OpenWrt” to “GetPwn3dHere”. We must always remember to write the changes from memory (RAM) to the NVRAM partition on the flash by executing the command nvram commit. Although changing NVRAM and committing to flash stores the variable and value, you may need to run other scripts or programs (or even reboot the device) to really apply those values. In the examples that follow, we will specify the actions that need to be taken in order for your changes to take effect. For the preceding changes to take effect, you will need to run the command /sbin/wifi, which applies the current wireless configuration.
Note
Although many of the examples will show you how to set or change a variable’s value, sometimes you may want to clear the contents of a variable. You can do this by issuing the command nvram set <variable>=“”. This is different from leaving a variable undefined through the nvram unset <variable> command. Depending on the variable, the end result can be the same using both methods, or not.
So, let’s assume you’ve just installed OpenWrt on your WRT54G and you plan to use it for purposes other than your firewall/router/access point to the Internet. It might be best to do this on a test router first, in order to become familiar with the operating system and how it works before using it as your primary firewall. Also, many projects in this book are written with the assumption that the device is not your primary router/firewall.
Once you’ve installed the new firmware on the router, you should change the Internet Protocol (IP) address of the device before plugging it into your network and SSH to it for the first time. This ensures that there are no IP address conflicts, especially ones involving the default gateway, as many times you may have a default gateway of 192.168.1.1. Given that we recommend that you restore to factory defaults, which sets the router to a default IP address of 192.168.1.1, before applying firmware, changing the IP address is usually the first step. You will need to make certain that your username is root; otherwise, you will not be able to log in to the router. OpenWrt does not have the concept of multiple users, so all logins are done with the root username.
pdc:~ nologin$ssh root 192.168.1.1
The authenticity of host '192.168.1.1 (192.168.1.1)' can't be established.
RSA key fingerprint is aO:88:ee:8b:10:13:If:7f:5d:CC:9c:53:lb:c4:20:d8.
Are you sure you want to continue connecting (yes/no)? yes
Warning: Permanently added '192.168.1.85' (RSA) to the list of known hosts.
[email protected]'s password:
You will notice that the SSH client asks you to accept the key, which is normal because this is the first time you are connecting to the device through SSH. In Chapter 2, we explained how to establish the initial Telnet or Web connection to change the default password. To change the IP address that is accessible from the local area network (LAN) assigned ports, use the following commands:
# nvram set lan_ipaddr="192.168.1.85"
# nvram set lan_gateway="192.168.1.1"
# nvram set lan_dns="192.168.1.10"
# nvram commit
The settings that control the actual IP address of your device all begin with lan_. Using the nvram command, make the appropriate changes for the new IP address (lan_ipaddr), default gateway (lan_gateway), and local domain name system (DNS) server (lan_dns). By default, these settings are changed only in RAM, so you need to run the nvram commit command to commit them from RAM to the NVRAM partition on the flash memory. You then need to tell the system to begin using these new values. To tell Open Wrt to reread and apply the network settings for the LAN interface run the following command:
# ifup Ian
You will then lose your network connection to the device. Using SSH you can quickly reestablish your terminal session using the new IP address, and accept the new SSH key entry (as the IP address has changed and will place a new entry in the client SSH known_hosts file).
pdc:~ nologin$ ssh 192.168.1.85
The authenticity of host '192.168.1.85 (192.168.1.85) ' can't be established.
RSA key fingerprint is a0:88:ee:8b:10:13:If:7f:5d:cc:9c:53:1b:c4:20:d8.
Are you sure you want to continue connecting (yes/no)? yes
Warning: Permanently added '192.168.1.85' (RSA) to the list of known hosts.
[email protected]'s password:
BusyBox vl.00 (2007.01.30-11.42+0000) Built-in shell (ash)
Enter 'help' for a list of built-in commands.

WHITE RUSSIAN (0.9)-------------------------------
 * 2 oz Vodka    Mix the Vodka and Kahlua together
 * 1 oz Kahlua   over ice, then float the cream or
 * I/2oz cream   milk on the top.
--------------------------------------------------
root@OpenWrt:~#
Tip
To better manage your SSH connections from your Linux client it is advisable to set up the $HOME/.ssh/config file to automatically set certain parameters when you log in to devices. You can do this by adding the following lines to your config file:
     hosf wrt-hacker
          hostname 192.168.1.85
          user root
Now, when you type ssh wrt-hacker, your SSH client will know to use root as the username and 192.168.1.85 as the IP address.
In this case, you changed the IP address and will have to reconnect using its new IP address. Next, you may want to disable the wireless interface until you are ready to use it. This will prevent someone from associating to your router and attacking it or the rest of your network while you are in the process of configuring it:
# nvram set wl0_radio="0"
# nvram set wl0_akm="none"
# nvram commit
The wl0_radio NVRAM variable sends a command to the driver to disable the wireless interface. (For more information, run the command wl radio. Installation instructions for the wl command will follow.) The command wl0_akm specifies the wireless authentication and encryption mode—Wi-Fi Protected Access (WPA), Wi-Fi Protected Access 2 (WPA2), WPA-PSK, and so on—which is good to disable along with the radio. As with the LAN interface settings, you need to tell OpenWrt to reread and apply the NVRAM variables before the changes will take effect. You can do this by issuing the following command:
# /sbin/wifi
Before you get too far down the hacking path, you will want to turn on boot_wait:
# nvram set boot_wait="on"
# nvram commit
The boot_wait setting will allow you to easily upgrade or change firmware using the Trivial File Transfer Protocol (TFTP) method described in Chapter 2. Finally, you should set a proper hostname (wan_hostname) and commit your changes:
# nvram set wan_hostname="wrt-hacker"
# nvram commit
# reboot
Once your router has finished rebooting, you can SSH to it again and see that the prompt now displays your new hostname as:
rootowrt-hacker: ~#
OpenWrt comes with a robust package management system used for installing, removing, and updating software, called ipkg. Those familiar with the Debian “apt” (Advanced Packaging Tool) structure should be very comfortable using ipkg, as ipkg very closely resembles the Debian project’s package management system. In order to take advantage of the package management system, you must have a working Internet connection and a network configuration on the router (covered in the preceding section).
The first task you will want to perform on your OpenWrt installation is a complete package update. This will update your system with the current list of available packages, and you do it by issuing the command ipkg update:
# ipkg update
Downloading http://downloads.openwrt.org/whiterussian/packages/Packages
Updated list of available packages in /usr/lib/ipkg/lists/whiterussian
Downloading http://downloads.openwrt.org/whiterussian/packages/non-free/Packages
Updated list of available packages in /usr/lib/ipkg/lists/non-free
Successfully terminated.
Warning
It is very important that you back up your router before applying a package upgrade. The package upgrade process could break any changes that you have made, or even brick your router. Be certain to follow the backup procedures covered in this chapter. Also, when the upgrade is complete, reboot your router to be certain that it will come back. If it does, you will need to telnet to the router’s IP address and reset your password, just as you did the first time you installed OpenWrt.
Once you have the latest list of packages, you arc now ready to begin installing software. The first step is to make certain that you have all of the latest versions of the previously installed packages. You do this by issuing the command ipkg upgrade:
# ipkg upgrade
Nothing to be done
Successfully terminated.
The ipkg command is good about telling you what it did, and the results of your commands. The preceding code is the message displayed when all your packages are up-to-date. These first two steps are vital to ensuring that subsequent packages are installed properly.
Note
During the writing of this book, there was a new release of OpenWrt which ended the Whiterussian development branch as of RC6 (version 0.9). RC6 (or Release Candidate 6) was the last major release, which made some fairly major changes (such as implementing the mini_ro file system). A minor release was made, 0.9, which contains minor bug fixes and you can apply it by running ipkg update and ipkg upgrade commands, as shown earlier.
When installing software, a good first step is to list the available packages in the OpenWrt package tree. You do this by issuing the ipkg list command. There are many to choose from, and each includes a short description. Here are some examples:
tcpdump - 3.8.3-1 - A tool for network monitoring and data acquisition.
tor - 0.1.0.17-1 - An anonymous Internet communication system
vsftpd - 2.0.4-1 - a fast and secure FTP server
wpa-supplicant - 0.4.7-1 - WPA Supplicant with support for WPA and WPA2
To list only the installed components you can run ipkg list_installed. Here is the complete installed package listing for OpenWrt from a newly installed system, representing the base packages that would be installed, for example, on a WRT54GL:
# ipkg list_installed
base-files - 8 - OpenWrt filesystem structure and scripts
base-files-brcm - 2 - Board/architecture specific files
bridge - 1.0.6-1 - Ethernet bridging tools
busybox - 1.00-4 - Core utilities for embedded Linux systems
dnsmasq - 2.33-1 - A lightweight DNS and DHCP server
dropbear - 0.48.1-1 - a small SSH 2 server/client designed for small memory environments.
haserl - 0.8.0-1 - a CGI wrapper to embed shell scripts in HTML documents
ipkg - 0.99.149-2 - lightweight package management system
iptables - 1.3.3-2 - The netfilter firewalling software for IPv4
iwlib - 28.pre7-l - Library for setting up WiFi cards using the Wireless Extension
kernel - 2.4.30-brcm-4 -
kmod-brcm-wl - 2.4.30-brcm-4 - Proprietary driver for Broadcom Wireless chipsets
kmod-diag - 2.4.30-brcm-5 - Kernel modules for LEDs and buttons
kmod-switch - 2.4.30-brcm-1 - switch driver for robo/admtek switch
kmod-wlcompat - 2.4.30-brcm-4 - Compatibility module for using the Wireless
Extension with broadcom's wl
mtd - 4 - Tool for modifying the flash chip
nvram - 1 - NVRAM utility and libraries for Broadcom hardware
uclibc - 0.9.27-8 - Standard C library for embedded Linux systems
webif - 0.2-1 - A modular, extensible web interface for OpenWrt.
wificonf - 6 - Replacement utility for wlconf
wireless-tools - 28.pre7-l - Tools for setting up WiFi cards using the Wireless
Extension
Installing software packages using OpenWrt is a straightforward process and you can do it using the ipkg install <pkgname> command. For this example, we will install tcpdump, an extremely useful tool for traffic sniffing and network troubleshooting. To install tcpdump, execute the command ipkg install tcpdump:
# ipkg install tcpdump
Installing tcpdump (3.8.3-1) to root...
Downloading http://downloads.openwrt.org/whiterussian/packages/tcpdump_3.8.3-
l_mipsel.ipk
Installing libpcap (0.9.4-1) to root...
Downloading http://downloads.openwrt.org/whiterussian/packages/libpcap_0.9.4-
l_mipsel.ipk
Configuring libpcap
Configuring tcpdump
Successfully terminated.
As you can see, the package tcpdump_3.8.3- l_jnipsel.ipk was downloaded and installed, in addition to libpcap_0.9.4-1_mispel.ipk. But wait, we didn’t tell it to install libpcapl This is one of the powerful features of ipkg. It automatically recognizes and installs dependencies. In this example, we told it that we wanted to install tcpdump. The package management system knows that in order for tcpdump to work properly (or work at all, for that matter) it needs libpcap, so it happily installs it for you. You will also notice the two lines that read Configuring libpcap and Configuring tcpdump. This is yet another nice feature of ipkg. It will configure your OpenWrt installation properly to allow the installed packages to run (environment variables, scripts, etc.).
Now that you have gone through the process of getting your newly “hacked” WRT54G configured on your network, you may want to change the network ports configuration. Unlike the default Linksys firmware, OpenWrt allows you to be more flexible when it comes to how the WRT54G functions on the network, and reassign ports and virtual LANs (VLANs) just as you would one any other enterprise switch. Figure 3.1 displays the default port layout.

It is important to understand that the LAN port assignments in Figure 3.1 on the outside of the WRT54G above the LAN ports are there only to correspond to the lights on the front of the device. They have no meaning when referring to them using OpenWrt, as the LAN ports are assigned numbers 0-3, and the wide area network (WAN) port is assigned to port 4 on the internal switch. You can view and change which VLAN is assigned to a particular port by manipulating NVRAM variables:
vlanOhwname="etO"
vlanlhwname="etO"
vlan0ports="3 2 10 5*"
vlanlports="4 5"
The vlanxhuname variables refer to the physical interface associated with the switching hardware—that is, the internal built-in switch represented by et0. The WRT54C and WRT54GL have only a single internal switch (et0); other routers may have more than one. The et0 interface is associated to one or multiple VLANs, with one or more ports assigned to each VLAN. The vlanXports variables contain the switch ports assigned to that particular VLAN, indicated by number (X). Port numbers 0–3 are the physical LAN ports (labeled on the back of the WRT54G as 1–4). Port 4 is the WAN (or Internet) port, and port 5* is reserved for the VLAN tagging interlace.
Tip
Need an extra LAN port? Did you know that you can change the function of the WAN port (the one labeled “Internet” on the back) to act like a LAN port? This gives you one extra switch port in cases where you just want to use your WRT54G as a wireless access point or switch and not use it as a router. Here are the NVRAM settings required to convert port 4 (the default port number for the WAN interface) from the WAN VLAN (vlanl) to the LAN VLAN (vlanO):
   # nvram set vlanOports="0 12 3 4 5*"
   # nvram set vianlports="5"
   # nvram set wan_proto=static
   # nvram commit
   # reboot
The first command modifies the vlanOports variable to include port 0, which changes the WAN interface VLAN assignment to vlan0; remember, port number 0 corresponds to the WAN interface. Next, we modify the vlanlports variable to remove port 0 from vlanl, leaving just the virtual port 5 in case we ever want to reuse this VLAN (port 5 is the virtual tagging port that must exist in every VLAN). Then, we set the wan_proto variable from the default setting of dhcp to static. This will disable the Dynamic Host Configuration Protocol (DHCP) client for that interface because it is no longer necessary. All that is left is to commit the changes and reboot. Once completed, enjoy the extra switch port!
One of the most common features sought after by WRT54G hackers is the ability to adjust the wireless radio transmit power (TX power). Entire firmware distributions are dedicated to this ability (for instance, HyperWRT, covered in Chapter 2). There are a few items to note that we covered briefly up until now, but that we believe require more explanation. The actual transmit power limit of the WRT54G hardware and associated driver is 251mW. As stated in Chapter 2, this will cause overheating. In addition to melting, cranking up the power this high to achieve more gain will actually have the reverse effect. Due to the noise created by such a high output power, the signal actually bleeds into other channels and becomes less efficient (see http://explorer.cyberstreet.com/wrt54g/WRT54g-spectraloutput.html). The optimum output power, meaning one that will increase gam and not introduce noise, is documented as 89mW. This setting will also not overheat the router; however, we do recommend that you provide adequate ventilation for your WRT54G routers (e.g., do not put them in your desk drawer).
You can easily change the transmit power using OpenWrt from the command line. First, let’s take a look at the default wireless transmission power value in OpenWrt (Whiterussian 0.9). To do this we will need to install the wl command-line program. This is a small, proprietary, binary program from Broadcom that allows you to view and change the settings of the wireless driver.
# ipkg install wl
Installing wl (3.90.37-1) to root...
Downloading http://downloads.openwrt.org/whiterussian/packages/non-free/wl_3.90.37-
l_mipsel.ipk
Configuring wl
Successfully terminated.
Warning
During the course of writing this book, the authors uncovered a bug in the wl command. If you execute this command (with any parameter) while the radio is disabled (nvram set wl0_radio=“0”; nvram commit; isbiniwifi) you will receive an error, as show here:
   # wl txpwrlimit
   Segmentation fault
Once this command has executed and generated the preceding error, any subsequent attempt to access the wireless subsystem will result in the command hanging and not responding. These commands include wl, wifi, and even reboot. You will still be able to connect to the router via SSH from the LAN or WAN ports; however, to fix the wireless problem you need to power-cycle the device. It is a good idea to be certain that your wireless radio/interface is enabled before executing commands that access it (nvram get wlO radio). The authors are in the process of contacting the vendor (because the wl binary comes from Broadcom) and reporting this bug. Check www.wrt54ghacks.com for updates.
Once you have downloaded and installed the wl program, you can use it to query the driver for the transmit power setting:
# wl txpwrlimit
Current TX Power Limit:	       89 mW ( 19.50 dBm)
The default setting, once you install OpenWrt, depends on the default driver setting, which in most cases will be 89mW (19.5 dBm), the optimum power output for the radio on the WRT54G. TX power is often expressed in dBm, a measure of absolute power. For reference, you can read http://en.wikipedia.org/wiki/DBm. However, suppose you want to decrease the radio transmit power? This could help to limit the range and save power consumption (especially if you are implementing one of the battery hacks in Chapter 7). To change the transmit power do the following:
# nvram set wl0_txpwr="56"
# nvram commit
# wifi
# wl txpwrlimit
Current TX Power Limit:        25 mW ( 14.00 dBm)
In the first command, we set the NVRAM variable wl0_txpwr to 56. This variable is expressed as qdBm, which means that it is four times (one-quarter) the value of dBm. The default value is 78 qdBm.A setting of 56 means that we should have a dBm of 14 (56 I A — 14). We then commit the changes to the NVRAM partition and reload the wireless settings using the wifi command. To verify that the settings have taken effect, we can again use the wl txpwrlimit command, which returns 14 dBm as our output power.
The wl txpwrl provides even more comprehensive and accurate information by displaying the current TX power in all the different measurement units already described:
# wl txpwrl
TxPower is 56 qdbm, 14.00 dbm, 25 mW  Override is Off
You can also double-check that this value was set properly by using the iwconfig command:
# iwconfig
lo         no wireless extensions.
eth0 no wireless extensions.
eth1       IEEE 802.11-DS ESSID:"OpenWrt"
           Mode:Master Frequency:2.437 GHz Access Point: 00:18:F8:D8:09:22
           Tx-Power:14 dBm
           RTS thr=2347 B Fragment thr=2346 B
           Encryption key:off
           Link Noise level:-12 dBm
           Rx invalid nwid:0 Rx invalid crypt:0 Rx invalid frag:0
           Tx excessive retries:1284 Invalid misc:0 Missed beacon:0
In the preceding example, you can see that the iwconfig command output indicates a transmit power of 14dBm. Chapter 7 provides full coverage of wireless power measurements, radio transmit power, and adding antennas for increasing signal gain.
Note
For reference, most WRT54G model routers come from the factory with the radio power set to 89mW, which is approximately 19.5 dBm. It is left up to the operating system on the router to interact with the driver to change this setting.
warning
Please be certain that when adjusting power, and adding antennas, as covered in Chapter 7, you are abiding by the regulations in your associated jurisdiction. The following resources are helpful in determining these limits, which are set to 1 watt (indoors) by the FCC in the United States and lOOmW by the ETSI in the EU:
     United States "Understanding the FCC Part 15 Regulations for Low Power, Non-
        Licensed Transmitters"; www.fcc.gov/Bureaus/Engineering_Technology/
     Documents/bulletins/oet63/oet63rev.pdf (Pages 20 & 21)
     Europe "Electromagnetic compatibility and Radio Spectrum Matters (ERM);
        Wideband transmission systems; Data transmission equipment operating in
        the 2.4 GHz ISM band and using spread spectrum modulation techniques;
        Harmonized EN covering essential requirements under article 3.2 of the
        R&TTE Directive"; http://webapp.etsi.org/action/OP/OP20060922/
en_300328v010701o.pdf (pages 10 and 11)DNS and DHCP are two of the most fundamental protocols in use on the Internet today. Whereas DHCP provides hosts with dynamic IP addresses, DNS is used to resolve hostnames to IP addresses and vice versa. Your WRT54G running OpenWrt (and DD-WRT, for that matter) uses an open source DNS/DHCP server called dnsmasq. Dnsmasq is a lightweight server that provides functionality for both DNS and DHCP, in addition to some useful features which we will cover shortly. If you do not plan to use your WRT54G as a DNS or DHCP server, refer to the last section in this chapter, “Securing Your Firmware,” as it details how to disable this service.
A caching-only DNS server is a great way to control your local DNS lookups. Instead of having to connect to your Internet service provider’s (ISP’s) DNS servers, you can set up your own server to answer queries from the local network, which then are forwarded to the ISP’s servers. For each lookup that you do, the local DNS server will cache the lookup so that each subsequent lookup will come directly from the local DNS server. The other advantage this has is the ability to “blackhole” certain domains. For example, there is a list of domains that are commonly used to provide banner ads, and others that are commonly used to distribute malware. By adding entries for these domains to resolve to 127.0.0.1, you can effectively prevent yourself from seeing the banner ads or potentially downloading malware. For example, Web sites use banner ad companies to not only display annoying animated images, but also possibly collect personal information about you. Using cookies, a company such as DoubleClick could log your IP address, Web browser type and version, and operating system, and even your name! These same images could be used to distribute malware, either through directly exploiting your computer with the images (see the Microsoft advisory MS06-001, www.microsoft.com/technet/security/Bulletin/MS06-001.mspx) or by enticing you to click on a link which will take you to a Web site that will attempt to exploit your Web browser software and/or operating system.
The first step in the process is to disable the default startup script for dnsmasq, which is the program that controls DNS and DHCP for OpenWrt:
# cd /etc/init.d
# mv S60dnsmasq disabled_s60dnsmasq
# chmod -x disabled_s60dnsmasq
Next, you need to create a replacement file. The new S60dnsmasq startup script should look as follows:
#!/bin/sh
dnsmasq -C /etc/dnsmasq.conf
This startup script requires execute permissions to run. You can set these using the following command:
# chmod 755 /etc/init.d/S60dnsmasq
Next, you need to remove the default /etc/resolv.conf file and replace it with your own:
# rm /etc/resolv.conf
# cat > /etc/resolv.conf
nameserver isp.dns.srv.ipl
nameserver isp.dns.srv.ip2
<CTRL-D>
Be certain to replace isp.dns.srv.ipl and isp.dns.srv.ip2 with the IP addresses of your ISP-provided DNS servers. Next, you need to update the DNS resolution file option in /etc/dnsmasq.conf, which you should change to the following value:
resolv-file=/etc/resolv.conf
Finally, reboot the device so that your changes will take effect and you can verify that your startup script changes were successful.
# reboot
Once the system has rebooted, you can go to any other host and use the nslookup command to test your new DNS server. The nslookup examples in this section are from a Linux client:
paulda@bud:~$ nslookup
> server 192.168.1.85
Default server: 192.168.1.85
Address: 192.168.1.85#53
>pauldotcom.com
Server:        192.168.1.85
Address:       192 .168.1.85#53


Non-authoritative answer:
Name:   pauldotcom.com
Address: 67.15.62.53
>
In the preceding example, we are on another host on our local network, called bud. When we type nslookup, it gives us the standard tool prompt in the form of the “>” symbol. By typing server 192.168.1.85, we tell nslookup to use that IP address as the DNS server, instead of the one in the local /etc/resolv.conf file. When we look up a hostname, nslookup comes back and tells us that using 192.168.1.85 as the DNS server, it is able to resolve the hostname given—in this case, pauldotcom.com.
Once you have the configuration working, you can then add the list of domains that you want to blackhole. Add the following lines to /etc/dnsmasq.conf:
# Blackhole ad domains


address=/adcentriconline.com/127.0.0.1
address=/addynamix.com/127.0.0.1
address=/adelphia.com/127.0.0.1
address=/adelphia.net/127.0.0.1
address=/adlegend.com/127.0.0.1
address=/adserver.com/127.0.0.1
address=/adware.com/127.0.0.1
address=/allfreethings.com/127.0.0.1
address=/bluestreak.com/127.0.0.1
address=/centrport.com/127.0.0.1
address=/chicagowebs.com/127.0.0.1
address=/clickaffiliate.com/127.0.0.1
address=/clickagents.com/127.0.0.1

address=/clickfire.com/127.0.0.1
address=/cossette.com/127.0.0.1
address=/deepmetrix.com/127.0.0.1
address=/digitalriver.com/127.0.0.1
address=/dmpi.net/127.0.0.1
address=/doubleclick.com/127.0.0.1
address=/doubleclick.net/127.0.0.1
address=/eboz.com/127.0.0.1
address=/eyeblaster.com/127.0.0.1
address=/fastclick.com/127.0.0.1
address=/imrworldwide.com/127.0.0.1
address=/insightexpress.com/127.0.0.1
address=/interpolls.com/127.0.0.1
address=/klipmart.com/127.0.0.1
address=/kliptracker.com/127.0.0.1
address=/linkbuddies.com/127.0.0.1
address=/nextag.com/127.0.0.1
address=/nielsen-netratings.com/127.0.0.1
address=/overture.com/127 .0.0.1
address=/planninggroup.com/127.0.0.1
address=/pointroll.com/127.0.0.1
address=/questionmarket.com/127.0.0.1
address=/redsheriff.com/127.0.0.1
address=/serving-sys.com/127.0.0.1
address=/streamexchange.com/127.0.0.1
address=/topdownloads.com/127.0.0.1
address=/trueffect.com/127.0.0.1
address=/unicast.com/127.0.0.1
address=/valueclick.com/127.0.0.1
address=/videobanner.com/127.0.0.1
Note
You can download this file directly to the WRT54G by using the command wget http://www.wrt54ghacks.com/whiterussian/BlackholeAdDomains and copying to the appropriate filename and location.
Now, restart the dnsmasq server:
# killall dnsmasq
# /etc/init.d/S60dnsmasq
Again, you can test this by going to any other host and using the nslookup command:
pauldaobud:~$ nslookup
> server 192.168.1.85
Default server: 192.168.1.85
Address: 192 .168 .1. 85#53
>doubleclick.net
Server:	        192.168.1.85
Address:	192.168.1.85#53


Name:  doubleclick.net
Address: 127.0.0.1
>
Now that you have a working configuration, you are ready to use your new DNS server for local client lookups. You can do this in the various operating systems in the network interface configuration. Each time the client performs a lookup for a host in the blackhole list, the DNS server will return 127.0.0.1. Typically, there is no Web server on the client performing the Web browsing, so the Web browser will quickly return an error in place of an annoying banner ad. In the next section, we will show you how to configure the DHCP server so that it will distribute your new DNS server address automatically.
Dnsmasq also provides a DHCP server which you can customize for your own use. First, we will show you how to set up a standard DHCP server that will provide clients with an IP address, DNS server, and default gateway. Then, we will show you how to assign fixed IP addresses based on Media Access Control (MAC) addresses so that specific computers will always receive the same IP address. To enable the DHCP server, edit the /etc/dnsmasq.conf file and be certain that it contains the following directives:
# enable dhcp (start, end, netmask, leasetime)
dhcp-authoritative
dhcp-range=192.168.1.100,192.168.1.150,255.255.255.0,12h
dhcp-leasefile = /tmp/dhcp.leases


# other useful options:


#Default Gateway
dhcp-option=3,192.168.1.1
# DNS Servers
dhcp-option=6,192.168 .1.85
The first three lines tell the DHCP server to be authoritative (i.e., it will act as though it is the only DHCP server on the network), specifies the range of IP addresses that it will be handing out to clients (from .100 to .150), and provides the lease file location where it will store DHCP leases. The dhcp-option parameter allows you to specify individual DHCP options by number (for a complete listing, see www.iana.org/assignments/bootp-dhcp-parameters). Now, stop and restart dnsmasq:
# killall dnsmasq
# /etc/init.d/S60dnsmasq
To test the DHCP server you can use any client that supports DHCP. Windows systems work well to identify the DHCP server settings. Simply put a Windows server on the same subnet as your router and configure the network interface for DHCP. Then start a command prompt (go to Start | Run, type cmd.exe, and click OK) and enter ipconfig /all. Review the results and be certain that your machine received the appropriate IP address, subnet mask, default gateway, and DNS server.
If all that looks good, you are ready to move on to the next step, assigning a fixed IP address via DHCP. To enable this feature, add the following lines to your /etc/dnsmasq.conf file:
# use /etc/ethers for static hosts; same format as --dhcp-host
# <hwaddr> <ipaddr>
read-ethers
The preceding directive tells dnsmasq to read the static MAC address to IP address mappings from a file. Save and exit this file, and create a new file that contains the mappings:
# cat > /etc/ethers
00:04:75:F7:B0:BE 192.168.1.45
<CTRL-D>
This tells dnsmasq that every time a device with a MAC address of 00:04:75:F7:B0:BE makes a request for an IP address, give it the 192.168.1.45 IP address. To enable your change you must once again stop and restart dnsmasq, as you did earlier:
# killall dnsmasq
# /etc/init.d/S60dnsmasq
Now you are ready to start using the enhanced DNS and DHCP server configuration. It would be best to have at least two DNSs on your network in case one fails. You can do this easily using the earlier configuration examples.
Note
You could also run two DHCP servers on your subnet for redundancy. You would want to remove the dhcp-authoritative directive and make certain that the dynamic DHCP ranges are different on each one. Your client would use whichever DHCP server responded first, which would be fine for a home or small-office environment.
Although SSH is already a very secure protocol, there are a few minor enhancements you can make to be certain that you are using it properly. SSH supports public key cryptography for authentication and encryption, meaning that you have a public/private key pair, and your router has a public/private key pair. Let’s create this for accessing our routers.
First, create a public key on the host from which you will be managing your router:
paulda@bud:~$ ssh-keygen -t dsa
Generating public/private dsa key pair.
Enter file in which to save the key (/home/paulda/.ssh/id_dsa):
Enter passphrase (empty for no passphrase):
Enter same passphrase again:
Your identification has been saved in /home/paulda/.ssh/id_dsa.
Your public key has been saved in /home/paulda/.ssh/id_dsa.pub.
The key fingerprint is :
60:99:71:df:d3:b2:6e:52:32:bC:Cd:80:46:b6:ed:90 paulda@bud
Copy the public key to the router:
pauldaobud:~$ scp -/.ssh/id_dsa.pub wrt-hacker:/tmp/
[email protected]'s password:
id_dsa.pub                                  100% 597 0.6KB/s 00:00
Create the authorized keys file on the router:
# cd /etc/dropbear/
# cat /tmp/id*.pub >> authorized_keys
# chmod 06 00 authorized_keys
Now when you SSH to the router, instead of asking you for your password, it will ask you for the passphrase protecting your private key:
paulda@bud:-$ ssh wrt-hacker
Enter passphrase for key '/home/paulda/.ssh/id_dsa' :


BusyBox vl.00 (2006.11.07-01:40+0000) Built-in shell (ash)

Enter 'help' for a list of built-in commands.

WHITE RUSSIAN (0.9) ----------------------------------
 * 20Z Vodka Mix the Vodka and Kahlua together
 * 1 oz Kahlua over ice, then float the cream or
 * I/2oz cream milk on the top.
------------------------------------------------------
root@wrt-hacker:~#
Let’s face it; if you’ve made it this far in the WRT54G hacking process, you probably don’t care too much about the SecureEasySetup (SES) feature that came with your router. In fact, if you’ve applied third-party firmware, it is most likely already broken. Because it’s there, we want to do something useful with it, such as turn the wireless radio on and off. This is a useful feature, especially if you want to have an open access point only for a certain period. With the script that follows, disabling and enabling the radio is as easy as pressing a button!
The diag kernel module controls the communications with the LED lights, and the Reset and SES buttons. The diag kernel module, among many other things, controls the lights by looking for scripts in a particular directory. You must first create the directory for the SES button:
# mkdir /etc/hotplug.d/button
In this directory, place the following file and call it “01-wifitoggle”, which is a shell script:
     #!/bin/sh


     #
     # If the Cisco SES button was pressed and released
     #
     if [ $BUTTON = "ses" -a $ACTION = "released" ]
     then
             # Make SES button flash white when pressed
             echo "f" > /proc/diag/led/ses_white

             # If the Wifi is disabled when button pushed
             if [ "$(nvram get wl0_radio)" = "0" ]
             then

             # Enable the Wifi and set light to orange
             logger -t wifi "Activating wi-fi"
             echo "1" > /proc/diag/led/ses_orange
             nvram set wl0_radio=l
             wifi
     else
             # If Wifi was already enabled, disable it
             # then turn off the light
             logger -t wifi "De-Activating wi-fi"
             nvram set wl0_radio=0
             echo "0" > /proc/diag/led/ses_orange
             wifi
     fi
     sleep 1
     echo "0" > /proc/diag/led/ses_white
fi
Note
You can download this file directly to the WRT54G using the command wget http://www.wrt54ghacks.com/whiterussian/wifi-toggle.sh and copying to the appropriate filename and location.
Now when you press the SES button, you should see the light flash white, and then turn solid orange. This means WiFi is enabled. If you press the button again, you should see the button flash white and then go off. This means WiFi is disabled. You can verify that the script is running and writing to the logs by issuing the logread command. In the output, you should see the following:
Jan  1 08:02:26 (none) user.notice wifi: Activating wi-fi
Jan  1 08:04:16 (none) user.notice wifi: De-Activating wi-fi
You will want to be certain that your WRT54G is keeping the correct time. This becomes important when analyzing logs for troubleshooting or investigating security incidents. Configuring time in OpenWrt requires installation of the ntpclient package and some minor configuration.
First, you must download and install ntpclient:
ipkg install ntpclient
The most difficult part of this process is determining the best time server. When in doubt, refer to your ISP’s documentation to find out if they are maintaining a time server, as that would be the best one to use. For a complete listing and NTP-related documentation, refer to http://ntp.isc.org. Once you have found the appropriate NTP server, you can then add the following script to /etc/init.d/S65ntpclient:
#!/bin/sh


NTPSERVER=time.nist.gov


#
# kill any existing ntpclient processes
#
/usr/bin/killall ntpclient


#
# Sync the system clock to time server
#
/usr/sbin/ntpclient -1 -h $NTPSERVER -c 1 -s &
Note
You can download this file directly to the WRT54G using the command wget http://www.wn54ghacks.comlwhiterussianlntpdient.sh and copying to the appropriate filename and location.
You should replace time, nist.gov with your local NTP server. This will synchronize your clock each time you reboot your router.
This startup script requires execute permissions to run. You can set these using the following command:
# chmod 755 /etc/init.d/S65ntpclient
You will also want to synchronize time at a regular interval. To synchronize the system time every 30 minutes, you can add a cron job as follows:
crontab -e
Running this command will allow you to edit the root user’s cron jobs. Simply add the following lines:
# Sync system time every 3 0 minutes
*/30 * * * * /etc/init.d/S65ntpclient
The final task is to set the time zone. By default, OpenWrt sets the time zone to UTC. To specify the time zone you will need to first select which time zone you are in by using the reference located in section “5.8 Timezone” in the OpenWrt configuration guide (http://wiki.openwrt.org/OpenWrtDocs/Configuration).
echo "EST5EDT" > /etc/TZ
This will set the time zone to U.S. Eastern Standard Time (EST).
One of the fundamental challenges we face when working with a small embedded device such as the WRT54G is limited storage capacity. Even the routers with the most available flash contain only 16MB of storage space. To make the most out of your routers with USB ports, such as the WRTSL54GS, adding USB support and attaching a large drive is handy. The first step is to add USB 1.1/2.0 support by installing the following packages:
ipkg install kmod-usb-uhci   # Kernel driver for UHCI USB controllers
ipkg install kmod-usb-core   # Kernel Support for USB
ipkg install kmod-usb-ohci   # Kernel driver for OHCI USB controllers
ipkg install kmod-usb-storage        # Kernel modules for USB storage support
ipkg install kmod-usb2	           # USB 2.0 Support
Next, check the dmesg output and be certain that OpenWrt has found your USB controller:
usb.c: registered new driver usbdevfs
usb.c: registered new driver hub
PCI: Setting latency timer of device 00:03.0 to 64
usb-ohci.c: USB OHCI at membase 0xb8003000, IRQ 6
usb-ohci.c: usb-00:03.0, PCI device 14e4:4715
usb.c: new USB bus registered, assigned bus number 1
hub.c: USB hub found
hub.c: 2 ports detected
PCI: Enabling device 01:02.0 (0000 -> 0002)
PCI: Setting latency timer of device 01:02.0 to 64
usb-ohci.c: USB OHCI at membase 0xc018b000, IRQ 2
usb-ohci.C: usb-01:02.0, PCI device 1033:0035
usb.c: new USB bus registered, assigned bus number 2
hub.c: USB hub found
hub.c: 3 ports detected

PCI: Enabling device 01:02.1 (0000 -> 0002)
PCI: Setting latency timer of device 01:02.1 to 64
usb-ohci.c: USB OHCI at membase 0xc018d000, IRQ 2
usb-ohci.c: usb-01:02.1, PCI device 1033:0035
usb.c: new USB bus registered, assigned bus number 3
hub.c: USB hub found
hub.c: 2 ports detected
SCSI subsystem driver Revision: 1.00
Initializing USB Mass Storage driver...
usb.c: registered new driver usb-storage
USB Mass Storage support registered.
hub.c: new USB device 01:02.0-1, assigned address 2
PCI: Enabling device 01:02.2 (0000 -> 0002)
ehci_hcd 01:02.2: PCI device 1033:00e0
ehci_hcd 01:02.2: irq 2, pci mem cOlcOOOO
usb.c: new USB bus registered, assigned bus number 4
hub. c hub. c usb. c hub. c
ehci_hcd 01:02.2: USB 2.0 enabled, EHCI 1.00, driver 2003-Dec-29/2.4
hub.c USB hub found
hub.c 5 ports detected
hub.c USB device not responding, giving up (error=-145)
hub.c new USB device 01:02.2-1, assigned address 2
Now connect the drive you want to use to the USB port and verify that you can see it by entering the command df–h:
# df -h
Filesystem               Size         Used Available  Use% Mounted on
/dev/root              896.0k       896.0k         0  100% /rom
none                    14.9M       28 .0k     14.9M    0% /tmp
/dev/mtdblock/4          6.3M         1.9M      4.4M   30% /jffs
/jffs                  896.0k       896.0k         0  100% /
/dev/scsi/host0/bus0/target0/lun0/partl    465.6G      32.0k	465. 6G
/mnt/disc0_1
You can see in the preceding code snippet that the 500GB drive is now available as /mnt/disc0_1. You also have the option of repartitioning and/or reformatting the drive to suit your needs. You can do this by plugging the drive into another device, or if you want to use OpenWrt, you must install the fdisk package (ipkg install fdisk).
Again, trying to overcome the limited storage on a WRT54G is challenging, and even more so if you do not have a USB port. For most WRT54G models, the best way to add more storage, without making hardware modifications, is to install Samba support. Samba will allow your routers to attach to Windows networking shares, sometimes referred to as SMB shares, CIFS, or NetBIOS shares. Your WRT54G can be either a Samba client, or Samba server sharing out files to the rest of your network (which works best with the USB configuration mentioned earlier).
The first step is to configure OpenWrt to look at the Backports package tree. Backports is a collection of useful software that has been made available from the development branches of OpenWrt. These packages are not all fully supported and, as such, should be installed with caution.
Warning
Be certain that you have enough free space on your flash device before installing packages. When installing large packages (Python, for example), you can very easily run out of flash space. The Linux command df -h will list the currently mounted partitions approximately and how much available space is left on each.
To use Backports you must tell ipkg to look at the Backports package tree by adding the following line to /etc/ipkg.conf:
sre backports http://downloads.openwrt.0rg/backports/O.9
Then run an ipkg update and you should see the following in the output:
Downloading http://downloads.openwrt.org/backports/O.9/Packages
Updated list of available packages in /usr/lib/ipkg/lists/backports
Note
Although you can install a Samba server and have it share what is on the default flash chip, it is not so useful, as there is only a limited amount of storage. This section will use the WRTSL54GS model router to share the USB storage device on the network using Samba.
To complement our USB storage, let’s share out the attached USB drive so that it is accessible via Samba to the rest of the network. The first step is to install file system support for some common file systems you might want to use, such as ext2, ext3, and vfat, which allows you to mount FAT file system partitions:
# ipkg install samba-server kmod-vfat kmod-ext2 kmod-ext3
Once you’ve installed Samba, you need to first modify your /etc/hosts file so that your router has an appropriate entry, such as:
127.0.0.1 localhost
192.168.1.70 wrtsl54gs
where 192. 168.1.70 is the IP address of your router, and wrtsl54gs is your router’s hostname (nvram set wan_hostname=wrtsl54gs).
Next, you need to edit /etc/samba/smb.conf. Here is an example:
[global]
 syslog = 0
 syslog only = yes
 workgroup = OpenWrt
 server string = OpenWrt Samba Server
 security = share
 encrypt passwords = yes
# guest account = nobody
 guest account = root
 local master = yes
 name resolve order = lmhosts hosts beast


[tmp]
 comment = /tmp
 path = /tmp
 browseable = yes
 public = yes
 writeable = no


[MyBackupDrive]
 comment = /mnt/discO_l
 path = /mnt/discO_l
 browseable = yes
 public = yes
 writeable = yes
There are a few notable items in the preceding configuration. We have commented out the line guest account = nobody, and replaced it with guest account = root. This allows remote Samba users to write files to the Samba shares. We are also sharing out /tmp, which is typically the JFFS2 writable partition. The backup drive, called MyBackupDrive, has the writable flag set, which means that with the current configuration, anyone can connect to this share and write files to the disk. There are many aspects of Samba security, and they go beyond the scope of this book. The preceding configuration is merely an example, so please take the time to properly secure your network and systems if you plan to use it. For an extra layer of security, consider configuring the device’s iptables firewall to limit which hosts on your network can access the Samba shares.
Next, we need to set Samba so that it starts automatically on boot:
# mv /etc/init.d/samba /etc/init.d/S75samba
The final step is to reboot the router and then connect to the share with any compatible Samba client, including the native clients in Windows and Mac OS X.
The easiest way to get extra storage on WRT54G series routers is to use the CIFS file system, which allows you to act as a CIFS client and mount Samba shares. This is an excellent way to get storage on WRT54G series routers that do not have a USB port. First, you need to install the CIFS kernel module and the cifsmount package, which will allow you to mount remote Samba or Windows Server Message Block (SMB) shares:
ipkg install cifsmount kmod-cifs
Once the installation has completed, you need to add CIFS file system support into the kernel with the following command:
# insmod cifs
Using /lib/modules/2.4.30/cifs.o
Next, you will create a directory to which to mount your remote file share:
# mkdir /mnt/smblog/
And finally, mount the remote share:
# mount.cifs //192.168.1.208/wrt54g /mnt/smblog
Password: <enter your password here>
To verify that the share was mounted successfully, issue the mount command. You should see a line that looks as follows:
//192.168.1.208/wrt54g on /mnt/smblog type cifs
(rw, mand, nodiratime, unc=\192.168.1.208wrt54g, username=root, domain=, rsize=4100, wsi
ze=4100)
Now that you can add local storage with USB and even mount remote file shares, let’s put together a backup strategy for your WRT54G. The following script will automate backing up the router’s firmware image (kernel, packages, and JFFS2 partition), in addition to the NVRAM partition which holds all of your settings:
#! /bin/sh


DATE='date +%m%d%Y'

HOSTNAME='nvram get wan_hostname'
BACKUP_FILE=$HOSTNAME.$DATE
SMBSHARE=/mnt/smblog


#
# Check for the existance of the SMB Share
# and that we can write to it
#
touch $SMBSHARE/.backup


if [ -f $SMBSHARE/.backup ]; then


        #
        # The following command will create a backup of the
        # firmware image (kernel, packages, and JFFS2)
        #
        dd if=/dev/mtdblock/l of=/$SMBSHARE/$BACKUP_FILE.trx


        if [ -s $SMBSHARE/$BACKUP_FILE.trx ]; then
                logger -s "Firmware Backed Up Successfully"
        else
                logger -s "Firmware backup did not complete"
        fi


        #
        # The following will backup the NVRAM parition
        #
        dd if=/dev/mtdblock/3 > /$SMBSHARE/$BACKUP_FILE.bin


        if [ -s $SMBSHARE/$BACKUP__FILE.bin ]; then
                logger -s "NVRAM Backed Up Successfully"
        else
                logger -s "NVRAM backup did not complete"
        fi


else

        logger -s "SMB Share $SMBSHARE not available. Exiting..."
        exit 1
fi
Note
You can download this file directly to the WRT54G by using the command wget http://www.wrt54ghacks.com/whiterussian/backup.sh and copying to the appropriate filename and location.
The preceding script requires that an SMB share be made available. However, you could easily modify the script to save the configuration to a USB share or, with slightly more modifications, use SSH to send your backups to any SSH server. Of course, no backup strategy is complete without the ability to restore your configuration. To restore the firmware and/or NVRAM partition, use the following commands:
# Restore NVRAM
dd if=/tmp/nvram-backup.bin of=/dev/mtdblock/3


# Restore Firmware
mount -o remount,ro /dev/mtdblock/4 /
mtd -r write /tmp/firmware-backup.trx linux
Replace the nvram-backup.bin and firmware-backup.trx files with the appropriate NVRAM and firmware backup files from the backup script shown earlier.
In this section, you learned how to take the default installation of OpenWrt and customize it to suit your needs, preparing it for further hacking. You locked it down by configuring security protocols and disabling the ones you do not need. More configuration settings were tweaked, such that your routers keep the right time and get backed up on a regular basis. You then learned how to create DNS and DHCP servers and Samba servers with your WRT54Gs as well.
X-Wrt is a full-featured, robust Web interface for OpenWrt. The project has greatly expanded upon the simple Web interface that comes with OpenWrt, and includes features such as QoS configuration, an interface for creating iptables firewall rules, easy updating via the Web interface, and more. X-Wrt is perfect for those just getting started with OpenWrt, primarily because, just as with OpenWrt, as you make changes in the GUI you can click the Review Changes link in the lower right-hand corner and see the equivalent command-line statements to all actions in the Web interface.
There are three ways to install X-Wrt:
Install it as a firmware upgrade, replacing the firmware you currently have installed.
Install it from the Web-based installer on the X-Wrt Web site.
Manually install the X-Wrt packages from the command line.
We will cover the third option, installing X-Wrt from the command line. You must have OpenWrt already installed to use this option (Whiterussian RC5, RC6, and 0.9 were supported at the time of this writing, with Kamikaze support on the way). To install the latest, versio, issue the following command:
# ipkg install http://ftp.berlios.de/pub/xwrt/webif_latest_stable.ipk
Downloading http://ftp.berlios.de/pub/xwrt/webif_latest_stable.ipk
Upgrading webif on root from 0.2-1 to 0.3-6...
Configuring webif
Downloading http://downloads.openwrt.org/backports/rc6/Packages
Updated list of available packages in /usr/lib/ipkg/lists/rc6-backports
Downloading http://download2.berlios.de/pub/xwrt/packages/Packages
Updated list of available packages in /usr/lib/ipkg/lists/X-Wrt
Downloading http://downloads.openwrt.org/whiterussian/packages/Packages
Updated list of available packages in /usr/lib/ipkg/lists/whiterussian
Downloading http://downloads.openwrt.org/whiterussian/packages/non-free/Packages
Updated list of available packages in /usr/lib/ipkg/lists/non-free
Downloading http://downloads.openwrt.org/backports/0.9/Packages
Updated list of available packages in /usr/lib/ipkg/lists/backports
Successfully terminated.
Device: Linksys WRT54G/GS/GL
Committing new device id ...
Committing new firmware id ...
SUCCESS! Webif^2 installation appears OK. Welcome to X-Wrt!
You may need to do a hard REFRESH to clear old CSS style from your browser.
Reinitializing httpd ...
I'm sorry, but I must reboot your router. This is a ONE time thing and
 future upgrades of the webif will NOT require a reboot.
Please wait about one minute for your router to reboot ...
Successfully terminated.
Your router will then reboot, allowing you to browse to the router’s default Web page to begin using X-Wrt, as shown in Figure 3.2.
As you can see, X-Wrt closely resembles the OpenWrt Web interface, except you have far more options and configuration screens to choose from. For example, changing VLANs is very easy. Go to Network | VLAN. You will see the screen depicted in Figure 3.3.
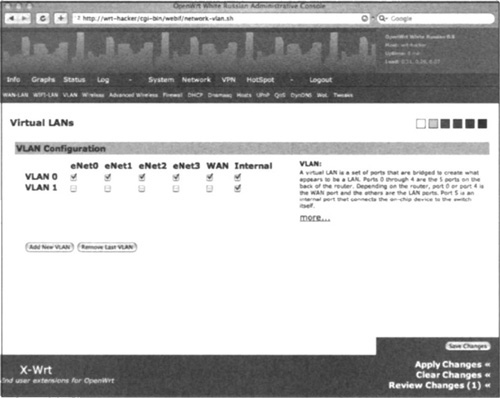
Now, switching the WAN port to be on the LAN VLAN is as easy as unchecking the box in the WAN column in the VLAN 1 row, and checking the box in the WAN column in the VLAN 0 row. Once you’ve done that, you can click Save Changes, and then Apply Changes.
X-Wrt is a very promising project that is certain to grow into a stable, easy-to-use platform that will enable many to take advantage of the OpenWrt firmware, without having to be a command-line expert.
Your primary interface to DD-WRT will be the Web interface. It allows you to configure many of the useful features offered by DD-WRT and is more enhanced than its OpenWrt counterpart. For this reason, many novice users will prefer DD-WRT. In addition to the Web interface, you can still use the command line to make changes; however, be certain to read the documentation as the command-line interface for DD-WRT is not as full-featured or well documented as the OpenWrt command line. We provide a few examples of DD-WRT configuration so that you can get a feel for the interface. This will enable you to configure other options by exploring the Web interface and DD-WRT documentation (located at www.dd-wrt.com).
Not only does DD-WRT allow you to change the transmit power of the radio, but it also offers the ability to graphically view and change these settings (see Figure 3.4).

The setting most users are typically interested in is about one-third of the way down, and labeled “Xmit Power”, which corresponds to the transmit power of the radio measured in milliwatts (mW).
You might be looking at the screen in Figure 3.4 and wondering what Afterburner is. No, we are not talking about the video game, but about wireless chipset manufacturers attempt to get more throughput using 802.1 lg. Broadcom’s attempt was marketed to device manufacturers as “Afterburner” and rebranded by Linksys as “SpeedBooster”. It uses a combination of reduced signal overhead and combining packets to provide more throughput. Of course, this does nothing to improve distance and the client card must also support this technology to see any performance improvements (in fact, using it with cards that do not support it can decrease performance!). Linksys originally intended that the WRT54GS models would only support SpeedBooster; however, third-party firmware can enable this on even WRT54G models because the same chipsets are used. See www.dd-wrt.com/wiki/index.php/Afterburner for more information.
DD-WRT, by default, comes with the SQUASHFS file system enabled, so, unlike old versions of OpenWRT, you do not have to choose a file system at installation time. You can enable the writable JFFS2 file system by going to the command line and changing the NVRAM variables. You can get to the command line on DD-WRT by using Telnet. Later, we will show you how to enable SSH. To enable JFFS2, do the following:
# nvram set jffs_mounted=l
# nvram set enable_jffs2=l
# nvram set sys_enable_jffs2=l
# nvram set clean_jffs2=l
# nvram set sys_clean_jffs2 = l
# nvram commit
# reboot
DD-WRT provides a nice interface for changing VLANs on selected ports, and even creating new VLANs (see Figure 3.5).
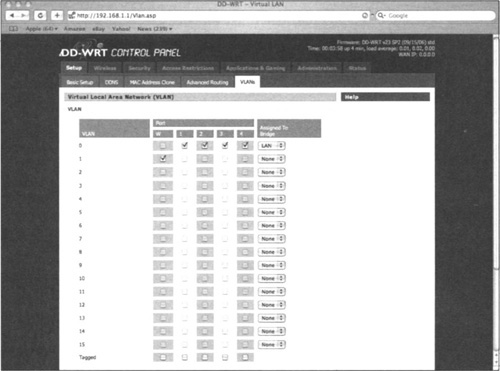
As you can see in Figure 3.5, the five ports on the WRT54G are represented in the column headings (LAN ports 1–4, and the “W” for the WAN port). Ports 1–4 are assigned to VLAN 0, and the WAN port is assigned to VLAN 1. By checking and unchecking the radio buttons, you can enable or disable selected ports, and change the VLAN assignment of each port.
Many distributions come with services enabled by default in order to provide a better user experience. However, usability and security are typically mutually exclusive, and one must trade usability for security. What follows is a guide to securing the default installations, sometimes called “hardening,” of both OpenWrt and DD-WRT. The services offered by both are identical. How you secure them is very different in each distribution.
The first step when trying to secure a network device is to execute a portscan of the device while it is on the network to see what services it is offering. Each service could potentially be a security risk, so your strategy is to enable only those services that you absolutely need. A great tool for discovering the services running on your WRT54G is Nmap (www.insecure.org/nmap). It runs on Linux, Windows, and Mac OS X and does a fantastic job of describing to which services are available on the WRT54G:
nologin@pdc:~# nmap -0 -sS -T4 -pl-65535 wrt-hacker


Starting Nmap 4.20 ( http://insecure.org ) at 2007-02-16 18:20 EST
Interesting ports on 192.168.1.85:
Not shown: 65531 closed ports
PORT  STATE SERVICE
22/tcp open  ssh
23/tcp open  telnet
53/tcp open domain
80/tcp open http
MAC Address: 00:18:F8:D8:09:20 (Cisco-Linksys)
Device type: broadband router
Running: Linksys embedded
OS details: Linksys WRT54GS v4 running OpenWrt w/Linux kernel 2.4.30
Network Distance: 1 hop


OS detection performed. Please report any incorrect results at
http://insecure.org/nmap/submit/.
Nmap finished: 1 IP address (1 host up) scanned in 35.242 seconds
The command nmap –O –sS –T4 –p t-65535 wrt-hacker attempts to connect to every Transmission Control Protocol (TCP) port on the WRT54G to determine whether it is listening. The switch –p 1-65535 denotes the ports that we want to test, and the -sS tells Nmap to try to determine which TCP ports are opened using a SYN scan. The –O switch provides us with operating system fingerprinting information. The –T4 tells Nmap to scan the device quickly using ”aggressive” timing.
Because you will be using SSH to log in to the router, you do not need Telnet, even though it is not configured to accept login requests, as shown here:
pdc:~ nologin$ telnet wrt-hacker
Trying 192.168.1.85 .. .
Connected to wrt-hacker
Escape character is '^]'.
Login failed.
Connection closed by foreign host.
The preceding code could still be an attack vector if an attacker were to uncover a remote buffer overflow in the Telnet service (besides, if you are using this in an environment that ever has succumbed to an IT audit, having Telnet enabled with not help you make friends with your local auditor). To disable it altogether, do the following:
# cd /etc/init.d
# mv S50telnet disabled_s50telnet
# chraod -x disabled_s50telnet
Now reboot your router and verify that Telnet is disabled by going to any other host command line and entering telnet <router-ip-address>. Enabling SSH is not required because it comes enabled by default once the router password is initially changed. The only SSH version provided by the OpenWrt SSH server is version 2.
As with Telnet, HTTP will transmit your usernames, passwords, and all data in clear text across the network. This means that anyone on the same subnet on either the client or the server networks could intercept the traffic and steal your credentials. Using packages from Backports, you can install an HTTPS-only Web server:
# ipkg install mini-httpd-openssl
Installing mini-httpd-openssl (1.19-1) to root...
Downloading http://downloads.openwrt.org/backports/O.9/mini-httpd-openssl_l.19-
l_mipsel.ipk
Installing libopenssl (0.9.8d-l) to root...
Downloading http://downloads.openwrt.org/whiterussian/packages/libopenssl_0.9.8d-
l_mipsel.ipk
Configuring libopenssl
Configuring mini-httpd-openssl
Successfully terminated.
The mini-httpd-openssl package works even if you have installed the advanced X-Wrt Web-based interface covered in this chapter. Verify that this works by going to https://<router-ip-address>. You will receive a certificate error upon visiting this Web site because the Web server uses a self-signed Secure Sockets Layer (SSL) local certificate.
Tip
To solve the problem of the certificate error you can make a secure connection to the device via SSH and extract the certificate from the cert.pem file:
   # cd /etc
   # cat miniJhttpd.pern
   ------BEGIN RSA PRIVATE KEY---
   <Private key removed from output>
   -----END RSA PRIVATE KEY----
   ----BEGIN CERTIFICATE----
MIICOTCCAaKgAwlBAglJANRuTbnzy80bMAOGCSqGSIb3DQEBBAUAMFMxCzAJBgNV
BAYTAkZSMQ4wDAYDVQQIEwVQYXJpczEOMAwGAWEBxMFUGFyaXMxEDAOBgNVBAoT
BO15IEhvbWUxEjAQBgNVBAMTCU15IFJvdXRlcjAeFwOwNTAxMTQwMjQzMjdaFwOw
NjAxMTQwMjQzMjdaMFMxCzAjBgNVBAYTAkZSMQ4wDAYDVQQIEwVQYXJpczEOMAwG
A1UEBxMFUGFyaXMxEDAQBgNV8AoT8015IEhvbWUxEjAOBgNVBAMTCUl5IFJvdXRl
cjCBnzANBgkqhkiG9wOBAQEFAAOBjQAwgYkCgYEAuaxSTkGpMDJhfWqFZwF2kCzj
j6GDhJNff5bPVWbdWan80Lk2xhhq4DCA3JQdJBzBb0m83olYzJ60nUEzXtYDkABr
R4R4qroKy6h/Zt8Kjnq23/2lq4YnPVOI/UWIgugczYHGFNULT59bA7WzDRQAeo8x
d1u+haRxKG4DLX6rccCAwEAAaMVMBMwEQYJYIZIAYMQgEBBAQDAgZAMA0GCSqG
Slb3DQEBBAUAA4GBAErl3QmcZVzjxKcoPTO3z8cRJV87SVFp0qbljbYCBDUWBlQY
/bMkQPr2zJyfJmUYLEs4iKgHrmlaUCMHy9NZKOg9ZxrW42BtQSQnOtDm3UifwzJW
oCFC3uPWfTYsZn/FrUXIErds+xXXT63VJzBe6DdXwHcdcdxzl05olyL9Jlzl
   -----END CERTIFICATE-----
A pern file consists of the private key (which has been removed for privacy and brevity) and the certificate information. Because you need only the certificate infor mation, copy the text starting with ------BEGIN CERTIFICATE------ all the way down to where it says ------END CERTIFICATE------. Now create a new file on whatever operating system you are using on your client system, and paste in the contents. Depending on which operating system you are using, the instructions for importing this new certificate will vary. Here are some resources to assist you with importing your new certificate and trusting it:
Once you have verified that it works, you can disable the HTTP Web server using the following commands:
# cd /etc/init.d
# mv S50httpd disabled_s50httpd
# chmod -x disabled_s50httpd
# mv mini_httpd SSOhttpd
# chmod +x S50httpd
Alternatively, you could skip the preceding step that installs mini-httpd-openssl and disable the Web interface entirely using the following commands:
# mv S50httpd disabled_s50httpd
# chmod -x disabled_s50httpd
# killall httpd
The first two commands will disable the startup script, and the killall httpd command stops the running HTTP server on the router. Now you can remove the packages that you no longer require:
ipkg remove haserl webif
which in JFFS2 and OpenWrt version 0.9 or later will actually free up some space on your JFFS2 partition. At this point, you should be able to reboot and browse to https://<router-ip-address>—for example, https://192.168.L85/.
If you have chosen not to use your WRT54G as a DNS or DHCP server, you can disable them both using the following commands:
# mv S60dnsmasq disabled_s60dnsmasq
# chmod -x disabled_s60dnsmasq
# reboot
These commands will tell the system not to start dnsmasq upon startup, disabling all of the DNS and DHCP server functionality (you will still be able to act as a DHCP client, using the udhcpc program).
When you are finished, it is crucial to verify the results:
pdc:~ root# nmap -o -sS -T4 -pl-65535 wrt-hacker


Starting Nmap 4.20 ( http://insecure.org ) at 2007-02-18 12:07 EST
Interesting ports on wrt-hacker (192.168.1.85):
Not shown: 65533 closed ports
PORT    STATE SERVICE
22/tcp open ssh
443/tcp open https
MAC Address: 00:18:F8:D8:09:20 (Cisco-Linksys)
Device type: broadband router
Running: Linksys embedded
OS details: Linksys WRT54GS v4 running OpenWrt w/Linux kernel 2.4.3 0
Network Distance: 1 hop


OS detection performed. Please report any incorrect results at
http://insecure.org/nmap/submit/.
Nmap finished: 1 IP address (1 host up) scanned in 104.279 seconds
Another way to check is to locally issue the netstat command:
# netstat -ant
Active Internet connections (servers and established)
Proto Recv-Q Send-Q Local Address           Foreign Address      State
tcp        0      0 0.0.0.0:22              0.0.0.0:*            LISTEN
tcp        0      0 0.0.0.0:443             0.0.0.0:*            LISTEN
The netstat command is great for listing the ports that are open and actively listening. The –a tells netstat to list all listening and nonlistening sockets, the -t will list only TCP ports, and the –n tells netstat not to attempt any DNS lookups.
This is the same exercise as before; however, we will apply the security settings in DD-WRT using the Web interface. When you Nmap a router running DD-WRT, the services available are identical to those that come enabled by default in OpenWrt, except for the SSH daemon and the OS fingerprinting results:
pdc:~ root# nmap -0 -sS -T4 -pl-65535 ddwrt


Starting Nmap 4.20 ( http://insecure.org) at 2007-02-18 12:26 EST
Interesting ports on ddwrt (192.168.1.35):
Not shown: 65532 closed ports
PORT   STATE SERVICE
23/tcp open  telnet
53/tcp open  domain
80/tcp open  http
MAC Address: 00:18:F8:D8:08:90 (Cisco-Linksys)
Device type: WAP|general purpose
Running: Linux 2.4.X
OS details: Linksys Linux 2.4.30 (X86), or Linksys WRT54G WAP running DD-WRT Linux
kernel 2.4.34-pre2
Uptime: 3.142 days (since Thu Feb 15 09:03:09 2007)
Network Distance: 1 hop


OS detection performed. Please report any incorrect results at
http://insecure.org/nmap/submit/.
Nmap finished: 1 IP address (1 host up) scanned in 46.838 seconds
Once you have completed the installation, you will want to enable the secure management protocols. By default, the access methods are Telnet and HTTP. What follows are instructions on how to enable SSH (the next section) and HTTPS to replace Telnet and HTTP, respectively.
To enable HTTPS in the Web interface go to Administration | Management | Web Access, and click the HTTPS checkbox, and unchcck the HTTP checkbox, as shown in Figure 3.6.

Go to the bottom of the page and click Save Settings. When the page comes back, click Reboot Router. After a minute, your router will come back and you will be able to browse to https://<router-ip-address>. You will get a certificate error when connecting because it uses an SSL self-signed local certificate. See the previous OpenWrt tip for instructions on extracting the certificate (in DD-WRT, the certificate is located in /etc/cert.pem).
The next step is to disable Telnet and enable SSH. To do so you will first enable SSH and test it, and then disable Telnet. This will allow you access to the router in case anything goes wrong with your SSH server when you enable it. To turn on the SSH server go to Administration | Services | Secure Shell and set SSHd to Enable, as shown in Figure 3.7.

You must click Save Settings and then Restart Router before your changes will take effect. At this point, using any SSH client, you should be able to SSH to your router, as shown in previous examples. Once verified, you can disable Telnet by going to the DD-WRT Web interface, navigating to Administration | Services | TELNET, and choosing Disable, as shown in Figure 3.8.

To disable both DNS and DHCP in DD-WRT, go to Administration | Services | DNSMasq and click Disable, as shown in Figure 3.9.

You must click Save Settings and then Restart Router before your changes will take effect. You can verify the results the same way you did with OpenWrt, using a combination of nmap and netstat.
You must keep security up-to-date. This means that each time you upgrade, you should follow the same steps as we outlined earlier, making certain that an upgrade did not enable any services that you do not need. However, how do you know whether your router needs an update? You could constantly monitor the Web site and look for updates; however, you could easily miss the announcement (and anyway, this is not terribly efficient). With the script that follows, your router will check for updated software nightly. If your packages are out-of-date, it will send you an e-mail telling you it’s time to update. We tested the following script with OpenWrt Whiterussian 0.9:
#!/bin/ash


HOSTNAME='nvram get wan_hostname'
EMAIL="[email protected]"
SMTP_RELAY=your.isp.relay.net


#
# Make sure we have mini-sendmail installed
#
if [ -z "$(ipkg list_installed | grep sendmail)" ]; then
        echo -e "ERROR: You must have the mini-sendmail package installed from
backports to use this script
"

        echo -e "Add backports to /etc/ipkg.conf, then ipkg install mini-sendmail

"
        echo -e "Reference: http://wiki.openwrt.org/rsync-usb-sambaHowTo
"
        exit 1
fi


logger "Updating Package Tree..."
ipkg update > /dev/null 2>&1


if [ ! -z "${ipkg -test upgrade | grep "Upgrading")" ]; then


        BODY='ipkg -test upgrade | grep "Upgrading"'
        SUBJECT="$HOSTNAME - Packages are out of date"


        # Send Email notification with a list of packages to be upgraded
        (echo "To: <${EMAIL}>"
        echo "From: <${HOSTNAME}> $HOSTNAME"
        echo "Subject: $SUBJECT"
        echo
        echo $BODY
        echo "<eom>"
        ) |  mini_sendmail -f"${HOSTNAME}" -s"${SMTP^RELAY}" $EMAIL
else
        logger "Packages are up-to-date"
fi
Note
You can download this file directly to the WRT54G using the command wget http://www.wrt54ghacks.com/whiterussian/update-alert.sh and copying to the appropriate filename and location.
Change the variables in the preceding script to suit your environment, which includes your local Simple Mail Transfer Protocol (SMTP) server and e-mail address that will receive the notifications. Make certain that you set this script to run on a cron job nightly, as follows, by typing:
crontab -e
and then adding the following lines:
# Check for package updates
30 3 * * * /mnt/update-alert.sh > /dev/null 2>&1
OpenWrt and DD-WRT are two of the firmware distributions which we will use as examples throughout this book, and they seem to be the most popular of all firmware distributions. OpenWrt’s primary interface is the command line; however, an ambitious project called X-Wrt is aimed at providing a full-featured Web interface. The DD-WRT primary management interface is its full-featured and easy-to-use Web server.
You can make many small configuration enhancements to improve the maintainability and usability of your firmware, which include Samba, USB, NTP, and using the SES button as a WiFi toggle.
Security is important to every network device, and WRT54G series routers are no exception. Following best practices standards is the desire approach. This means disabling services that are not in use or required, and using encrypted protocols in favor of clear-text protocols.
http://wiki.openwrt.org/DropbearPublicKeyAuthenticationHowto. OpenWrt Wiki entry that covers how to set up public key authentication, and includes detailed instructions on how to configure clients, such as putty, an SSH client for Windows.
www.linuxdevices.com/articles/AT4802795572.html. An animated BusyBox mini-tutorial that covers what BusyBox is, pros and cons, and how to customize your own instance.
www.dd-wrt.com/wiki/index.php/Ipkg. A tutorial on the ipkg command from the DD-WRT project, including alternative sources for packages, and other DD-WRT-specific configuration examples.
www.tcpdump.org/tcpdump_man.html. The complete tcpdump command reference (man page), which includes details on all tcpdump command-line switches. For example, to capture all packets in their entirety and disable service and name resolution, use tcpdump –X –sO –nn –i <interface>.
www.daleholley.com/linksys/linksys.htm. A WRT54G “cooling hack,” which details how one person modified a WRT54G, version 2.0, using PC chipset coolers and heat syncs. Use at your own risk!
http://thekelleys.org.uk/dnsmasq/doc.html. The main site for dnsmasq, including FAQs and command documentation in the form of an online man page.
http://matt.ucc.asn.au/dropbear/dropbear.html. The project home page for drop-bear, the SSH server used in many firmware distributions for the WRT54G, such as OpenWrt. It includes a complete list of other projects using dropbear.
www.bleedingsnort.com/blackhole-dns/. An excellent article from bleedingsnort.com that explains how to use DNS blackholes for malware prevention, including links to a few different DNS blackhole lists.
www.securityfocus.com/infocus/1806. A great article on SSH host keys, the security they provide, generating keys, and verifying the integrity of SSH host keys.
http://ntp.isc.org/bin/view/Servers/WebHome. General information about NTP servers, including a searchable list of public NTP servers.
| OpenWrt relies on the command-line interface to manipulate its settings. It uses a stripped-down Linux shell called BusyBox to provide a Linux/UNIX interface. Configuration data stored in NVRAM is easily changed using the nvram command. |
| Ipkg is a package management system similar to the Debian Linux “apt” project. It provides for package updates, easy software installation, and dependency handling. You can point ipkg at a few different package repositories, including backports, a collection of ported software not in the main OpenWrt package tree. |
| Using OpenWrt, you can customize your DNS and DHCP environments, including domain filtering and fixed address assignment by MAC address. |
| Adding USB support and/or configuring Samba will provide your router with access to more disk space. If you have disk space attached to the router itself, you can share this with the rest of your network using Samba too. |
| DD-WRT relies on the Web interface for configuration. It is one of the most complete Web interfaces, allowing you to change and configure all aspects of your WRT54G. |
| Changing VLANs and adjusting radio transmit power is easy in the various configuration screens. Changing the VLAN assignment of a port is as easy as manipulating checkboxes in the Web interface. |
| The command-line interface to DD-WRT is somewhat limited; however, for certain tasks (such as enabling the JFFS file system), you will need to use the command line. |
| The first step to securing your firmware is to use Nmap to detect the services available from the network (open ports). |
| Whenever possible, disable insecure plain-text management services such as HTTP and Telnet and replace them with their more secure, encrypted equivalents such as HTTPS and SSH. Disable any unused services that listen on a network interface. |
Disabling Telnet and HTTP in favor of SSH and HTTPS greatly improves the security of your router when managing it. Both firmware distributions, OpenWrt and DD-WRT, allow you to do this without too much trouble. | |
| If you are not using the DNS and DHCP server components, it’s best to turn them off. Not only will this help to secure the device, but it can improve performance as well. |
The following Frequently Asked Questions, answered by the authors of this book, are designed to both measure your understanding of the concepts presented in this chapter and to assist you with real-life implementation of these concepts. To have your questions about this chapter answered by the author, browse to www.syngress.com/solutions and click on the “Ask the Author” form.
How do I keep my software up-to-date once I flash my WRT54G with OpenWrt? | |
OpenWrt uses ipkg to keep everything up-to-date. Issuing ipkg update and then ipkg upgrade will bring you to the latest package level for that release. If you are upgrading releases (for example, Whiterussian RC5 to Whiterussian RC6), it is recommended that you reflash. | |
I’ve always used Telnet and HTTP to manage my WRT54G routers. Why should I change? | |
Your usernames and passwords could be sniffed it an attacker where to be on the client or server subnet, or any network between the client and the server. One method for doing this in a switched environment is through ARP cache poisoning to achieve a man-in-the-middle attack. Using secure protocols such as SSH and HTTPS helps to defend against these attacks. | |
I’ve made configuration changes and now my router will not boot. What do I do? | |
To reset your NVRAM configuration type mtd –r erase nvram. This will erase the NVRAM partition on the flash, causing the CFE to reset to defaults upon reboot. Use caution, as this does not work on all routers. | |
My ISP does not provide me with an NTP server. Where cna I find one? | |
http://ntp.isc.org/bin/view/Servers/WebHome contains a list of public NTP servers. To find the closest NTP server with the best response time, consider using the Linux/UNIX command ntp-sweep. | |
Which router do I need if I want to get USB support? | |
You will need a WRTSL54GS model router to gam support for USB. Additionally, the Asus WL-500G Premium has a very similar processor architecture and has two USB 2.0 ports. | |
What is the best way to provide additional storage on a WRT54G? | |
Samba, and specifically the CIFS file system, works well to mount remote Samba/Windows file shares to provide additional storage. | |
I really like OpenWrt, but I am not familiar with the command line and the GUI that comes by default is limited. What are my options? | |
X-Wrt, although still in beta, is an excellent choice for a Web interface until you can become comfortable with the command line. Each task you perform in the GUI is translated to the command-line equivalent and displayed to you on the screen while you are committing the changes. | |
How do I see how much space is left on the flash device? | |
Issuing the command df –h will list each mounted volume, the available disk space, the used disk space, and the total disk space for each in human-readable format. |