
Chapter 15. Concurrency with isolates
- Spawning new function isolates
- Passing messages between isolates
- Loading Dart code dynamically
- Using isolates for batch processing
Modern computer hardware provides more processing power than ever before, whether it’s in a server room serving thousands of requests per minute or in your pocket as a mobile phone or tablet. Rather than providing ever-increasing processor speeds, chip designers have achieved this improvement by adding more CPU cores. To take advantage of this greater processing power, web application design also needs to be able to scale out to use the additional CPU cores.
Earlier in this book, we discussed how Dart code runs in a single thread but can call out to asynchronous APIs, such as accessing the filesystem or external servers. In the browser, applications use async APIs to perform AJAX-type requests for data from the server. But your Dart code still runs in a single thread and will take advantage of only a single CPU core. This is a design constraint imposed by the goal to allow Dart to be converted to JavaScript, which is also single-threaded.
In this chapter we’ll look at isolates, which are Dart’s solution to taking single-threaded Dart code and allowing your application to make greater use of the hardware available. Isolates, as the name suggests, are isolated units of running code. The only way to send data between them is by passing messages, similar to the way you pass messages between the client and the server or from Dart to JavaScript. You’ll use isolates on the server to modify the Dart File Browser application from chapter 13 to use isolates to analyze the file list in the results.
Once we’ve explored the basic concept of isolates, you’ll see how you can use the isolate mechanism to load and run code dynamically. Loading code dynamically allows you to provide a plug-in type of mechanism, where your application can run third-party code without knowing what that code is in advance.
Finally, you’ll see how isolates can be used to create a number of workers to process a list of items concurrently. This is a powerful technique for creating applications that perform well and make full use of the underlying hardware.
Let’s get started with exploring isolates and starting a new isolate. Concurrent programming is an advanced topic, and although Dart’s isolate concept simplifies it somewhat, you need to come to grips with two new classes: ReceivePort and SendPort.
15.1. Using isolates as units of work
Back in chapter 13, you created a server-side script to list files and folders in the current directory. When you use the DirectoryLister() async function to retrieve the contents of the current directory, you hand control to the underlying operating system. In the same way, you can hand control from your Dart code to another piece of Dart code running asynchronously and use this to analyze the results, counting the types of files and file sizes for each type. You’ll write this code first as a straightforward single-isolate server-side script and then build on it to analyze the file list in multiple isolates. Figure 15.1 shows the structure of the Directory Analysis app, which retrieves a list of files, counts them, and totals the size.
Figure 15.1. Skeleton of the Directory Analysis code
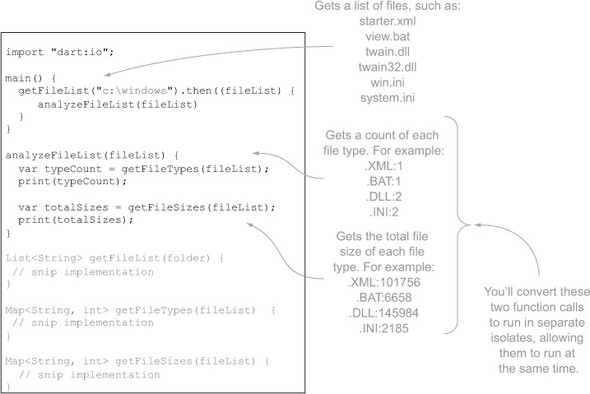
The two key functions are getFileTypes() and getFileSizes(). In the implementation shown previously, they run sequentially; you’ll use isolates to make them run at the same time.
15.1.1. Creating an isolate
You’ve seen isolates already. Every running Dart script or application is running in an isolate known as the default isolate. When a Dart application starts, the Dart VM spawns an isolate, passing in the script’s main() function as the entry-point function. main() begins the flow of single-threaded code in the isolate. The main() function is a top-level function and must return nothing and take no parameters.
In the same way that the Dart VM spawns an isolate, your Dart code can also spawn an isolate, passing in an entry-point function to it. As with main(), the isolate entry-point function must also be a top-level function, return nothing, and take no parameters. The function name can be any valid function name—main() is restricted to the default isolate.
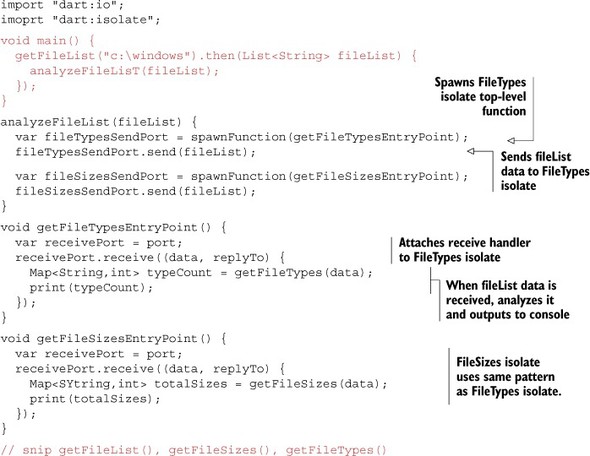
To spawn a new isolate with an entry-point function, you need to import the dart:isolate library and use the spawnFunction() function, passing in the entry-point function name. Listing 15.1 shows a modified version of the analyzeFileList() function, which modifies your Directory Analysis script to get the file types and file sizes in two new isolates (FileTypes and FileSizes) by using spawnFunction(). The script doesn’t do anything useful yet: it creates two new isolates that print a message and exit immediately, the isolate equivalent of printing “hello world.”
Note
If you run this code, you might be surprised that the FileSizes isolate print statement never completes. The default isolate (running the main() function) exits first, and program execution halts without waiting for the spawned isolate to complete. For the example only, a time-wasting for loop is included at the end of main(); you’ll remove it later.
Listing 15.1. directoryAnalysis.dart

spawnFunction() starts a new isolate. The underlying VM is responsible for creating a new thread for the code to run in, and as you’ll see, this new thread doesn’t share any state with the thread that spawned it.
It’s important to understand this. Although the code exists in the same single physical source file, there are now three execution contexts, each with its own memory, objects, and state. You can prove this by adding a top-level property to the library and modifying its value in each of the three isolates, as shown in figure 15.2.
Figure 15.2. Adding a top-level property IsolateName, which is different in each isolate

Each of the three isolates get a new memory context, separate from the other. In this respect, it’s conceptually similar to the way Dart and JavaScript code executes separately or the code on the client and server executes separately.
Now that you can start new isolates, you need to make them do some work. That means passing data into them, such as your list of files. You’ll also see how to keep the default isolate running (rather than adding a temporary for loop) so the other isolates can fully complete.
15.1.2. One-way isolate communication
Each Dart isolate runs in a separate execution context. This means isolates have no shared memory. The default isolate stores the list of files in the fileList variable. In order to make that file list available to the other isolates, the default isolate must send it as a message to the other isolates, like sending a message from a client to a server or from Dart to JavaScript.
But isolates are more flexible than sending a message from client to server or Dart to JavaScript. Instead of needing to convert a message to a JSON string, you can pass any types you’d otherwise be able to convert to JSON. Table 15.1 lists the valid types you can send to another isolate.
Table 15.1. Valid types to send between isolates
|
Types |
Classes |
Notes |
|---|---|---|
| Primitive types | null, num, bool, double, String | Although these are object instances, they’re treated as primitives for the purpose of copying between isolates. |
| Collection types | List, Map | Can contain any valid primitive or collection type, including other lists and maps. |
Sending Messages to Another Isolate
When you spawn an isolate, the spawn function returns a SendPort instance, which provides a send() function to send data to that isolate:
SendPort fileTypesSendPort = spawnFunction(getFileTypesEntryPoint);
var message = "Hello FileTypes Isolate from the Default isolate"
fileTypesSendPort.send(message);
This is simple enough so far, but the code doesn’t work yet. The receiving FileTypes isolate must be able to receive data, and it could receive data from multiple other isolates.
Receiving Data From Another Isolate
Each isolate receives messages via a listener callback function attached to a ReceivePort instance. Every isolate, including the default isolate, has a ReceivePort, which you access through the top-level port property. The port property, which comes from the dart:isolate library, is like the IsolateName property you created earlier in that each isolate has its own independent instance of port, separate from the other.
When you access the port property, you’re accessing that isolate’s ReceivePort instance, of which there’s only one in that isolate. This means you’ll use the port.receive (callback) handler to handle messages being sent into the isolate from some other isolate. This works for both the default isolate and spawned isolates, such as the FileTypes isolate and the FileSizes isolate, as shown in figure 15.3. The receive callback takes two parameters: data, which is one of the valid inter-isolate data types, and replyTo, which is a SendPort. We’ll look more at the replyTo parameter in a couple of pages.
Figure 15.3. The port.receive() handler attaches a callback function to the current isolate.

When the default isolate sends data to the FileTypes isolate, the FileTypes isolate receives the message and can act on it. The following listing shows a cut-down version of the server-side script so far, with the FileTypes isolate receiving data in the form of a "hello world" type message from the default isolate.
Listing 15.2. FileTypes isolate receiving data from the default isolate

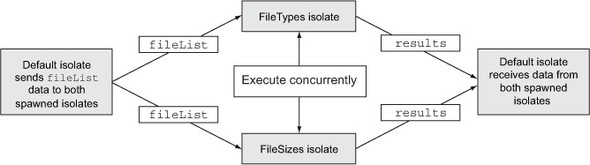
The sendPort.send() function lets you send data from the default isolate to the FileTypes isolate. You’re now in a position to modify your application to perform the analysis of a file list. You can rewrite the app to send the file list from the default isolate to the FileTypes and FileSizes isolates. The flow of execution is shown in figure 15.4.
Figure 15.4. Default isolate sending data to other isolates

Listing 15.3 performs the file analysis in your two separate isolates by sending the file list data to both isolates where the file analysis code runs. Each isolate is responsible for printing the output to the console.
Listing 15.3. Performing the file type and file size analyses in separate isolates
This code still has a problem, though: the default isolate doesn’t wait for the other isolates to finish. Ideally, you’d start the file analysis in the FileTypes and FileSizes isolates, and then the default isolate would wait for them to finish. You’ll deal with this next and look at the replyTo parameter, which provides a mechanism for two-way isolate communication.
15.1.3. Two-way isolate communication
You’ve seen how to send data into an isolate, but one-way data transfer isn’t as useful as sending data back and forth between isolates. The next step is to have the default isolate wait for the FileTypes and FileSizes isolates to return the processed file information back to the default isolate, as shown in figure 15.5.
Figure 15.5. Default isolate waiting for the result data to be returned from the spawned isolates
In the modified script, when the default isolate receives the results, it prints them to the console. This also means that because the default isolate is waiting for results, it doesn’t exit immediately.
Using a Sendport to Send Data to an Isolate, Revisited
In order for the FileTypes isolate to return data to the default isolate, the FileTypes isolate needs the default isolate’s SendPort. A SendPort, remember, is used to send() data into an isolate, and this includes sending data into the default isolate. This relationship between SendPort, ReceivePort, and the isolates is shown in figure 15.6.
Figure 15.6. A receiving isolate has a single ReceivePort but multiple SendPorts.
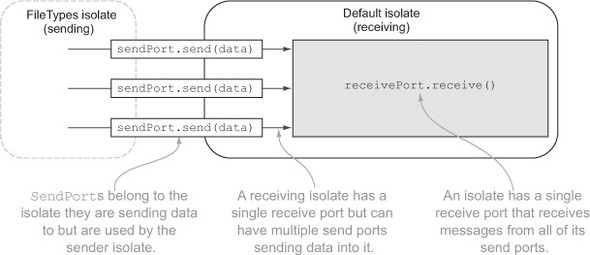
One isolate can send data to another isolate with a SendPort. You saw that earlier when you used spawnFunction() to get the SendPort of a new FileTypes isolate. But how does the FileTypes isolate get the default isolate’s SendPort so it can return data?
Using Sendport as a Replyto Argument
This is where the replyTo argument of the receive callback function comes in. The send() function has an optional replyTo parameter, allowing the sending isolate to pass its own SendPort to the receiving isolate.
The sending isolate gets its own SendPort instance by using a function on its own ReceivePort. The sending isolate uses the top-level port property to call port.toSendPort() to get a SendPort it can pass to another isolate, as in the following snippet:

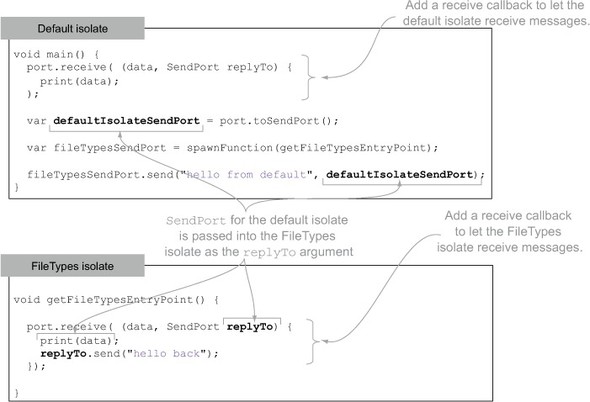
Once an isolate has an instance of its own SendPort, it can pass it into the send(data, replyTo) function of the receiving SendPort. Figure 15.7 shows a simplified version of the Directory Analysis script in which the default isolate sends a “hello world” message to the FileTypes isolate, and the FileTypes isolate sends a “hello back” message back to the default isolate.
Figure 15.7. The SendPort from one isolate is passed into another isolate as the replyTo argument.
Sending and Receiving Data Between Isolates
Now that you have a way to send data back to the calling isolate, you can modify your Directory Analysis application to let the default isolate wait for results from the FileTypes and FileSizes isolates. The next listing shows this in action.
Listing 15.4. FileTypes and FileSizes isolates send results to the default isolate.

The default isolate is now responsible for printing the results from the FileTypes and FileSizes isolates. The default isolate no longer exits immediately; instead, it waits to receive messages from other isolates via its receive callback handler. This means you have a new problem. Instead of the application exiting too early, it waits indefinitely for messages to be passed to it from other isolates. You need a way to let the default isolate know that it has received all the data it’s waiting for.
Closing a Receiveport
Fortunately, you can use a ReceivePort’s close() function to close an isolate’s communication port. When you call close() on a ReceivePort, any messages that are in the process of being sent are lost, and the ReceivePort doesn’t receive any more messages. If this is the default isolate ReceivePort, the default isolate continues execution without waiting for any more messages.
Because your Directory Analysis script is waiting for two sets of results to be returned, you can add a simple counter to the default receive handler. When two sets of results have been received, you can close the ReceivePort, as shown in the following listing.
Listing 15.5. Closing a ReceivePort when all data is received

The Directory Analysis application now runs processes concurrently, using isolated execution units of code and passing messages back and forth between them. Each top-level isolate entry-point function shares the same function signature as the default isolate’s main() function (returns void and takes no parameters). You’ll use this feature in the next section when you split the Directory Analysis application into separate code files that are dynamically loaded from the default isolate.
- Every isolate has access to a top-level port property, which is its ReceivePort instance.
- SendPort spawnFunction(entryPointFunction) creates a new isolate and returns a SendPort for sending data into the new isolate.
- You can send data to an isolate by using the receiving isolate’s sendPort.send() function.
- An isolate can access its own SendPort by calling port.toSendPort().
15.2. Loading code dynamically
The Directory Analysis application currently provides two analysis functions that count the file types and count the file sizes. By opening your application to let users extend it with plug-ins, the application will become useful without users having to edit any of the app’s code.
You’ll modify the application to dynamically load source files that are passed on the command line. Each source file will be responsible for analyzing a file list and returning the results to the main application. This is similar to the Directory Analysis application you already have, except the user will be able to provide a list of source files to analyze, rather than you specifying them up front in the source code. Figure 15.8 shows how the dynamically loading Directory Analysis application will work.
Figure 15.8. The Directory Analysis application will load a list of source files dynamically to analyze the list.

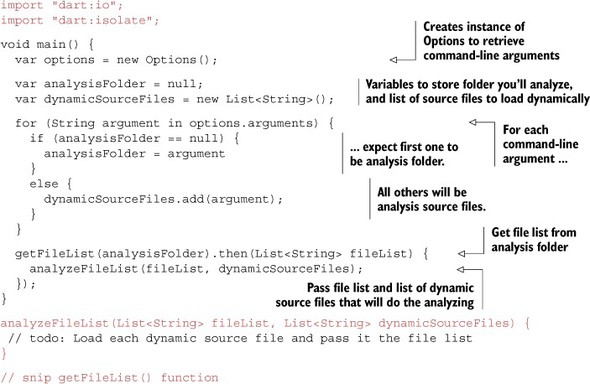
To achieve this flow, you need to modify the entry-point application file DirAnalysis .dart to read command-line parameters. You’ll use the Options class you saw back in chapter 13, which provides the list of arguments passed to the Dart application on the command line. The first parameter will be the folder to analyze, followed by a list of source files, each of which is loaded and used to analyze the file list. The following listing shows the boilerplate main() function in the entry-point DirAnalysis.dart that you’ll use to populate the fileList and dynamicSourceFiles list variables.
Listing 15.6. DirAnalysis.dart: reading the command-line arguments
15.2.1. Spawning an isolate from a filename
Now you have a fileList variable, which, for example, could contain a list of filenames in the c:windows folder, and a dynamicSourceFiles list, which could contain the filenames fileSize.dart and fileTypes.dart. Each of the dynamic source files, which the running application doesn’t know about in advance, must be loaded into an isolate and have some data passed into it. This is similar to the spawnFunction() function, except that to dynamically load code from an external file, you use the spawnUri() function, passing in a URI or filename to load, such as spawnUri("fileTypes.dart");.
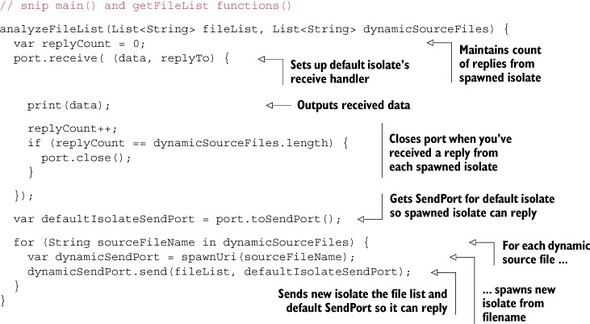
You can update the analyzeFileList() function to iterate through the list of dynamic source files, spawning an isolate from each one in turn and passing the fileList data into it. The default isolate (the DirAnalysis.dart application) will wait until it has received the same number of replies as there are source files before closing its port. The next listing shows the new analyzeFileList() function to perform this task.
Listing 15.7. DirAnalysis.dart: using spawnUri() to load a source file dynamically
You’ve seen how to load source files such as fileTypes.dart and fileSizes.dart dynamically and send them data. Next, let’s see what these dynamic source files look like.
15.2.2. Defining a dynamic source file
When you load a Dart application, it has main(), which returns void and takes no parameters. This is the entry-point function for the main isolate. When you load an isolate dynamically from a source file, main() is also the entry-point function that begins executing in a new isolate. This means any source files that are loaded dynamically need to define a main() function, the same as a Dart script. This makes sense, because each Dart script runs in its own isolate, including the default isolate; internally, the default isolate and dynamically loaded isolate use the same mechanism. Figure 15.9 shows the outline of the default isolate and the dynamic source files.
Figure 15.9. Dynamically loaded source files need a main() function that begins executing when loaded.

In the main() function of the dynamically loaded source file, you can attach a receive listener to the isolate’s ReceivePort, accessible via the top-level port property, as you did when you started the isolate from a function with spawnFunction(). The following listing shows the main() function in fileTypes.dart; it receives file list data from the default isolate, analyzes it, and returns the data to the default isolate.
Listing 15.8. Adding the receive handler to the isolate

You’ve provided a model for third-party users to provide their own file-analysis code, and the Directory Analysis application can use that third-party code without needing to modify the core application. The fileSizes.dart file is a second analysis source file, and users can provide their own analysis files, perhaps to return the average file size for each file type.
By using dynamic code-loading in isolates, you have a safe way to use code from a third party without needing to be concerned with shared internal state or external code directly accessing values without your application. By providing a message-passing mechanism, Dart isolates allow safe communication between different code bases with a concurrency model that’s simpler than the multithreaded shared-state concurrency found in C# and Java.
- spawnFunction() dynamically loads a Dart source file into a new isolate.
- Dynamically loaded Dart code needs to provide a main() function, which begins executing in the new isolate.
In the next section, we’ll take a deeper look at isolates and explore how you can create multiple, identical isolates to distribute a single task among multiple worker isolates.
15.3. Spawning multiple workers
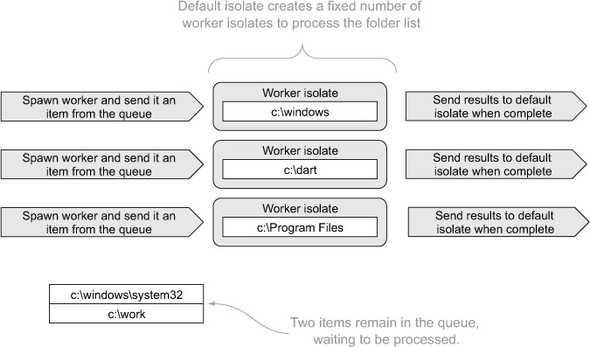
Often, a server-side process has a batch of work to perform. The Directory Analysis application currently counts the types of each file type in a single folder, one level deep. Isolates, which run concurrently, are also ideal for batch-processing tasks such as processing a list of folders. Each folder in the list is independent of the other; the default isolate is interested in getting it analyzed as fast as possible. This is where worker isolates come in. By starting up a number of background worker tasks, you can process a list of items, passing a new item into each isolate when it finishes processing the last. Figure 15.10 shows the list of folders you’ll process.
Figure 15.10. You have a list of work that can be processed concurrently.

This is a small list of work, but you can imagine that you might have many hundreds of folders to analyze. You couldn’t create a new worker for each item in the list—your computer would quickly run out of resources. Instead, you’ll create a small, fixed number of worker isolates and pass them a single work item each. The Directory Analysis script will create three isolates.
Tip
Some tuning is normally required to find the sweet spot for best performance and resource utilization. Too many isolates, and you’ll quickly run out of memory, and the CPUs will spend as much time switching between isolates as they do running them. Too few isolates, and you could be missing out on a performance boost. Starting with the number of available cores on your machine is usually a good rule of thumb.
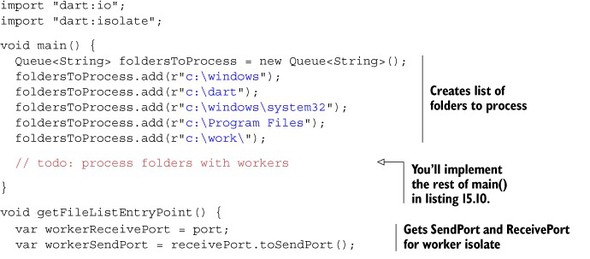
Listing 15.9 shows the starting point for your batch Directory Analysis application, which has a new getFileListEntryPoint() function that’s used as a worker isolate. The getFileListEntryPoint() function will receive the folder name to process as its message data. It retrieves the file list and passes it to an analysis function to count the types of files and return the results. When it returns the results, it also returns its own SendPort, which the default isolate will eventually use to send the next folder to process back to the worker.
Listing 15.9. batchDirAnalysis.dart: starting point for the batch application

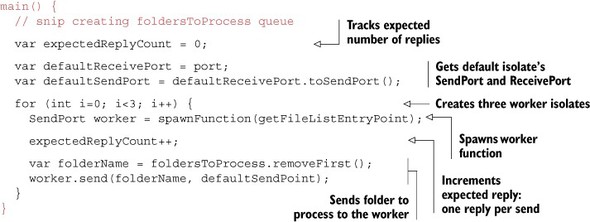
In the default isolate, you need to start a fixed number of worker isolates and send each an item of work to process—in this case, a folder from the queue of folders waiting to be processed is the item of work. Once all the worker isolates have work to complete, the default isolate waits for them to return their work, as shown in figure 15.11.
Figure 15.11. The application spawns a fixed number of workers and sends each a folder to process.
Listing 15.10 shows spawnFunction() in action, passing three worker isolates an initial data item. Note that you never store a list of all the worker isolates—spawning them and passing data is enough, because each worker isolate returns its own SendPort when it returns its results. Each time you send a folder name to a worker isolate, you expect a reply from it, so you also track the number of expected replies. Once the count of replies matches the number of expected replies, you’ll close the default isolate ReceivePort and allow the application to exit.
Listing 15.10. Spawning worker isolates and passing initial data items
Now you have three isolates processing a folder each. The final step is to let your default isolate receive data from each of the three worker isolates and pass each worker isolate its next work item if there’s still work waiting to be performed. This is why the worker returns its own SendPort in the replyTo argument: so the default isolate can pass more data into it. Figure 15.12 shows this final sequence of events.
Figure 15.12. The default isolate receives results and sends more work back to the worker isolates.
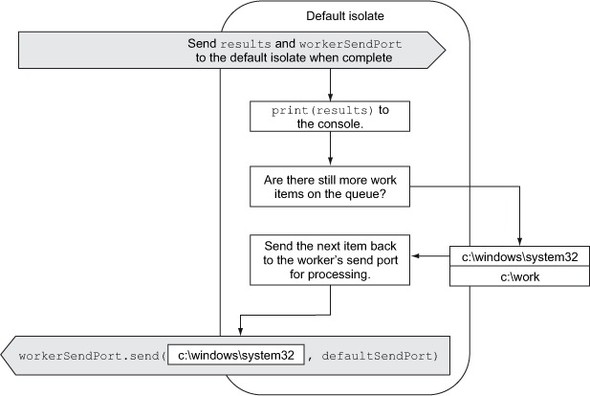
This loop of the worker returning results and the default isolate sending the next work item continues for all the worker isolates while there’s still work on the queue. Because the code in a single isolate only runs in a single thread, you don’t need to be concerned with locking access to the queue of work items as you’d do in Java or C#. When the default isolate checks the folder queue and removes an item, no other thread or process has access to the list. This is one of the key benefits of message-passing between isolates: it provides a protected environment for your code to run in, with no other code able to access and modify memory locations that might cause concurrency bugs.
Listing 15.11 puts this last step into action by adding the default isolate’s receive() callback handler to send more data into the worker while there’s still data available. When expectedReplyCount matches actualReplyCount, you’ve received all the replies; the application stops waiting for more replies by calling defaultReceivePort.close().
Listing 15.11. Implementing the default isolate receive() function


The application will now keep passing work to the workers while there are still folders to process. In the previous batch direct analysis example, you use a predefined queue, but the previous pattern also works when items are still being added to the queue. Imagine a scenario where each top-level folder that’s analyzed returns a list of child folders along with the file-count data, so more folders are added to the back of the queue at the same time other workers are removing items from the front of the queue.
Tip
Although an isolate may be expected to return, it may in fact never return due to some internal condition in the isolate. For this reason, your applications should ensure that they can cope with this scenario.
- The worker isolate can return its own SendPort to the default isolate when it wants more work.
- The list of work items in the default isolate isn’t directly accessible by worker isolates.
- Each isolate has access to only its own memory locations, so you don’t need to synchronize or lock data when accessing the isolate.
15.4. Summary
Isolates, with their separate memory model and message passing, provide a way to achieve concurrency in Dart that’s simpler to implement than in Java and C#, because you have only a single thread accessing a memory location at any one time. By spawning isolates to perform multiple different tasks at once, you can use modern hardware to complete work more quickly. And by creating worker isolates, you can distribute the processing of batch tasks across multiple workers in a memory-safe way.
Isolates are spawned as top-level functions from within your code, or by using spawnFunction(), or by dynamically loading a Dart source file with spawnUri(). Spawning an isolate dynamically from a source file allows you to create a plug-in model to let users of your application provide their own code, which runs as part of your application but about which your app has no prior knowledge. This is a powerful technique for creating extendible, customizable applications for your users to install and use.
You’ve reached the end of the book. Dart is a fast-moving language, which means you’ll have more to learn as the language evolves, but you now know enough to understand the core concepts in the Dart language. Congratulate yourself, and build great applications—and make sure you tell everyone that they’re built with Dart.