
Chapter 2. Developing a simple RESTful microservice
- Introducing the Cayambe monolith
- Developing a simple RESTful application
- Packaging your simple RESTful application as a microservice
- Understanding development with Enterprise Java for microservices
This chapter will introduce you to the Cayambe monolith. The Cayambe monolith will assist as we develop Enterprise Java microservices throughout the book, with each microservice becoming a part of a new Hybrid monolith in chapter 10.
2.1. Cayambe monolith
Cayambe is an e-commerce application that hasn’t been maintained for the last 15 years and needs serious modernization. It’s easy to see from the homepage in figure 2.1 that it doesn’t quite have the same look as modern websites do today.
Figure 2.1. Cayambe homepage

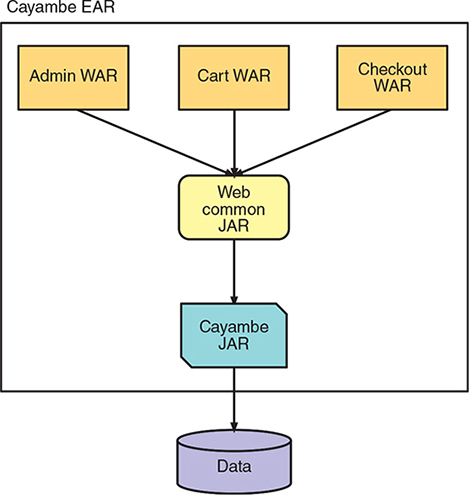
As you can see in figure 2.2, Cayambe is an EAR deployment that consists of three WARs, a common JAR for the UIs, and a JAR containing the EJBs (Enterprise Java-Beans) and DAOs (data access objects) for interacting with the database.
Figure 2.2. Cayambe monolith architecture
Throughout the book, you’ll work toward moving Cayambe to a series of deployments, as represented in figure 2.3. Chapter 10 outlines additional details of Cayambe; in that chapter, you’ll integrate the monolith with the microservices you develop over the coming chapters.
Figure 2.3. Cayambe future architecture

2.2. New administration site
As part of modernizing Cayambe, you’ll split out the administration of the site, enabling the customer aspects of the site to be scaled without also scaling the administration aspects.
The first tasks are to develop a JAX-RS RESTful microservice to provide the necessary administration endpoints, and to develop a new UI for it by using ReactJS. For those already familiar with JAX-RS, you’ll see some repetition of prior knowledge.
Figure 2.4 is the current administration interface for Cayambe. Viewing or updating categories in the UI isn’t possible except for the main category Transportation. This is far from an ideal situation, so you’ll begin by developing a new administration site and microservice to handle managing the product categories.
Figure 2.4. Old Cayambe administration interface

Figure 2.5 shows the new administration interface with ReactJS, along with the category data displayed as a tree.
Figure 2.5. New Cayambe administration interface

Figure 2.6 shows where the RESTful microservice you’re developing in this chapter will fit into the new Cayambe architecture when you’re finished with the book.
Let’s dive into creating the RESTful microservice you need in order to enable the new interface to work.
Figure 2.6. Cayambe administration microservice and UI

2.2.1. Use cases
For this chapter, you’ll focus on developing the category management parts of the administration, but you’ll want to migrate the other aspects from the previous administration site at some point as well. Doing so simplifies what you’re learning to a single problem domain instead of many, focusing on the code required to make category management possible.
As part of category management, you need to support Create, Read, Update, and Delete (CRUD) operations on the categories. This process certainly isn’t the most interesting part of developing RESTful endpoints, but most services will need some type of CRUD at their core.
The UI will call the CRUD operations on the microservice for maintaining categories. The microservice RESTful endpoints could be called from any client, but you’ll show them operating with your UI. Figure 2.7 details the states and transitions between them for managing the categories within the UI.
Figure 2.7. Category management state flow

2.2.2. Architecture of the application
Ignoring microservices for now, the architecture for your application will look something like figure 2.8. At the presentation layer, you use ReactJS for the UI, though we won’t be covering the development of the UI as part of this chapter. The API layer contains the RESTful endpoints using JAX-RS for the category. Finally, you have JPA entities of the category in your data layer that interacts with the physical database. The API layer is responsible for interacting with the data layer to persist record updates.
Figure 2.8. Category management architecture

You could’ve separated the API layer and used services within a business layer on top of the data layer, but I chose to simplify it by removing an unnecessary layer. Typically, all these layers would be packaged within a single WAR for deployment to an application server.
How does the architecture change when you shift to constructing a microservice? See figure 2.9.
Figure 2.9. Category management microservice architecture

Here you can see that your server-side layers are encompassed in a single microservice. Your UI then sits in its own WAR to package and deploy the UI to a separate runtime. The application architecture is now split into separate deployable pieces: the UI, a microservice, and a database.
Note
On this occasion, you choose to package the UI as a WAR, but because it’s solely HTML/CSS/JS, you could’ve used any means for packaging and deploying static sites.
Because you’ve split your UI and services into separate runtimes, you need to add support for cross-origin resource sharing (CORS). If you don’t, the browser will prevent the UI from making an HTTP request to the microservice. To do that, your microservice needs a filter.
Listing 2.1. CORSFilter
@Provider
public class CORSFilter implements ContainerResponseFilter {

  @Override
  public void filter(ContainerRequestContext requestContext,
        ContainerResponseContext responseContext) throws IOException {
    responseContext.getHeaders().add("Access-Control-Allow-Origin", "*");
    responseContext.getHeaders()
      .add("Access-Control-Allow-Headers", "origin, content-type, accept,
authorization");
    responseContext.getHeaders().add("Access-Control-Allow-Credentials",
"true");
    responseContext.getHeaders()
      .add("Access-Control-Allow-Methods", "GET, POST, PUT, DELETE, OPTIONS,
HEAD");
    responseContext.getHeaders().add("Access-Control-Max-Age", "1209600");
  }
}
authorization");
responseContext.getHeaders().add("Access-Control-Allow-Credentials",
"true");
responseContext.getHeaders()
.add("Access-Control-Allow-Methods", "GET, POST, PUT, DELETE, OPTIONS,
HEAD");
responseContext.getHeaders().add("Access-Control-Max-Age", "1209600");
}
}
Tip
Keep in mind where a UI retrieves data from, and whether CORS needs to be taken into account. Not doing so can easily lead to frustrating UI bugs when RESTful calls fail for seemingly no reason. On the flip side, if your UI is using an API gateway to interact with microservices, the API gateway could offer configuration to handle CORS directly as opposed to in a microservice.
2.2.3. Creating RESTful endpoints with JAX-RS
To keep the microservice simple, you’ll focus on the RESTful endpoint, the API layer, and ignore the development of the JPA entities you need for the database. You’ll assume that another kind developer has already written them for you! Rest assured that this kind developer has made them available in the project code.
In addition to the JPA entities, the developer has provided a convenient load.sql file containing initial categories that will be used on startup to populate the database.
Figure 2.10 shows what you’ll be developing in this section. The code for this section can be found in the /chapter2/admin directory of the book’s example code.
Figure 2.10. Category management—API layer

In this section, you’ll develop CategoryResource. Your CategoryResource will focus on making the CRUD-style operations for category data available from RESTful endpoints. It specifies that the RESTful @Path for the controller is /category. You define EntityManager to be injected with CDI, which then provides a way to perform operations on the database.
Note
Though many would argue CRUD isn’t appropriate for RESTful services, it’s often used that way by developers as a means of bolting RESTful onto existing CRUD. Many levels of REST also are defined by Leonard Richardson in the Richardson Maturity Model. Hypermedia as the Engine of Application State (HATEOAS) is the most complex and difficult level within the model. The examples in this book don’t conform to the HATEOAS level of REST, mostly because it’s not what many enterprise developers are familiar with in their regular work. Take a look at http://mng.bz/vMPk and https://restfulapi.net/richardson-maturity-model/ for further information on the maturity model.
By default, all JAX-RS resource instances are active only on a per-request basis. If you don’t change that, every request will spend time creating the necessary EntityManager instance to be injected. That doesn’t have a huge performance impact, but if you can avoid it, you should. To avoid the re-creation of EntityManager, you need to mark it as @ApplicationScoped. This tells the runtime that you want CategoryResource to have its lifecycle managed by CDI, and not by JAX-RS. You need to define a JAX-RS application class to define the root path for your microservice.
Listing 2.2. AdminApplication
@ApplicationPath("/admin")                             1
public class AdminApplication extends Application {
}
- 1 Defines the RESTful URL for the root of the application
That’s all you need to do for this class. Because you’re asking CDI to manage the lifecycle of CategoryResource, you don’t need to configure any singletons within JAX-RS. Now it’s time to develop the RESTful endpoints you need for CRUD operations of your categories.
Viewing all categories
The main screen for your application is a tree of categories. Populating the list on the screen requires a RESTful endpoint to retrieve all the categories from the database.
Listing 2.3. @GET on CategoryResource
@Path("/")
public class CategoryResource {

    @PersistenceContext(unitName = "AdminPU")            1
    private EntityManager em;

    @GET                                                 2
    @Path("/categorytree")                               3
    @Produces(MediaType.APPLICATION_JSON)                4
    public CategoryTree tree() throws Exception {        5
        return em.find(CategoryTree.class, 1);           6
    }

    ...
}
- 1 Specifies the particular persistence unit, AdminPU, that you want an EntityManager for
- 2 @GET indicates that the method will accept only HTTP GET requests.
- 3 RESTful URL to the endpoint is set as /categorytree.
- 4 Indicates that the method returns data that has been marshaled to JSON
- 5 Returns a CategoryTree as the root category. All other categories will be retrieved as children of the root.
- 6 Finds the CategoryTree instance with primary key of 1 using the injected EntityManager
Deleting a category
After you have a category, you need the ability to delete an old one that isn’t used. For that, you need to add a RESTful endpoint for deleting a category from the database as shown in listing 2.4.
Listing 2.4. @DELETE on CategoryResource
@Path("/")
public class CategoryResource {
    ...

    @DELETE                                                              1
    @Produces(MediaType.APPLICATION_JSON)
    @Path("/category/{categoryId}")                                      2
    @Transactional                                                       3
    public Response remove(@PathParam("categoryId") Integer categoryId)
throws Exception {
        try {
            Category entity = em.find(Category.class, categoryId);       4
            em.remove(entity);                                           5
        } catch (Exception e) {
            return Response
                    .serverError()
                    .entity(e.getMessage())
                    .build();                                            6
        }

        return Response
                .noContent()
                .build();                                                7
    }

    ...
}
- 1 @DELETE indicates the method will accept only HTTP DELETE requests.
- 2 Defines that the method accepts a parameter and gives it a name of categoryId
- 3 Requires a transaction to be present when executing this endpoint
- 4 Finds the Category instance based on the categoryId you received as a parameter
- 5 Removes the Category instance from being persisted
- 6 If you encountered an exception, returns a server error containing the exception message using JAX-RS Response
- 7 Returns an empty response if the Category was successfully deleted
Adding a category
Sometimes new categories need to be added. For that, you have a RESTful endpoint to add a new category into your database.
Listing 2.5. @POST on CategoryResource
@Path("/")
public class CategoryResource {
    ...

    @POST                                                            1
    @Path("/category")
    @Consumes(MediaType.APPLICATION_JSON)                            2
    @Produces(MediaType.APPLICATION_JSON)                            3
    @Transactional
    public Response create(Category category) throws Exception {

        if (category.getId() != null) {                              4
            return Response
                    .status(Response.Status.CONFLICT)
                    .entity("Unable to create Category, id was already set.")
                    .build();
        }

        try {
            em.persist(category);                                    5
        } catch (Exception e) {
            return Response
                    .serverError()
                    .entity(e.getMessage())
                    .build();
        }
        return Response
                .created(new URI(category.getId().toString()))
                .build();                                            6
    }

    ...
}
- 1 @POST indicates the method will accept only HTTP POST requests.
- 2 Indicates that the method will accept only JSON that can be marshaled to a Category instance
- 3 The method also returns a Category that’s marshaled to JSON.
- 4 If the Category has an ID set, returns a 409 response status to indicate a conflict with the record attempting to be created
- 5 Persists the new Category into the database
- 6 As part of the Response, sets the location path to the new Category with its identifier
In addition, the CategoryResource has RESTful endpoints defined to retrieve and update a category. The code for the additional methods is available in the chapter 2 source.
2.2.4. Running it
Although you’ve indicated that your RESTful endpoint is an administration microservice, nothing in the code you’ve developed prevents it from being built as a WAR and deployed to an application server.
Because you’re dealing with a UI communicating with only a single microservice, there isn’t any difference between that and existing Enterprise Java development with WARs. The upside to the similarity is that migrating existing Enterprise Java code into a microservice is easier if no code changes are required for a microservice producer.
To give more of a microservice feel for our example, you’ll package it as an uber jar with Thorntail. Thorntail offers an alternative approach to packaging your applications as a WAR or EAR and then deploying to a full Java EE application server. It allows you to choose the parts you need from WildFly and package them into an uber jar that can be run from the command line. Chapter 3 covers the features of Thorntail in detail. To run the microservice, you need to add the plugin in listing 2.6 to your pom.xml.
Listing 2.6. Maven plugin configuration
<plugin>
  <groupId>io.thorntail</groupId>
  <artifactId>thorntail-maven-plugin</artifactId>
  <version>${version.thorntail}</version>                  1
  <executions>
    <execution>
      <id>package</id>
      <goals>
        <goal>package</goal>                               2
      </goals>
    </execution>
  </executions>
  <configuration>
    <properties>
      <thorntail.port.offset>1</thorntail.port.offset>     3
    </properties>
  </configuration>
</plugin>
- 1 Latest version of Thorntail
- 2 Run the package goal of the plugin when executed.
- 3 Specify a port offset of 1 so your microservice will start on port 8081.
That’s all you need to do to provide a way to run the microservice from the directory, as well as package it as an uber jar. So how and what do you run? Two pieces need to be run: one for the UI and one for the microservice. If you wanted to execute tests against the RESTful endpoints directly, without using the UI, you need to start only the microservice.
Starting the microservice
Open a terminal, or command window, and navigate to the /chapter2/admin directory of the book example code. From that directory, run this:
mvn thorntail:run
This starts the administration microservice containing your RESTful endpoints. After the log shows that the microservice is deployed, you can go to a browser and open it to http://localhost:8081/admin/category. Your browser will load the category data and display it in JSON format. Now that you know the microservice is running, let’s run the UI.
Starting the UI
Open a terminal and navigate to the /chapter2/ui directory of the book’s example code. From that directory, run the following:
mvn package
java -jar target/chapter2-ui-thorntail.jar
This packages the UI in an uber jar, and then starts the uber jar that contains a web server with the UI code only. After the log shows that it’s deployed, you can go to a browser and open it to the following:
http://localhost:8080
Your browser will load the UI containing the Cayambe category data, as shown previously in figure 2.5. Both the microservice and UI can be stopped by pressing Ctrl-C in each terminal window.
Summary
- You can develop a category management microservice with JAX-RS.
- RESTful microservices can easily be created with Enterprise Java.
- Developing RESTful endpoints doesn’t change between Enterprise Java and a microservice.
- Enterprise Java experience is easily transferable to developing Enterprise Java microservices.