
Chapter 5. Cloud native development
This chapter covers
- Why is the cloud important?
- What is cloud native development?
- What do you need to deploy your microservice to the cloud?
- How does your application scale in the cloud?
- Can you test your application in the cloud before production?
In this chapter, you’ll extend the admin service from chapter 4, giving it the ability to be deployed to a local cloud environment, and then run tests against the service deployed to that environment.
First, you’ll learn what cloud means and about the cloud providers you have to choose from. You’ll also explore your options for running the cloud on your local machine. After you’ve chosen a type of cloud, you’ll modify the admin service from chapter 4 to deploy into the cloud. After completing deployment, you’ll scale the application to show how it can handle the additional load, and finish up by running tests with your application deployed in the cloud.
5.1. What is the cloud anyway?
The cloud, and cloud computing, have been present in software engineering for decades. These terms are usually used in reference to a platform for distributed computing. It wasn’t until the early to mid-1990s that their use became more prevalent.
Some of the key benefits of the cloud are as follows:
- Cost efficiencies— Most cloud providers charge enterprises to use their services as a measure of CPU time that’s spent. This significantly reduces the overall cost of running the environments compared to physical machines.
- Ability to scale— Cloud providers provide ways to scale up and down individual services as required, ensuring that you never have too much or too little capacity. The spread of information can occur quickly, thanks to social media, so being able to immediately scale up identical instances to handle immediate short-term load is crucial. How quickly can an enterprise scale up when it takes months to purchase and provision just one machine? In such a situation, the cloud provider will provide scale by replicating instances with identical configuration of memory, CPU, and so forth.
- Freedom of choice— If you work for an enterprise that develops only in Java, because that’s what its operations team knows how to manage, how do you experiment with new programming languages such as Node.js or Go? Cloud brings additional languages to your fingertips like never before. You don’t need to have internal experience maintaining environments for new languages; that’s what a cloud provider is for!
5.2. Service models
Figure 5.1 shows the multiple types of service models for the cloud, along with where an application fits within that. In this illustration, an application has code on the server. If you have an application that’s purely mobile or is browser based that interacts with one or more services via Software as a Service (SaaS), it’s still an application, but not an application as depicted here. In this context, an application could be an executable JAR, or a WAR or EAR deployed to an application server.
Figure 5.1. Service models in the cloud
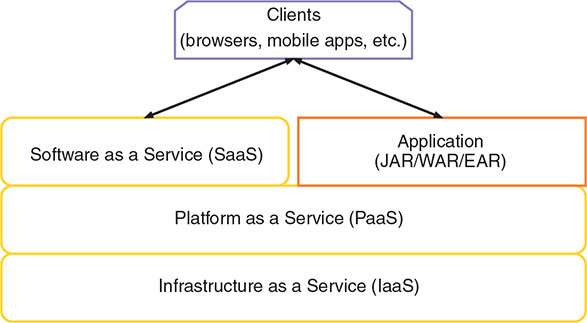
Let’s briefly describe each of these layers:
- Infrastructure as a Service (IaaS)— Provides an abstraction over network infrastructure that includes computing resources, data partitioning, scaling, security, and backup. IaaS usually involves a hypervisor that runs virtual machines as guests. To use an IaaS requires constructing a virtual machine that could be deployed to the environment. Some well-known IaaS providers are Amazon Web Services, OpenStack, Google Compute Engine, and Microsoft Azure.
- Platform as a Service (PaaS)— Forms the layer above IaaS to provide a development environment that includes an operating system, an execution environment for various programming languages, databases, and web servers. A PaaS saves a developer from needing to purchase, install, and configure hardware and software to have an environment for deploying an application. Popular PaaS providers include Red Hat OpenShift, Amazon Web Services, Google App Engine, IBM Bluemix, Cloud Foundry, Microsoft Azure, and Heroku.
- Software as a Service (SaaS)— Provides common pieces of applications, or sometimes entire applications, on an as-needed or on-demand basis. SaaS is usually charged on a pay per use basis. What’s offered as a SaaS can vary from a niche service, such as everything related to marketing, to an entire suite of SaaS to manage a business from beginning to end. Many SaaS providers exist, and more are cropping up every day. Some of the well-known ones are Salesforce.com, Eloqua, NetSuite, and Cloud9.
Over the last couple of years—with the rise of containers, and in particular the growth and popularity of Docker as a container solution—a new layer has been created in cloud service models.
Figure 5.2 introduces Containers as a Service (CaaS) as a new foundation for PaaS providers. CaaS takes advantage of container technology, such as Docker, to simplify the deployment, scaling, and management of multiple applications or services. Containers allow you to package any application or service into its own operating system environment, with whatever custom software or configuration might be required, while also being able to reduce the size of the image that’s generated when compared to traditional virtual machines.
Figure 5.2. Service models in the cloud with containers

The other major advantage to CaaS, and containers in general, is their immutable nature. Because a container image is derived from a specific version of that container, updating that container in any way requires a new container image and version to be built. Mutable deployments have long been an issue with deploying to internally managed servers, because operations could update something on the system and potentially break an application. Immutable container images can then be sent through CI/CD processes to verify that the container performs as expected before being released in production.
Currently, the most popular CaaS provider is Kubernetes. Kubernetes was created by Google and was heavily influenced by the way it managed containerized applications internally. Previous PaaS providers already have shifted to be built on top of a CaaS, and in particular Kubernetes. Red Hat OpenShift is one such PaaS that now takes advantage of Kubernetes as its CaaS.
CaaS is the best way to manage deployments, but you don’t always want something that low level. Generally, our ideal environment is a PaaS that’s built on top of a CaaS, such as with Red Hat OpenShift.
5.3. Cloud native development
You may have heard the term cloud native development before, but new terms are always cropping up, so it doesn’t hurt to clarify the definition. Cloud native development is the process of developing an application or service for deployment to cloud environments, where it can take advantage of loosely coupled cloud services.
Shifting to this type of development requires an alteration in mindset when developing, as you’re no longer concerned with the details of external services that an application requires. All you need to know is that there will be a service, such as a database, available to your application in the cloud, and which environment variables you might require to connect with it.
You can also look at cloud native development from another angle, in that it abstracts away much of what your application or service requires to function correctly. Cloud native development allows the developer to expend effort on things that add business value, by focusing on developing business logic and not plumbing code.
Though not present with most cloud providers, the idea of a service catalog is being introduced into Kubernetes for just this purpose. A service catalog provides a definition of services that can be connected to within the cloud, along with the environment variables that are required to connect with them. It’s then possible for a service to specify criteria about an external service it needs to connect to. Criteria could include database and postgresql, which would translate into a PostgreSQL database instance from the service catalog.
This concept isn’t that much different from providing environment-specific configuration for databases, as we’ve done for many years. But as work on the service catalog continues, we may reach a point where an application connecting to an external service through specific environment variables is no longer needed. A database client may be injected into a service, with configuration already set by the service catalog.
Cloud native development sounds great, but how can you quickly test and debug your service if you have to deploy it to the cloud every time? Won’t that slow your development speed? Yes, deploying to the cloud for every code change to see the impact would likely slow development speed, if only marginally, and possibly more.
But what if you can bring the cloud, or something as near as identical to the cloud used for production, onto your local development machines? That would certainly speed up the round-trip time from code change to seeing it in action. Do cloud providers offer such a thing? Some of them do!
Minikube was the first to offer a single-node Kubernetes cluster that could be run on your local machine. All that’s required is a virtual environment, such as VirtualBox, Hyper-V, or xhyve driver, installed on your machine that can be used by Minikube to create a virtual cluster on your machine.
Since Minikube formed, Minishift was founded to extend Minikube with a built-in PaaS of a single-node OpenShift cluster. Minishift uses the upstream of OpenShift, OpenShift Origin, as the PaaS. Revisiting where a CaaS fits into service models, figure 5.3 shows what Minishift provides.
Figure 5.3. What Minishift provides

There’s nothing wrong with using a CaaS directly, such as Kubernetes, but there are benefits of using a PaaS on top. One main benefit is a nice UI to visualize what’s deployed. Because of its simplicity in setting up, and wanting to use a PaaS over a CaaS, we’ll use Minishift to create our local cloud environment.
5.4. Deploying to the cloud
Quite separate from the service model that the cloud might offer, there are also three main deployment models that the cloud could use:
- Private cloud— A cloud that’s solely for the use of a single enterprise, which is usually hosted internally.
- Public cloud— Services within the cloud are available over a public network. The main difference between this and a private cloud relates to security. Whether a microservice or database, they need to have more stringent security because these services are accessible on a public network.
- Hybrid cloud— A combination of public and private clouds. It’s also possible that each of these clouds could use different providers. The hybrid cloud deployment model is quickly becoming the most common, as it provides the best of both worlds, especially when wanting to quickly ramp up capacity and scale.
Minishift, in essence, gives you your own private cloud instance running on your local machine. But the PaaS within Minishift, OpenShift, is the same PaaS that would be used in a public cloud or hybrid cloud deployment. The only difference is it’s running locally.
Whether you’re using a cloud for microservices, a monolith, or anything else, the way a deployment is pushed to the cloud is no different. The only difference might be that a microservice is more likely to have a CI/CD process that automatically pushes releases into production. It’s more likely that a deployment of a monolith will require greater coordination than an automatic deployment.
5.5. Starting Minishift
The first thing you need to do is install Minishift on your local machine. Head over to http://mng.bz/w6g8 and follow the instructions to install the necessary prerequisites, if they aren’t already installed, and then install Minishift.
Note
The examples have been tested with Minishift 1.12.0 and OpenShift 3.6.1.
After Minishift is installed, open a terminal window and start it with the default settings:
minishift start
By default, this gives you a virtual machine with two virtual CPUs, 2 GB of RAM, and 20 GB of hard drive space for it. The terminal provides details of what Minishift is doing as it starts, including which version of OpenShift Origin is being installed. After the installation is finished, the last output will provide details for the web console URL, and login credentials for developer and administrator accounts:
OpenShift server started.

The server is accessible via web console at:
    https://192.168.64.11:8443

You are logged in as:
    User:     developer
    Password: <any value>

To login as administrator:
    oc login -u system:admin
For most things you need to do, either through the web console or via the OpenShift command-line interface (CLI), you need only the developer credentials. There’s also a handy way to launch the OpenShift web console without having to remember the URL and port:
minishift console
This command opens a browser window directly at the login page of the web console. After logging in, the console looks like figure 5.4.
Figure 5.4. OpenShift web console

By default, a fresh instance of OpenShift sets up an empty project called My Project for you. You can then choose to delete it and create your own, or use it; the choice doesn’t really matter.
You now have a cloud that you can deploy your services into, but you first need to make your service deployable to it.
5.6. Microservice cloud deployment
You’ll take the admin service that you updated in chapter 4, and add the necessary configuration to support deploying to the cloud.
By far, the easiest way to deploy your application is the fabric8 Maven plugin (https://maven.fabric8.io/). A huge benefit to the plugin is it can bring Java applications to OpenShift or Kubernetes! You can go from no configuration deployments to adding as much configuration as you might require.
Let’s start by modifying your pom.xml to include the plugin in a profile called openshift.
Listing 5.1. Maven profile for OpenShift deployment
<profile>
  <id>openshift</id>
  <build>
    <plugins>
      <plugin>
        <groupId>io.fabric8</groupId>
        <artifactId>fabric8-maven-plugin</artifactId>      1
        <version>3.5.33</version>
        <executions>
          <execution>
            <goals>
              <goal>resource</goal>                        2
              <goal>build</goal>                           3
            </goals>
          </execution>
        </executions>
      </plugin>
    </plugins>
  </build>
</profile>
- 1 Name of the fabric8 Maven plugin
- 2 Creates Kubernetes or OpenShift resource descriptors
- 3 Generates a Docker image of the application in a container
The goals that are defined in the plugin inform it of what you want it to do. With this configuration, the plugin will create the necessary resource descriptors for OpenShift and then use Docker to build a container image with your deployment inside it. What the code does is no different than if you created an image with Docker directly, but without the hassle of having to remember the correct command each time you need it!
I mentioned that the plugin generates resource descriptors for you, but what are they? Take a look at this listing.
Listing 5.2. service-chapter5-admin.json
{
  "apiVersion":"v1",
  "kind":"Service",
  "metadata": {
    "annotations": {
      "fabric8.io/git-branch":"master",
      "fabric8.io/git-commit":"377ac684babee220885246de1700d76e3d11a8ab",
      "fabric8.io/iconUrl":"img/icons/wildfly.svg",
      "fabric8.io/scm-con-url":"scm:git:[email protected]:kenfinnigan/ejm-
samples.git/chapter5/chapter5-admin",
      "fabric8.io/scm-devcon-url":"scm:git:[email protected]:kenfinnigan/ejm-
samples.git/chapter5/chapter5-admin",
      "fabric8.io/scm-tag":"HEAD",
      "fabric8.io/scm-url":"https://github.com/kenfinnigan/ejm-
samples/chapter5/chapter5-admin",
      "prometheus.io/port":"9779",
      "prometheus.io/scrape":"true"
    },
    "creationTimestamp":"2017-11-21T01:47:02Z",
    "finalizers":[],
    "labels": {
      "app":"chapter5-admin",
      "expose":"true",
      "group":"ejm",
      "provider":"fabric8",
      "version":"1.0-SNAPSHOT"
    },
    "name":"chapter5-admin",
    "namespace":"myproject",
    "ownerReferences":[],
    "resourceVersion":"3074",
    "selfLink":"/api/v1/namespaces/myproject/services/chapter5-admin",
    "uid":"decf5db7-ce5d-11e7-994e-0afca351eb6b"
  },
  "spec": {
    "clusterIP":"172.30.221.166",
    "deprecatedPublicIPs":[],
    "externalIPs":[],
    "loadBalancerSourceRanges":[],
    "ports": [
      {
        "name":"http",
        "port":8080,
        "protocol":"TCP",
        "targetPort":8080
      }
    ],
    "selector": {
      "app":"chapter5-admin",
      "group":"ejm",
      "provider":"fabric8"
    },
    "sessionAffinity":"None",
    "type":"ClusterIP"
  },
  "status": {
    "loadBalancer": {
      "ingress":[]
    }
  }
}
samples.git/chapter5/chapter5-admin",
"fabric8.io/scm-devcon-url":"scm:git:[email protected]:kenfinnigan/ejm-
samples.git/chapter5/chapter5-admin",
"fabric8.io/scm-tag":"HEAD",
"fabric8.io/scm-url":"https://github.com/kenfinnigan/ejm-
samples/chapter5/chapter5-admin",
"prometheus.io/port":"9779",
"prometheus.io/scrape":"true"
},
"creationTimestamp":"2017-11-21T01:47:02Z",
"finalizers":[],
"labels": {
"app":"chapter5-admin",
"expose":"true",
"group":"ejm",
"provider":"fabric8",
"version":"1.0-SNAPSHOT"
},
"name":"chapter5-admin",
"namespace":"myproject",
"ownerReferences":[],
"resourceVersion":"3074",
"selfLink":"/api/v1/namespaces/myproject/services/chapter5-admin",
"uid":"decf5db7-ce5d-11e7-994e-0afca351eb6b"
},
"spec": {
"clusterIP":"172.30.221.166",
"deprecatedPublicIPs":[],
"externalIPs":[],
"loadBalancerSourceRanges":[],
"ports": [
{
"name":"http",
"port":8080,
"protocol":"TCP",
"targetPort":8080
}
],
"selector": {
"app":"chapter5-admin",
"group":"ejm",
"provider":"fabric8"
},
"sessionAffinity":"None",
"type":"ClusterIP"
},
"status": {
"loadBalancer": {
"ingress":[]
}
}
}
This is just one of the many resource descriptors that could be created by the plugin, depending on which options are specified. You don’t want to be handcrafting files this long for every microservice you deploy! The beauty of the fabric8 Maven plugin is that it hides all that boilerplate configuration you don’t need to know about unless you want to.
If finer control over service configuration is needed, it can be achieved with custom YAML files that are used by the plugin to generate the necessary JSON. That’s beyond the scope of this book, but further information is available at the fabric8 website, https://maven.fabric8.io/.
Though Minishift is already started, you need to do one more thing before you can deploy your service with the fabric8 Maven plugin. You need to log in to OpenShift in the terminal, because the fabric8 Maven plugin uses the credentials to create resources within OpenShift. This is necessary only once, or until your authenticated session expires and you need to log in again.
To log in, you need the OpenShift CLI installed. There are two ways to do that:
- Add the .minishift/cache/oc/v3.6.0 directory onto your path, because the oc binary is retrieved by Minishift for you.
- Download the CLI directly from www.openshift.org/download.html.
After the CLI is installed, you can authenticate in the terminal:
oc login
You’ll be prompted to enter the user ID, developer, and any value for a password.
You’re going to use the default My Project for now, so you can deploy the admin service into OpenShift with the following:
mvn clean fabric8:deploy -Popenshift
You invoke the fabric8 deploy goal, which will be executed after the resource and build goals you defined in pom.xml. You also specified the openshift profile so that the fabric8 Maven plugin is available.
In the terminal, you’ll see the usual Maven build logging, mixed in with messages from the fabric8 plugin telling you what it’s generating for deployment to OpenShift. After it’s finished deploying the service, you can open My Project in the console and see all the details of your deployed service, as shown in figure 5.5.
Here you can easily see at a glance the various pieces of information in your service:
- Name of the deployment
- Which Docker image is used for the deployment
- Which build created the Docker image
- The ports that are exposed from the container
- How many pods are running and whether they’re healthy
- The external route pointing at your deployment
Note
A pod is a grouping of container(s), such as Docker containers, that use shared storage and network infrastructure. A pod is equivalent to a physical or virtual machine with collocated applications.
Figure 5.5. OpenShift web console, showing the admin service

Clicking the route URL for external traffic opens a new browser window at the root URL of the service. Because the admin service doesn’t serve anything at /, you need to modify the URL in the browser to include /admin/category before you can see the JSON data that was retrieved from the database.
With the admin service functioning, can you scale the number of instances you have of that service running? Within the OpenShift console, scaling is super easy. All you do is expand the section for the chapter5-admin deployment, if it’s not already expanded, as shown in figure 5.6. Then click the arrowheads next to the blue circle, which denotes the number of current pods. As noted previously, pod is the Kubernetes term for the containerized deployment, but essentially it’s the number of instances of a given service.
Figure 5.6. Admin service pod instances

Here you can see that the number of pods has increased from the default of 1, up to 3. Open several private browser windows and click the endpoint for /admin/category a few times in each. Then head back to the OpenShift console and take a look at the logs for each of the pods that are running. You should see the SQL calls that were made against the different pods.
If you want to remove the admin service, you can just as easily remove it from OpenShift with the following:
mvn fabric8:undeploy -Popenshift
Warning
To undeploy your service, you didn’t use the Maven clean goal. As part of deploy, fabric8 stores files in /target that contain details of all the resources that were deployed to OpenShift. If you clean them out before undeploy can run, fabric8 has absolutely no idea what it’s trying to undeploy and is unable to do anything.
You can now deploy and undeploy the admin service to OpenShift locally running inside Minishift, but can you execute tests in the same way? That’s what the next section is all about!
5.7. Testing in the cloud
Because you’re able to deploy the admin service to a local cloud with Minishift, can you also use that local cloud to test it as well? You most certainly can!
To help develop tests that integrate with OpenShift you’re going to use an extension from the Arquillian ecosystem called Arquillian Cube (http://arquillian.org/arquillian-cube/). Arquillian Cube gives you the ability to run tests against code inside Docker containers, by providing hooks for controlling the execution of Docker containers. Though OpenShift is much more than just Docker, because it uses Docker for its container images, you can still use Arquillian Cube to control the deployment and run tests against it.
What’s the benefit of executing your tests in a cloud as opposed to what can be achieved with integration testing? It all comes down to wanting to test your microservice in an environment that, as closely as possible, resembles production. If you’re deploying your microservice into production in a cloud, your best chance of finding out problems with such a deployment is being able to deploy your tests to a cloud as well. To be able to do that, you need to add the following to pom.xml.
Listing 5.3. Arquillian Cube dependencies
<dependencyManagement>
  <dependencies>
    <dependency>
      <groupId>org.arquillian.cube</groupId>
      <artifactId>arquillian-cube-bom</artifactId>         1
      <version>1.12.0</version>
      <type>pom</type>
      <scope>import</scope>
    </dependency>
  </dependencies>
</dependencyManagement>

<dependencies>
  <dependency>
    <groupId>org.arquillian.cube</groupId>
    <artifactId>arquillian-cube-openshift</artifactId>     2
    <scope>test</scope>
    <exclusions>
      <exclusion>
        <groupId>io.undertow</groupId>
        <artifactId>undertow-core</artifactId>             3
      </exclusion>
    </exclusions>
  </dependency>
  <dependency>
    <groupId>org.awaitility</groupId>
    <artifactId>awaitility</artifactId>                    4
    <version>3.0.0</version>
    <scope>test</scope>
  </dependency>
</dependencies>
- 1 Import all Arquillian Cube dependencies so they’re available.
- 2 Add the main Arquillian Cube artifact as a test dependency to the project.
- 3 Exclude Undertow as a transitive dependency from Arquillian Cube. It interferes with Thorntail.
- 4 Add a test dependency for Awaitility to help with waiting for endpoints to be available.
Because you want to be able to run tests outside the cloud as well, though the code for chapter 5 has them currently removed, you need a separate profile to activate the tests you have for your cloud, OpenShift:
<profile>
  <id>openshift-it</id>
  <build>
    <plugins>
      <plugin>
        <groupId>org.apache.maven.plugins</groupId>
        <artifactId>maven-failsafe-plugin</artifactId>
        <executions>
          <execution>
            <goals>
              <goal>integration-test</goal>
              <goal>verify</goal>
            </goals>
          </execution>
        </executions>
      </plugin>
    </plugins>
  </build>
</profile>
Here you tell Maven that you want the maven-failsafe-plugin to execute your test, integration-test goal, and then verify the results.
Now it’s time to create your test! You’re going to create a test similar to one of your integration tests from chapter 4, but it’ll be executed against your cloud, OpenShift, instead of a local instance. As the fail-safe plugin requires IT in the test class name to activate it, you’ll name it CategoryResourceIT.
Listing 5.4. CategoryResourceIT
@RunWith(Arquillian.class)
public class CategoryResourceIT {

    @RouteURL("chapter5-admin")                                        1
    private URL url;

    @Before                                                            2
    public void verifyRunning() {
        await()
                .atMost(2, TimeUnit.MINUTES)                           3
                .until(() -> {
                    try {
                        return get(url + "admin/category").statusCode() ==
200;
                    } catch (Exception e) {
                        return false;
                    }
                });

        RestAssured.baseURI = url + "/admin/category";                 4
    }

    @Test
    public void testGetCategory() throws Exception {
        Response response =
                given()
                        .pathParam("categoryId", 1014)
                .when()
                        .get("{categoryId}")
                .then()
                        .statusCode(200)
                        .extract().response();                         5

        String jsonAsString = response.asString();

        Category category = JsonPath.from(jsonAsString).getObject("",
Category.class);

        assertThat(category.getId()).isEqualTo(1014);                  6
        assertThat(category.getParent().getId()).isEqualTo(1011);
        assertThat(category.getName()).isEqualTo("Ford SUVs");
        assertThat(category.isVisible()).isEqualTo(Boolean.TRUE);
    }
}
- 1 Inject a URL pointing at the OpenShift Route for chapter5-admin.
- 2 Execute the method before a test to ensure you’re ready for testing.
- 3 Wait no more than 2 minutes for /admin/category to respond with a 200 response.
- 4 Set the root URL for use with RestAssured.
- 5 Retrieve the category with ID 1014, ensuring you received a 200 response.
- 6 Verify that the details of the Category you received match what you expected.
It’s time to test it out!
First you need to ensure that you have Minishift running, and that you’ve recently logged in with oc login. Authentications do expire! If all that’s done, you run the following:
mvn clean install -Popenshift,openshift-it
Here you activate the profiles for openshift and openshift-it. The openshift-it profile will execute your test, but without the openshift profile being present, the admin service won’t be deployed to OpenShift! If the service successfully deploys and the tests pass, the terminal should show a Maven build that completed without error.
You’ve only just scratched the surface of what’s possible with the fabric8 Maven plugin and Minishift, but you have a solid footing to begin exploring further on your own. Because it’ll be a while before you use Minishift again, let’s stop it for now:
minishift stop
5.8. Additional exercises
Here are additional exercises for you to grow your understanding of OpenShift and to help improve the code for the example:
- Modify the deployment of the admin service to use PostgreSQL or MySQL when running on OpenShift.
- Add test methods for CategoryResourceIT for creating a Category, and another that fails the name validation.
If you take on these exercises and would like to see them included into the code for the book, please submit a pull request to the project on GitHub.
Summary
- You can take advantage of immutable container images by choosing a PaaS that uses a CaaS internally.
- Minishift provides a cloud environment with OpenShift on your local machine, to simplify both the execution and testing of microservices without needing to provision lots of machines.
- The fabric8 Maven plugin removes all the boilerplate needed to define resources and services within OpenShift or Kubernetes to reduce the configuration hurdles before seeing a microservice running in the cloud.