
Chapter 11. Data streaming with Apache Kafka
- Understanding data streaming with Apache Kafka
- Using data streaming to simplify an architecture
- Incorporating data streaming into the Cayambe hybrid
In chapter 10, you put together the Cayambe hybrid, combining the slimmed-down monolith with your new microservices. This chapter simplifies the access of administration data in the Cayambe hybrid by switching it to use data streaming.
First you’ll learn about data streaming and how it can benefit developers and architects alike. Taking those lessons, you’ll develop a data-streaming solution for the Cayambe hybrid from the previous chapter, completing the journey from monolith to hybrid.
11.1. What can Apache Kafka do for you?
Before delving into Apache Kafka, the solution you’re going to use for recording and processing data streams, you need some background on data streaming. Otherwise, what Apache Kafka does and how it works will be completely foreign to you as an Enterprise Java developer.
11.1.1. Data streaming
Data streaming doesn’t just refer to the way Netflix gets its movies to play on all your devices. It also refers to a continuously generated stream of data from potentially thousands of sources; each piece of data, or record, is small in size and is stored in the sequence that it was received. That may seem like a lot of buzzwords, but data streaming is still relatively new, and new ways to use it are always being conceived.
What kinds of data apply to data streaming? In a nutshell, pretty much any type of data could be useful in the context of data streaming. Common examples include measurements from vehicle sensors, real-time share prices from the stock market, and trending topics from social networks and sites.
A common use case for data streaming occurs when you have a lot of data, or records, and you want to analyze it for patterns or trends. It may well be that large amounts of the data can be completely ignored, and only key pieces of data are pertinent. It’s also possible for the same set of data records to have different purposes, dependent on which system might be consuming it! For instance, an e-commerce site that captures a stream of page-visit events can use the same data not only to record the number of pages a user visits before purchasing, but also to analyze the number of views each page is getting across all users. This is the beauty of data streaming: you can solve different problems with the same set of data.
Figure 11.1 illustrates how data is received as a stream.
Figure 11.1. Data-streaming pipes

The data for a particular type is received from potentially many sources, and is added to the end of the stream, or pipe, in the order it was received by the system that’s responsible for recording the data stream. There’s no concept of inserting a particular record at a given point in the stream. Everything is added to the end as it’s received.
Though you have several options for recording and processing data streams, for this chapter you’ll focus on Apache Kafka, so let’s take a look at it now.
Definition
To clarify the terminology used throughout this chapter, the terms data streaming, data streams, and streaming all refer to the same thing: the process of streaming data from a source for capture.
11.1.2. Apache Kafka
Apache Kafka (https://kafka.apache.org/) was originally developed by LinkedIn in 2010 to be the core for its central data pipeline. Currently, the pipeline processes upward of 2 trillion messages a day! In early 2011, Apache Kafka was proposed as an open source project at Apache, and it moved out of the incubation phase in late 2012. In the space of a few years, many enterprises are using Apache Kafka, including Apple, eBay, Netflix, Spotify, and Uber.
What is Apache Kafka? It’s is a distributed streaming platform. What do I mean by distributed here? Apache Kafka can partition data from a single data stream across multiple servers within a cluster. In addition, each partition is replicated across servers for fault tolerance of that data.
There are many ways to configure Apache Kafka, in terms of how it’s distributed and its level of fault tolerance, but those topics are beyond the scope of this chapter. For full details, take a look at the Apache Kafka documentation at https://kafka.apache.org/documentation/.
As a streaming platform, the key capabilities that Apache Kafka provides are as follows:
- Publish and subscribe to streams of records.
- Store streams of records in a fault-tolerant, durable manner.
- Process streams of records as they happen.
At its core, Apache Kafka is a distributed commit log: it doesn’t notify sources that a piece of data has been recorded in the stream until it’s committed to the log. Being distributed, as I mentioned before, refers to each commit in the log, or stream, being spread across partitions and replicated.
Another way of describing Apache Kafka is as a database with no clothes: the data is at the forefront and not hidden. Databases, at their core, use a commit log, as Apache Kafka does, to track changes and as a means of recovering from server failures to reconstitute the database. With Apache Kafka, the clothes of the database (tables, indexes, and so forth) have been stripped away, leaving just the commit log. This makes Apache Kafka infinitely more consumable and accessible than regular databases.
Apache Kafka also uses semantics that are familiar to Enterprise Java developers that have integrated with messaging systems. There are producers, which generate records or events that are added to the stream, equivalent to the multiple sources present in figure 11.1 previously. Each stream of records is referred to as a topic, and anything that reads records from the stream is a consumer. Figure 11.2 shows how producers and consumers integrate with Apache Kafka.
Figure 11.2. Apache Kafka integrations (reproduced from https://kafka.apache.org/intro.html)
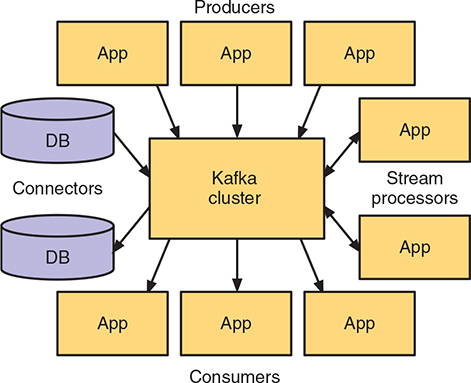
In addition, connectors enable databases, or other systems, to be sources of records being sent to Apache Kafka. Finally, stream processors have the ability to stream records from one or more topics, perform some type of transformation on the data, and then output it to one or more different topics.
What is a record?
Now that you understand some of the pieces that make up Apache Kafka, let’s define what a record means. Each record within a stream consists of a key, a value, and a timestamp. The key and value are straightforward in terms of their purpose, but why is a timestamp needed? The timestamp is crucial to Apache Kafka knowing when a record was received (which will become even more critical when we cover partitions).
You also need to be aware of additional concepts about records before continuing. Each record is immutable within the data stream: you can’t edit, modify, or remove a record from the data stream after it’s been added. All you can do is provide update records for the same key that sets a different value.
Figure 11.3 expands on the stream from figure 11.1, showing possible records for a real-time stream of share prices. In figure 11.3, you can see that there’s no single record for the key RHT. There are currently three, all with different values. This is the immutability of the data stream. If the stream weren’t immutable, there likely would be a single record with key RHT that’s continually updated with a new value.
Figure 11.3. Immutable data stream

A big advantage with immutable data streams is that you have a history of change for the same key. Certainly in some situations, you might be concerned with only the current value of something. But far more often, knowing the history and being able to determine change over time is critical.
Records are also persisted: the log is retained on the filesystem, allowing the records to be processed at any point in the future. Having said that, limits exist on how long a record is retained. Each record is persisted only so long as is allowed by the retention policy on that particular topic. A topic could be defined to retain records indefinitely, presuming disk space isn’t an issue, or it could be purged after a few days, whether or not it has been consumed by anything.
How do topics work?
Topics in Kafka relate to a category, or type, of record that can be published and consumed. For instance, you’d use one topic for real-time share prices and a separate topic for measurements from vehicle sensors.
Each topic is divided into one or more partitions, across one or more servers within the Kafka cluster. A partition is a single logical data stream, or topic, such as those you saw in figures 11.1 and 11.3, that’s split into multiple physical data streams.
Figure 11.4 shows a partition. Partitioning of a topic increases the parallelism that can be achieved when writing or reading from a specific topic. The figure illustrates a single topic that’s split into three partitions. Each partition represents an ordered and immutable sequence of records that’s continually appended to, creating a structured log of change events within a data stream. Each record in a given partition is assigned a sequential ID number known as the offset. The offset uniquely identifies a record within a specific partition.
Figure 11.4. Topic partitions (reproduced from https://kafka.apache.org/intro.html)

A critical point with Kafka records that developers need to be especially mindful of is the definition of the key to be associated with a record. If the key isn’t truly unique within the context of the business, there’s the danger of overlap between key and timestamp combinations—especially as Kafka guarantees that all records with the same key are placed on the same partition, ensuring that all records for a key are stored in sequence on a single partition.
Figure 11.5 shows how producers and consumers interact with a topic partition.
Figure 11.5. Topic producers and consumers (reproduced from https://kafka.apache.org/intro.html)

As mentioned previously, producers always write new records to the very end of a partition. Consumers typically process records sequentially, but are able to specify at which offset they begin processing. For instance, in figure 11.5, Consumer B may have begun reading from offset 0 and is now processing offset 11. Consumer A is at offset 9 but may have begun reading records from that offset only and not from 0.
Figure 11.5 introduces some concepts regarding consumers that are worth elaborating on, so you’re familiar with what they can do:
- Consumers can start reading a topic from any offset, including from the very beginning, offset 0.
- Consumers can be load balanced by specifying a consumer group when reading records.
- A consumer group is a logical grouping of multiple consumers, ensuring that each record is read by only a single consumer within the same consumer group.
11.2. Simplifying your monolith architecture with streaming
Figure 11.6 is a brief reminder of what has been developed and integrated so far with the Cayambe hybrid. The grayed-out piece is to be completed in this chapter and links the Admin and Cayambe databases, via an Apache Kafka topic, to remove the need for the Cayambe database to manage categories directly. This makes it possible to simply feed the data from one database to another.
Without data streaming in figure 11.6, you have a few alternatives:
- Modify the Cayambe JAR to retrieve records from the Admin database. Quite apart from it being bad data design to have different services interacting with the same database, you found in chapter 10 that such a change in this case would require a lot of code changes to accomplish.
- Develop a scheduled job to extract all the records from the Admin database, and then clear out and insert those records into the Cayambe database. This is simpler to implement but does result in periods where the data is out of sync, and also where the data in Cayambe would be unavailable when the job to run it is executing. Depending on how frequently the data changes, this may be an acceptable solution, though having any scheduled downtime is far from ideal.
- Modify the Admin microservice to also update the records within the Cayambe database. Though this would be easier to implement than the first option, this solution is prone to problems around transactions and knowing whether both updates were successful. It would require the Admin microservice to be a lot smarter about succeeding or failing, and how to handle failures appropriately in one of the database calls to roll back the other.
To properly support the model in figure 11.6, you want to be able to convert the database change events into records in Kafka for you to process. Such a solution has the least impact on the Admin microservice while still enabling you to consume its data. What you need is a connector for Kafka that can do this for you.
Figure 11.6. Current Cayambe hybrid monolith

Are any tools available that would make that possible? Why, yes, there are! Debezium is an open source project for streaming changes out of databases into Kafka.
Note
Debezium is a distributed platform for change data capture. You can start Debezium, point it at your databases, and react to each insert, update, or delete that’s made on those databases in completely separate applications. Debezium allows you to consume database row-level changes, without any impact or changes to applications that currently perform those database updates directly. A huge benefit with Debezium is that any applications or services consuming the database changes can be taken down for maintenance without losing a single change. Debezium is still recording the changes into Kafka, ready for consumption when the services are available again. Full details on Debezium can be found at http://debezium.io/.
To gain a better understanding of Apache Kafka, data streaming, and how they can be integrated into your microservices, you aren’t going to implement Debezium for the Cayambe hybrid in this chapter. I’ll leave that as an additional exercise for you.
For the Cayambe hybrid, you’re going to directly produce events into Apache Kafka, and then consume them on the other side. Figure 11.7 shows the changes you’re going to make to the architecture, in support of showing more details of the way Apache Kafka works.
Figure 11.7. Cayambe hybrid monolith

You’re adding code to the Admin microservice to produce events that will be sent to an Apache Kafka topic. Then you have a Kafka microservice to consume those events and update the Cayambe database with the changes.
You’re still going to use data streaming to move the data you need from one place to another, though not using something like Debezium will be a bit less efficient in terms of real production use, but beneficial to understand what’s going on.
11.3. Deploying and using Kafka for data streaming
Before looking at implementing the microservices to integrate with Kafka, let’s get Kafka up and running on OpenShift! If you don’t have Minishift running already, let’s start it now just as you did in chapter 10:
> minishift start --cpus 3 --memory 4GB
11.3.1. Kafka on OpenShift
After Minishift is up and running, start the OpenShift console and log in. In your existing project, click Add to Project and then click Import YAML/JSON.
Paste into the text box the contents of /chapter11/resources/Kafka_OpenShift.yml, some snippets of which are in this listing.
Listing 11.1. Kafka OpenShift template
apiVersion: v1
kind: Template
metadata:
  name: strimzi                            1
  annotations:
    openshift.io/display-name: "Apache Kafka (Persistent storage)"
    description: >-
      This template installs Apache Zookeeper and Apache Kafka clusters. For
      more information
       see https://github.com/strimzi/strimzi
    tags: "messaging,datastore"
    iconClass: "fa pficon-topology"
    template.openshift.io/documentation-url:
     "https://github.com/strimzi/strimzi"
message: "Use 'kafka:9092' as bootstrap server in your application"
...
objects:
- apiVersion: v1
  kind: Service
  metadata:
    name: kafka                            2
  spec:
    ports:
    - name: kafka
      port: 9092                           3
      targetPort: 9092
      protocol: TCP
    selector:
      name: kafka
    type: ClusterIP
...
- apiVersion: v1
  kind: Service
  metadata:
    name: zookeeper                        4
  spec:
    ports:
    - name: clientport
      port: 2181                           5
      targetPort: 2181
      protocol: TCP
    selector:
      name: zookeeper
    type: ClusterIP
...
- 1 strimzi is the name of the application that will appear within OpenShift.
- 2 Defines the kafka service
- 3 kafka service will be available on port 9092.
- 4 Defines the zookeeper service
- 5 zookeeper service is available on port 2181.
Hold on there, what’s ZooKeeper doing there? It wasn’t mentioned before! That’s right, it wasn’t mentioned before. ZooKeeper is an implementation detail because it’s used internally by Kafka as a distributed key/value store. It’s not something you need to interact with. You’re seeing it here because you’re acting as operations staff to set up Kafka for yourself.
/chapter11/resources/Kafka_OpenShift.yml was originally copied from http://mng.bz/RqUn, but was modified to have only a single Kafka broker instead of three. As a result, it doesn’t support topic replication, but your OpenShift instance needs fewer resources to run Kafka!
After you’ve pasted the contents of the modified file into the pop up, click Create and then Continue to see a form where you can specify different default values. For now, leave those as they are and click Create at the bottom of the page. OpenShift will now provision a Kafka cluster with a single broker, which you can see from the main console page under the strimzi application.
Warning
It can take a little time to complete the downloading of the necessary Docker images and then start the containers. Don’t be concerned if the Kafka cluster fails initially if ZooKeeper isn’t running yet. Given time, it’ll restart, and everything will be running as expected.
After all the pods are started, open a terminal window and log into the OpenShift client, if you’re not already. You need to retrieve all the OpenShift services to find the URL for ZooKeeper:
> oc get services
NAME                 CLUSTER-IP       EXTERNAL-IP   PORT(S)    AGE
kafka                172.30.225.60    <none>        9092/TCP   5h
kafka-headless       None             <none>        9092/TCP   5h
zookeeper            172.30.93.118    <none>        2181/TCP   5h
zookeeper-headless   None             <none>        2181/TCP   5h
From the list, you can see the ZooKeeper URL is 172.30.93.118. Head back to the OpenShift console and select Applications and then Pods from the menu options. This provides a list of the running pods in OpenShift. With a single broker, there should be only a single kafka-* pod. Click that Pod and then select the Terminal tab, and you should see something similar to figure 11.8.
Figure 11.8. OpenShift pod terminal

To use Kafka, you need to create a topic for your records. Let’s do that within the Terminal tab:
./bin/kafka-topics.sh --create --topic category_topic --replication-factor1 --partitions 1 --zookeeper 172.30.93.118:2181
You use a Kafka script to create a topic named category_topic that has only a single partition and a single replication. You specify only single replication and partition because you have a single broker in the cluster. For instance, if you had three brokers in the cluster, you could use three partitions and a replication factor of 2.
11.3.2. Admin microservice
Now that Kafka is running and your topic is created, it’s time to modify the Admin microservice to produce events onto the topic!
To assist in integrating your Enterprise Java code with Kafka, you’ll use a library that converts the pull approach of Kafka into a push approach. This library is still in its infancy but is easy to use because it removes a lot of the boilerplate code that’s required when using the Kafka APIs directly. It’s written as a CDI extension and is available as Maven artifacts for you to consume. The code is available at https://github.com/aerogear/kafka-cdi.
What’s the advantage of converting Kafka’s pull approach into a push one? It’s beneficial for those of us more familiar with Enterprise Java development, where with the CDI programming model we’re able to listen for events and perform an action when we receive one. This is what the Kafka library we’re using brings for us, the ability to listen for events every time a new record is written to a topic, just as if it were a CDI event listener.
The first thing you need to do is update the pom.xml of the Admin microservice to use the new dependency:
<dependency>
  <groupId>org.aerogear.kafka</groupId>
  <artifactId>kafka-cdi-extension</artifactId>
  <version>0.0.10</version>
</dependency>
Next you modify CategoryResource to connect with the Kafka topic, and produce records to be appended onto it.
Listing 11.2. CategoryResource
@Path("/")
@ApplicationScoped
@KafkaConfig(bootstrapServers =
"#{KAFKA_SERVICE_HOST}:#{KAFKA_SERVICE_PORT}")                          1
public class CategoryResource {
...
    @Producer
    private SimpleKafkaProducer<Integer, Category> producer;              2
...
    public Response create(Category category) throws Exception {
...
        producer.send("category_topic", category.getId(), category);      3
...
    public Response remove(@PathParam("categoryId") Integer categoryId,
        @Context SecurityContext context) throws Exception {
...
        producer.send("category_topic", categoryId, null);                4
...
}
- 1 Identifies the Kafka server you’re connecting to. You can use environment variables for the host and port because you’re deploying the microservice into the same OpenShift namespace as Kafka.
- 2 Inject a CDI producer that accepts an Integer as key and Category as value.
- 3 create() was modified to call send() after the new Category was created. It indicates the topic you’re sending the record to, along with the key and value.
- 4 remove() was modified in a similar manner. The main difference with create() is that you’re passing a null value because there’s no longer a valid value.
With the changes made to the Admin microservice, you can now deploy it! Before deploying the microservice, you need to have Keycloak running, because your micro-service uses it to secure the delete endpoint. To do that, you need to run this:
/chapter9/keycloak> java -Dswarm.http.port=9090 -jar
If the database files haven’t been removed from the directory, Keycloak should start up and remember all the settings you’ve installed previously. With Keycloak running again, you can now deploy Admin:
/chapter11/admin> mvn clean fabric8:deploy -Popenshift
After the microservice is up and running, you can use the new Administration UI, or via HTTP requests directly with Postman, to update and delete categories. How do you know the Admin microservice is correctly putting records onto the Kafka topic? You don’t have anything consuming those records!
Thankfully, Kafka provides a consumer you can use in a console to see the contents of a topic. In the OpenShift console, you go back to the kafka-* pod, as you had before, and select the Terminal tab. On the command line, run the following:
./bin/kafka-console-consumer.sh --bootstrap-server 172.30.225.60:9092 –
Alternatively, you could connect to the kafka-* pod and run the command remotely:
oc rsh kafka-<identifier> ./bin/kafka-console-consumer.sh --bootstrap-server 172.30.225.60:9092 –
You used the IP address and port of the Kafka service from the list of OpenShift services you retrieved earlier to specify where Kafka is located. Next you tell the script you want to consume all records from the beginning, which is the same as saying from offset 0. Finally, you give it the name of the topic. If all has worked OK, you should see a record appear for each change you made through the Admin microservice.
We’ve covered the producing side of the Kafka topic. Now let’s look at the consuming side.
11.3.3. Kafka consumer
All the code for the Kafka consumer is in the /chapter11/kafka-consumer/ directory of the book’s code. As with the producer, you add the kafka-cdi-extension dependency to the pom.xml. The remainder of the pom.xml contains the usual Thorntail plugin and dependencies, and the fabric8 Maven plugin for deploying to OpenShift. You also specify a MySQL JDBC driver dependency so you can update the records within the Cayambe database.
For connecting to the Cayambe database, you need to define a DataSource.
Listing 11.3. project-defaults.yml
swarm:
  datasources:
    data-sources:
      CayambeDS:                                            1
      driver-name: mysql                                    2
      connection-url: jdbc:mysql://mysql:3306/cayambe       3
      user-name: cayambe                                    4
      password: cayambe
      valid-connection-checker-class-name:

   org.jboss.jca.adapters.jdbc.extensions.mysql.MySQLValidConnectionChecker
      validate-on-match: true
      background-validation: false
      exception-sorter-class-name:
   org.jboss.jca.adapters.jdbc.extensions.mysql.MySQLExceptionSorter
- 1 Name of the DataSource in JNDI.
- 2 Uses the module created from the MySQL JDBC driver dependency
- 3 URL to the MySQL database instance on OpenShift
- 4 Credentials for the Cayambe database
Finally, you create a class to process the records from the Kafka topic, as you receive them.
Listing 11.4. CategoryEventListener
@ApplicationScoped @KafkaConfig(bootstrapServers =
- 1 As you did on the producer, you define the Kafka host and port for the configuration.
- 2 The JNDI name for the CayambeDS that you created with project-defaults.yml. It’s used by getDatasource(), so you can update the Cayambe database with changed Categories.
- 3 @Consumer identifies the method as accepting Kafka topic records, and provides the necessary configuration to wire it up to the Kafka API. It defines the name of the topic you want records from, the type of the key, a unique consumer group identifier, and that you want the offset to start at the beginning of the topic.
- 4 Method to receive the Kafka record, with parameters for the key and value types to be passed
- 5 Execute the SQL to remove the category.
- 6 Execute the SQL to remove the category from the category hierarchy, either as a child or parent.
- 7 Execute SQL to determine if a row for a category ID already exists. Determines whether you're updating or inserving a record.
- 8 Execute SQL to update the fields on a category in the database.
- 9 Execute SQL to insert the new category into the database, and insert it into the category hierarchy.
- 10 Method to handle SQL update execution.
- 11 Method to check if a Category row exists in the database.
- 12 Method for retrieving the DataSource from JNDI.
CategoryEventListener registers a method to listen to the Kafka events, by defining the key type, value type, which topic you’re processing, a consumer group, and that you want to process all records in the stream from the beginning. When you receive a Kafka record, you then determine whether you need to remove a category, the value is null, or whether we’re processing a new or updated record.
To distinguish between update and new categories, you execute an SQL statement on the existing categories in Cayambe to see whether this record exists. If it does, it’s an update record; if it doesn’t, it’s a new one.
If you didn’t want the overhead of running an SQL statement to determine whether you’re dealing with an update or a new category, you could change the value type for the records in Kafka to be an enclosing object. The Category instance, the current value, can be a field on a new type, with a flag to indicate the type of change event that’s being dealt with.
Now that you’ve finished developing the Kafka consumer, you’re ready to see it all working in unison! But before you deploy the Kafka consumer you just created, to see the visual changes as they happen, it’s worth starting up the Cayambe hybrid from chapter 10 with the following:
/wildfly-11.0.0.Final/bin/standalone.sh
With Cayambe started, open a browser and navigate around the category tree. You should notice that any changes you made through the Admin microservice aren’t visible, which makes sense because you haven’t activated the process to update the Cayambe database with any changes. So let’s start your Kafka consumer now:
/chapter11/kafka-consumer> mvn clean fabric8:deploy -Popenshift
When the pod becomes operational, it should process all the records that are present on the Kafka topic, because you specified for it to begin at the earliest offset on the topic. You can open the logs of the service and see the console statements that were printed for each record processed.
With the records processed by the Kafka consumer, go back to the Cayambe UI and refresh the page. When navigating through the category tree and finding categories that were changed through the Admin microservice, you’ll notice that they’re now updated or removed based on what you did earlier.
You’ve successfully decoupled the data between the two systems so that one owns the data, the Admin microservice, and the other consumes a copy of it in a read-only manner. As an added benefit, as long as the Kafka producers and consumers are functioning, the data never becomes stale.
11.4. Additional exercises
As discussed earlier in the chapter, for an additional exercise, try converting the Cayambe hybrid to use Debezium to process database entries directly, instead of by you producing records within the Admin microservice.
This will also provide another benefit over the current solution, as the category hierarchy can be completely reconstructed from the Kafka topic records whenever needed. The hierarchy will contain records for all the initial inserts you did to load the database initially, as well as any insertions, updates, and removals that have occurred since then.
Summary
- Data streaming simplifies an architecture by enabling separate components or microservices to remain decoupled, while still using the same data.
- You can use data streaming with Apache Kafka to share data among microservices and applications without the need for REST calls to retrieve it.
Note
Additional details on developing microservices with Spring Boot can be found in the appendix.