Chapter 3: Importing Data into SAS
Importing Data from an Excel Workbook
Importing an Excel Workbook with Invalid SAS Variable Names
Importing an Excel Workbook That Does Not Have Column Headings
Importing Data from a CSV File
Shared Folders (Accessing Data from Anywhere on Your Hard Drive)
Demonstrating How to Read Data from a Shared Folder
Introduction
Now that you have learned how to perform some simple tasks using one of the built-in SASHELP data sets, it's time to see how to import your own data into a SAS library. SAS data sets contain two parts: one is called the data descriptor, also known as metadata. Metadata is a fancy word for data about your data. In the case of a SAS data set, this portion of the data set contains such information as the number of rows and columns in the table, the column names, the data type for each column (SAS has only two data types—character and numeric), and other information about how the data set was created.
The second part of a SAS data set contains the actual data values. If you tried to examine a SAS data set using another program such as Word or Notebook, it would show up as nonsense. Only SAS can read, write, and analyze data in a SAS data set. If you have data in Excel workbooks or text files, you need to convert that data into a SAS data set before you can use SAS to modify or analyze the data.
In this chapter, you will see how easy it is to import your own data from Excel workbooks, CSV files, and many other file formats such as Microsoft Access and SPSS, and create SAS data sets.
Exploring the Utilities Tab
Start by clicking the Tasks and Utilities tab in the navigation pane. It looks like this:
Figure 1: The Tasks and Utilities Tab in the Navigation Pane

When you click this tab, you see two separate tabs, one labeled Tasks, the other labeled Utilities. Expanding the Utilities tab displays three sub-tabs: Import Data, Query, and SAS Program (see Figure 2 below):
Figure 2: Expanding the Utilities Tab

The Import Data task is used to import data in a variety of formats and to create SAS data sets. A complete list of supported file types is shown in Figure 3 below:
Figure 3: List of Supported Files

As you can see, this import data utility can import data from many of the most common PC data formats. Because Excel workbooks and CSV files are so popular, let's use them to demonstrate how SAS converts various file formats into SAS data sets.
The Excel selection can accept both the older XLS workbooks as well as the current form with XLSX extensions. The import data task can use file extensions to automatically determine the file type. If you have a nonstandard file extension or if you prefer to manually select a file format, you can use the dropdown list in Figure 3 to instruct SAS how to convert your file.
Importing Data from an Excel Workbook
Your virtual machine is running a Linux operating system where naming conventions for files are different from the naming conventions used on Microsoft or Apple computers. Filenames in Linux are case sensitive, and folders and subfolders are separated by forward slashes. Filenames on Microsoft platforms are not case sensitive, and folders and subfolders are separated by backward slashes. To help resolve these file-naming conventions, you set up shared folders in your virtual machine that allow your SAS programs to read and write files to the hard drive on your computer.
There are slight differences in how you create shared folders, depending on whether you are running VirtualBox, VMware Workstation Player, or VMware Fusion. The easiest way to read and write data between your SAS Studio session and your hard drive is to place your data files in a specific location—SASUniversityEditionmyfolders. If you followed the installation directions for your choice of virtualization software, this location on your hard drive is mapped to a shared folder called /folders/myfolders in SAS Studio.
For most of the examples in this book, the location c:SASUniversityEditionmyfolders is the folder where your data files and SAS data sets are located. All the programs and data files that you place in SASUniversityEditionmyfolders will show up when you click the My Folders tab in the Navigation pane. Later on, you will see how to set up other shared folders that allow you to read files from any location on your computer.
Let's use the workbook Grades.xlsx (located in the folder c:SASUniversityEditionmyfolders) for this demonstration.
Note: This file is one of many files stored in a ZIP file containing all the sample data and programs referred to in this book. You can download it from support.sas.com/cody and unzip it into the c:SASUniversityEditionmyfolders folder.
If you open this workbook in Excel, it looks like this:
Figure 4: Excel Workbook Grades.xlsx

The first row of the worksheet contains column names (also known as variable names). The remaining rows contain data on three students (yup, it was a very small class). The worksheet name was not changed so that it has the default name Sheet1.
The first step to import this data into a SAS data set is to double-click the Import Data task.
Figure 5: Double-Clicking the Import Data Task

You have two ways to select which file you want to import. One is to click the Select File button on the right side of the screen—the other method is to click the Server Files and Folders tab in the Navigation pane (on the left), find the file, and drag it to the Drag and Drop area.
Clicking Select File brings up a window where you can select a file to import. Here it is:
Figure 6: Clicking on the Select File Button

Select the file that you want to import and click Open. This brings up the Import Window:
Figure 7: The Import Window

Use the mouse to enlarge the top half of the Import window or use the scroll bar on the right to reveal the entire window. The figure below shows the expanded view of the Import window:
Figure 8: Expanded View of the Import Window

The top part of the window shows information on the file that you want to import. You can enter a Worksheet Name (if there are multiple worksheets). But because you only have one worksheet, you do not have to enter a worksheet name.
The OPTIONS pulldown menu allows you to select a file type. However, if your file has the appropriate extension (for example, XLSX, XLS, or CSV), you can leave the default actions (based on the file extension) to decide how to import the data.
Because the first row of the spreadsheet contains column names, leave the check on the "Generate SAS variable names" option. This tells the import utility to use the first row of the worksheet to generate variable names.
You probably want to change the name of the output SAS data set. Clicking the CHANGE button in the Output Data area of the screen brings up a list of SAS libraries (below):
Figure 9: Changing the Name of the SAS Data Set

The WORK library is used to create a temporary SAS data set (that disappears when you close your SAS Session). For now, let's select the WORK library and name the data set Grades.
When all is ready, click the RUN icon (Figure 10 below).
Figure 10: Click the Run Icon

You are done! Here is a section of the results:
Figure 11: Variable List for the Work.Grades SAS Data Set

Here you see a list of the variable names, whether they are stored as numeric or character, along with some other information that we don't need at this time. Notice that the import utility correctly read Name as character and the other variables as numeric.
Listing the SAS Data Set
A quick way to see a listing of the Grades data set is to select the LIBRARIES tab in the navigation pane, open the Work library, and double-click Grades. It looks like this:
Figure 12: Data Set Grades in the Work Library

You can use your mouse to scroll to the right to see the rest of the table. To create a nicer looking report, click the Tasks and Utilities tab of the navigation pane and select Data followed by List data, like this:
Figure 13: The List Data Task

Double-click List Data, and select the Grades data set in the WORK library. Then click the RUN icon. You will be presented with a nice looking list of the Grades data set (see Figure 14 below):
Figure 14: List of the Grades Data Set

Importing an Excel Workbook with Invalid SAS Variable Names
What if your Excel worksheet has column headings that are not valid SAS variable names?
Valid SAS variable names are up to 32 characters long. The first character must be a letter or underscore—the remaining characters can be letters, digits, or underscores. You are free to use upper- or lowercase letters.
As an example of a worksheet with invalid variable names, take a look at the worksheet Grades2 shown in Figure 15:
Figure 15: List of Excel Workbook Grades2
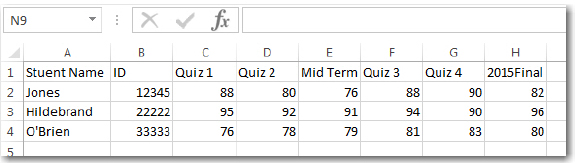
Most of the column headings in this spreadsheet are not valid SAS variable names. Six of them contain a blank, and the last column (2015Final) starts with a digit. What happens when you import this worksheet? Because you now know how to use the Import Data task, it is not necessary to describe the import task again. All you really need to see is the final list of variables in the data set. Here they are:
Figure 16: Variable Names in the Grades2 SAS Data Set

As you can see, SAS replaced all the blanks with underscores and added an underscore as the first character in the 2015Final name to create valid SAS variable names.
Importing an Excel Workbook That Does Not Have Column Headings
What if the first row of your worksheet does not contain column headings (variable names)? You have two choices: First, you can edit the worksheet and insert a row with column headings. The other option is to uncheck "Create Variable Names" in the options section in the Import Window (see Figure 17) and let SAS create variable names for you.
Figure 17: Uncheck the Create Variable Names Option

Here is the result:
Figure 18: Variable Names Generated by SAS

SAS used the column identifiers (A through F) as variable names. You can leave these variable names as they are or change them using DATA step programming. Another option is to use PROC DATASETS, a SAS procedure that allows you to alter various attributes of a SAS data set without having to create a new copy of the data set.
When you import a CSV file without variable names, you will see variable names VAR1, VAR2, etc., that are generated by SAS.
Importing Data from a CSV File
CSV (comma-separated values) files are a popular format for external data files. As the name implies, CSV files use commas as data delimiters. Many web sites allow you to download data as CSV files. As with Excel workbooks, your CSV file may or may not contain variable names at the beginning of the file. If the file does contain variable names, make sure that the "Generate SAS Variable Names" options box is checked; if not, uncheck this option.
As an example, take a look at the CSV file called Grades.csv in Figure 19 below:
Figure 19: CSV File Grades.csv

This CSV file contains the same data as the Excel Workbook Grades.xlsx. Notice that variable names are included in the file. You can import this file and create a SAS data set, using the same steps that you used to import the Excel workbook. The import facility will automatically use the correct code to import this data file because of the CSV file extension. The resulting SAS data set is identical to the one shown in Figure 14.
Shared Folders (Accessing Data from Anywhere on Your Hard Drive)
When you follow the instructions in setting up SAS Studio, a default folder referred to in SAS Studio as /folders/myfolders allows you to read data from the folder called SASUniversityEditionmyfolders on your hard drive. If this is the only place where you plan to read data, you can skip the remainder of this section. However, if you need to read data from other folders on your hard drive, you will need to learn how to create shared folders. This may seem a bit scary, but if you repeat the steps in the example that follows, you should be successful.
For this example, a folder called c:BooksBook_Data was created on the hard drive.
To create a shared folder, click Settings before starting your virtual machine.
Note: Your virtual machine should be either off or running, not in a suspended state. We recommend that you abort (turn off) your virtual machine when you are creating (or removing) folders.
Figure 20: Click the Settings Icon

Under the Settings menu, select Shared Folders.
Figure 21: Select Shared Folders

To add a new folder, click the plus (+) sign as shown in Figure 22:
Figure 22: Click the + Sign to Add a Folder

In the Folder Path pull-down list, select Other.
Figure 23: In the Pull-Down List, Choose Other

Browse the list to locate the folder c:BooksBook_Data.
If you type in a folder name instead of browsing for it, be sure to use the same case (upper- mixed case or lowercase) for the folder name.
Figure 24: Browse and Select Your Folder

Make sure that the two boxes labeled "Auto-mount" and "Make Permanent" are checked. Note: Depending on how you choose your folder, the selection "Make Permanent" may not be listed. This is OK.
Figure 25: Check Auto-Mount and Make Permanent

Click OK and the folder name is automatically created.
Note: The folder name cannot contain any blanks. If the folder name on your hard drive contains blanks, either leave them out in the Folder Name being created or replace them with underscores.
Your new folder should now show up in the list of folders on your virtual machine.
Figure 26: Your Folder Is Created

If your virtual machine was off, restart it. (You can do this by clicking Machine and selecting the Start option. You can also double-click the virtual machine that you wish to restart in the list of virtual machines (you may only have one in the list).
Figure 27: Restart Your Virtual Machine

When you open SAS Studio, you will see your new folder under the heading of Folder Shortcuts. (If your Studio session was already open, you need to restart it).
Figure 28: Your New Folder in Studio

Demonstrating How to Read Data from a Shared Folder
The last section in this chapter demonstrates how to read data from a shared folder. An Excel file called Demographics.xlsx contains some demographic data on four subjects and was placed on the hard drive in c:BooksBook_Data. It is listed in Figure 29 (below):
Figure 29: File Demographic.xlsx in C:BooksBook_Data

To read this workbook and convert it into a SAS data set, follow the same steps as in the previous demonstration of reading a workbook from the SASUniversityEditionmyfolders location. But when you browse for a file, select Demographics.xlsx in the Book_Data Folder Shortcut (Figure 30 below):
Figure 30: Select Demographics.xlsx from the Book_Data Folder Shortcut

Conclusions
In this chapter, you saw how to import data from Excel workbooks and CSV files. Importing data from any of the other choices displayed in Figure 3 is basically the same as importing data from Excel workbooks and CSV files. If your data resides in text files (either in fixed columns or separated by delimiters), read the next chapter to learn how to create SAS data sets from these types of files. Finally, you saw how to create a shared folder and read data from locations on your hard drive other than SASUniversityEditionmyfolders.
Problems
3-1: Use the Import Utility to create a temporary SAS data set called Clinical using the Excel workbook ClinicData.xlsx. Use the List Data task to list the data set.
3-2: Use the Import Utility to create a temporary SAS data set called Diabetes, using the Excel workbook Diabetes.xls. Use the List Data task to list the first five rows of the table.
3-3: Repeat problem 3-2 except use the CSV file Diabetes.csv as the source of your data.
3-4: Using the SAS data set Diabetes, use a filter to display all subjects with blood glucose levels (variable Glucose) above 400. You can do this by using the temporary SAS data set you created in Problems 2 or 3, or you can try to use the permanent SAS data set Diabetes that you downloaded to your hard drive. Refer to the Problem Instructions section of this book if you forgot how to create a libref.