
Chapter 6. Tools, Equipment, Components, and Supplies
This chapter is divided into five parts.
Kits. Various kits have been prepared, containing components and supplies that you can use to complete the projects in the book. See “Kits” just below, for details.
Searching and Shopping Online. Instead of buying kits, you may prefer to do your own shopping. I have compiled some tips to help you. See “Searching and Shopping Online” just below, for details.
In Checklists of Supplies and Components you will find an itemization of everything that you need. The lists of supplies begin at “Supplies”, and the lists of components begin at “Components”.
Buying Tools and Equipment. I have listed all the tools that are discussed at the beginning of each chapter of the book, and I have some suggestions about where to find them. See “Buying Tools and Equipment”.
Suppliers is a list of sources. Abbreviations in this list are used in the buying guides. See “Suppliers”.
Kits
Kits of components are available for many of the experiments in this book. Be careful not to buy old kits that were marketed for the first edition of Make: Electronics. Some of the old kits are still available online, and are not compatible with this second edition.
Up-to-date information about recommended kits is available at http://www.plattelectronics.com. At that site you will also find information about other books by Charles Platt, and news about upcoming publications.
The page will be updated as more options become available. Please note that kits may be offered by independent suppliers who are not affiliated with Maker Media in any way.
Searching and Shopping Online
I’m including some general advice about searching for parts because many readers of the first edition of this book seemed to have difficulty getting the results they were looking for. I’ll start with the most basic considerations, and work up. Even some seasoned shoppers may find a couple of tips here that are useful.
For a comprehensive list of all suggested suppliers, see “Suppliers”. Here are the ones that I consider primary:
Electronic components are available from large retail vendors online, most of which don’t impose minimum quantities. Mouser, Digikey, and Newark are the obvious choices, maintaining huge inventories. Find them at:
Mouser Electronics ships from Texas
Digi-Key ships from Minnesota
Newark element 14 ships from Arizona
In addition, don’t forget eBay, where prices are often lower than from other sources, especially if you use Asian sellers. eBay is not so useful for parts for which there is less demand, such as logic chips.
Tools and equipment are available from eBay, Amazon, and Sears, but if you want a truly monumental selection, McMaster-Carr is unbeatable.
They also have excellent tutorials—for instance, on the properties of different types of plastic, or the relative advantages of different drill bits.
The Art of Searching
The easiest search is for a specific part number, if you have one. You can enter it into the search field on a site such as mouser.com, where the algorithm is smart enough to allow some flexibility. For example, suppose you want a 7402 logic chip. Mouser will helpfully suggest that a SN7402N from Texas Instruments may be what you want, bearing in mind that Texas Instruments adds SN to the front and N to the end of the basic chip type.
However, the search will not be helpful if there is an additional code in the middle of a part number. When you search for a 7402, Mouser won’t think of showing you any chips in the 74HC02 family, because HC is added in the middle.
Try the Chat Option
Suppose you only have an incomplete part number, or you don’t know if the part is obsolete, or you generally need a bit of help. Don’t overlook the option to make a voice call. A large distributor will have sales representatives who can assist you. It doesn’t matter that you are an individual buying small quantities.
Better still, open a chat window. This will allow you to copy-paste a part number into the window and get a fairly quick answer advising you of similar options if the part is unavailable.
Parts on Google
If you want to do comparison shopping, use a generic search engine. I’ll assume that Google is your default, because I feel it’s the most appropriate for our purposes.
If a part number is long and complicated, you will have a better chance of finding what you want, and not being offered things that you don’t want. Searching for a 7402 on Google will generate results including a Pantone ink color and an Institutes of Health standard. Searching for 74HC02 will narrow the results to logic chips.
Unfortunately, you are now likely to get hits from a lot of datasheet resellers. These companies harvest datasheets from electronics manufacturers and repackage them for you with ads that pay for this “service.” It wouldn’t matter, except that the reseller often shows you just one datasheet page at a time, because each page will have a new set of ads, all of which make money for the reseller. Waiting for each page to display is a waste of time, so I often use a hyphen as a minus sign to block datasheets when I search for components on Google, like this:
74HC02 -datasheet
Note that when you specify a part number, the search engine is less likely to compensate for any little errors that you make. Google understands that if you type “compoments” you probably meant “components,” but it will not know that an 84HC02 chip should really be a 74HC02.
Datasheets
What if you actually want to see a datasheet, because you need to check the specification of a component before buying it? Go to one of the big distributors, find the part that you want, and you will see the option to click a datasheet icon. This will link you with a printable multipage document (almost always in PDF format) maintained by the component manufacturer itself. For me, this is a lot quicker than dealing with datasheet resellers on Google.
General Search Techniques
If you are looking for a component type, a search term that is brief and vague is usually inadequate. Suppose you search for:
switch
In my location, the first hit from this search was for light switches, the second hit was for a local wine bar, and I was then offered a variety of network switches (which are like routers). I also found a company named Switch that helps people to find a new job. How can you avoid these irrelevant hits?
As a first step, add a word to define your area of interest. For example, this may help:
switch electronic
Better still, if you want a DPDT toggle switch rated for 1 amp, just say so:
"toggle switch" dpdt 1a
Note the use of quote marks to nail down a specific phrase, discouraging Google from showing near-miss search results that are not quite what you asked for. Also note that search terms are not case-sensitive; there’s no advantage in putting a term such as dpdt in caps.
You can narrow your search even further by naming a source, such as:
"toggle switch" dpdt 1a amazon
Why mention Amazon, if you can go to amazon.com and do your searching there? Because the search capability at amazon.com has fewer features than Google. In this example, it would not recognize the use of quote marks.
Fortunately Amazon allows Google to crawl all over its site and index everything, so that a search from Google can jump you straight to an Amazon list of toggle switches.
Exclusions
Use the minus option to avoid items that you don’t want. For instance, if you are only interested in a full-size toggle switch, you could try this:
"toggle switch" dpdt 1a amazon -miniature
Note that the minus sign is another piece of syntax that Amazon’s search feature doesn’t understand.
Alternatives
Don’t forget the AND and OR logical operators. If a single-pole, double-throw switch will work just as well for you as a double-pole, double-throw switch, you could try this on Google:
"toggle switch" dpdt OR spdt 1a -miniature
But even this may cause some problems, because naming conventions in electronics can be inconsistent. Some people refer to a DPDT switch as a 2P2T switch. Some call a SPDT switch a 1P2T switch. You’ll need a lot of ORs to cover these alternatives.
Too Much Typing?
Personally I find that a carefully constructed, detailed search will save time by avoiding subsequent searches. However, if you don’t want the chore of typing an elaborate search term, you have other options. One is to click the word “Images” which Google displays immediately above each set of search results, adjacent to the word “Web.” Google Images will show you pictures of every conceivable kind of switch, and because our brains are well equipped to recognize images quickly, scrolling through a lot of pictures can be a more efficient way to find what you want than scrolling through a lot of text.
Alternatively, you can click the “Shop” option above Google’s search results. This will give you the ability to list items in order of price from dozens or hundreds of different vendors. Some vendors will not be included, however.
Vendor Categories
Another option is to go to a vendor’s site and use their system of categories. At mouser.com, digikey.com, and newark.com, if you search for “switch” you’ll be shown a list of different kinds of switches. Click the type you want, and you’ll be offered additional options, to narrow your search one step at a time.
Ultimately on mouser.com and other large-vendor sites you are likely to see little windows listing attributes such as voltages, amperages, and other values. This can be frustrating, because the lists are not intelligently managed. Some switches rated for half an amp, for instance, are grouped under 0.5A, while others are grouped separately as 500mA. These ratings are identical, but the people who create the listings just seem to copy the specifications from datasheets, some of which use amps while others use milliamps.
What to do? Use your Control-click option (Command-click on a Mac). Holding down the Ctrl key (or Command key) while you click the additional selection allows you to select the 0.5A switches and the 500mA switches and any others that might be suitable—including 1A switches, as a higher current rating will work fine at lower currents.
Which to Click First?
When using categories on a vendor site, it’s useful to begin by choosing the attributes that you absolutely, positively need. For instance, if you are shopping for logic chips, begin by selecting through-hole versions, because you definitely won’t want the tiny surface-mount versions. But note that a “DIP” package (meaning, dual-inline pin) is almost the same thing as a “PDIP” (plastic DIP) package, which is the same as a “through-hole” version.
Conversely, any chip format identified by an acronym beginning with S is almost always a surface-mount version, which you do not want. SMT, in particular, means surface-mount.
A Real-Life Search
Here’s an example of an actual search that I performed for a part that I used in this book. I knew what I wanted it to do, but I didn’t know the part number.
I wanted a counter with a 3-bit output for use in the “Nice Dice” circuit (see “Experiment 23: Flipping and Bouncing”). So I went to Mouser Electronics and I started by searching for:
counter
While I was typing my search term, Mouser suggested an autocomplete:
Counter ICs
An IC is an integrated circuit, which is the same thing as a chip. So I clicked the autocomplete suggestion, which took me to a page suggesting 821 matches. Little scrolling windows would allow me to narrow the search by manufacturer, counter type, logic family, and much more. How should I proceed?
I scrolled horizontally to the window allowing me to choose the mounting style. Only two options: SMD/SMT (which are surface mount chips) and through-hole (the chips that plug into breadboards, not requiring a magnifying glass). I clicked the through-hole option and then clicked the Apply Filters button. That gave me 177 matches.
All the logic chips in this book are HC type in the 7400 family, so I went to the Logic Family window, and clicked 74HC. But, not so fast! I know that Mouser often lists the same thing under different names, so I scrolled through the other options. Sure enough I found HC listed separately from 74HC. I Control-clicked it to select both terms.
Now I had 52 options to choose from. As Counter Type, I selected Binary, because I wanted a binary output. This left me with 33 remaining matches.
There were no 3-bit chips, but I could use a 4-bit chip and ignore the highest bit. I saw two options in Number of Bits: 4 and 4-bit. I Control-clicked to select them both.
Counting sequence could be Up, or Up/Down. I only wanted Up, so I clicked that. Now only nine matches left! Time to inspect the results. I wanted to use the most commonly available chip, which I determined by seeing how many of each one were in stock. I saw more than 7,000 of the SN74HC393N by Texas Instruments.
I clicked the datasheet link to make sure it would do what I wanted. A 14-pin chip providing maximum continuous output current of plus-or-minus 25mA with a nominal 5-volt supply (“nominal” means “typically used”). Yes, this was a standard logic chip in the 74HCxx family. Actually it contained two 4-bit counters, and I only needed one, but I wasn’t going to quibble over that, and in fact I realized I could make use of the second counter in the chip, if I enlarged the scope of my project.
The 74HC393 would cost me about 50 cents. Might as well put six of them in the shopping cart. That’s only $3, so maybe I should look for something else, reasonably small and light, so that I could add it without paying any additional shipping charge. But first I printed the datasheet for the 74HC393 and added it to my paper-based file-folder system.
You can see that this process entailed a lot of clicking. But it took me less than 10 minutes, and I found exactly what I wanted.
I could have followed a different path. Because I knew I wanted a chip in the 74xx family, I could have gone to this URL, which I keep bookmarked for easy reference:
www.wikipedia.org/wiki/List_of_7400_series_integrated_circuits
This includes all the 74xx logic chips that have ever been made. If you go to this page, you can press Control-F to search the text, and then type in:
4-bit binary counter
It has to be an exact match, which means you must type 4-bit, not 4 bit. The search yields 13 hits, and you can compare the features of the chips. After you choose one, you can copy its number and paste it into the search field of a site like Mouser, which takes you to that one component.
The only problem is, the Wikipedia page doesn’t tell me which chips are old and almost out of production, and which are still popular. For my purposes, writing a book that I hope will be around for a while, I have to stick with the most popular components. This may be a good idea from your point of view, too, because if you build a circuit around an old chip, you are locking yourself into the past.
I could have used yet another approach, doing a Google search for people discussing and advising each other about counter chips. But you get the general idea. You don’t need a part number, to find what you want.
eBay Options
I buy a lot of parts through eBay because I find bargains there, and also because most companies selling through eBay are extremely quick and reliable. To minimize your time and trouble, you need to know a few search basics that are specific to eBay.
First, don’t hesitate to click the little “Advanced” option just to the right of the Search button on eBay’s home page. This will allow you to specify attributes such as the country of origin (if you want to avoid overseas suppliers), and can limit your search to Buy It Now items. You can also specify a minimum price, which can be useful to eliminate stuff that is too cheap to be any good. Then, before starting the actual search, I usually click the display option for Price + Shipping: Lowest First.
Once you find what you want, it’s time to check the seller’s feedback. For sellers within the United States, I want 99.8% or better. I’ve never had a problem with sellers rated 99.9%, but I have been disappointed sometimes with service from sellers rated 99.7%.
If a supplier is in an Asian nation such as China, Hong Kong, Thailand, or others, you can be less fussy about feedback, because a lot of buyers give bad feedback when they don’t receive something as quickly as they expect. Overseas sellers will warn you that a small packet will take 10 to 14 days in transit, but buyers complain anyway, and this drags down the feedback rating. In reality, in my experience, every item that I have ordered from overseas sources has always turned up, and has always been what I wanted. You just need to exercise a little patience.
After you find what you want on eBay, you may want to click the Add to Cart button, rather than the Buy it Now button, because you can look for additional items from the same seller, and you’ll save time by grouping them into one shipment. This should also reduce shipping costs.
Click the Visit Store option in the Seller Information window, or if the seller doesn’t have an eBay store, click to See Other Items. You then have the option to search within that seller’s list of products. After you add as many as you want to your cart, it’s checkout time.
You can make direct contact with overseas suppliers, instead of finding them through eBay. Tayda Electronics in Thailand (abbreviated tay in my list—see “Suppliers”) is a popular source.
Amazon
I don’t think amazon.com is very useful for components, but it can be a good source for tools and for supplies such as wire or solder. The only problem I have is that Amazon doesn’t like to show me the cheapest stuff first. You have to choose that option repeatedly after every search, and if the products are scattered among different store categories, the option to resequence the results will not exist. Even when you can prioritize the list by cheapness, Amazon (unlike eBay) is not smart enough to factor in the shipping cost. Pliers with a price of $4.95 and $6 shipping will be listed as being cheaper than pliers selling for $5.50 with $3 shipping. On the other hand, Amazon ships fast and if you buy a bunch of items at one time, all of them warehoused by Amazon themselves, you may be able to spend enough to get free shipping.
Killing Autocomplete
One last tip regarding Google. The default mode of the search engine will prompt you with a pop-up list of similar terms while you are still trying to type your search string. I get really annoyed with the interference of this autocomplete option, so I have disabled it—and you can, too.
In the address bar of your browser, use this URL to launch Google:
http://www.google.com/webhp?complete=0
Now save it as one of your favorites, and when you click the favorite, Google won’t try to tell you what it thinks you are looking for. It will wait quietly for you to finish typing.
You can also use the URL as the default page that will open every time you launch your browser.
Is Searching Worth the Trouble?
You may feel that you don’t want to memorize all these searching techniques. OK, that’s why Maker Shed and myself are offering kits to go with this book. Buy a kit, and you should have all the components that you need, with no searching necessary.
But what are you going to do if you get interested in projects outside of this book? Suppose you see a circuit online—or suppose you want to modify a circuit, or design your own. At that point, I think you’ll have to buy your own parts, and even if you try to obtain them all from one source, search techniques can be valuable.
Checklists of Supplies and Components
Photographs and general information are provided at the beginning of each chapter of this book. See “Necessary Items for Chapter One”, “Necessary Items for Chapter Two”, “Necessary Items for Chapter Three”, and “Necessary Items for Chapter Four”.
Below you will find listings of all the components and supplies. But I need to clarify the distinction between these two words.
Supplies are items such as solder or wire that I suggest you buy in a one-time purchase, sufficient for all the experiments. It doesn’t make sense to consider how many inches of wire you will need for each project.
Components become an integral part of a project. You may be able to reuse these items, but only if you remove them from a previous project. Therefore, to take one example, a breadboard is included with components.
Supplies
The following supplies will be sufficient for all the projects. See “Suppliers” for a list of sources from which you can buy these supplies, and abbreviations that I will use to refer to them.
Hookup Wire
You need 22 gauge, solid conductor, in at least two colors (red and blue), and preferably two more colors (your choice). Automotive wire is acceptable, so long as it is solid-core. Search eBay or Google for
solid wire 22 gauge OR awg
or check discount suppliers such as all, elg, and jam, or hobby suppliers such as ada and spk. (AWG is an acronym for American Wire Gauge.)
Quantities? If you want to do the experiments in Experiments 26, 28, 29, 30, and 31 that explore the world of inductance, you really need 200 feet of wire. Different colors can be joined together temporarily when winding coils. The wire can be unwound afterward and reused for other purposes.
If you are willing to skip the inductance experiments, I suggest you buy three spools of 25 feet each. You can find smaller lengths than 25 feet, but the price per foot goes up rapidly.
Jumpers
Personally I prefer not to use precut jumper wires, but if you choose them, one box should be sufficient. In addition you will need 25 feet of raw hookup wire, to make connections that are longer than the longest precut jumper. To find precut jumpers, you have to use the right search term. On Google, search for:
jumper wire box
The word “box” is the key to finding what you want. It automatically eliminates the type of undesirable flexible jumpers with plugs at each end, which are generally sold in bundles, not boxes. I don’t think they are a good idea.
Stranded Wire
This is an optional addition, for situations where flexibility is important. One 25-foot spool will be enough.
Solder
This is usually sold by weight. See “Essential: Solder” for the pros and cons of solder containing lead. Either way, be sure you buy electronic solder with a rosin core. The thickness may range from 0.02” to 0.04” (0.5mm to 1mm). If you only want to solder a couple of projects, three feet of solder will be sufficient, and some sources on eBay will sell very small quantities. Otherwise, try all, elg, jam, ada, amz, and spk.
Heat-Shrink Tubing
This is optional, but useful. One assortment of three or four (small) sizes will be enough. Because it has automotive applications, you can find it from hardware suppliers such as hom, har, and nor as well as hobbyist sources.
Perforated Board (unplated)
Only required in Experiment 14, although you can use it to build a permanent version of any projects in the book if you are willing to solder point-to-point wiring. A small piece, perhaps 4” x 8”, will be enough for three average projects. Finding unplated board can be difficult, as most of it has copper or nickel solder pads. I think these are undesirable when doing point-to-point wiring, as they increase the risk of short circuits. Search for:
perforated board bare -copper
Also try searching for “prototyping board,” or “proto board,” or “phenolic board.” Note that unplated board is also known as “unclad” in some places. At the time of writing, Keystone Electronics makes very small, cheap pieces of unplated perforated board, available through mou and dgk. You can also find unplated board at jam.
Perforated Board (plated)
This type of board is used for the finished version of Experiment 18, but of course you can use it for other projects where you want to make a permanent version. For convenience, use the type that has copper traces in the same pattern as connections inside a breadboard. This can be hard to find, because there are many different patterns, and the pattern that you want does not have a generally agreed name.
The BusBoard SB830 describes it as a “solderable breadboard” and it is currently available through amz. At ada, you find something similar named “Perma-Proto.” GC Electronics 22-508 is another option, available through jam.
The Schmartboard 201-0016-31 (available through mou) is a two-part package consisting of a breadboard and a matching perforated board. The manufacturer suggests placing the perforated board over the breadboard and inserting components through both of them while developing and testing the circuit. Then lift up the perforated board, and the components are already in position, ready for soldering. Unfortunately this may not work for components with very short leads.
Machine Screws (bolts)
These and nuts with nylon inserts are available from hardware stores, but probably not in the small sizes necessary for attaching perforated board to the inside of a project box, or similar tasks. I suggest you buy #4 size flat-headed bolts in lengths of 3/8” and 1/2”. My favorite source for this kind of hardware is McMaster-Carr.
Project Boxes
These vary a lot in price. Those made of ABS plastic are usually the cheapest. Try discount suppliers such as all, elg, and jam, or hobby suppliers such as ada and spk.
Components
Quantities and specifications for resistors, capacitors, and other components are listed below. See “Suppliers” for a list of sources, and abbreviations that I will use to refer to them.
Regardless of which supplier you use, components are likely to be manufactured overseas, and quality control has been deteriorating over the years. For example, we found that some capacitors marked 3.3μF were actually about 1.5μF. I suggest you try to buy the name brands that you see most frequently listed in online suppliers, and when in doubt, use your meter to check component values.
Resistors
Any manufacturer is acceptable. Lead length is usually unimportant. All projects in this book can use a quarter-watt power rating (the most common value). A tolerance of 10% is acceptable, and the color bands on 10% resistors are easier to read than the bands on 5% or 1% resistors. However, you can buy 5% or 1% resistors if you wish.
The total number of resistors used in each section of the book is shown in Figure 6-1, but because resistors and capacitors are cheaply available in quantity, I don’t think it makes sense to buy specific numbers for individual experiments. You will save time and money by buying packaged assortments.
-
To buy sufficient resistors for all the projects in this book (with some to spare), get at least 10 of each of these values: 47 ohms, 100 ohms, 150 ohms, 330 ohms, 680 ohms, 1K, 2.2K, 4.7K, 6.8K, 10K, 47K, 100K, 220K, 330K, 470K, 1M. Also, get 20 of 470 ohms. Prepackaged assortments are your best bet. The quantities I have specified assume you will reuse some resistors after they serve their purpose in simple demonstration experiments.
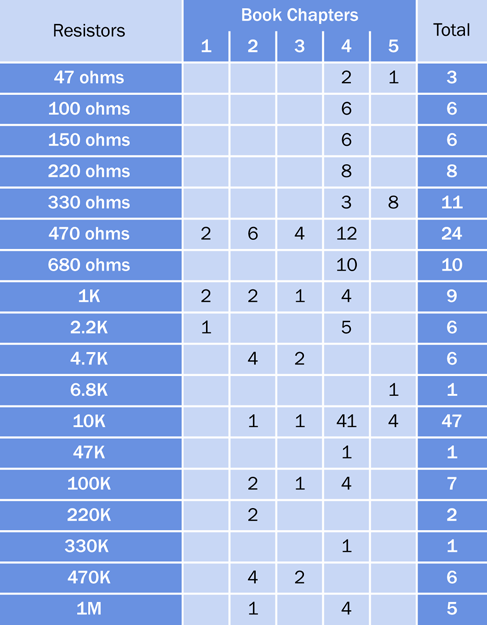
Figure 6-1. The number of resistors used in experiments in each chapter of the book.
Capacitors
Find them at the same sources listed for resistors, above. Any manufacturer is acceptable. Radial leads are preferred, meaning that both leads emerge from the same end of the capacitor, instead of a lead at each end. A working voltage of at least 16VDC is recommended for power supplies up to 12VDC. You can substitute capacitors with higher working voltages, but the components will be physically larger. Other ratings such as temperature and impedance are not important for our purposes.
Ceramic capacitors are likely to last for many decades, while the longevity of electrolytic capacitors is a subject of some debate. For larger values, you have to use electrolytics, because the cost of ceramics becomes prohibitive. Personally I would use ceramics for values below 10µF and electrolytics for 10µF and upward, but you’ll probably save money if you use electrolytics for values of 1µF and upward.
If you want to know the exact number of capacitors required in each chapter of the book, see Figure 6-2.
-
To buy sufficient capacitors for all the projects in this book (with some to spare), get at least five of each of these values: 0.022µF, 0.047µF, 0.33µF, 1µF, 2.2µF, 3.3µF, 100µF, 220µF. Also get at least 10 of values 0.01µF, 0.1µF, and 10µF. You only need two of each of these values: 15µF, 22µF, 68µF, 1,000µF. You need one of value 33µF. The quantities I have specified assume you will reuse some capacitors after they serve their purpose in simple demonstration experiments.

Figure 6-2. The total number of capacitors used in experiments in each chapter of the book.
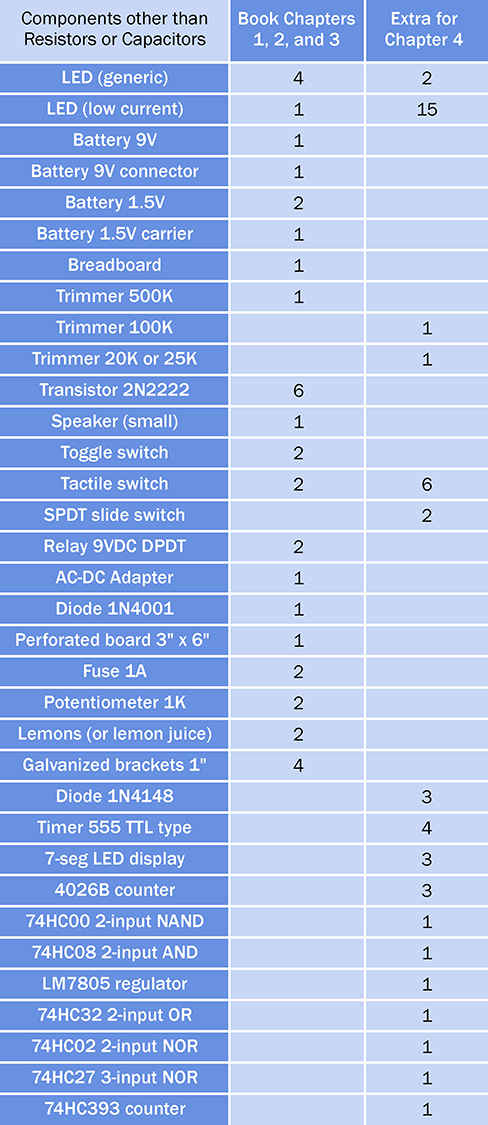
Figure 6-3. Minimum numbers of components, assuming you will reuse items from each experiment in subsequent experiments. Items for Chapter Four are additional to items listed for Chapters One, Two, and Three.
Other Components
For components other than resistors and capacitors, the minimum necessary quantities to build all the projects in Chapter One, Chapter Two, and Chapter Three of the book are shown in Figure 6-3. These quantities assume you will reuse all the components from each experiment in subsequent experiments. Components for Chapter Four are additional to those for previous sections of the book. Components for Chapter Five are not listed here, as the experiments are so diverse; see the beginning of each experiment in Chapter Five for a summary of options.
If you are concerned about burning out chips or transistors, which are vulnerable to damage, please add at least 1 to each quantity in Figure 6-3.
What if you may want to keep some of the projects that you build, instead of reusing the components for subsequent projects? In that case, please consult the tables for individual experiments that follow, and add the numbers of components for those experiment(s) which interest you.
The information that you need for finding and buying components is also provided below.
See “Suppliers” for a list of suppliers that are referred to by abbreviations of their names. For most electronic components, go to all, eby, elg, jam, and spk for special deals, or dgk, mou, and nwk for one-stop shopping where everything will be available.
Components for Chapter One
Components for Chapter One, other than resistors and capacitors, are listed in Figure 6-4.
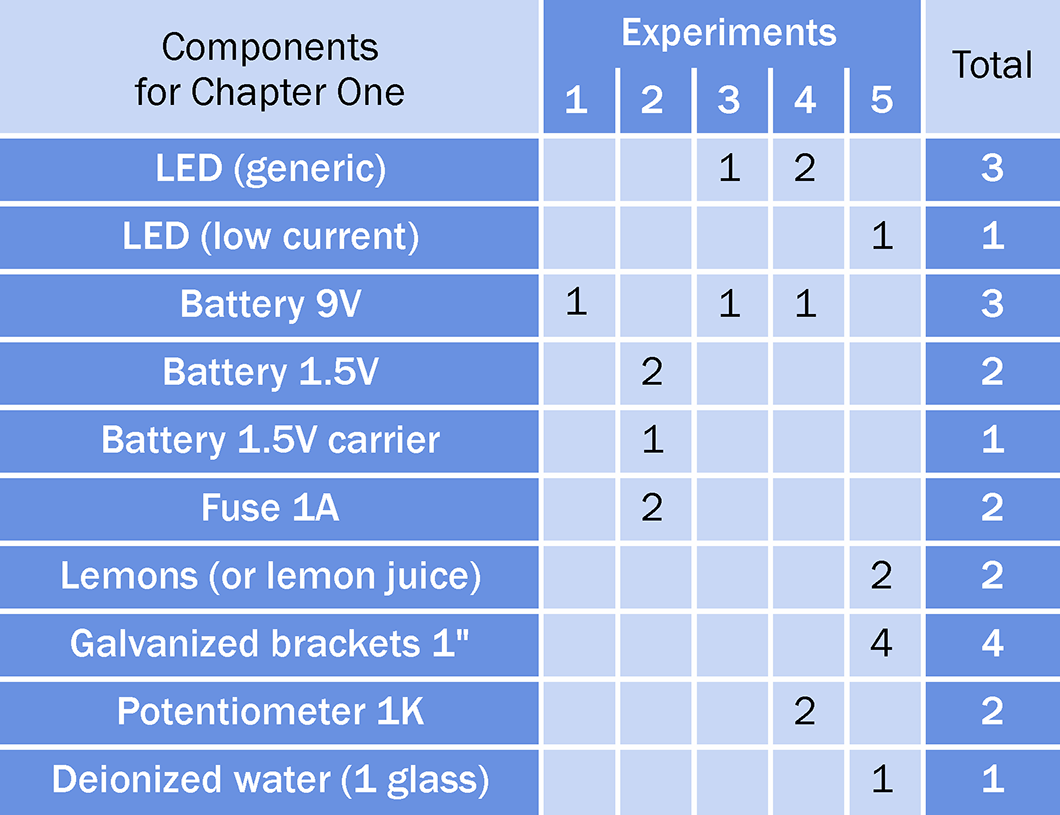
Figure 6-4. Components other than resistors and capacitors, used in the first chapter of this book.
Generic LEDs
The Lumex SLX-LX5093ID or Lite-On LTL-10223W are examples, but generic LEDs can be from any manufacturer. Probably 5mm LEDs are easier to handle, but 3mm LEDs can fit more easily into a crowded breadboard.
A typical forward current would be 20mA, typical forward voltage around 2VDC (blue and white LEDs will require a higher voltage). If you find a bunch of LEDs bundled for a low price on a site such as eBay, they can be considered generic.
Low-Current LEDs
These should be rated for 3.5mA forward current or less. The Kingbright WP710A10LID is an example, although the manufacturer, physical size, and color are unimportant. You could actually use this type of LED in all the experiments, but if you do, you should double the values of all the series resistors to protect it, as its maximum rating may be as low as 6mA.
Batteries
Nine-volt batteries can be the everyday alkaline type, available from supermarkets and convenience stores. Rechargable 9-volt batteries are an acceptable alternative.
The AA-size 1.5-volt batteries used in Experiment 2 must be alkaline. Do not use any type of rechargeable battery in this experiment.
Battery Connectors and Carriers
Just one carrier for a 1.5-volt battery will be necessary and sufficient. Note that a battery carrier may also be described as a battery holder or battery receiver. Make sure you get the type that holds only one AA battery (not two, three, or four). The Eagle 12BH311A-GR is an example.
You should buy at least three connectors for 9-volt batteries, because you may want to leave them attached to circuits that you build. Nine-volt connectors are sometimes described as snap connectors or battery snaps. Typical examples are the Keystone model 235 or Jameco Reliapro BC6-R. Buy whatever is cheapest, but make sure it terminates in wire leads.
Fuse
The 1A fuse in Experiment 2 ideally should be the automotive type, as its blades are easy to grip with alligator clips. Any automotive parts source will stock this type of fuse. The physical size is unimportant. Alternatively buy a 2AG size cartridge fuse, which is the smallest cartridge size, from an electronics supplier. It should be the fast-blow type, not a delay-fuse or “slow-blo” type. The voltage rating is not important. Littelfuse 0208003.MXP is an example.
Potentiometer
The full-size 1K potentiometer required for Experiment 4 should ideally be 1” in diameter, but sizes as small as half an inch are acceptable. Power rating, voltage rating, tolerance, shaft type, shaft diameter, and shaft length are unimportant. Select a potentiometer that has linear taper, and makes one turn, with panel mounting style, and solder lug terminals. Buy two. The Alpha RV24AF-10-15R1-B1K-3 and Bourns PDB181-E420K-102B are examples.
Juice and Brackets
If you use lemon juice in a squeeze bottle for Experiment 5, make sure it is undiluted and unsweetened. Vinegar is an acceptable substitute.
The 1” brackets for Experiment 5 must be galvanized. Pipe straps and hanger straps, to mount conduits and pipes, are an acceptable substitute. Any hardware source will have them cheaply available.
Deionized Water
This is often known as distilled water. Your local supermarket should have this, but make sure it is not “purified” and is not “spring water.” It must have zero mineral content.
Components for Chapter Two
Components for Chapter Two, other than resistors and capacitors, are listed in Figure 6-5.
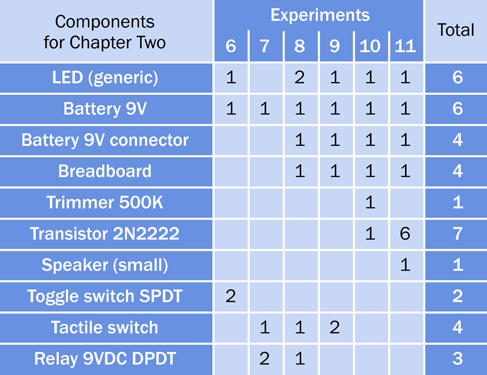
Figure 6-5. Components other than resistors and capacitors used in the second chapter of this book.
Breadboards
A breadboard is classified here as a component, because it cannot be separated from the circuit; on the contrary, it is the foundation for the circuit. You have to decide how many circuits you may want to keep on their breadboards, and how many you are likely to disassemble so that the breadboard can be reused. Ideally, each breadboard should have a single bus on each side, and 700 connection points, as shown in Figure 2-10. Search Google or eBay for
solderless breadboard 700
However, if you prefer, you can use a dual-bus breadboard and ignore the extra lines of holes.
Trimmer Potentiometer
Trimmers of the recommended type are shown at left and at right in Figure 2-22, and a discussion of other types accompanies that photograph. The power rating is not important. The preferred type is single-turn, and it must terminate in pins that are spaced in multiples of 0.1” (2.54mm or 2.5mm). The Vishay T73YP504KT20 is a low-cost 500K trimmer.
Transistors
Before purchasing any 2N2222 transistors, see “Essential: Transistors” for an important cautionary note.
Toggle Switch
This should be panel-mount type, ideally with screw terminals, although pins or solder lugs will be acceptable. It can be SPDT or DPDT. Voltage and current ratings are unimportant for the experiments in this book. The NKK S302T is an example, but you can find cheaper switches on eBay.
Tactile Switch
The type of tactile switch shown in Figure 2-19 is very strongly recommended, with two pins 0.2” apart, ideal for insertion in a breadboard. Avoid buying the more common tactile switches that have four pins or leads. The Alps SKRGAFD-010 is preferred (currently available from Mouser). Any tactile switch with 2 pins spaced 0.2” can be substituted, such as the Panasonic EVQ–11 series.
Relay
See “Essential: Relay” for information about the recommended type of 9VDC, DPDT relay. The Omron G5V-2-H1-DC9, Axicom V23105-A5006-A201, and Fujitsu RY-9W-K have all been tested for suitability.
Components for Chapter Three
Components for Chapter Three, other than resistors and capacitors, are listed in Figure 6-6.
Many of the components for projects in Chapter Three have already been mentioned for Chapters One and Two; see above.
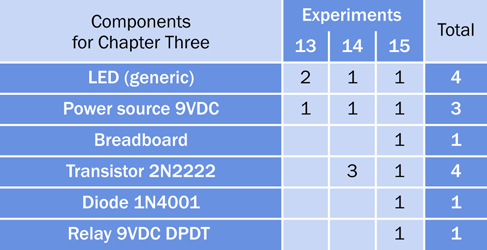
Figure 6-6. Components other than resistors and capacitors used in the third chapter of this book.
AC Adapter
This must have an output of 9VDC. It may have additional outputs providing different voltages. See “Essential: Power Supply” for a discussion of the options. Minimum output should be 500mA (0.5A) DC.
If you want a multi-voltage adapter, finding one can be tricky, because if you search for “ac adapter” you will find hundreds or even thousands of single-voltage units. Your answer is to search a source such as eBay for:
ac adapter 6v 9v
This should provide you with several affordable multi-voltage options. Make sure the photograph of the unit shows a little switch to select the various voltages.
Diode
The 1N4001 switching diode is cheap and generic. Buy 8 or 10, and buy a similar quantity of 1N4148 signal diodes at the same time.
Headers
These miniature plugs and sockets are an optional item. Examples are Mill-Max part numbers 800-10-064-10001000 and 801-93-050-10-001000, or 3M part numbers 929974-01-36RK and 929834-01-36-RK.
Components for Chapter Four
Components for Chapter Four, other than resistors and capacitors, are listed in Figure 6-7.
Slide Switch
The recommended slide switch is SPDT with three pins spaced 0.1” apart, and is shown in Figure 4-5. I suggest the EG1218 made by E-switch. If you buy an alternative, it must terminate in solder pins for insertion in a breadboard. An example is the NKK CS12ANW03, but if you search eBay for
slide switch breadboard
you will find some that are much cheaper. The type of contact plating, voltage rating, and current rating are unimportant for the projects in this book.
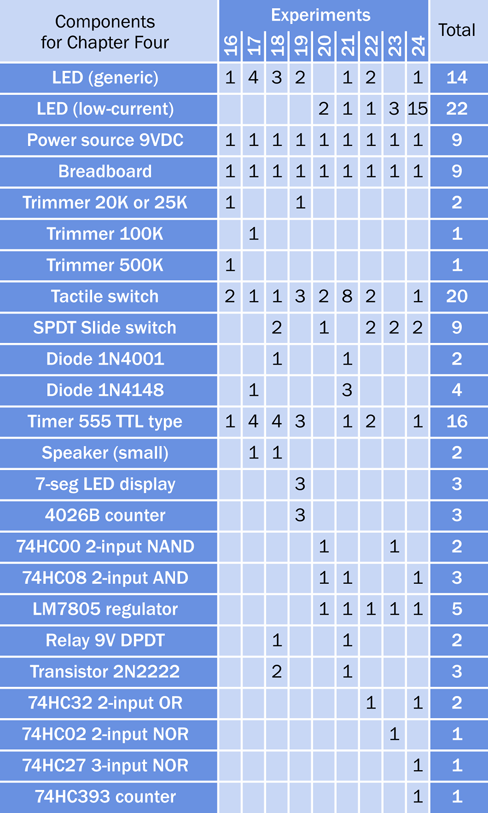
Figure 6-7. Components other than resistors and capacitors used in the fourth chapter of this book.
Integrated Circuit Chips
See “Fundamentals: Choosing Chips” for a discussion of chips. While all the chips you will need are listed in Figure 6-7 (with the exception of one more 555 timer required for Experiment 29), it’s a good idea to buy an extra chip of each type, as they are easily damaged by incorrect voltage, reversed polarity, overloaded outputs, or static electricity.
Any manufacturer is acceptable. The “package” of a chip refers to its physical size, and this attribute should be checked carefully when ordering. All logic chips must be in a DIP package (meaning a dual-inline package with two rows of pins that have 0.1” spacing). This may also be referred to as PDIP (meaning a plastic dual-inline package). They are also described as “through hole.” The DIP and PDIP descriptors may be appended with the number of pins, as in DIP-14 or PDIP-16. This number can be ignored.
Surface-mount chips will have packaging descriptors beginning with S, as in SOT or SSOP. Do not buy any chips with “S” type packages.
The chip family used exclusively in this book is HC (high-speed CMOS), as in 74HC00, 74HC08, and similar generic identifiers. These numbers will have additional letters or numbers added by individual manufacturers as prefixes or suffixes, as in SN74HC00DBR (a Texas Instruments chip) or MC74HC00ADG (from On Semiconductor). These versions are functionally identical. Look carefully, and you will see the 74HC00 generic number embedded in each proprietary number.
Old TTL logic chips, such as the 74LS00 series, have compatibility issues. They are not used or recommended for any of the projects in this book.
555 Timer
Unlike the logic chips, you do want the TTL version of the timer (also known as the bipolar version), not the CMOS version. Here are some guidelines:
The TTL version (which you want) often states “TTL” or “bipolar” in its datasheet, specifies a minimum power supply of 4.5V or 5V, specifies an inactive current consumption of at least 3mA, and will source or sink 200mA. Part numbers often begin with LM555, NA555, NE555, SA555, or SE555. If you search by price, the TTL versions of the 555 timer are the cheapest.
The CMOS versions (which you don’t want) always state “CMOS” on the first page of their datasheets, allow a minimum power supply of 2V in most cases, claim an inactive current consumption in microamps (not milliamps), and will not source or sink more than 100mA. Part numbers include TLC555, ICM7555, and ALD7555. If you search by price, the cheapest CMOS version of the 555 timer still costs almost twice as much as the cheapest TTL version.
Seven-Segment Display
The display used in Experiment 19 must be an LED device, height 0.56”, low-current red preferred, able to function at 2V forward voltage and 5mA forward current. The Avago HDSP-513A is preferred, or Lite-On LTS-5003AWC, or Kingbright SC56–11EWA, or similar.
Components for Chapter Five
Components for Chapter Five, other than resistors and capacitors, are listed in Figure 6-8.
Neodymium Magnets
I suggest K&J Magnetics as a source of supply, as the site maintains a very informative primer on magnets.
In Europe, supermagnete.de is a popular source.
16-Gauge Wire
This is only required for the antenna in Experiment 31. If the cost is prohibitive, try 50 or 100 feet of 22-gauge wire. If you live relatively close to an AM radio station, it should be adequate.
High-Impedance Earphone
Only required for Experiment 31, this can be ordered from the the Scitoys catalog.
You may also find them on Amazon. On eBay, search for:
crystal radio earphone
If you search eBay for crystal radio headphones instead of earphones, you’ll find some antique items from the early days of radio.
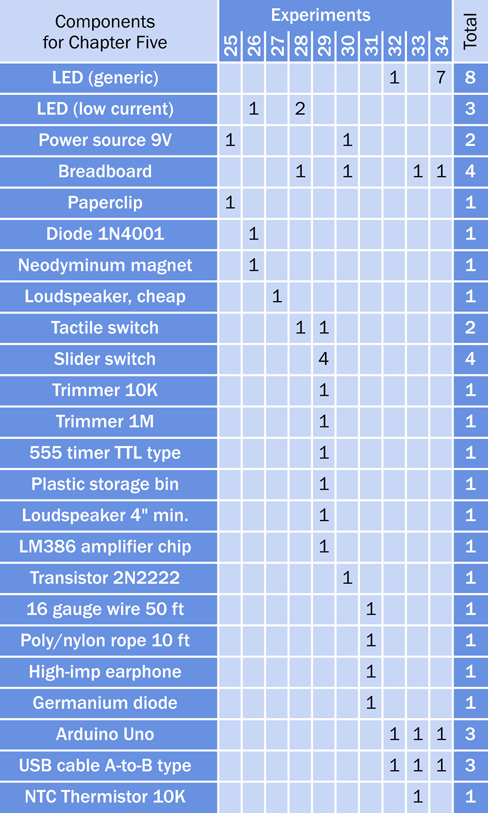
Figure 6-8. Components other than resistors and capacitors used in the fifth chapter of this book.
Germanium Diode
Available from the same sources as the high-impedance earphone, above. Some may also be available from dgk, mou, or nwk.
Arduino Uno Board
For a discussion of sources, see “Beware of Imitations?”
Thermistor
The recommended thermistor for Experiment 33 is the Vishay 01-T-1002-FP. If you make a substitution, use a 10K NTC-type thermistor rated at 1% or 5% accuracy with wire leads.
Buying Tools and Equipment
See “Components” for a list of components and see “Supplies” for a list of supplies.
Photographs and general information about tools and equipment are provided at the beginning of each chapter of this book. See “Necessary Items for Chapter One”, “Necessary Items for Chapter Two”, and “Necessary Items for Chapter Three”. No additional tools are required for Chapters Four and Five.
Because products come and go, I have not included stock numbers or names of manufacturers of tools and equipment. The specifications and photographs at the beginning of each chapter should provide you with sufficient guidance, and if you restrict your search to large sites such as amazon.com or ebay.com, you may find everything you need fairly quickly, all in one place.
While it’s true that expensive tools may be manufactured with greater precision and durability, the cheapest products should be satisfactory for the purposes of this book.
See “Suppliers” for URLs that are referenced here with three-letter abbreviations
Tools and Equipment for Chapter One
For photographs and discussion of these items, see Chapter 1.
Only one of each item is required, unless otherwise specified.
Multimeter
For a discussion of multimeter features, see “The Multimeter”. Good sources include all, amz, eby, and jam.
Test Leads
Double-ended test leads should terminate in alligator clips approximately 1” long. The wire connecting them should measure 12” to 15” (not longer). You need at least three red and three black. Additional colors are useful.
You don’t want the kind of test leads that have a plug at each end. Those are sometimes known as “jumper wires.” Just search a site such as eBay for
test leads double ended alligator
and you should find what you want. Buy 10. Sources include all, eby, jam, or spk.
Safety Glasses
Try amz, eby, har, hom, or wal. Ideally, look for glasses with ANSI Z87 rating (you can use this as a search term). Avoid tinted glasses.
Tools and Equipment for Chapter Two
For photographs and discussion of these items, see Chapter 2.
Long-Nosed Pliers
They should measure approximately 5” end-to-end, with a flat inside jaw, not round. From amz, eby, mcm, mic.
Wire Cutters
Also known as “side cutters,” and should measure approximately 5” end-to-end. From amz, eby, har, hom, nor, or mcm.
Flush Cutters
These are optional. From amz, eby, har, hom, nor, or mcm.
Wire Strippers
You need the type with specifically sized holes for numbered wire gauges, but the most common range (10 to 20 gauge) is not suitable.
I think you should buy wire strippers that have a specific provision for 22-gauge wire, because there’s no point in making your task more difficult than it needs to be. Search online for:
wire strippers 20 30
This should find tools with holes for 20–, 22–, 24–, 26–, 28–, and 30–gauge wire. Alternatively, look on amz, eby, elg, jam, and spk.
Tools and Equipment for Chapter Three
For photographs and discussion of these items, see Chapter 3.
Low-Power Soldering Iron
This should be rated for 15W with a plated, slender, conical tip. Try all, amz, eby, jam, and mcm.
General-Duty Soldering Iron
Should be rated at 30W or 40W. Try amz, eby, har, hom, mcm, nor, or srs.
Helping Hand
Can be found at ada, amz, eby, jam, or spk.
For a small, close-up magnifying lens try amz, eby, or wal. It may be listed as a magnifier or a loupe.
Minigrabbers
The Pomona model 6244-48-0 is available from amz, dgk, mou, and nwk. For cheaper alternatives try eby, which is also your first choice for meter probes terminating in alligator clips.
Heat Gun
Usually sold as a general-purpose tool, and therefore is available from hardware stores. Try amz, har, hom, or nor. For a miniature heat gun, try eby.
Desoldering Equipment
Various options are available from amz, elg, jam, spk, and eby.
Soldering Iron Stand
This will be found in the same places that sell soldering irons.
Miniature Saw
My personal favorite is the #15 X-Acto blade. You also need the handle that it fits in. It is available online from Tower Hobbies, Hobbylinc, ArtCity, and many other arts/crafts sources. Also look for the larger X-Acto saw blade, #234 or #239, which you can use for cutting perforated board.
Deburring Tool
If your local hardware store does not stock this item, it is inexpensively available from amz, eby, mcm, nor, srs, and some specialty sources. The standard blade in this tool is intended for right-handed use. Left-handed blades are made, but can be hard to find. Some blades are harder than others; an E300 means that it is intended for soft metals and most plastics.
Calipers
I like Mitutoyo calipers, although many cheaper brands exist and will be sufficient for everyday use. The Mitutoyo website will show you all their available models, after which you can Google “Mitutoyo” to find retail sources. Many people prefer calipers with a digital display, switchable between metric and inches. I prefer calipers that do not require a battery.
Copper Alligator Clips
Available cheaply and in small quantities from the big general electronics suppliers such as dgk, mou, or nwk.
Suppliers
The three-letter abbreviations preceding each supplier are used throughout the text to suggest appropriate sources.
ada: Adafruit
all: All Electronics
amz: Amazon
dgk: Digi-Key
eby: eBay
elg: Electronic Goldmine
evl: Evil Mad Scientist
har: Harbor Freight
hom: Home Depot
ins: Instructables
jam: Jameco
mcm: McMaster-Carr
mou: Mouser Electronics
nwk: Newark Electronics
nor: Northern Tool
plx: Parallax
spk: Sparkfun
srs: Sears
tay: Tayda Electronics
Many of these sites also host extensive tutorials and other helpful information. You can learn a lot by browsing through their pages.