
CHAPTER 4 Crafting a Story
Our first interaction with food, whether in a photo or real life, is to see it. In that first look, we get an idea of texture, flavour, and colour, and experience the food visually before we even take the first bite. This gives plenty of opportunity to connect the viewer to our food through the story and narrative we present.
Your story or narrative is what takes your photo from a collection of technical elements to a visual story that means something. It’s the why behind your image. Why does this story need to be told?
But what is a food story, and how do you tell one? A food story is an emotion that we evoke in the viewer while they are looking at an image. What kind of emotion we want to evoke will tell us a lot about how to compose our photo. Knowing what the story of your image is before you shoot will help you answer some of the most important questions about styling, and help you take the technical things you’ve learned in the first chapters about lighting, composition, and styling, and weave them together with creativity and emotion.
Styling your image is all about bringing your vision and story to life. You need to connect the props you use, the backgrounds and the lighting into one cohesive composition to achieve a style. In this chapter we’ll explore different ways you can create narrative in your work.
A story doesn’t need to be busy or complicated, but it is the most important thing you can create to bring your work to life, so let’s go!
Crafting Your Food Story
Even if you’re very clear on what the story you want to tell is, translating that into your photo can be challenging. Here are some steps you can take as you’re planning your image to help incorporate your story. As you begin, try to go through this process for each photo.
1. IDENTIFY YOUR HERO
The first thing to do is ask yourself what it is you want to showcase or highlight about your food. What’s the hero of your story? A hero will give your image focus and intention, helping the viewer connect with it on a deeper level.
It could be something special about the texture of your food, like a crispy top, the pillowy texture of a loaf of bread, the filling inside a pie, a strong colour, or something more abstract like a season, a holiday tradition, a childhood memory, or a family favourite. There are endless possibilities, and what you choose is up to you and your vision.
Identifying your hero will help you start to build your composition. Once you’ve got your hero lined up, other decisions like the best camera angle, lighting, backdrop, and props will fall into place more easily. You can then start to use the techniques we talked about in the first three chapters to start framing your hero and creating your story.
Some examples of hero elements are:
- A Colour
- An Ingredient
- An Action
- A Season
- A Holiday or Event
- A Mood
2. SKETCH IT OUT
As we talked about in the composition chapter (see page 43), sketching out your photo before you start is a great way to effectively use composition techniques while you lay out the elements of your photo. Doing this before you walk into your shoot will help give you a vision of what you’re trying to achieve and think about how to tie the different elements in your image together. I like to sketch directly onto a template of a composition technique to help me utilise the technique fully.
3. CREATE ATMOSPHERE WITH LIGHT
The way you light the image will give a photo a completely different feel, so choosing the right lighting for your image is very important. If you’re trying to convey a light, airy story of a calm morning, then backlight or slightly angled side light might be the best choice, but if you’re going for a more sombre, moody look, then side light that’s partially flagged to create a moody scene might work best.
Experiment with hard and soft light—there’s nothing like hard light for re-creating an outdoor summer look. If you’ve found yourself playing it safe with lighting or wondering why photos don’t look the way you envision them in your mind, chances are you need to switch up your lighting. Make sure you study the techniques from the lighting chapter of this book to start experimenting!
Here are some different lighting styles you can try.
Hard Light—Undiffused, high-contrast light gives the feel of a bright, sunny day.
Soft Light—Soft light is created through diffusion and creates soft shadows and gradients.
Dappled Light—Created by interruptions between the light source and the scene; in nature this could be created by a tree casting shadows. Or you can create your own GOBOs (go between) when using artificial light.
4.1
4.2
In these images you can clearly see that we have two completely different moods. One is light and airy; one is dark and mysterious. The difference in lighting and backdrop had a huge impact on the story of this image.
Colour Temperature—Dark and moody scenes often have a cooler colour temperature, and cosy, inviting scenes can be a bit warmer. Play around with your white balance to get the right look for your story.
4. BUILD YOUR SCENE
Next, think about what’s happening to the food in your frame. Is it being prepared? Is it already plated and on the table, or is it already being enjoyed by people around a table?
This will help you decide on the best camera angle for your image. If your hero is syrup beautifully pouring out of a jug onto a stack of waffles, then a straight on angle will help you convey that story. If it’s a busy food scene on a big table with lots of hands diving in, a flat lay is better suited. Once you’ve decided on your angle, you can start to build other elements into your scene.
For example, should your cake have a slice already taken out? Is the curry you’re serving still in its cooking pot, or is it served up into bowls in a table scene? Thinking about this will help you decide what props to use, and how to position them in your scene using composition techniques.
Lastly, think about any supporting elements that will help add to your story. Is there a certain flavour or ingredient in your dish that you could highlight? A sprinkle of ingredients found in the dish will help the viewer to imagine the flavours in the food.
4.3
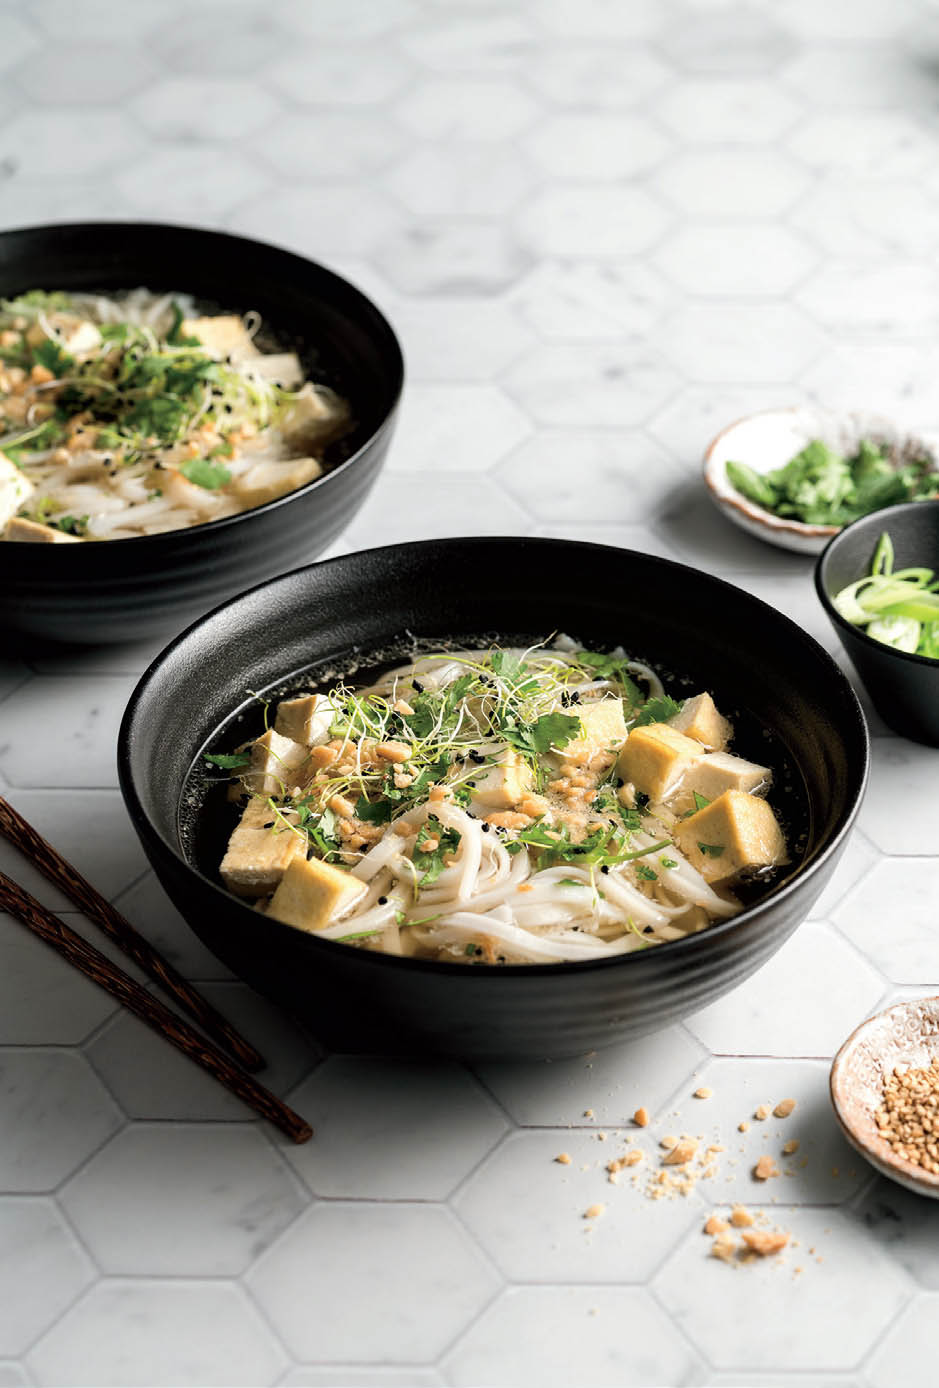
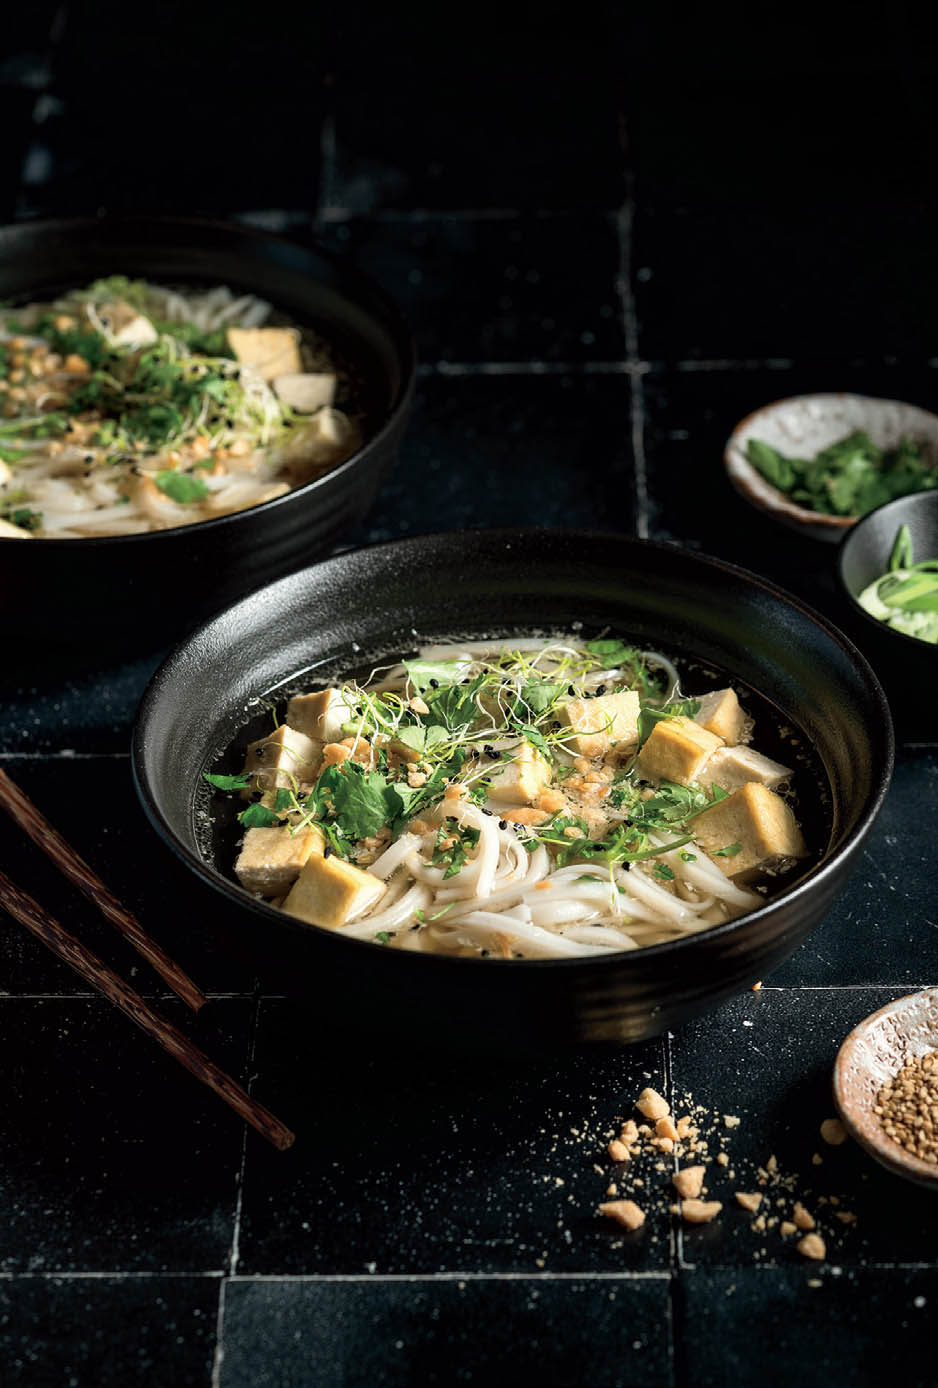
4.4
In these images, I created two shots together, one showing the ingredients and preparation (Figure 4.3) and the other showing the final soup (Figure 4.4). Together they give the viewer a much clearer view of what goes into this soup, and how it’s prepared.
Story Examples
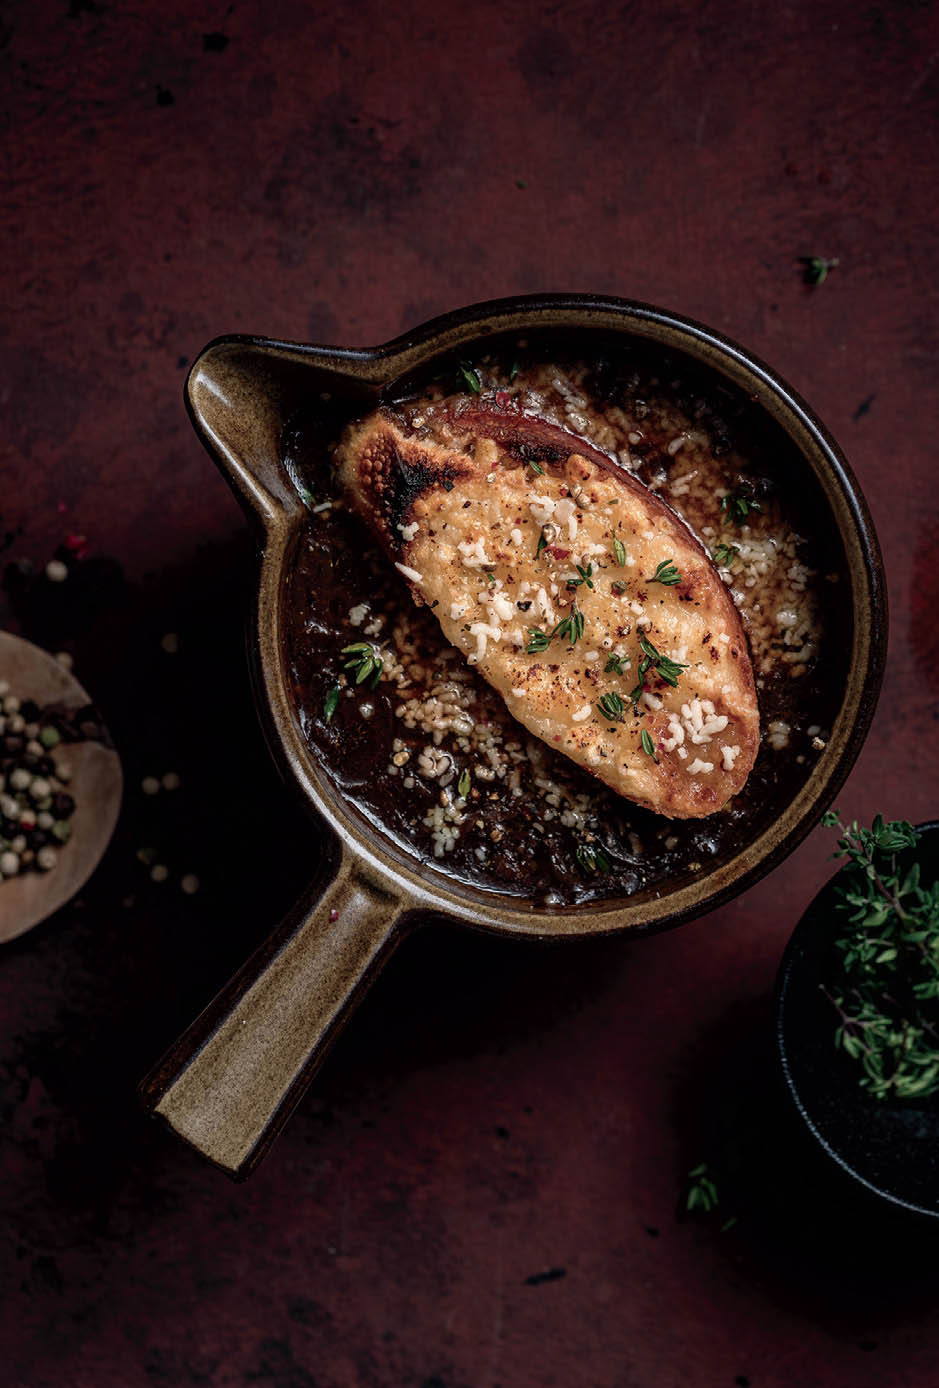
Food is quintessentially seasonal. Whatever kind of food you enjoy, nature takes us through a journey each year. There’s a reason we enjoy pumpkins in the autumn and green asparagus in the spring. In the following images are some examples of creating a narrative in a single image, using each season as inspiration.

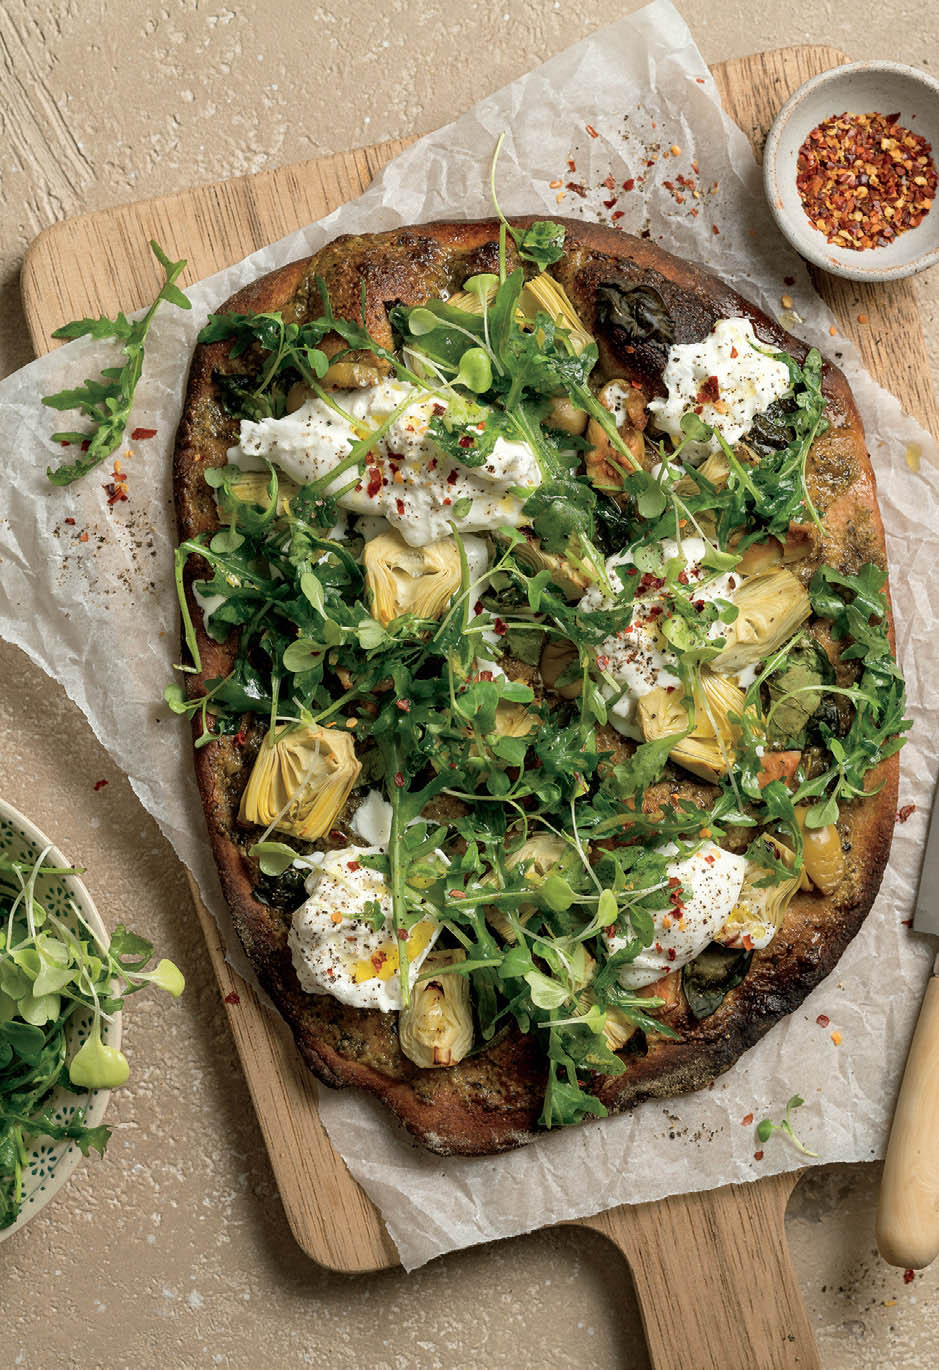
4.5 In this image, I created a vibrant green spring pizza, featuring a green pesto base, lots of fresh greens and spring produce like artichokes and rocket. I kept the scene light and bright with a small bowl of greens to the left of the frame to re-enforce the colour and flavours of spring.
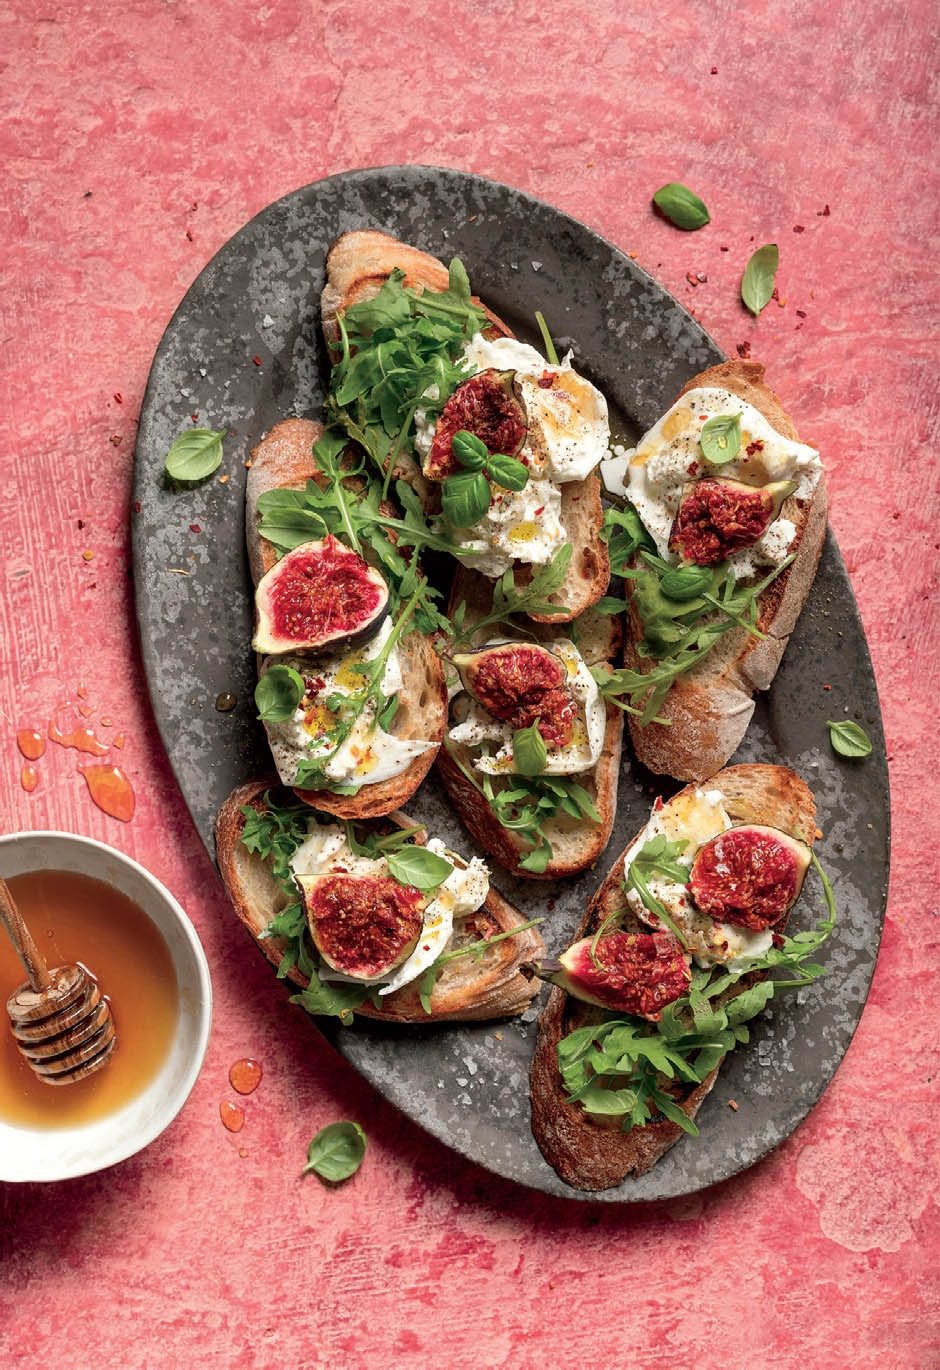
4.6 To embrace the bold colour of summer, I shot these burrata and fig toasts on an intense pink vinyl backdrop, which ties in the soft pink of the figs, and creates a bright, colourful image. If I had used a more neutral backdrop the image overall wouldn’t have had the same impact it does with a bright, colourful backdrop.
SPRING
After a long winter, spring brings the promise of new life, with birds returning, flowers starting to pop up through the ground, and the sun finally has a warm tinge to it again.
Spring is all about green, fresh, crisp dishes, so light colours and bright and airy setups help convey this feel. It’s a time where I normally pull out the pale, cool colours for backdrops and props as well as large modifiers which help me create bright, soft light, which mimics the spring sky.
SUMMER
Summer is all about colour and abundance. It’s the most fruitful season with all the colours of the rainbow and beautiful fresh produce available for that short, sweet time. It’s the time of long days and light evenings, where food becomes more social again as we meet outside for picnics and grills.
When shooting scenes for a summer theme, don’t be afraid to go bright and bold with colour. I spent the first few years of my food photography career being hesitant to work with bright colours. I always imagined that choosing neutral backgrounds and props worked best, leaving all the colour in the food. However, as time went on, I realised that bold colours, when used with colour theory in mind, can add so much to an image, bringing the food to life even more.
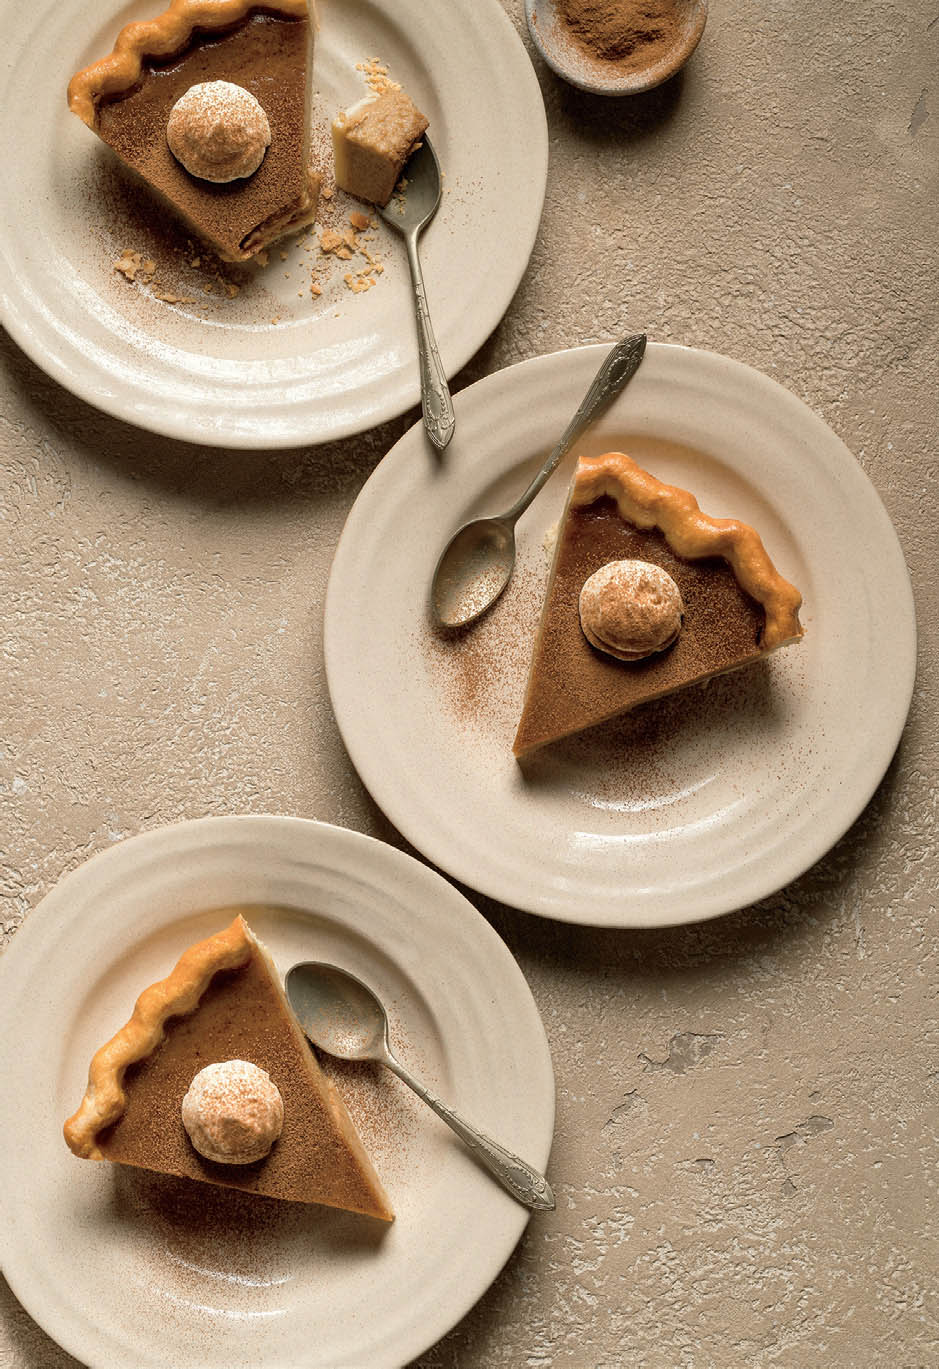
4.7 In this pumpkin pie photo, I styled a classic pumpkin pie with cinnamon and whipped cream. I chose a warm-toned backdrop to create an analogous colour palette that focusses on the brown/orange/yellow tones we associate with autumn. I also positioned my soft box a little lower to create longer shadows, which we also experience during the autumn months, and sprinkled some extra cinnamon to visually bring out this flavour.
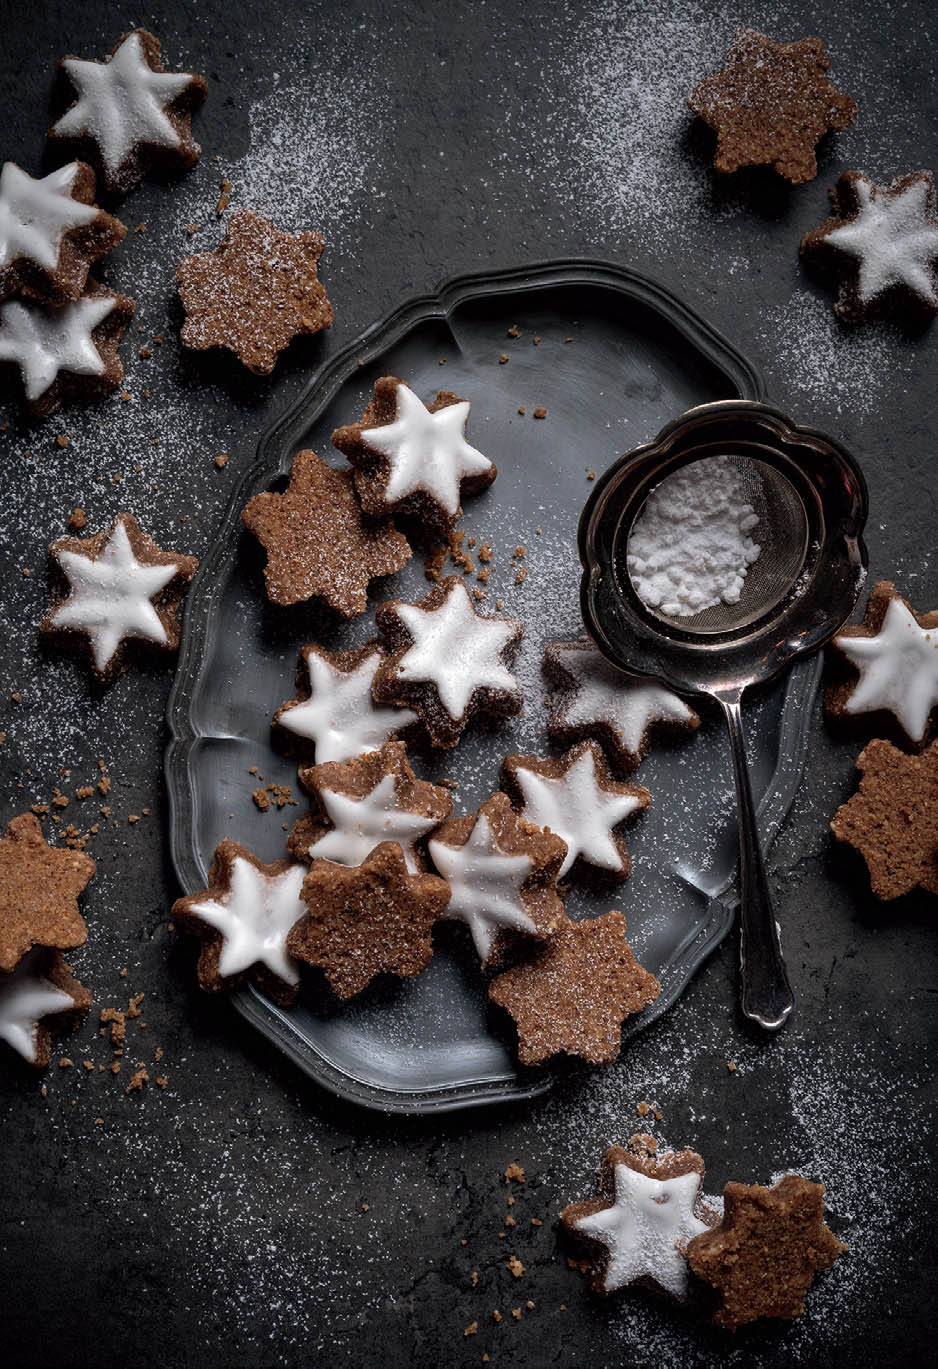
4.8 In this shot of these holiday cookies, I created moody light with lots of deep, soft shadows by adding a grid to my soft box, which also helps mimic the darker days, often full of clouds and fog. I also used a black fill card to deepen the shadows and a slightly cooler white balance to enhance the grey and blue tones of the backdrop. I chose vintage props that I found at a thrift store to help create a cosy, nostalgic feel.
AUTUMN
There’s a reason we love pumpkin in the autumn. It’s the time of year when root vegetables and other comforts are at their peak season. The summer is just starting to turn, and the air has a fresh, crispness to it again. All around we start to see the warm tones of leaves, turning from yellow to orange to red, before falling.
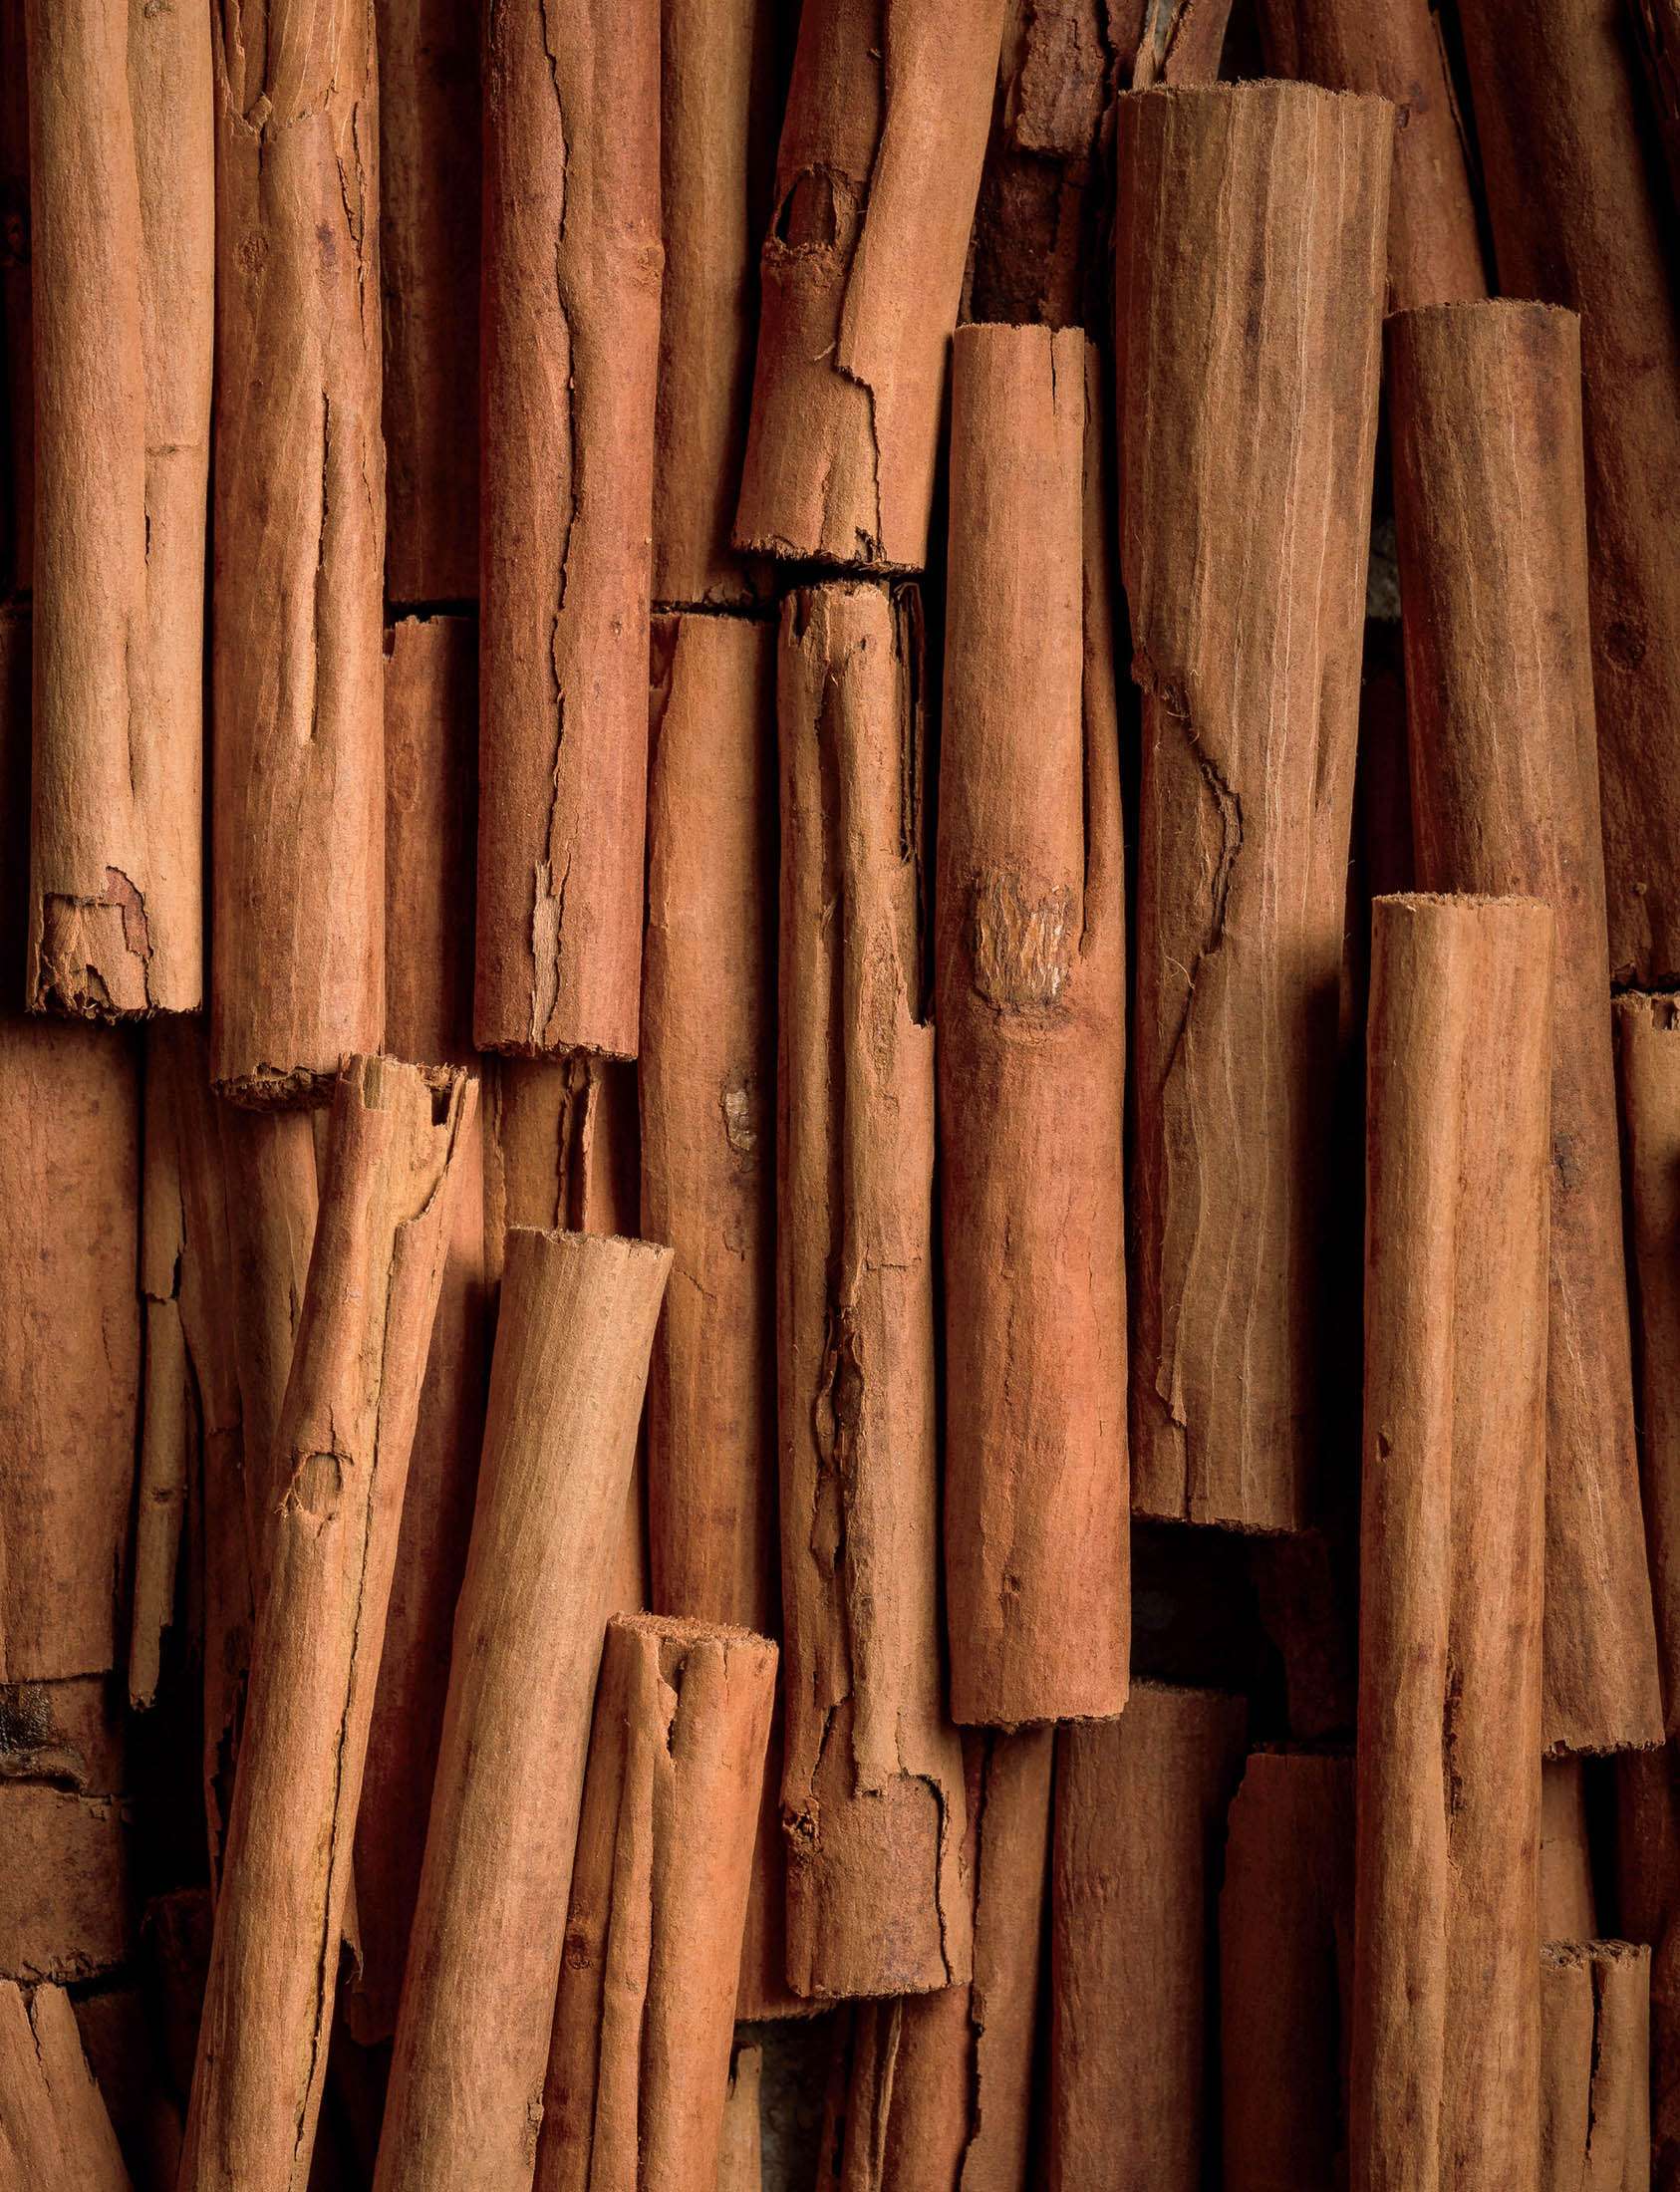
These warm colours extend to the food we eat in this season, as we start to cook more soups, stews, curries, and spiced dishes. Baking also becomes popular again in the autumn, with lots of cinnamon, nutmeg, ginger, and other warming spices.
WINTER
Winter is the cold season that we often long to be over, but it can be magical, too. Darker, moodier shots are a good way to show a wintery feel, echoing the shorter days and darker evenings we experience at this time of year. Holiday food is steeped in tradition and is often personal with everyone having their own recipes and methods. This makes an interesting food story as you can speak your own personal experience through your images, so try including props that make your story your own.
I often opt for darker backgrounds and props, and a cool white balance to help portray the cold of this season.
Take Your Story Further
HANDS AND HUMAN ELEMENTS
Adding some hands to your scene injects a human feel into an image, giving the viewer something to connect with. In real life we don’t just look at food, we interact with it, eat it, serve it, share it. It’s something we’re used to experiencing with other people, be that family or friends, so why not try and bring that into your food story, too?
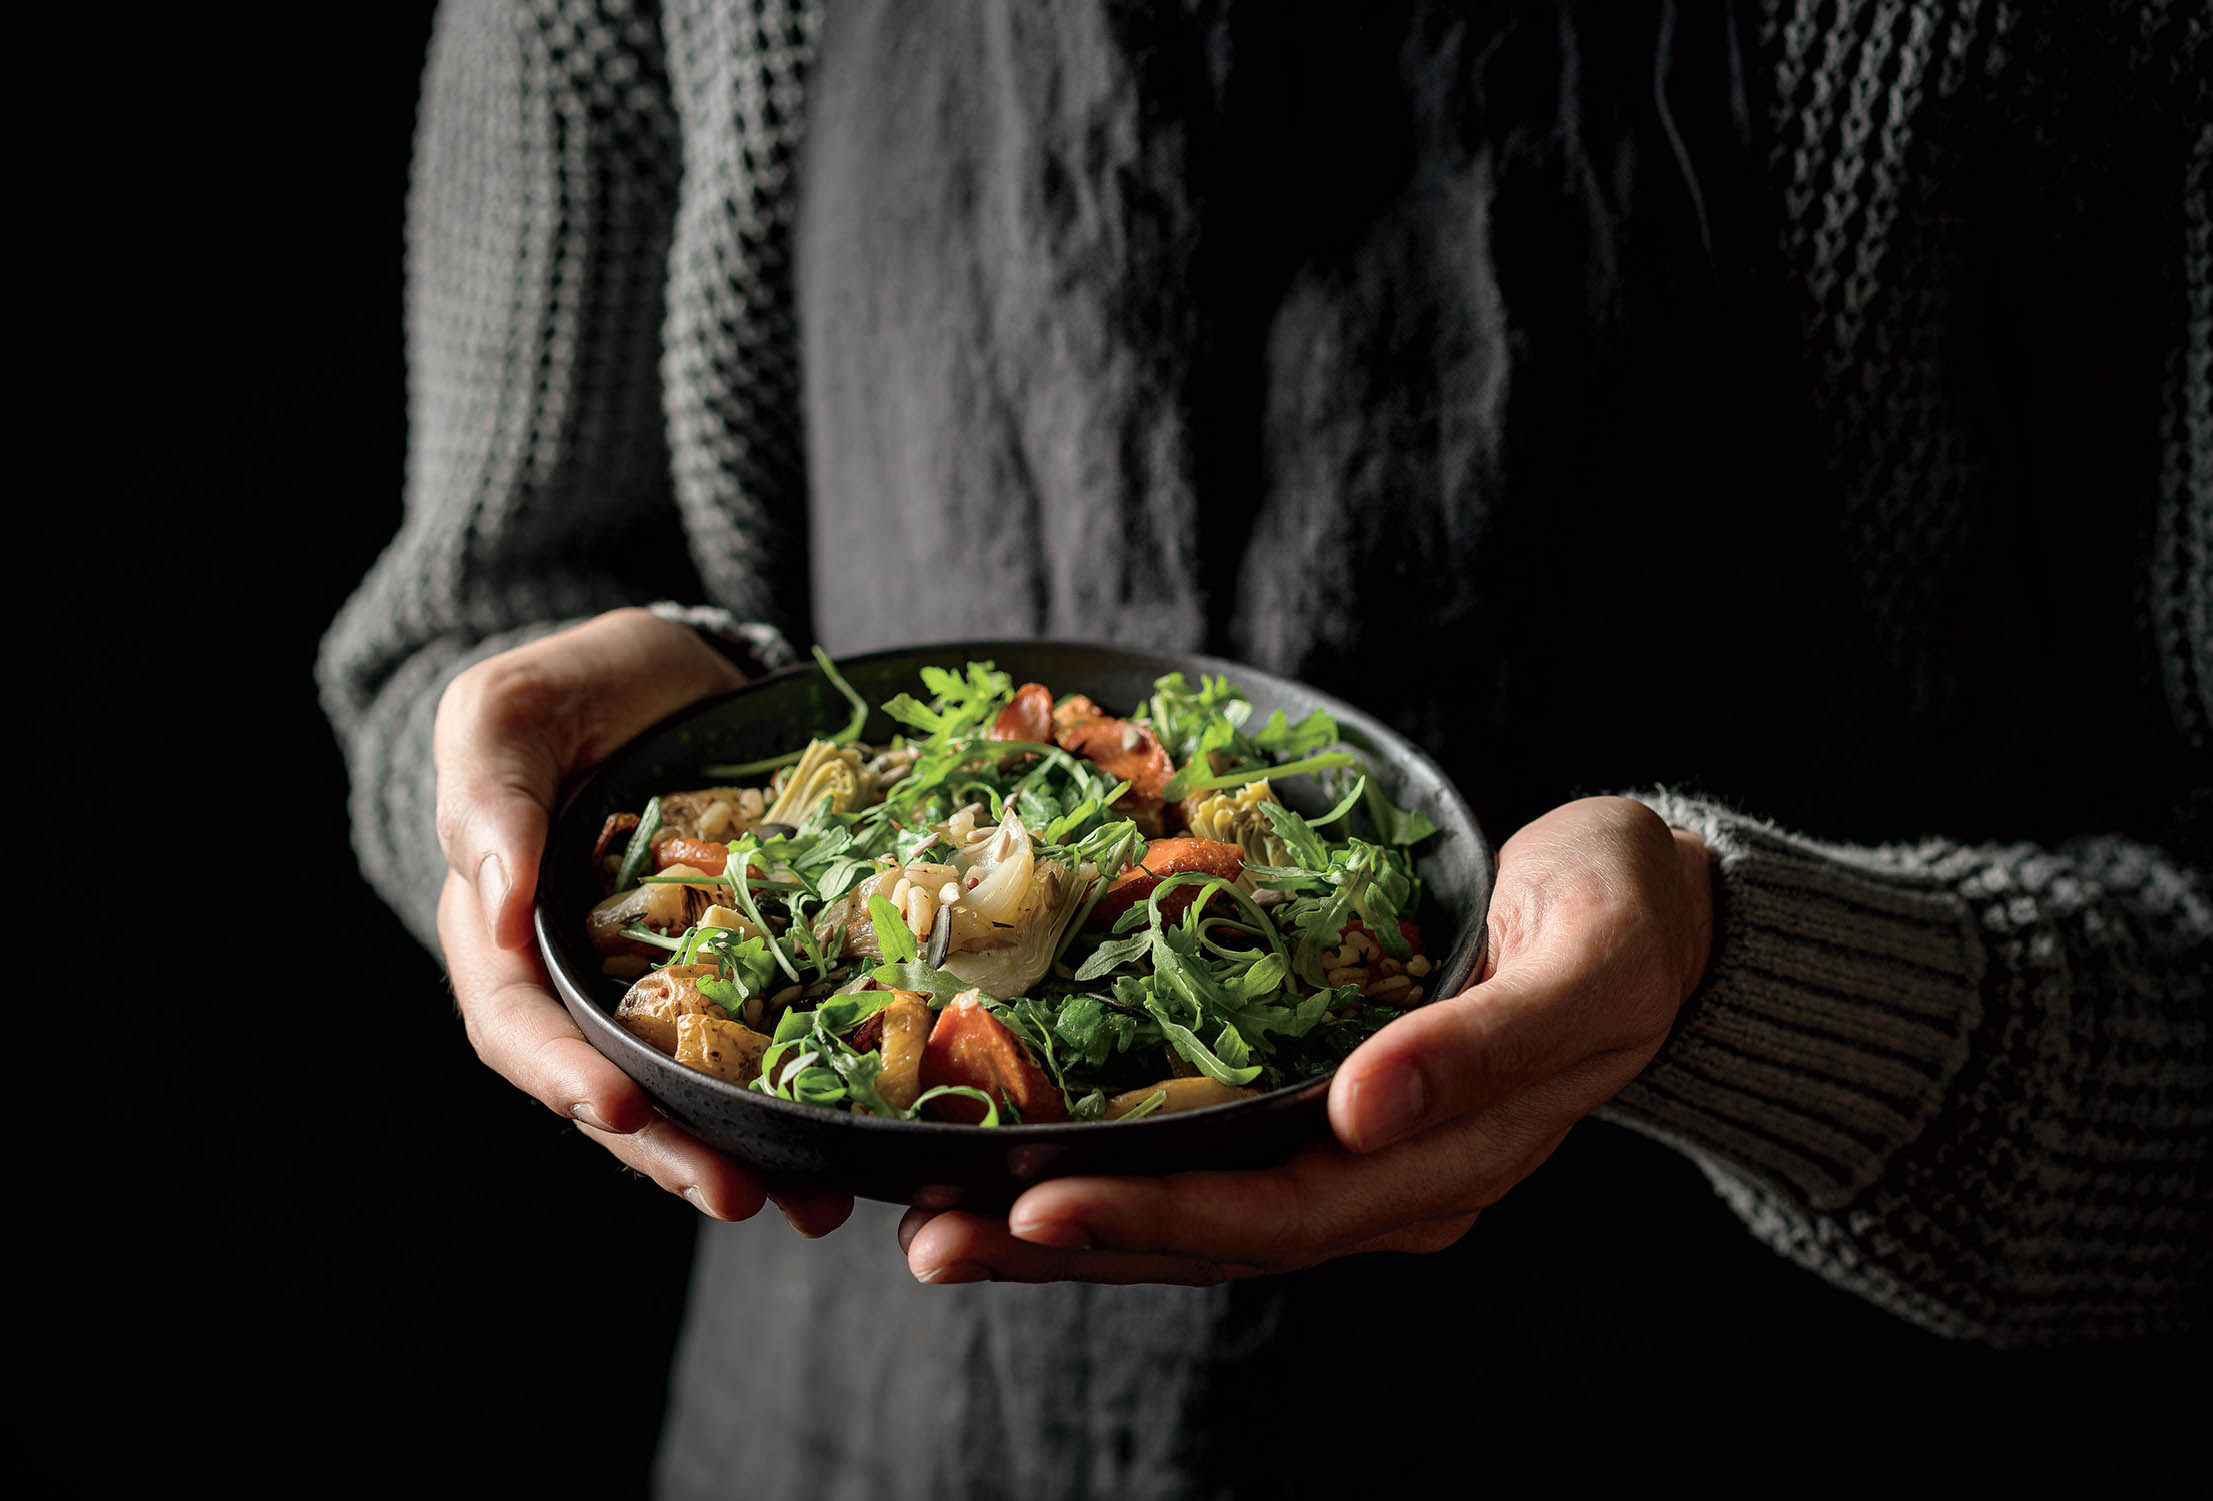
4.9 Having someone holding the bowl on a dark background focusses the story more on someone enjoying this wholesome, healthy bowl, rather than just the bowl on its own. It’s less about the recipe and more about the connection the food creates.
Add Flare to Images with Action
Adding action to a food photo can help bring an image to life, bringing a viewer into the story. It could be as simple as pouring sauce onto a prepared dish, or as dramatic as an icing sugar cloud. It adds an element of movement to a photo giving more for the viewer to interact with.
When creating an action shot, consider how you want the action to look. Do you want to include motion blur to really “see” the motion as it’s happening (as can be seen in Figure 4.12), or do you want an action frozen in motion, like a liquid splash, (Figure 4.10)? Both are effective at telling a story but have a different look.
CREATE FROZEN ACTION
For crisp, frozen motion shots like the splash in Figure 4.10, using artificial light, specifically flash, is going to make this process much easier. When shooting with flash, your exposure time is not controlled by your shutter speed, but by your flash power. The lower the flash power you use, the faster your flash can fire and then reduce back to nothing—if you want to learn more about the technicalities of this, I’d suggest looking up what a T.1 rating is and how it works. This creates an extremely short exposure time that would be almost impossible to achieve using continuous or natural light. Therefore, when it comes to capturing any sort of action in a crisp, frozen way, flash wins hands down.
MOTION BLUR
To create a more fluid motion blur action, you’ll need a slower exposure time to allow your camera to see the motion happening while the sensor is still exposed to light. This is much easier to achieve when shooting in continuous light, which could be artificial or natural. When you’re shooting in continuous light, your exposure time is determined by your shutter speed. The exact shutter speed you should use depends on how blurred you want your subject to be, and how fast it’s moving. Somewhere between 1/15 and 1/60 of a second is normally a good starting point, but don’t be afraid to go even slower if you need to.
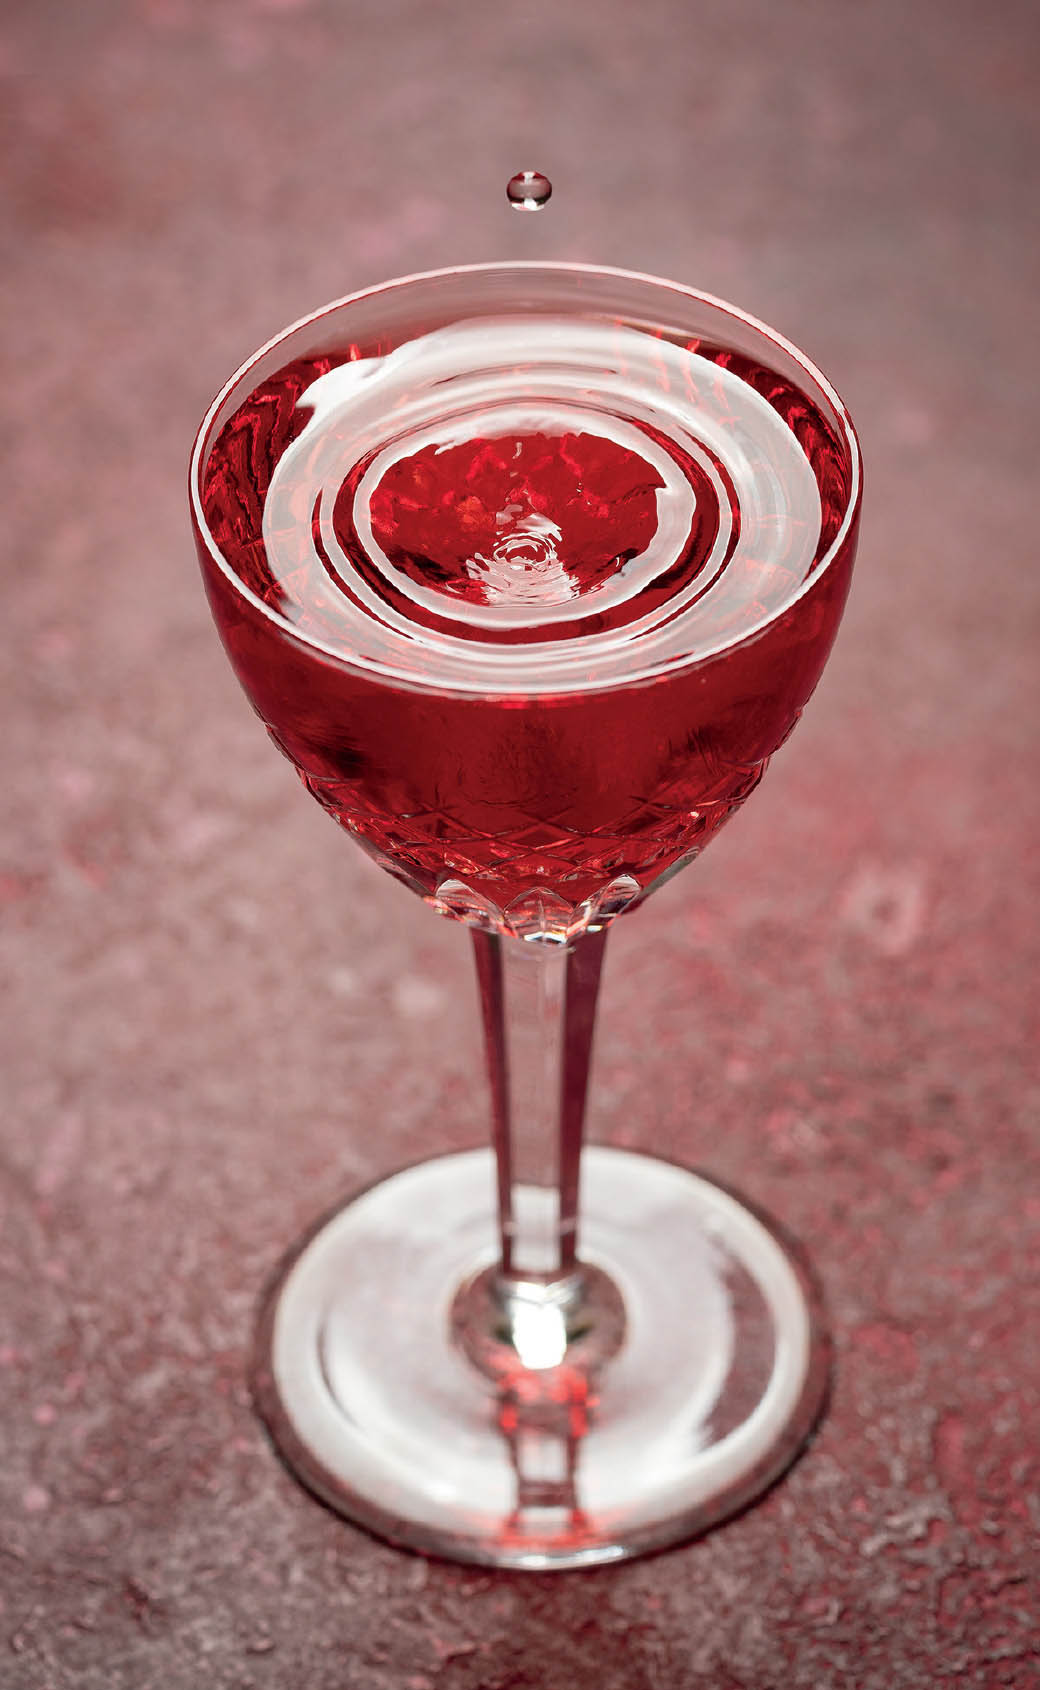
4.10 Splash shot taken with a shutter speed of 1/250, f/5.6, ISO 100 and flash power of 1/16.
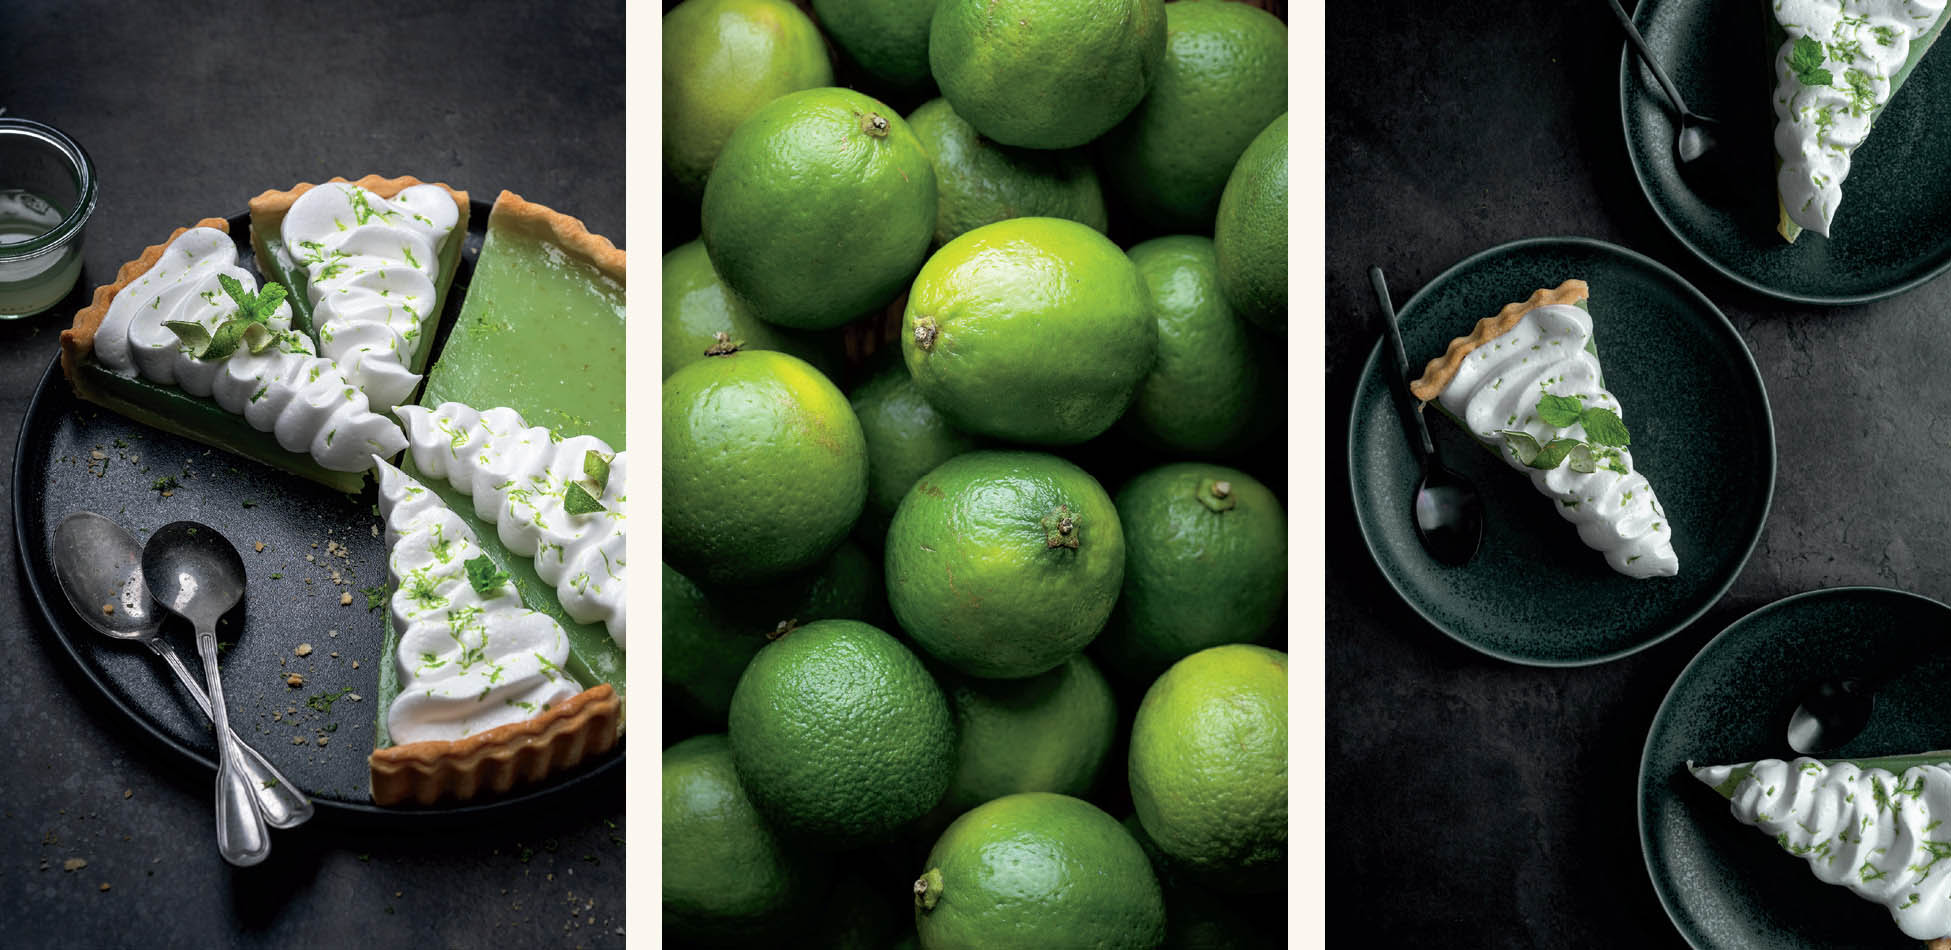
4.11 In this triptych, I chose to display the pie in two different ways, whole and cut, and at two different angles. I then created an impactful macro shot of limes to accentuate the flavour of the pie.
Create an Image Story with Multiple Images
Sometimes, to tell a larger story, you need more than one image. These images are designed to complement and build on each other, working together to create interest and narrative. These kinds of series are useful for blogs, and editorial projects like cookbooks or magazines where the images will form part of a bigger story.
Creating these image series will also help you exercise your creativity, getting you to think about how you can show a subject in multiple ways, and fully explore it. If you find yourself shooting the same three angles for every shoot, planning an image series can help you break out of that creative rut and explore some new techniques.
An image series can have any number of images in it. Over the years you might create a whole collection of images centring around a theme, but for a more short-term project, creating a diptych or a triptych can be a good place to start.
Diptychs—Two images presented together.
Triptychs—Three images presented together.
PLANNING AN IMAGE SERIES
When planning a series, firstly ask yourself what your story is. Below are a few ideas of how you could create a theme between images, and depending on what your story is, some may work better than others. Your images don’t all have to be from the same shoot (although they absolutely can be). The beauty of an image series is you can build on it over months or years. It can be a good opportunity to take an older image you love and build something new around it.
Challenge
Plan a multi-image series to practice weaving together images into a story. Ask yourself the following questions as you plan your setup.
- What is the story you are trying to tell with this shoot?
- What will your hero subject be? (An ingredient, colour, flavour, etc.)
- How many images will your series have?
- How will you create interest between the images in your series (e.g., a macro shot and a wide shot)?
- Make some notes about the lighting you intend to shoot with, what backgrounds, props, and supporting elements you will use.
Once you’ve got these ideas laid out, start planning the images together with your notes. It may help you to sketch out a plan for each image (see page 86). You don’t need to shoot your series all in one day—it’s something you can add to over time!
Ideas to Connect Images Together into a Story
Here are some ideas on creating an image series. Start by creating a diptych or triptych, and then move onto larger image stories as your collection builds.
Different angles of the same subject. This could be a flat lay and a 45° angle of the same subject.
Stages of preparation. A raw ingredient shot plus the final dish can emphasise a flavour.
Different presentations of the same dish. If you have a dish like a pie or a cake, showing the whole finished product and then a shot of slices together can tell a powerful story.
Various focal lengths. Different lenses capture different perspectives on the same subject. Try pairing a detailed macro shot with a more pulled back wider angle.
A theme. This could be a colour, a season, or ingredient presented in different ways. This works particularly well for pairing together images that aren’t from the same shoot and tying them together through a common theme.
Process Shots
Food isn’t just about the end product; showing the process of how you get from ingredient to the final dish is as much a part of the story as the plating. Process shots give you the chance to bring your viewer into the story, joining you on the journey of making food. Food preparation is very tied up in traditions, memories, and culture, so showing this makes a very powerful story.
In traditional Thai green curry (Figure 4.12), the most important part of the dish is pounding the curry paste in a pestle and mortar. Achieving the perfect consistency is what makes the perfect curry, and it’s a process that requires patience and determination. It’s somewhat therapeutic, mixing and pounding all the vibrant ingredients, releasing their flavours as you go, until you have the perfect, soft paste.
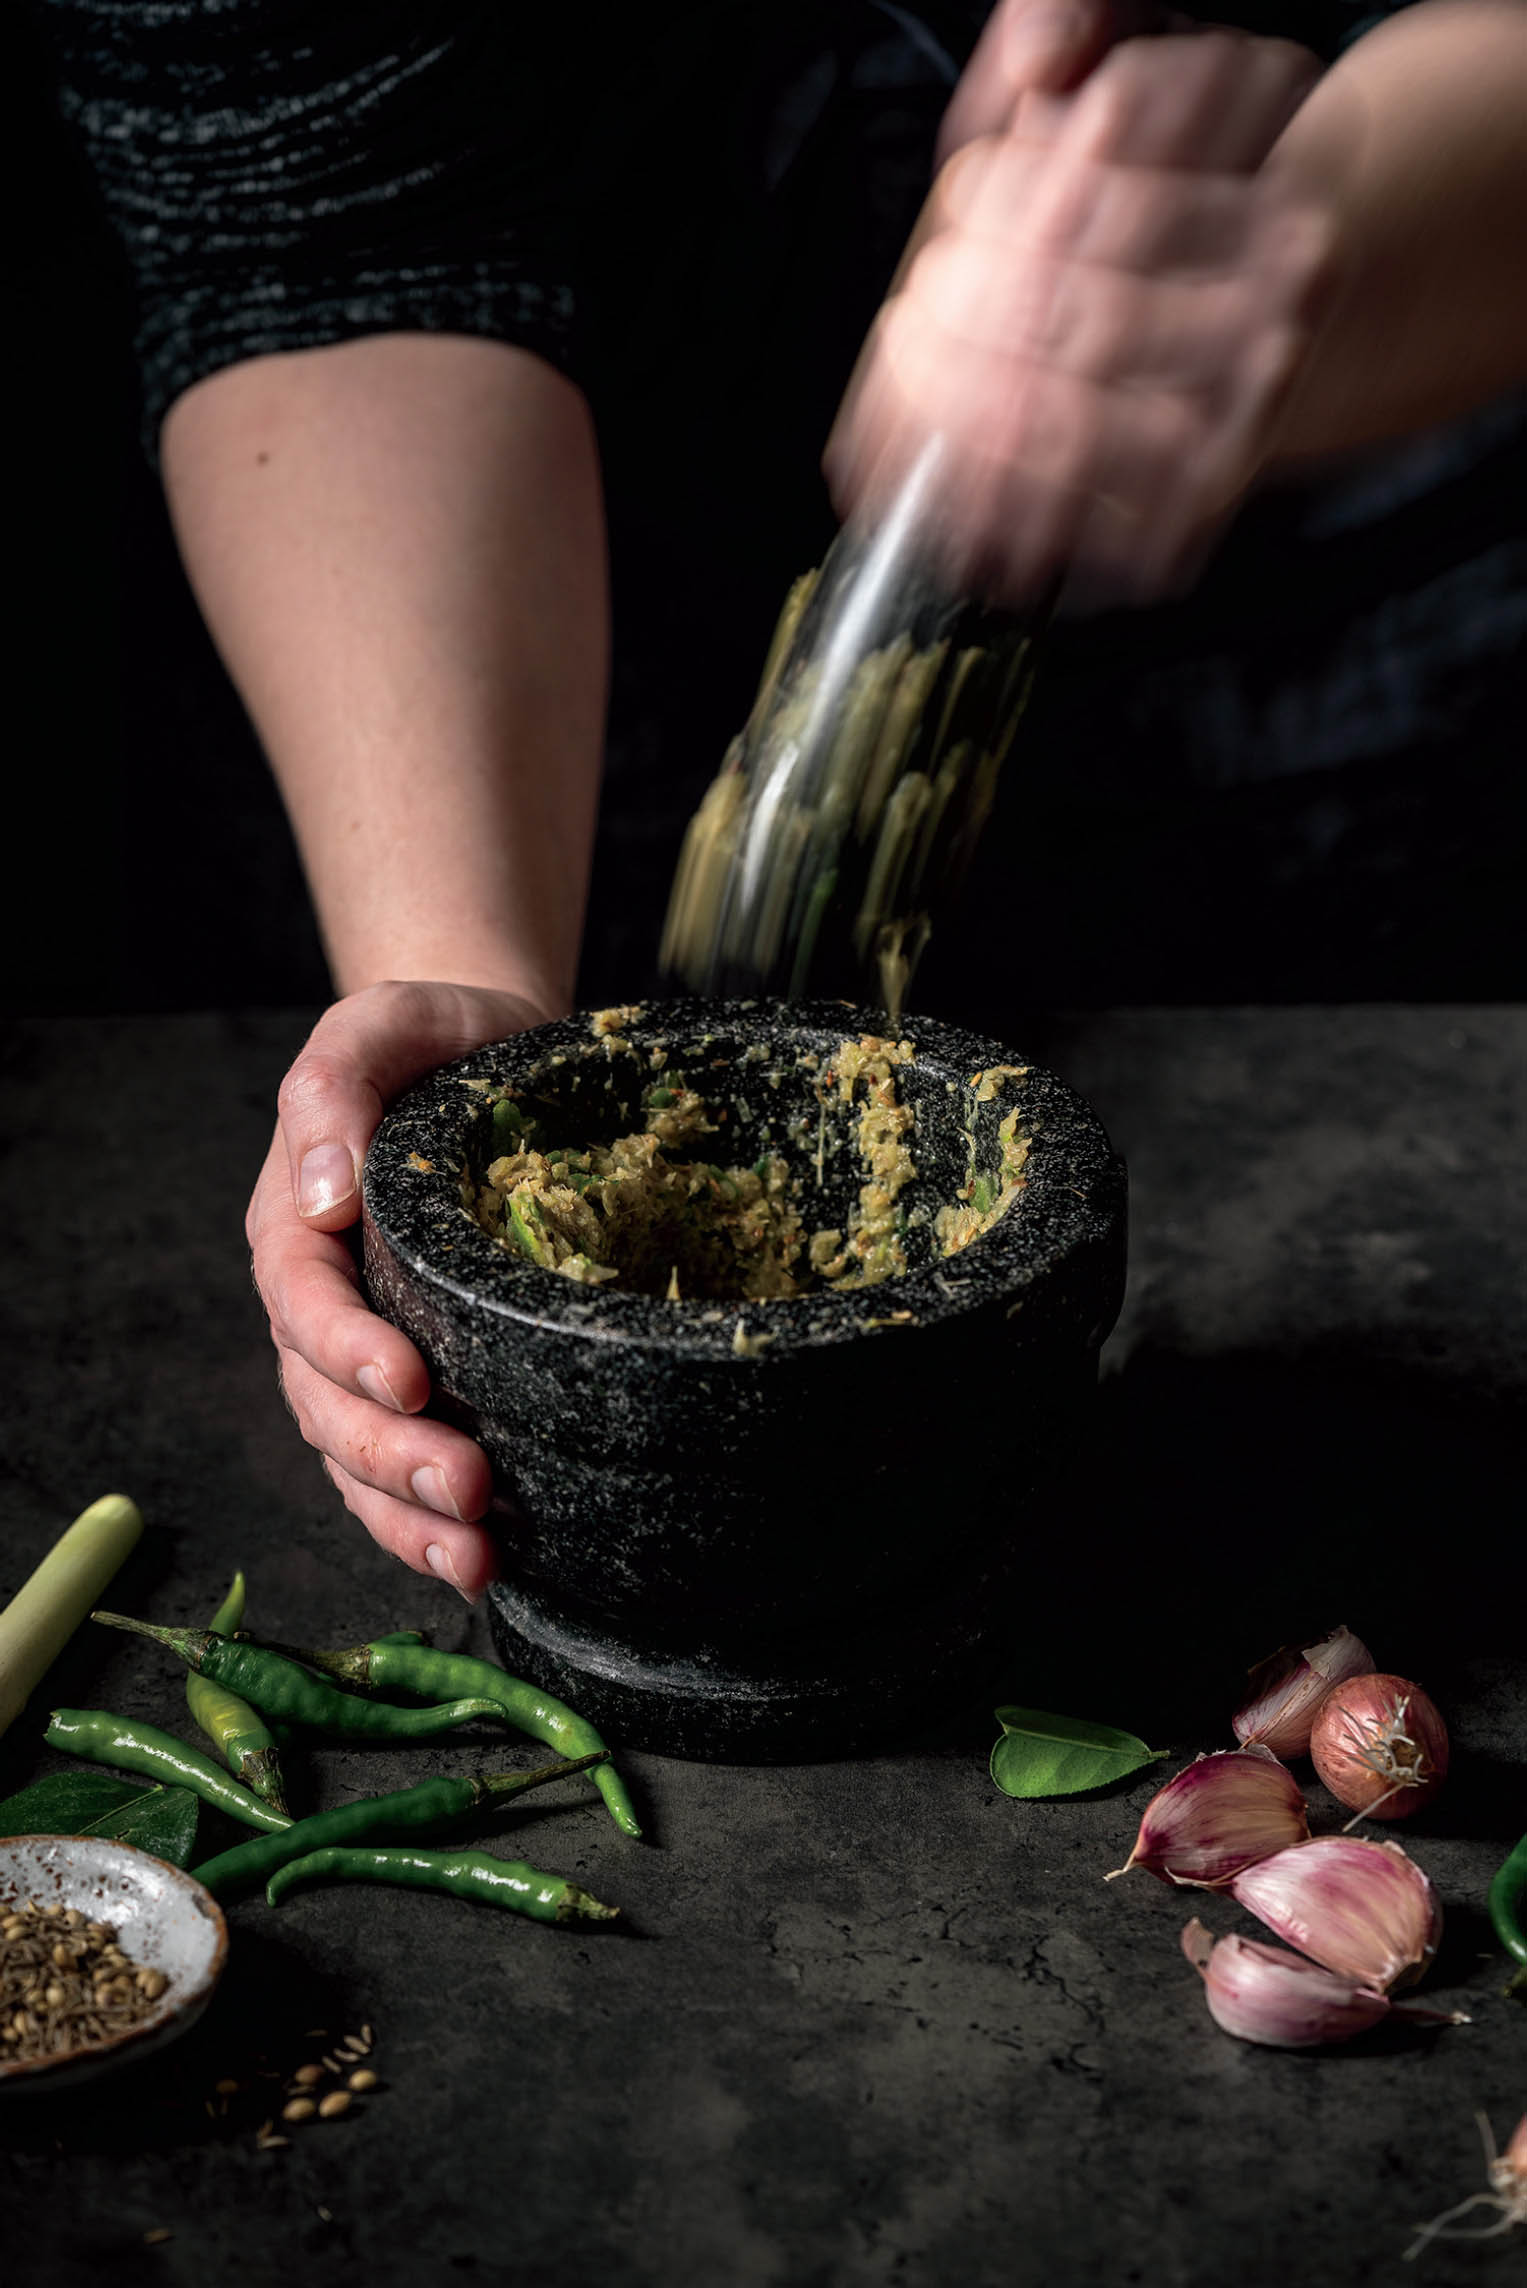
4.12
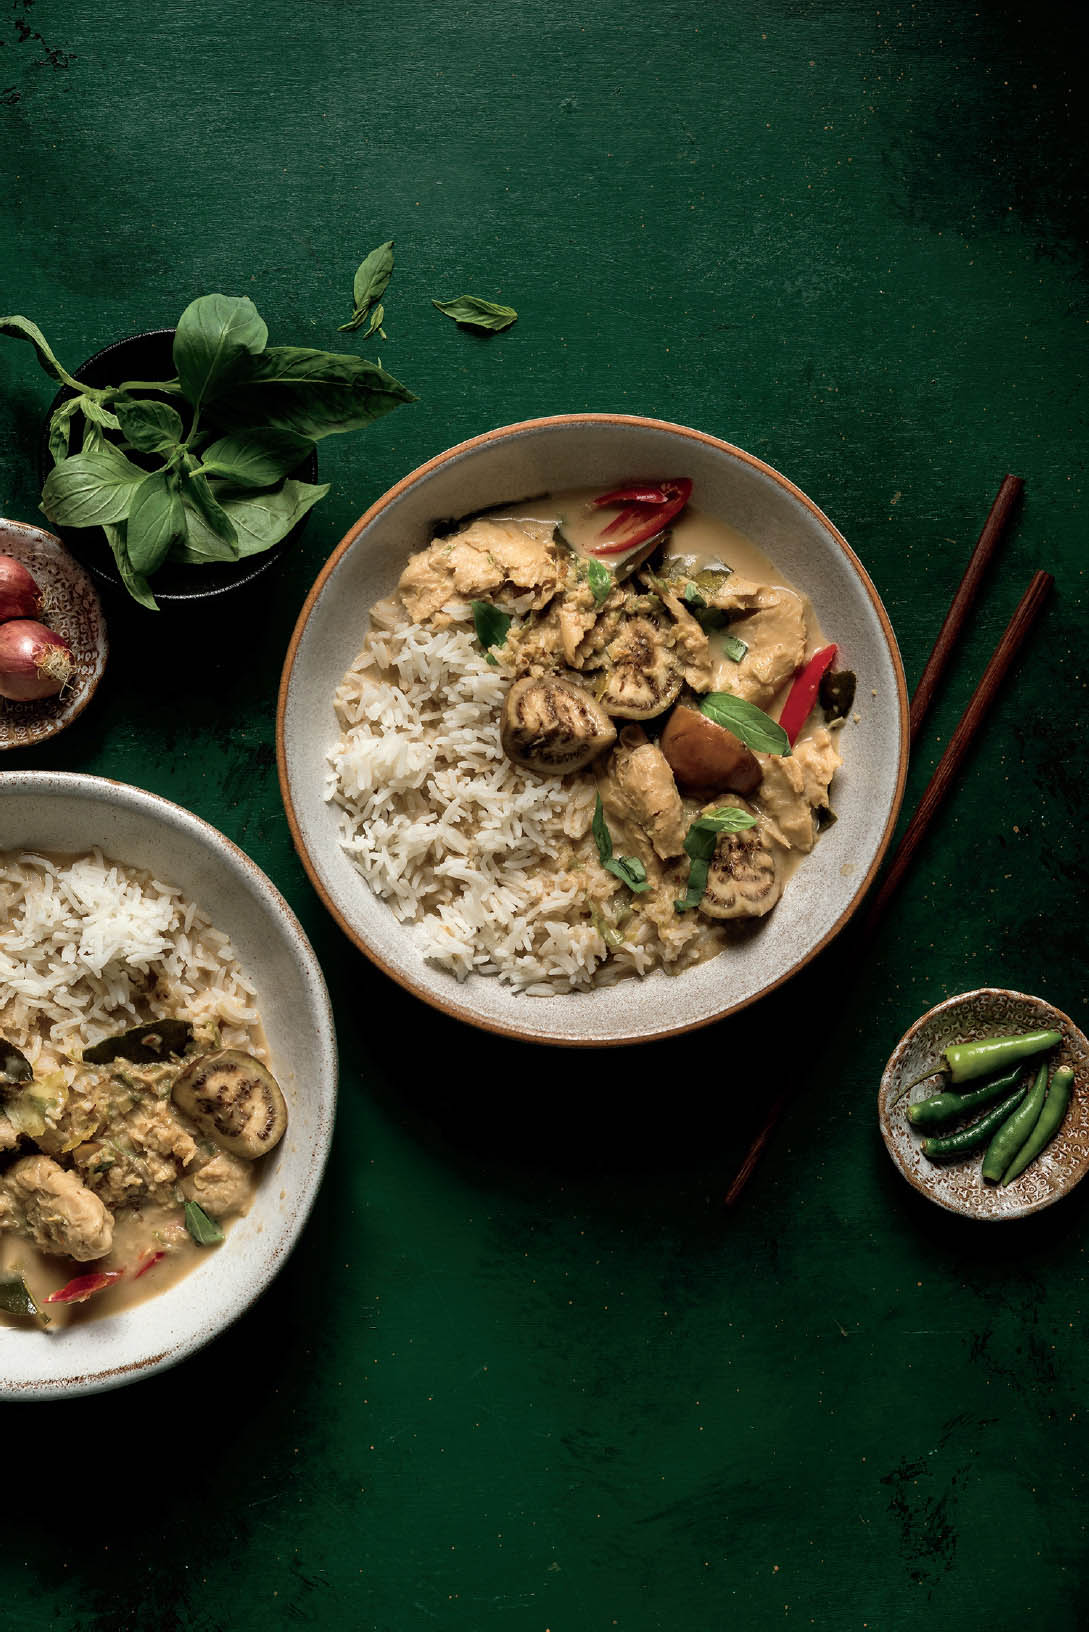
4.13
Process shots are almost always part of a multi-image story. In this diptych (Figure 4.12 and Figure 4.13), I chose to show one shot of the preparation of the curry paste, with motion blur to really emphasise the action and the motion involved with making the paste, and a shot of the final curry. The process shot adds a lot more to the story of how we got to the final dish than just the final dish on its own.
Next up we’re going to talk about one of my favourite parts of the food photography process—editing!