

Photo credit Tommy Reynolds
CHAPTER 5 Editing and Processing
Editing your food photos is the icing on the cake, the final touch, the secret sauce that takes your RAW files and makes them pop with colour and magic. But it’s often overlooked or undervalued.
When I started my journey in food photography, I really didn’t know what I was doing when it came to processing my images. I would import my files into my editing software, play around with a few sliders until I had something I liked, and then export, but I didn’t really know why I was doing the things I was doing, which also meant I was unable to really make conscious creative decisions about an image.
Successful processing isn’t about which software you use, or what edits specifically you make, it’s about being able to look at your RAW file and make conscious decisions about what you want to do to achieve the vision in your mind, and that’s what we’re going to explore in this chapter.
This isn’t a specific tutorial on one software, as choosing the right editing program for you is personal. They all have different ways of doing similar things, with some functions better suited to some than others. Instead, we’ll look at the types of edits you can make, and some different ways of doing them. But don’t worry, there are eight full editing walk-throughs in the case studies section of the book, so head to page 149 for those.
The last thing before we jump in is to get some terminology straight.
Editing—Sorting through images and picking your final files, essentially culling the group of photos you took into your final picks.
Post processing—Making changes to your RAW files to change the appearance of your photo.
These are any adjustments you make in your editing program of choice.
The term “editing” has become synonymous with processing, so during this chapter, we’ll refer to “processing” as making any adjustments to your images.
Let’s get into it!
The Purpose of Editing and Processing
The goal with food photography is to create realistic, yet irresistible food imagery that makes people want to eat what they’re looking at. That’s why food magazines are full of vibrant, carefully processed images. The processing isn’t to change the appearance of the food or to “trick” the viewer into something, it’s there to help us enhance the best qualities of the food.
COLOUR ACCURACY
Image processing can help us fine tune the colours in our images to look exactly how we envision. The reality is that every camera interprets colours differently, so it’s important as a photographer that we have the final say on colour interpretation. For example, on one camera, yellows might come out super vibrant, while reds are a little dull; and on another, red might be very vibrant but greens are a bit more muted; therefore when we process the image, we can balance that back out and get every single colour looking perfect.
PERFECT WHITE BALANCE
However hard you try in the shooting process, sometimes your white balance needs a bit of a tweak to get the colour temperature of your image just right. Having the ability to adjust this in post will keep everything looking true to life.
POST COMPOSITIONAL CORRECTION (CROPPING)
We can also take the opportunity to adjust the composition of our image in post processing. The best practice is that we compose our shot as close as possible to the final crop before we hit the shutter, and simply use the cropping tools in editing software to refine the crop. Any cropping you do will cause your photo to lose resolution, which may or may not have an effect on the final file depending on the size you export the image. Ideally, we want to keep post-production cropping to a minimum.
RETOUCHING
Sometimes you don’t realise just how distracting that crumb or crack is until you get the file on the computer, and sometimes there’s nothing we can do about imperfections on set. Being able to tidy up elements of your image in post-production can elevate it to a professional level.
BUILD CREATIVITY
The digital world of post processing has opened a whole new creative realm for photographers, allowing us to create images that just aren’t possible straight out of camera. We can use techniques like masking and compositing to layer images together to create things like epic splash shots and perfect pour shots. The possibilities are endless, and if we embrace post processing as just as much a part of our creative vision as everything we do in camera, we can create something special.

5.1 In this image, you can see what an impact processing had on the final result. To get as much data as possible in camera, the RAW file looks a bit bright and flat, but by processing it I was able to bring back contrast and drama, and create an impactful, moody action shot.
DEVELOP YOUR STYLE
Your processing style also plays a huge part in your overall style as a photographer. There is no right or wrong way to edit, so a lot of how you process is down to personal preference. As you edit more and more photos, you’ll find your own groove and process that you rely on.
The Importance of Shooting in RAW Format
If you’ve heard about RAW format before but haven’t been using it, or you are using it but aren’t necessarily sure why it’s beneficial, that’s what we’re going to break down here. Shooting in RAW will help you get the most out of your images as you process them.
JPEG FORMAT
JPEGs are probably the most common file type for images, and you probably encounter them daily. When you shoot in JPEG, the files are processed within your DSLR. Your camera is essentially doing a bit of the post processing for you. The exact way in which the image is processed varies slightly camera to camera, but typically it will add blacks, contrast, brightness, noise reduction, and sharpening. Exposure and white balance are set based on your camera settings when the image is taken.
JPEGs are known as a “lossy” file format, which means that any changes made to the file are destructive. Destructive edits are irreversible in a file, so once it’s made, that’s it.
RAW FORMAT
RAW files are uncompressed, unprocessed files that capture all the detail possible on the camera’s sensor. They are known as “lossless” file formats, which means all the data is recoverable when they are processed.
Because the camera isn’t making any changes to the file, the images come out of the camera looking a little flatter than a JPEG. But don’t be alarmed, this is a good thing for food photography.
Let’s look at some of the key benefits of using RAW format for your food photography
1. Non-Destructive Editing
This is probably one of the biggest advantages of RAW files over JPEGs. When you process a RAW file, you aren’t touching the original data, instead, you’re just telling your editing software how to interpret the data and how to manipulate it.
Every time you make a change to a JPEG, some of the data is lost, so each subsequent change is being made on a lower quality file.
2. Easy White Balance Adjustments
When you shoot in JPEG format, the camera has already applied the white balance based on your settings, but because of the “lossy” format of JPEGs, that means that those settings are burned into your photo, so you can’t easily change them in post production without losing quality in your file.
With a RAW file, the original data is retained, so you can change the white balance quite dramatically without changing the quality of your photo. Because of the lossless quality of RAW files, you can also continue to change it without data loss. However, I still recommend shooting with a white balance as close to the final look that you want as possible, to make it easier for you to see what you’re doing as you’re shooting and processing.
3. More Tonal Range
Quick definition: Tonal range is the number of visible tones in a photo, between the darkest and lightest points of your photo (the shadows and the highlights).
In a JPEG file, there isn’t as much data retained in the brightest and darkest areas of the photo, so when you start processing them, you’ll notice the lack of quality. You’re far more limited in how much you can lift the shadows and darken (burn) the highlights.
RAW files on the other hand are much more flexible in this area. You have around +/−2 stops to play with when it comes to brightening underexposed shots and a good amount in the highlights as well.
Note: It’s important to pay attention to your histogram as you’re shooting, even when shooting in RAW. If you have too many clipped areas you won’t be able to recover the data, which is especially important if your images will be printed.
Approaching Post Processing
No matter which editing program you choose to work with, the kind of adjustments you will make to your RAW files will largely fall into the following categories. Each software offers different tools and ways of achieving similar results—which tools you use are up to you.
Don’t forget—there’s no perfect formula for post processing! The adjustments you make to each image will vary, and that’s OK! Some might need a lot, some only a few. It’s up to you as the photographer and the creative visionary behind your image to decide how you’re going to bring your vision to life.
Before we jump into the categories, I just want to highlight the difference between global and local adjustments.
Global Adjustments are applied to the entire image.
Local Adjustments are applied to only a part of the image. This is achieved by masking or selecting only a specific part of the image, and there is an abundance of different ways to do this across different software.
EXPOSURE
Exposure describes the amount of light that hits your camera’s sensor when you take your image. The exposure is affected by the camera settings you choose (ISO, shutter speed, aperture, and if you’re using artificial light, the power of your light). The more light that hits the sensor, the brighter your image is and the less light that hits the sensor, the darker your image is. The “right” exposure is subjective.
Other than overexposed and underexposed images where large amounts of data is lost, there is no correct exposure for an image—it all depends on the mood of the scene you are trying to create. What you should try and achieve in camera is an image that captures as much detail as possible without blowing out areas of your image. When post processing, adjusting the exposure is a global adjustment that will affect every pixel in your image.
Use Your Histogram As a Tool
A histogram is a graphical representation (in bar graph form) of the tonal range of your photo. The X-axis denotes the tones in your photo, going from left to right as follows:
Pure Black > Shadows > Mid-tones > Lights > Pure White
The Y axis shows how many pixels in your image fall into each tone, so a histogram that is weighted more to the right represents a light image, and a left-weighted histogram denotes a dark image.
There’s no right or wrong shape for a histogram, but it’s a helpful tool to show us if we’ve got clipped areas in the shadows or highlights, so as you’re making your adjustments, you can see if you’ve gone too far.
5.2

5.3
In Figure 5.2 you can see the histogram is higher on the left, showing a darker exposure, whereas Figure 5.3 shows a brighter exposure with more tones on the right.

5.4

5.5
In this image, I adjusted the exposure in the basic panel in Lightroom. You can see the specific adjustments I made in Figure 5.5. These added some exposure and contrast to the otherwise flat RAW file (Figure 5.4).
Adjusting Exposure
Exposure is normally the first adjustment I’ll make to any image, if necessary, but it’s not something I always do. I like to get the exposure of the image to a base I want, as that helps as I continue to edit contrast and colour. Exposure affects colour (we’ll come to this later in the module), so if you make local colour adjustments and then change the exposure, that exposure adjustment is going to change your colours again, potentially undoing the careful colour work you did. So it’s better to start with exposure, then move onto colour.
Tools You Might Use to Adjust Exposure
Across different software, there are many ways to adjust exposure, and each work slightly differently. Making considered and powerful exposure adjustments requires an understanding of the different ways in which these tools work, so you can pick the best one for the job. Here are some of the most common adjust tools.
- Exposure Slider
- Whites/Blacks
- Highlights/Shadows
- Brightness
- Tone Curve
CONTRAST
Contrast is another type of exposure adjustment, but instead of changing each tone in the same direction (up or down), it works by increasing or decreasing the tonal range in an image.
Tonal range is the difference between the lightest and darkest area of an image. An image with a deep shadow, but also a window with light streaming in has a much larger tonal range than an image which is an evenly lit indoor scene with bounce cards lifting the shadow.
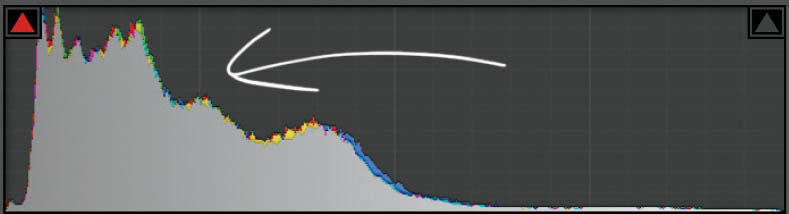
The histogram of a high contrast image looks a little something like Figure 5.6.

5.6 In this example you can see there is a peak on the left and right sides of the histogram with a dip in the middle creating a “U” shape. This represents an image with both heavy light and dark tones, and a large tonal range.

5.7 In this image, I adjusted the contrast using the basic panel as well as the tone curve in Lightroom. You can see the specific adjustments I made in Figure 5.8. The tone curve adjustment creates a subtle “S” curve, which brightens the light tones and darkens the dark tones, adding contrast.
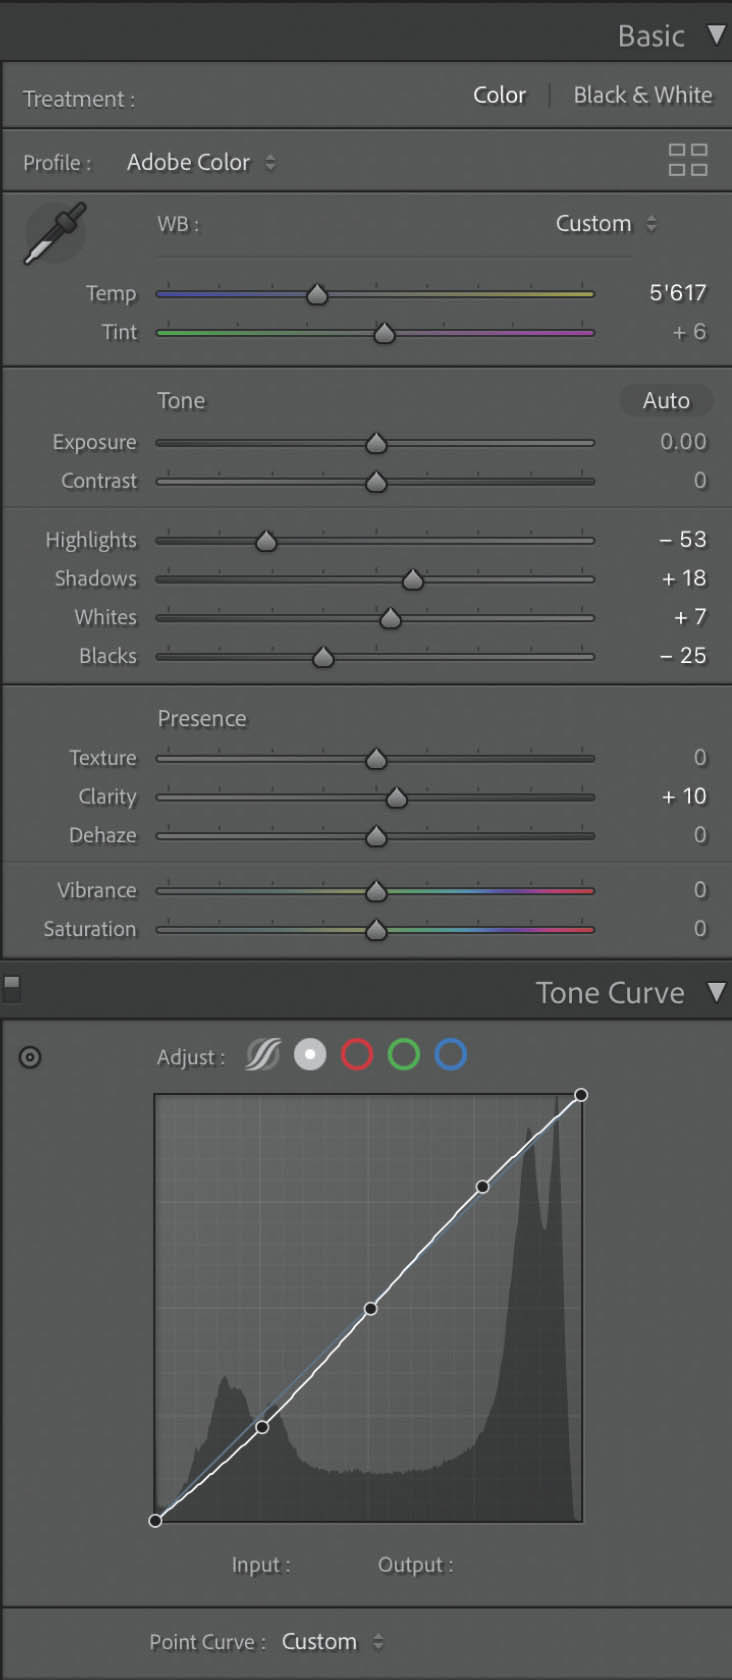
5.8
A lack of contrast can make food images look flat, but that doesn’t mean that cranking up the contrast slider is always the best way to go. There are many ways we can add contrast to images with a bit more control, so spend time exploring these in your editing program of choice.
Tools You Might Use to Adjust Contrast
- Contrast Slider
- Tone Curve
- Whites/Blacks
- Highlights/Shadows
- Clarity
5.9

5.10

5.11
In this image, I adjusted the colour locally in two different ways in Lightroom using the HSL (Hue, Saturation, Luminance) panel, and the Color Grading panel. Both allow you to target colours differently. I focused on the orange, yellow, green, and aqua in this image as these are the tones present, adjusting their hues slightly, and increasing saturation and luminance in different amounts. This gave me more control over the specific colours, more than a global exposure or saturation adjustment would have.
COLOUR
These are probably my favourite adjustments to make in post processing, and it’s where the magic happens. Colour can completely change the mood of a photo and the emotional response the viewer has to it. As you’re shooting, think about what colours will best tell your story.
Colours don’t always have to be totally realistic to work. Although most of the time with food we do want to stay as true to life as possible, occasionally creating images that are stylised with colour can have a powerful effect. Colour grading (in Light-room), or Colour Balance (in Capture One) are two great tools available for these kinds of edits, which can completely change or enhance colours in your images.
Adjust Colour Globally and Locally
I generally stay away from, or only minimally adjust colour globally in an image. I like to target colours specifically to refine them and create exactly the balance I’m looking for. As we talked about in the colour theory section (page 58), it’s how colours interact with each other that makes them so powerful, so small adjustments to hue (the origin of the colour), saturation (the intensity), and luminance (the lightness) can make a huge difference.
Don’t be afraid to move around the different tools, adjust, come back, adjust again. Keep stepping back and looking at your image as a whole.
Tools You Might Use to Adjust Colour
- White Balance
- Vibrance/Saturation
- Hue, Saturation, Luminance Adjustments
- Region Tone Curve
- Colour Grading/Colour Balance
CROPPING AND TRANSFORMING
Refining your composition and crop is something else you can do in post production. While it’s always advisable to get as close to the final crop you need in camera, sometimes post production cropping is needed.
One of the most common reasons you might need to crop an image in post production is if you need an aspect ratio different than the one that your camera shoots in. Client jobs sometimes come with specific requirements for aspect ratio, as do different social media platforms, so cropping becomes inevitable. You want to make sure that you are considering your aspect ratio and cropping requirements while you’re shooting to give yourself as much resolution as possible when you need to export your image.
Most tethering programs allow you to overlay custom composition guides, which you can make in different aspect ratios, so you can visualise your final crop as you shoot. Then when you move into your editing software, most of these also allow you to use a composition grid overlay as you crop, so you can make sure that your final crop is lining up with the lines and intersections where you want.
COMPOSITING
Sometimes to achieve the hero shot, we need to combine multiple images together and take the best parts of each one. This is often useful when shooting pour shots, action shots, or images with many pairs of hands, when you might only have one person to shoot with. I’ve even used this technique to create busy images with many plates of the same dish when I only have one or two of the plates I need. I simply move the plate around, changing up the styling and the garnish slightly each time, then merge all the photos together as a composite.

5.12 In these images you can see four of the available composition overlays in Lightroom within the crop tool. Currently there are eight available overlays in the crop tool.

5.13 I wanted to create a busy scene of salads, but I only had two of the green bowls available. Photoshop composites to the rescue! I simply took a few images of the plates in different positions, making sure I changed up the garnish as I went so it wasn’t obvious that they were the same dish, and also making sure they didn’t overlap. I created a composite image in Photoshop using layer masks to show all the plates together.
This kind of combining is done in Photoshop by using layer masks and bringing in only the parts of your top layers that you want. You can see a full demonstration of this in the case study on page 151.
RETOUCHING
Like any other kind of photography, food photography sometimes requires us to remove imperfections on our food. This could be cracks on the side of a cake, smudges on plates, rogue crumbs, or even distracting reflections in glassware. How far you go with retouching is up to you. Personally, I like to keep things still looking realistic, so I keep some imperfections in, and only remove ones causing a distraction. When you’re looking at your image, try and see where your eye is drawn. If it’s drawn to an area with an imperfection, that might be a good sign that you should remove it. But if the imperfection is adding character to your dish and image, leaving it in might be better.
Lightroom offers a basic spot healing tool, which works fine for small blemishes on backdrops. If you have any serious retouching to do, Photoshop is the software for the job. There are many different tools available for precise retouching, so you can play around with which one works the best for the job you’re doing.


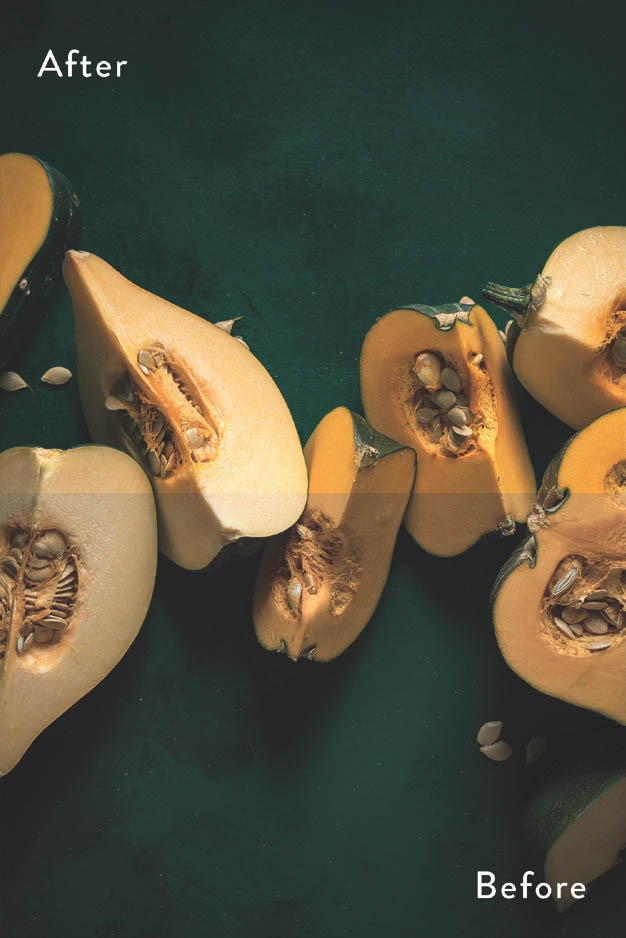
5.14 On the left, you can see there are some distracting smudges caused by the oily dressing, which weren’t possible to remove on set whilst styling. I use the clone stamp tool in Photoshop to remove these with brush settings of size 62px, hardness 20%, and flow 20% to give me control and precision in these small areas. You can see in the after shot (right) that these smudges are completely gone, and aren’t causing a distraction anymore.
Tools You Might Use to Retouch
- Clone Stamp
- Content Aware Fill
- Spot Healing Tool
- Healing Brush Tool
- Patch Tool
EFFECTS
Adding additional effects to your image, like vignettes or grain, can be nice if the image is enhanced by it. I always err on the side of caution with effects, as it’s easy to go too far and create something that is a distraction rather than an enhancement.
Editing Programs
Choosing the right software is personal, and as you develop, you’ll probably find yourself dipping into many for different jobs. The right software for you depends on how you like your workflow to be, what kind of tools you like to use, and personal preference. Let’s look at the four main softwares currently available. There are of course others, but these are the most common ones you’ll encounter.
LIGHTROOM
Lightroom is a powerful RAW editor, so you can import your RAW files directly and work on them.
The program edits RAW files non-destructively by holding your changes in a sidecar .LRCAT file. This means your original file remains untouched so you can always go back and remove or add to your changes without losing quality. It is also possible to configure Lightroom to create .XMP sidecar files if you prefer.
Lightroom’s develop module (where you process your images) is very intuitive. You can easily copy over edits to multiple images, whilst specifying the adjustments you want and don’t want, which makes editing multiple images from one shoot very quick.
Lightroom has a basic spot removal/healing brush tool, but it’s very basic and only good for removing small imperfections. It’s not sufficient for more significant retouching or combining images into composites. However, Lightroom conveniently links to Photoshop directly for single images and multiple images, which creates an easy workflow for using the two programs together.
Lightroom is also a comprehensive catalogue system, which makes it easy to categorise your photos in collections and tag images with keywords and ratings, so you have multiple ways to easily find images later.
It also has some basic tethering capabilities although these are not robust, and currently are not compatible with all camera brands.
CAMERA RAW
Camera RAW is another RAW editor which you can use before importing an image into Photoshop for retouching. The tools are very similar to Light-room (as they are built on the same system), so if you’re used to using Lightroom, Camera RAW is very intuitive.
There is no catalogue system like Lightroom. Each file is opened individually as it’s designed to work with Photoshop rather than as a standalone program, so it’s not ideal for editing large volumes of images.
Camera RAW also edits RAW files non-destructively by holding your changes in a sidecar .XMP file, which means your original file remains untouched so you can always go back and remove or add to your changes without losing quality.
CAPTURE ONE
Capture One is a powerful hybrid system that provides comprehensive tethering capabilities, as well as being a powerful RAW editor.
You can choose to work with a catalogue (which is very similar to the catalogue system in Lightroom) or with sessions (or both!). Which one you choose is up to you and how you prefer your workflow.
When you create a session, Capture One creates four folders for you: Capture, Selects, Output, and Trash. You can move images around these folders directly from within the program, which makes file management incredibly easy and organised.
The editing tools in Capture One are very similar to Lightroom in function, so if you’re used to editing in Lightroom, the switch is not too difficult. Some of the tools are a bit more comprehensive and advanced than Lightroom, and you also get the addition of layers, which can help keep your adjustments organised.
You can quickly apply adjustments to multiple images, including while you tether, which also speeds up your editing workflow.
The retouching tools in Capture One are also quite limited, but you can link to third-party editors such as Photoshop directly for single images. You can’t directly import multiple images as layers, so creating composites would still require you to export TIFF files first.
PHOTOSHOP
Photoshop is not a RAW editor, so it cannot open RAW files directly. Files need to be processed in a RAW editor (such as Camera RAW) first and converted into a file type Photoshop can read.
Photoshop only works with one file at a time, so it doesn’t have a catalogue system like Lightroom, meaning it’s probably not a great choice for editing a large volume of images. Personally, I like to use it in conjunction with a RAW editor that does have a file organisation system and use it for the tasks it shines at—retouching.
Photoshop is my go-to program for creating composites and retouching. There are many ways to make selections, create masks, and retouch different elements, so you can really customise your favourite tools and workflow for retouching.
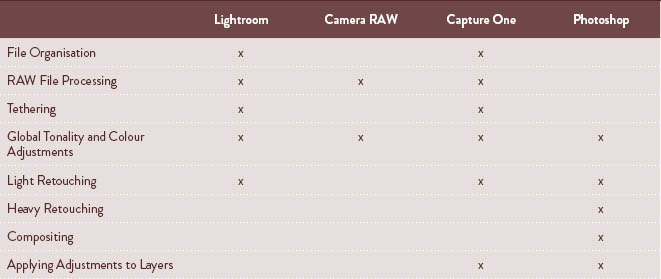
Software Comparison
To help you see what each program is best for, see the table below for the main features.
Presets
DEVELOP PRESETS
Presets are a workflow tool that allow you to apply multiple different adjustments in one click. If you regularly find yourself making the same adjustments to your images, creating your own presets could be a great tool for you. Each software has different names for presets, as follows.
Photoshop—Actions
Lightroom, Camera RAW—Presets
Capture One—Styles
You will often see that photographers will sell presets that you can install and use on your own images. These can be a great learning tool, but I would suggest using them as just that—a learning tool. Applying someone else’s preset to your image will not automatically make your image look like theirs, as an image is affected by lighting too.
Once you apply a preset, spend time playing around with the settings to see what it is about it you like, and what you don’t. Over time as you get more confident, the best thing you can do is create your own personal presets that reflect your unique style.
IMPORT / EXPORT PRESETS
These are presets you can apply when you import or export images from an editor. For example, when I import RAW files into Lightroom, I know that I always apply the Adobe Standard colour profile and enable lens corrections, so I have saved a preset with these settings which I apply to all my RAW files upon import.
You might also find you have a few different export settings that you use over and over again, for example for your website, social media, and clients. You can save these as well, so that exporting your images becomes even quicker.
These also have different names per software.
Lightroom, Camera RAW—Presets
Capture One—Recipes
Photoshop doesn’t currently have an easy way to save multiple export presets, but you can configure the “Quick Export” tab to be the export you most commonly use for ease.
Keep it Organised (and Safe!)
FILE STORAGE AND ORGANISATION
None of the software we have talked about in this chapter will store your images for you. Lightroom does have a cloud version of its software, but the storage is limited, and increasing it gets costly very quickly.
Instead, you’ll need to create your own file storage and management system, and believe me, doing this from the start will be so much easier than two years down the line when you’re swimming in a sea of RAW files all hanging out in one folder.
How you organise your files is totally up to you. Some people like to do it by date, with a folder for each shoot named by its date; others like to categorise by food type, client, or even a mixture of these. Finding a system that works for you is essential in ensuring that you know where to find what you’re looking for later.

Whether you decide to keep all your RAW files, or whether you edit them and only keep the ones you process is also up to you. However, I would urge you to consider getting rid of RAW files you cull, as they are hefty files and will take up a lot of space on whatever storage you use, which is rather wasted if they are files you never intend to use.
BACKUP!
Backup backup backup…shall I say it once again for impact? Backup.
Let me interject with a little story. I learned the hard way. I was vigilant about storing my files on an external hard drive, but less vigilant about backing it up. It had probably been about six months since I did my last backup when suddenly one day while unplugging my hard drive, the metal plug sheared off and got stuck inside the hard drive. There was no way of getting it out without destroying the connection, so I had no choice but to send it off to a data recovery service and hope for the best. One hard drive and $1,200 later, I was lucky enough to get my data back—but soon learned that paying for cloud backup storage is way cheaper (both in money and stress!) than recovering a lost hard drive.
Now, I have a much better workflow. As I shoot tethered, my RAW files are immediately saved on my external hard drive, where they are already categorised through my Capture One session with their folder and naming convention. Straight after my shoot, this hard drive gets plugged into my computer, where I have a second hard drive which is set to back up my whole computer as well as the original external hard drive via Time Machine (an Apple backup system). Then I have a cloud backup service installed on my computer which creates a remote backup every 24 hours.
Suggested Backup Workflow
- Shoot tethered directly onto external hard drive.
- Back up that hard drive to a second hard drive as soon after your shoot as possible.
- Have a cloud backup system in place to back up your hard drives remotely.
Having three copies of all your files, with at least one in a remote location (cloud) is a safe way to make sure that you never lose any files permanently. Equipment can always go wrong, but with good backups it shouldn’t be disastrous.
EQUIPMENT
External hard drives—Investing in a good-quality external hard drive (at least 1TB in storage size) with good connections will help keep your images safe.
SD cards—If you shoot directly in your camera and then transfer your images from your SD card later, make sure you invest in good quality SD cards with a fast write speed (95 MB/s is a good speed). I like to get a minimum of 128GB-sized memory cards, but preferably 256GB, especially if you intend to also shoot videos in 4k.
A computer with the right specs—If you’re frustrated by lagging and freezing, it could be that you’re asking too much of your current computer. It isn’t about buying “the latest and greatest,” this isn’t always necessary. It’s about making sure you’ve got the right specs in the right places. For a hardcore gamer, this will be different to a photographer editing multiple RAW files. The current recommended requirements for a computer to run editing software well is 16GB RAM (internal memory), HD display (minimum—retina is recommended), 4GB of VRAM (graphics card, for 4k displays upward), multi core processor with 64-bit support or Apple Silicon.
Screen Calibration Tool—A screen calibration tool is very handy if you want to ensure the colour consistency of your screen over time. All monitors change slightly as they age and calibrating regularly can help you maintain continuity.
Monitor Hood—This is a nice to have, but not essential. However, if your editing spot is often in bright daylight, or you have sun directly falling on your screen, this will be more essential. It’s a hood that fits snugly around your monitor to ensure that no ambient light is affecting your display.
Now it’s time to bring everything together in the case studies. Come behind the scenes with me in eight shoots in different styles.