
We're now on the home stretch. The ultimate prize for us is to be able to create a Java EE 6 application using Maven and the Eclipse IDE.
In this example, we will again be using the webapp-javaee6 archetype to keep a line of continuity with our earlier chapter; nevertheless, you are encouraged to explore some specific JBoss archetypes, such as jboss-javaee6-webapp-archetype, that will create a more articulate project structure including some sample classes, or the equivalent jboss-javaee6-webapp-ear-archetype archetype that packages your application in an enterprise archive.
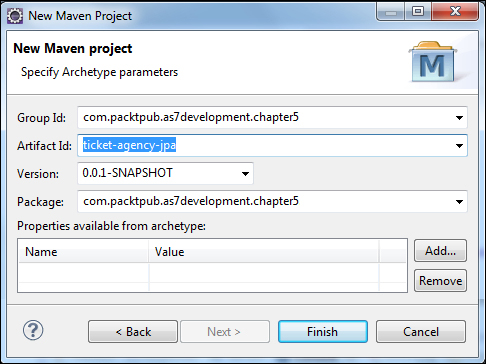
For our purpose, let's start by creating a new Maven project based on the webapp-javaee6 archetype, following the same steps exposed in Chapter 4, Learning Context Dependency Injection. The only difference is that we are now going to use the archetype configuration shown in the following screenshot:
Complete the wizard by clicking on Finish and you will return to your Eclipse project view.
Now that your Maven skeleton is set up, we will include the required dependencies so that Eclipse will be able to compile your classes as you code them.
The first thing we will add is the Bill of Materials, which includes both the jboss-javaee-6.0-with-tools and jboss-javaee-6.0-with-hibernate artifacts so that Maven will be able to pick up the right enterprise stack:
<dependency>
   <groupId>org.jboss.bom</groupId>
   <artifactId>jboss-javaee-6.0-with-tools</artifactId>
   <version>${version.jboss.bom}</version>
   <type>pom</type>
   <scope>import</scope>
</dependency>
<dependency>
   <groupId>org.jboss.bom</groupId>
   <artifactId>jboss-javaee-6.0-with-hibernate</artifactId>
   <version>${version.jboss.bom}</version>
   <type>pom</type>
   <scope>import</scope>
</dependency>
Next, you will need the following dependencies to be added to your project, starting from the hibernates persistence API.
<dependency>
    <groupId>org.hibernate.javax.persistence</groupId>
    <artifactId>hibernate-jpa-2.0-api</artifactId>
    <scope>provided</scope>
</dependency>
Next, since we will be using JSR-303 Bean Validation in our example, we need to include the hibernate-validator artifact as well.
<dependency>
  <groupId>org.hibernate</groupId>
  <artifactId>hibernate-validator</artifactId>
  <scope>provided</scope>
  <exclusions>
    <exclusion>
      <groupId>org.slf4j</groupId>
      <artifactId>slf4j-api</artifactId>
    </exclusion>
  </exclusions>
</dependency>
When declaring the hibernate-validator dependency, we are using an explicit exclusion for the slf4j API, which will not be added to the project's classpath since we use the java.util logging API instead.
Finally, we will add one more hibernate dependency – the annotation processor that will check for compilation errors whenever constraint annotations are incorrectly used.
<dependency>
  <groupId>org.hibernate</groupId>
  <artifactId>hibernate-validator-annotation-processor</artifactId>
  <scope>provided</scope>
</dependency>
The remaining dependencies are borrowed from Chapter 4, Learning Context Dependency Injection (since the examples in this book grow incrementally in complexity, we would suggest referring to the latest chapter's pom.xml file and adding just the new dependencies).
<dependency>
  <groupId>javax.enterprise</groupId>
  <artifactId>cdi-api</artifactId>
  <scope>provided</scope>
</dependency>

<dependency>
  <groupId>org.jboss.spec.javax.annotation</groupId>
  <artifactId>jboss-annotations-api_1.1_spec</artifactId>
  <scope>provided</scope>
</dependency>

<dependency>
  <groupId>org.jboss.spec.javax.ejb</groupId>
  <artifactId>jboss-ejb-api_3.1_spec</artifactId>
  <scope>provided</scope>
</dependency>

<dependency>
  <groupId>org.jboss.spec.javax.faces</groupId>
  <artifactId>jboss-jsf-api_2.1_spec</artifactId>
  <scope>provided</scope>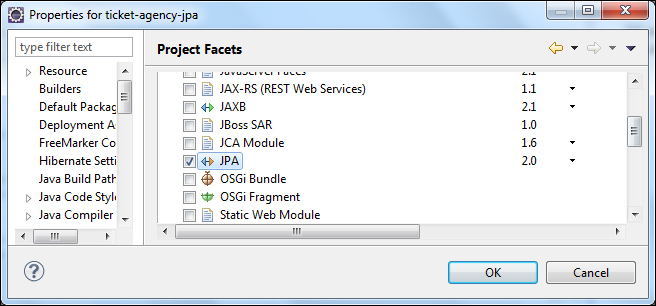
</dependency>Now that we're done with the tedious configuration part, we will add our entities to the project. Some valuable options exist for auto-generating our entities, starting with the database schema. For example, Eclipse's File menu includes an option JPA Entities from Table that (once a connection has been set up to the database) allows reversing your DB schema (or part of it) into Java entities.
If you are willing to try this option, remember that you need to activate the Eclipse JPA facet in your project, from Project Properties, as shown in the following screenshot:
One more option is mentioned in the Appendix, Rapid Development Using JBoss Forge, which discusses JBoss Forge , a powerful, rapid application-development (aimed at Java EE 6) and project-comprehension tool.
Whatever your strategy, the expected outcome needs to conform to the following entities. Here is the first one, SeatType, which maps the table SEAT_TYPE:
@Entity [1]
@Table(name="seat_type) [2]
public class SeatType implements Serializable {

  @Id  [3]
  @GeneratedValue(strategy=GenerationType.IDENTITY)
  private Long id;

  private String description;

  private int price;

  private int quantity;

  //bi-directional many-to-one association to Seat
  @OneToMany(mappedBy="seatType", fetch=FetchType.EAGER) [4]
  private List<Seat> seats;
      // Getters and Setters omitted for brevity
}
The first meaningful annotation is @Entity [1], which declares the class as Entity. The @Table [2] annotation is used to map the bean class with a database table.
The @Id annotation, [3], is a mandatory one; it describes the primary key of the table. Along with @Id, there is the @GeneratedValue annotation. This is used to declare that the database is in charge of generating the value.
Moving along, the @OneToMany annotation [4] defines an association with one-to-many multiplicity. Actually, the SeatType class has many seats. The corresponding Seat reference is contained in a list collection.
Finally, note that we have not included here, for the sake of brevity, the field getters and setters that have been generated.
Let's have a look at the Seat entity.
@Entity
public class Seat implements Serializable {
  private static final long serialVersionUID = 1L;

  @Id
  @GeneratedValue(strategy=GenerationType.IDENTITY)
  private Long id;

  private boolean booked;

  //bi-directional many-to-one association to SeatType
  @ManyToOne [1]
  @JoinColumn(name="seat_id") [2]
  private SeatType seatType;

        // Getters and Setters omitted for brevity

}
As you can see, the Seat entity has the corresponding @ManyToOne [1] annotation, which naturally complements the @OneToMany relationship. The @JoinColumn [2]
notifies the JPA engine that the
seatType
field is mapped through the foreign key of the database's seat ID.
JavaBeans Validation (JSR-303 Bean Validation) is a new validation model available as part of the Java EE 6 platform. The Bean Validation model is supported by constraints in the form of annotations placed on a field, method, or class of a JavaBeans component, such as a managed bean.
In our example, the SeatType entity will be created using an input form; therefore, we will need to validate the data that has been entered by the user.
In our example, we will place a @javax.validation.constraints.NotNull constraint on every field that is part of the SeatType entering form, and a more complex constraint on the description field, which will set the maximum size for the seat description to 25 (@javax.validation.constraints.Size constraint) and allow just letters and spaces in it (@javax.validation.constraints.Pattern constraint).
@Entity
@Table(name="seat_type)

public class SeatType implements Serializable {
  private static final long serialVersionUID = 1L;

  @Id
  @GeneratedValue(strategy=GenerationType.IDENTITY)
  private int id;

  @NotNull
  @Size(min = 1, max = 25, message = "You need to enter a Seat Description (max 25 char)")
  @Pattern(regexp = "[A-Za-z ]*", message = "Description must contain only letters and spaces")
  private String description;

  @NotNull
  private int price;

  @NotNull
  private int quantity;

// Getters/Setters here
}
As you can see, we can also place a description on a constraint, which can be used to provide a customized error message to the JSF layer should the data fail to pass the constraint. You can check the Oracle documentation for a full list of constraints available at http://docs.oracle.com/javaee/6/tutorial/doc/gircz.html.