The Entity API looks great and very intuitive, but how does the server know which database is supposed to store/query the entity objects? The persistence.xml file, which will be placed under src/main/resources/META-INF of your project, is the standard JPA configuration file. By configuring this file, you can easily switch from one persistence provider to another and thus also from one application server to another (believe it, this is a huge leap towards application server compatibility).
In the persistence.xml file we will basically need to specify the persistence provider and the underlying data source used.
<persistence version="2.0"
  xmlns="http://java.sun.com/xml/ns/persistence" xmlns:xsi="http://www.w3.org/2001/XMLSchema-instance"
  xsi:schemaLocation="
        http://java.sun.com/xml/ns/persistence
        http://java.sun.com/xml/ns/persistence/persistence_2_0.xsd">
  <persistence-unit name="primary">
    <jta-data-source> java:jboss/datasources/jbossas7development</jta-data-source>
    <class>com.packtpub.as7development.chapter5.model.Seat</class>    <class>com.packtpub.as7development.chapter5.model.SeatType</class>
    <properties>
      <!-- Properties for Hibernate -->
      <property name="hibernate.hbm2ddl.auto" value="create-drop" />
      <property name="hibernate.show_sql" value="false" />
    </properties>
  </persistence-unit>
</persistence>
We have highlighted the attributes you need to add to persistence.xml. The attribute name is a mandatory element that will be used to reference the persistence unit from our Enterprise JavaBeans.
Then, we have specified some provider-specific properties, such as hibernate.hbm2ddl.auto, that can be used to create and drop your database tables each time you deploy your application. That can be an advantage if you want to start with a clean storage each time you deploy the application. Additionally, we have included another attribute, such as hibernate.show_sql, that (if turned on) can be useful for debugging your Hibernate queries.
Producer classes have been introduced in the earlier chapter as a means of providing some object resources to our application. In this example, we will use it to produce lots of resources, such as the JPA Entity Manager and the list of objects that are transferred to the JSF views. For this reason, we have provided a Resources class that contains some general-purpose resources and single instances of the SeatProducer and SeatTypeProducer classes, which will be used to produce collections of entities.
Here's the first com.packtpub.as7development.chapter5.producer.Resources class:
public class Resources {

    @Produces
    @PersistenceContext
    private EntityManager em;

    @Produces
    public Logger produceLog(InjectionPoint injectionPoint) {
        return Logger.getLogger(injectionPoint.getMember().getDeclaringClass().getName());
    }

    @Produces
    @javax.enterprise.context.RequestScoped
    public FacesContext produceFacesContext() {
        return FacesContext.getCurrentInstance();
    }

}
As you can see, this class will be the factory for three kinds of resources:
EntityManager, which will resolve to the "primary" persistence unit since there is just one persistence unit definedjava.util.Logger, which will trace some information on the server consoleFacesContext, which will be used to output some JSF messages on the screen
Tip
Producers versus the Java EE 5 @Resource injection
If you have never used the dependency injections framework before, you might wonder what the benefit is of adding an extra layer to produce some container resources. The reason becomes evident once you need to change some configuration elements, such as the persistence unit. With the older Java EE 5 approach, you will be forced to change the @Resource injection's details wherever they are used; however, using a producer method for it will centralize resource creation, making changes trivial.
Next we will add some entity producers; let's add the SeatTypeProducer and SeatProducer classes:
@javax.enterprise.context.RequestScoped

public class SeatTypeProducer implements Serializable {

    @Inject
    private DataManager seatRepository;

    private List<SeatType> seatTypes;

    @Produces
    @Named
    public List<SeatType> getSeatTypes() {
        return seatTypes;
    }

    public void onListChanged(@Observes(notifyObserver = Reception.IF_EXISTS) final SeatType member) {
        retrieveData();
    }

    @PostConstruct
    public void retrieveData() {
      seatTypes = seatRepository.findAllSeatTypes();
    }
}
If you have gone through our example in Chapter 4, Learning Context Dependency Injection, you will find nothing new here; as you can see, this class will merely produce a collection of seatTypes that are tagged as @Named so that they can be accessed from JSF EL
as well. Additionally, this class contains an Observer handler method (onListChanged), which will be fired when data in the collection is changed.
The collection data is filled up using the retrieveData method (loaded the first and only time when the class is constructed) of the DataManager CDI Bean. We will define this bean in a moment; right now, we will add the last producer class used in this example, the SeatProducer bean:
@javax.enterprise.context.RequestScoped
public class SeatProducer implements Serializable {

  @Inject
  private DataManager seatRepository;
  private List<Seat> seats;

  @Produces
  @Named
  public List<Seat> getSeats() {
    System.out.println("Seattypes "+seats);
    return seats;
  }

  public void onMemberListChanged(@Observes(notifyObserver = Reception.IF_EXISTS) final Seat member) {
    retrieveAllSeats();
  }

  @PostConstruct
  public void retrieveAllSeats() {
    seats = seatRepository.findAllSeats();
  }
}
This bean will be used to produce the list of Seat objects that will actually be available for booking.
As you can see from the earlier code, the producer classes make use of a bean named DataManager to fill up their collection of data. This bean performs some simple finds on the Seat and SeatType objects, as shown by the following code:
@javax.enterprise.context.ApplicationScoped
public class DataManager {

  @Inject
  private EntityManager em;

  public Seat findSeatById(Long id) {
    return em.find(Seat.class, id);
  }

  public List<SeatType> findAllSeatTypes() {

    return em.createQuery("from SeatType seat").getResultList();
  }
  public List<Seat> findAllSeats() {

    return em.createQuery("from Seat seat").getResultList();
  }
  public void deleteAllData() {
    em.createQuery("delete from Seat").executeUpdate();
    em.createQuery("delete from SeatType").executeUpdate();

  }
}
Besides running queries, this class will execute some other methods that are not bound to the user session, such as the deleteAllData method that is to be used to clean the DB data and restart the application.
Until now we have coded all the information that will be visible to the user through the application screen. What is obviously missing here is all the business logic that translates ultimately into inserting data or updating the existing data. For this reason, we will now add two classes under com.packtpub.as7development.chapter5.service package. The first one is TicketService, which is a stateless EJB that will be used to perform the core business logic of this application, and the second one is our stateful EJB's counterpart, BookerService. Let's start with the stateless EJB.
@Stateless
public class TicketService {

  @Inject
  private Logger log;

  @Inject
  private EntityManager em;

  @Inject
  private Event<SeatType> seatTypeEventSrc;

  @Inject
  private Event<Seat> seatEventSrc;

  @Inject
  private DataManager repository;

  @Inject
  private List <SeatType> seatTypes;

  public void createSeatType(SeatType seat) throws Exception {
    log.info("Registering " + seat.getDescription());
    em.persist(seat);
    seatTypeEventSrc.fire(seat);
  }

  public void createTheatre(List<SeatType> seatTypes) {

    for (SeatType type: seatTypes) {
      for (int ii=0;ii<type.getQuantity();ii++) {
        Seat seat = new Seat();
        seat.setBooked(false);
        seat.setSeatType(type);
        em.persist(seat);
      }
    }
  }

  public void bookSeat(Long seatId) {
    Seat seat = repository.findSeatById(seatId);
    seat.setBooked(true);
    em.persist(seat);
    seatEventSrc.fire(seat);
  }

  public void doCleanUp() {
    repository.deleteAllData();
  }

}
Tip
Why has this component been coded as an EJB instead of a CDI Bean?
One of the main advantages of using EJBs is that they are inherently transactional components
. If we were to use CDI Beans, we would have to manually demarcate the transaction begin() and commit() (or rollback()) in every single method.
This service is made up of four methods. The first is the createSeatType method, which will be used in the first application screen to add a new SeatType object to our theatre. The next method, createTheatre, will be invoked once we are done with setting up our theatre; so we create the list of seats that will be available for booking in the next screen.
Next in the list is the bookSeat method that, as you might have guessed, will be used to book a seat. Finally, the doCleanUp is actually used to perform some clean up if you want to restart the application.
The last piece of our puzzle is the BookerService class, which adds a tiny session layer to your application.
@Named
@ConversationScoped

public class BookerService implements Serializable {

  @Inject
  private Logger logger;

  @Inject TicketService ticketService;

  int money;

  @PostConstruct
  public void createCustomer() {
    this.money=100;

  }

  public void bookSeat(Long seatId, int price)   {
    FacesContext fc = FacesContext.getCurrentInstance();

    if (price  > money) {

      FacesMessage m = new FacesMessage(FacesMessage.SEVERITY_ERROR, "Not enough Money!", "Registration successful");
      fc.addMessage(null, m);
      return;
    }
    logger.info("Booking seat "+seatId);
    ticketService.bookSeat(seatId);
    money = money - price;

    FacesMessage m = new FacesMessage(FacesMessage.SEVERITY_INFO, "Registered!", "Registration successful");
    fc.addMessage(null, m);
    logger.info("Seat booked.");

  }

  public int getMoney() {
    return money;
  }


}
As you might remember from the earlier chapter, the conversation scope is a bit like the traditional session scope, in that it holds the state associated with a user of the system and spans multiple requests to the server. However, unlike the session scope, the conversation scope is demarcated explicitly by the application. Therefore, you can set the boundaries of your conversation and unload objects from memory once your conversation has ended.
The link between the Persistence layer and the user's view falls to the TicketController bean, which will drive requests to the actual services exposed by our application. Since this bean will be bound to RequestScope and we need to expose it to our views as well (using @Named), we can use the convenient @Model annotation for it, which is a sum of these two attributes.
@Model
public class TicketController {

  @Inject
  private FacesContext facesContext;

  @Inject
  private TicketService ticketService;

  @Inject
  private List <SeatType> seatTypes;

  @Inject
  private Conversation conversation;

  @Produces [1]
  @Named
  private SeatType newSeatType;

  @PostConstruct
  public void initNewSeatType() {
    newSeatType = new SeatType();
  }
  public String createTheatre() {

    ticketService.createTheatre(seatTypes);
    conversation.begin();  [2]
    return "book";
  }

  public String restart() {
    ticketService.doCleanUp();
    conversation.end(); [3]
    return "/index";    [4]
  }

  public void create() throws Exception {
    try {
      ticketService.createSeatType(newSeatType);
      FacesMessage m = new FacesMessage(FacesMessage.SEVERITY_INFO, "Done!", "Seats Added");
      facesContext.addMessage(null, m);
      initNewSeatType();

    } catch (Exception e) {
      String errorMessage = getRootErrorMessage(e);
      FacesMessage m = new FacesMessage(FacesMessage.SEVERITY_ERROR, errorMessage, "Error while saving data");
      facesContext.addMessage(null, m);
    }
  }

  private String getRootErrorMessage(Throwable e) {
    String errorMessage = "Registration failed. See server log for more information";
    while (e != null) {
      errorMessage = e.getLocalizedMessage();
      e = e.getCause();
    }
    return errorMessage;
  }
}
The TicketController class
is due to complete the following tasks:
- At first it produces a
SeatTypeobject[1]and exposes it to the JSF View layer using the@Namedannotation.Note
This technique is a great addition provided by CDI since it removes the need to create a boilerplate object,
SeatType, to transport the information from the view to the services. TheSeatTypeobject is produced by the controller and will be populated by the JSF view and persisted by theTicketService. - Next, it is used to demarcate the user's conversation
[2]by starting it once you've done with your theatre setup and you have chosen to restart the application[3]. - It then drives user navigation between the application screens by returning to the home page
[4].Note
As you can see from the
restartmethod, JSF 2 supports implicit navigation, which means that you don't need to define navigation rules inside the JSF configuration file. You can simply return the page name (for example,book) from your methods (or set it in your form actions) and the JSF engine will look for a page namedbook.xhtmlin the current directory.
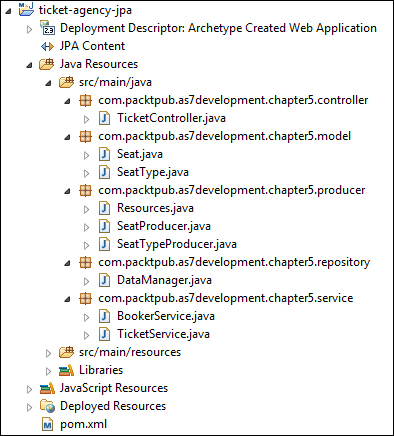
We are done with the Java classes. You should now check your project structure matches the following screenshot:
Now that our middle tier is completed, we just need to add a couple of JSF views to our application into the views folder of our webapp. The first view, named setup.xhtml, will set up our theatre and the second one, named book.xhtml, will be used to book tickets, borrowing much of its code from the earlier chapter. So here's the content from setup.xhtml:
<ui:define name="content">
  <h1>Step #1: Theatre Setup</h1>

  <div>
    <p>Enter the information about Seats.</p>
    <img src="resources/gfx/seat_chart.gif" />
  </div>

  <h:form id="reg">
    <p>Add Seats.</p>
    <h:panelGrid columns="3" columnClasses="titleCell">
      <h:outputLabel for="desc" value="Description" />
      <h:inputText id="desc" value="#{newSeatType.description}" />
      <h:message for="desc" errorClass="invalid" />

      <h:outputLabel for="price" value="Price:" />
      <h:inputText id="price" value="#{newSeatType.price}" />
      <h:message for="price" errorClass="invalid" />

      <h:outputLabel for="quantity" value="Number of Seats:" />
      <h:inputText id="quantity" value="#{newSeatType.quantity}" />
      <h:message for="quantity" errorClass="invalid" />
    </h:panelGrid>
    <p>
      <h:panelGrid columns="2">
        <h:commandButton id="Add" action="#{ticketController.create}" value="Add" />

        <h:messages styleClass="messages" errorClass="invalid"
          infoClass="valid" warnClass="warning" globalOnly="true" />
      </h:panelGrid>
    </p>
  </h:form>
  <h:form id="reg2">
    <h:panelGrid columns="1">

      <h:commandButton id="Finish"    action="#{ticketController.createTheatre}"
        value="Finish" styleClass="register" />

    </h:panelGrid>

    <h2>Seats List</h2>
    <h:panelGroup rendered="#{empty seatTypes}">
      <em>No Seats Added.</em>
    </h:panelGroup>
    <h:dataTable var="_seatType" value="#{seatTypes}"
      rendered="#{not empty seatTypes}" styleClass="simpletablestyle">
      <h:column>
        <f:facet name="header">Id</f:facet>
        #{_seatType.id}
      </h:column>
      <h:column>
        <f:facet name="header">Name</f:facet>
        #{_seatType.description}
      </h:column>
      <h:column>
        <f:facet name="header">Price</f:facet>
        $ #{_seatType.price}
      </h:column>
      <h:column>
        <f:facet name="header">Quantity</f:facet>
        #{_seatType.quantity}
      </h:column>
    </h:dataTable>
  </h:form>
</ui:define>
As you can see, this view contains in the topmost section a form for entering a new seat type. The highlighted input texts will actually pass data to the SeatType object, which will be transferred to the TicketController CDI Bean and ultimately persisted when the user clicks on the Add button.
Each time you add a new block of seats to your theatre, the dataTable contained in the lower part of the screen will be updated. When you are done with your setup, click on the Finish button, which will recall the finish method of the TicketController CDI Bean, creating the list of seats.
This action will also redirect you to the next view, named book.xhtml, which is used to book seats.
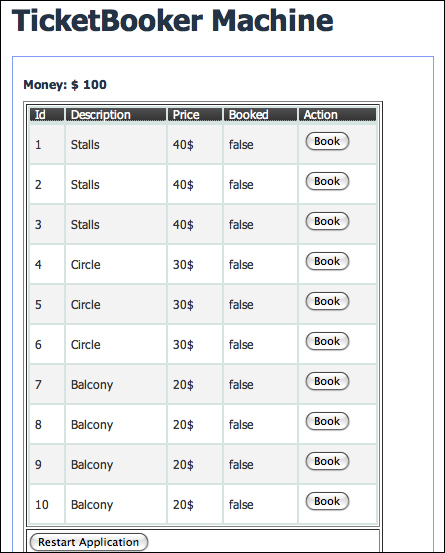
<ui:define name="content">
  <h1>TicketBooker Machine</h1>
  <h:form id="book">

    <h3>Money: $ #{bookerService.money}</h3>
    <h:messages errorClass="error" infoClass="info" globalOnly="true" />
    <h:panelGrid columns="1" border="1" styleClass="smoke">
      <h:dataTable var="_seat" value="#{seats}" rendered="#{not empty seats}"
        styleClass="simpletablestyle">

        <h:column>
          <f:facet name="header">Id</f:facet>
          #{_seat.id}
        </h:column>

        <h:column>
          <f:facet name="header">Description</f:facet>
          #{_seat.seatType.description}
        </h:column>
        <h:column>
          <f:facet name="header">Price</f:facet>
          #{_seat.seatType.price}$
        </h:column>
        <h:column>
          <f:facet name="header">Booked</f:facet>
          #{_seat.booked}
        </h:column>
        <h:column>
          <f:facet name="header">Action</f:facet>
          <h:commandButton id="book"
            action="#{bookerService.bookSeat(_seat.id, _seat.seatType.price)}"
            disabled="#{_seat.booked}" value="#{_seat.booked ? 'Reserved' : 'Book'}" />

        </h:column>
      </h:dataTable>

      <h:commandButton id="restart" action="#{ticketController.restart}"
        value="Restart Application" />
    </h:panelGrid>
  </h:form>
</ui:define>
Finally, we will add a template page named default.xhtml, which acts as a container for our resources.
<!DOCTYPE html PUBLIC "-//W3C//DTD XHTML 1.0 Strict//EN"
"http://www.w3.org/TR/xhtml1/DTD/xhtml1-strict.dtd">
<html xmlns="http://www.w3.org/1999/xhtml"
xmlns:h="http://java.sun.com/jsf/html"
xmlns:ui="http://java.sun.com/jsf/facelets">
<h:head>
<title>Ticket Booking</title>
<meta http-equiv="Content-Type" content="text/html; charset=utf-8" />
<h:outputStylesheet name="css/screen.css" />
</h:head>
<h:body>
<div id="container">
<div class="dualbrand">
<img src="resources/gfx/masks.jpg" />
</div>
<div id="content">
<ui:insert name="content">
[Template content will be inserted here]
</ui:insert>
</div>
<div id="footer">
<p>
A Java EE 6 application featuring CDI JPA 2.0 JSF 2.1.<br />
</p>
</div>
</div>
</h:body>
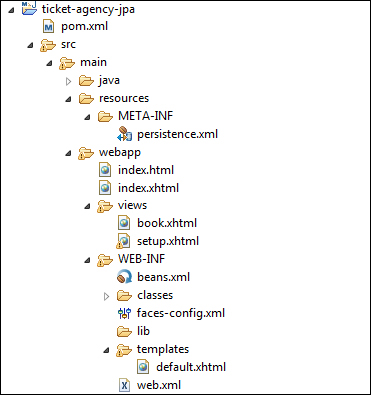
</html>Here's a snapshot of the project, expanded at the webapp level (as you can see, we have also included a basic index.html screen and an index.xhtml screen to redirect the user to the initial screen, setup.xhtml):
Deploying the application requires, as usual, packaging it using the following Maven goal:
mvn install
[INFO] Scanning for projects...
[INFO]
[INFO] ------------------------------------------------------------------
[INFO] Building ticket-agency-jpa
[INFO] ------------------------------------------------------------------
[INFO] Building jar: C:chapter5	icket-agency-ejb	arget	icket-agency-jpa.jar
. . . .
[INFO] ------------------------------------------------------------------------
[INFO] BUILD SUCCESS
[INFO] ------------------------------------------------------------------------
[INFO] Total time: 5.308s
Finally, provided that you have installed the JBoss Maven plugin, you can deploy your application using the following command:
mvn jboss-as:deploy
Once the deployment has successfully completed, browse over to http://localhost:8080/ticket-agency-jpa/ to view the application's welcome page.
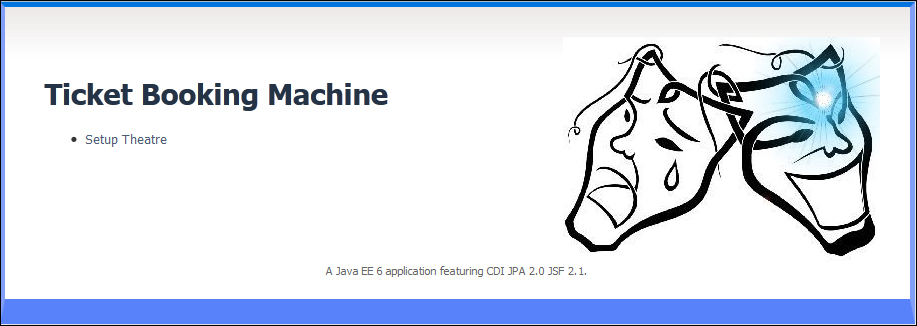
Congratulations! You're done. By clicking on the Setup Theatre link, you can start creating places in the setup.xhtml page.

Once you click on the Finish button, you will be redirected to the last screen, which performs the seat booking in book.xhtml: