JAX-RS (JSR-311) is a new JCP specification that provides a Java API for RESTful web services in the HTTP protocol.
In their simplest form, RESTful web services are networked applications that manipulate the state of system resources. In this context, resource manipulation means resource creation, retrieval, update, and deletion (CRUD). However, RESTful web services are not limited to just these four basic data manipulation concepts. On the contrary, RESTful web services can execute logic at the server level, but, remember that every result must be a resource representation of the domain.
The main difference with SOAP web services is that REST asks developers to use HTTP methods explicitly and in a way that's consistent with the protocol definition. This basic REST design principle establishes a one-to-one mapping between CRUD operations and HTTP methods.
Therefore, with the delineated roles for resources and representations, we can now map our CRUD actions to the HTTP methods POST, GET, PUT, and DELETE as follows:
|
Action |
HTTP protocol equivalent |
|---|---|
|
|
|
|
|
|
|
|
|
|
|
|
As we said, REST resources can be accessed using actions that map an equivalent HTTP request. In order to simplify the development of REST applications, you can use simple annotations to map your actions; for example, in order to retrieve some data from your application, you can use something similar to the following:
@Path("/users")
public class UserResource {

@GET
public String handleGETRequest() { . . .}
}
@POST
public String handlePOSTRequest(String payload) {
}
The first annotation, @Path, used in our example is used to specify the URI that is assigned to this web service. Subsequent methods have their specific @Path annotation so that you can provide a different response according to the URI requested.
Then, we have an @GET annotation that maps an HTTP GET request and an @POST annotation that handles an HTTP POST. So in this example, if we were to request for a web application bound to the web context example, an HTTP GET request to the URL http://host/example/users would trigger the method handleGETRequest; while on the other hand, an HTTP POST request to the same URL would conversely invoke the handlePOSTRequest method.
Having understood the basics of REST services, let's see how we can develop a RESTful web service using JBoss AS 7. The application server includes an out-of-the-box RESTEasy library that is a portable implementation of the JSR-311 specification. RESTEasy is able to run in any servlet container; however, it is perfectly integrated with JBoss Application Server, thus making the user experience nicer in that environment.
Besides the server-side specification, RESTEasy has been innovative in bringing JAX-RS to the client through the RESTEasy JAX-RS Client Framework . This client-side framework allows you to map outgoing HTTP requests to remote servers using JAX-RS annotations and interface proxies.
RESTEasy is bundled with JBoss AS 7, so you need very little effort to get started. At first, you must at least provide an empty web.xml file:
<web-app version="3.0" xmlns="http://java.sun.com/xml/ns/javaee"
        xmlns:xsi="http://www.w3.org/2001/XMLSchema-instance"
        xsi:schemaLocation="http://java.sun.com/xml/ns/javaee http://java.sun.com/xml/ns/javaee/web-app_3_0.xsd">
</web-app>
Once you have completed the web.xml file, you just need to activate the JAX-RS resources by declaring the application path used by your REST service, using the @ApplicationPath annotation in a class that extends javax.ws.rs.core.Application:
@ApplicationPath("/rest")
public class JaxRsActivator extends Application {

}
This simply means that if we were to deploy our former example, the HTTP GET method, http://host/example/rest/users would trigger our getUser business method; while the same URL would place a request through the handlePOSTRequest method using a POST request.
With all the configurations in place, we can now add a simple REST web service to our Ticket Web Service project that will provide the same functionalities of our SOAP web service.
So add a new class to your project and name it TicketRESTService. The code for this is as follows:
package com.packtpub.as7development.chapter8.webservice;

import java.util.*;

import javax.enterprise.context.RequestScoped;
import javax.inject.Inject;
import javax.ws.rs.*;
import javax.ws.rs.core.*;

import com.packtpub.as7development.chapter8.ejb.TheatreBox;
import com.packtpub.as7development.chapter8.model.Seat;


@Path("/seat")
@RequestScoped
public class TicketRESTService {


  @Inject TheatreBox service;
  @Inject TheatreInfoBean infoBean;

  @GET
  @Produces(MediaType.APPLICATION_JSON)
  public List<Seat> getSeatList() {
    return infoBean.getSeatList();
  }

  @POST
  @Path("/{id:\d+}")
  @Produces(MediaType.APPLICATION_JSON)
  public Response buyTicket(@PathParam("id") int id) {
    Response.ResponseBuilder builder = null;
    try {
      service.buyTicket(id);
      builder = Response.ok("Ticket booked");
    }
    catch (Exception e) {
      // Handle generic exceptions
      Map<String, String> responseObj = new HashMap<String, String>();
      responseObj.put("error", e.getMessage());
      builder = Response.status(Response.Status.BAD_REQUEST).entity(responseObj);
    }
    return builder.build();
  }

}
If you have understood our earlier section well, this code will be almost intuitive to you. We have included two methods here, just like the SOAP alter ego; the former one is named getSeatList, which is bound to an HTTP GET request and produces the list of Seats. The list is returned using a JSON representation that is pretty common when returning Java objects to the client.
Note
The grammar for JSON objects is simple and requires the grouping of the data definition and data values, it is as follows:
- Elements are enclosed with curly brackets (
{and}) - Values of elements come in pairs having the structure of
name:valueand are comma separated - Arrays are enclosed with square brackets (
[and])
That's all there is to it. (For the full JSON grammar description, see http://www.json.org/.)
The second method included in this class is buyTicket that will be used to invoke the corresponding buyTicket class of our EJB. This method, on the other hand, is bound to the following HTTP POST method:
@POST
@Path("/{id:\d+}")
@Produces(MediaType.APPLICATION_JSON)
public Response buyTicket(@PathParam("id") int id)
You might be thinking that this Path expression seems a bit weird, but all it does is map a URI numeric parameter (included in the Path expression) to a method parameter. In short, the parameter that is included in the URL will be passed to the method in the ID variable.
The previous method also returns a JSON-formatted string that we will get decoded on the client side using a simple Java library.
Now the REST service is complete and we can start deploying it in the usual way:
mvn install jboss-as:deploy
If you followed all the steps so far, the following GET method issued by your browser should print out the list of available seats:
[{"id":0,"seatName":"Stalls","price":40,"booked":false},{"id":1,"seatName":"Stalls","price":40,"booked":false},{"id":2,"seatName":"Stalls","price":40,"booked":false},{"id":3,"seatName":"Stalls","price":40,"booked":false},{"id":4,"seatName":"Stalls","price":40,"booked":false},
. . . . . .Connecting to a RESTful web service takes no more work than directly connecting to the service through an HTTP connection. For this reason, you can use plenty of APIs to access your REST services, such as the JDK URLConnection class or Jakarta Commons HttpClient API. However, since we are already using RESTEasy in our project, we suggest using its great client API that helps you to easily consume REST web services in the way JAX-RS is consumed.
A simpler way to create an individual HTTP request is using the org.jboss.resteasy.client.ClientRequest class. Therefore, if you want to retrieve the list of Seats from your REST service, you just need to issue the following
ClientRequest class:
ClientRequest cr = new ClientRequest("http://localhost:8080/ticket-agency-ws/rest/seat");
String result = cr.get(String.class).getEntity();
System.out.println(result);
The previous code will simply perform a GET action to the REST service that is deployed as part of the ticket-agency-ws web application. Once that ClientRequest class is returned, we cast the result as a string, which in our case will be a list of JSON-formatted Seat objects.
Here's a quick recap of what the ClientRequest class is made up of:

As you can see, besides the Web Context string, you need to include the JAX-RS application path (rest) we discussed earlier. Next, you need to include the @Path annotation of your TicketRESTService (the seat) and eventually the ID of the seat booking if you are trying to book a seat.
The previous approach works well if you are issuing a single request; on the other hand, if you have lots of URIs to consume, you can use the ClientRequestFactory class to encapsulate your URIs. This approach has two main benefits:
- It allows the initial request to be reused by just changing the
queryparameter or aPathelement - It allows the REST interceptor to be registered so that any future
client.getcalls orclient.createRequestwill use that interceptor
So, let's see the full test method using the ClientRequestFactory class:
@Test
  public void testREST() {
    System.out.println("Testing Ticket REST Service");

    ClientRequestFactory crf = new ClientRequestFactory(UriBuilder.fromUri("http://localhost:8080/ticket-agency-ws/rest/seat").build());


    ClientRequest bookRequest = crf.createRelativeRequest("/4");

    String entity=null;
    try {
      entity = bookRequest.post(String.class).getEntity();

      assertTrue(entity.equals("Ticket booked"));
      System.out.println("Ticket Booked with REST Service");
      ClientRequest request = crf.createRelativeRequest("/");
      String seatList=null;

      seatList = request.get(String.class).getEntity();
    } catch (Exception e1) {

      e1.printStackTrace();
    }
    System.out.println("SEAT List
" + seatList);

    Object obj=JSONValue.parse(seatList);
    JSONArray array=(JSONArray)obj;
    JSONObject seat =(JSONObject)array.get(4);

    Boolean isbooked = (Boolean)seat.get("booked");

    assertTrue(isbooked);
  }
So in our test, we are first creating the ClientRequestFactory class from the URI http://localhost:8080/ticket-agency-ws/rest/seat. The factory is then used to issue two ClientRequest; the first one will be used to book a Ticket, adding the URI /4, that will be translated on the server side as an invocation of buyTicket, passing as the ID value of 4.
Next, another ClientRequest is issued to retrieve the list of Seats which will be returned in the JSON format. The last piece of code uses a utility library named JSON.simple (http://code.google.com/p/json-simple/) that adds a thin wrapper over your JSON objects so that they can conveniently be converted from/to Java objects.
Once we have got a reference to the fourth element in the JSONArray
, we'll simply check the Boolean value of the field booked, asserting that it has actually been booked.
In order to compile our project with the REST web service, we need to import the JAX-RS API that is included in the application server libraries. This ensures that we will use the provided scope for our dependency class, which means that we will not include it in the target artifact:
<dependency>
   <groupId>org.jboss.spec.javax.ws.rs</groupId>
   <artifactId>jboss-jaxrs-api_1.1_spec</artifactId>
   <scope>provided</scope>
</dependency>
Then since we are using the RESTEasy native client API, we'll need to include its dependency class as well:
<dependency>
   <groupId>org.jboss.resteasy</groupId>
   <artifactId>resteasy-jaxrs</artifactId>
   <version>2.2.1.GA</version>
   <scope>test</scope>
</dependency>
Finally, the JSON.simple library from googlecode needs to be declared in your pom.xml file as well, using a test scope, just like the RESTEasy client:
<dependency>
  <groupId>com.googlecode.json-simple</groupId>
  <artifactId>json-simple</artifactId>
  <version>1.1</version>
  <scope>test</scope>
</dependency>
You can test your application using the JUnit profile which you created previously:
mvn verify
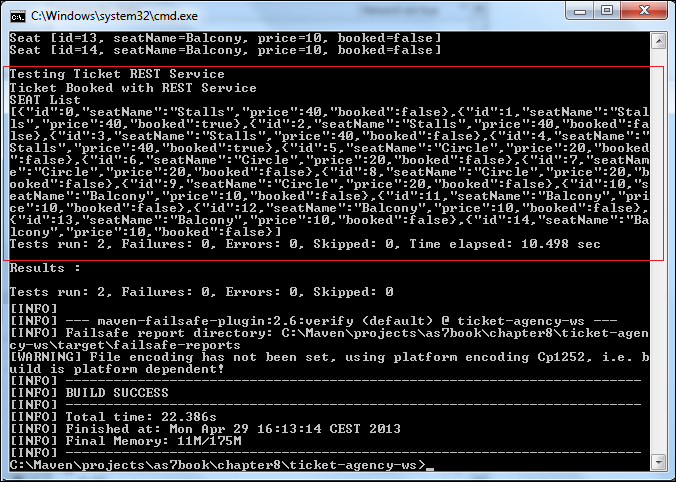
You should be able to see an output similar to the following screenshot; it is confirmation that the Ticket has been sold and verified via JUnit's assertion: