
JBoss AS comes out of the box with clustering support. There is no all-in-one library that deals with clustering, but rather a set of libraries that cover different kinds of aspects.
The following diagram shows the basic clustering architecture adopted by JBoss AS 7:
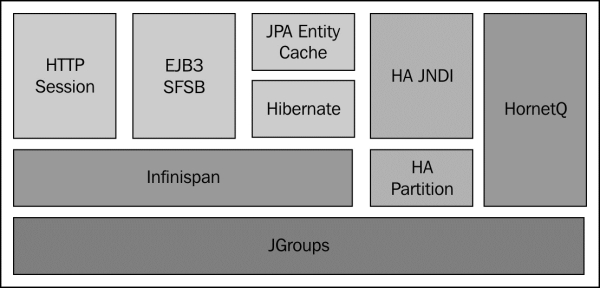
The backbone of JBoss clustering is the JGroups library, which provides communication between members of the cluster using a multicast transmission.
The next building block is Infinispan , which handles the consistency of your application across the cluster by means of a replicated and transactional JSR-107-compatible cache.
Before getting started with some cluster examples, we will first need to describe how to set up a cluster of JBoss AS 7 nodes using the two available nodes: standalone cluster and domain cluster.
A standalone server starts as a single JVM process; therefore, we need to start each server using the standalone.bat/standalone.cmd command, passing all the required parameters. In the following example, we are starting a cluster of two server nodes on two different boxes that are bound to the IP addresses 192.168.1.1 and 192.168.1.2 respectively:
./standalone.sh -c standalone-ha.xml -b 192.168.1.1
./standalone.sh -c standalone-ha.xml -b 192.168.1.2
The -c parameter specifies the server configuration to be used; out of the box, the application server includes two standalone clustering configurations: standalone-ha.xml and standalone-full-ha.xml. The latter one also includes the messaging subsystem; therefore, it has been named the "full" configuration.
The other parameter (-b) should sound familiar to the older JBoss users, as it's still used to specify the server-bind address, which needs to be unique in order to avoid port conflicts.
In this other example, we are starting another cluster of two nodes on the same box using some additional parameters in order to avoid port conflicts:
./standalone.sh -c standalone-ha.xml -Djboss.node.name=node1
./standalone.sh -c standalone-ha.xml -Djboss.node.name=node2 -Djboss.socket.binding.port-offset=200
As you can see, we had to specify two additional parameters: jboss.node.name, in order to assign a unique server name to each node, and a socket-binding port, which uses an offset of 200. So for example, the second node would respond to the HTTP channel on port 8280 instead of port 8080.
In order to configure a cluster running on a domain of server nodes, you need to configure the main domain.xml file for your domain controller, and then, for every AS 7 host that is a part of the cluster, you need to provide a host.xml configuration file, which describes the configuration of a single-server distribution.
Note
The domain configuration has been enhanced in the latest AS 7 builds and in the current EAP 6 platform. It is available for download at http://www.jboss.org/jbossas/downloads; therefore, you need to upgrade your current AS 7.1.1 release in order to be able to complete the following steps.
The domain.xml file is located at JBOSS_HOME/domain/configuration/. It includes the main domain configuration, which is shared by all server instances. In the domain.xml file, we will define the server group configurations, specifying a profile that is compatible with clustering. Out of the box, a JBoss AS 7 domain ships with four different profiles:
default: This profile has the support of Java EE Web Profile and some extensions, such as RESTful web services or support for EJB 3 remote invocationsfull:This profile supports all the default subsystems contained in the default profile and the messaging subsystemha: This profile corresponds to the default profile with clustering capabilitiesfull-ha: This is the full profile with clustering capabilities
So, first specify in your domain.xml file a cluster-aware profile for your server groups. In our example, we have adopted the full-ha profile for both server groups so that you can run the full Java EE stack on all your domain servers:
<server-groups>
        <server-group name="main-server-group" profile="full-ha">
            <jvm name="default">
                <heap size="64m" max-size="512m"/>
            </jvm>
            <socket-binding-group ref="full-sockets"/>
        </server-group>
        <server-group name="other-server-group" profile="full-ha">
            <jvm name="default">
                <heap size="64m" max-size="512m"/>
            </jvm>
            <socket-binding-group ref="full-sockets"/>
        </server-group>
</server-groups>
In addition to the domain.xml file, you need to check that your domain controller's host.xml file contains a reference to the local domain controller, as shown in the following code snippet:
<host name="master" xmlns="urn:jboss:domain:1.3">
    ...
    <domain-controller>
       <local/>
    </domain-controller>
    ...
</host>
In case your domain controller is located on a remote host, the preceding configuration requires to specify the remote domain controller host and its port (in this example we have added some variables as placeholders):
<host name="master" xmlns="urn:jboss:domain:1.3">
    ...
    <domain-controller>
       <remote host="${jboss.domain.master.address}"  port="${jboss.domain.master.port}" />
    </domain-controller>
    ...
</host>
Finally, you need to create a management user that will be used to establish a connection between the slave nodes and the domain controller. For this purpose, launch the add-user.sh/add-user.cmd script, which is located in JBOSS_HOME/bin of your distribution:
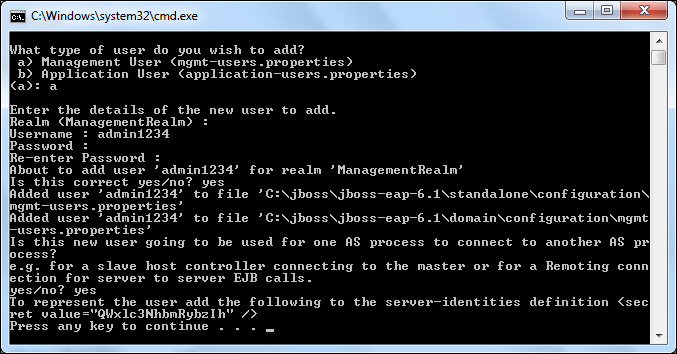
As you can see from the preceding screenshot, you have to create a management user by specifying a username and a password for it. You should answer the previous question with yes or y to indicate that the user will be used to connect to the domain controller from the host controller. The generated secret value is the Base64-encoded password of the newly created user.
Note
Please note that in the earlier example we have used a latest snapshot of JBoss AS 7.2. The current JBoss AS 7.1.1 release will not display the secret key, which is a Base64-encoded version of your password. You can use any free Base64 utility such as http://www.motobit.com/util/base64-decoder-encoder.asp to convert your password into a Base64-encoded password.
Now we can start the domain controller by specifying the address that will be used for the public and management interfaces (in our example 192.168.1.1) with the following command:
domain.sh -b 192.168.1.1 -Djboss.bind.address.management=192.168.1.1
We have set the physical network bind address to the host configuration with the jboss.bind.address.management property. The management interface must be reachable for all hosts in the domain in order to establish a connection with the domain controller.
After the domain controller is configured and started, the next step is to set up the other hosts that will connect to the domain controller. On each host, we also need an installation of JBoss AS 7, where we will configure the host.xml file (as an alternative you can name the host file as you like, and start the domain with the -host-config parameter. For example, ./domain.sh -host-config=host-slave.xml.)
The first thing is to choose a unique name for each host in our domain in order to avoid name conflicts. Otherwise, the default is the hostname of the server.
<host name="server1" xmlns="urn:jboss:domain:1.4">
    ...
</host>
And for the other host:
<host name="server2" xmlns="urn:jboss:domain:1.4">
    ...
</host>
Next, we need to specify that the host controller will connect to a remote domain controller. We will not specify the actual IP address of the domain controller, but leave it as a property named jboss.domain.master.address.
Additionally, we need to specify the username that will be used to connect to the domain controller. So let's add the user admin1234, which we have created on the domain controller machine:
<domain-controller>
       <remote host="${jboss.domain.master.address}"      port="${jboss.domain.master.port:9999}"
       username="admin1234"
       security-realm="ManagementRealm"/>
</domain-controller>
Finally, we need to specify the Base64 password for the server identity that we have included in the remote element:
<management>
   <security-realms>
      <security-realm name="ManagementRealm">
         <server-identities>
            <secret value="QWxlc3NhbmRybzIh" />
         </server-identities>
         <authentication>
            <properties path="mgmt-users.properties" relative-to="jboss.domain.config.dir" />
         </authentication>
      </security-realm>
      <security-realm name="ApplicationRealm">
         <authentication>
            <properties path="application-users.properties" relative-to="jboss.domain.config.dir" />
         </authentication>
      </security-realm>
   </security-realms>
   <management-interfaces>
      <native-interface security-realm="ManagementRealm">
         <socket interface="management" port="${jboss.management.native.port:9999}" />
      </native-interface>
   </management-interfaces>
</management>
The final step is to configure the server nodes inside the host.xml file on both hosts. So, on the first host, we will configure server-one and server-two to belong to main-server-group:
<servers>
        <server name="server-one" group="main-server-group"/>
        <server name="server-two" group="main-server-group" auto-start="false">
            <socket-bindings port-offset="150"/>
        </server>
</servers>
And on the second host, we will configure server-three and server-four to belong to other-server-group:
<servers>
     <server name="server-three" group="other-server-group"/>
     <server name="server-four" group="other-server-group"> auto-start="false">
            <socket-bindings port-offset="150"/>
     </server>
</servers>
Please note that the auto-start flag indicates that the server instances will not be started automatically if the host controller is started.
For server-two and server-four, a port-offset value of 150 is configured to avoid port conflicts. Okay, now we are done with our configuration. Assuming that the first host has an IP address of 192.168.1.2, we can then start the first host with the following code snippet:
domain.sh
-b 192.168.1.2
-Djboss.domain.master.address=192.168.1.1
-Djboss.bind.address.management=192.168.1.2
The second host(192.168.1.3) can be started with the following code snippet:
domain.sh
-b 192.168.1.3
-Djboss.domain.master.address=192.168.1.1
-Djboss.bind.address.management=192.168.1.3