
Let's build a simple RabbitMQ-based Hello World application.
Navigate to your source code examples folder and locate the folder Hello-World. Here you will find two files: producer.js and consumer.js required for this task. Our Hello World application is simple; we have a producer which creates messages and sends them to an exchange, and the exchange delivers the messages to a queue. A consumer will read and process the messages from the queue.
Let's take a look at the producer.js script.
- First, we import the
amqpmodule and callcreateConnectionon that module, returning a connection to the RabbitMQ server. This connection will have the following default properties:{host: 'localhost', port: 5672, login: 'guest', password: 'guest', vhost: '/'}For more information, navigate to www.rabbitmq.com/uri-spec.html.
- Then, we create an array of
messages. - We wait on a connection
readyevent. - When the connection
readyevent fires, we create an exchange. Here we use the default exchange, which is a direct exchange type. - We then create a queue named
'hello', and wait for aqueueDeclareOkevent to fire. - When the
queueDeclareOkevent fires, we bind the queue to the exchange using a binding key hash (#), which means to accept all messages delivered on the queue, ignoring the routing key. We then wait on thequeueBindOkevent. - When the event
queueBindOkhas fired, we publish our messages. - We loop through the messages; the
ex.publishcall publishes the message to the default exchange with a routing keyhello.var connect = require('amqp').createConnection(); var messages = []; messages.push(' (\-/)'), messages.push(" ('.') –> hello world"); messages.push('(") (")'), connect.on('ready', function() { var ex = connect.exchange(); var q = connect.queue('hello'), q.on('queueDeclareOk', function(args) { q.bind('#'), q.on('queueBindOk', function() { messages.forEach(function(message) { ex.publish('hello', message, {}); }); }); }); });
Let us now take a look at the consumer.js script.
- First, we import the
amqpmodule and callcreateConnectionon that module, returning a connection to the RabbitMQ server. - We wait on a connection
readyevent. - When the
readyevent fires, we create a queue called'hello'and wait for aqueueDeclareOkevent to be fired. - When the
queueDeclareOkevent is fired, we bind the queue to the exchange using a binding key hash (#), and we wait on thequeueBindOkevent. - When the event
queueBindOkhas fired, we subscribe to the queue, parse, and then print the incoming messages to the console.var connect = require('amqp').createConnection(); connect.on('ready', function() { var q = connect.queue('hello'), q.on('queueDeclareOk', function(args) { q.bind('#'), q.on('queueBindOk', function() { q.subscribe(function(message) { console.log(message.data.toString()); }); }); }); }); - Open a command-line console and start RabbitMQ:
rabbitmq-server - Open a command-line console, navigate to our source code examples folder, and locate the folder
Hello-World. Execute the following command:Hello-World> node consumer - Open another command-line console, and again execute the following command:
Hello-World> node producer
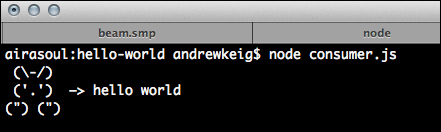
The following screenshot shows the output of running the Hello World consumer/producer application—in the RabbitMQ style.
AMQP 0-9-1 is structured as a logical grouping of AMQP methods. The AMQP 0-9-1 reference www.rabbitmq.com/amqp-0-9-1-quickref.html has a complete list of all the AMQP methods. If you would like to get under the covers and see the AMQP methods firing in real-time, consider using Wireshark, a network protocol analyzer that lets you capture and interactively browse the traffic running on a computer network. Wireshark allows you to monitor AMQP traffic by simply adding amqp to the filter. You can download Wireshark from www.wireshark.org/download.html.
Following is an example analysis of the consumer application from this task.
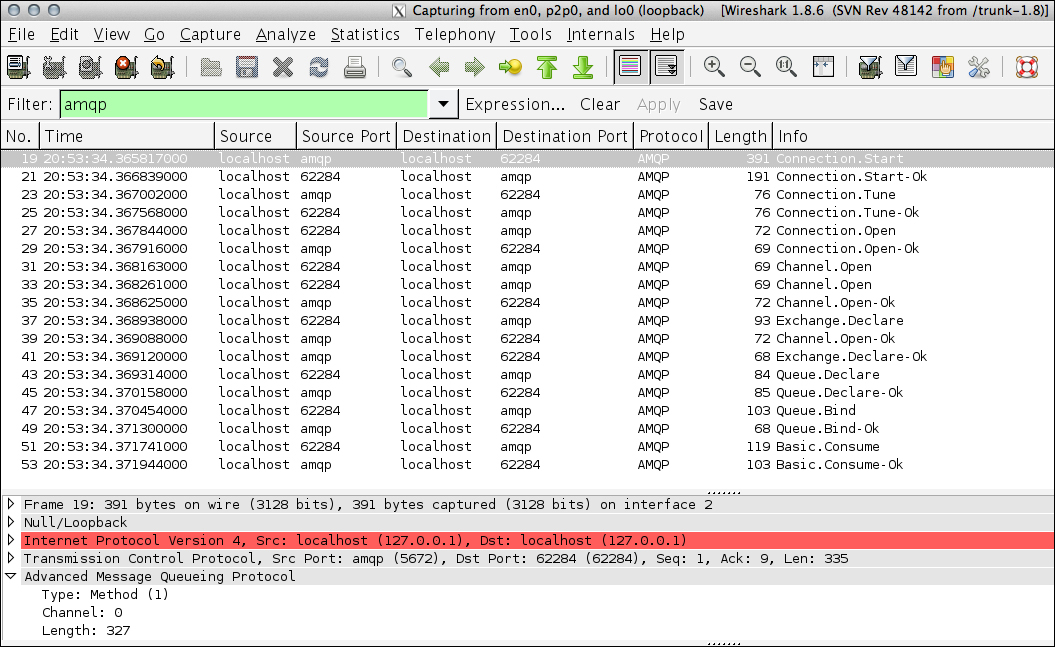
You can see in the Info column the various AMQP methods required in order to consume a message. Wireshark is a great tool for debugging AMQP-based messaging applications.
The RabbitMQ management plugin (www.rabbitmq.com/management.html) enables management and monitoring of your RabbitMQ server. In order to install the RabbitMQ management plugin, run the following command from your RabbitMQ installation sbin subfolder:
rabbitmq-plugins enable rabbitmq_management
The management plugin includes three different methods for managing RabbitMQ:
- The web-based UI is located at
localhost:15672 - The HTTP API and its documentation are both located
localhost:55672/api/ - A command-line tool, rabbitmqadmin, located at
localhost:55672/cli/
For more information navigate to www.rabbitmq.com/management-cli.html.
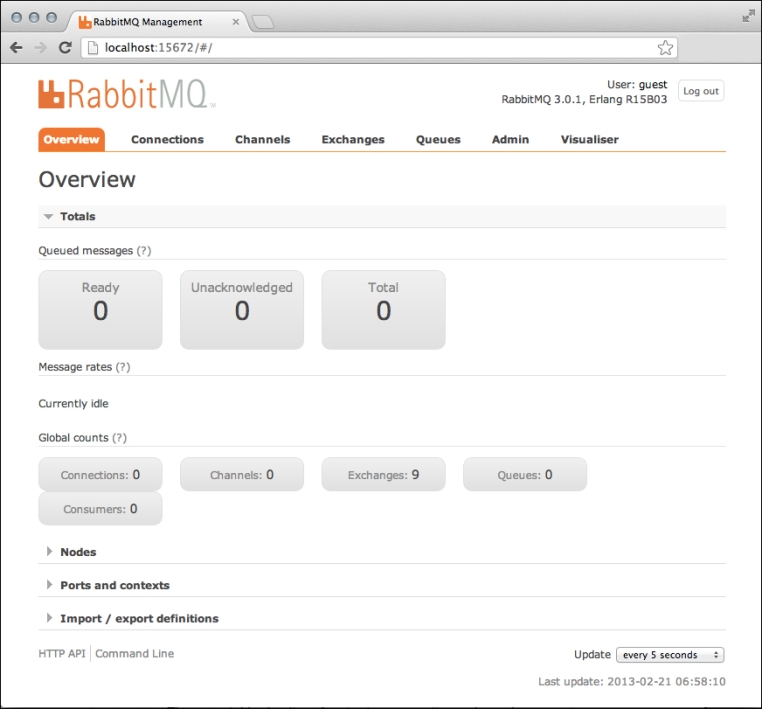
Let's login to the web-based UI:
Navigate to http://server-name:15672 and enter the default username and password:
username guest
password: guest
When logged in you should see the following real-time overview of the RabbitMQ server. The overview includes the number of queued messages. There are tabbed options for viewing Connections, Channels, Exchanges, and Queues.
The CLI command-line tool can perform all of the functionalities available to you in the web-based management tool as follows:
Let's again run the example from this chapter. Execute the following command to produce messages:
Hello-World> node producer
You should now see the number of queued messages on your management UI increase. If you run the following command, it will consume those messages and the number of queued messages will display 0, emptying the queue.
Hello-World> node consumer
Please play around with the example and get comfortable with it. Add more messages to our producer.js script's message array.
Also try the command-line tool, rabbitmqadmin, which allows you to perform all of the same functions available to you via the management UI:
|
List all connections |
|
|
List all exchanges |
|
|
List all bindings |
|
|
List all queues |
|
|
List all channels |
|
For a full list of commands, visit www.rabbitmq.com/man/rabbitmqctl.1.man.html.
AMQP is a multi-channeled protocol. The Node.js client node-amqp (unlike some other clients) abstracts away the concept of channels. Channels provide a way to multiplex a heavyweight TCP/IP connection into several lightweight connections. Whenever you create a queue or exchange with the node-amqp, you are creating a channel; exchanges and queues are a subclass of channel.