
Let's introduce the topic of the remainder of this book. sHop is a simplified but highly coupled e-commerce application. It contains a long running process that performs the following functions:
PaymentGateway: Calls a payment gateway with credit card detailsUpdateStatus: Updates the order status; with success/failureUpdateInventory: Updates the catalog stock inventorySendEmail: Sends a confirmation email to the customerUpdateReporting: Updates the reporting analytics database
Let's navigate to our source code examples folder and locate the folder Shop. Here you will find our e-commerce application; it consists of three files, namely order.js, orderService.js, and server.js.
Let's take a look at the order.js script. This is a simple object with two properties, OrderId and Status.
module.exports = function order(orderId) {
    this.OrderId = orderId;
    this.Status = "Processing";
};
Let's take a look at the orderService.js script, which contains the order processor; the following has been simplified, so check the source code for a complete listing:
module.exports = function OrderService(order) {
    this.Order = order;
    this.Checkout = function() {
console.log("INFO, Placed order " +   this.Order.OrderId);
      this.ProcessOrder();
    };
    this.ProcessOrder = function() {
      this.PaymentGateway();
      this.UpdateStatus();
      if (this.Status === 'OrderComplete') {
          this.UpdateInventory();
          this.SendEmail();
          this.UpdateReporting();
       }
       console.log('INFO, Thank you for placing your order...'),
    };
    this.PaymentGateway = function() {// see source };
    this.UpdateStatus = function() {// see source };
    this.UpdateInventory = function() {// see source };
    this.SendEmail = function() {// see source };
    this.UpdateReporting = function() {// see source };
};
Each of the preceding functions simply simulates doing actual work by printing a message.
The server.js script is our entry point and runs the order processor for a single order.
var order = require('./order'),
var orderService = require('./orderService'),
var service = new orderService(new order(1));
service.Checkout();
To run this program open a command-line console, navigate to our source code examples folder, and locate the folder Shop. Execute the following command:
sHop> node server
The following screenshot shows the output of running our sHop application.

So how can we improve our application using messaging? The Work Queues pattern allows us to efficiently distribute time-consuming tasks among multiple workers. RabbitMQ will use a round-robin dispatch, sending each message to the next consumer in sequence.
What we need to do is split the application into two separate services: a service which simply starts the process by creating an order (producer), and a service that processes the order (consumer). Our producer application would simply add a message to a RabbitMQ queue. The message contains the order details, and then displays an order confirmation message. Our consumer service picks these messages off the queue and processes the order.
Let's review our existing sHop application and see what changes we need to make in order to implement Work Queues.
Take a look at the orderService.js script. In order to split this apart we remove the call to ProcessOrder from our Checkout method. Our producer application will call the Checkout function, and our consumer application will call the ProcessOrder function.
   this.Checkout = function() {
       console.log("INFO, Placed order " +
      this.Order.OrderId);
      this.ProcessOrder(); //remove
    };
    this.ProcessOrder = function() {
        this.PaymentGateway();
        this.UpdateStatus();
        if (this.Status === 'OrderComplete') {
            this.UpdateInventory();
            this.SendEmail();
            this.UpdateReporting();
        }
        console.log('INFO, Thank you for placing your order...'),
    };
Let's navigate to our source code examples folder and locate the folder Work-Queues. Take a look at the producer.js script.
- First, we import the
orderandorderServicemodules. - Now, we import the
amqpmodule and callcreateConnectionon that module, returning a connection to the RabbitMQ server. - We also create an
orderIdvariable and set it to0. - We wait on a connection
readyevent. - When the
readyevent fires, we create an exchange. We name the exchangeshop.exchangeand specify the exchange typedirect. - We then create a queue and wait for a
queueDeclareOkevent to fire. - When the
queueDeclareOkevent is fired, we bind the queue to the exchange using a binding keyorder.key, and we wait on thequeueBindOkevent. - When the event
queueBindOkis fired, we publish our messages. - We create an
orderand anorderService; we callCheckouton our service module, starting theorderprocess. - The
exchange.publishcall publishes a message, which contains an order to the exchange with a routing keyorder.key. We repeat this indefinitely usingsetIntervalfor the purpose of this example to simulate lots of orders being placed:var order = require('../shop/order'), var orderService = require('./orderService'), var connect = require('amqp').createConnection(); var orderId = 0; connect.on('ready', function() { var ex = connect.exchange('shop.exchange',{type:'direct'}); var q = connect.queue('shop.queue'), q.on('queueDeclareOk', function(args) { q.bind('shop.exchange', 'order.key'), q.on('queueBindOk', function() { console.log("Place your order"); setInterval(function(){ var newOrder = new order(++orderId); var service = new orderService(newOrder); service.Checkout(); ex.publish('order.key',newOrder);}, 100); }); }); });
Take a look at the consumer.js script.
- First, we import the
orderServicemodule. - Now, we import the
amqpmodule and callcreateConnectionon that module, returning a connection to the RabbitMQ server. - We wait on a connection
readyevent. - When the
readyevent fires, we create an exchange. We name the exchangeshop.exchangeand specify the exchange typedirect. - We then create a queue and wait for a
queueDeclareOkevent to be fired. - When the
queueDeclareOkevent is fired, we bind the queue to the exchange using a binding keyorder.key, and we wait on thequeueBindOkevent. - When the event
queueBindOkhas fired, we read our messages from the queue. - We call the
subscribefunction on the queue and create anorderService, passing in the message details (our order). We then call theProcessOrderfunction on our service module completing the order.var orderService = require('./orderService'), var connect = require('amqp').createConnection(); connect.on('ready', function() { var ex = connect.exchange('shop.exchange',{type:'direct'}); var q = connect.queue('shop.queue'), q.on('queueDeclareOk', function(args) { q.bind('shop.exchange', 'order.key'), q.on('queueBindOk', function() { q.subscribe(function(message) { var service = new orderService(message.data); service.ProcessOrder(); }); }); }); }); - If it's not running, open a command-line console and start RabbitMQ:
rabbitmq-server - Open a command-line console, navigate to our source code examples folder, and locate the folder
Work-Queues. Execute the following command:Work-Queues> node consumer - Open another command-line console, and execute the following command:
Work-Queues> node producerRabbitMQ, like its namesake, is fast, but we can consume messages at an even faster rate.
- Open another command-line console, navigate to our source code examples folder, and locate the folder
Work-Queues. Execute the following command:Work-Queues> node consumer
We now have multiple consumers processing messages/orders; these consumers could exist on separate servers. We can horizontally scale, adding more consumers/servers with ease of improving the performance.
Up until now we have used a Direct Exchange type; a Direct Exchange is also the default exchange. A Direct Exchange does an exact match between the routing key provided when publishing messages and the routing criteria used when a queue is bound to this exchange. The following diagram demonstrates the concept:
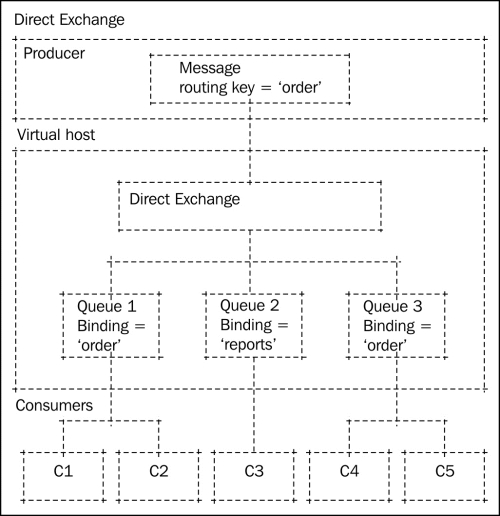
As you can see, a Direct Exchange can route messages to multiple queues with the same binding. From the preceding diagram we can see that the messages are routed to queues 1 and 3.