
In this task, we will decouple our application further by splitting up sHop's logging. We will use a topic exchange to implement a variation of the Publish Subscribe pattern, routing different types of messages to multiple queues.
Let's decouple the various levels of logging our sHop application uses. We have three loggers, each represents a function within our sHop organization. Each function is interested in different types of message/logs:
|
Logger |
Levels |
Binding |
Description |
|---|---|---|---|
|
Fulfillment |
ERROR |
|
Errors from orders |
|
Developer |
ERROR |
|
Errors from everywhere |
|
Operations |
ERROR, WARN, INFO |
|
Everything from Everywhere |
Let's navigate to our source code examples and locate the folder Complex-Routing. You will find our e-commerce application; consisting of 11 files:
consumer.jsdeveloperLog.jsfulfilmentLog.jsloggingService.jsoperationsLog.jsorderService.jsproducer.jsupdateInventory.jsupdateRecommendations.jsupdateReporting.jssendEmail.js
Let's take a look at the loggingService.js module; it's basically a producer.
- We export a single function called
Log, which accepts three parameters:location,level, andmessage. - Now we import the
amqpmodule and callcreateConnectionon that module, returning a connection to the RabbitMQ server. - We wait on a connection
readyevent. - When the ready event fires we create an exchange. We name the exchange
logging.exchangeand specify the exchange typetopic.var ex = connect.exchange('logging.exchange', {type: 'topic'}); - We define a queue named
logging.queue, and we bind it tologging.exchangeas follows:var q = connect.queue('logging.queue'), q.bind('logging.exchange'), - We publish
messagewith a routing key, which is a concatenation of thelocationandlevelparameters.module.exports = function Logging() { this.Log = function (location, level, message) { var connect = require('amqp').createConnection(); connect.on('ready', function() { var ex = connect.exchange('logging.exchange', {type: 'topic'}); var q = connect.queue('logging.queue'), q.on('queueDeclareOk', function(args) { q.bind('logging.exchange'), q.on('queueBindOk', function() { ex.publish(location + '.log.' + level, message); }); }); }); }; };
Let's take a look at the fulfilmentLog.js script; it's basically a consumer. Each of our three loggers follow this pattern, so we will not repeat all three:
- We define an exchange of the type
topic.var ex = connect.exchange('logging.exchange', {type: 'topic'}); - Each logger has its own queue; we name this queue
order.logging.queue.var q = connect.queue('fulfilment.logging.queue'), - Importantly, when we bind the exchange to the queue, we specify the binding key
Order.log.ERROR.q.bind('logging.exchange', 'Order.log.ERROR'), - For the purpose of this example, the logger simply publishes to console:
  connect.on('ready', function() {
    var ex = connect.exchange('logging.exchange', {type: 'topic'});
    var q = connect.queue('fulfilment.logging.queue'),
    q.on('queueDeclareOk', function(args) {
        q.bind('logging.exchange', 'Order.log.ERROR'),
        q.on('queueBindOk', function() {
            q.subscribe(function(message) {
                console.log(message.data.toString());
            });
        });
      });
  });
Now, let's complete the picture and take a look at the orderService.js script.
- First, we import and create
loggingService. - Now instead of using
console.log, we pass our messages to thelogger.logfunction as follows:var loggingService = require('./loggingService'), var logger = new loggingService(); module.exports = function OrderService(order) { this.Order = order; this.Checkout = function() { logger.Log("Checkout", "INFO", "Placed order " + this.Order.OrderId); }; this.ProcessOrder = function() { this.PaymentGateway(); this.UpdateStatus(); logger.Log("ProcessOrder", "INFO", "Thank you for placing your order"); return this.Status; }; this.PaymentGateway = function() { logger.Log("PaymentGateway", "INFO", "Made payment"); this.Status = "OrderComplete"; }; this.UpdateStatus = function() { logger.Log("UpdateStatus", "INFO", "Updated status"); }; this.UpdateInventory = function() { logger.Log("UpdateInventory", "INFO", "Update inventory"); }; this.SendEmail = function() { logger.Log("SendEmail", "INFO", "Sent email"); }; this.UpdateReporting = function() { logger.Log("UpdateReporting", "INFO", "Updated reporting"); }; this.UpdateRecommendations = function() { logger.Log("UpdateRecommendations", "INFO", "Updated recommendations"); }; }; - Open a command-line console and start RabbitMQ:
rabbitmq-server - Open a command-line console, navigate to our source code examples folder, and locate the folder Complex-Routing. Execute each of the following commands in a new command-line console:
Complex-Routing> node updateInventory
Complex-Routing> node sendEmail
Complex-Routing> node updateReporting
Complex-Routing> node updateRecommendations
Complex-Routing> node developerLog
Complex-Routing> node operationsLog
Complex-Routing> node fulfilmentLog
Complex-Routing> node consumer
Complex-Routing> node producer
Now, when we run this example all the output is directed to the three loggers. Each logger receives only the messages it's interested in. operationsLog receives all the messages.
The Topic Exchange algorithm performs a wildcard match between the routing key and the routing pattern specified in the binding. The routing key must be a list of words, delimited by dots. Our example uses Order.ERROR, *.ERROR, and so on. The following diagram explains this:
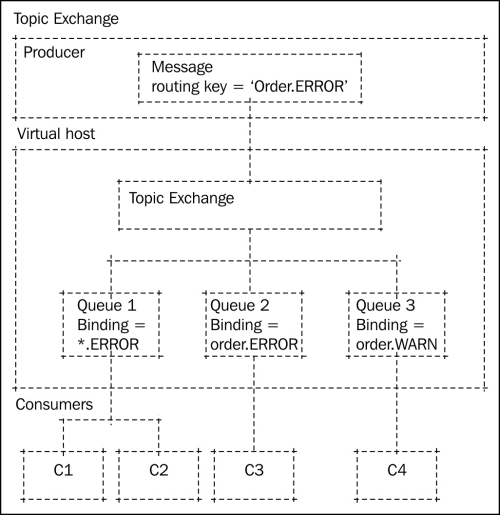
A message sent with a particular routing key will be delivered to all the queues that are bound with a matching binding key. However, a Topic Exchange has two special cases for binding keys as follows:
*(star) matches one word#(hash) matches zero or more words