
First of all, we need to enable the NetScaler Gateway feature. This can be done either in the GUI by navigating to System | Settings | Configure Basic Modes and choosing Access Gateway or by using the following CLI command:
enable ns feature SSLVPN
Note
After build 10.118 was released, Citrix introduced a quick configuration wizard that makes it easy to set up and configure the NetScaler Gateway feature. In the steps covered in this book, we do not make use of the wizard, but we are going for the same configuration. This wizard can be started from within the GUI by navigating to NetScaler Gateway Pane | NetScaler Gateway Wizard.
Then, we go into the NetScaler Gateway feature of the GUI. Here, we choose Virtual Servers, and right-click and choose Add Server. This will open a menu that allows us to create a virtual server, which the clients are going to access.
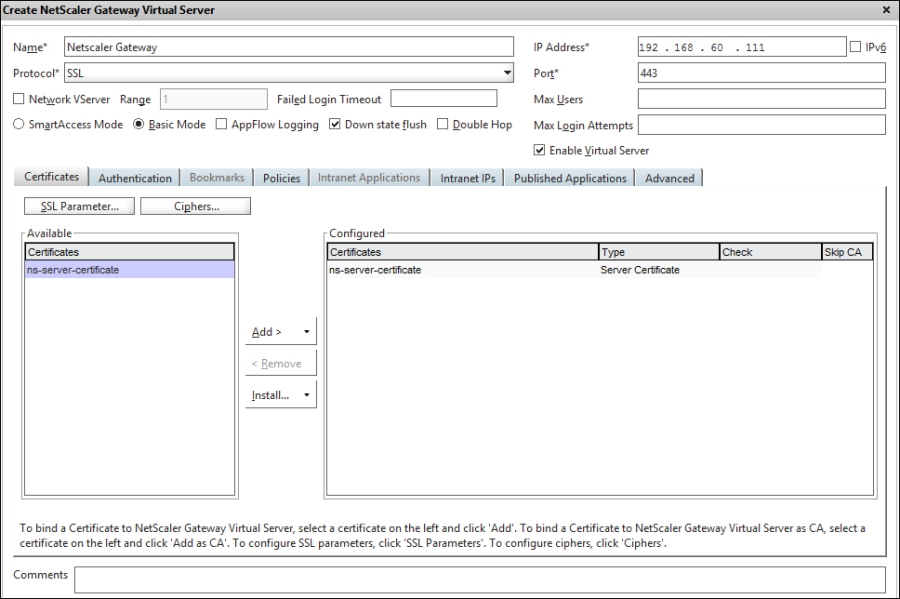
There are multiple configuration items that are required in order to create a fully functional vServer. Remember that first we need to configure the default settings such as NSIP, SNIP, and a functional license. Following are some of the settings we need to set:
- Name of the server: This is purely for description purposes.
- Protocol: This is always SSL.
- IP Address: This is going to be the VIP address.
- Port: The default port is port 443.
- Basic mode / SmartAccess mode: For configuration of ICA Proxy, we need to set this to Basic mode. If we need a SSL VPN-based vServer, we should create another vServer and set it to SmartAccess mode.
- Certificate: A trusted certificate is required by the clients and the StoreFront server. It should be issued by a public certificate provider, such as GlobalSign or Go Daddy. This certificate is added under the certificate pane.
- Authentication Policy: This defines the connection strings to the Active Directory for authentication and, for example, to the RADIUS two-factor authentication method.
- Session Policy: This defines where and how to contact the StoreFront server, and how credentials are forwarded to the StoreFront server.
- STA: This is the Secure Ticket Authority server.
We enter the information in the window, such as Name and IP Address and set the vServer to Basic mode, and leave the rest at default for now, as shown in the following screenshot:
Note
This section assumes that you are familiar with how a digital certificate works, and what the prerequisites are to create one. In order to create a certificate, we first need a private key and a Certificate Signing Request (CSR), which is sent to a third-party certificate issuer such as Go Daddy. In NetScaler, go to the SSL pane under Traffic Management in the GUI. This menu also allows us to import the certificate itself, and the intermediate and root certificates. It also has an option to import PFX certificates, which often bundle the private key, the intermediate certificate, and the PFX certificate itself in one file. You can also use OpenSSL from NetScaler to convert a CRT certificate to a PFX certificate using the guide located at http://bit.ly/1lzMvEq.
Next, we need to add a digital certificate for the vServer. The typical way is by going to the Certificate pane, choosing Install, and adding a certificate. Now, depending on how the public certificate provider issues certificates, the steps may vary. Following are the cases:
- If we have a PFX certificate, it usually contains the private key, the intermediate certificate, and the PFX certificate itself. In this case, we need to choose PFX as the certificate filename and the private key filename. If the intermediate certificate is part of the file, we should also choose the certificate bundle.
- If we have a CER certificate, it usually contains a single certificate file and a key file, which contains the private key we need to add to it. If we have an additional intermediate certificate that we need to add to the vServer, we first have to import the certificate and choose Add as CA. In many cases, you would need to link the main certificate to an intermediate certificate to validate the chain. You can see how to configure it at http://support.citrix.com/article/CTX114146.
There is an excellent blog written by Derek Seaman describing how to add a certificate to NetScaler, which can be viewed at http://www.derekseaman.com/2013/05/import-iis-ssl-certificate-to-citrix-netscaler.html. Also, I have written a post on how to use OpenSSL to convert a CRT file to a PFX file. This can be viewed at http://msandbu.wordpress.com/2012/10/15/convert-from-crt-to-pfx-with-openssl/.
After we have added a certificate, we need to add an authentication policy. There are two types of authentication policies that we need to think about, primary and secondary. The primary authentication type is typical LDAP (Active Directory), and the secondary might be a RADIUS solution. When the users try to log in, they will be presented with an interface that requires them to enter a username and password for the Active Directory, and a second password for the secondary authentication solution.
Now, this is very dependent on how the RADIUS provider delivers the authentication process. An example is SafeNet, which we just need to add as a secondary RADIUS authentication provider. There are also others that completely replace the LDAP authentication process. I have added links to different vendors and their setup for a two-factor authentication. For RSA SecurEnvoy, the link is https://www.securenvoy.com/integrationguides/citrix%20net%20scaler%20with%20ipad.pdf. For SafeNet, the link is http://www2.safenet-inc.com/cryptocard/implementation-guides/Citrix/Citrix_Access_Gateway_Implementation_Guide_1111.pdf.
For mobile devices, such as an iPad, we need to enter the RADIUS solution as the primary authentication. In order to sort the different authentication policies, based upon which device is connecting, we need to use the appropriate expression. We are going to cover this later in the chapter. You can also read more about this at http://support.citrix.com/article/CTX125364.
As this scenario focuses only on a single Active Directory authentication, we only need to create a single primary authentication policy. Click on the Authentication pane under vServer Settings | Primary. Go to Insert Policy | Policy Name, and choose New. This will open a policy window. First, we need to enter a name for this policy and then choose LDAP as the authentication type.
It is also important that we understand how policies work in NetScaler, as this not only applies to authentication, but to other features in NetScaler as well. When we create a policy, we define an expression. That expression defines what must happen to the policy it is bound to for it to run. There are multiple options that we can choose here. If we click on the Add button, we get numerous options that allow us to granularly define who this policy should apply to.
In the following scenario, we want a policy to apply to all users who want to access this solution. Therefore, we are going to add the ns_true expression. This can either be typed directly into the Expression field or found through the GUI under General | True Value Expression | Add Expression. This expression now states that this authentication policy should apply to all users that are connecting via NetScaler.
Note
You can read more about expressions and how to create sample expressions in the Citrix article at http://support.citrix.com/proddocs/topic/ns-main-appexpert-10-map/ns-pi-config-classic-expr-tsk.html.
After we have added the expression, we need to define a server that NetScaler can contact to verify the credentials. Under the Server pane, choose New. Here, we need to enter information about the Active Directory server, such as the following:
- IP Address: This is the IP address.
- Base DN: This defines the organizational unit in Active Directory where the users are located. For example, a base DN for an organizational unit called users in the domain
test.comwould look like CN = users, DC = test, DC = com. - Administrator Bind DN: This is the username for an AD user that is allowed to query the domain. The username can be written in the domainusername form.
- Administrator Password: This is the password for the account and needs to be written twice.
- Server Log on Name Attribute: This should be set to
samAccountName. It is also possible to useUserPrincipleName. This allows users to log in with their e-mail addresses.
After this is done, you can check the connection to the domain controller, and verify that the user has the correct rights by clicking on the Retrieve Attributes button.
Also, you might encounter a case where you would need the user to choose from different AD domains, for example, in a migration situation, or if you have multiple domains from which the users need to choose a domain to log in to. By default, there is no built-in feature that allows users to choose from different domains. We can add multiple authentication policies that point to different domains, or we can use expressions to filter domains based upon different criteria, such as the IP address. We could also add a drop-down menu on the login portal that allows the users to choose from different domains. Citrix has published an article that covers how you can create a drop-down menu to choose a domain. You can read it at http://support.citrix.com/article/CTX118657.
If you are having issues with authentication from NetScaler to Active Directory, there is a built-in tool that can be run from the CLI. Start by typing shell, and then change the directory to tmp cd /tmp. Then run the following command:
cat aaad.debug
This will automatically generate events in the console for every authentication attempt. The task can be killed by pressing Ctrl + Z.
After we have finished adding an Active Directory server, adding an expression, and naming the policy, we can click on Create. This will then add the Active Directory policy to the vServer. Notice that the policy has a priority of 100. If we have multiple policies here, the one with the lowest priority will win as long as the expression is the same. Therefore, if we have three primary authentication policies, all with the same configuration, but with different priorities of 80, 90, and 100, and all try to connect to the service, they would be bound to the policy that has the priority of 80.
Let us look at another example of how policies work. Suppose we have three authentication policies bound to a vServer, each with different priorities, and each of them has an expression that requires the client to have a particular IP address such as the following:
- Policy 1: In this policy, the priority is 80. The expression is
REQ.IP.SOURCEIP == 200.0.0.0 -net mask 255.0.0.0. - Policy 2: In this policy, the priority is 90. The expression is
REQ.IP.SOURCEIP == 210.0.0.0 -net mask 255.0.0.0. - Policy 3: In this policy, the priority is 100. The
expression is REQ.IP.SOURCEIP == 220.0.0.0 -net mask 255.0.0.0.
When a client connects, NetScaler will look at the list of policies starting with the one having the lowest priority and see if the clients match the criteria in the expression. If they do not match, it will go down the list until it gets a match. This is also the case if we have multiple RADIUS servers listed under secondary authentication.
Now, the most important part that is needed to finish the configuration is the session policy. This can be found under Policies | Session on the vServer. Click on Insert Policy, and then choose New Policy. We are presented with a policy window. As we want all users to be bound to this policy, we use the same general expression ns_true as shown in the following screenshot:

We give this session policy a name, and then we add a request profile to the policy. The request profile stores information about where the StoreFront server is located, how it should forward credentials to the StoreFront server, whether ICA Proxy should be used, and so on.
Click on New under Request Profile, and we are taken to another window. Here, there are multiple configurations that we need to take a closer look at. They are shown in the following screenshot:

Note
Notice that we have the option to choose Override Global for every item. Instead of defining settings at the vServer level, we can also define settings at a global level. These settings would then be default for all vServers created in NetScaler. If we have settings set at a global level, and we wish to override these, we need to choose Override Global.
The Network Configuration pane is used for regular VPN profiles, so we will skip that for now. Under the Client Experience pane, we have multiple settings that we can define. We are going to cover all of these as some are used for ICA Proxy and some are used for SSL VPN or VPN. Following are the settings:
- Home Page: This is mostly used for XenMobile deployments and when you want to define a homepage for an SSL VPN session.
- URL for Web-Based Email: This is used for logging in to web-based e-mail solutions, such as Exchange OWA.
- Split Tunnel: This is used to define whether all client traffic or only traffic meant for destined servers in the network should go through the gateway in a VPN connection.
- Session Time-out (mins): This defines how long NetScaler waits before it disconnects the session when there is no network traffic. This applies to all type of clients.
- Client Idle Time-out (mins): This defines how long NetScaler waits before it disconnects the session when there is no user activity. This applies only to NetScaler plugins.
- Clientless Access: This defines whether the SSL-based VPN should be enabled or disabled.
- Clientless Access URL Encoding: This defines if the URLs of internal web applications are obscured, or are in clear text and visible to the users.
- Clientless Access Persistent Cookie: This is needed for access to certain features in SharePoint, such as opening and editing documents.
- Plug-in Type: This defines what kind of plugin is offered to the user, whether it is Windows/Mac-based or Java-based.
- Single Sign-on to Web Applications: This allows NetScaler to do SSO either for the web interface/StoreFront or for a custom homepage that is set to be the SharePoint site.
- Credential Index: This defines which authentication credentials are forwarded to the web application. Here, we can choose from the primary or the secondary authentication set.
- Single Sign-on with Windows: This allows the Gateway plugin to authenticate to NetScaler using the Windows credentials.
- Client Cleanup Prompt: This is used to control the display of the client cleanup prompt after exiting an SSL VPN session. This feature is available for regular Windows/Mac-based clients, but not for mobile devices.
All we need to do in the Network Configuration pane is check the Single Sign-on to Web Applications option, and set the Credential Index field to PRIMARY. This allows NetScaler Gateway to forward LDAP credentials (which are defined as the primary authentication) to the StoreFront server. We should also define the plugin type to be Windows/Mac, as we want users to connect using the Windows plugin.
The plugin will be offered to users after they log in to the site, if they do not have it installed.
In the Security pane, all we need to do is make sure that the Default Authorization Action option is set to Allow. This ensures that the users are actually allowed to log in and access the resources.
Next, we have the Published Applications pane. This is where we enter the information needed to access our Citrix environment. Following are the settings:
- ICA Proxy: Here, we define if NetScaler should tunnel ICA traffic through port 443.
- Web Interface Address: Here, we define the URL to StoreFront Citrix web receiver.
- Web Interface Portal Mode: This defines if the web interface should appear with full graphical experience or use the compact view.
- Single Sign-on Domain: This defines which AD domain should be used for single sign-on.
- Citrix Receiver Homepage: This is used to define the URL for clients connecting to a Citrix receiver that does not support StoreFront.
- Account Services Address: This is used for e-mail based account discovery for Citrix Receiver. The URL must be in the form of
https://<StoreFront/AppController URL>/Citrix/Roaming/Accounts. This requires that the DNS is properly configured. More information can be found at http://blogs.citrix.com/2013/04/01/configuring-email-based-account-discovery-for-citrix-receiver/.
Here, we need to set ICA Proxy to On, and define the URL to the StoreFront address. We can also define a single sign-on domain. The domain name entered here has to match the one set in StoreFront. After this is set, we are done with the session policy and we can click on Create. Now, the final part that is remaining is to add the STA servers. In the vServer Creation window, go to the Published Applications pane and click on Secure Ticket Authority to add the servers. Also, if we need to add the StoreFront server to the session policy using HTTPS, we need to import the trusted root certificate of the StoreFront server to NetScaler or else the call back authentication will not function properly. This can be done under Traffic Management | SSL | Import PKCS #12 with the root certificate from the StoreFront server.
After this is done, we have now fully configured the Gateway function on NetScaler. Now, we have to configure StoreFront to allow remote connections to pass through authentication.
These steps require an existing StoreFront and XenApp/XenDesktop deployment in place. First, we need to add a gateway to StoreFront. This can be done from the GUI by navigating to StoreFront Administration Console | Gateways. On the right-hand side here, click on Add Gateway Server and then add the information as shown in the following screenshot:
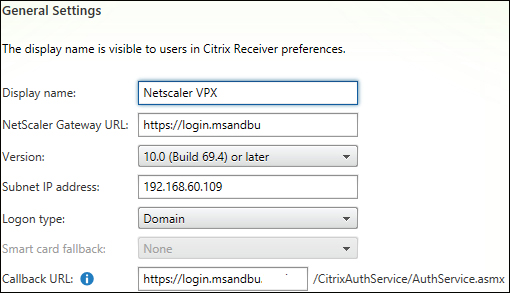
Enter the relevant information. The Callback URL field needs to point to the VIP address of NetScaler Gateway. This is needed so that StoreFront can send validation back to the Gateway authentication service. The Subnet IP address is used by StoreFront to identify if a user is connecting from NetScaler. This field is optional for newer releases of NetScaler Gateway. This can also cause an issue if we are using NetScaler to load balance StoreFront, so it is advisable not to do so if not necessary.
Now, there are some issues that might occur when communicating back to the callback URL via the external VIP in DMZ. Here, the problem might be twofold. One of the problems we face here is certificate mismatch. First, open a web browser on the StoreFront server and verify the certificate chain by connecting to the VIP. If it is unsuccessful, we need to add the root or intermediate certificate to the StoreFront server to verify the chain. Also, if DNS is pointing you to the external VIP, you can add an entry to the location in the local hosts file on the StoreFront server, where we enter the FQDN of the VIP server and the internal VIP. The second problem that might occur is a firewall issue. For example, if StoreFront is located in the intranet zone and is not allowed to communicate back to the VIP, which is located in DMZ.
If we are unable to communicate back to the internal VIP because of network restrictions, we can add a dummy VIP to NetScaler, which resides on the internal network with the SNIP. All we need to do to create a new vServer is add STAs and a certificate, and alter the StoreFront hosts file to point to the dummy VIP instead of the external VIP, which resides in DMZ.
Now for the final part, we need to go to the Stores node, and on the right-hand side of the console click on the Enable Remote Access option of the store we want to have remote access enabled for. Here, we have to specify how and when resources will be available. Following are the settings:
- None: This option means only local users on the internal network will be able to access the store.
- No VPN Tunnel: This option makes resources available directly to NetScaler Gateway and does not require the use of the NetScaler Gateway plugin.
- Full VPN Tunnel: This option makes resources only available through an SSL VPN. This requires a NetScaler Gateway plugin.
As ICA Proxy requires only Citrix Receiver, we choose No VPN Tunnel, and we mark the NetScaler appliance we added earlier. Lastly, we need to enable pass-through authentication from the Authentication pane in StoreFront. This is needed as users are entering their credentials in NetScaler Gateway, and we want them to automatically sign-on to the StoreFront site. This is shown in the following screenshot:

One last thing we need to configure in StoreFront are beacons. Beacons are used to identify if a user is coming externally or internally. You can read the Citrix article on how to set up beacons at http://support.citrix.com/proddocs/topic/dws-storefront-21/dws-configure-beacon.html. Now, we have successfully set up and configured ICA Proxy.
One thing that is important to note is that ICA Proxy allows for client-initiated renegotiation by default after establishing an SSL connection. This applies to every virtual server that uses SSL and is created in NetScaler. Because of a security vulnerability in the SSL and TLS protocols, this would allow an attacker to inject a custom packet inside a secure session when it starts. There is a free tool available on https://www.ssllabs.com, which we can use to find out if our service is vulnerable to such an attack. In the following screenshot, we can see that our solution is vulnerable to a client renegotiation attack.

There is a workaround that we can deploy in NetScaler to disable this attack. We can do this by using the following CLI command:
Set ssl parameter –denySSLrenegNONSECURE