
StoreFront is the replacement for Web Interface, and is included by default in XenDesktop 7. This deployment should be in place before starting to set up a load-balanced service for it. We should configure StoreFront as part of a server group. More information about this can be found in the eDoc located at http://support.citrix.com/proddocs/topic/dws-storefront-21/dws-deploy-join.html.
Before we start configuring a load-balanced service for StoreFront, we need a monitor in place to verify that the StoreFront store is functioning and not just checking if it is responding on HTTP or HTTPS. NetScaler has a built-in monitor that we can use for this purpose, but we have to specify some additional parameters and create it first. Go to Load Balancing | Monitors, and click on Add. In the right-hand part of the window, choose STOREFRONT from the list, and then go to the Special Parameters pane. Here, we need to enter the name in the Store Name field, as shown in the following screenshot. This can be found in the StoreFront administration console.
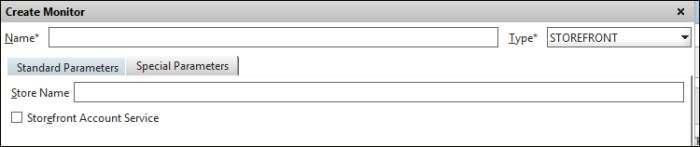
After this is done, give the monitor a name, and click on Create. Now, we can continue on with the setup as follows:
- First, we need to add the backend servers that are running StoreFront to the server list.
- Next, we need to bind a service to the servers. The difference from when we configured the generic web application is that we need to choose the custom-made monitor we created. This will make sure that the StoreFront service is functioning before a client connects to it. Another option we could configure here is to allow NetScaler to insert the client IP into the HTTP header. Because of the way NetScaler operates, the StoreFront server will never actually see the client IP, which is sometimes needed for troubleshooting and logging purposes. We can configure this while setting up the services by going to Advanced | Settings | Enable Client IP. Under the header box, we enter, for example
X-Forwarded-For, to distinguish the name in the web server logs. When we have created the service for each of the StoreFront servers, it is time to create the vServer. - Go to Virtual Servers and click on Add. Enter an IP address, a port, and a protocol. Lastly, bind the backend services to the vServer. Now, depending on how we want the users to access the StoreFront resource, we need to consider what kind of protocol we set here. For example, if all users are accessing Citrix using the Gateway function, we should choose the HTTP protocol, and change the URL in the session policy to point to the new VIP created by the load-balanced server. If Citrix access is also available for internal users directly without using Gateway, we should choose SSL and add a certificate, and use NetScaler to handle the SSL traffic. If we want the traffic from the client to StoreFront to be encrypted, we should choose SSL_bridge under protocol type.
- Most regular deployments use SSL here. After we have defined this, we should add a persistency to the vServer, which allows us to stay connected to the same StoreFront server. The recommended setting here is to use COOKIEINSERT, and the timeout value should be set to 0, which means no expiry. This will allow users to reconnect to the same StoreFront server as long as it is responding to requests. Also, if there are browsers that do not allow or are configured to not allow cookies, we should set up a backup persistency such as SOURCEIP.