
The purpose of many NetScaler instances is to provide load balancing and high availability for services. This should be the case for NetScaler itself as well, so configuring it as a high-availability pair should always be considered. NetScaler often sits in front of large web services processing large amount of data; thus troubleshooting might be cumbersome. So the ability to gather trace data is crucial; the same goes for the ability to protect the numerous services that are available. The following are some of the subjects that we will go through in this chapter:
- Different scenarios for high availability
- Setting up high availability
- AppFlow and integration with NetScaler Insight
- Traffic analysis and Wireshark
- Protecting services using AppFirewall
Consider the scenario where we have NetScaler sitting in front of our numerous services, and thousands of different websites that are load balanced and monitored by NetScaler.
So what will happen when NetScaler goes down, and the services stop and are no longer available for the end users? That's why we should always consider setting up a high availability NetScaler solution for our services.
By having a high availability NetScaler solution, we can ensure that if one of the appliances go down we still have another one or more that are available to serve the requests and load balance the different services.
NetScaler has many solutions that we can use to ensure high availability. The most commonly used deployment is an active/passive pair. This means that we have two appliances that cooperate so that one of the nodes is active (primary) and responds to requests and maintains the connectivity to the servers in the backend and the other node sits passively (secondary) waiting for the active node to go down.
By default, this feature uses GARP to broadcast its MAC address via layer two since both of the nodes use their own MAC address. When a device failover occurs, the secondary node sends out GARP packets to update the MAC table of nearby nodes (switches, routers, and firewalls) so that the new requests will be sent to the new node.
It is important to note that some firewalls do not support GARP or where GARP is blocked and therefore we need to configure VMAC for the deployment. When using VMAC, the MAC address is shared between the two nodes and therefore it is not required to use GARP to update the MAC table on nearby nodes. I'll come back to this later in the chapter and see how we can configure VMAC.
So if the primary node should go down or if it stops responding to requests, the secondary node is going to take over. The nodes monitor each other using heartbeats that are sent between the NSIP address of each of the nodes.
By default, there are some ports that need to be open in the firewall to allow for communication between the nodes in the high availability setup, as follows:
- The UDP port
3003is used to exchange heartbeats for communicatingUPorDOWNstatus - The TCP port
3008is used for secure high availability configuration synchronization - The TCP port
3009is used for secure command propagation and for the Metric Exchange Protocol (MEP) - The TCP port
3010is used for high availability configuration synchronization - The TCP port
3011is used for command propagation and for the MEP
Note
High availability is included in every edition of NetScaler and supports a maximum of two nodes. It is important to note that this feature requires us to have two of the same models and the same main release build version. Running an HA pair with, for example, a MPX 5550 and a VPX 1000 is not supported by Citrix.
In order to set up a high availability pair from one of the nodes, we need to know the following information about the other node: its IP address and the default system username and password. It is also required that they have the same RPC passwords; by default, this is the same across NetScaler. To set up a high availability pair, go to System | High Availability | Nodes and click on Add from one of the nodes. Here we are presented with the following options:
- Remote IP address (The NSIP of the other node)
- Configure remote system to participate in high availability setup
- Turn off HA monitor on interfaces that are down
- Turn on INC (Independent Network Configuration) on self node
- Remote System credentials
All we need to do is enter the IP address, configure the remote system to participate, turn off HA monitors on interfaces that are down, and enter a different username and password if it differs from the node we are configuring it on.
Turning off HA monitors on interfaces that are down means that NetScaler will not try to send HA probes from one node to another on interfaces that are not in use.
The last option is that INC is needed if the appliances are on different subnets and therefore require independent network configurations, since the regular HA option sets them up using the same network configuration.
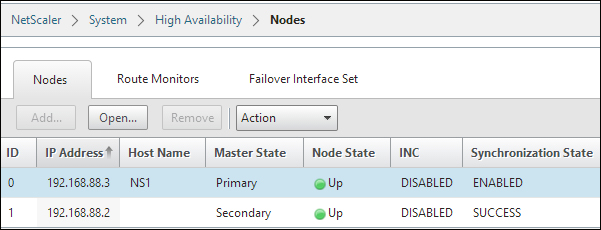
After we have entered the information and clicked on OK, the primary node will start to propagate its information and configuration with the secondary node and set up a high availability pair, as shown in the following screenshot:
It will also start to synchronize files such as SSL certificates and application firewall XML files; you can view the different files that are part of the synchronization process at http://support.citrix.com/article/CTX138748.
It is important to note that there are a few items that will not be synchronized, and those are licenses and rc.conf files. There might be issues with syncing SSL certificates; you can verify that they have been synced by using the CLI command:
sync ha files ssl
Since it is set up in an HA pair, changes that are made to the primary node will be propagated to the secondary node. We cannot make changes from the secondary node; this is shown in the CLI and GUI.
We can view the configuration from the GUI or using the following command:
Show ha node
In CLI, this shows us which is the primary (active) node and which interfaces are active.
We can also use failover interface sets; if we have multiple network interfaces on NetScaler attached on different switches, we can use them to failover to another interface.
For instance, if we have NetScaler with two interfaces, where interface 1 is attached to switch 1 and interface 2 is attached to switch 2, we can use failover interface sets to failover from NIC 1 to NIC 2 if, for example, switch 1 goes down. In a large environment, there are often large trunk tunnels that span multiple switches that handle this automatically.
In the GUI, we can right-click on each of the nodes and configure actions such as force sync and force failover. Force failover allows us to manually failover if, for example, we need to upgrade.
If we double-click on a node (the one we are logged in to), we get a configuration screen where we can set how the HA pair should function.
By default, when the primary node goes down, the secondary node would take over and promote itself to primary; when the main primary node comes back online, it promotes itself again to the primary node. If we, for example, have a small upgrade process and the primary node goes down, the secondary would take over. If we do not want the secondary to promote itself during the upgrade process, we need to set the secondary node as STAYSECONDARY. This stops the process and the primary mode will remain as primary after the reboot.
In this menu, we can also define how often the nodes should send probes to monitor if the nodes are responding.
If you are having some issues with the HA feature, we can use the nsconmsg feature by using the CLI. By running the command nsconmsg –d event, we can get a live view of events that are happening directly in the console.
Note
By default, NetScaler uses Gratuitous ARP (GARP) to advertise its MAC address after a failover has occurred. Some older firewalls from vendors such as Cisco and Juniper do not accept the type of GARP request packets that NetScaler sends out. So if failover is not working in your environment, there is a slight change that needs to be made in order for GARP to function, by logging in to the CLI of NetScaler and running the set network L2param –garpReply enabled command.
This command needs to be set on both of the nodes in a high availability setup.
If our firewalls or routers do not support GARP, we can configure NetScaler to use VMAC. VMAC allows NetScaler to have a floating MAC address between them, therefore bypassing the ARP problems with GARP. This can be configured by navigating to System | Network | VMAC.
Here we have to define a virtual router ID, for example, 100 and bind it to an interface where the VIP requests come from. The virtual router ID is just used as an identifier within the VMAC. After this is done, the HA nodes will replicate addresses and if we now go to Network | Interfaces we can see a VMAC pane that shows the virtual MAC address, which both of the appliances use.
Now, besides the regular high availability feature that requires the use of two nodes, NetScaler also has some other high availability features such as clustering.
We are not going to do a deep dive into clustering but we will be going through a basic overview. If you wish to read more about clustering, you should read the clustering guide from Citrix, which can be found at http://bit.ly/1gLBlWO.
Regular high availability operates with a two-node instance where one is active and the other is passive. With clustering, we can scale from 2 up to 32 nodes, which are operating in an Active/Active state. This allows for a large amount of traffic throughput. In order to use this, we require an additional license. Also, there are some other requirements, as follows:
- To be on the same subnet
- To be of the same hardware type (for example, physical appliances)
- To be of the same platform type
- To have the same licenses (Standard, Enterprise, and Platinum)
- To be of the same software version and build
- To have their own feature license to be able to use clustering
Here, we can configure all NetScaler nodes from a single IP called the cluster IP, which in essence replaces the NSIP for management, so they act as one logical entity. The cluster IP is owned by the configuration coordinator, which is in essence the cluster coordinator role, which floats between the different nodes within a cluster.
Every VIP address that we create will automatically be available on all the nodes (called striped IP address) in a cluster; every Subnet IP (SNIP) address can also be distributed to all the nodes (striped IP address) or be available from just one node (spotted IP address). Citrix recommends using striped IP addresses for SNIPs.
Clustering can be set up either using Equal Cost Multiple Path (ECMP) or using cluster link aggregation.
ECMP is a routing protocol; it defines that a route has multiple paths to the destination with the same cost. This means that if I have multiple roads that I can travel to get to a destination and the distance is equally far, I just choose one of the paths; this way we can distribute traffic between the paths.
Different network vendors have different mechanisms to handle ECMP traffic; for example, Juniper uses a hash algorithm to determine if a packet should travel one path or another. Citrix has written an article on how to configure this using a Cisco Nexus 7000, which is available at http://support.citrix.com/proddocs/topic/ns-system-10-map/ns-cluster-traf-dist-ecmp-tsk.html.
Cluster link aggregation is an extension of link aggregation, meaning that we have one interface connected from all the nodes to a switch to create a virtual interface. So instead of a regular link aggregation where we have multiple interfaces from the same appliance, we have one interface from many appliances.
Note
It is important to note that not all features running on a clustered environment are supported, for example, NetScaler Gateway. A list of supported services running on a clustered deployment can be viewed at http://support.citrix.com/proddocs/topic/ns-system-10-map/ns-cluster-feat-supp-ref.html.
Now we also have Global Server Load Balancing (GSLB).This is not a high availability feature per say; however, as the name describes, it is a load balancing feature. We are not going to configure GSLB but just see how we can use it and how it works.
GSLB works with the help of DNS. It allows us to deliver a service from different data centers spread across different geographical locations; this helps us in case of data center failures and disaster recovery.
It can also help to spread the load across different locations with its proximity feature and allows users to be sent to the closest data center. This type of feature is often used with, for example, Facebook and Google.
So let us take a closer look at how GSLB works. First off, it is important to know how DNS functions, as this is the fundamental component in GSLB.
When a user connects to a service, for example, www.myservice.company.com, the client will send a DNS request to its DNS server. The DNS server of the client will send a recursive request to the authoritative DNS server of that record. The authoritative DNS server will respond with an A-record to the recursive DNS server, which will in turn respond to the client.
Now the client and the recursive DNS server will store the A-record in their cache based upon the time-to-live (TTL) entry of the record. When the TTL expires, the client has to once again query the DNS server. This is the component that allows GSLB to work, as GSLB in essence is load balancing and DNS. For example, with GSLB configured and the client again querying for the service www.myservice.company.com, the DNS server has a list of different A-records for that particular service that might represent a list of vServers on an HA pair NetScaler on a site. This can also depend on the setup that might return with an A-record for the closest vServer that is able to handle the request.
Now, there are different ways to configure DNS with GSLB here, which are as follows:
- Authoritative DNS configuration: This allows NetScaler to act as an authoritative DNS server for a domain, in this case
company.com. This means that NetScaler will respond to all DNS queries from a recursive DNS server, and based upon where the client is located, respond with an A-record that is closest to the client. - Authoritative sub-domain DNS: This allows NetScaler to act as an authoritative DNS server for a subdomain, for example,
myservice.company.com. - Proxy DNS vServer: This allows NetScaler to proxy DNS requests to an authoritative DNS server running inside the corporate network. NetScaler has a vServer DNS service running, which load balances DNS queries externally to an internal or another external DNS server.
After we have decided how we want the DNS setup to be, we need to configure GSLB. You can read more about how to configure GSLB at http://support.citrix.com/servlet/KbServlet/download/22506-102-671576/gslb-primer_FINAL_1019.pdf.
It is important to note that GSLB can be configured in different ways as follows:
- Active/Standby
- Active/Active
- Proximity
- Weighted round robin
- Data center persistence
How to configure GSLB for these different scenarios is explained at http://support.citrix.com/proddocs/topic/netscaler-traffic-management-10-map/ns-gslb-config-comn-dplmnt-scenro-con.html.
Now that we have explored some of the different high availability features that NetScaler offers, it is also important to keep in mind that running NetScaler in a virtual environment requires planning where to place it. It is important to have some sort of availability feature in place for the virtualization hosts as well, as having a high availability feature on NetScaler is not enough if something happens to the virtualization hosts. We can consider having features such as the following:
- Failover cluster: This allows live migration in case of hardware failure.
- NIC teaming: This ensures continuous availability in case of NIC failure.
- Raid on local disks: This ensures that the system continues to run in case of hard drive failures.
- SAN redundancy: This ensures that the storage on which NetScaler resides is redundant.
And, of course, these features should always be used in combination with redundancy in NetScaler as well, as in regular high availability.