
Let's create the simplest process ever and see how we can execute it inside our Kie Containers. This section will give you a quick overview about how you can create a Process Instance based on a process model using the KEI APIs. As you can imagine, we cannot cover all the details about jBPM in just one chapter, so consider this as a very short introduction.
So let's get started by creating the following process:
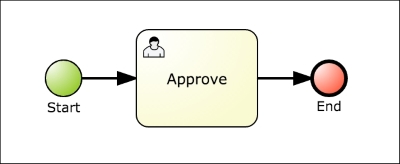
This process has just one User Task and two events, the Start Event and the End Event. We will start this process by submitting a value to be reviewed; the process engine will create an activity to a user so it can review the submitted value and approve or reject it.
The BPMN2 Specification also defines how these diagrams are stored and the XML schemas that are used to validate that our models are correct. So, at the end of the day, our process models will be stored in XML files that will need to be parsed by the Process Engine in order to be executed.
Most of the time, we will use a graphical tool to model our business processes, instead of manipulating the XML files. We strongly recommend you to take a look at KIE Workbench and Process Designer to model your business processes. You can find more about these projects here: http://docs.jboss.org/drools/release/6.3.0.Final/drools-docs/html_single/index.html#d0e15772.
You can also find it here:
http://docs.jboss.org/jbpm/v6.3/userguide/ch12.html
The following XML is a stripped down version of the XML generated by the Process Designer for this very simple example:
<bpmn2:definitions … >
  <bpmn2:process id="simple" name="simple" isExecutable="true">
    <bpmn2:property id="requested_amount"/>
    <bpmn2:property id="request_status" />
    <bpmn2:startEvent name="Start"></bpmn2:startEvent>
    <bpmn2:userTask name="Approve">
      <bpmn2:ioSpecification id="">
        <bpmn2:dataInput drools:dtype="Integer" name="amount"/>
        <bpmn2:dataOutput drools:dtype="Integer" name="status"/>
      </bpmn2:ioSpecification>
      <bpmn2:potentialOwner >
        <bpmn2:resourceAssignmentExpression >
          <bpmn2:formalExpression>manager</bpmn2:formalExpression>
        </bpmn2:resourceAssignmentExpression>
      </bpmn2:potentialOwner>
    </bpmn2:userTask>
    <bpmn2:endEvent name="End"> </bpmn2:endEvent>
    <bpmn2:sequenceFlow sourceRef="..." targetRef="..."/>
    <bpmn2:sequenceFlow sourceRef="..." targetRef="..."/>
  </bpmn2:process>
The complete XML file of this example can be found inside chapter-10/chapter-10-kjar/src/main/resources/chapter10/simple.bpmn2.
Highlighted in the XML snippet are the three tasks, the process variables (bpmn2: properties, information that the process will handle or generate), and sequence flows, which are the connection between the activities.
Using a similar parser to the one the rule engine uses to read DRL files, these XML files are parsed and compiled to become part of our Kie Basess. As soon as we have them inside our Kie Basess we can start using them by creating Process Instances. So let's take a look at the KIE API to interact with processes. In the same way that we used the Kie Session to interact with the Rule Engine to insert/update/retract facts and fire all the rules, we have a specific method to start process instances:
ProcessInstance pI = ksession.startProcess("simple", params);The first argument is the process id that we specified in the <bpmn2:process> tag and the second argument is the initial information that we want to pass to the newly created Process Instance.
Some other methods to interact with our process instances are:
- We can abort instances that were previously created if they are no longer needed or if they don't make sense anymore:
ksession.abortProcessInstance(processInstanceId);
- We can create Process Instances without starting them. Once we have created them, we can start them by using the generated Process Instance Id:
ksession.createProcessInstance("simple", params); - We can use this method if we have already created a process instance without starting it:
ksession.startProcessInstance(id);
- We can use this method to get hold of all the process instances created inside a session:
ksession.getProcessInstances(...);
- We can notify the Process Instances (or even all the processes inside a session) about an external event. The Process Instances might (or might not) react, based on the process definitions:
ksession.signalEvent(...);
The following sections describe some of the most important methods on the Kie Session interface to configure our Process and Rule engine for specific needs.
Event listeners allow us to attach more functionality to the internal events generated by the Rule and Process engines while they are operating. The following event listener allow us to get hold of all the events internally generated by the process engine so we can get real-time information about our business processe executions:
ksession.addEventListener(new MyProcessEventListener());
We can attach to the Kie Session any number of the following: org.kie.api.event.process.ProcessEventListener. These listeners will let us know what the process engine is doing for every process that we run inside that session. Some of the events that are captured by the ProcessEventListener implementations are:
- before/after
ProcessStarted - before/after
ProcessCompleted - before/after
NodeTriggered - before/after
NodeLeft - before/after
VariableChanged
We can create our own implementation to store the trace of the process execution in a separate database or storage to track progress, or for later analysis. This is an extension point provided by the engine for us to externalize the data that we might want to expose to the people interested in the execution of our processes.
Work Items provide our process with a way to interact with the outside world. In other words, Work Items represent any external work that needs to be performed by an external service or a person. We can define and register our own work item handlers to the Kie Session, so that, every time that we need to perform the same task, we can rely on the same implementation. Let's take a look at the registerWorkItemHandler() method and at a simple example:
        ksession.getWorkItemManager().
registerWorkItemHandler("Human Task", new MyWorkItemHandler());
The WorkItemHandlers allows us to hook integration points with external entities. As you can see in this example, we are registering a new implementation of the WorkItemHandler interface to handle our Human Tasks inside the process. Human Tasks are represented by the User Task Activities inside the BPMN2 specification. For the sake of the example, we are creating a Handler that will automatically complete the activity created.
Let's take a look at our first test scenario:
@Test
public void testSimpleBPMN2Rejected() {
   KieSession ksession = this.createDefaultSession();
   ksession.addEventListener(new SystemOutProcessEventListener());
   ksession.getWorkItemManager().registerWorkItemHandler("Human Task",new ManagerApprovalSimpleWorkItemHandler());
   Map<String, Object> params = new HashMap<String, Object>();
    params.put("requested_amount", 1005);
    ProcessInstance processInstance = ksession.startProcess("simple", params);
    WorkflowProcessInstance wpi = (WorkflowProcessInstance) processInstance;
    assertThat(processInstance, notNullValue());
    assertThat(ProcessInstance.STATE_COMPLETED, is(processInstance.getState()));
    assertThat("rejected", is(wpi.getVariable("request_status")));
}
The source code of this test can be found in chapter-10/chapter-10-tests/src/test/java/org/drools/devguide/chapter10/SimpleProcessTest.java.
The test starts by creating the default session that will include our simple.bpmn2 file. Once we have the session for running our process instances, we register a new ProcessEventListener. We can find the implementation of the SystemOutProcessEventListener also in the project sources:
- For this simple example the
SystemOutProcessEventListenerwill just log to the console every activity executed by the process engine. If you execute the test you will see all the events that are being captured and printed out to the console. - We now register a new
WorkItemHandlerto deal with the User Tasks inside our process:ManagerApprovalSimpleWorkItemHandler. Now, for every User Task that we have in our processes running inside this session, thisWorkItemHandlerwill be used.
Let's take a look at the implementation for this example:
private class ManagerApprovalSimpleWorkItemHandler implements WorkItemHandler {
  @Override
  public void executeWorkItem(WorkItem wi, WorkItemManager wim) {
    String actorId = (String) wi.getParameters().get("ActorId");
      if (actorId.equals("manager")) {
    Integer amount = (Integer) wi.getParameters().get("amount");
    Map<String, Object> results = new HashMap<String, Object>();
      if (amount >= 1000) {
        results.put("status", "rejected");
        wim.completeWorkItem(wi.getId(), results);
      } else {
    results.put("status", "approved");
       wim.completeWorkItem(wi.getId(), results);
     }
  }
  }
  @Override
  public void abortWorkItem(WorkItem wi, WorkItemManager wim) {}
}
The WorkItemHandler interface pushes us to implement two methods:
- This method will be called every time that an activity in our process is delegated to our
WorkItemHandlerimplementation. This method gives us access to theWorkItemitself, which contains all the contextual information that we can use to interact with external systems or services. And it also allows us to execute operations using theWorkItemManager, such as completing or aborting theWorkItem:void executeWorkItem(WorkItem wi, WorkItemManager wim)
- For the sake of simplicity, in this example the abort
WorkItemmethod is not executing any logic, but we should include here the logic to handle cases where theWorkItemis no longer needed and, for that reason, aborted:void abortWorkItem(WorkItem wi, WorkItemManager wim)
The logic inside the ManagerApprovalSimpleWorkItemHandler implementation works as follows:
- Check that the activity is targeted to the
manageruser. - Get the initial
amountvalue:- If the
amountis greater than or equal to1000it will set thestatusvariable torejected - If the
amountis less than1000it will set the status variable toapproved
- If the
- The last step is to complete the
WorkItemby using theWorkItemManagerand setting the results.
Now we are ready to start our process instances, and we can see that the test does exactly that after registering our WorkItemHandler implementation:
Map<String, Object> params = new HashMap<String, Object>();
params.put("requested_amount", 1005);
ProcessInstance processInstance = ksession.startProcess("simple", params);
Note
Notice that we are only setting one of the two Process Variables defined in the process. We are starting the process with the requested_amount process variable set to 1005. The other process variable will be filled by our WorkItemHandler implementation based on the evaluation of the requested_amount value.
In order to move information (process variables) from the Process Instance scope to the WorkItems, these variables will be copied so they can be manipulated. We can observe that, for each activity defined in the process definition, DataInput/DataOutput associations are needed to define how data will be copied from the Process Variables to the WorkItem scope and the other way around (how the results created by the WorkItem execution will be copied back to the process variables). For this reason we will see that in the WorkItemHandler implementation we make reference to amount and status instead of using the names of the Process Variables.
Let's see the output of our test case called testSimpleBPMN2Rejected, which is starting a new Process Instance with the initial requested_amount set to 1005.
###### Starting Simple BPMN2 ######
###### >>> Requesting $1005 ######
>>> BeforeVariableChanged: requested_amount new Value: 1005 - old Value: null
>>> AfterVariableChanged: requested_amount new Value: 1005 - old Value: null
>>> BeforeProcessStarted: simple
>>> BeforeNodeTriggered: Start
>>> BeforeNodeLeft: Start
>>> BeforeNodeTriggered: Approve
>>> Here the Manager reviewing requested amount
>>> Requested Amount: $1005
>>> But I can approve until $1000, so I'm rejecting the request
>>> BeforeVariableChanged: request_status new Value: rejected - old Value: null
>>> AfterVariableChanged: request_status new Value: rejected - old Value: null
>>> BeforeNodeLeft: Approve
>>> BeforeNodeTriggered: End
>>> BeforeNodeLeft: End
>>> BeforeProcessCompleted: simple
>>> AfterProcessCompleted: simple
>>> AfterNodeLeft: End
>>> AfterNodeTriggered: End
>>> AfterNodeLeft: Approve
>>> AfterNodeTriggered: Approve
>>> AfterNodeLeft: Start
>>> AfterNodeTriggered: Start
>>> AfterProcessStarted: simple
###### >>> Request Status rejected ######
###### Completed Simple BPMN2 ######
The output in the console shows all the steps internally executed by the process engine; as we mentioned before, we have plugged in our own ProcessEventListener, which is creating this output for us, but we can come up with a much more interesting use of this information such as:
- Using this information for real-time monitoring in a dashboard-like interface
- Keeping track of unfinished processes or activities and meaningful send alerts
- If something fails, making sure that we know why
- Measuring activities—for example, their average time of completion
- Triggering new processes in the case of anomalies or unexpected situations
If we already have a Dashboard to monitor other applications or resources, we can always create a ProcessEventListener then send information to it or to a database of our choice.
In the previous log, half of the entries seem to be linear as expected; we can follow the process graph jumping from one activity to the next one. But after the AfterProcessCompleted event, everything seems to go backwards. The next figure shows how the events are related to activity execution:
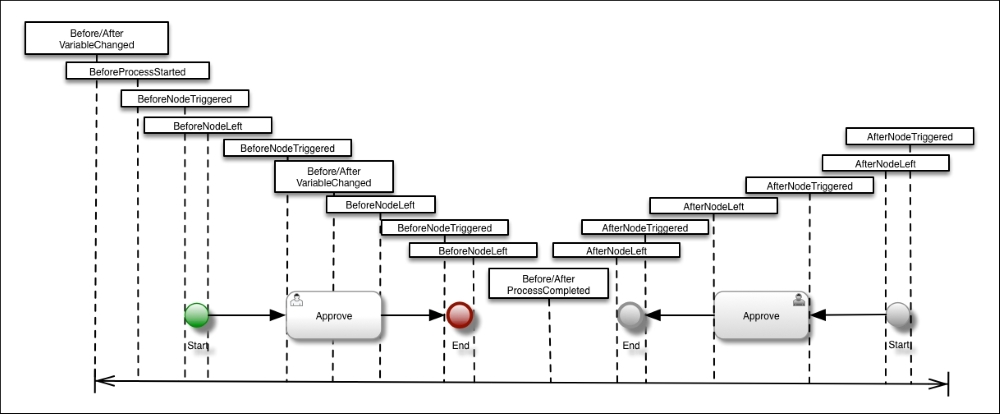
As we can see, the Process Engine nests the execution of the activities together and, from inside the Start Event, calls the Approve User Task; from inside the Approve User Task, it calls the End Event. When it reaches the end of the process, it needs to go back to the stack and this is where all the AfterNodeLeft and AfterNodeTriggered events are dispatched.
You can also take a look at the testSimpleBPMN2Approved() test, which shows how the requested amount is approved if it is under $1,000.
The last step in analyzing our very simple example is to simulate a more real-life scenario. If we have a User Task in our process, the execution will not go straight from Start to End in just one go. We will need to wait for external input and, as we know, human input is not always available. In reality, when we deal with people we need to wait for them; the same happens with some systems, so knowing how to deal with this waiting period is a must.
Let's jump to our last test called testAsyncSimpleBPMN2Approved(), which shows how to implement a WorkItemHandler that doesn't automatically complete the WorkItem after executing its internal logic.
This is the executeWorkItem(...) method of the AsyncManagerApprovalSimpleWorkItemHandler implementation:
@Override
public void executeWorkItem(WorkItem wi, WorkItemManager wim) {
  String actorId = (String) wi.getParameters().get("ActorId");
  if (actorId.equals("manager")) {
    Integer amount = (Integer) wi.getParameters().get("amount");
    if (amount >= 1000) {
      results.put("status", "rejected");
      results.put("workItemId", wi.getId());
    } else {
      results.put("status", "approved");
      results.put("workItemId", wi.getId());
    }
  }
}
We have two options while implementing an Async WorkItemHandler: we can do some processing internally and then wait for external completion or we can just send the contextual information needed to complete the activity and allow the external system or person in charge of completing it to do the calculations. We will need to choose what's best based on our domain and the information and systems that we are trying to integrate together. As we can see here, we are keeping the WorkItem Id inside the results map so that, from outside the WorkItemHandler, we know how to complete it later on.
By having an Async WorkItemHandler we will see that the execution now changes and it is clearly represented in the process logs:

The process will run until there is nothing else to do, in this case after the logic inside the WorkItemHandler is executed, and it will return the control to the caller. In the test, the first thing that we do after getting the control back from the startProcess(...) method is to check the state of the process:
...
ProcessInstance processInstance = ksession.startProcess("simple", params);
assertThat(processInstance, notNullValue());
assertThat(ProcessInstance.STATE_ACTIVE, is(processInstance.getState()));
WorkflowProcessInstance wpi = (WorkflowProcessInstance) processInstance;
assertThat(null, is(wpi.getVariable("request_status")));
System.out.println(" ###### >>> Now I'm completing the WorkItem externally ###### ");
ksession.getWorkItemManager()
    .completeWorkItem((long)results.get("workItemId"), results);
assertThat(ProcessInstance.STATE_COMPLETED, is(processInstance.getState()));
Now the state of the process instance is Active, meaning that the process hasn't yet reached any End Event. We can also check the value of the process variable called request_status to see that it is in fact null. This is because, the WorkItem has not been completed yet; hence the process variable hasn't been updated. Next we can use the ksession.getWorkItemManager().completeWorkItem() call to complete the WorkItem, this time from outside the process engine scope. This simulates an external application or person completing the activity by using a form in a web application or a JMS message that is being picked up from a queue, for example. This will trigger the completion of the process instance by copying the results to the process variable and executing the End Event.
Look at a more advanced example in the test called ProcessOrderTest, which can be found here: chapter-10/chapter-10-tests/src/test/java/org/drools/devguide/chapter10/ProcessOrderTest.java.
This test executes the
process-order.bpmn2 file, which implements the process introduced at the beginning of the chapter:

This process includes the use of Service Tasks and the Exclusive Gateway, which allows us to choose different paths from the process based on an expression that can evaluate Process Variables.
The tests are all using synchronous WorkItemHandlers for User Tasks and Java Bean Service calls for ServiceTasks. It is strongly recommended you take a look at the tests and play around with the idea of implementing Asynchronous interactions instead.
In the following sections, we will be reviewing some integration patterns that can be used to leverage processes while using rules and vice-versa. Again consider this as an introduction and not as an detailed guide.