
We have already looked at a basic wander behavior for RAIN in Chapter 2, Patrolling, when creating patrolling AI, but there, we manually created each possible location for the NPC to go to. In this demo, we will pick random points to wander to from anywhere in the navigation mesh. The NPCs won't have any interaction, though such features are not difficult to add. Here is a breakdown of the steps we will do in this section:
- Set up a world
- Build the behavior tree
- Add a script to pick new points
- Add the NPCs
- Learn about the RAIN AI world and behavior tree setup
First, we'll create a new world. Start with a large plane called floor, and add some cubes shaped into walls. You will need to add a navigation mesh and bake it into the scene. These are the same steps we have performed for RAIN demos in earlier chapters. The following is an example of how the scene could look:

Next comes the behavior tree. From the RAIN menu, select Behavior Tree Editor. Create a new tree called RandomWalk. The objective of this AI is broken into three steps, taken in this order: select a target, walk to it, and then wait a moment. This is a good case for the RAIN decision node sequenced. Under the root node, we will right-click and go to Create | Decisions | Sequencer.
As there is no behavior tree node built into RAIN that will choose a random location, we will use a custom action and write our own script. Right-click on the new SEQ node and navigate to Create | Actions | Custom Action. Set the Repeat property to Until Success because we want it to continue processing this node until it returns a success and then move on to the next node. Name the custom action node Select Next Target. You'll notice that you can put spaces in the name. This is useful as it shows up in the behavior tree, making it easier to follow:

We could add the script now, but we'll finish the rest of the nodes in the tree and then come back; for now, we will assume that the script will find a spot to walk to. The next action is to walk to it. This needs two things happening simultaneously, animation and actual walking, which means that we will use the Parallel decision node. Right-click on the sequence node and select Create | Decisions | Parallel. Name it Walk to Target.
Under Walk to Target, right-click and go to Create | Actions | Animate. Name it Appear Walking. Set the animation state to walk. Also under Walk to Target, right-click and navigate to Create | Actions | Move. Name it Move. Set the Move Speed property to 1, so it moves 1 meter per second. The Move Target value should be set to TargetPoint without the quotes. TargetPoint doesn't exist yet; our script will create it.
The last step that the NPC must perform is generate a wait moment. To give the NPC more life, we will make sure that it uses an idle animation, which also means two things must happen simultaneously. Right-click on the root sequence node (SEQ) and go to Create | Decisions | Parallel. Name it Look Busy. Add an animation action under this and set idle as its Animation State and Stand here as its name.
Also, under the Look Busy node, we will right-click and go to Create | Actions | Wait for Timer. Name it For a couple seconds. Set the Seconds property to 2.
The behavior tree is now complete. All we need to do now is fill in the script that gets our TargetPoint, so it knows where to move.
To start creating our needed wander scripts, first select the Select Next Target action in the behavior tree. Under the Class property, set it to Create Custom Action, which pops up a box to define the script. The following screenshot shows what a RAIN custom action creation dialog looks like:
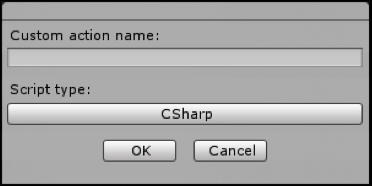
Set the name to SelectRandomTarget and the script to CSharp. This will generate the default custom action script file already filled with a few common methods. In this demo, we only need to use the Execute function:
public override ActionResult Execute(AI ai)
{
  var loc = Vector3.zero;
  List<RAINNavigationGraph> found = new List<RAINNavigationGraph>();
  do
  {
    loc = ai.Kinematic.Position;
    loc.x += Random.Range(-8f, 8f);
    loc.z += Random.Range(-8f, 8f);
    found = NavigationManager.Instance.GraphsForPoints(
      ai.Kinematic.Position,
      loc,
      ai.Motor.StepUpHeight,
      NavigationManager.GraphType.Navmesh,
      ((BasicNavigator)ai.Navigator).GraphTags);
  }
  while ( Vector3.Distance(loc, ai.Kinematic.Position) < 2f
      || found.Count == 0);
  ai.WorkingMemory.SetItem<Vector3>("TargetPoint", loc);
  return ActionResult.SUCCESS;
}
In this code, we try to find a good value for the loc variable, a location variable that is set to a different random location, up to 18 meters away. The found variable identifies whether a path exists or not. These two things are determined in a loop, which ends as long as two conditions are met. First, the distance has to be greater than 2, as the movement should be detected by the player and second, we see if the points found is greater than zero. If it found none, then we would not be able to get to that location.
Once the loc variable has a location that works, the next thing it does is use RAIN's memory system and sets a memory entry, TargetPoint, to the new location. Remember that we have the Move action in our behavior set to find TargetPoint, so Move will go to our newly found location. Finally, we return a success.
This completes our behavior and script. The last thing we need to do is give that behavior to some NPCs and run the game.
Start by adding another simple NPC character to the game, like we did in the first chapter. We don't need to add any scripts directly to it. Instead, make sure that the NPC is selected in the hierarchy, and from the RAIN menu, select Create AI.
In the AI GameObject/component that was added, from the Mind tab, set the Behavior Tree Asset value to RandomWalk, which is found in Assets. Under the animation tab, click on the Add Existing Animations button.
Now, try the game. A single NPC should be walking around the screen, pausing, and then walking to another location at random. To create a larger crowd, just duplicate the NPC GameObject in the scene at several locations.